#the html and css are pretty simple for what I'm trying to do. for now.
Explore tagged Tumblr posts
Visit Tumblr Blog
Explore Tumblr blogs with no restrictions, modern design and the best experience.
Last Seen Tumblr Blogs


Fun Fact
There are dozens of funny blogs to kill time on Tumblr.
Text
html and css are so eeeasy (when you get someone else to do like half of it for you)
#actually she helped me mostly with js stuff#the html and css are pretty simple for what I'm trying to do. for now.#actually making a website. btw
5 notes
·
View notes
Text
Instead of doing a Six Sentence Sunday today, I think I'll do a short tutorial on copying over fanfic from FFnet to Ao3.
So you've got some old fics on FFnet and you'd like to back them up to Ao3, given the instability of FFnet. And for whatever reason you don't have the original files for the fics, or maybe you have edits to the FFnet versions that you don't want to lose that the OG files don't have. Whatever the reason, you're looking to directly copy over your fic from FFnet to Ao3. And you're looking for a relatively easy way to do so, but Ao3's import functionality doesn't work with FFnet web pages.
Never fear! It's actually a fairly easy process to get your fic copied over from FFnet.
First, head over to FFnet and open up the fic you want to port over to Ao3. You don't need to log in if you don't want to, just so long as the fic in question is yours and you can access the page, then you're good.
In a separate tab, open Ao3 and login, then choose the option for posting a new work.
Now back on the FFnet tab, you should be able to directly copy over the title, summary, fandom, and what little tagging was available on that site onto the relevant Ao3 fields in the tab you have for a new fic. You'll also want to take note of the published date on FFnet and back date the new work in the Ao3 tab.

FFnet may not have a lot of useful tag data, but it's pretty easy to replicate and build off that in Ao3.
Now for the hard part. Which is still pretty easy. Getting the fic body, plus any notes in the fic itself, copied over to FFnet.
While getting around FFnet's lockdown on the text of the fics they host is fairly simple - I'm pretty sure it's entirely css based - you don't really need to do that in order to get the body of your fic copied. And, honestly, even if you do have a work around in place to allow copying of the fic's text... you will probably find the following method a lot easier still.
In the body of the fic, right click the first line of the fic, which should bring up a menu with a bunch of options. On Firefox or Chrome you want the inspect option.

This'll bring up the dev tools with the html inspection tab open and, if you give it a few seconds to load, the specific line you right clicked to inspect should become the visibly selected section of the html.
The selected section of the html should be a paragraph (or <p>) element. You're going to want to right click the div (<div>) element that encapsulates that paragraph and the rest of the paragraphs in the fic body. This'll bring up another browser menu with the option to copy, which will bring up a flyout menu when you select it. From that flyout menu, you want the select the option for Inner HTML.

You have officially copied the html for the fic body. And you can dump that entirely in html format straight into Ao3's html work text editor. Then switch it to rich text for easier editing if you want to fix any spelling, grammar, formatting, or aesthetic issues. I typically try to fix at least the line breaks since it took a long while before FFnet adopted real line breaks and so there are a lot of fics where I have various combinations of dashes, em-dashes, equals signs, and other characters as line breaks. I figure, if I'm bringing the fic to Ao3 then I can try to make it more screen reader friendly in the process.
You can also move fic notes around in order to move pre/post fic notes out of the fic body or basically whatever you want to the fic. Maybe re-read it to determine any additional tagging you want to add now that your fic has access to Ao3's much more robust tagging system.
But that's it. You can hit post and have your fic with all it's original notes, and a back dated post date to reflect when it was actually written, all available on Ao3 now.
It's a pretty quick process, all told, and the only real bottleneck you might encounter is any time spent in re-editing the fic between migrating and posting. Even chaptered fics are fairly easy to migrate with this process, since the bulk of the work in publishing a new chapter is just copying the inner html and then moving any notes to the appropriate location before hitting post.
Anyway, for my fellow fic writers looking to move your old FFnet fics to a more stable archive, I hope this process helps a lot.
#kitkatt0430 rambles#fanfiction archiving#migrating from fanfiction.net to ao3#ao3#ffnet#fanfiction.net#tutorial
13 notes
·
View notes
Note
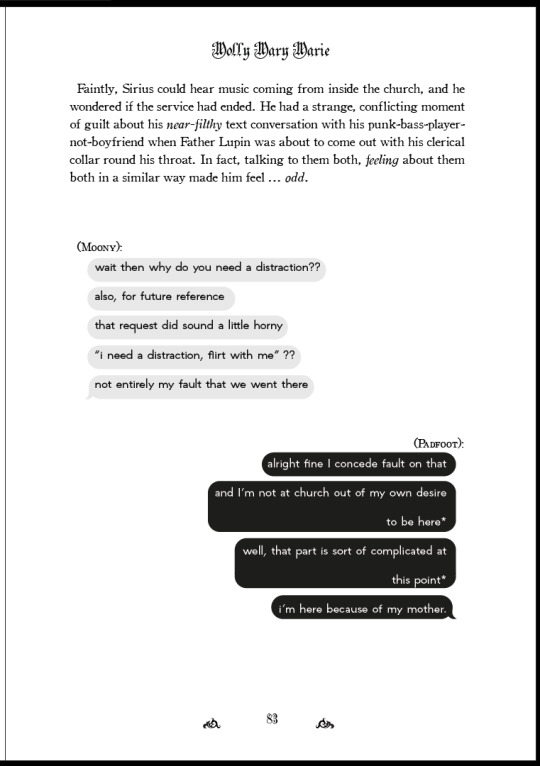
hi there, just discovered your blog, binged scrolled and consumed all your posts. <3 [ sorry, i don't want to sound weird ] I have a question if you would be so kind to answer? I saw your WIP of Dear Your Holiness, and I am wondering how are you doing your speech-text bubbles? How do you make it look like texts? Is it a software? I am trying to typeset Did you miss me? - Fantismal&Krethes, and let me tell you, that is 80% text-bubbles. And I don't think what i've got going on now is very efficient. Right now i am editing the .css and .html directly in Calibre.
hi! I'm glad you like this blog, nothing weird about it, sorry about the messy house actually and be my guest!!
I really love your ask cause text bubbles are really a pain in the ass and I love babble about my typessets. So I warn you, this answer may be a bit longer than expected.
The short is: Existing 200k ways to do chat text on writer and more 200k to do on typessets.
Editing the .css and .html directly is my first time seeing it, but I guess it works very well too, just maybe too much time consuming. In general, the most common is pre-setting a paragraph on the software you use to design your project. Most of the softwares for writers can do this. So you can select the dialog, click a button and voilá all your dialogs will look the same and your typesset will be really beautiful really fast.
Affinity and Adobe InDesign I know better, but I know Word does this too, just don't know how. Find one to learn and have joy :)))
My personal response is more like: How do you want your project to look?
So I think the most important thing to me here is not where to do it, or how to do it fast, but how to do exactly what we want it and what we can do to make this happen. And here lives my lack of sanity.
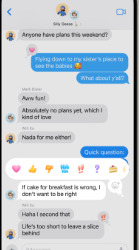
It really depends on the project. I have done some fic with chats and none of them I did exactly the same way. But for my Dear Your Holiness project, I want this look of a mobile chat but without remembering any social media chat we know and I want make it fancy

So I try to emulate some things we see on these social media chats and with a bit of compulsory search I discover some things really helpful.
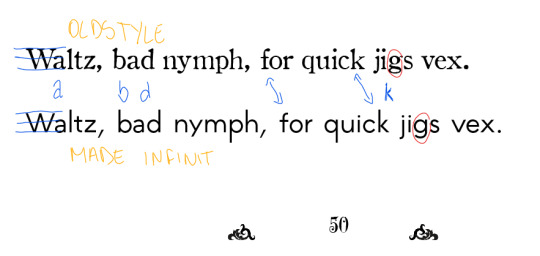
First of all, the typography choice
I'm a little biased here, I love typography. But it is exactly because of this that I notice that chat typography is simple. They need we read fast but without notice, so we don't have serifs, that remember us of academic texts, and the contrast are really light
I had this other typesser of Wish You Are Here by @afieryfox, and she uses Discord and Twitter to set her fic, in this case I choose the exact fonts that each platform uses to set my typesset (and setting a paragraph for each site). But in the main text I use some simple serifed font, to help the reading.
Main Text: Cambria
Discord: Whitney
Twitter/X : Helvetica Neue

The same to DYH, I chose a serif font with some fancy look to the body and a saint serif font to the text, but I chose one with some alike things to do not look too drastic.
I chose to set the main text in OldStyle because it has this vintage look., and the chats on Made infinit (this one I ask permission for personal use). They pretty similar except for the g, so i think work very well

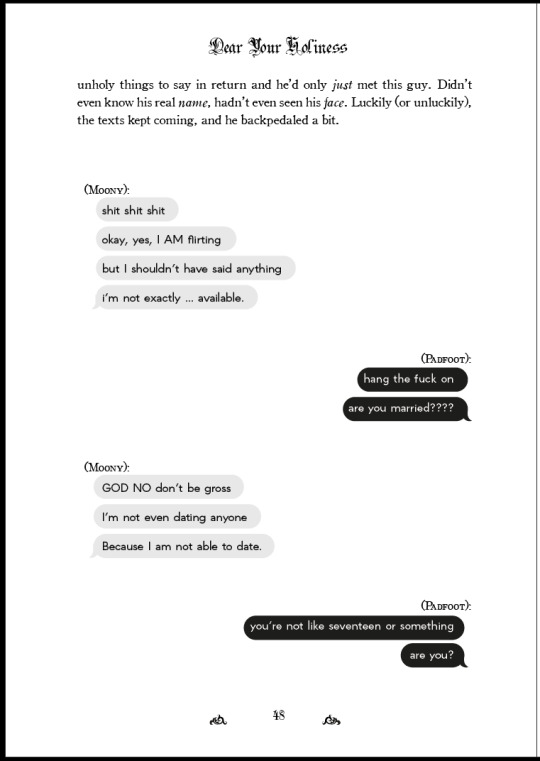
The second was the contrast.


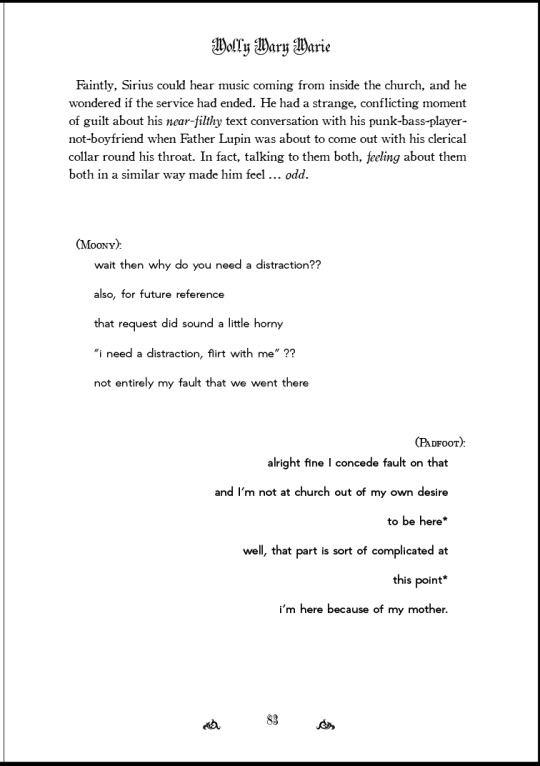
We had this constant that is the color of the chats, where who sends the text is the most eye-catching bubble, and the right one. So I just set this with the pov one being our dramatic bubble. In this case, our Padfoot
And the last thing, our guides and spaces!!
We are not on a mobile, so we have pretty much space and this is a problem, because chat texts are compacts and a book… not exactly. So what i did was divide the space I had to rearrange our text so we can feel like the space was purposeful
I divide my workspace in 3, and each side of the chat could only transpose ⅔. then they has their own section and don’t steal the friend's space.
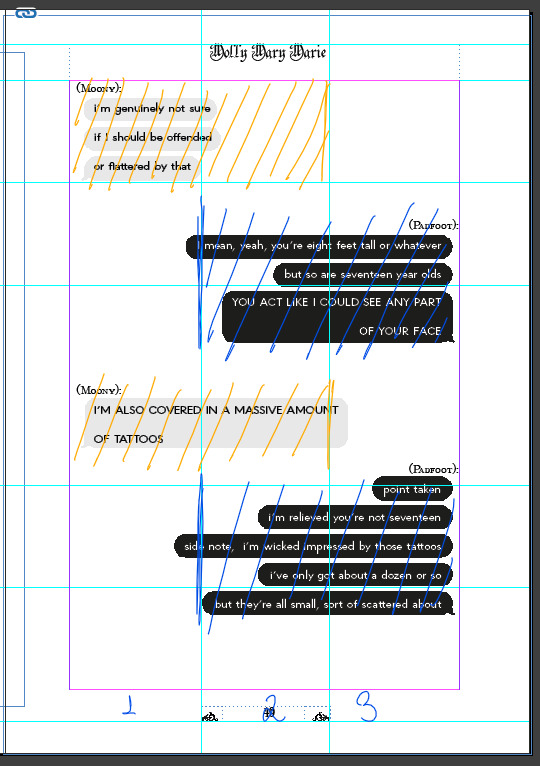
this is not extremely strict, the text can transpass the line till I feel like is acceptable. So, if the text is too long and insist on cross the guide, i can shift then and make these big balloons

Other guides I like:

the space between the start of the text end the start of the bubble
the space between bubbles
the center of the text on inside de bubble
the last bubble with the call tail (idk how call this)
So
How I did my Dear Your Holiness chat bubbles?
I did all the typesset first.
I use Adobe Indesign to do my typessets, so I set up all the text blocks, with all the typos to set my pre-sert paragraphs. All my paragraphs are pre-settings cause I like my life easy when I can have it, cause the rest of the process is really time-consuming.
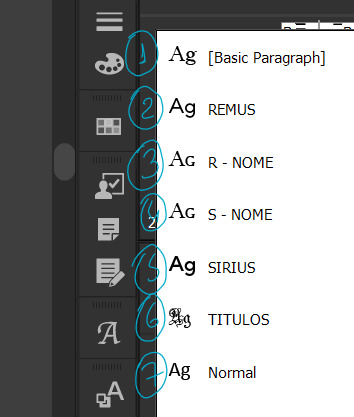

So set all the pre-set paragraphs and the dialogues exactly the way I want it. Till look something like this

So I take a simple print from the naked page and go to Adobe Illustrator, were I put the the cute little outfit (the bubble)
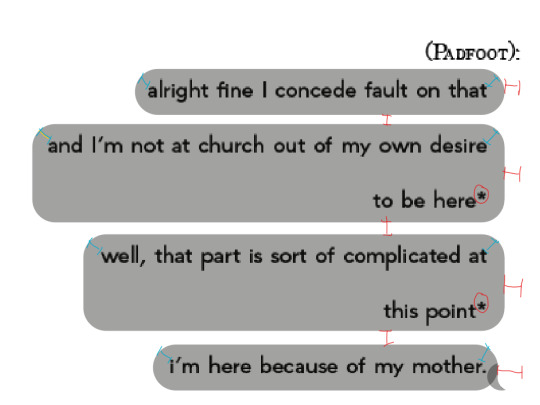
There I have a board setting on my page size to use the correct scale on the bubbles, I just scale the print on the board and fit the bubbles on the dialogues.


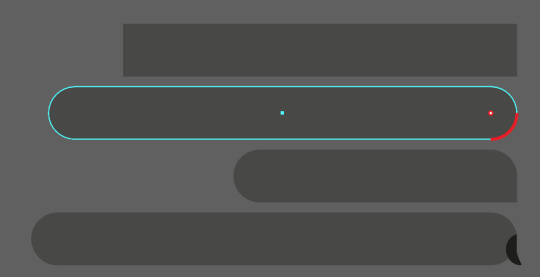
The bubbles are actually little rectangles with rounded corners. We can easily do the call tail (still don't know how call this thing) just push one off the corners staring, but I really wanted this sexy toothpaste curve, so I make this little shape and overlapped my bubble.
To put the bubbles over the print, i set the opacity on 80% or less just to confirm the guides and the * I left to mark the ones that will be big balloons. So I correct the opacity, remove the print and save as a pdf

the pdf I put above my text, and change the color of Sirius’s chat, because we can’t read black on black and voíla, -1 page to do.

Now all we need is repeat till end all dialogues bubbles left in the fic.
After some time this became a really mechanical thing, so listen to something in that maintime that the time flies. So yes, a pain in the ass as i said, but look how pretty they turn!!!!

yeah, I think that's it
I hope I've answered
5 notes
·
View notes
Text
Learn to Code
Daily Blogs 356 - Oct 26th, 12.024 Being someone who actually codes and is a software engineer, please learn how to code.
Why?
Before anything else, it is fun, even more if you like puzzles and solve problems, and you could find your future career even.
Nonetheless, coding is an enormous skill to have nowadays with every little job, task, and even hobby, having some sort of technology or another. How many times have you wanted to rename a bunch of files into a more structured form? Or even wanted to have a fast way to see all your tasks for the day? Maybe you are animating in After Effects (unfortunately) and want to make an object pulse following a song beat? Or maybe in your job you have to make spreadsheets in Excel (again, unfortunately) and need something more dynamic? Or maybe, you want to have your own simple website? All of these things can be done, and can be easier, knowing a little bit of coding/scripting.
Coding not only lets you do things in a faster way, it also helps you better understand the technology you use. Did you never think how the little applications that you use are made? Because they are, by humans, like me and you, and that's why they have bugs most of the time. Maybe learning to code, you can even start modding your favorite game! Or even create your own.
But Coding is Hard!
I'm going to be honest, yes, it can be hard. But we aren't talking about doing whole software products or even what could be called engineering, we are talking about scripting/coding, which is just creating files for some utilities, which is far from hard. And instead of trying to explain, let me show you some examples.
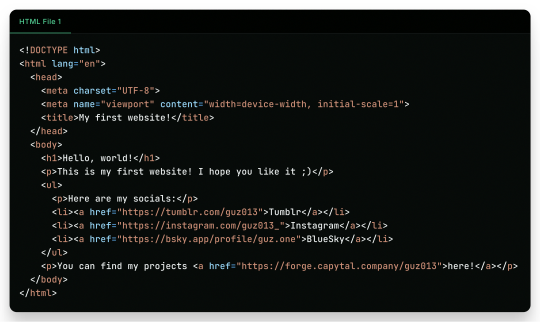
Creating a Website Yes, you heard me right, the first example is how to create a website, because you can do it in literally just a file:

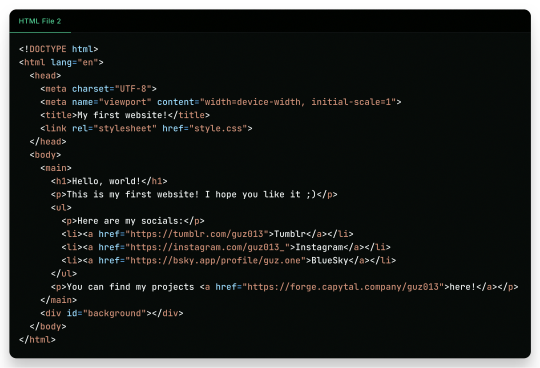
"But it is ugly!", well, just modify a little the first file, and add another file!
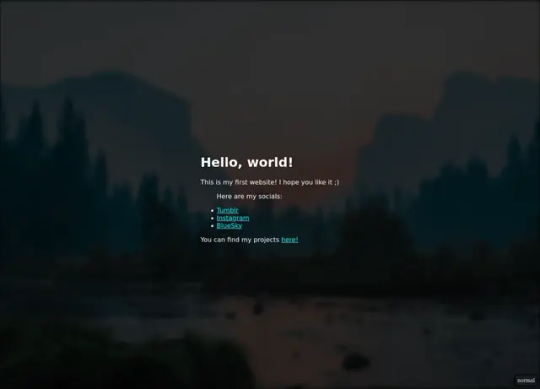
And there it is! Your own website. Now to put it into the internet to everyone to see it is nothing more than uploading these two files to a Web Hosting Service, which most of the simple ones are free! A few examples are GitHub Pages, Vercel, Netlify, all of them you can find easy tutorials to upload your files and have them for the web!
What Are Those Files?
Glad you asked! Let's go step by step.
The first file, the one full of <tags\/>, is what is called an HTML file. HTML (or Hypertext Markup Language) is the language used by all websites you visit, it is designed to structure text in such a way that you can easily put meaning and style into the document, and have you browser read it to show you. These files are marked up using tags, which encapsulate text with an opening tag (like this one <p>) and a closing tag (like this one </p>, see the slash before the letter P), looking like this <p>Hello world</p>. We have multiple types of tags, such as <p> for Paragraphs, <h1> for Heading/titles, <h2> for subheadings/subtitles, <link> for linking one file to another, <ul> for an Unsorted List, which will have <li> for each List Item, <main> for informing what's the main content, <a> for an Anchor/hyperlink for another website, etc. etc. All HTML files will have an <html> encapsulating everything, a <head> tag for information about the page, and a <body> tag for the content of the page. That's pretty much how HTML works, and all you need is to learn what tag does what, and you're pretty much good to go.
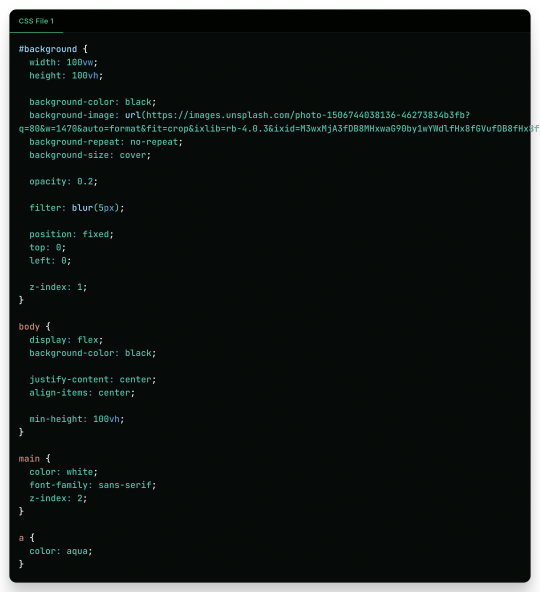
In the second file, we just add some structure to it better, adding a <main> tag and a <div> tag with the ID "background", so the third file, the stylesheet, can make it look pretty! The third file, the one with the {} blocks, is a CSS (or Cascading Style Sheets) file, and it is the one that makes all of our websites beautiful. It is made by these "blocks" of code that applies styles for multiple elements in the page, it is a little bit more hard to explain, but in summary, that file does this:
The "#background" block applies styles to any tag with ID "background". In the example, we make the tag have 100% of the view width (width: 100vw) and 100% of the view height (height: 100vh); make the background be an Unsplash image; decrease the opacity, so the image is not so bright; apply a blur filter; and make its position be absolute in the top left corner, so it doesn't move with the rest of the content;
The "body" block applies styles to the tag and makes it display its content on a flexible layout (display: flex), which we use to make the content be centralized in the page;
We then make the text-color inside the tag white, use a sans font, and make it be in front (z-index: 2) of the tag (see the z-index: 1 in the "#background" block);
And to finish off, we make the color of links an aqua color.
That's pretty much it and pretty much how the fundamentals of how to create a website works. Just 2 files of code, and you can have your own website.
But Where Are the Loops? Where Are the "if"s?
Yes, yes, if you know the concept of coding, you may be asking where are all the loops, "if"s, and variables. Truth be told is that HTML and CSS aren't programming language per-say, they are markup languages to structure and display text, so they can't run anything really. However, they are easy to understand and are considered "code" nonetheless, and personally I find fascinating that websites, the thing we all access every single day, that most people I know think is magic… are based in two simple languages that anyone can learn in an afternoon and have its own website up and running in less than a day.
I Want real code!
Ok ok! Let's so add a little interactivity into our website. What about a little character you can control? Yes, a little game character to control with WASD on your website, with less than 40 lines of code. Let's first update the HTML file so we can add the character:
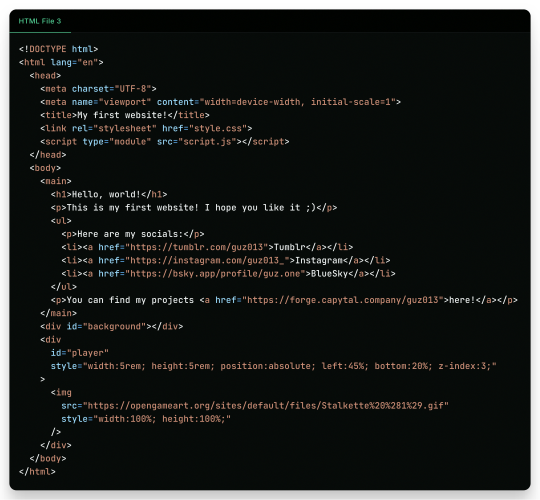
As you can see in the new file, we just added another <div> tag on the website, with the ID "player" and a <img> tag which we can use to add a visual sprite to our character! I'm using this simple sprite/gif I found on OpenGameArt.org. Also, in the new <div> we add some CSS styling directly in the tag, using the style attribute, the reason to this being that here we can manipulate its value with a programming language, in the case of the web, JavaScript. We add the JavaScript file with a <script> tag.
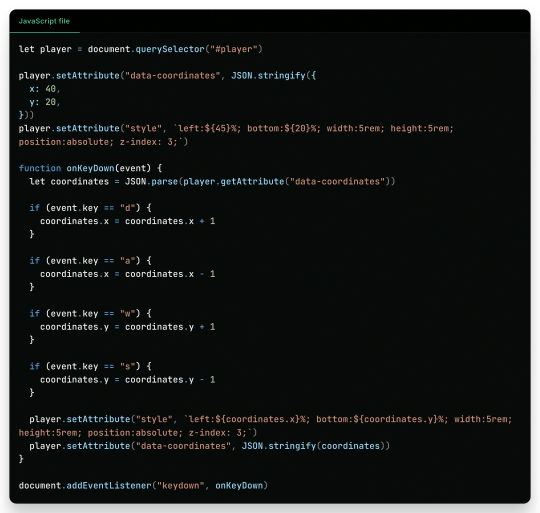
And in the JavaScript file, we can write this simple script:
This can be a little overwhelming, but let's go line by line:
First, we get the player element/tag with document.querySelector("#player") (similar on how in CSS we would use #player {} to style the tag). This tag is then saved into a variable player, think of it like a box or alias for document.querySelector("#player"), so when we use something like player.setAttribute it can be thought like document.querySelector("#player").setAttribute;
After that, we use player.setAttribute("data-coordinate", JSON.stringify({ x: 40, y: 20 })). This is just so we can more easily access the coordinates of the player after. An attribute is like that style in the tag, so calling this is like we wrote in the HTML file;
We again call player.setAttribute, but this time to rewrite the value of the style attribute, just to be sure. See how in the text for the style tag (the 2nd argument, aka the left: ${45}%; bottom:${20}%; ...), we use ${}? Well, this is a neat feature that lets us put values inside the text, so it makes the final result be left: 40%; bottom 20% ..., in this line it seems a little redundant, but in later in the lines we will use it more cleverly. Just remember that if we make a variable, a "box", like let x = 10 and use it inside the text like left: ${x}%, it would be in the end left: 10%;
Now the meat of the script, the "onKeyDown" function. A "function" in programming is like a piece of code you can reuse, and pass variables to it to use inside the code, like a box you can put stuff inside to it to do things, a box that uses other boxes, a box inception. Inside the "onKeyDown" function, we take back the value inside that data-coordinates attribute we wrote on the 3rd line, and put it inside the coordinates variable; than, we check if the key pressed is "d", if so, we add 1 to the X coordinate, we are changing the value of coordinate.x; we check for the other keys like "a", "w" and "s", changing the according variable to it; and then, we rewrite both the style attribute and data-coordinates attribute with the new value;
And finally, we use document.addEventListener("keydown", onKeyDown) to tell the browser "hey! Use this function ("onKeyDown") when a key is pressed!".
And that's pretty much it.
As you can see in the top right corner, the values of the style and data-coordinate attribute change when we press a key!
If you want to access this simple website, this is the live version of it hosted on GitHub Pages and the source-code is available under the public domain.
Learning More
Being honest, what I showed here is just a very small toy project, and a lot is simplified because of the gigantic convenience that the browser provides nowadays. But again, this is the type of thing you can do with just a little bit of knowledge on how to code, probably the scripts you will do can be even simpler than this. And just imagine the things you can invent, learning a little bit more!
Besides the toy project, code can be used in a lot of fields:
If you work on data or science in general, coding in Python is a great skill to have on your toolkit, and it is very easy to learn. It works great with creating graphs and can even be used inside Excel for creating more dynamic spreadsheets;
Do you want to make games? Well, learn something like Lua, a very simple language and one of my favorites for scripting, and powerful enough to be chosen by engines like Roblox Studio (which surprisingly is powerful than I thought). But if Roblox is not your taste, well, learn something like GDScript, the language of the Godot game engine, fully free, fully open;
Also, Lua is used for modding on games such as Factorio, and can be very powerful for small scripts for your computer;
If you want to make websites, HTML, CSS and JavaScript, learn them and go nuts (I won't recommend you use any framework as other programmers use, learn the fundamentals first). There are a lot of documentation about the web, and it is one of the fields with the lowest entry;
Are you an 3D Artist? Well then, Python is also the language used for creating add-ons, you can take some time to learn and create your owns to help your workflow!
And if you are a poor soul who is using Adobe products, first: my condolences; second, most Adobe products use ActionScript to create dynamic animations and values such as making an element react to music beats in After Effects.
---
Learn to code, be happy, and maybe you will find a new passion like I did.
Today's artists & creative things Music: Late Night Walk - by Ichika Nito
© 2024 Gustavo "Guz" L. de Mello. Licensed under CC BY-SA 4.0
please learn how to code
like, if you're bored today, and not doing anything,
learn a little bit of coding please
34K notes
·
View notes
Text
Dislate DevLog 1: When Comparing Size Matters
Daily Blogs 277 - Aug 8th, 12.024
Something which I noticed today while programming the project-dislate's database interface, is how much the files that I write got bigger. When I was starting programming, most files didn't pass the 100 lines most of the time. I still remember doing my first "real" project, a simple To-Do list application called ToToday (which I actually used when I was starting to organize my life), which I made 2 years ago and felt really proud on how I made the code "scalable" to add more features and just use the LocalStorage API for everything. The Tasks' Component I specially felt proud about, and even showed to friends them, showing the amount of lines and how much it was scalable and organized.
However, seeing now, even though the files have around 300 lines of code, the actual logic of the code is just around 120 lines, the rest is just HTML and CSS. Not only that, but last year, as an experiment, I created another To-Do list application in just one HTML file, which ended having 350 lines of code for the entire application (this kinda also shows how much JavaScript, and its ecosystem has the tendency of over-engineering a log of things).
And today, I actually wrote just a database interface, and it ended up with 300 lines of code before I was even having time of completing it today. All these lines are code, pretty much. And I asked me "why?", and pretty much already had the answer in mind: I'm doing more complex things now.
I hardly look backwards to compare myself, which I know is a problem and I probably should do it more since it really shows me how much I improved as a programmer/Software Engineer. I even call myself now a "Software Engineer" instead of "Programmer", because that what I am, I solve problems now, I make actual software that solves problems instead of just gluing things together and calling it a day. Even though number of lines doesn't really represent quality or even improvement, the idea that nowadays this amount of code every day is normal and the bare minimum for a small part of the projects that I do, I would say that it shows that I'm improving and actually creating things. Projects and codebases aren't big when the only thing you're doing is gluing libraries and frameworks together, I would say. If you are solving problems, if you're making business logic, you will need to write it and write more code.
That's why I always recommend making and write projects that you will use, that you actually care, instead of just following tutorials and making To-Do apps. Actual software is hard and big most of the time, but writing them can be fulfilling. I acknowledge that my first To-Do app was a start and a good step in actually trying to complete something, but I fell a lot happier seeing myself now actually persuading bigger challenges. And I hope that you go pursue bigger challenges.
Today's artists & creative things Music: Road To Hide - by ZeRO
© 2024 Gustavo "Guz" L. de Mello. Licensed under CC BY-SA 4.0
#scope/code#day/2024-08-08#type/devlog#project/dislate#language/go#subject/personal-improvement#codeblr#golang#software engineering#personal growth#personal improvement#progblr#programming
1 note
·
View note
Text
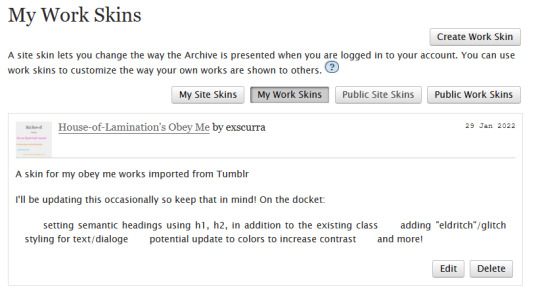
A not-so-quick how-to for Ao3 work skins
Ao3 has some pretty powerful customization tools at your disposal - if you know how to use them. Did you know this entire time you could change your text colors, size, background colors, outlines, underlines, overlines, and even fonts of your works? It's fairly easy to do - you only need a little knowledge about markup languages to get started. The way this is done is through classes and the clever application of some simple CSS. Though I've written this guide around using my Obey Me coloring and work skin, the principles are applicable across anything you may want to do with your Ao3 styling.
I've done all the heavy lifting this time around, and have actually created a very, very simple skin that you may want for the purposes of your Obey Me fic including:
Unique colors for each character (sticking to WCAG 1:3 minimum contrast ratio for accessibility)
Heading font and size styling (separate from character colors)
Styled 'pullquotes' for written letters/passages/quotes (at 75% size)
Make sure to keep checking back for updates - I'll put word out here on my tumblr whenever I update, but I've also created a codepen (work skin CSS found in the CSS tab) with the latest version of the skin that you can use to play around in.
Just a heads up before you start: there is a bit of a learning curve, but I have tried to make the explanation as simple as possible, and hopefully provide enough tools and knowledge that you can run with what I've given you and start creating your own styles.
1. Markup: The Basics
I'm sorry - no matter how simple I try to make this work skin, you're going to need at least a little understanding of what markup languages are and how they work. But don't fret: I've had a few years experience now teaching this to absolute beginners so hopefully by the end of this tutorial you'll be feeling like a real Hackerman.
So what is Markup? A tl;dr
Markup is a set of instructions used to tell a program (in this case your internet browser) how something should behave. HTML stands for Hypertext Markup Language and is likely the markup language you'll encounter most often. Ordinary text like you would type in a word document is meaningless to a computer browser - it doesn't know how to read. You need to talk to it in a language it understands so that it can translate your wonderful words into something that appears in your browser. This is done through the use of 'elements'.
Like how you know "words captured in these quotation marks" are quotes (or text written in parentheses is related to but non-essential to the main body), elements are essentially markers that indicate how a thing should be read. In HTML, these elements are denoted through angular brackets <> containing the necessary info that your browser understands. These often consist of an opening tag <[element type]>with content within, followed by a closing tag</[element type> denoted through the use of the "/" slash. Every element that has been opened must always be closed. Common tags include:
<p></p> for paragraphs
<em></em> for emphasis (typically displayed as italic)
<strong></strong> for strong (typically displayed as bold)
<h1></h1> for your highest headline (and subsequent-level headings use 2-6)
<div></div> for generic sections or blocks
<span></span> for specific selections of text.
<a></a> for anchors (links)
<img> containing images <- this one doesn't have closing tags because it's special
and more!
Everything you see on the internet rests within tags like these. You don't see them because they're only for your browser's eyes. Even your fics are formatted with this - though Ao3 does it automatically. You can freely switch between Markup (HTML) and Rich Text Formatting up in the top right corner.
Attributes
Attributes are additional information you can add to an element. Some attributes are essential, like a href (hyperlink reference) for anchor elements. Some are additional information used to differentiate between different identical elements like a class or id. It's this latter, non-essential attribute we're going to be utilizing for our work skins.
Once you have your fic in Ao3, make sure to switch over to the html editor. From there, you are going to find the element that you want to change the look of, and we're going to add a class.
We do this by finding the open tag of an element. That will probably be a <p>. Inside those angular brackets, after the name of the element, we are going to type class=""
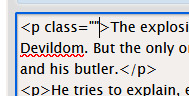
What we've done there is create a field for the class, but we haven't actually given the element a class yet.
It's always a good idea to name classes that describe the content, not what you want it to look like. You could change your mind down the line, but then you're stuck with a class called red that's really changing the color to blue. So rather than calling a class "gold", you might instead give it the name "Mammon" as it indicates when Mammon is speaking. This is known as Semantic markup.
Here's a few things you need to know about classes:
Class names cannot contain spaces. We use spaces to delineate new classes in the same element (like commas to separate tags on tumblr).
You can use as many classes as you want, as many times as you want.
They are case-sensitive.
You can add classes to all most html elements. That means that you don't have to just make entire paragraphs a particular style.
I have already specified several classes in my existing work skin. These are [Luci Mammon Levi Satan Asmo Beel Belphie Dia Barb Luke Sol Sim Heading pullQuote] - remember that these are case-sensitive. Feel free to use any one of these, or use your own! Put your chosen class name between those quotation marks I had you make earlier like so!

These don't actually do anything just yet. For that, we need to now head on over into our work skin.
2. Introducing the work skin: CSS
Now that we hopefully have our heads wrapped around the basics of elements and classes, we can start using that to make things look interesting. CSS stands for Cascading Style Sheet. HTML gives the browser structure, CSS gives the browser style.
But first, we have to create a new work skin.
Go to your Ao3 Dashboard and up in the top left underneath "Profile" and "Preferences" you should see an option for Skins. It'll land land you in "site skins" by default, so make sure to click on My Work Skins. From here you can click on Create Work Skin in the top right corner.
In the "About" section, make sure Work Skin is selected, and give your new skin a title!
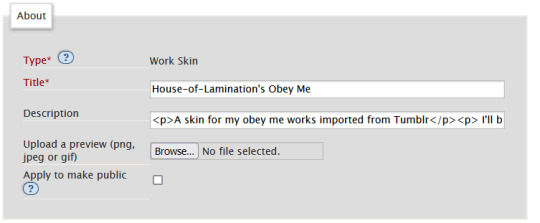
Feel free to also include a description for your own sake. Now. Onto the fun part!
Below the "About" section, you should see a box labelled CSS. In that box, feel free to copy+paste the styles below into that box:
#workskin .Luci { color: #0071ed;}
#workskin .Mammon { color: #e5a71c;}
#workskin .Levi { color: #e26600;}
#workskin .Satan { color: #00c117;}
#workskin .Asmo { color: #ff00bd;}
#workskin .Beel { color: #e80b00;}
#workskin .Belphie { color: #4f08b5;}
#workskin .Luke { color: #00c0ed;}
#workskin .Dia { color: #9b0000;}
#workskin .Barb { color: #007215;}
#workskin .Sim { color: #c1ac44;}
#workskin .Sol { color: #757575;}
#workskin .Heading { font-size: 1.25em;}
#workskin .pullQuote { text-align: center; font-size: 0.75em; display: block;}
This can also be found in the CSS section in this codepen. (disclaimer: tumblr may or may not mess with the line spacing when you copy things over. After you've copied, save your work skin and then reopen it in "edit" - Ao3 will automatically format your work so that it's nice and clean).
So what's actually happening here?
Let's read from left-to-right, top-to-bottom - because that's precisely what CSS does. Feel free to skip this part if you're not interested in creating your own styles and you're happy to just copy and paste existing work skins :)
#workskin .Luci { color: #0071ed; }
This first part here is what is called a "selector". Here, we're specifying what exactly we want to target in order to change its looks. Every character, including the spaces, symbols, and capitals matter.
#workskin .Luci { color: #0071ed; }
#workskin is specifying a unique ID within the HTML - one that encapsulates everything that you want to apply the work skin to - so basically your entire work. This is absolutely necessary in order for the work skin to actually function. We didn't create this ID in our HTML because Ao3 (will) create it for us automatically down the line.
#workskin .Luci { color: #0071ed; }
Following the work skin id, we have a space, a period, and then - hey! That's a class name! The space between the ID selector and the next part indicates we're looking for things inside this particular ID. Periods are used to indicate classes. When targeting a class, you use the period, followed by the class name. So if you're targeting your Levi class, you would write #workskin .Levi . If you were targeting a class that you created in your html, you would write #workskin .[classname] (removing the square brackets, of course).
#workskin .Luci { color: #0071ed; }
Now it's time for the fun stuff - the rules. Once we've targeted what we want to style with our selector, we use curly brackets to contain all the "rules" that we're using to make the browser appear a certain way.
#workskin .Luci { color: #0071ed; }
We start with our property - or what we want to change. In this case it's the text colour, denoted through 'color'. Yes. It's American spelling. I have no control over this. Find a simple list of css properties here! There's loads, but the ones that are probably of most use to you at this point are color, font-size, font-weight, text-align, text-decoration, and display. Make sure to put a colon after the property - that links us into the next step.
#workskin .Luci { color: #0071ed; }
Finally, we have our value - or what we're asking the property to do. In this case, we're changing the color, so the value is a hex color value. Color can also be denoted through rgb [written as rgb(0,0,0)]. Different properties will have different values. For example, text-align can have a value of left, right, or center (note the Americanized spelling again). If you click on the property in this list, it will tell you what values you can use!
You can have as many rules as you want in your selectors, as long as you end each of them with a semicolon. I cannot stress the semicolon enough. If your CSS isn't working - it's probably a missing semicolon. An example of multiple rules being used within one selector is in the pullquote styling:
#workskin .pullQuote { text-align: center; font-size: 0.75em; display: block; }
You can even write rules that override each other, though we try and avoid doing that. When this happens, your CSS will read from top-to-bottom, prioritizing the latest thing it has read (typically your bottom-most). There are exceptions to this, but that's not necessary for this guide.
So by this point you should have copied over the CSS I've written into your work skin, or perhaps tried your hand at making your own. This would be a good point to save.
3. With our Powers Combined
Right! So we have our work skin. We have our work formatted properly, resplendent with classes. Here's how we get these things talking to each other:
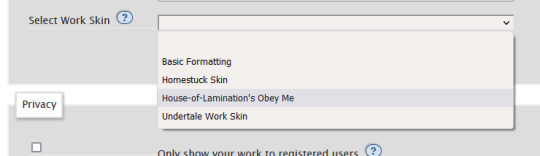
Once you've saved and closed your new work skin, open up or post the work you would like to apply the styling to. Down the bottom of the Associations section, there is an option to Select Work Skin. Ao3 already provides some work skins by default - Homestuck and Undertale - but you should be able to select your new work skin from this dropdown.
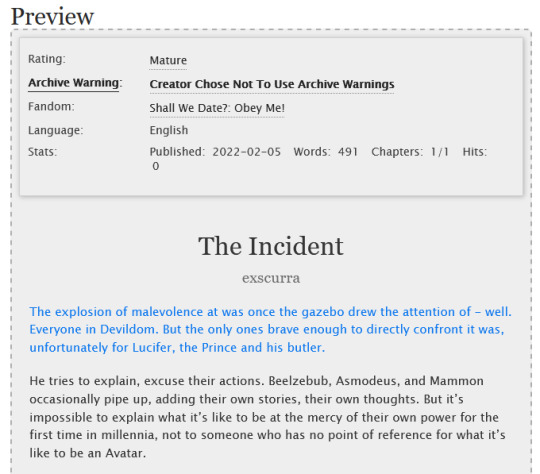
Now here's the magic. Time to check if this worked. Go through and make sure you've applied your classes to each of the elements you want to change the look of. These can be <p> elements, <em> elements, <strong> elements, or you can even make new, unique sections using <span>. Save your work as a draft and preview it - if you've done everything right, you should see the sections of text you've added classes to have changed in appearance!
A reminder that you can add multiple classes to one element: say for example you want to create section headings unique to each 'character', you can name both classes in the class field, separated by a space. See the example below:

And that's about it! You can use the same work skin for multiple works - just remember that you should be using the same class names if that's the case. If you create a new class in your html, make sure to go back to your work skin and make some rules for that class!
I've created this codepen that you can play in that is using all the same classes - it also has the work skin in the CSS which you're also very welcome to mess around with.
Ao3 itself has a great guide to using work skins, explaining things just like I did here. The Modzilla Developer Network is a great resource for learning more in-depth about html and css if you want to do weirder and wonderful-er things!
I hope this has been informative and useful! Best of luck using skins in your own fics! 💛
#obey me#ao3#tutorial#omswd#writing reference#long post#cs people dont come @ me about my oversimplifications. this is for beginners! i am not here for definitional semantics!!!!#literally only one person asked for this and YET. i really enjoy writing tutorials
237 notes
·
View notes
Note
I'm a frosh cos major, but unlike many of my friends, I've had minimal experience with programming before Princeton. Since it seems unlikely that I would be offered an internship from any tech company due to my lack of knowledge in languages and my lack of side projects, what are some other non-swe related internships that I should pursue?
Response from Exupery:
Other contributors should add to this, but check out Princeton SPE! https://www.cs.princeton.edu/academics/ugradpgm/spe/home/ It’s pretty much designed for people in your position, and a lot of my friends benefited from it and went on to get fancy name tech internships the following summer.
Response from Sushi:
1) Just wanted to clear up a misconception. You don’t have to know multiple languages. Just be really good at ONE of: Java, Python, C/C#/C++. You don’t need to know more than one language, just know the libraries and stuff for one. I use Java but I know other friends who specialize in Python and even others who do everything in C or C++ and it’s perfectly fine. Companies don’t care usually, you can learn things on the job through stackoverflow and googling and reading books. Plus you’ll be fully prepared for a frosh/soph tech internship with just 126 and 226 if you plan to take that next sem.
2) The program that Exupery linked is really good and relevant to this question!! Definitely recommend checking it out/participating.
3) There are a lot of code schools/code bootcamps that you can attend to try to boost your skills this summer in hopes of getting something better next summer! Can’t think of any names off the top of my head but I know Google runs one, and I’m sure you can find others by asking your COS preceptor or googling.
4) Many frosh soph programs (https://realtalk-princeton.tumblr.com/post/166233828054/best-freshman-internships-programs-for-software) only expect you to have taken 126 and 226! So you will be fine even if you’ve come in with no programming experience. It doesn’t matter where you started, it matters where you are now :)
5) You can do your own project over fall break! I searched and couldn’t find Roonil+my former post about it but a simple website would work. Simple HTML/CSS/Javascript.
0 notes