#this was originally a traditional sketch I coloured digitally! you can still see some concept sketches and doodles of Sterlitzia :)
Text
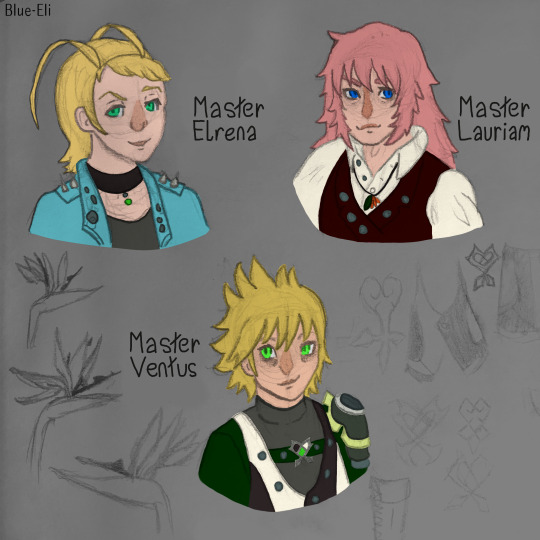
Masters Elrena, Lauriam, and Ventus from my never spilt au!! I’ve been calling them the Dandelion trio and they are Friends :)!
The Never Split AU is an au where Ventus escaped Xehanort’s attempt to split his heart, and Elrena and Lauriam avoid being nobodies! They are keyblade masters and good good friends
More info about each of them under the cut
I imagine that Ephemer basically named the dandelions (or just the union leaders + Elrena) as Keyblade masters in scala ad caelum law.
Master Elrena:
-still an absolute asshole (affectionately) like,,, the Mean Lesbian.
-25 years old. 12 in KHUx. Very insistent that Ventus is still younger then her.
-not good with kids, or people in general. Tends to play the bad cop to Ventus or Lauriam’s good cop.
-Has taken Aqua under her wing, she is a Bad Influence but honestly I think that’s what Aqua needs.
-she will bring back treats from different worlds for the others, you know she likes you when she comes back from a mission and just yeets a chocolate bar at you.
Master Lauriam:
-THE big brother, to everyone (but especially Ventus)
-29 years old. 14 in KHUx. Old.
-still looking for his sister, a bit more causal due to learning from past mistakes and also it’s been years a while more hopefully won’t hurt.
-not necessarily overprotective, he knows Ventus is very powerful, but will worry about him a lot,,, he lost him once he doesn’t want to again.
-fancy man, very respectable, most likely to get along with authority (he is a mess, he is a disaster, do not be fooled-)
Master Ventus:
-MAIN CHARACTER he is the connecting thread he is whole he is one of the Seven Lights AND Thirteen Darknesses at the same time I love him
-27 years old. 10 in KHUx. Went from baby baby to old baby. He is short and people keep thinking he twelve. He is only taller then Sora.
-has problems with authority, will either treat them as an equal (King Micky, most of the princesses) or be very open about his dislike of them (Yen Sid, Ansem, Eraqus).
-can summon unversed! Generally used them to help with large battles, as something to keep company/keep safe his loved ones (mainly Sora), or to vent feelings.
-only trained with Eraqus for two weeks, left after Eraqus flipped out after finding him with an unversed. Still visited to spend time with Aqua+Terra and use the library (Eraqus let’s him because he isn’t actively antagonistic, he figures Aqua and Terra will be good influences, he’d feel like a hypocrite considering he still is friendly with Xehanort. In return Ventus doesn’t summon unversed while visiting) this leads to a very odd Wayfinders Trio dynamic
#kingdom hearts#kh ventus#kh lauriam#kh elrena#kingdom hearts au#kh#never split au#blue boi draws#never split au my beloved#Ventus has chronic pain and fatigue hence the bags under his eyes#this was originally a traditional sketch I coloured digitally! you can still see some concept sketches and doodles of Sterlitzia :)#ooooooo this au lives rent free in my head#I love this trio so much there is NO content for them#fanart#digital art
63 notes
·
View notes
Text

“Now thank the good lordy above this absolute belter of a nook is still open in the wee hours of the day!”
The sudden blast of energy the newcomer radiated as his voice joyfully boomed through the tiny, cramped eatery was an immediate overdose for the overworked waitress. It was far too late (or rather, early, according to the man) for this sort of social interaction.
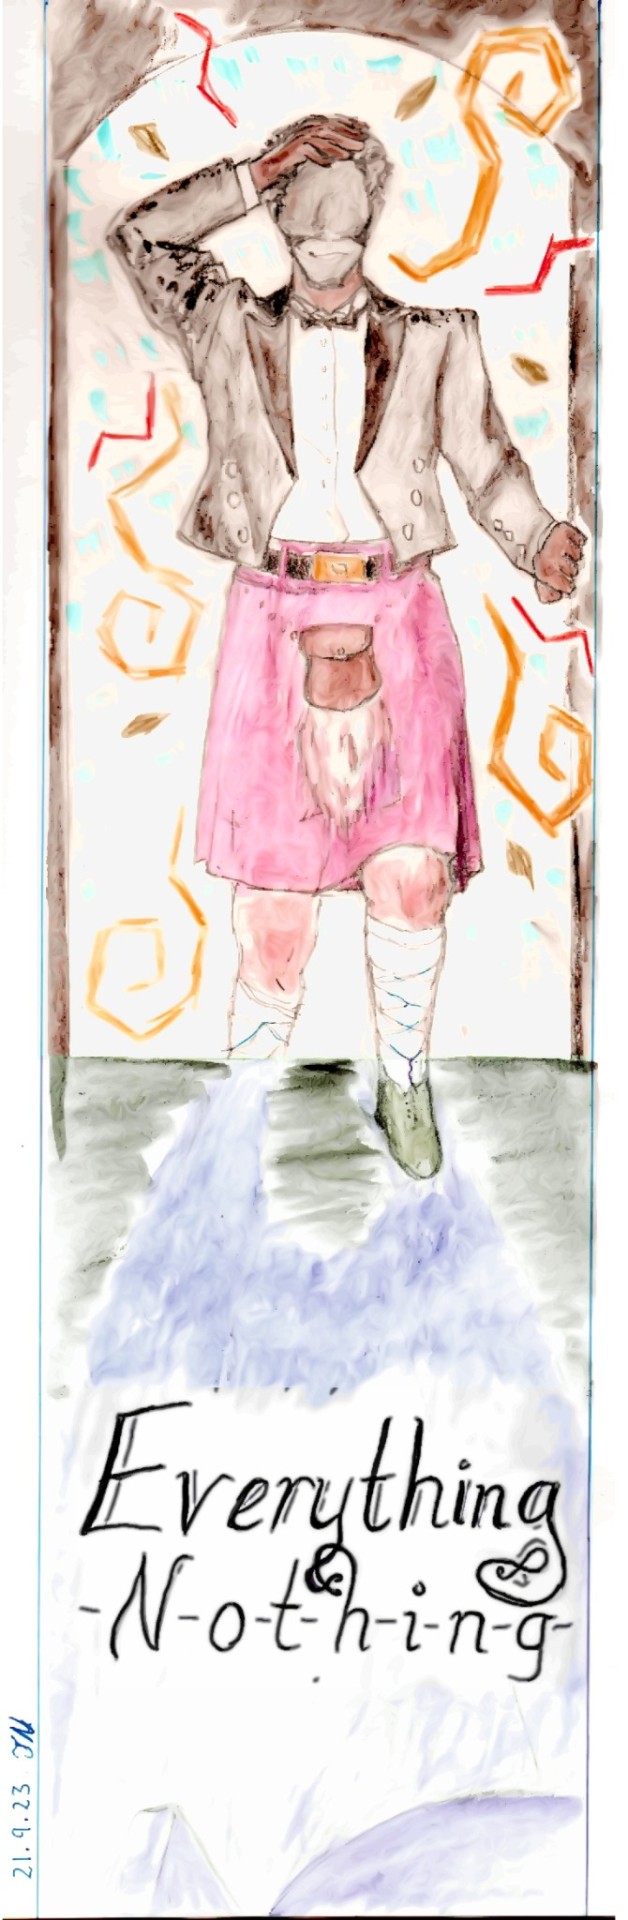
Check out Everything and Nothing by beans (with 6 e's and 6 a's) on AO3! Also check out my co-artist @gearbroth 's (!!!) art on their blog!
For the 2023 TF2 Big Bang! @tf2bigbang
~~~
See below for bonus sketches and infodump!
It's been a while since I did a big art piece like this. It was fun, and it got me experimenting with watercolour pencils for the first time. I'm still learning the craft, and as much as I want my first ever watercolour painting to be perfect, it'll have to do. I'm satisfied with my attempt this time.
Although I do wish I could capture the painting in a higher resolution; phone camera and scanner couldn't cut it, everything is still a bit blurry. Here's the best I can take on my phone:
It's also the original colours, before digital shenanigans were done to it. The work of a sleep deprived art wizard waving his silly little magic wand tool to get everything to look nicer.
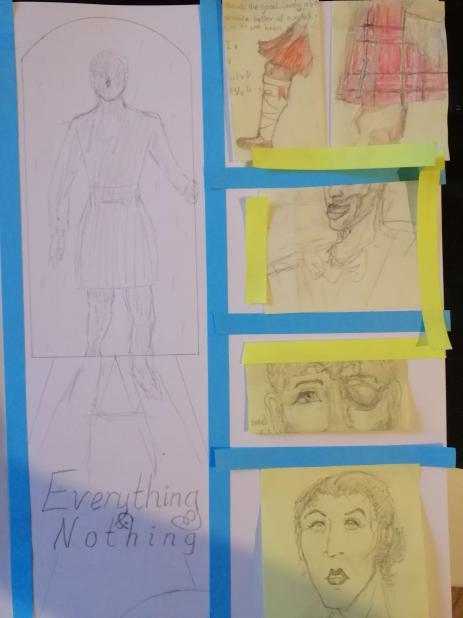
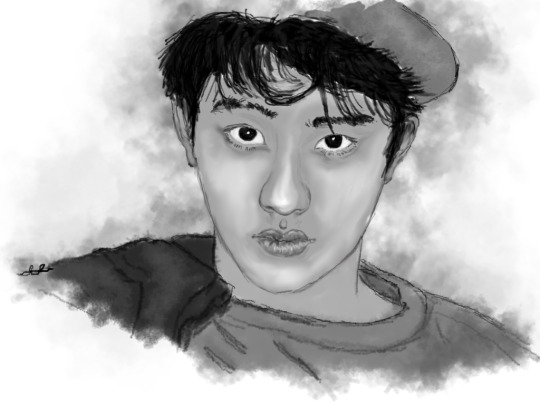
The original concept for this mini-comic came to me while I was sitting under a tree, halfheartedly trying to study for my two exams the next day. I quickly sketched this:

I honestly like the lineart of this sketch better than the final. What could be better than demo's sparkley anime eyes?
I was excited I finally came up with an idea after being high and dry for weeks. Basically my mental state:

I was going to have Demo stride in, burst through that door with exuberant energy that filled the Spy's shitty dead-end cafe. And also showcase his traditional Scottish garb, which let me tell you is a whole rabbithole that I eagerly leapt into while researching for cultural accuracy. (I tend rely on real life references alot. Trying to branch out to stylised drawing would be cool.)
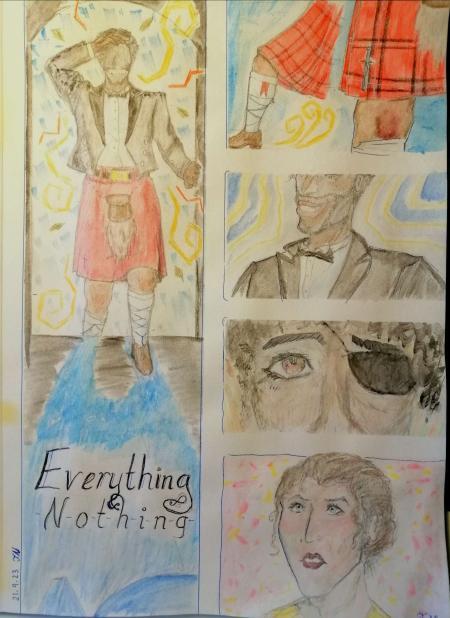
What happened next were these little sketches on post-it notes. I draw on them first before committing paper because...it's fun :)
Also in this case, this is a comic, so I could rearrange the drawings how I liked, so this was actually goated.
In the second image, see another case of liking the lineart more than the final. I had half a mind to keep that sketch of Spy and paint over it, but that wasn't watercolour paper, so no... :(


I was surprised how well the sketches turned out. Bloody hell, I'm an artistic genius! Now lets see how that translates to paint, eh? Well, you already know.
Some things to improve on, personally, is to make the lineart cleaner next time, so the paint doesn't mix with the pencil to make this weird greyish colour. Anatomy, always. Clothing folds is another big one. And finally, time management. Man, art is a passion, but damn does having too little time screw my art quality over. Well as they say, scarcity breeds innovation.
If you've made it this far, I am putting a virtual turtle (vurtle) in your hand, because turtles are cool, and you are too.
As a bonus bonus to this info-dump, have the original concept sketch while I was feeling out how to draw Demo in formal Scottish suit and kilt.

THAT IS ALL.
#tf2bigbang2023#tf2#demoman#tf2 spy#demospy#bomb voyage#tf2 demoman#might add image descriptions later if people want
30 notes
·
View notes
Text
Art Advice #3 - Drawing tips!
Hi everyone!
As you may know, every week or so I’m writing blog posts with art advice hints and tips for artists of any skill level in the hopes of helping some people out a bit! The tag is here so feel free to check out some of my other posts!
This week’s post is going to be some drawing tips I’ve picked up over the years that could hopefully be useful for beginner artists!
(this is about 1800 words altogether btw)
Drawings tips!
I’m going to split this post up into little sections which will hopefully make it easier for you to scroll to find certain advice you’re particularly interested in!
Part 1 - How to get started?
I’m a firm believer that anyone can be an artist, regardless of what materials or equipment they have. So when it comes to my advice on what kind of materials I recommend for beginner artists, I’d mainly say ‘whatever you have’.
But if that’s a bit vague, I’d essentially recommend you have a set of pencils which you can usually get relatively inexpensive online or in craft/art shops which range from 6B all the way to 6H (’B’ being for softer, darker pencils, often good for shading, and ‘H’ for the harder pencil leads which are best for much lighter shading or if you want a really faint sketch. Something important to note about ‘H’ pencils is not to press too hard with them since they’re a lot more likely to leave indents in the paper than ‘B’ pencils! For general sketching I personally use 2B or 3B pencils since they have the perfect balance of soft & hardness in my opinion!)
Of course, you can just draw with whatever pens or pencils you already have, so definitely don’t feel you have to go out of your way to buy something new or expensive just because your favourite artists use a particular brand of pencil or pen... Of course, often higher quality pens or pencils (especially colouring pencils) will have better pigment payoff than the cheaper alternatives, but as someone who’s been using the same WHSmith pencils they got when they were a child, I definitely think that as long as you have something to draw with, you’re all set to produce masterpieces of your own!
A lot of my art education got us using charcoal for a lot of our drawing practise. It’s not a medium I’m particularly fond of personally, but it is a great way to practise being a lot quicker and expressive with drawing, so definitely if you’re up for the challenge you can try some charcoal stuff! Only piece of advice is that I wouldn’t really recommend those ‘charcoal pencils’ you can buy in some shops, since they mostly just break apart every time you try and sharpen them... Regular charcoal is messy, though, and smudges very easily, so if you are interested in using it I’d say to do a little bit of research before hand!
(Or feel free to send me an ask if you want any further advice on using it!)
If you’re wanting to get into digital art, I’m planning on making a post discussing my tips for beginners to digital so... keep an eye out for that in the near future lol!
~
Part 2 - Getting over ‘Drawing Anxiety’
Drawing can be a daunting thing, particularly when artists who are already pretty good at it can seemingly produce a perfectly proportioned face out of thin air. But these artists weren’t magically born with this skill, of course, so with practise and some perseverance, I can assure you that you’ll be at that stage one day!
So my first piece of advice here is to be patient with yourself. Don’t expect yourself to be perfect straight away.
Second piece of advice is to sketch constantly!! I notice a lot of people who haven’t been drawing long are really careful about how they draw, almost like they’re afraid to be rough with the pencil. So I’d really recommend just starting to sketch a lot: be rough, be messy, draw things you can see and things from your imagination!
Observational drawing is another thing I think is crucial in improving your drawing skills (and I’ll go into more detail with this in a bit), but honestly just sketching things you like is such a great way to help you grow as an artist! And yes this includes drawing anime fanart or drawings of your original characters!
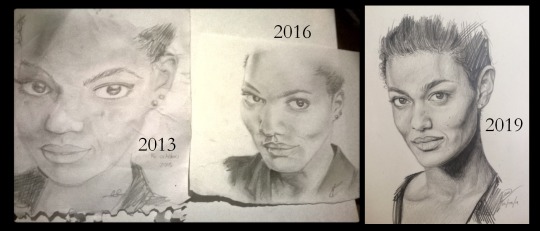
Below is some comparisons of my attempts at drawing Freema Agyeman from 2013 to 2019... Is the latest version of this perfect? Of course not. But I just want to show what constant practise can achieve!
~
Part 3 - Observational drawing
I honestly think that observational drawing was one of the most important things I learnt in my years of art education.
Observational drawing can take on many meanings. Perhaps it’s drawing a still life of a fruit bowl, or a life drawing class with a naked dude in front of you, or even drawing from a photo. The point of observational drawing is to improve how you translate the world around you onto a 2D surface, essentially.
And you don’t need anything fancy to do observational drawing either! Just placing an array of things in front of you and trying to sketch them (try and focus on a mix of textures and surfaces for the objects. So, for example, including a cup along side a woolly hat will help you get a handle on how to create texture with your drawing, and drawing anything with a reflective surface like cutlery is both challenging and interesting to do! Basically just use what you have around you!)
If you’re lucky (or unlucky, depending on how fond you are of seeing naked people lol) enough to have the chance to do life drawing, I would honestly recommend it! Often the final results aren’t great, but it’s a really good way of practising your observational skills! And even if you don’t have the opportunity, just trying to sketch a friend or family member from across a room, for example, is something that can really help you improve!
Top tip: a teacher once told me that when you’re drawing something like a face, for example, a way to improve how you draw is to see the face not as a ‘face’, but instead as a collections of shapes. Because our brains have a preconceived idea of what a face looks like that we end up drawing what we think we can see rather than what we can actually see!
There’s a lot of art snobs who believe that drawing from reference images is ‘cheating’ in comparison to life drawing, Of course, this is bs, and I’d say I’ve learnt just as much from using reference photos for the basis of my art as I have from drawing from ‘real life’. For more information about my thoughts on references and how to use them, see This post!
~
Part 4 - Drawing from references: Tracing, Grids and Freehand (which is best?)
Tracing in the world of art is a ... Contentious subject to say the least. And I’m not really interested in getting into the ‘moral’ implications of whether it is ‘cheating’ or not.
Instead I want to focus on the pros of using something like tracing when you’re starting out. I think particularly if you’re trying to improve how you shade things, colour things or how to get better at blending, then I do think that tracing can be a useful tool! Even I used tracing in the very start of my delve into digital art, but soon found that tracing wasn’t really something that was helping me in the long run so moved onto freehand stuff.
Overall, I think tracing is good as a starting point when you’re still learning about art, and also if you’re not too comfortable with your freehand drawing skills yet. I’d also recommend you mention if you have traced a piece if you share art to social media. Of course, no one is obligated to do this though!
This is an example of an artwork that I traced (it’s from 2013, hence why it looks... like That lol)
But if you’re someone who perhaps has used tracing in the past and found it doesn’t really work for you, or if you don’t want to start with tracing at all, then a good ‘next step’ I’ve seen other artists get into is using grids.
Now I have to admit, I’m not the best person to talk about grids since I’ve actually never used them lol... But I know a lot of artists who do, particularly people who do a lot of traditional work, since it makes it a lot easier to translate the reference image to your piece of paper or canvas.
And in a way I would recommend grids more for people starting out in drawing than tracing, and this is mainly due to the fact grids force you to use a lot more observational drawing skills than tracing! If you’re interested in getting into using grids I’d recommend doing a bit of research yourself!
The final technique of drawing from references I want to talk about is freehand! Now this is the one I’ve been doing for the majority of my art ‘career’ and honestly is probably the most ‘difficult’ to do of the three techniques.
But I find freehand drawing particularly rewarding with the ways it can make you reimagine an artwork in ways you never intended! Like what I mentioned in my Reference advice post, I have found that making ‘mistakes’ in freehand drawing can actually lead to more interesting and unique works of art than tracing or grid work could ever do!
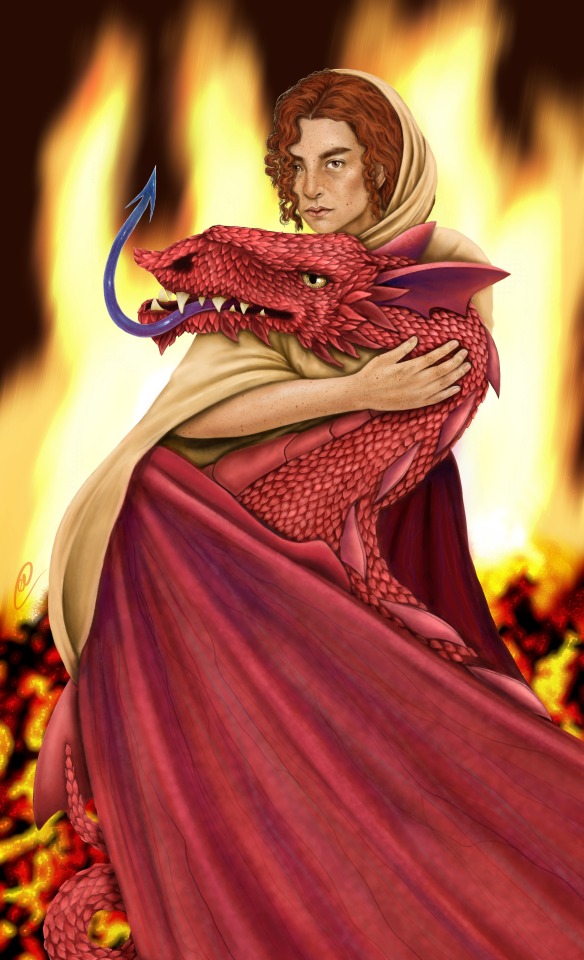
I also think that freehand allows you to create your own characters or concepts in a much more free way. For example, my Spirit of Somerset piece was something I created from a variety of references (I seem to remember I used Isak from SKAM’s mouth as a basis for the girls’ mouth?) and the dragon was based on a real mishmash of references, which is something that I I feel I couldn’t have done if I’d have been using grids or tracing!
With this I’m not trying to say that freehand is the ‘best’ way of drawing, it is just the one that I personally have found to fit me the best, which is the entire point of this post! All of my advice is just pointers I think could be useful for new artists, it is up to you to find which ‘path’ in art suits you best!
And of course, I’ve phrased these techniques as separate purely for the sake of explaining them easier, but the fact of the matter is that you can use a combination of these in your art if you wish!
If you struggle with drawing the outlines of hands, perhaps use tracing as a way to get a handle of the shape and then maybe use freehand to fill in the colour of them! Use a grid to draw a tree but freehand the leaves and bench below it!
Remember that your art is your art, and no one can tell you how to draw things!
~
I think I’ll leave this here for now! But I may do a part two at some point in the future! & my ask box is always open for anyone who wants any specific advice!
I really hope you found this at least moderately helpful, and a massive thank you to everyone for the constant support of these posts and my art!
#art advice#drawing#drawing tips#art advice for beginners#drawing advice#artists on tumblr#art#i SWEAR i am trying not to ramble in these i just... have a lot to say lol
53 notes
·
View notes
Text
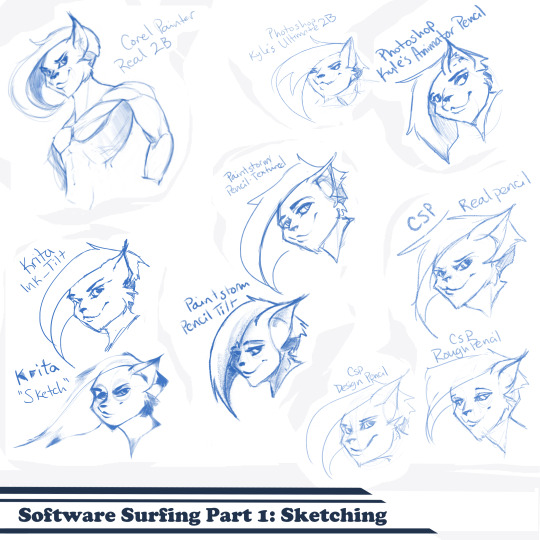
Artist’s Software Surfing P1 - Sketching
SSSo recently, after finishing (an admittedly long-overdue) a piece, I decided to download a trial of the new Corel Painter 2019. I hadn’t used Painter since my old DeviantArt days (circa 2005) and wanted to see how it felt with more digital art-veteran hands. Loaded it up, started sketching my default doodle-muse and wow, that “Real 2B” pencil feels great. I loved it so much, and wondered why.
That’s the story that is spawning this weird personal series of Software Surfing. I wanted to write little notes to future-me on how it felt using my favorite sketching tools in each program I have, and after the sixth one I thought it might be a good idea to check out inking, colouring, painting, etc. and writing those down as well.
So I’m writing this series for myself, but making it available in case anyone else can benefit as well. Thanks for sticking with the intro, let’s get into it.
Artist’s Software Surfing P1 - Sketching
Artist’s Software Surfing P2 - Inking
Artist’s Software Surfing P3 - Colouring
Artist’s Software Surfing P4 - Painting
There are many ways to sketch, but this is specifically the classic “pencil” or “drawing” form using the tools with the program’s default settings.
As an introduction, this is my doodle-muse, Cloey. She was my first original character, and though I don’t usually share my anthro art on here (I know that’s not everyone’s thing) I do have a separate blog for that stuff that you can find here if you’re so inclined. If you’re familiar with Artgerm (and you should be), she’s basically my Pepper.
Corel Painter’s “Real 2B”:
The one that started it all. The pencil just GLIDES, and I’ve always loved when you can tilt a pencil tool and it will shade just like tilting a real-life pencil. The only thing I want from a program now is to be able to bind touch to blenders so I can use my finger to smudge-blend the scribbling. (I tried drawing that fist so many times /fume)
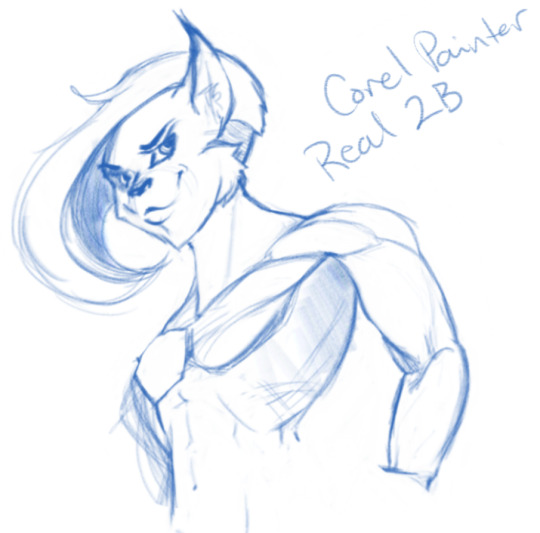
Likes: Tilt functionality, line width variance, stroke speed, eraser
Dislikes: Rebinding Rotate Canvas tool was a pain. I like Shift+Space, and that key combo is reflected in the shortcut panel, but it just continued to pan. Never worked for me, and rotating or flipping the page quickly is crucial for my sketching process. Also sometimes if I quickly resize the eraser and mash it down to use, it won’t detect any input.
Photoshop, Kyle Webster’s “2B” & “Animator Pencil”:
**Disclaimer** Firstly, I’ve used Photoshop for over 15 years now, and it’s a great digital art tool, but for drawing and painting I find it’s sorely lacking. It’s slow, expensive, and unintuitive. That being said, there are some things this program does exclusive to others so I’m still clinging to it (desperately) and while I would definitely recommend something else for budding digital artists, I have to supplement my misgivings by purchasing additional plugins and tools, such as the famed Kyle T Webster’s Ultimate Megapack for Photoshop (
which is now complementary with Photoshop CC, damnit
). Unless otherwise noted, all the brushes I use in Photoshop will be from that pack. **End Disclaimer**
Following off the heels of Corel, I remembered messing around with another “2B” (which btw is my personal favorite traditional pencil to sketch with) in Kyle Webster’s Drawing Box in Photoshop. It felt a bit similar, but with no tilt functionality and it really lacked the chunky-thickness (a scientific term) I enjoyed with Painter’s pencil. I switched to my favorite (and the favorite of MANY digital artists btw) his “Animator’s Pencil”. So chunky, but the ability to shade lightly... It’s really a fun brush to use for sketching digitally. Still one of my absolute favorites.

Animator Pencil Likes: Line width variance, texture fills in and scales perfectly
Dislikes: It’s a photoshop exclusive, a program that for some reason you can’t bind shortcuts to whatever you please, takes forever to load, and WAY too often suffers input lag while drawing. Also no tilt shading, :’( aw
Paintstorm’s “Textured Pencil” & “Pencil Tilt”
As a bit of an aside, I love Paintstorm, Paintstorm is what got me back into digital drawing and painting after doing 3D and game design for 7 years. I bought it for the very low price of entry (2 licenses for $30) and was impressed by its ability to customize literally anything in the program. You can create your own tool/brush boxes, bind any shortcut to any key combination, and every single brush tool adjustment comes with the most customization control of any program I’ve come across since Photoshop set the bar way back in the day. Out of the box a lot of the basic brushes have that old OpenCanvas or PaintTool Sai feel, but more recently they’ve added some very textured default brushes you can play around with. It’s also hands-down the FASTEST program I’ve ever worked in. I highly recommend giving it a try, it’s great for learning and experimentation. I grew a lot working in Paintstorm.

The Textured Pencil is a fun sketching brush, you can get as think or thick as you’d want and it keeps a clean outline. The Pencil Tilt really blew my mind the first time I used it. YOU CAN SHADE! It was the first time I had ever seen a program do that. The tilt has a great texture, fantastic control, and gets just as dark as you’d need. I’d recommend using them both, the Textured Pencil for a cleaner sketch, and the Pencil Tilt for something more expressive or loose.
Krita’s Ink-Tilt & “Sketch”:
I’ll be honest, I have almost no experience in Krita despite having downloaded and given it a try back in 2014. It was a hell of a time to figure out how to rebind my usual shortcuts (flip horz, rotate canvas). I couldn’t even rebind colour grab/eyedropper. Yikes. I opened up the “Sketching” brush box and there were only two options, made worse as one was a sketch pen... That lacked the flexibility of ballpoint.
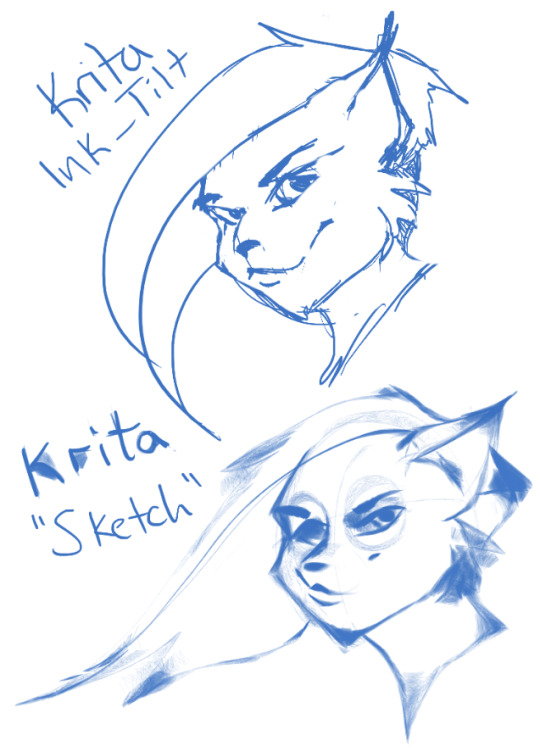
First I grabbed the pencil dubbed “Sketch” and was bewildered why the size of the circle was so large compared to the mark it made. Very confusing. Feeling intimidated, I abandoned it immediately to try out the “ink_tilt” (which by the way there’s no tilt functionality??) and hated it. I reluctantly went back to the pencil and just started trying to make marks. Wow. It’s weird, but surprisingly fun. You have to be willing to relinquish a LOT of control, but the shapes the brush makes while moving and tilting during a stroke can yield some really interesting and suggestive shapes. I would say great for early concepting or making something really loose and expressive. Fun to play with, but not really practical.
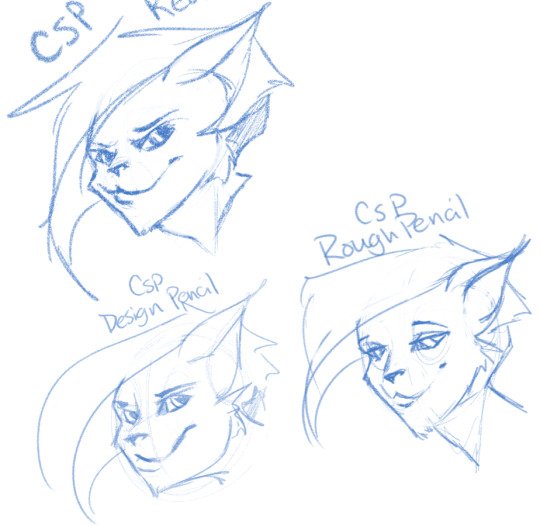
Clip Studio Paint’s Real Pencil & Rough Pencil
I’ve been wholly immersed in CSP since I purchased the program back in late 2016. It goes on sale often, so you can pick up a nice fully featured program for ~$35. I’d had my eye on it for a while and still really want to get into self-publishing comics, so I picked it up, bought a couple of brush packs for it (it’s pretty lacking in default painting tools) and I’ve been illustrating in it ever since. The brush creation isn’t as fun as Paintstorm, but brushes are quite customizable. I usually like to use the “Rough Pencil” if I want just a little texture and line variance, or the “Darker Pencil” for something cleaner. Trying to be different, I just jotted out a couple heads in ones I don’t normally use, the Real Pencil and Design Pencil. The Real Pencil has a lot of texture, but for some reason in CSP the textures don’t seem to scale with the brush, so I tend to avoid using it in most cases. I hate the design pencil, I just could never get dark enough. I guess that’s probably the point, though.
Well, that definitely wraps this digest up. I feel refreshed after trying out a lot of new digital sketching brushes. I was really reminded of how much I enjoyed drawing in Paintstorm. I hope someone other than me found this useful or otherwise inspiring! Sometimes, especially if you’re stuck in some art blockage, it’s a good idea to try something new, and for me digitally that’s hopping programs and trying new brushes.
I’m thinking about doing inks, colours, and painting at some point. Let me know if anyone’s interested in those! I’m planning on doing some for myself eventually, but I might expedite a post if anyone is interested. o/ Take it easy, y’all.
Artist’s Software Surfing P1 - Sketching
Artist’s Software Surfing P2 - Inking
Artist’s Software Surfing P3 - Colouring
Artist’s Software Surfing P4 - Painting
6 notes
·
View notes
Text
Final Evaluation
The title of my FMP ( Final Major Project ) is Conflict.
When you think of conflict you automatically think of violence, so I had some ideas on that, but I didn’t want to create something based on violence. All I imagined at the time is that I would have to research on wars, and battles and see gruesome pictures, so I had to think of other ideas. To help myself I looked up the definition and images of conflict online. Once I knew the meaning of conflict, I could think of many more ideas, that I didn’t even know had anything to do with conflict. Two of my ideas I really liked, Family Conflict and Emotional Conflict. I decided to base my FMP on the sub theme family conflict. All the research, sketches and ideas I created for a month derived from that theme. When I had to scrap the family conflict idea, I moved onto my second favourite idea, emotional conflict.
I had two limitations that I could recognise in my project, time and skill set. I did not have the time to I needed to get all my work completed on time. I also did not have the skill – set to carry out my idea exactly how I wanted it.
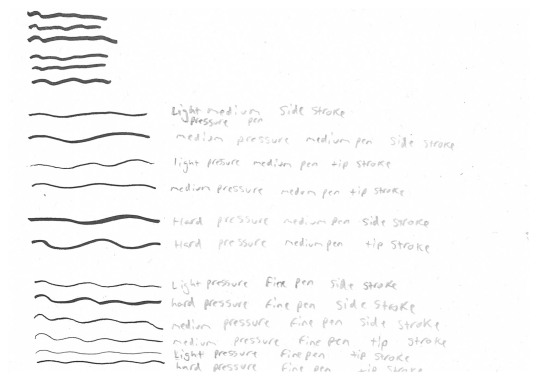
My artist research on ChiNoMiko was vital to my project, especially my final outcome. ChiNoMiko is an artist I have liked ever since I played her first game when I was fourteen. Looking at her illustrations for her artist study, I was going to add her art book cover images to her section of the sketchbook, when I realised I would like to try something like that. This caused me to have a lot of ideas in my head, so when I started on my backup plan I decided to turn them into posters. This led me to also look at other game genre posters for design research. ChiNoMiko’s artist research also helped support my sketches and line art for the posters. ChiNoMiko’s characters are created for love games, so her character’s line art is always dainty and fine/thin. By studying her line art I began to think and experiment with different pens, the amount of pressure I apply to the pens and the angle I hold them, to get different line widths. The purpose of this experimentation was to help me decide how the line art should be for all my posters.
For this project, I was tasked to find twelve artists to research. These artists had to either give inspiration for my project or work in the interactive media and digital arts field that I will be studying next year. Though all the artists I researched, art I like and interests me. When I originally wanted to explore and incorporate pop art into my project, a lot of the artists I started to research created art in that field, from these artists I started researching and experimenting. Though in the end I decided not to create my project in the pop art style, as I still don’t quite know enough about pop art, understand it, or even know how to intergrate it into my project. For the other artist’s I explored a website called Art Station, which is a site where games, film, media and entertainment artists across the globe can showcase their portfolios and apply for jobs. I chose artists who are illustrators because I could relate their art to my FMP, and artists who are animators, concept artists, game designers, environment artists, and 3D and 2D artists, because I will be studying these skills next year.
My work is a mix between traditional and digital media. I used paper, tracing paper, pencil, masking tape, repro blue pencil, and one medium and fine markers, to create my sketches and line art. I used an Apple Mac computer, Wacom tablet and Photoshop to create my experimentations and some of my final outcome. Recording the process and research of my FMP in a sketchbook and on my Tumblr blog.
My work has three functions:
1. To aquire me the grade I need to study the interactive media and creative arts course next year.
2. To show the skills, knowledge and improvements, I gained from the digital arts course.
I hope that my audience feel they can relate to my work. That they find interest in in my work. I want for the emotions I was trying to convey in each of my outcome posters, to be recognized by an audience.
If I had more time on the project I would have finished my family conflict animation for my outcome. I had several episode ideas, so hopefully I would have been able to create several of them. I would also have had 2 sketchbooks to record all my work on the project, since I prefer sketchbooks over blogs. This would have also allowed me to record more research and experimentation. I would also have liked to be able to make my sketchbooks more artsy. Have the writing in the sketchbooks all in different colours, and add borders of different, colourful designs.
I am both pleased and disappointed with my final outcome. I am pleased with the idea, but disappointed with the execution. I need to take drawing lessons as I have trouble drawing the human form. This problem had caused me trouble while drawing the characters poses, that I wasn’t even able to finish one of my poster ideas. Hopefully taking drawing classes will also help me draw faster. I am happy with the background in my stress poster, and although I think the lines of the furniture in my anger poster are a bit wobbly, I am still pleased with the posters background too.
My project does not meet my proposal aims. When I wrote my project proposal I intended for my final outcome to be a short animation based on the theme family conflict. But due to complications I was unable to complete the animation and had to go with my backup plan for my final outcome. This I had mentioned in my project proposal as an idea, to digitise my character designs for the theme emotional conflict. Though I also changed this somewhat, as I took the character designs I had and turned them into game posters for the theme.
Throughout the project my work had been evaluated by my teachers. This helped as during the disscusions they would tell me whether my ideas were achievabel or not, and input there own ideas to.
This in a way has been both a success for me and a disaster. I am not completely happy with my work or the time it took to complete it, but this experience has taught me a lot. I need to plan better, so I can get my work done when it needs to be done, in the order it needs to be done. I would say I should also start coming up with ideas realistically on what I’m able to do, instead of what I want to do. However I know this is impossible for me, so instead I should strive to learn and master, the skills I need to be able to successfully execute my ideas.
4 notes
·
View notes
Text
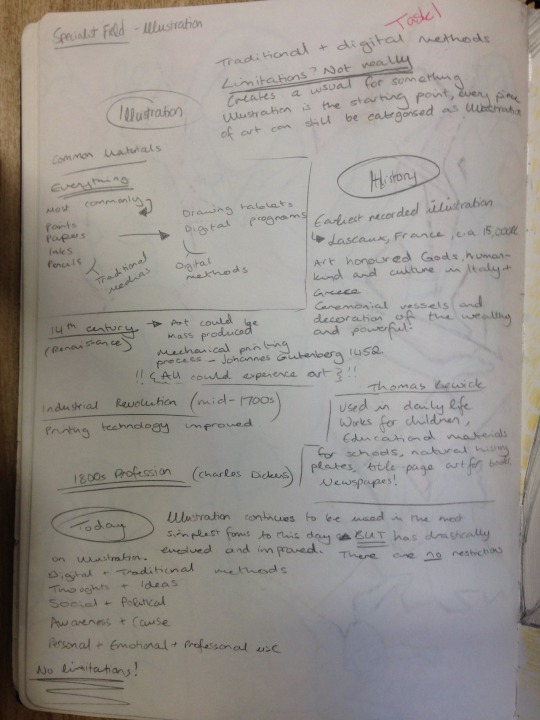
Specialist Field
Illustration
Illustration is an endless subject that could be argued as the platform for every art type and medium. Creating an illustration means creating something visual for something else - the possibilities are endless.
The most common materials used for traditional illustration are paints, papers, inks and pencils however an illustration can be created from anything and doesn’t necessarily have to use these items. Similarly, illustration doesn’t have to be traditional. It also expands to newer digital methods using digital programs- even something as simple as MS Paint - and drawing tablets, allowing the user to draw directly into the digital device.
Illustration has been around since the start of human life. Something as simple as cave paintings are a form of illustration - much less detailed to what some might consider the topic to be today but still a visual illustration.
The earliest recorded illustrations were found in Lascaux, France, c.a. 15,000BC. Art during those times was used to honour Gods, human kind and culture in Italy and Greece. Throughout the years and during colonisation across the globe many other cultures created illustrations for their own honours and beliefs.
Fast forward to the fourteenth century, set during Renaissance art could now be mass produced. Art was once a luxury for the rich but could now be experienced by everyone. The mechanical printing process was developed by Johannes Gutenberg in 1452.
Mid-seventeen hundreds during the industrial revolution, printing technology continued to improve. Art and illustration could be experienced in all lives from newspapers, posters, books, etc.
Even today illustration continues to be used in the most simplest forms but has drastically evolved and improved to much more complex styles and methods too. There are no restrictions for illustration, artists continuously using new materials and creating new art styles. Whilst modern art tends to be much more simplistic there is no guarantee that it might not backtrack in the future and return to older, famous styles like the Renaissance.
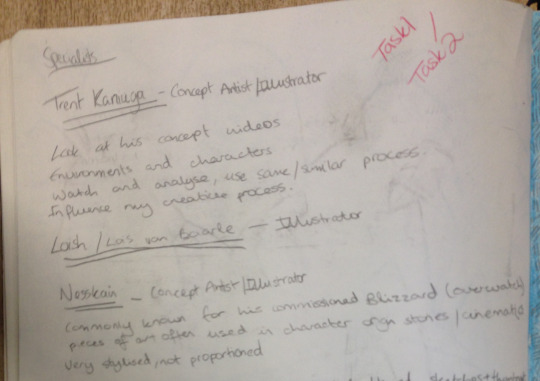
Specialists
Trent Kaniuga - Concept artist/illustrator
https://www.artstation.com/trentkaniuga
I first discovered Trent by stumbling upon his League of Legends background concepts (https://www.artstation.com/artwork/Vbb4N). He’s done a lot of work with Blizzard, his art featured in World of Warcraft, Diablo, Overwatch and Hearthstone, focusing on characters and environments.
Trent Kaniuga has his own youtube channel which he regular uploads process videos, advice and tips & tricks. His most popular uploads are the ones that include tons of good info about how to improve and survive in the art/freelance industry.
Most videos he has an idea or sketch already planned but he shows the process from his first sketch to a rendered final production and often includes extra concept sketches - whether it be for a character or environment.
One of my favourite videos of his is Upgrade your Design sketches - Environment Concept Artist daily process. He takes a good concept and further develops to make it even better by adding story and other minor details which are very easy to overlook, yet this video shows how important the details are. In Mao - Oliff - Bartol (Beast of Tuksa title page time lapse artwork) you see his design process, how he very quickly blocks things in before going back and rendering them. Despite the lines being rather sketchy they’re still bold and confident. It’s there on purpose and it shows.
I only recently discovered this artist but his advice and style has quickly become an inspiration for me. His videos have helped me realise what I need to improve and work on and effectively showing how to use Photoshop correctly which I continue to try to use more often.
https://www.youtube.com/user/novacolonyshow/featured
Loish - Lois van Baarle - Illustrator
https://loish.net/
An artist who started out animating and now has her work printed on wacom packaging. Loish is very bold in her colours and style, not afraid to go out of the usual. Her style differs greatly from when she first started and even now, some of her illustrations having exaggerated features whilst others are very realistic. Regardless, her style is always recognisable with the way she uses colours - not afraid to use unnatural colours to colour and shade something like skin (example: https://www.instagram.com/p/BwSJKH6nNlj/)
Nesskain - Concept artist/illustrator
https://www.youtube.com/user/nesskainn/featured
I discovered Nesskain via his illustrations he creates for Blizzard, namely some of Overwatch’s character origin stories/cinematics. His art is very stylised with wacky proportions - not over dramatic but not realistic either. It’s very easy to pick out Nesskain’s style from other artists commissioned by Blizzard due to his unique style. It’s also his own unique style and not something he only uses for Blizzard, as seen in his own personal projects.
Like the rest Nesskain creates speedpaints, allowing us to watch his workflow. He starts off with a sketch which develops overtime as he continues to re-sketch it over and over. A good example is his Mermay piece. Eventually, when he’s happy with a sketch he continues onto the lineart and so forth. However in some cases he skips ahead to the colouring, using a lineless style in some of his artworks like this Pharah painting.
0 notes
Text
Design Museum—Primary Research Trip
The Design Museum is a museum focusing on contemporary design and showcases work from a range of time periods and areas of design. As a group, the Year 2 graphics students visited this museum as it relates to the work we have done so far surrounding our curious objects and generating ideas from these. Visiting the museum would give us the chance to see how design as a whole has evolved.
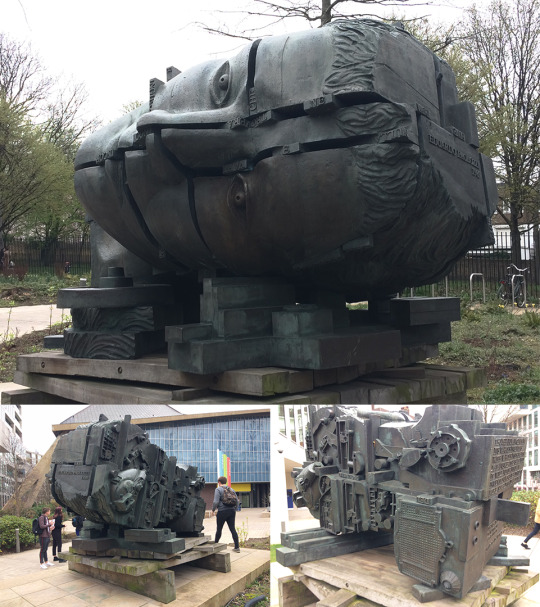
At the entrance of the museum is a sculpture made by Eduardo Paolozzi, a British artist I have previously looked at who was known for having a large influence on pop art. He produced both 2-dimensional artworks as well as sculptures. This piece titled “head of invention” is an example of his sculpting work and features various segments of a human head fitting together with words slotted in between the gaps. When approaching the back of the head, the complex machinery dominates the space. This showcases what I think is the main benefit of creating work in 3-dimensions—the possibility of having different interpretations depending on the viewers’ position. This is elevated by the size of the sculpture as well, which makes the viewing experience completely different from looking at it from a secondary source. The machinery at the back and the slotting together of the segments of the head represents the evolution of technology and I think this is why the sculpture is as big as it is. The size portrays how crucial technology started to become during the industrial revolution.
“I suppose I am interested, above all, in investigating the golden ability of the artist to achieve a metamorphosis of quite ordinary things into something wonderful and extraordinary”
This is a quotation said by Eduardo Paolozzi which relates to my own project. I believe so because this quote talks about making something “wonderful and extraordinary” out of “quite ordinary things” which is something I have been aiming to do so far and will continue to do. Using my 10 curious objects as the main example, I have seen how using seemingly unrelated ideas to generate new ones has been largely beneficial to me by providing a wider scope of inspiration for my project. Paolozzi calls doing this well the “golden ability” of an artist, or the main characteristic a good artist will possess.
Designer/Maker/User
‘Designer/Maker/User’ is the name of the exhibition held at the Design Museum which was the focus of our trip. The name itself relates to the connection between ‘artist’, ‘artwork’ and ‘audience’ which I identified as something I need to constantly look back on and evaluate against. The importance of this is achieving an understanding in all three of the aspects which will carry your work from something which is made to ‘look good’ to something with a real impact. The entrance to the exhibition includes a very large display, where each of the words appear to fade into each other after a period of time. This was an example of a 2-dimensional graphic being applied to a different type of material other than the usual wall or canvas. The effect of this from far away creates the illusion of moving image, but it is instead 3 different images being transitioned into each other by the wall itself.
On the opposite side of the entrance, was the first piece of work. When I saw this, I instantly drew the connection to Lisa Temple Cox’s Lion Walk decoration. This piece used a collection of items which were donated in a similar way to Temple Cox’s display boxes. In both cases, the concept reflects the process I have used so far for generating ideas out of random objects. My 10 curious objects are all unrelated to my ideas at this stage, but I wouldn’t have these ideas without using these items and various practical experimentations to develop them.

The main difference which is striking between this new example of assorted objects and the ones I have looked at is the size. Even the Mark Dion examples which were large boxes of still life are a lot smaller than this wall of objects. It’s a mixture between the large-scaled display boxes and the neat organisation of the small examples. As a result, the wall offers a similar narrative which can be seen in the smaller examples but on a larger scale. The viewer can be intrigued for longer because there’s more to explore and interpret.

The exhibition showcased the evolution of technology throughout the years. With this, the production of type was heavily affected by what was seen to be possible with the technology available at the time. This specific example above is some early work developing a typeface with the assistance of early vector graphics. What I find interesting about type and this image especially is how similar the quality of the letters are from then to now. Looking at the ‘Q’s at the bottom right of the image, it’s hard to differentiate them from type made and used today which is evidence of how timeless successful type is.
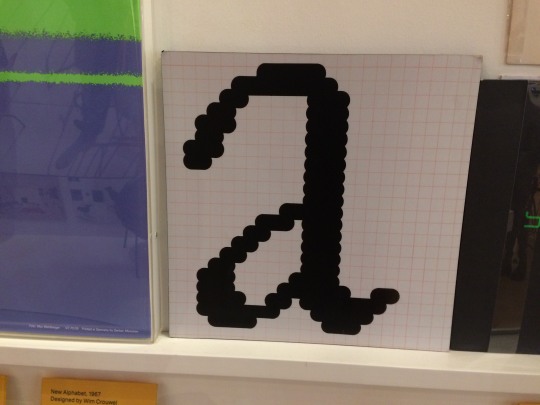
The earliest examples of digital typefaces were made on grids due to the limitations of screen resolutions. All graphics were made on extremely low-resolution bitmap screens which makes the earliest examples of digital graphics have a distinct ‘pixel’ look to them. The Macintosh icons created by Susan Kare are something which follow very similar guidelines and have the same similar distinct look. Susan Kare is an artist I looked at during my ‘Animal Instincts’ project where I looked into the process of limiting myself to sketching on a grid much like she did. Although I am not limited by the grid because of how technology has evolved, exploring this process taught me how revisiting traditional methods and restricting yourself in similar ways can, in fact, produce more effective results. The pixel type is an example of this because when it is sketched onto a grid first, everything is consistent and legible to the viewer.

On the contrary, this bionic arm is an insight into what the future could look like with the advancement of technology. This is a bionic arm which was made completely from the process of 3D printing. A relatively new process for product design which has evolved what is possible with digital software. This was produced by e-NABLE, an organisation where volunteers use 3D printing techniques to produce bionic prosthetics for under-served populations globally. Because of how automated the process of 3D printing is, once you have one digital model to print, the costs become very low which is what allows e-NABLE to give back to communities. The material also works in their favour. The vibrant colours of the 3D printing plastic are a distinction between e-NABLE and other mechanical prosthetics which makes them especially marketable to children.

This is an example of how impactful technology can be. Using design to combat important issues which, without these efficient processes like 3D printing, would not be possible. With the evolution of technology, comes the simplification of the product. Just recently, bionic arms would have been seen as inaccessible, especially by poorer communities. Now e-NABLE produces bionic parts on a mass scale, with construction kits even being an option.

These Olivetti posters and Olivetti posters, in general, are often used as an example when referring to ‘vintage’ design. Although each poster has its own unique qualities, there are certain characteristics which I picked up on which are common. Firstly, the colour and tone. Most of the colours used are flat and saturated with warm colours being used slightly more. There is rarely a lot of gradients being used, but when tonal value is applied, it is done through different flat colours. The large blocks of colour work effectively to draw attention to the posters. I find the posters with the examples of large blocks of colour naturally draw my eye to them, which is the purpose of these. Another thing I noticed, although not as prominent as the use of colour, is the use of shape. Circles are the core in some of the designs and remind me of Saul Bass’ work because of this along with the colour usage. Now I have access to technology which can allow me to produce more ambitious effects in easier ways. But these posters remain effective to this day, which shows how whilst technology evolves, successful design remains that way.

Because branding is something I want to explore with my project; when I saw these examples of logo evolutions I wanted to use them as research. Starting with the leftmost example: Apple. Their logo started off as a complex illustration and the impracticality of this is illustrated by how far away I was standing. The small details become too small to see and the complexity of the logo is lost with its size. In contrast, the simplicity of the next Apple mark remains effective from both close-up and far away. Because of this, once Apple had an effective logo, the changes that followed only became minimal, but eventually leading to the most simple revision of all of them—the plain black version.
A similar instance happened with the ‘Braun’ logotype in the right image. The logo was changed from a minimalistic design to a styled one with a 3D effect added to it. Because this added nothing functionally to the logo, they reverted back to the original concept but with a more modernistic approach applying the logo to a grid.
The middle image shows two variations of the ‘Sony’ logotype. Only being two, the Sony logo has gone through less change but the same elements in terms of legibility have improved. The other logos are companies owned by Sony and are all in my opinion successful logos.
What these teach me is that effective brands should stick with their brand identity for as long as possible as it is over-time that recognisability is created. The Apple logo is the perfect example of this benefitting the company themselves. Over many years the Apple logo has gone through little changes which means the consumers are familiar to the image and link it to the products. This then allows Apple to raise the prices of their products as the customers are more likely to buy into a brand they are familiar with.

I also made sketches as I walked around the exhibition. It’s important to do this because you can portray the feeling you had when reacting to the original object. A photograph can only provide so much to my research, but sketches I made at the time of viewing the research are more insightful into their effects on me.
Review
This trip provided a new element of research to my project in the form of primary investigation. It was a lot more engaging for me as a viewer reacting to the work first-hand as it was intended to be viewed. Secondary research is beneficial due to it taking less time to gather information. However, secondary examples can often provoke a different response to original artworks. Size is something which heavily effects how an audience reacts to art work. From a secondary source, the Paolozzi sculpture or the wall of donated possessions at the Design Museum will not provoke the same reaction that I had when looking at them first-hand. The size adds to the statement the piece is making and makes the work seem a lot more powerful. Large works like these keep me interested to look at because there is often more to look at and interpret.
I have researched designs from other time periods before, but the Design Museum offered a unique outlook on the evolution of technology and how this aided the production of design. The most shocking thing from this visit was how automated the 3D printing was and how cheap it had become to produce products in mass because of this.

Looking Back
As I spectated the numerous examples of design from different times, I kept noticing the similarities between these and my own project. Firstly, the vast wall of donated possessions reminded me of the work I did on my display box and the research I did into artists who produced similar things. Mainly Lisa Temple Cox, who also used donated objects to form various smaller display boxes in the Lion Walk toilets in Colchester. I was also able to observe these in person as they were installed locally, and although the concepts of narrative remain similar between the two, the reaction I had to them both was very different. Lisa Temple Cox herself said that people “don’t go there for it, but they enjoy it while it’s there”. I feel the same way with my experience of looking at her work and found it to be a lot more passive than the vast example at the Design Museum. I was in awe of the size of the. The concept remained the same but the scale alone of the display box altered the reaction from the audience completely.
Next, the examples of type and how they have evolved. Type has been a large of my project so far and I plan to continue this way moving forward. I find type to be so interesting because of how explicitly it can communicate a message but in more ways than one. I have previously looked at type mainly with digital processes; the Lost & Found workshop series allowed me to mirror the same process but with very different materials (such as the garden wire typeface I made in part 1). These seemingly unrelated methods make sense when I view the work at the Design Museum. Restricting myself to garden wire to make a typeface made me feel extremely limited, but as I highlighted when looking at the pixel type work at the Design Museum, limiting yourself to a strict amount of rules to follow can sometimes create more effective outcomes. Even if not, the ideas that spark from challenging yourself allow for a lot more possibilities for outcomes.
Moving Forward
There were some things which I was interested in from the Design Museum that I haven’t yet explore in my project, that now I see as a possible direction to follow. The first one being the Olivetti posters. Looking at these got me interested in poster design as a whole and how it links with type. I then thought about how it could link with animation as that is another area I want to explore. Moving forward, I may consider looking into more abstract poster design which comes from limiting myself and forcing myself to come up with completely different ideas to what I am comfortable with. Much like when I tried screenprinting in the 2nd Lost and Found workshop, I found that being out of my comfort zone may produce results I am less happy with, but the ideas that I will generate can benefit my project.
I highlighted the use of shape in the Olivetti posters. Geometry was something I mind-mapped at the very beginning of the brief as an interest on mine, so I think it would be appropriate to explore using geometry in design in the future. I have already done this with logos in the ‘Animal Instincts’ project, but I want to attempt to combine it with poster design. Looking at gestalt and my display box also let me understand how groups of objects are perceived by a viewer. I could possibly use this knowledge in a 2-Dimensional format such as with poster design and learn about the technicalities of laying things out in 2 dimensions.
On the subject of logos and branding as a whole, this is something I definitely want to explore. I would say it is one of my biggest strengths, which is why I have limited myself away from it so far. But at this stage, I want to start using the ideas I have gathered, combine them with ideas I initially had at the start of the project and use what I am interested in (type, branding, motion etc.) to do so. The Apple, Sony and Braun logos that were showcased at the museum showed me how effective branding works in practice. I want to explore the possibility of creating entire brand identities rather than just a single logo.
Lastly, the type I looked at made me want to continue exploring type but limiting myself more. I know I am comfortable with digital processes so my next step will be to reflect upon early methods of producing type, (such as sketching on grids) to learn about the fundamentals of creating legible typefaces. I believe this will broaden my understanding of the field of type and ultimately allow me to use type more effectively in my own work.
0 notes
Text
Future proof - Documentation
DOCUMENTATION
-Find 3 - 5 industry related job vacancies you would like to apply for
https://chk.tbe.taleo.net/chk01/ats/careers/requisition.jsp?org=FRAMESTORE&cws=39&rid=855
This link will take you to 1 of the 3 jobs I have looked at. The job is for concept artist and I feel I have met all the specifications that they require from me.
These requirements are.
At least one year of experience doing concept art in film or games
I have been drawing all my life.
Excellent 2D skills and knowledge of traditional art techniques
Most of my best work is 2D.
Some experience working with 3D applications
I’ve used 3d software’s before and I was decent with them.
An excellent understanding of anatomy, character/creature design, colour theory, perspective, lighting and composition
When it comes to people and animals I am familiar of their layouts and how they are made, when it comes to colours and stuff I am very wise with the colours I choose depending on the themes, and when it comes to shadows depending on the character the light can create shadows to help define the shape of the character.
Be able to design a variety of original concepts including: interior and exterior environments and accompanying scene objects
Again it depends on the environment and theme of the game, my strong points are all in character design and kind of lack in scenery but my skills in scenery are okay and do the job.
Be fluent working with digital media (e.g. Photoshop)
I am okay when it comes to using Photoshop and I am familiar with keyboard shortcuts to help making editing easier. I am more comfortable used the software “GIMP” which stands for “GNU Image Manipulation Program”.
Be able to quickly render imaginative concepts from verbal and written direction
I have drawn a few scene from text in my past depending on the description I can do the task very well.
Work well in and communicate ideas within a team environment
My communication skills lack as I spend most of my time alone, but I am very good at following orders and getting jobs done.
Be a self-motivated individual with a strong work ethic
When it comes to motivation when drawing I am always on top and get loads of sketches complete or few high quality drawings complete.
https://cloudimperiumgames.com/jobs/267-Concept-Artist
Here is link 2 of the industry jobs I have been looking at. In this job it is mostly digital art related but mostly around environments, so I felt I could be suitable for this role as it involves a lot of fancy lighting in the environments and I feel lighting is very important when it comes to creating scenery.
Requirements:
Have a good understanding of form and function with an eye for Industrial design
Collaborate heavily with the design and production teams while maintaining the Art Directors vision
When it comes to design I am very strong, as long as I know the subject and genre I will do my research and work to the best of my ability.
Create stunning environmental art that captures the overall filmic quality of the games universe
I am very good with this as I have my own story’s going on it the background with my own characters and have been working on this for years to try and get my own unique feel different to other genres.
Have a strong foundation in lighting and atmospherics
I am pretty good when it comes to lighting as I feel it allows the viewer to get a better perception of the environment.
Ability to create concept art in 3D and 2D
I am an expert when it comes to creating in the 2D area but I still lack in the 3D department but I see it as a new ability to work on.
http://jobs.gamesindustry.biz/amiqus-games/uk-and-europe/storyboard-concept-artist-id89345
Here is the link to 3 of 3 links to jobs I have looked at in the industry. With this job I felt I met the requirements of the task and would gladly work for this company once I sorted out travels and arrangements. This one was based around drawing but also had some film aspects included to put towards the project.
Requirements/Skills
A keen interest in photography and film
I did a film course back in college and it helped me to design better shots when it came to my comic design and it did interest me how these different angles could affect the situation when it came to building tension and drama.
The ability to work in a variety of styles
As long as I have an understanding of the style I can adapt to it and perfect my skills to work in the style fluently.
Good character and architectural drawing skills
My character design skills are at very good standard and my architectural design skills are not as good as I tend to focus on characters a bit too much. But as long as I know the theme and style I can adapt to it. I can draw different dimensions and the banishing points to show the depth and distance to show perception from the character and point of view.
An understanding of light and tone
When it comes to different lights I think it is very important to have a good light source as it can help to show the viewer the shapes and dimensions of the environment and the characters.
Good knowledge of film camera angles and the importance of good framing i.e. architectural v character
I did film for most of my school time as I was part of a media courses I am very familiar with camera angles and I know when certain shots would be necessary for different shots.
An understanding of set layout for lighting and camera
Depending on the set the lighting should always reflect the mood and energy of the area. For example if you was in a busy street you could have dim light as it could be a miserable environment, and if you was in a forest full of light you could have bright light to raise the contrast to show it’s a happy environment.
Understanding of camera lens/definitions i.e. Close up and wide
I have a fairly good understanding of different lenses from what I have learnt from college as we didn’t get to use those tools back in school. But some lenses have different effects on the environment as there are some which reduce reflection and some that can turn down lighting effects. As with the camera angles It can affect the scene as wide angles can cover more area and could be used as a point of view scene if a characters was to leave a building. And close ups can be used for when you want to catch emotion on a person’s face or to pick up a small object on camera.
Understanding of camera movement/definitions i.e. Track and crane
I used to enjoy moving the cameras on the tripods and try to keep it steady whist keeping the camera focused on the object or person we’re following or tracking. Most of it would be a combination of zooming and tracking.
Good storytelling through visuals
As long as the storytelling is well written and has a decent layout I can make out the visual and draw them out flawlessly. I practiced with this when I was younger as I used to design characters for friends and they’d describe the character to me and I’d draw it down.
1 note
·
View note
Text
Digital developments inspired by David Carson & Saul Bass
In this blog post I will be reflecting on my practical experimentation which was taken from the ‘Out Here In The Field’ workshop. I will be giving you a detailed overview in how I produced this outcome and what designers inspired me along the way. The final stage of this post will involve me comparing and contrasting my work against my inspirations pieces but also including peer feedback to allow me to gain ideas for future practical developments.
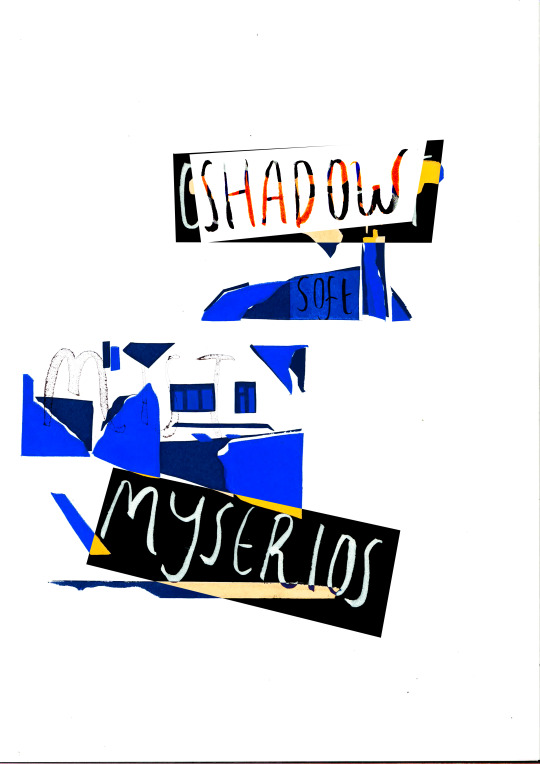
Final Digital Development
My aims for this development was to create a poster which shows type and image being composed together to cause the audience to question the message/meaning. Working with the developments created earlier in the week I wanted to add a range of words which I gathered off my peers; I asked them to write the first five words which came to their mind when studying my work which acted as my primary source for this development. What my aim was for the typography I was going to use was to excite the audience whilst still mentally challenging them which was going to accomplished through scale, colour, leading and kerning.
The designers I looked at for inspiration before embarking on my development were the following, David Carson and Saul Bass. These two artists both work within poster design and have many different qualities which I feel when combined could create something interesting. The principles I am taking from David Carson’s work is his use of abstract and chaotic text which creates a blurred pathway in his posters. This is what first caught my eye about his work and I would like to involve these characteristics within my practical experimentations. David Carson is also know for his use of simple and subtle illustrations which complements his use of abstract text, I feel as this has a very strong connection to Saul Bass who has created some very iconic and successful poster and title sequences. Moving onto Saul Bass, his minimal poster designs have inspired me because of the impact it has on the viewer which instantly gives you relevant information behind the message being portrayed. What I want to take from Saul Bass's posters is his use of negative space which isolates the illustration which is being used, I want to do this because it will show more meaning behind my message and draw the audience into the relationship between text and image.
Primary Words Collected By Peers
Method:
After taking my earlier development through the traditional process of print I wanted to widen my processes used so decided to explore some digital terms. I did this so I can compare the outcomes against each other to discuss the similarities and differences between the two processes.
To begin this process I gathered all my prints from the print room and placed them out in front of me. I did this because I wanted to selected the cleanest print which clearly shows the geometric shapes being layered onto one an other to show highlight and tone. Once this was chosen I had to scan in my image which I found to be a challenge, this was because of the scale I chose to do my prints in which ended up being bigger than the scanner. After some thinking the solution which I used was to scan my image using the photocopier, this didn't capture the best image but this could be edited through the image levels and saturations. What this technique did was make the colours captured more bold and elusive which was what I wanted to achieve in the original scan and this visual quality connects back to colour schemes Saul Bass and David Carson use on regular basis.
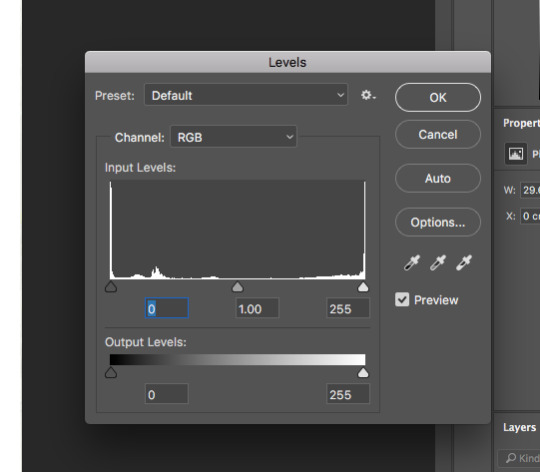
Adjusting the image levels
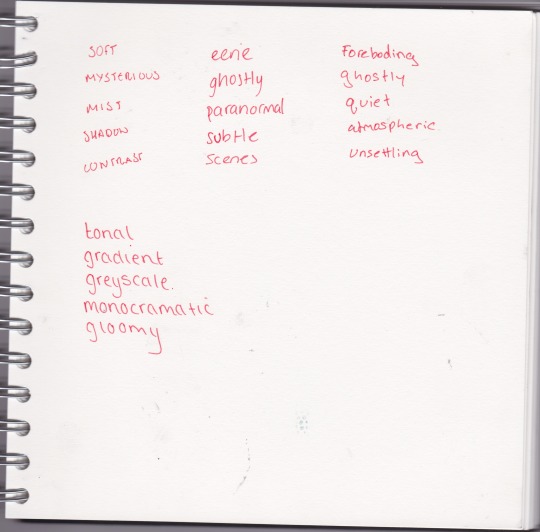
What my next step involved was beginning to plan and construct my words which I was going to take from my primary research gathered from my fellow peers. Before completing anything digitally I wanted to explore different hand-rendered fonts which would form a base for my typography used in this practical experiment. What this technique will gain me in my outcome is rough and textured font which holds a organic and personal style to it which connects the poster to me. The fonts I wanted to explore varied a lot, so I created some experiments in my sketchbook which focused on fluid movement and a broad stature. I wanted to do this so I had a broad range of reverences to work from but also to enable me to create more outcomes using different compositions and styles. What I could do next time is gather different fonts from peers which will feed primary research into my practical outcome and work along side my own personal style.
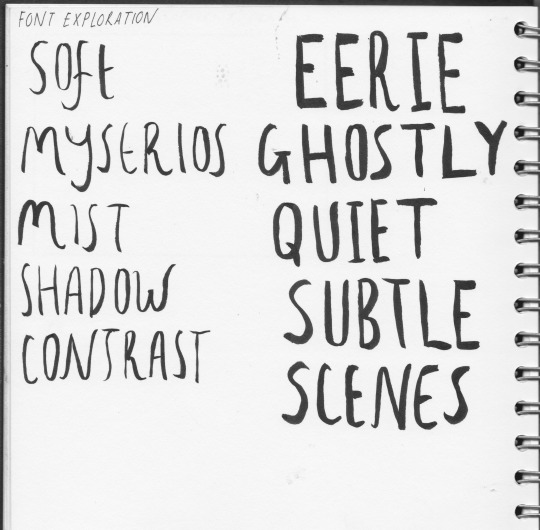
font experimentation
The final step of this development involved me composing my text alongside my image/print. I wanted to be playful with this and explore different techniques which create new and exciting visuals when being layered. What I did with each individual scan was use the polygonal lasso tool and select the word by creating an abstract shape around it. Once this was done I copied and pasted it onto the print and started to layer them alongside each other. What I found worked well with these technique was exploring the layer filters and decided to show a range of these in the poster. One of my favorite filter was the expand, this was because it collaborated with the layered colour and created a nice, fiery orange which really gave my poster more importance and recognition.
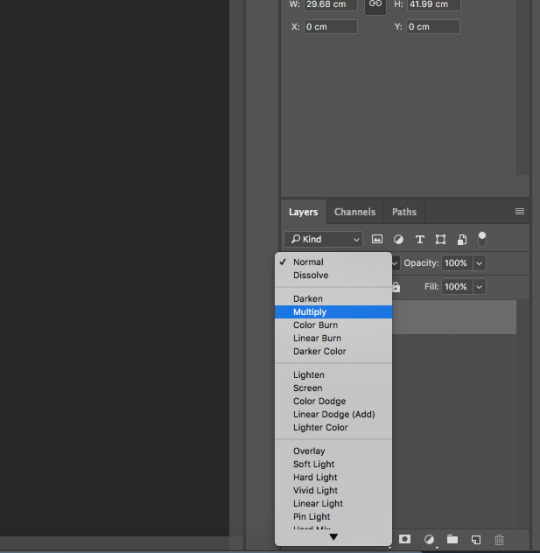
Filter exploration within levels
Review and Comparison:
When looking at my finished practical experiment I was very statified with the end results, What I feel is the greatest success is the use of negitive space which instatly draws the audience into the cenetre of the poster which I aimed to do at the start of this development process. What I feel went well in this experiment is the use of layer filters which created contrast between the text and image (print). This was shown through different means of colour and tonal values which was added to the illistration through this unique process. Another good feature in this poster is the relation back to the workshop ‘Out Here In The Field’ and how it celarly shows relevent to my primary observational sketches but also shows exploration through new and exotic meduims.
How I think my outcomes relate and connect to the work of Saul Bass and David Carson is through the visuals created in the text. This is mainly towards David Crason and his style, I think this because of the way David Carson composes his phrases which come together to create a image for the audience. I dont think my poster creates this affect but adopts the style of abstract composition which Carson uses to make his work playful and exciting. However I do see a strong relation in my work and teh designers Saul Bass, this is because of the similar thought behind use of negitive space but also adopting a subtle illistration to work from to work alongside the negitive space. I also see comparisions between the anatomy of a murder poster in which the text is cut out and taken from the illistration, I have tried to carry this style in my work to make it more subtle.
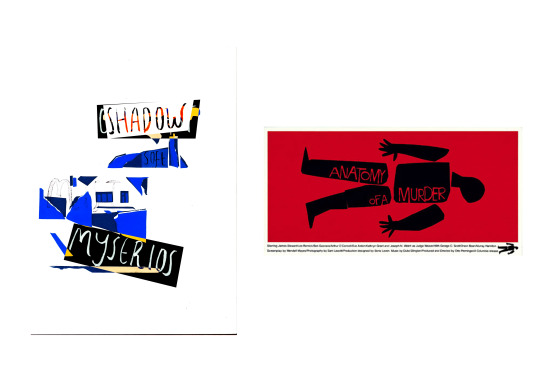
Comparison between Saul Bass and practical outcome
During this devlopment I came arcoss a range of things which turned out unsuccessful during the build up of this devlopment but also elements involved in the finished practical development. What I could change in this poster would be the colour scheme used, I would do this so I could show a relation to my concept but also influential artists such as Saul Bass and Dface. The final thing I would also change is the use of primary text, this is only so I could compare the outcomes and have a clean text to work from.
Peer Review:
Actions:
> Begin to consider developemnts towards my project concept.
> Research artsists such as Dface and Ace to give me new means of development.
> Compare this outcome aginst a fellow peers and ask for constructive critizim.
0 notes
Photo


My Final Pieces As a Whole
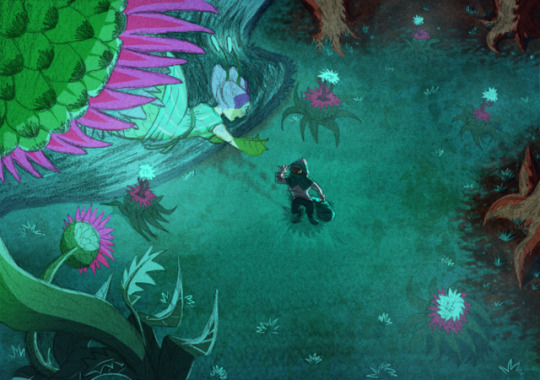
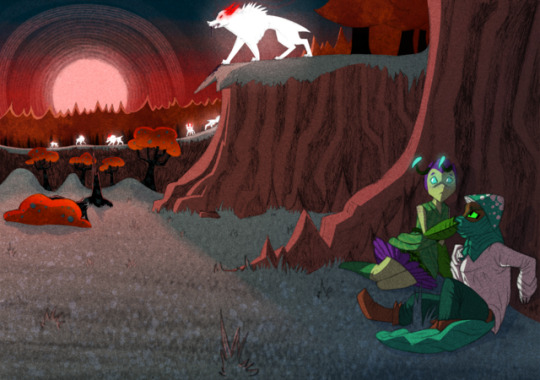
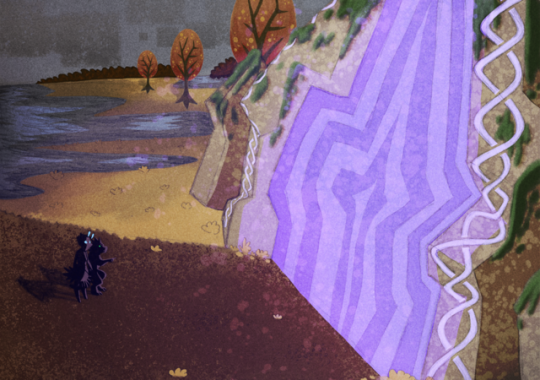
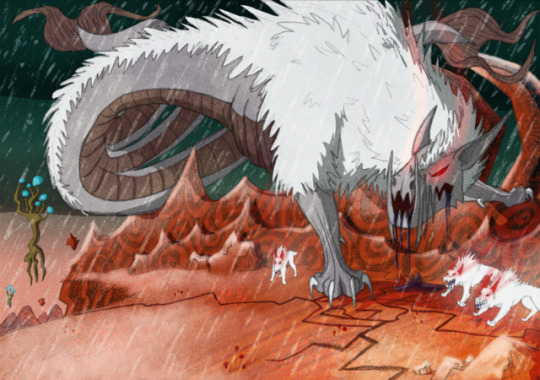
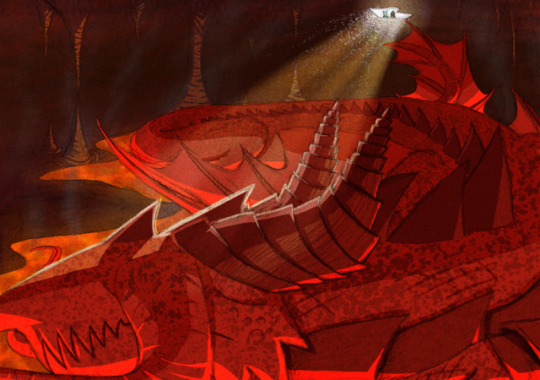
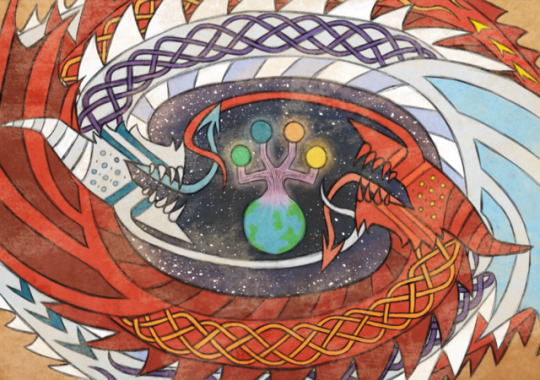
I’m very pleased with the overall result of this project, all the sketching, designing, writing and planning came together really quite well in the end and I’m very happy with the universe I’ve created throughout these past weeks. The thing I really wanted from my last project in level 5 was to be able to expand on the idea of creating a fleshed out world and narrative in which to be able to set a more complex game, and I believe this project has really allowed me to open up in terms of investigating a concept thoroughly enough to have a solid and believable world, with good characters, even going so far as to have planned what each race’s culture might be like and how it relates to actual mythology. I’m excited about what I have created and what the possibilities for it might be in the major project, and maybe even further into the future, as I do strongly wish to carry this idea forward now that I have set the groundwork and designed the most important aspects, mainly, characters and environments. During the designing process I had many ideas for the narrative, and I have an even stronger plan for what I want now, even possibly having themes within the game that explore other concepts, such as politics.
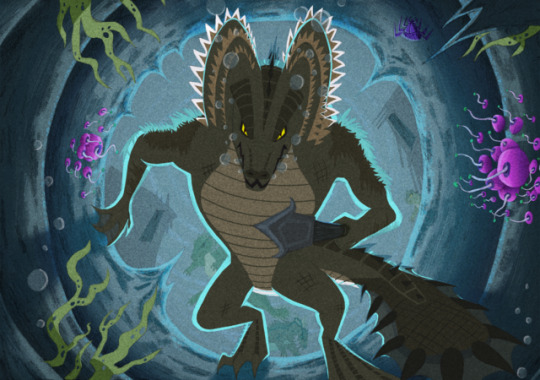
The final art-style I arrived at adapted from looking at many different sources as well as experimenting with my own existing style, and using traditional medias such as graphite and acrylic paints. It’s actually quite different than I thought it would be originally, as I thought initially that it might be closer to a style like Samurai Jack’s which is very 2D and involves very little shadow or lighting, relying more on colour. Though the final style does reflect this research, it is still very much my own and I look forward to seeing how I can bring this into a game setting.
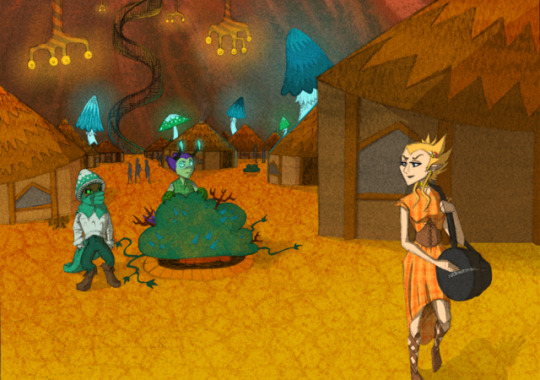
I’m surprised by how unique I was able to make each piece in terms of composition, but also with the colours and locations each looking very different. Each one has its strengths and weaknesses which I can learn from, in terms of what works and what does not, and these are all things I can take into consideration when adapting this further in the future. Although I changed my outcome idea halfway through this project due to the feedback at the critique, I still believe this was the right decision. I don’t even think I will include the kinds of dialog I had originally planned in the game, as they are very over done and actually not very interesting. I also was glad I decided to do these concept scenes instead because it shows the characters actually interacting with the environments around them rather than just blandly standing static with a pretty background behind them, which is far more riveting to look at. Changing the outcome also allowed me to explore ideas for the locations more too, challenging me to think about how to portray different species cultures and behaviors through the environment and what was around them, particularly for the scenes within a town or village. I think I still could have expanded more upon this aspect within my work though, as I think this area was a bit lacking occasionally. I have the ideas in my head, I just need to represent them on paper!
It was also nice for me to have an opportunity to experiment more with composition, as this is something I have struggled with previously in other projects, though I think what I have achieved in this project has helped me understand how things can work more harmoniously within an image if you plan the layout properly. Good composition in itself can be used as a narrative device.
In future, I do think I should use more of the paintings I scan, as these not only already have textures, but can be a useful tool in creating a landscape as I discovered when digitally colouring and editing these. This could be a vital part in creating environmental assets for a game. I should also consider experimenting with Adobe Illustrator, as the vector style might well be ideal for creating character sprites in this particular style. I must also investigate what I would like to include as other gameplay aspects, as of course this will be integral to the mechanics and the narrative. Though I still think it best to stick with the 2D platform, a little investigation into 3D wouldnt hurt either, as some games include both 2D and 3D character models/ locations.
0 notes
Text
Chris Howker
This is the final portfolio review I’ve got to write up. [Thank God] and boy is it a long one. A word of warning this is going to be VERY long. I’m not kidding so I’ll put it under the cut. Chris sent me a super long and in-depth email that he felt really bad about sending because it was so long but it gave me 4 pages of notes that contained fair and insightful comments about my portfolio that have definitely helped me to structure my portfolio. I was like a kid in a sweetshop picking through all the information he gave me, it was like analysing research all over again. [Wow I just read that back and realised how sad that sounded. I might need to revaluate my life.] But anyway here is the concise notes from that e-mail.
Craft Beer Hint
>Show evidence of this in my portfolio. [When I’d sent this I didn’t have any in there, but now I do.]
>Think about designing the back too because sometimes I won’t have to option not to.
>Show what I’ve created so far. If I’ve not done it why? [Because when I’d sent out the email I had just had the idea and nothing to show for it.]
>Have fun setting your own brief. Don’t bother waiting for a company to give you a brief. [I did have a load of fun making my own brief and company, thinking up a pun for the name of the brewery was the best bit.]
>Find a bit on a niche with it. [Again I did my designing my label characters based off my research project/ dissertation thing.]
>Think about the possible design limitations the company could throw at you. For example, the labels can only be square/ oval/ rectangle or only in two colours.
>The fact that it’s not a real company I’m designing for means I’ve got more room to have fun with what I make. It’ll show that I’ve had fun with the project and that I’ve enjoyed it. It also means that I won’t have to make an inane list of changes that the client has requested back and forth. [Whoo!!]
Folio Vibe
>What it actually says is that I like animation or possibly computer game concept art. There is no harm in sending work to animation studios- there’s enough of them in Manchester if I wanted to stay local [Toooooooown!!] but don’t limit yourself to just looking at design studios like he did just because a graphic designer might need a character designing.
>Turnarounds are ideal for animation- it’s the important bit that the whole design team works from.
>Props and backgrounds are scaled around the character designs and have a huge impact on the overall style of the animation. My Post-it note monsters look like animators doodles since that’s what they do on their breaks to get back into physical drawing when not on the computer.
>Maybe I already (subconsciously) know where to start looking towards after uni? But do I really want to give off the vibe of designing characters?
Folio Design
>White background always works because it’s clean, however my turnarounds still look cramped so I should give them space to breathe. (E.g- Ink Warrior and Shadow Mage- are they the same character in two different forms? [Yes.] The squashing up reads as if they’re the stages of a character’s progression [It’s more of a regression if I’m honest.] but bits also pass over one another which hides important bits. Spread them out and put the guide lines on. Add Front, side, 1/8, 3/4 and backwards facing variations so at a glance art directors can see that you’ve put care into it and to make sure the turnaround is accurate use the full page!) [I just took this one out because it was no longer relevant.]
>Add more information to the bottom of the page, where is stuff from? [Most of my turnarounds were done when I was still doing the Trading Card Project so in order to not waste time by spending 3ish weeks on one full turnaround of one character like last term, I limited it to three views to save time because I had a lot of characters to get through. That’s also why I didn’t really mention where they were from because I’m no longer doing that project so they just didn’t have a home and to put ‘unused’ or ‘rejected’ on them wouldn’t be very professional now would it?]
>Maybe don’t put the materials used unless you really want to stress it.
>Post-it Notes don’t look like Post-it notes, photograph them in their raw state to get a better feel for them. [Or option two is to just take them out there and them like I did.]
>Front cover, Drop the titles, people are thick but they’re not that thick. [This is about my information page, I’ve done this though so it’s all good.]
Folio Work
>Start drawing with a tablet! [I’ve started doing this actually, I was originally put off because my overlay lines over my sketch layer looked wobbly and awful but I’ve recently found the stabiliser thing and everything is alright now, all my lines are as smooth as a wee baby’s butt now. More digital work definitely!]
>He liked the negative space the biro Post-it note monsters give off and the textures on my Plague Doctor work really well giving it a dirty almost magical feel to it. [Literally reading that made my dark heart grow like three sizes that day, I was so happy words don’t describe how I felt at that moment.]
>50% grey is good for backgrounds because it’s nice and neutral.
>Do more character designs with varying height differences (head heights.) Exaggerate shapes and push things to the extreme before dialling it back to the finished product.
>Treat facial expression sheets like they’re turnarounds and put guidelines on to make sure they’re accurate and add up.
>Do life drawing, different shapes and poses!
>Having a standard turnaround is needed but give them dynamic poses to add context as you ask what they’re for. A game? A cartoon? Make an action sequence of like one or two characters so the viewer gets an idea of what they’re like i.e body language and personality.
>Maybe try lino cutting/ wood printing with the Post-it note monster look.
Masters vs. Beer
>These are two wildly different things. He only commented on what he knows so I’ve filled in some of the blanks.
>Continuing with education is a great idea, but is a Masters really what you need to do your dream job with illustration/ art and design? [Yes. I intend to do an MRes (Masters by Research) which is more essay based than a traditional art Masters. This is because my essay writing is the only thing pulling me through the course and is my strongest skill whereas my practise isn’t. Which is weird considering I’m doing an art degree. I really want to lecture in Universities and focus on the Contextual side of art rather than the practical side. 30,000 words here I come!] Do I have an answer for when someone questions me on my life choices? [See above for the career options, anything else I’m still working on. I really like the idea of looking into the knowledge and feeding it back through teaching like Chris mentioned when giving a sample answer to his question. I really like Binaries and how they work within aspects of popular culture like Narratives, Movies and Games as each stems into each other. It’s just really interesting okay.]
Craft Beer Labels:
>They’re very popular, but there isn’t really anyone who makes a career out of it.
>Breweries might hire one illustrator for one label but not the others.
>If you’re a freelance illustrator you sadly don’t get to pick and choose what work clients give you. He’s taken on jobs which will never see the light of say within his portfolio because they’re not relevant to his career path. [In all honesty I don’t want to be an illustrator when I’m grown up, I just want to read/ maybe write books fiction/ non-fiction and doodle a bit.]
Finishing Uni is when you actually start learning, the course doesn’t teach you how clients will act nor what they will expect from you. There’s very few full time illustration positions available unless you’re very lucky. You won’t immediately get a job out of uni and staying motivated during that time is a killer because there are no tutors or class to motivate you, find some way to recreate that feeling either with renting a studio space, arranging occasional social meet-ups with friends but also attending events like Draw North West.
#chazrizart makes word#e-mail portfolio review#Chris Howker portfolio review#wow this is really long i'm sorry#i'm sick of typing now#final portfolio review#thank the God's its over#no more please
0 notes
Photo

“Conversations” Sequential Art Workshop
CREATING 20-PANEL DEMOCRATIC COMICS, INTERCONNECTED WITH PARTS OF OVERHEARD CONVERSATIONS EXPLORING OBSERVATORY SKETCHES OF PEOPLE FOR REFERENCE
AIMS:
Using a range of inspiration, both primary and secondary sources, sketch out 20 illustrated characters to use in the comic.
Sketch out the characters in pencil in the panels
Ink the illustrations
Handletter the recorded snippets of conversation in the empty panels
Review and reflect on the process and outcome
Format vs Style
In sequential art, it is important to understand the difference between the format of the work, and the style. Comics are the format, meaning juxtaposed images in a deliberate sequence to convey information, and or to produce an aesthetic response. Cartoon, on the other hand, is the style. If you work in a cartoon style, characters will be caricatures, roughened, simplified versions of the original, likely intended for comical purposes. Famous examples of cartoon characters include “Mickey Mouse”, “The Simpsons” and “Looney Tunes”.
Above, “The Simpsons”, a cartoon based on the classic American family
Equipment:
0.5 - 0.8 Fineliner
Pencil (Light)
Brush/Brush pen
Black Ink
Task 1: Sketch and Study
youtube
The comic will consist of a family of 20 paneled images, drawn using a range of reference material, such as vintage photographs, modern photographs, famous busts or arrest photos and observatory drawings from public places, such as a café or the street. Previously, I had walked around the town center, sketching and recording various people and interesting conversations I found. This meant that I had a series of observatory drawings of characters which I could work off, as well as sketching new characters from recently found sources. When sketching it was made important that we should “look and draw” at all times, not worrying about detail or style, just recording what our eyes can see. It is important to work quickly when sketching from observation to get the main detail, such as shape, tone, line, down on the page. The area of focus for our comics was their head and shoulders, so I focused purely on those elements when sketching.
I used a normal sketching pencil at first, but then experimented with blue and red pencil, which is common practice for illustrators, specifically comic book artists. They use a blue pencil over a typical sketching pencil as it does not smudge, can be edited out very easily when scanning to work digitally and allows us to work in the basic structure of the sketch, and then go over the design with a red pencil, before inking.
Task 2: Pencils

After creating a series of visual studies, I chose several characters that I wanted to use in my comic and proceeded to pencil those drawings into their respective panels, considering how I would draw each character a little differently, playing with different compositions and positions. Here I tried to add character and personality to my pencils, exaggerating certain features or traits which stood out to me when observing them originally.
Task 3: Inks
youtube
After penciling my sequence, it was time to add ink. Originally, my idea was to work monochromatically as the example on the brief, however once I added tone to one panel, I decided to go against this initial concept, still leaving a few panels monochromatic. However I liked the effect adding tone gave to the comic, it made some panels stand out compared to others: I liked the subtle contrast this created.
Task 4: Lettering
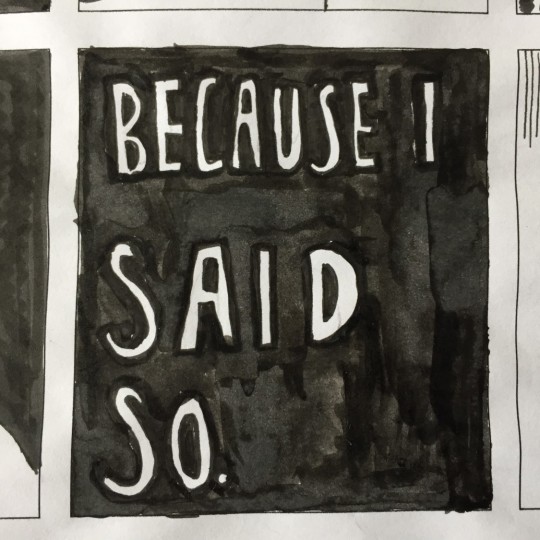
The final stage of the workshop involved filling in the empty panels with recorded “snippets” of conversations. This consisted of lines which may be taken out of context, funny quotes or serious dialogue. I recorded some interesting pieces of conversation, including the cliché “So I was like ….” and the not so cliché “Do I look like give a damn?”.
After a discussion, I decided to write my lettering in white, with a black background. This stark contrast proved to be very powerful and worked well with my black fills on the page, more than a regular black on white colour scheme for the lettering would have, I think.
Task 5: Review and Reflect
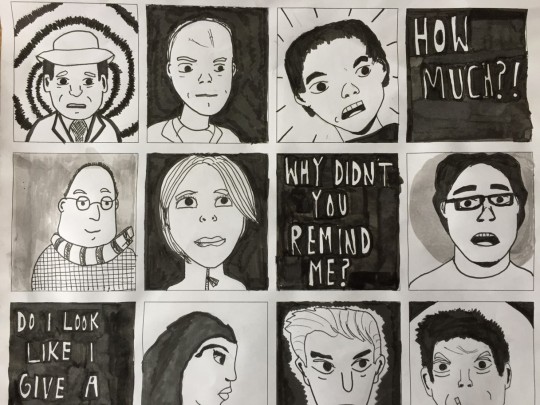
I think my comic works in the fact that the piece has a consistency of line, tone and visual style that may suggest a sequential narrative, despite none of the images having any thematic connection whatsoever. However, when reading the comic, I did find it difficult to see the piece as a whole narrative. Due to the democratic nature of the layout the variety of characters and backgrounds, I saw each panel as a separate narrative, viewing the comic as individual subjects rather than a whole.
This effect is very similar to that of Katsushika Hokusai’s early panelled studies, during the Edo period, shown below, which possesses a consistency of visual style, which suggests the panels follow a narrative, despite the fact that there really isn’t a continuous narrative.
The democratic layout also makes the “comic” look much more regular structured and informal. With several notable exceptions, such as “Watchmen”, a democratic panel layout such as Hokusai’s and my own, creates a much more separate feeling to the panel than a layout with different sized and shaped panels, there is a more stilted sense of motion and flow here, suggesting that the subjects drawn are not necessarily shown in any real sequence.
Pages from Alan Moore’s “Watchmen”
I could do something like this in the medium of animation, animating my sketches of characters (seemingly not liked in any way) interconnected with recording of people speaking the conversation snippets I documented earlier. This is non-linear narrative animation would be an interesting experiment, as I have not attempted something like this before.
The themes of the brief consisted of creating a 20 panel comic exploring various sources for reference, interconnected with interesting pieces of overheard dialogue. I think I responded well to these ideas as I succeeded in producing a piece that met these requirements, and explored the use of white on black lettering for effect, in opposed to traditional black on white.
In this workshop, I learnt the effect a democratic comic can create, how to properly construct a head sketch for illustrations and how to add character and personality to sketches.
The before-mentioned Katsushika Hokusai was a source of inspiration for my comic, as the idea of an observational panelled study of local individuals originates from this artist. His traditional style and monochromatic colour scheme creates a very distinct and original effect on his work.
My outcome for this workshop was experimental to a certain extent. Firstly, I used a white on black lettering scheme opposed to the traditional colours, to experiment with an alternative look to the comic. At least one panel on each row was a black fill background and I think that, because of this, the alternative lettering compliments my comic very well and maintains the sense of visual consistency to the piece as a whole. The two blend very well with all of the other panels, and I think works better than a traditional black and white lettered panel would have.
Secondly, inspired by Scott McCloud’s Understanding Comics, the backgrounds of some panels feature different line work, drawn to create different emotions in the reader. I experimented with wavy, curly lines to suggest madness, and short, vertical lines the top of the panel to convey a sense of calm and quiet.

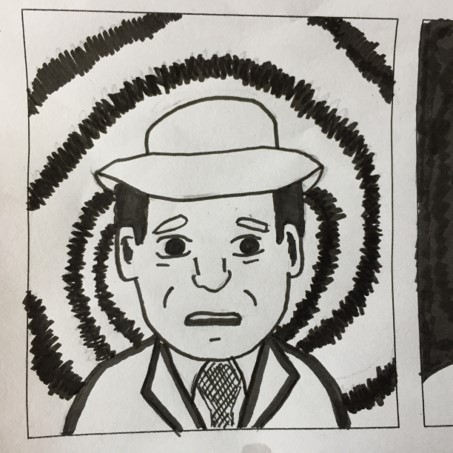
0 notes
Last Seen Blogs
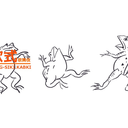
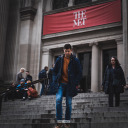
dirklange
_DirkLange_
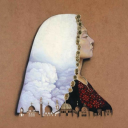
eyeonpalestine
Eye on Palestine

born-in-jun-blog
Lee

calaphort
raritwi truther FREE PALESTINE 🇵🇸