#timestretching
Text
Track 15 in the "Here's my discography please take a listen and support maybe?" super spam. In case you're new here, I recently came out as trans and I'm plugging the Bandcamp as a means of building a transition fund.
More ambient this time. More time stretchy reverby goodness. Let the soundscape consume you!
Want the full playlist? Here's Soundcloud and Spotify and Youtube.
Thanks for listening <3
#music#instrumental#ambient#timestretching#electronic music#trans#transgender#fundraising#Bandcamp#soundcloud#playlist
3 notes
·
View notes
Text
Native Instruments Kontakt 6 With Factory Library (MAC) Download

Introducing Native Instruments Kontakt 6 With Factory Library (MAC) – your ultimate solution for unparalleled sound design and music production on macOS. This groundbreaking software empowers musicians, producers, and sound designers with a vast array of high-quality instruments and samples, all within a sleek and intuitive interface.
With Kontakt 6, you gain access to the renowned Factory Library, featuring over 1,600 instruments ranging from orchestral strings and brass to cutting-edge synths and percussion. Whether you're crafting cinematic scores, electronic beats, or experimental soundscapes, there's something for every creative endeavor.
Unleash your creativity with advanced features such as wavetable synthesis, effects processing, and customizable modulation. Dive deep into sound manipulation with the powerful scripting engine, allowing you to sculpt and shape sounds with precision.
What sets Kontakt 6 apart is its versatility and expandability. Seamlessly integrate third-party libraries and instruments, or create your own using the built-in sampling tools. With full NKS compatibility, you can effortlessly browse and control your entire instrument collection from your favorite hardware controller.
Experience unmatched performance and stability, optimized specifically for macOS environments. Whether you're composing in your studio or performing live on stage, Kontakt 6 delivers seamless workflow and reliability you can count on.
Elevate your music production with Native Instruments Kontakt 6 With Factory Library (MAC) – the industry-standard platform for sampling and synthesis. Unlock limitless sonic potential and take your compositions to new heights.
#Celemony#MelodyneStudio5#AudioEditing#MusicProduction#PitchCorrection#TimeStretching#VocalEditing#SoundDesign#DAWIntegration#MusicTech
1 note
·
View note
Text

My Musical Dialogues With Chat GPT – Part 3 “Granular Sound”
Enjoy your day!
Rolf
#GranularSoundProcessing#AudioSampling#SoundSynthesis#MusicProduction#DigitalAudioWorkstations#DAW#GranularSynthesizerSoftware#ChatGPT#SoundDesign#ExperimentalMusic#TimeStretching#PitchShifting#AudioArt#Soundscapes#SoundManipulation#SoundEffects#fx#soundfx#AudioMicroscopy#SoundEditing#AcousticProcessing#SignalProcessing#SoundGeneration#AudioTechnology#MusicTheory#SoundEngineering#SoundArchitecture#AudioVisualization#AudioAnalysis#SoundLibraries
0 notes
Text
[youtube link]
[2013 remaster bandcamp link]
1 note
·
View note
Text
Roni Size - Time Stretch 93 Mix
youtube
0 notes
Text
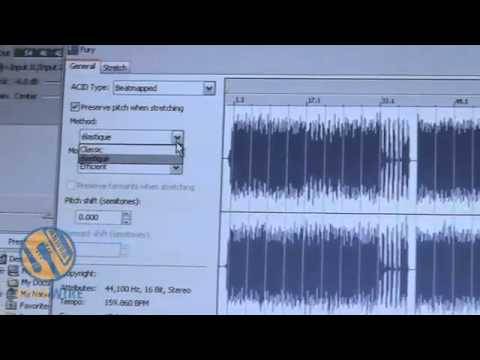
Acid pro 8 timestretch

Acid Pro 8, the first version since Magix's acquisition, was announced on Januand released in spring 2018. These include Acid Pro, Vegas Pro, Movie Studio, and Sound Forge Pro.
On May 20, 2016, German company Magix Software GmbH announced they had acquired the majority of the products in the Sony Creative Software portfolio. Sony's Acid Pro 6 (released in the third quarter of 2006) introduced a full-digital audio workstation that also included MIDI and multitrack audio recording with full support for ASIO computer-audio and VST synthesizer-plugin standards. Sonic Foundry sold its Acid, Vegas, Sound Forge, CD Architect, Siren, VideoFactory, ScreenBlast, and Batch Converter product lines to Sony Pictures Digital in July 2003 the merger resulted in the new Sony Creative Software division.
The software became very popular in the late 1990s and early 2000s among composers, producers, and DJs interested in quickly creating beats, music textures, or complete compositions and orchestrations, that would work with virtually any tempo or key signature. It was a loop-based music sequencer, in which Acid Loop files could be simply drag-and-dropped then automatically adjust to the tempo and key of a song with virtually no sonic degradation.Ī website for budding musicians using Acid technology was set up, named. Acid was first launched in 1998, as Acid pH1, by Sonic Foundry in Madison, Wisconsin.
0 notes
Text
The Divine Comedy - Timestretched + Bad Ambassador (Paris Le Trabendo, 2...
youtube
❤️
13 notes
·
View notes
Note
I will listen to them... later tho sorry procrastination is my toxic trait
7 notes
·
View notes
Text
Since my animation file corrupted enjoy this insted
<tnz framecount="27" version="71.1"> <generator> "OpenToonz 1.6" </generator> <properties> <hGuides> -490.779 666.711 594.646 -625.293 471.822 142.773 130.434 187.486 195.938 </hGuides> <vGuides> 322.555 255.763 286.805 -337.68 265.481 </vGuides> <cameras> <camera> <cameraSize> 16 9 </cameraSize> <cameraRes> 1920 1080 </cameraRes> <cameraXPrevalence> 1 </cameraXPrevalence> <interestRect> 0 0 -1 -1 </interestRect> </camera> </cameras> <outputs> <output name="main"> <range> 0 -1 </range> <step> 1 </step> <shrink> 1 </shrink> <applyShrinkToViewer> 0 </applyShrinkToViewer> <fps> 24 </fps> <path> "+outputs\\.tif" </path> <bpp> 32 </bpp> <multimedia> 0 </multimedia> <threadsIndex> 2 </threadsIndex> <maxTileSizeIndex> 0 </maxTileSizeIndex> <subcameraPrev> 0 </subcameraPrev> <stereoscopic> 0 0.05 </stereoscopic> <resquality> 0 </resquality> <fieldprevalence> 0 </fieldprevalence> <gamma> 1 </gamma> <timestretch> 25 25 </timestretch> <formatsProperties> <formatProperties ext="tif"> <property name="Byte Ordering" type="enum" value="IBM PC"> <item value="IBM PC"/> <item value="Mac"/> </property> <property name="Compression Type" type="enum" value="Lempel-Ziv and Welch encoding"> <item value="Lempel-Ziv and Welch encoding"/> <item value="None"/> <item value="Macintosh Run-length encoding"/> <item value="ThunderScan Run-length encoding"/> <item value="CCITT Group 3 fax encoding"/> <item value="CCITT Group 4 fax encoding"/> <item value="CCITT modified Huffman Run-length encoding"/> <item value="JPEG compression"/> <item value="JPEG compression 6.0"/> <item value="SGILog"/> <item value="SGILog24"/> <item value="8"/> <item value="zip"/> <item value="Unknown"/> </property> <property name="Bits Per Pixel" type="enum" value="32(RGBM)"> <item value="24(RGB)"/> <item value="48(RGB)"/> <item value=" 1(BW)"/> <item value=" 8(GREYTONES)"/> <item value="32(RGBM)"/> <item value="64(RGBM)"/> </property> <property name="Orientation" type="enum" value="Top Left"> <item value="Top Left"/> <item value="Top Right"/> <item value="Bottom Right"/> <item value="Bottom Left"/> <item value="Left Top"/> <item value="Right Top"/> <item value="Right Bottom"/> <item value="Left Bottom"/> </property> </formatProperties> </formatsProperties> </output> <output name="preview"> <range> 0 -1 </range> <step> 1 </step> <shrink> 1 </shrink> <applyShrinkToViewer> 0 </applyShrinkToViewer> <fps> 24 </fps> <path> "+outputs\\.tif" </path> <bpp> 32 </bpp> <multimedia> 0 </multimedia> <threadsIndex> 2 </threadsIndex> <maxTileSizeIndex> 0 </maxTileSizeIndex> <subcameraPrev> 0 </subcameraPrev> <stereoscopic> 0 0.05 </stereoscopic> <resquality> 0 </resquality> <fieldprevalence> 0 </fieldprevalence> <gamma> 1 </gamma> <timestretch> 25 25 </timestretch> <formatsProperties> <formatProperties ext="tif"> <property name="Byte Ordering" type="enum" value="IBM PC"> <item value="IBM PC"/> <item value="Mac"/> </property> <property name="Compression Type" type="enum" value="Lempel-Ziv and Welch encoding"> <item value="Lempel-Ziv and Welch encoding"/> <item value="None"/> <item value="Macintosh Run-length encoding"/> <item value="ThunderScan Run-length encoding"/> <item value="CCITT
11 notes
·
View notes
Note
Ooh!! These songs are cool!!
4 notes
·
View notes
Text
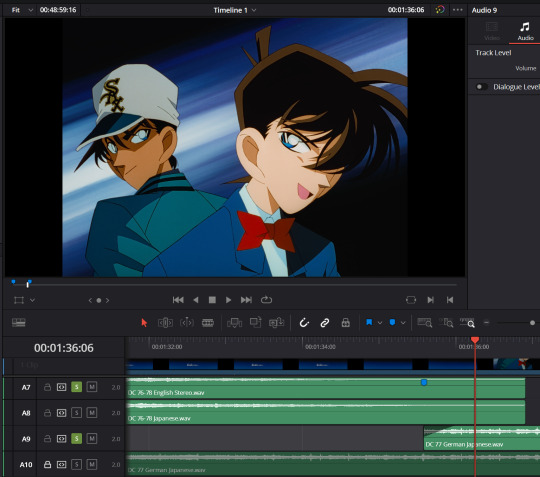
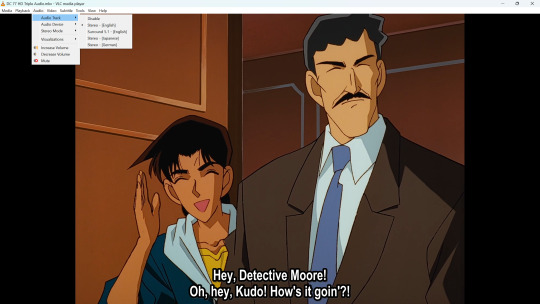
Mixing an Old Anime Dub with HD Footage
How I'm trying to mix every episode of the old FUNimation English dub of Detective Conan/Case Closed with the new remastered footage currently being released on Blu-ray in Germany.
This is less of a tutorial and more of a, "I-don't-really-know-what-I'm-doing-but-this-is-my-process" sort of thing. I welcome suggestions for improvements! Many thanks go to Fabre on the Detective Conan EN Community Discord server for getting me here at all; my earlier method of mixing, requiring me to cut the audio a bajillion times, is definitely not recommended.
Since I just posted a clip from Episode 76—thank you for the warm response!—I'll demo here with Episode 77! It's the start of a Heiji case!
Programs
Every program I use is free (though some have paid options available). These programs are:
MakeMKV, for ripping Blu-rays and DVDs
HandBrake, for ripping DVDs and compressing files
BeHappy, for audio conversion
DaVinci Resolve, for video editing
Subtitle Edit, for exactly what it says on the tin
Getting the Materials
To rip the Detektiv Conan Blu-rays, I use MakeMKV. (Note that the file size will be very large.) I also try to use MakeMKV to rip the FUNimation Case Closed DVDs, but there can be struggles. With Seasons 4 and 5 of the Viridian Collection, for example, not all episodes would rip without a lot of finagling. In that situation, it's easier to use HandBrake instead, making sure to select a FLAC codec for lossless compression of the audio.

Audio Conversion
With Detective Conan, the Case Closed DVDs have an audio "framerate" of 24 FPS, but the Detektiv Conan Blu-rays have an FPS of 23.976. They've gotta match for easy mixing. The way I fix the discrepancy is to convert the FUNi audio to 23.976 FPS, which can be done with BeHappy:

I use WAV Writer for a lossless conversion, and I've learned to select the "Normalize to 100%" option because I've had strangely low audio levels otherwise (as can sadly be heard in my Episode 76 clip).
(Also, one of my biggest struggles with BeHappy was how to even get the job going. So, putting it out there for anyone else who might need it: to get the conversion started, you gotta click that "Enqueue" button on the bottom right. It is indeed a button!)

I use FFAudioSource, and with the "Configure..." button on the far right of that, I can select the stream index to convert. (For many of the FUNimation volumes, Stream Index 1 is English stereo, Stream Index 2 is Japanese stereo, and Stream Index 3 is English surround sound.)

My mixing process involves lining up the Japanese audio of the FUNimation DVD with the Japanese audio from the German Blu-ray; then, I copy any movements or cuts to the English audio. So, I convert both the English and Japanese audio tracks from the FUNimation DVD.
But this is unnecessary. You can also line up the dub with the Blu-ray audio directly. I just don't trust myself to do that because they're not going to match up exactly due to the different languages.
Resolve can also have trouble importing the audio from my Blu-rays, so I BeHappy that audio as well, just making sure not to select the "TimeStretch" option.
Video Editing
The mixing isn't too complicated. Like I said above, it's about matching the Japanese audio tracks of the DVD and the Blu-ray. I solo the Japanese audio track from the Blu-ray, mark the starting point of a sound, and then I repeat the process with the Japanese audio track from the DVD and line up the markers (and solo both Japanese audio tracks together to make sure they're properly synced). Anything changed on the Japanese audio track from the DVD is copied to the English audio track(s).

Rinse and repeat. Timings generally need to be checked at transition points: the opening, doors, ending, post-credits, next-episode previews, and "Next Conan's Hint" segments. The Blu-rays also have blank sponsor screens and end-card jokes that aren't included on the DVDs, and I fill these spaces by either editing in the English version of the song that plays during the sponsor screen, or by simply copying the Japanese audio from the Blu-ray for content that wasn't dubbed.
There are some more nitty-gritty details involved with openings. For OP 1, I edit in the full English version of the song from Episode 1, while for OP 2, which wasn't dubbed (with OP 1 played instead on the DVDs), I use AI vocal isolation to isolate the audio of Shinichi's opening speech and edit that with the Japanese song. For OP 3, no full English version of "Nazo" exists, so I just kind of have to awkwardly splice in the Japanese version at the end during the sponsor screen.
Of course, this is a lot of extra effort that even the German Blu-rays don't do for the German dub. Songs and intros are entirely left in Japanese there, vastly simplifying this work. But I definitely want to preserve the English songs. And also, I love making things harder for myself.
Subtitles
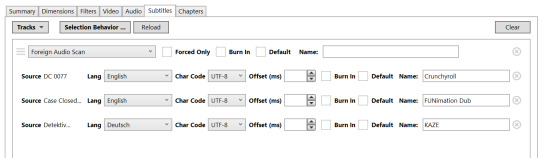
Finally, I'm all about subtitles! Some of the FUNimation volumes include English dub subtitles, which I like to include on my final mix.
To extract them from the DVD, I use Subtitle Edit. I go to File -> Import -> Subtitle from video file...
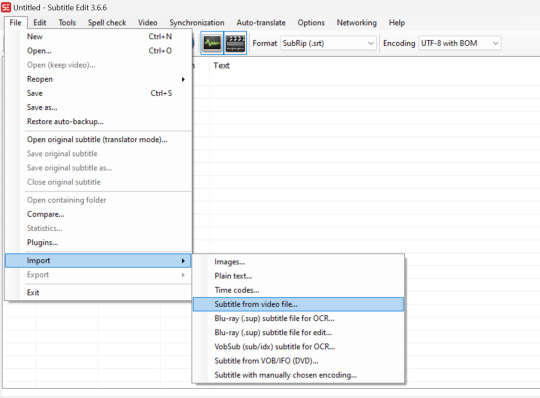
The file does have to be an .mkv, which can be made with MakeMKV or HandBrake.
Once I select the file (in this case Episode 77), I use these settings to OCR the subtitles:
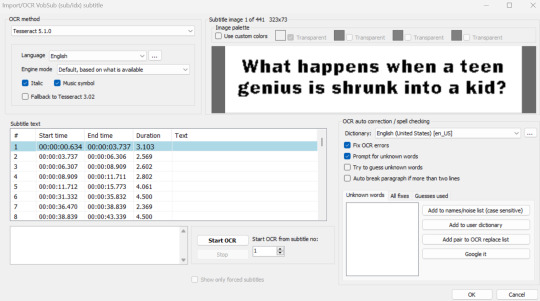
I make sure to have "Prompt for unknown words" checked because OCR (Optical Character Recognition) isn't a perfect process and may make mistakes.

"How's it goin (TM)" is pretty great, though, ngl.
I run through the OCR and fix anything that's needed. Since the FUNimation subtitles are a little hard to read, I also try to quality check them thoroughly for errors—though, I usually do that after the next step, which is timing the subtitles to the remastered mix.
Much like the BeHappy process, I want to start by changing the framerate of the subtitles from 24 FPS to 23.976 FPS. This can be done by going to Synchronization -> Change frame rate...
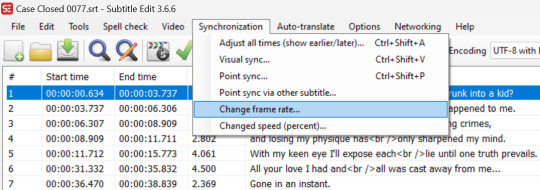
After that, I can attach the remastered video file and time much like I did with the video editing. I go to Synchronization -> Adjust all times (show earlier/later)... and click the "Selected and subsequent lines" option at all of the transition places that need adjusting. It definitely helps to have the waveform on when timing.

I also like to attach Crunchyroll subtitles for the more literal translation of the original Japanese script. The .ass files can be found here. Crunchyroll subtitles are timed very closely to the Blu-rays; all that needs to be done is a second or so of delay at the start. I also OCR the German subtitles from the Blu-ray and use those to time the Crunchyroll subs, but it's just as effective to use the waveform and/or your ear to time them.
And speaking of Crunchyroll subs, I like to copy their formatting for my OCR'd subs. To do this, I first need to export the Crunchyroll styles, which can be done by opening the Crunchyroll subtitle file in Subtitle Edit and clicking the big "A" by the checkmark for "Advanced Sub Station Alpha styles."
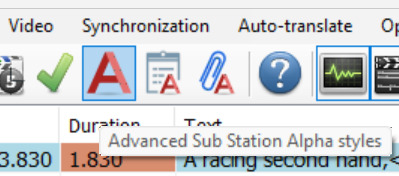
The following menu will pop up, and from there, I just have to click the "Export" button to save the styles.

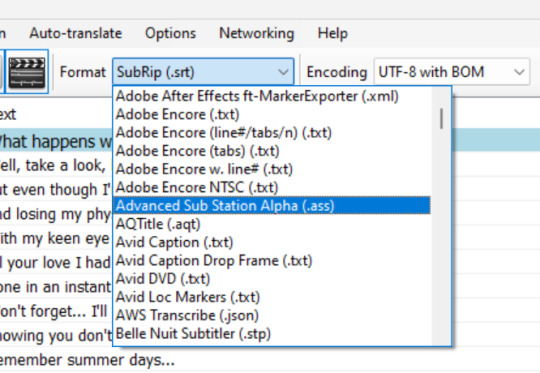
After that, I have to change the .srt file of the OCR'd subs into an .ass file by opening that file and selecting "Advanced Sub Station Alpha (.ass)" on the "Format" drop-down menu.
Then, I again click the big "A" by the checkmark for "Advanced Sub Station Alpha styles" and hit the "Import..." button on the menu to import the Crunchyroll styles. I delete the original "Default" style afterwards and rename the Crunchyroll default from "Default 2" to "Default."
And that's basically it! There are some things I kind of glossed over; for example, I have to assign buses in video editing to get all the different audio tracks the way I want, and I do have to add subtitle lines to the English dub subs to get subs for things that weren't on DVD. But this is the basic process of preparing the video and subtitles.
Compression
The last step is compressing with HandBrake. I wind up with ginormous file sizes after exporting from Resolve, and it's nice to get something smaller. Plus, with HandBrake, I can also attach all my subtitle files to the video.
To do so, I just need to pop over to the "Subtitle" tab and select "Import Subtitle" on the "Tracks" drop-down menu.

The subs can even be named. I keep mine soft so that they can be toggled on or off, but they can certainly be burned in, too, if that's preferred.
Compression settings are utterly beyond me, unfortunately; my file sizes are still ginormous even after HandBraking. But there are several presets on the program that can be used.
And that's really the whole process!
Note that I use the German Blu-rays, despite their shortcoming of the name boxes being edited in a way that can't be turned off, because there are no other Blu-ray releases of this remastered material at the moment. Maybe one day I'll write a post about all the Detective Conan available on BD—it's surprisingly little!—but this is it for now!
Thanks for reading!
#detective conan#case closed#ramblings#shut up goop#long post#idk why i wrote this but i hope it's interesting/useful! happy to answer any questions if there are any
37 notes
·
View notes
Text
ハルカゼ/DaVinci Resolve Fusionのスクショと備忘録/dddd
今回脱アドベを掲げてダヴィンチリゾルブとその中にあるFusionで動画を作成した。その理由は以下である
買い切り〜〜〜"✌️"
歌詞階段作りたくない〜〜〜✊💨
令和にmp4直で書き出せないってなに〜〜〜?😉🌟
という至極真面目な理由から、もうこいつしかいないと思った(すみません)
ちなみに4おはノードベース(FusionやBlenderのアレ)素人ではないです。たくさんのノードと線を見ても吐血しない特殊な訓練を受けています。このソフトの簡単な扱い方は存じている程度
元々は実写素材の色を色々するためのソフトだったのですが、エディット機能や音を編集するFairlight、コンポジット作業を行えるFusionなど様々なソフトが合体して「俺が考えた最強の動画編集ソフト」になりました
買い切りとはいえ5万円ほど、ていうかほぼ無料の超優良ソフトなので気になった方はぜひ。ブラマジだいすき〜
エフェクトも良く、今回仕上げで使用しているエフェクトも標準で付いているアナログダメージなどをを使用しています
一枚絵で歌詞を入れるだけなら字幕機能を使って、デリバー画面で字幕を焼き付けにチェックを入れて書き出して、ついでに字幕のタイムコードも書き出せばちょっと修正が必要(わすれた)でしたがYouTubeに取り込むことも可能でした
以下制作手順です。アニメーションもアニメの撮影もまった苦の素人ですがご理解いただける方、気になった方はぜひ↓
制作手順
最初に環境設定から以下の項目にチェックを入れる
書き出すと色が変問題をある程度解決できます(おこ)Macで作業しています

--------------------------
1 アニメーションの書き出し

クリップスタジオで描いたアニメーションをファイル>アニメーションを書き出し>アニメーションセル出力でpngで書き出し。(組み直すことが面倒な場合は連番画像でも良)同時にタイムシート情報も書き出す
2 キーフレームを打つ
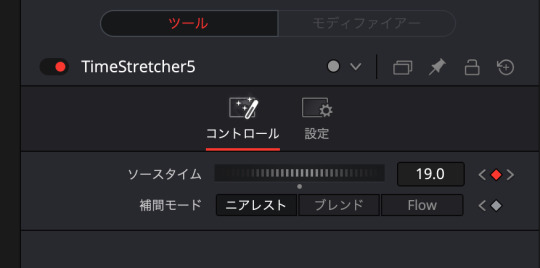
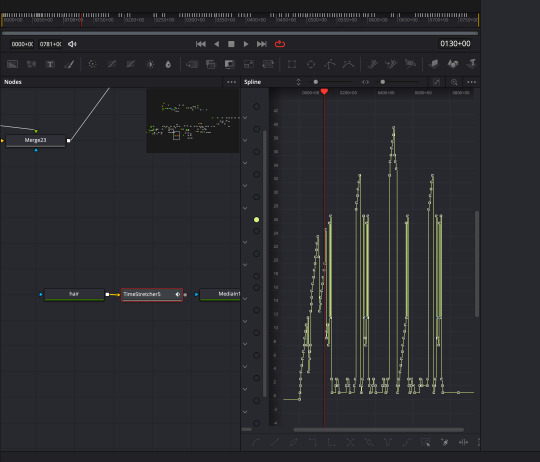
ダヴィンチリゾルブ(以下DR)のFusionのTimeSretcherでタイムシートを元に組み立て。悲しいことにDRの開始フレームが0でクリスタが1だったので数字が1ずれてしょんぼりした
3 色を着ける
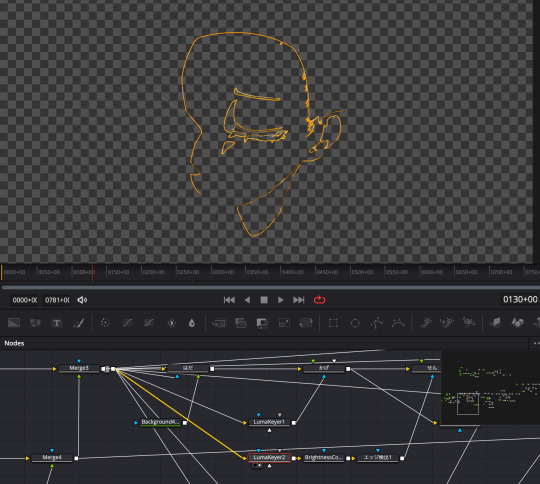
ある程度組めたらルミナンスキーヤーでモノクロで作画した色を分割してそれぞれにグラデーショントーンを乗せる。青色の枠で書いた部分は青を選択すると取れた
なぜ後から色を乗せるのかと言うと作画の段階で色を決められないから。こんな動きの無いシンプルな絵だから良いものの、動き回る配色の多いアニメーションだったらどうする?
できないことはないですが汎用性は低いかも。たったこんだけのアニメーションなのにノードが多いなぁって思いましたから。できないことはないんですけど
4 再生する
タイムラインで再生してチェックしたいけど
重くって…全然動かなくてェ…
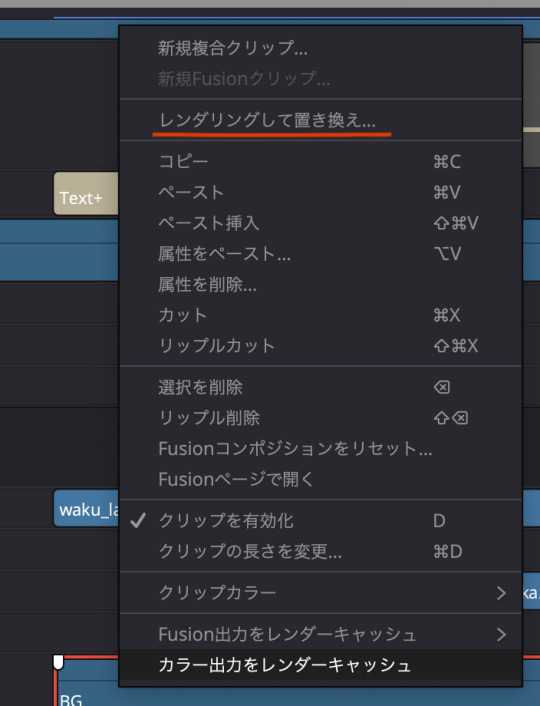

なので右クリックでレンダリングをして置き換えでクリップを一時的にレンダリングする。今回Prores4444で書き出し
ちなみにProres4444XQが最も高画質とされているが当然容量も増えるので好みでもある(けんた食堂)
Fusion内のレンダリングもあるが激重なので放った。強くてかっこいい容量をお持ちの方は良いかもしれない
このレンダリングをして置き換えの良いところは、同じく右クリックをしてオリジナルに分解をすればまた元のFusionデータを触ることができるところ。悪いところはレンダリング中な何もできないのでこうやって公開するかわからない文字を打ったりしてるところ
5 歌詞を入れる

色味を調整したりテキスト+で歌詞を乗せる。テキスト+一択
右クリック>Fusionで開くから、この中に複数の文字列を配置したり、音を聴きながらアニメーションをつけたり、エフェクトをかけたり、往々に
オレンジ色になっているのは自分で色をつけています。最終的に使わなかった書き出した4444を残しておくのは容量の要領が悪いので、
タイムラインで色付け→色がつかなかったメディアプールのクリップと元データを削除
という地道な方法で後片付けしました
6 書き出す
デリバー🚀タブで書き出し画面に移動する
Youtubeのエンコード設定を参照しなから設定をいじいじ…
DRにYoutubeのプリセットがあるのですが手動で設定をした方が音質が良かった気がします
ニコニコはまた設定が別なので後日確認してエンコードしました
--------------------------
以下トラブルシューティング
1.Fusionの画面で音声が流れない
新規MediaIn(メディアイン)を追加してオーディオのキャッシュを削除をクリックする

2.TimeStretcherでコマを設定したノードが赤くエラーになる+黒い画面が表示され書き出しできない
スプライン→アニメーションカーブをカクカクにするやつを押す。無いものは描画できませんと言いたげ
3.描画が途中で止まる
キーフレームの画面で描画範囲を伸ばす。作業中にfusionクリップの長さを変更すると発生しがち
もしくは開始フレームがおかしくなっているのでメディアプールからクリップを読み込み直す
訂正、fusionコンポジションの前はあまり伸ばさない方が吉。存在しないマイナスフレームが発生し正しく描画されない場合に多々遭遇
4.Fusion内だと想定通り表示されるのに、レンダリングするとコマが飛んだりしておかしい
タイムワープなど処理が重いとバグる可能性(今回、40枚ほどのセルの細かなアニメーションが起因)
新規タイムライン(もしくはそのタイムラインの遠い場所)にコピーしてそのレイヤーのみメディアoutでレンダリングしてから元のFusionにドッキングすると解決した(ステップレンダー)
Fusion内でレンダリングもできるが信じられないほど容量がデカ大きいので忌避。ちなみに、キャッシュの削除、新規Fusionクリップにノードのコピー、名前の変更、最終ベンダーでのチェック、プロキシ設定の変更どれも影響なし。コマ飛びするレイヤーを軽くしたら解決したので処理の重さと推測。以後気をつける。
5.Mergeでマスクが一緒に動かんのやが
調査中…やだね。一度mergeしてそれをmergeする方法しなのかナァ
その他、備忘録
描画がおかしくなったら落ちる寸前(n敗)
オートセーブもひっきりなしではないので期待していいのは50%ほど
描画されないorコマ飛びするorゆめにっきの背景のような絵が出てきたらあと数手で落ちる。でもやめるわけにはいかない、今すぐセーブ
レンダリングの長さは描画の多さによる。
同じデータでも描画が多い(コマのパラパラや単色の割合が少ない)場合はレンダリングも重くなる。これが重すぎると書き出しもエラーが起きて止まってしまうため、エミュレーターや細かいアニメーションがあるのもは一時レンダリングをお勧め
便利調整レイヤー
タイムラインの以下のレイヤーにまとめてエフェクトをふりかけたい時に使用する。お絵かきソフトの調整レイヤーのようなもの
右クリックからfusionの画面に入るとfusionの画面にそれ以下の統合された画像が現れて便利
マスクで一枚絵を後から分けるのはやめる
mergeで移動させた時にゴーストが出て邪魔。面倒だけどpngでバラバラに保存した方がいい
以上、何かの参考になれば幸です
4o
youtube
3 notes
·
View notes
Text

TimeStretched No.36 🍌
work.repponen.com/Time-Stretched
6 notes
·
View notes
Text
Two cool shop themes you probably know, now loopable!
downloads below, and the recommended website to listen to it on.
10 notes
·
View notes
Text
in my archive this is saved as:
Bassnectar - Here We Go (Bassnectar Remastered).mp3
[i thiiiiiink this is the current youtube link to the same one? unsure if exact same.]
1 note
·
View note
Text
My ambient ep
4 tracks made with Reapers timestretch algorithm, Valhalla supermassive and four old jams
https://sparkysynth.bandcamp.com/album/drift
2 notes
·
View notes
Last Seen Blogs

wileypick-blog
wileypick

katasztroka
katasztróka

gmebackup
GMEbackup

mikawaw
sexo

jw-marriott-jakarta-wedding
Amaryllis bogor Wedding Organizer Package