#tp link wifi router setup
Explore tagged Tumblr posts
Visit Tumblr Blog
Explore Tumblr blogs with no restrictions, modern design and the best experience.
Last Seen Tumblr Blogs


Fun Fact
In February 2021, Tumblr had 518.6 million blog accounts.
Text

Start with a reliable TP-Link wifi extender setup if you're having trouble with poor WiFi coverage. By extending your current signal, this procedure can assist in removing dead zones. To get quick TP Link setup instructions, plug your device close to the router and then use your browser. To connect it to your network, go to the setup page and follow the instructions. You can relocate the device to a more convenient spot after it has been configured. For best results, make sure the placement is within range of your primary signal.
#tp link setup#tplinkrepeater#Tp link repeater login#tp-link wifi extender setup#tp link wifi extender setup#tp-link extender setup through mobile
0 notes
Text

M30 AX3000 WIFI 6 SMART MESH ROUTER AVAILABLE IN 3-PACK
Experience seamless, fast Wi-Fi with the TP-Link M30 AX3000 Smart Mesh Router 3-Pack. Enjoy whole-home coverage, Wi-Fi 6 speed, and easy setup—perfect for streaming, gaming, and connecting all your devices without interruptions. Stay connected effortlessly wherever you are at home!
For more information, Visit:https://newtrend.ae/product-category/dlink/ Live chat: +971 507542792
#WiFi6#SmartMesh#HomeWiFi#TPLink#FastInternet#GamingWiFi#StreamSeamlessly#TechEssentials#StayConnected#WirelessRouter
0 notes
Text
How to Use TP-Link WiFi Range Extender Effectively?
To understand How to use tp link wifi range extender, plug it in and connect your device to its network. Access the setup page via a browser (often tplinkrepeater.net). Follow the wizard to connect it to your main router's WiFi, extending its signal reach. Visit our site for tips on optimal placement.
0 notes
Text
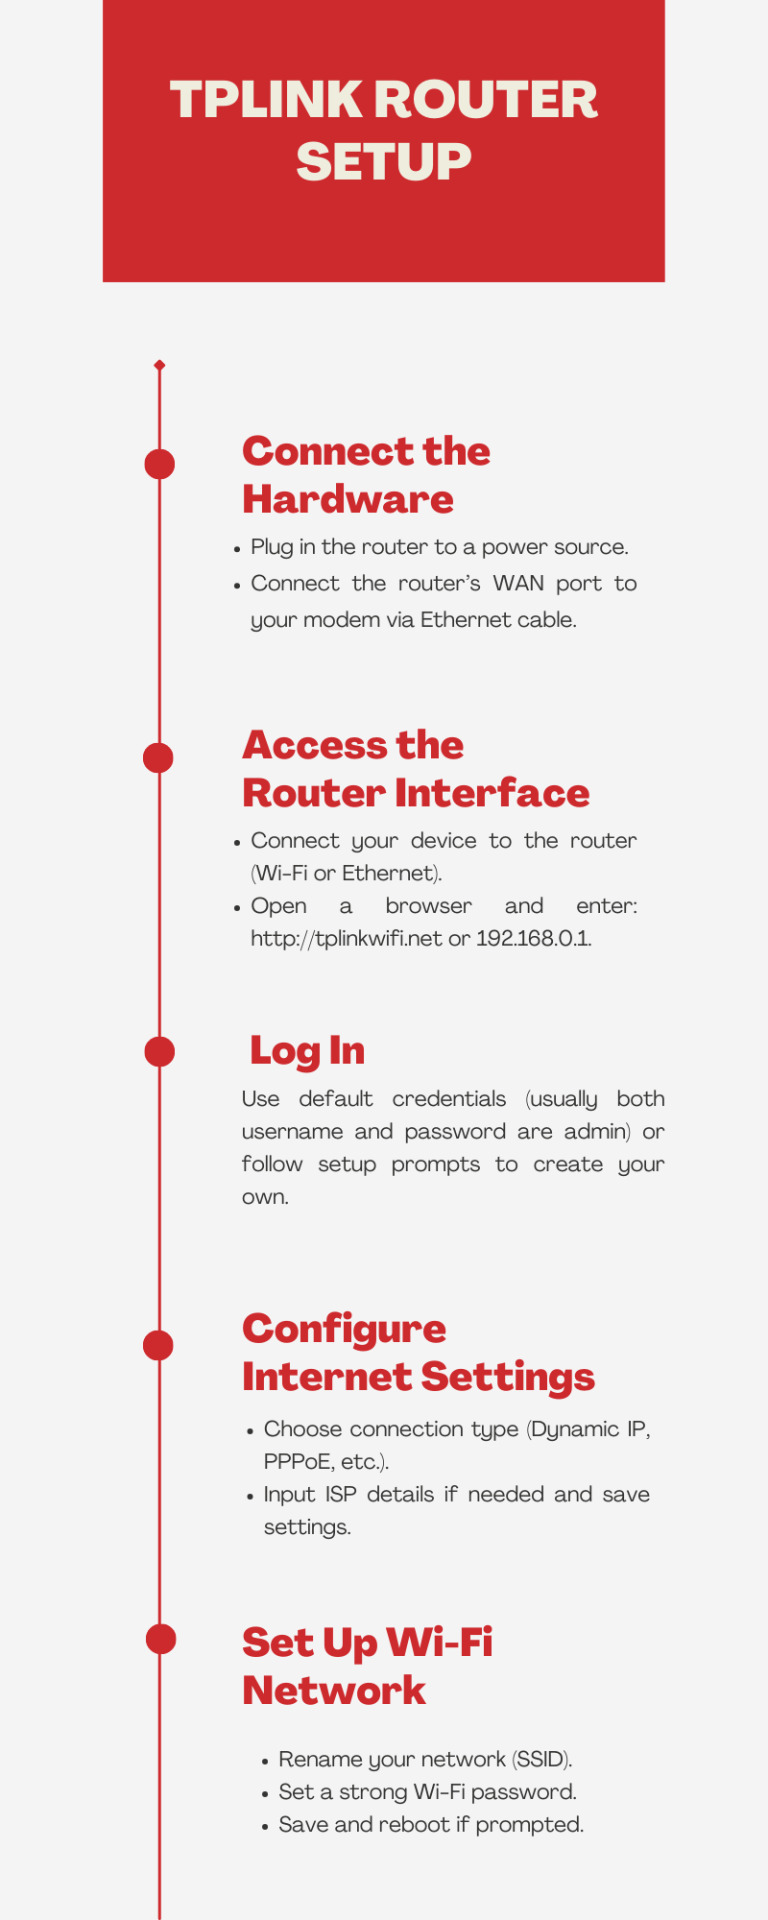
Tplink Router Setup
To perform the tplink router setup, connect the router to your modem and power. Connect your computer or phone to the TP-Link WiFi network and open a web browser. Enter the default IP address (usually 192.168.0.1 or 192.168.1.1) and follow the setup wizard to configure your network.
0 notes
Link
Welcome to TECH LOGICS! In this guide, we’ll walk you through the process of integrating a TP-Link TL-POE10R POE Splitter to power and connect a WiFi router, modem, or access point to a CCTV system’s POE switch. This powerful device simplifies your network setup by delivering both power and data through a single Ethernet cable, making it
0 notes
Text
Achieve Seamless Coverage With TP Link Extender Setup
Got your hands on TP link range extender and thus want a simplified and straightforward setup steps? If the answer is yes, then you are surely at the right destination. In this guide we'll share two most commonly used TP link extender setup methods. One is extremely quick that just takes less than 10 minutes. It is the WPS method. Whereas if you want a more hands on approach then Web GUI method is for you. Both the setup methods are extremely easy and can be performed without any expert help. So let's not waste any more time and dig straight into the process.
✓ Quick Setup Via WPS
Begin the process of TP Link extender setup by activating the range extender. Make sure you do this activation nearby to the host router. Meanwhile the extender is booting up, check the status of the host router. It should be actively working.
Moving further, first push the WPS key on the TP link range extender. In case the WPS LED didn't blink then push and hold the WPS key until the LED starts blinking.
Now it's time to push the WPS key on the host router. Here also make sure the WPS LED starts to blink. As this is the indication that the WPS function is enabled and the device is looking for its pair. Additionally remember, as soon as you push the WPS key on the TP link extender do not wait. Rather immediately push the WPS key on the router as well.
Now let the gadgets complete the synchronisation. As the TP Link extender setup process completes the wireless signal LED will light up. In case it doesn't light up, then it means the WPS connection has failed. So you need to redo the setup all over again. But in case everything went smooth, then it's time to relocate the extender to its desired location.
For placement select the area which is halfway from the host router and the area where you need coverage. Now as you replug the range extender, you’ll see both WPS LED as well as wireless signal LED light up. This indicates a successful setup.
✓ Manual Setup Using Web Browser
For conducting a smooth TP Link extender setup first collect the basic components and details. You need a smart gadget for initiating the setup. It can be anything like your smartphone, laptop, computer or an iPad. Next for a stable connectivity to the extender you need an Ethernet wire. Additionally, collect the username and password of your existing wifi network whose reach you want to extend. Further we advise you to keep the user manual by your side as it contains every little detail that you might need during the setup process. As you collect all these components and details, feel free to start with the setup steps:
✓ Activate The TP Link Extender
Begin the process by first bringing in the range extender to the same area where your host router is placed. Now avoiding any physical barriers plug in the range extender to activate it properly. Once done, now bring in the smart gadget. For the TP Link extender setup you need to connect this smart gadget to the extender. Now there are two methods for the same.
Either you can connect wirelessly or through ethernet wire. The details for wireless connection are written clearly on the product label which is stuck on the back panel of the extender. Additionally the details are written in the quick user manual as well. Once you build a connection between the TP Link extender and smart gadget, you can move to the next step which is Log In.
✓ Log In
To login first launch a web browser of your choice. You can go with Internet Explorer, Safari, Firefox or Google Chrome as well. Now hop on to the address field of the browser. In it fill up http://tplinkrepeater.net and press Enter. In case the web address doesn't work, then use another alternative which is http://192.168.0.254. As you press the enter key, a window pops up asking you to give in some details. So you need to enter your username and password. By default it is set to admin which you need to use in lower case only.
✓ Follow The Prompts
To complete the TP Link extender setup, now you need to follow the on-screen prompts one by one. So start by selecting the Quick Setup option and hit Next. Moving further, pick your region and hit Next. Now the web interface will automatically start scanning for the available networks. From the list choose your network name and give in its security key (password). Finally review all your settings and tap on Finish if it's appropriate. As you do so the extender will reboot itself. As it applies the changes.
Lastly, check the wireless signal LED to know whether the setup is successful or not.
0 notes
Text
Price: [price_with_discount] (as of [price_update_date] - Details) [ad_1] Product Description Easy Setup under seconds Installation Setup for Mini UPS Our Mini UPS offers a quick and easy 30-second DIY installation. Simply plug it in, and enjoy uninterrupted power for your Router. WiFi Router UPS: Oakter Mini UPS for wifi router provides upto 4 hours of power backup (depends on current consumption of wifi Router) to your 12V WiFi router, Broadband Modem. Mini UPS works as an inverter for WiFi router, Broadband modem which ensures uninterrupted power supply in case of power cuts or switch over to generators Smart UPS for WiFi Router: Mini UPS for WiFi Router having an intelligent battery management system, Mini UPS charges itself when there is electricity. Mini UPS is Online WiFi router UPS thus do not require switching between two paths in case of power failure or switch over to generators. it has inbuilt current, surge and deep discharge protection Plug-N-Play: Take out the power adapter from WiFi router and insert it in the Mini UPS input female socket, connect the "OUT" of Mini UPS to your WiFi router. Note - Use additional connector wherever require. Mini UPS is a consumer grade CE and ROHS certified. It Uses BIS Certified 2 Nos. Lithium-ion Cells (Brand: Sinohan Power Battery, Model: 18650) Supported WiFi Routers: Mini UPS for WiFi Router supports all type of 12V DC WiFi Routers, Broadband modems, Set-top box and CCTV cameras(12V-0.5A, 12V-1A, 12V-1.5A, 12V-2A, 12V-2.5A, 12V-3A). Supported all major routers like D-Link, TP-Link, Jio Fiber, Cisco, Mi, Tenda, Nokia, Asus, Linksys, airtel, BSNL, ACT, Netgear, and more except Jio Air fiber (Before buying please ensure your WiFi router is 12V DC). Post Warranty Assurance: Post 1-year Warranty, When your backup wanes simply contact our dedicated Customer Support via Whatsapp. Replacement available at 1049 INR. [ad_2]
0 notes
Video
youtube
TP-Link Archer Air5 Ultra Thin WIFI 6 Dual band router Setup | AX300
0 notes
Photo

TP-Link Deco E4 AC1200 Home Mesh Wi-Fi System - 3 Pack FEATURES: Deco uses a system of units to achieve seamless whole-home Wi-Fi coverage — eliminate weak signal areas once and for all! With advanced Deco Mesh Technology, units work together to form a unified network with a single network name. Devices automatically switch between Decos as you move through your home for the fastest possible speeds. A Deco E4 two-pack delivers Wi-Fi to an area of up to 2,800 square feet (EU version). And if that’s not enough, simply add more Decos to the network anytime to increase coverage. Deco E4 provides fast and stable connections with speeds of up to 1167 Mbps and works with major internet service provider (ISP) and modem. Deco can handle traffic from even the busiest of networks, providing lag-free connections for up to 100 devices. Parental Controls limits online time and block inappropriate websites according to unique profiles created for each family member. Setup is easier than ever with the Deco app there to walk you through every step. For Deco E4(3-Pack) 's Info, Please check here. WIRELESS Standards Wi-Fi 5 IEEE 802.11ac/n/a 5 GHz IEEE 802.11n/b/g 2.4 GHz WiFi Speeds AC1200 5 GHz: 867 Mbps (802.11ac) 2.4 GHz: 300 Mbps (802.11n) WiFi Range 3-4 Bedroom Houses (3-pack) TP-Link Mesh Technology Optional Ethernet backhaul work together to link Deco units to provide seamless coverage 2× Antennas (Internal) Multiple antennas form a signal-boosting array to cover more directions and large areas Beamforming Concentrates wireless signal strength towards clients to expand WiFi range WiFi Capacity Medium Dual-Band Distribute devices to different bands for optimal performance MU-MIMO Simultaneously communicates with multiple MU-MIMO clients Working Modes Router Mode Access Point Mode HARDWARE Ethernet Ports 2× 10/100 Mbps Ports *Per Deco Unit Supports WAN/LAN auto-sensing Buttons Reset Button SECURITY WiFi Encryption WPA-Personal WPA2-Personal Network Security SPI Firewall Access Control Guest Network 1× 5 GHz Guest Network 1× 2.4 GHz Guest Network SOFTWARE Protocols IPv4 IPv6 Parental Controls URL Filtering Time Controls WAN Types Dynamic IP Static IP PPPoE PPTP L2TP Quality of Service QoS by Device Cloud Service OTA Firmware Upgrade TP-Link ID DDNS NAT Forwarding Port Forwarding UPnP IPTV IGMP Proxy IGMP Snooping Bridge Tag VLAN DHCP Address Reservation DHCP Client List Server DDNS TP-Link Management Deco App TEST DATA WiFi Transmission Power CE:
#RANGE_EXTENDER#ROUTER#COMPUTERS#NETWORKING#AC1200#DECO_M3W#HOME_WIFI#MESH_WIFI#NET_TL_DECO_E4_3PK#TP_LINK
0 notes
Text
Why TP Link Extender Blinks Red Light
Are you wondering why the TP Link extender red light blinking? The extension and router's weak or broken connection is indicated by this blinking. The first thing to do if you see a red light on your TP Link WiFi extender is to move your devices closer together. Because they could interfere, keep the extender away from cordless phones and microwaves. Additionally, make sure the password you entered during setup is accurate. The problem is frequently fixed with a fast reset and fresh configuration, returning the connection to its robust, steady green state.
#tplinkrepeater#tplinkrepeater.net#tp link extender red light#tp link extender red light blinking#red light on tp link wifi extender#firmware update tp link#tp link extender stopped working#tp link extender not working
0 notes
Text
Wi-fi Antanna In Chennai
WiFi antennas in India come in various types and are used to extend the range and improve the signal strength of wireless networks. Here’s an overview of some common WiFi antenna types available in India and their typical uses:
Types of WiFi Antennas
Omnidirectional Antennas
Description: These antennas radiate signals in all directions (360 degrees horizontally).
Use Cases: Ideal for general-purpose WiFi coverage in homes, offices, and small outdoor areas.
Directional Antennas
Description: These antennas focus the signal in a specific direction, providing longer range and better performance in that direction.
Use Cases: Used for point-to-point connections, such as between buildings or for targeted coverage in large open areas.
Yagi Antennas
Description: A type of directional antenna with a high gain, often used for long-distance communications.
Use Cases: Suitable for rural areas where the WiFi source is far from the user, such as connecting to distant WiFi hotspots.
Parabolic Grid Antennas
Description: These antennas have a parabolic shape, providing very high directional gain.
Use Cases: Used for very long-distance point-to-point links, often in combination with outdoor WiFi systems.
Panel Antennas
Description: Flat antennas that can be mounted on walls or poles, offering moderate to high gain.
Use Cases: Ideal for point-to-multipoint setups, covering a specific area with stronger signal.
Popular Brands and Models in India
TP-Link
Models: TP-Link TL-ANT2408C (omnidirectional), TP-Link TL-ANT2415D (directional)
Known for: Reliability and good performance for home and small business use.
Ubiquiti
Models: Ubiquiti NanoStation (directional), Ubiquiti AirGrid (parabolic)
Known for: High-performance antennas suitable for professional and enterprise use.
Netgear
Models: Netgear AC1200 WiFi Range Extender (includes antennas for extended range)
Known for: Easy-to-use solutions for home and small office networks.
D-Link
Models: D-Link ANT24–0700 (omnidirectional), D-Link ANT24–2100 (directional)
Known for: Affordable and effective WiFi solutions.
Buying Considerations
Range and Gain
Higher gain antennas provide better range but may have a narrower coverage area.
Consider the environment (indoor vs. outdoor) and the distance you need to cover.
Compatibility
Ensure the antenna is compatible with your router or access point.
Check for connectors (RP-SMA, N-Type) and ensure they match your equipment.
Usage Environment
Indoor antennas are typically less rugged than outdoor models.
For outdoor use, look for weatherproof and durable designs.
Regulations
Be aware of local regulations regarding the use of high-gain antennas and frequency bands.
Where to Buy
Online Retailers: Amazon India, Flipkart, Snapdeal, etc.
Electronics Stores: Reliance Digital, Croma, Vijay Sales, etc.
Specialized IT Shops: Local computer and networking equipment stores.
Tips for Optimal Use
Position antennas in a central location for omnidirectional coverage.
Elevate antennas to reduce obstructions and improve line-of-sight.
Use quality cables and connectors to minimize signal loss.
By considering these factors, you can choose the right WiFi antenna to improve your network’s performance in India.
#UWB antenna in India#RFID antenna in India#IoT antenna in India#SMD antenna in India#GPS antenna in India#Antenna design in India#Antenna simulations in India#Chip antenna in India
0 notes
Text

Archer BE230 BE3600 Dual-Band Wi-Fi 7 Router
3.6 Gbps Dual-Band WiFi 7
2× 2.5G Ports
Maximized Coverage
EasyMesh-Compatible
Easy Setup and Use
TP-Link HomeShield
For more information, Visit:https://newtrend.ae/product-category/tplink/ Live chat: +971 507542792
#WiFi7#DualBandRouter#ArcherBE230#TPLink#HomeNetworking#EasyMesh#TPLinkHomeShield#WiFiCoverage#TechProducts#NetworkingSolutions#UAE
0 notes
Text
Google Nest Home Network Problem Statement
I've been dealing with some annoyances with my home network setup and I just want to document them for posterity in hopes of one day fixing them / asking for help.
Today I have a Google Nest Wifi mesh network with Google Nest Wifi Routers/AP's. They're these little rounded pucks:

I like them because they work well with the rest of our Google Home setup in our house (Nest x Yale lock, Nest Doorbell, Nest Thermostat, Nest security cameras, Smart lights, etc.) but I've recently been dealing with some annoyances with them.
The main issue I'm having is that I want to have my home office wired with ethernet, so I can get the performance benefits of my gigabit ethernet for my Mac, PS5, etc. that are in there. But I also want to have an AP in there that I can use to connect my phone and other mobile devices to (I'm a mobile developer, so have a few test devices I want to have on the wifi). I also want everything to be on one network/devices to be visible to each other (more about that later).
My current setup allows me to do that for the most part, here's what it looks like right now.
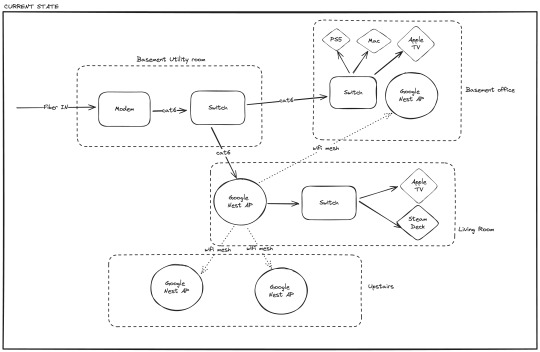
*Modem = Modem/Router supplied by the ISP
In my office, I circumvent the Google Nest network to connect directly to ethernet using a series of switches (TP-Link TL-SG105). This works okay, but it has two main drawbacks.
The Google Nest AP in my office doesn't get great connectivity from the mesh network.
When my PS5 is hard-wired into ethernet this way, it's not visible to my Steam Deck (connected to Google Nest wifi) via chiaki.
#1 is pretty clear-cut. I would ideally like to hard-wire in that AP so it had guaranteed good connectivity.
#2 is a bit more of a mystery to me, but I believe it's because the hardwired PS5 is somehow on my internet in a separate kind of network than the devices linked via my Google Nest wifi (I'm not a networking expert by any stretch of the imagination). If I was able to somehow get my PS5 hardwired in via Google Nest wifi I was hoping that would solve it.
Enter my first attempt at fixing this issue:
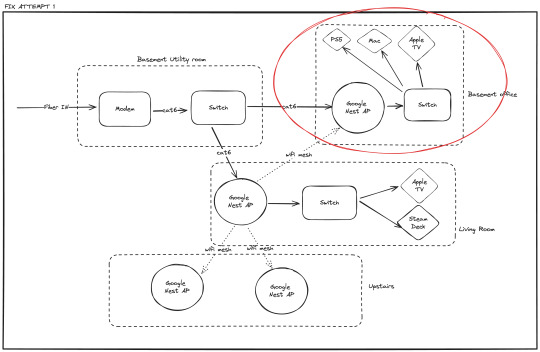
In this attempt I connected the Google Nest AP to ethernet, and then used the AP's 1 hard ethernet port to connect my switch & my other devices.
However I learned that Nest Wifi doesn't support multiple routers like this. There's 1 router & multiple mesh access points. So this approach still means the AP is connected to the mesh over wifi (ignoring the ethernet in) and thus limits all of my devices to wifi speeds. It also didn't solve my problem #2 with the Steam Deck.
At this point, I'm back to using the setup in the first diagram.
I'm now considering moving off of my Google Nest Wifi mesh network setup and towards something else, but I'm not sure what setup will work to give me everything I want. Primarily - the ability to have two AP's connected via ethernet, but still be part of the same home network.
Any suggestions / tips / troubleshooting ideas welcome.
#google nest#google#wifi#home network#networking#ethernet#troubleshooting#tech problems#ask#looking for help
0 notes
Text
Routers in Kenya
Embrace Remote Work with Powerful Routers in Kenya!
🏠💼 Stay connected from anywhere with top brands like D-Link, TP-Link, Huawei, and MikroTik, ensuring seamless video calls, fast file transfers, and uninterrupted productivity.
Upgrade your home office setup and conquer remote work challenges with ease!
See below link for help choosing one;
0 notes
Text
how to setup surfshark on vpn tp-link router
🔒🌍✨ Obtén 3 Meses GRATIS de VPN - Acceso a Internet Seguro y Privado en Todo el Mundo! Haz Clic Aquí ✨🌍🔒
how to setup surfshark on vpn tp-link router
Configuración
La configuración es un aspecto fundamental en cualquier dispositivo o sistema, ya que determina cómo funcionará y se adaptará a las necesidades del usuario. En el ámbito tecnológico, la configuración se refiere al proceso de ajustar parámetros, opciones y ajustes para optimizar el rendimiento y la operatividad de un dispositivo electrónico o software.
En el caso de un dispositivo móvil, la configuración incluye ajustes como el idioma, la fecha y la hora, la red Wi-Fi, las cuentas de usuario, las notificaciones y las preferencias de privacidad. Es importante configurar correctamente estos aspectos para garantizar un funcionamiento óptimo del dispositivo y una experiencia de usuario satisfactoria.
En el contexto de una red informática, la configuración abarca la asignación de direcciones IP, la configuración de routers y switches, la seguridad de la red, el acceso remoto y otros aspectos que influyen en la conectividad y la comunicación de los dispositivos dentro de la red.
En resumen, la configuración es un proceso esencial que permite personalizar y adaptar un dispositivo o sistema informático a las necesidades y preferencias del usuario. Con una configuración adecuada, se puede lograr un rendimiento óptimo y una experiencia de uso satisfactoria.
Surfshark
Surfshark es una reconocida empresa proveedora de servicios VPN que ofrece a sus usuarios privacidad y seguridad en línea. Con servidores en múltiples países alrededor del mundo, Surfshark permite a sus clientes acceder a contenido restringido geográficamente, navegar de forma anónima y proteger sus datos de posibles ciberataques.
Una de las principales características de Surfshark es su política de no registros, lo que significa que la empresa no guarda ningún registro de la actividad en línea de sus usuarios. Esto garantiza la privacidad y confidencialidad de la información personal de cada cliente.
Además de la protección de datos, Surfshark también ofrece otras ventajas como la protección contra malware y phishing, así como la capacidad de utilizar la misma cuenta en múltiples dispositivos simultáneamente. Esto resulta especialmente útil para aquellos usuarios que desean proteger su información en todos sus dispositivos, ya sea en casa o mientras están de viaje.
En resumen, Surfshark es una excelente opción para quienes buscan una solución segura y confiable para proteger su privacidad en línea. Con un servicio fácil de usar, servidores rápidos y una política estricta de no registros, Surfshark se destaca como una de las mejores opciones en el mercado de servicios VPN.
VPN
Un VPN, o Red Privada Virtual en español, es una herramienta cada vez más popular que ofrece una capa adicional de seguridad y privacidad en Internet. Con el creciente número de amenazas en línea y el seguimiento de la actividad en la web, es fundamental proteger nuestra información personal y nuestra identidad en línea.
Un VPN permite cifrar la conexión a Internet, ocultando la dirección IP del usuario y enmascarando su ubicación física. Esto resulta especialmente útil al conectarse a redes WiFi públicas, donde los ciberdelincuentes pueden intentar acceder a datos sensibles. Al utilizar un VPN, se evita el riesgo de que terceros no autorizados intercepten la comunicación y roben información confidencial.
Además de la seguridad, un VPN también permite acceder a contenido restringido geográficamente, como sitios web o servicios de transmisión de video que pueden no estar disponibles en ciertas regiones. Al cambiar la ubicación virtual a través del VPN, los usuarios pueden disfrutar de una mayor libertad en línea y explorar una variedad de contenido sin restricciones.
Es importante elegir un proveedor de VPN confiable y respetado, que garantice la protección de los datos del usuario y la velocidad de conexión óptima. En resumen, utilizar un VPN se ha convertido en una práctica fundamental para aquellos que valoran su privacidad y seguridad en línea.
Router TP-Link
Los routers TP-Link son una opción popular entre los consumidores debido a su rendimiento confiable y su facilidad de uso. Estos dispositivos son ideales para mejorar la conexión a Internet en el hogar u oficina, brindando una señal estable y rápida para múltiples dispositivos a la vez.
TP-Link ofrece una amplia gama de routers para adaptarse a las necesidades de cada usuario. Desde modelos básicos para uso doméstico hasta dispositivos avanzados con tecnología de vanguardia, TP-Link tiene una opción para cada presupuesto y exigencia.
Los routers TP-Link cuentan con funciones de seguridad avanzadas para proteger la red y la información personal de los usuarios. Con cortafuegos integrados, control parental y protocolos de cifrado seguros, estos dispositivos garantizan una experiencia en línea segura para toda la familia.
Además, la configuración de un router TP-Link es sencilla y rápida, gracias a su interfaz intuitiva y a la aplicación móvil dedicada. Los usuarios pueden personalizar fácilmente la red, establecer horarios de conexión y gestionar el ancho de banda de manera eficiente.
En resumen, los routers TP-Link son una excelente elección para quienes buscan un rendimiento sólido, seguridad y facilidad de uso en su red doméstica u empresarial. Con una reputación bien establecida en el mercado, TP-Link continúa siendo una marca de confianza para millones de usuarios en todo el mundo.
Tutorial
Un tutorial es una guía paso a paso que enseña a los usuarios cómo realizar una determinada tarea o utilizar una herramienta específica. Estos recursos son ampliamente utilizados en Internet para instruir a los usuarios en una amplia gama de temas, desde la cocina y la moda hasta la programación informática y el maquillaje.
Los tutoriales suelen estar diseñados de forma clara y concisa, con instrucciones detalladas para facilitar su comprensión y seguimiento. Pueden presentarse en diferentes formatos, como videos, artículos escritos, infografías o incluso en redes sociales a través de publicaciones o historias.
Una de las ventajas de los tutoriales es que permiten a los usuarios aprender a su propio ritmo y en el momento que les resulte más conveniente. Además, al ofrecer una explicación paso a paso, los tutoriales ayudan a evitar confusiones y aclarar cualquier duda que pueda surgir durante el proceso de aprendizaje.
En resumen, los tutoriales son una herramienta valiosa para adquirir nuevos conocimientos y habilidades de manera autodidacta. Ya sea que desees aprender a cocinar una receta especial, a reparar un electrodoméstico o a utilizar una nueva aplicación informática, los tutoriales están ahí para guiarte en el camino hacia el dominio de la tarea deseada.
0 notes
Text
Price: [price_with_discount] (as of [price_update_date] - Details) [ad_1] Product Description Easy Setup under seconds Installation Setup for Mini UPS Our Mini UPS offers a quick and easy 30-second DIY installation. Simply plug it in, and enjoy uninterrupted power for your Router. WiFi Router UPS: Oakter Mini UPS for wifi router provides upto 4 hours of power backup (depends on current consumption of wifi Router) to your 12V WiFi router, Broadband Modem. Mini UPS works as an inverter for WiFi router, Broadband modem which ensures uninterrupted power supply in case of power cuts or switch over to generators Smart UPS for WiFi Router: Mini UPS for WiFi Router having an intelligent battery management system, Mini UPS charges itself when there is electricity. Mini UPS is Online WiFi router UPS thus do not require switching between two paths in case of power failure or switch over to generators. it has inbuilt current, surge and deep discharge protection Plug-N-Play: Take out the power adapter from WiFi router and insert it in the Mini UPS input female socket, connect the "OUT" of Mini UPS to your WiFi router. Note - Use additional connector wherever require. Mini UPS is a consumer grade CE and ROHS certified. It Uses BIS Certified 2 Nos. Lithium-ion Cells (Brand: Sinohan Power Battery, Model: 18650) Supported WiFi Routers: Mini UPS for WiFi Router supports all type of 12V DC WiFi Routers, Broadband modems, Set-top box and CCTV cameras(12V-0.5A, 12V-1A, 12V-1.5A, 12V-2A, 12V-2.5A, 12V-3A). Supported all major routers like D-Link, TP-Link, Jio Fiber, Cisco, Mi, Tenda, Nokia, Asus, Linksys, airtel, BSNL, ACT, Netgear, and more except Jio Air fiber (Before buying please ensure your WiFi router is 12V DC). Post Warranty Assurance: Post 1-year Warranty, When your backup wanes simply contact our dedicated Customer Support via Whatsapp (+91 7575040506). Replacement available at 1049 INR. [ad_2]
0 notes