#tumblr bad image compression
Text
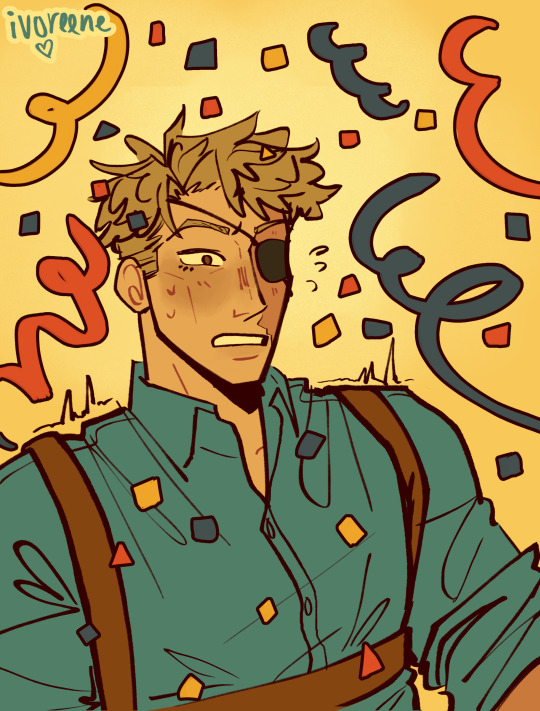
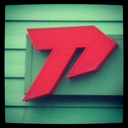
gordon freeman plays super punch out
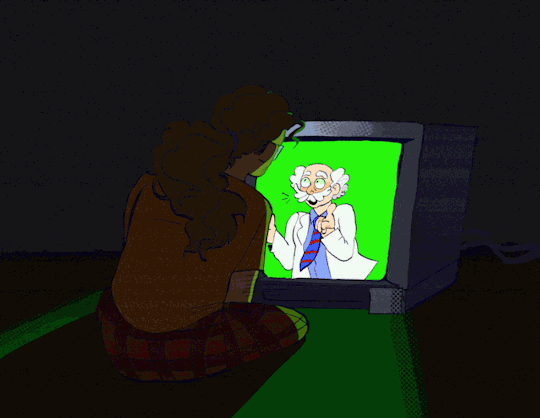
#hlvrai#hlvrai fanart#half life but the ai is self aware#dr bubby#tommy coolatta#benrey#dr coomer#i am praying this uploads correctly#and also please ignore how it wouldnt make any sense for them to be on a crt tv#i just thought the visual was cool i unno#and also also#fun fact bubbys pose was directly referenced off pf an image of shadow the hedgehog#blues art#also sorry for all the compression fuzz i hope it isnt too bad the gif was too massive for tumblr and the shady compression site fucked itu#tw flash
400 notes
·
View notes
Text

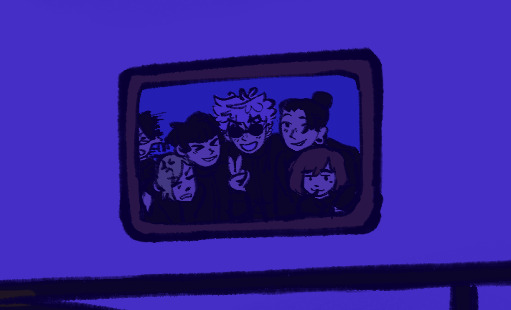
Double Date Squad take on Mt Rokkon!
(oh and Hancock is there too I guess)
#ffxiv#Ninira Nira#Aymeric de Borel#Estinien Varlineau#Hanami#Hancock Fitzgerald#Mt Rokkon#Aymeric: dearest would it not be a good idea if perhaps I tanked the next group of mobs?#Hanami: no.#she has provoke and she will use it#Aymeric the only bitch to bring a heal / res#Estinien and Nini just: (oops meme) dps loss?#Hancock in the bg just being ignored completely like: 🧍♂️#see Cyan and I decided they couldn't keep up the tradition of deep dungeon bc orthos was just trauma so this is the next best thing#obsessed with them#holy hell don't look too closely tho because tumblr's on some new horrific image compression BS and like... it's bad#I think I saved this but I tell you my first draft upload was R O U G H#art: mine
95 notes
·
View notes
Text
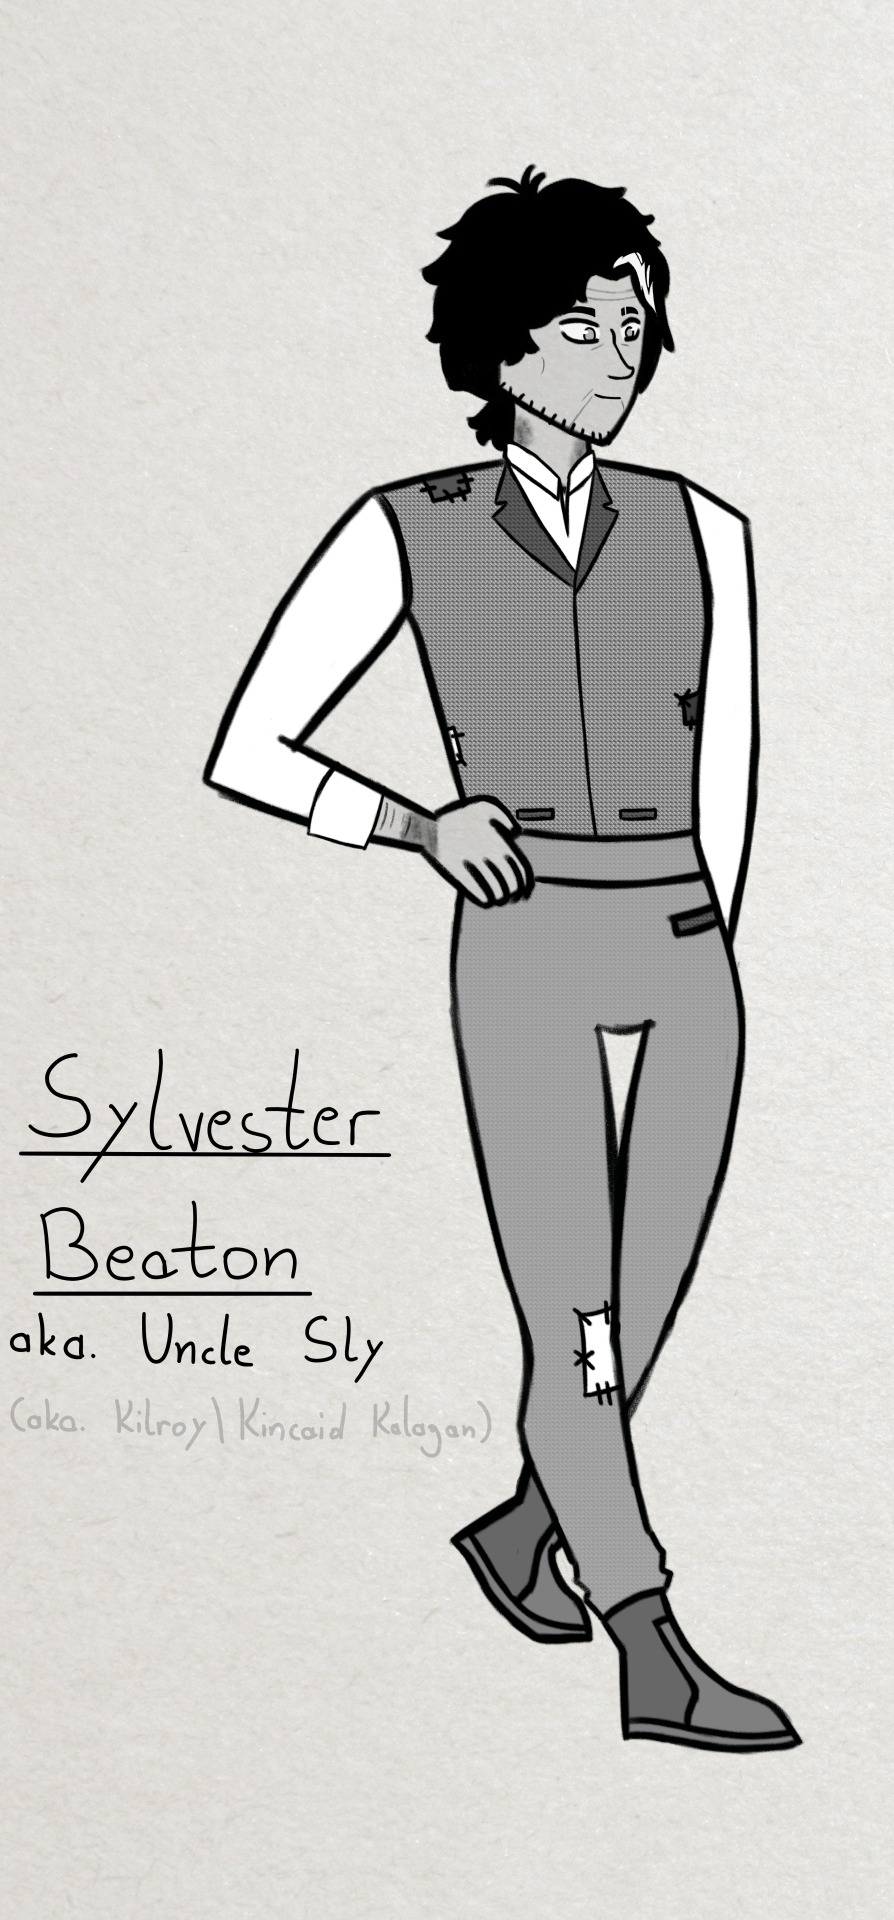


(Click for better quality, because this was a PAIN to get on Tumblr T-T )
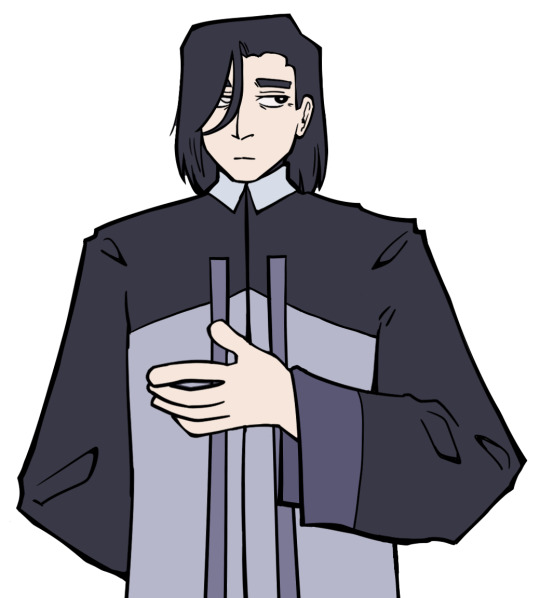
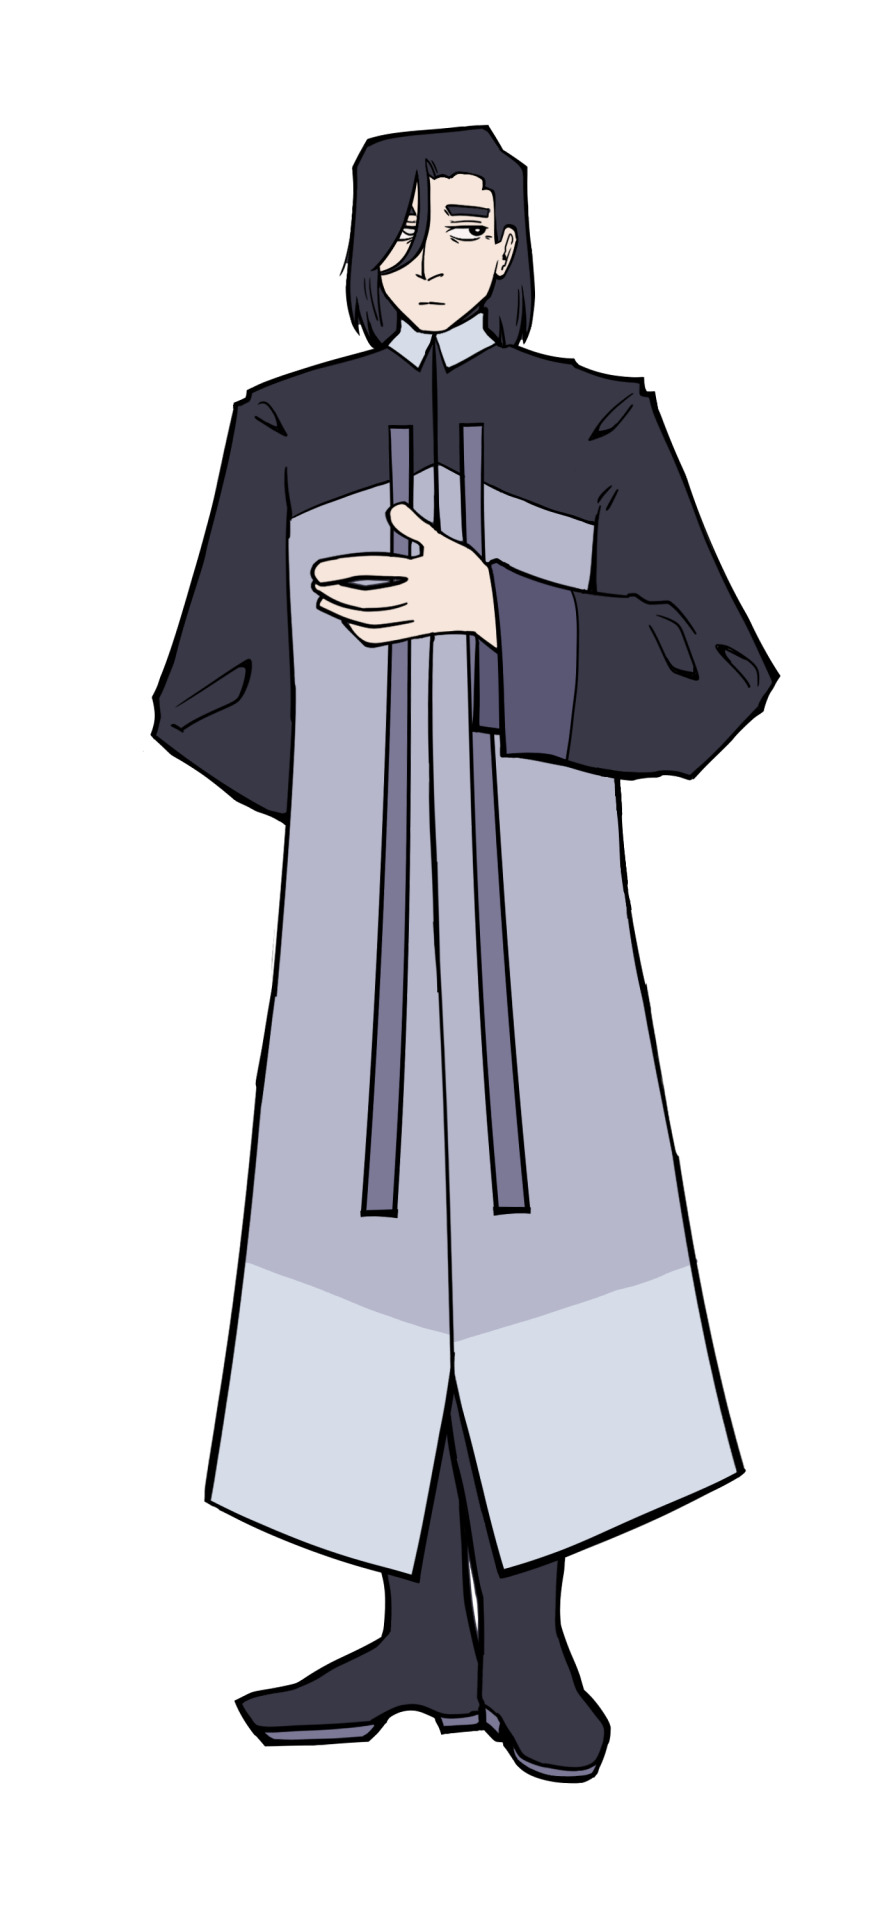
Tried drawing Uncle Sly for the AU again :)
First drawing is mostly canon accurate (mix between his description and his picture), and the second exists, because I somehow thought Uncle Sly had a trench coat, but that was literally never mentioned in the books, pretty sure. But he owns one, in this AU.
And I also wanted to draw one with colour, so there's three
(Sylvester is kinda a banging name though tbh. Shout out to him)
#This was original one image but Krita decided 'Screw you!' and made this a bajillion megabytes in size fsr#And the compressed version looked so bad colour-wise I could *not* post it#The image ID could probably be better; I apologize. Was just getting kinda tired of complications#I accidentally cut of the watermark too; I just noticed god dammit. But you guys know the gist of reposting and credit and stuff 👍#(I swear I actually like this drawing <3 I'll stop complaining now /lh)#magic misfits spoilers#spoilers#(I'm still not sure how many of the AU posts I also have to tag with spoilers. Just kinda a case-by-case thing)#Good Uncle Sly AU#magic misfits#the magic misfits#uncle sly#kalagan#kilroy kalagan#kincaid kalagan#magic misfits fanart#tw bruises#chill's art#artists on tumblr
10 notes
·
View notes
Text

The Three of Swords: rejection, betrayal, hurt and discouragement
I was saying a little while ago that I'd give a lot to be able to emulate the tarot style DAI uses, so eventually I decided to actually try it and practice. This is my first attempt with my KC, Sparrow!
I plan on doing one for each act--this would be Act 1! I'm hoping to see improvement as I do the rest lol
Act 1 | Act 2 | Act 3 | Act 4 | Act 5
#cassy draws#oc: sparrow#ngl im just pleased i managed to imitate that gold leaf texture all the bad bitches use in their tarots#also thank you once again tumblr for forcing me to compress the image quality :/#wrath of the righteous#pathfinder wotr#pwotr#wotr#sparrow tarot#pwotr pals
45 notes
·
View notes
Text
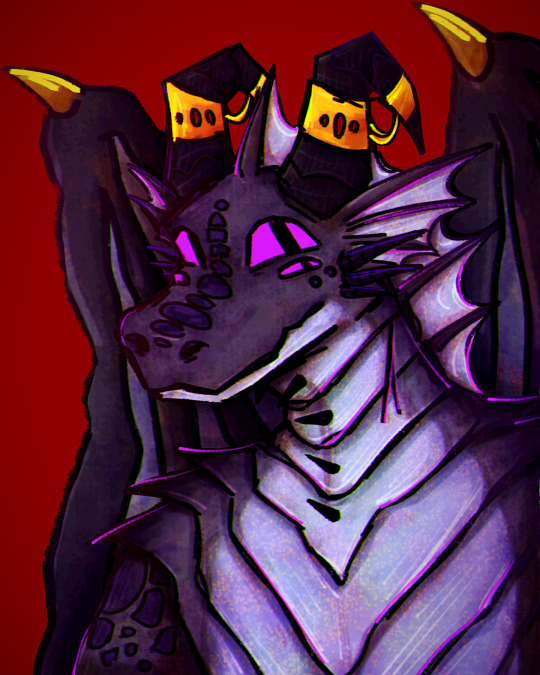
@thetantiger obsydia :)
#artmeat#not my oc#hi. you do not know me but i like your characters#this is the first time i've drawn a dracthyr in quite a while#unsure how bad tumblr compresses images. i can send a higher res version if you want :)
7 notes
·
View notes
Text

Yorveth
i've been watching spy x family can you tell
#OH MY FUCKING GOD TUMBLR IMAGE COMPRESSION IS SO BAD???#ssdfdghsjfhdjs#wow#iorveth#iorweth#spy x family#my art#that's a tag on this blog now#apparently#the witcher
13 notes
·
View notes
Text

#idk why tumblr compressed this so bad#its an old draft and i lost the og image oof#rojita#cant wait till i get my first rojita piece this wednesday ehehe#girly kei#ガーリー系#ガーリー#jfashion#dark girly#coord#ダークガーリー#outfit#コーデ
39 notes
·
View notes
Text

contemplating leg.
#an issue i have with like. design. is that i don't sketch well digitally BUT i can't just. fuck about with proportions#when i sketch traditionally lmao#close though got the spirit i want even if the proportions aren't quite right#vindraws#baby mode blogging#fighting for my life against tumblr's image quality#why do you do that to the contrast sir#i am too stupid to understand whatever it's doing compression-wise but it's Bad.
1 note
·
View note
Text
I’ve been so annoyed with how bad the compression on tumblr images has been lately. Usually clicking the image to fullview will load a higher res version, but even that hasn’t been working lately. There have been so many comics and graphics that are compressed so badly that the text becomes illegible. I’m probably gonna have to start making the text and watermarks in my comics larger.
572 notes
·
View notes
Text
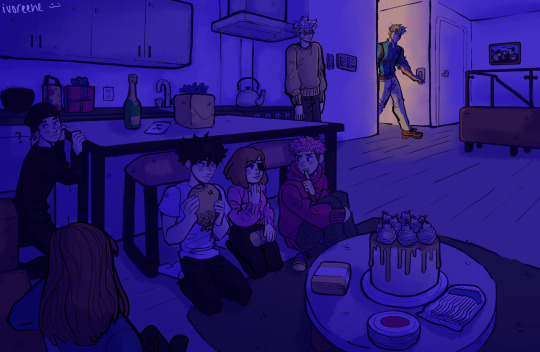
kinda last minute but.. happy birthday to nanamin!!!! :] I LOVE HIM SO MUCH
close ups under the cut vvvv


tumblr does not like the size of my images so a lot of them are compressed down.... higher quality ones on my twt and insta...... i know its bad practice but i want it crispy >:( JLKFDSFSDJKLKJSDF
debating just going on hiatus after this but i know i cant stay away... esp w season 2 TToTT might take a week off or something (even though the algo on twt will kill me LOL)
#let him be happy#gege bring him back..... pleaseeee#ill do anything#jjk#jujutsu kaisen#nanami kento#kento nanami#nanami#happy birthday nanami#jjk fanart#gojo satoru#satoru gojo#yuji itadori#itadori yuji#itadori yuuji#nobara kugisaki#kugisaki nobara#megumi fushiguro#fushiguro megumi#shoko in the back idk if i should tag her really...#shes there though... just so you know#ino takuma#takuma ino#yaga and ichiji are there too theyre hiding behind the couch though#my art
3K notes
·
View notes
Text
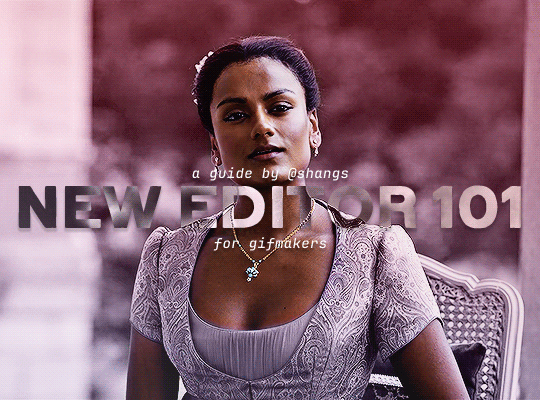
NEW EDITOR 101: A GUIDE FOR GIFMAKERS by v @shangs
Hi friends! I know I said I would do this way back in April/May when this change was announced but I've been massively busy lately so thank you all for being patient with me :)
Based on the results of this poll, I will be trying my level best to help make a guide for gifmakers to best deal with any problems that have been present with the new editor. However, it's worth noting that I have personally not experienced any of these problems myself and I have no record of any problems from other people that I could send to staff and get guidance on, so for some of these issues I will unfortunately be a broken record.
That being said, I have been using the new editor for a few months now and it hasn't been too bad. So don't be discouraged by the new editor if you still love to make gifs and share them. You may need to adapt a bit, but it's doable!
This is meant to be comprehensive and will be explanation and image heavy. Full guide under the cut.
CONTENTS:
What is the new editor?
Steps to take before posting
Making a post
Troubleshooting
01. WHAT IS THE NEW EDITOR?
Some of you may be asking yourselves what the point of the new editor even is and why it's being implemented in the first place when we already had a (mostly) functional editor. My very limited understanding of it as a CS student is app compatibility and flexibility. I'm not totally clear on the details nor am I 100% certain this is the case, but NPF posts (basically, posts made with the "new editor") first started with the mobile app. I'm unsure if the different post types were simply too unwieldy to transfer to the app - having to make a whole bunch of post types when with the new editor you can now have posts with any elements you want without the rigidity of a set post type - or if it was simply not able to be implemented, but the apps have always used NPF. The majority of Tumblr users are coming from the mobile apps. Then it became a case of having the legacy editor for the web users (which were fewer in number) and the new NPF editor for everyone else. That takes resources to keep around and it's pretty inefficient. Naturally the older editor that was used by less people was going to get the axe, especially since you couldn't tell on mobile that there was even a difference between NPF or legacy posts.
So now here we are and the posts are NPF. This means they're in "Neue Post Format." Basically, every post you make is by default a text post, containing "blocks" of other media - as gifmakers we will primarily be dealing with photos.
I understand that it's frustrating to many to see "our gifs are now rendered as text posts" and ask WHY it's happening when photos should logically be rendered as photo posts - but the fact is, there's now no real delineation between a "text post" and a "photo post." The reason NPF posts are now "text posts" is because that's how they are rendered for desktop themes, not because everyone is going to see your post as text and your gifs are going to be compressed into the quality of a potato (though I know some have seen this issue - more on that later.)
02. STEPS TO TAKE BEFORE POSTING
The long and short of it is that you may have to update your theme. More detail here for those who are interested, but check that your theme supports "new editor posts" or "NPF posts" AND that this is true for original posts (you can read more about why in this ask and, although this may be a bit time-consuming, test it out on your blog). I can say with certainty that my second theme Cygnus supports original NPF posts. This is NOT true of my first theme, though.
You can try to add the NPF Fix by @glenthemes to your own theme (beware if you don't know HTML/CSS) or try this tip by @burningblake for original posts.
Feel free to add theme makers with fully NPF-compatible themes in the notes! I have been happily using my own theme so I can't say to what degree others' themes are NPF-friendly.
03. MAKING A POST
If you're sticking around to post on the new editor and you have trouble ordering your gifs around, here's a little guide on how to post.
If I click on "Photo" from web and open up the editor, here's how it looks:
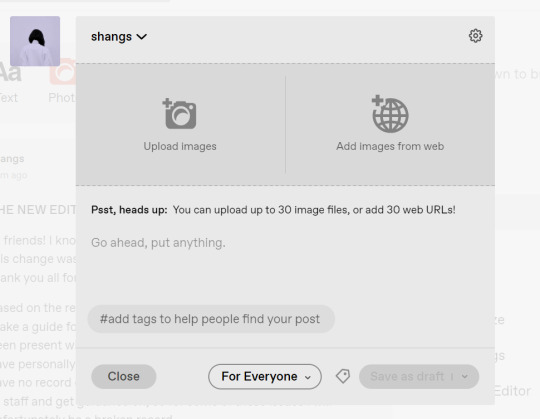
I went ahead and added three full-width gifs and the editor put them in like so:
You'll most likely also have to order your gifs around in the way you want them. You can go ahead and hover over your gifs to see the button to orient them (the four dots in the top left corner) and the button for an image description (the three dots in the bottom right corner). I've attached images of all three below:


If you hold the orientation button, move your gif around until you see the blue line that shows where your gif will end up in the spot that you want it. For example, I wanted to move the second gif below the first one, so I oriented it so that the blue line would show the marker between the two gifs:

Now my gifs are oriented nicely! Of course, this is a simpler layout, but the principles still hold.
If you save your gifs as a draft and reopen them or you just notice a large gap like this in between your gifs when you're in the editor, don't worry.

This will not show up in dash view or on a desktop theme that supports original NPF posts. For example, this is how the gifs' gap (without modification) looked in my desktop theme:

With your gifs ordered, the final step is to add alt text. You can read more about alt text and why you should use it here. (Feel free to ignore the sections about the captions on the legacy editor since it is no longer relevant. It's also unnecessary to clearly mark descriptions if they're not in the caption of your post because they will clearly show up under "ALT" on Tumblr.)
If you click the three dots in the bottom right corner as seen above, and click "update image description:"

You can add the description you like and click "update." Your photos' alt text will show up under the "ALT" bubble on Tumblr. This is generally a good practice to get into to make your content more accessible, so I hope you guys will consider using alt text regularly :)
Also, I've noticed that in the editor, if you go back and edit something it will take some time to show up. You may have to refresh the page or load it again after some time, but your edits should be there. I would not go back and edit posts again if you see your posts haven't shown up. I also advise against editing your posts on mobile because it's easier to make a mistake.
And there you go, you've successfully made a post with the new editor!
04. TROUBLESHOOTING
I'm sure you've all been waiting for this. Unfortunately I am probably going to be extremely unhelpful if the editor hasn't been refined in the last few months for those experiencing issues. I'm going to go in the categories that I listed out in my original poll, but keep in mind that I haven't personally seen any of these issues on my end so I haven't been able to contact staff with any evidence that this happened other than my poll.
Dashboard view quality issues:
I haven't noticed this issue. I'm not sure if this has been fixed since the original poll was posted. If you're experiencing this issue, this is not something I know how to fix so I would contact staff with screenshots of the issue.
Desktop theme side padding:
As noted before, this is a theme issue. If you change themes to something that is NPF-compatible with original posts, there shouldn't be any more issues here.
Small gifs on mobile:
In my experience this was happening regardless of what editor was used; it's a bug that seems to have been fixed since this poll was created. If you're still experiencing it, at the risk of sounding like a broken record, I would advise contacting staff.
New editor doesn't accept gifs of size 9.8MB < x < 10MB:
I haven't experienced this issue so I would say the only workaround would be to either trim the size of your gif so that it is under 9.8MB or whatever threshold seems to be the cutoff or contact staff (I am so sorry for constantly having to suggest this 😭 unfortunately there's no trick I can offer because the new editor has been taking all my gifs just fine)
Logistical issues ordering gifsets:
I hope this guide has been able to answer the majority of questions and shed some light on some of the more buggy behaviors of the new editor, but if you have any more specific questions you can feel free to shoot me an ask!
HTML issues / colored text:
Unfortunately it seems colored text may be deprecated entirely? This could be for accessibility purposes because I believe screen readers would read out every single letter of gradient text in captions which I imagine can get quite frustrating for users of this technology. I recommend just using the normal rich text editor. If you want small text, you can highlight and click the <s> button!
Other:
If it seems like something I may be able to answer, please feel free to ask me. Otherwise... hound staff 😭
Here's where you can hound staff, btw. If you're having major issues I would advise you guys to submit support tickets. That way if there are any widespread bugs, staff will hopefully be able to fix them.
I hope this guide was helpful to you guys in dealing with the new editor, and happy giffing <3
#gif tutorial#new editor tutorial#completeresources#userphotoshop#resourcemarket#userrobin#userbells#arthurpendragonns#ughmerlin#userbecca#usersameera#usermarsy#alielook#tuserlucie#tutorial
529 notes
·
View notes
Text
how to be a dog
god you can fit so much symbolism in these fucking stick figures. click on the image to look at my shapes boy the tumblr compression is so bad
79 notes
·
View notes
Text
ok i've seen some posts about the tumblr alternative cohost but none that were actually helpful so!
(disclaimer: i am very new to this website. users who have been there longer can and should chime in with additions and/or corrections)
Cohost Introduction Post

What is cohost?
Cohost is a fledgling website that is essentially a tumblr clone, but with its own culture and site-specific features. It is also very much a work in progress. You are encouraged to talk in the cohost forum to suggest changes for devs, report bugs, and upvote other people's suggestions. This website WILL grow and change over time. And as such, I do not know if/when the information I share here will be outdated. Edit: To answer an ask I received, anyone can join cohost without an invite. It used to be invite-only. It is not this way anymore.
Is "adult content" allowed there?
Yes. Cohost is not on the app store, meaning that it is not subject to Apple's specifications. You can post illustrations, writing, and photographs (cohost does not support any video formats at this time, just gifs). Cohost has an elaborate filtering and trigger warning system (moreso than tumblr), and you can disable adult content for your entire account or for individual tags. I actually don't engage with the adult content at all on there. Visual CSEM (both real and fictional) is specifically forbidden (although frankly I think the guidelines could be stricter wrt written content. Still, does seem to handle this better than AO3 does, going as far to say that written content about real minors is forbidden.)
How are minors protected?
The minimum age to join cohost is 16, and requires proof of parental permission to join. Users who are under 18 are automatically age-gated and cannot view adult content.
If cohost isn't on the app store, how is it used?
You can, of course, use cohost on a computer, but it is designed with mobile in mind. Opening the website on any IOS browser, clicking "share", and then "add to home screen" will install an app for you to use. The same can be done on an android. There is a guide here.
How does cohost work?
First, you create an account. Then you wait for approximately two days (read: weekdays) for the account to be activated. This is done to prevent spam bots. In the meantime, edit your profile. List some interests, your pronouns, your other social media links. Give yourself an icon. Note: icon and banner file sizes are small. You may need to shrink and compress images.
After the two days are up, make your first post! Write a basic introduction (with what you feel comfortable you feel sharing) and list some interests you like, maybe some hobbies, media, etc. And then tag this post with "#welcome to cohost". This will let existing members know that someone new has joined, and they may initiate conversation and/or follow you.
Next, go to the search and type in "The Cohost Global Feed" and click on the tag. Bookmark this tag. This is essentially one giant community space where you can find random users. (There is currently some discourse on the website as to whether this tag existing is a "bad thing" or not because "cohost isn't supposed to have a global tag". Just ignore that lol). Next, go back to search and type in things you like. TV shows, maybe. Video games. Music. Anything. See if people have posted in the tags. Follow them. Comment on their stuff. Click "like" to bookmark the post if you want to.
Most crucially, make sure that you bookmark the actual tag so you can look in that tag again later without having to manually type it each and every time. Also, you get a feed called "bookmarked tags" which allows you to scroll through all of them at once, which replaces the "for you" feature other websites have.
You can "share" a post (called "rebug" in user slang) which serves the same purpose as a reblog on tumblr. In a rebug, you can add your own tags or comment in the body of the post. Cohost users do not talk in tags as much as tumblr users - they tend to prefer to speak in the body of a rebug, or in the comment section (replies). At this time, you cannot view all reblogs. But you can view all comments in the comment section. Any post that is rebugged will preserve the tags of the OP, with any additional tags added being attributed to you. Rebugs are named after the website mascot Eggbug, a purple bee-like insect.
Posts are called "chosts" - and shitposting is called "shitchosting." Two examples of global shitposting tags are "#css crimes" - which is when a person does goofy things with the HTML/CSS editor to make colorful text, fake chat windows, and such - and "#shitchosting" which is a general shitposting tag. I've also seen people use tags like "#random".
If a post makes you laugh, check out the OP's profile. See if they post frequently, and if you have any common interests. If you realize you want to block or mute someone instead, you can.
You can send asks just like on tumblr, but your inbox must be manually opened first. So remember to do that.
How do I look at my own blog?
This is one of my gripes about the UI. You would think, intuitively, you would click here (at the top of the screen). But you would be wrong!
It is ACTUALLY under the sidebar menu, called "Profile." And I'm not the only one to to complain about this. (To get back to your dashboard, by the way, you click on the cohost logo.)

Are there sideblogs?
Yes! Each sidepage (sideblog) has its OWN set of likes AND followed pages (blogs). This allows you to easily switch between multiple sets of dashboards. A lot of users use this to have a SFW dashboard and an adult content dashboard. But it works like tumblr, too. You can have a side page/dashboard for whatever you'd like. Maybe one of your pages is for programming. Maybe another is for photography. You switch between your pages by clicking the arrow next to your icon/username at the top of the screen. ("Ohhhhh.... THAT'S what that's for.")
What's the userbase on there like?
Mostly programmers. Trans people. Furry artists. Plural systems. Furry trans plural programmers. Certainly a lot of shitposters. The website is trans-run and, as such, has zero tolerance for TERFs. Everyone seems pretty friendly from what I can tell. And there's very much a culture of "follow someone randomly based on their vibes" that doesn't happen as much on tumblr. Tumblr is more like "I really like this TV show, I'm going to follow 40 blogs about just this interest." Because the cohost community is so much smaller, there is a lot less content overall, especially fandom content. You can't follow 40 fandom pages because your fandom tag has a total of 3 posts, all made by one person approximately a year ago (well. for me anyway).
Cohost, then, actually has much more in common with real-life socialization. You seek out people with interests that may be very different from your own, and to find a common interest is very exciting! Unlike tumblr, you are encouraged to tag as much as possible. This allows your posts to be seen, to find common interests. And, of course, don't forget to look in "#Welcome To Cohost" too! You may find some new friends there.
What file formats can I post in?
Currently, I am aware of basic image formats working (like jpeg, png) animated gifs, and mp3s. You currently cannot upload videos to cohost. I believe the reason is not related to server costs, but rather as a way to curb the uploading of copyrighted content.
How does cohost make money?
There are no ads, and yet, as far as I am aware, cohost is operating comfortably. There is, however, an entirely optional "cohost plus" that is $5 USD a month. Currently, there are a few perks, but not enough to convince me.
What if I think something about cohost should change?
Cohost has a forum where users can submit ideas for features and other users can discuss/upvote those ideas.
Here is a list of posts made for newcomers to read:
114 notes
·
View notes
Photo


HOW TO: MAKE HIGH-QUALITY GIFS
Hi! A few people have asked me about my gif-making process and an anon asked about my coloring on a specific Bridgerton set. So, I decided to make a tutorial combining both! This is a very in-depth tutorial but there’s also nothing groundbreaking here. If you enjoy seeing how other people work like I do, this is for you <3 very long tutorial under the cut!
tech:
★ laptop: macbook pro (13-inch, M1, 2020)
★ external hard drive: seagate one touch ssd 1TB*
tools:
★ adobe photoshop 2022
★ mpv 0.29.1**
★ windscribe (vpn)
★ qBitt⚆rrent (for tv & film)
★ 4k video downloader (for music videos, trailers, interviews, etc.)
★ rizz’s action pack by @anyataylorjoy (highly recommend!)
resources:
★ resource directory by @usergif (a source blog I created for gif effects!)
* I have 2 externals, one dedicated just to storing all my 4k Star Wars files and another for Bridgerton and everything else
** I use this version of MPV bc the other ones weren’t compatible with my laptop for some reason. This one works well for me and doesn’t create duplicate screencaps which I’ve heard is a problem with other versions
PHASE 1: Prepare Your Base Gif
1.1 – Download video files.
I personally like not having to do this regularly for 2 reasons: (1) I t*rrent (I use r@rbg — make sure to use a VPN if you t*rrent!) and (2) I mainly work with 4k files which can take forever to download, especially old media, and I’m not trying to waste my life away. That’s why I keep my files on an external hard drive, so I only need to download when new content drops.
TIP A: Footage Type & File Size
As you saw in the header gifs, I work with HDR footage. You may have heard some gif-makers talk about HDR or 4K screencaps looking like the colors are faded or washed out. They are:
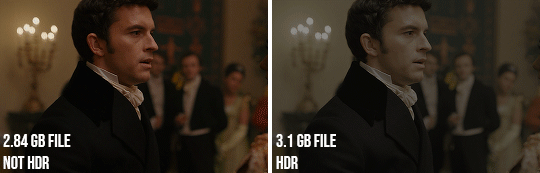
(I don’t have examples of the Mandalorian because I only have that in 4K which is always HDR — so I’m going to stick to using this Bridgerton clip for examples. Also, I made the Mando header gif a long time ago and I’m not letting it go to waste now lol.)
Some people don’t like working with HDR as a base, which is understandable! There are ways you can make your screencap software fix the coloring automatically. But my mentality is: I’m lazy, I’m used to it, I’m already coloring it anyway, and the muted coloring gives me a sense of control over the entire palette — instead of fighting with the existing colors from the original color grading. (I also talked to a videographer at work about this and he mentioned he prefers to color grade with this faded/washed-out look as a base too!)
For the sake of the demo, I tried to color these two scenes as equally as possible in black and white so you can decide if there’s a difference:

Ultimately, the file type you use is up to you! Hopefully this demo helps you make that choice easier. This tutorial is going to focus on HDR footage though.
The size of your file matters too! 4k (2160p) isn’t always better than 1080p (but it typically is for me which is why I prefer to use 4k footage when it’s available). But the main thing is to look at the GB size of your file.
1.2 – Make screencaps.
I use MPV which works great with 4k .mkv files (PS can’t read .mkv files if you try to Import Video Frames to Layers). Check out this tutorial for the basics on getting MPV set up and how to make screencaps.
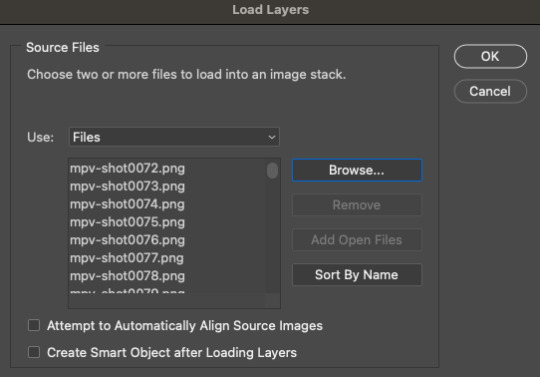
1.3 – Import screencaps.
Load your caps into PS by going to File > Scripts > Load Files Into Stack. Some people upload using Image Sequence because it loads faster, but idk. I don’t really care because I’m never uploading that many caps at a time that I need it to go any faster. This is what the Load Layers window looks like:
1.4 – Make Frames from Layers.
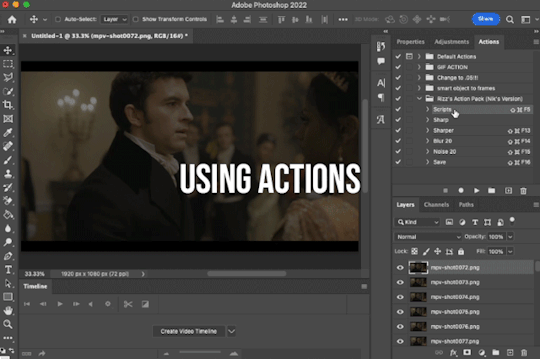
Recently, I’ve been using the Script Action in Rizz’s Action Pack (linked at the top of this tutorial — if you use it, be sure to like and reblog Rizz’s post!) with some actions of my own added to make it perfect for my process. Actions are huge timesavers because all you do is press play!
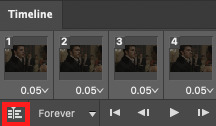
But to do this manually, you can simply select all the layers, click Create Frame Animation, click the menu in the Timeline tab (upper right), and click Make Frames from Layers. Click Reverse Frames in the same menu so your caps are in the correct sequential order and set your frame delay to 0.05 seconds.
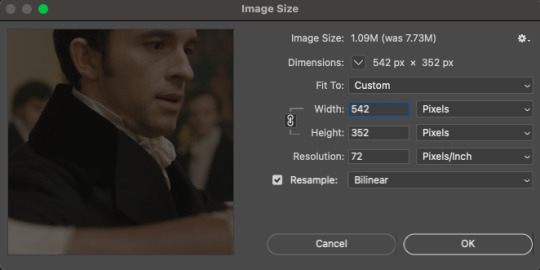
1.5 – Crop and Resize.
For this gif, I want my dimensions to be 540px wide x 350px tall. Do this to your liking but remember, Tumblr’s max width is 540px (here’s a guide for other dimensions). Any width smaller will be stretched and look bad. Any width larger will be compressed, make your gif file huge, and look bad.
P.S. RESAMPLE SETTINGS MATTER! Check out this resample experiment to figure out which one you prefer. I tend to stick to “Bilinear”
TIP B: Preserving Cropped Pixels
Have you ever cropped something, done all your coloring, then wished you could nudge your image just 5 pixels over only to realize you can’t because you’ll have 5 pixels of transparent space on the side? Uncheck “Delete Cropped Pixels” so you can change your image positioning later if needed!

TIP C: 2-Pixel “Buffer”
Something I do (and some gif-makers I know do) is resize with a 2-pixel “buffer.” Gifs sometimes have a slightly transparent border or “halo” effect. You can see it a lot when viewing Tumblr in dark mode. To get rid of it, I resize a tad bigger and then crop out the extra pixels. So, for example, since I’m making a 540x350 (w x h) gif, I’ll resize it to 542px width first. After I’ve converted to a smart object (Step 1.6), I’ll crop out those extra pixels so it’s a perfect 540x350.
(Btw, you can also do this in the export window by setting “Matte” to none. I guess I’m old school for doing this? Idk I haven’t properly tested and compared both methods.)
1.6 – Convert from Frame Animation to Video Timeline.
The sharpening action in Rizz’s Action Pack does everything in one go: converts from Frame Animation to Video Timeline, converts frames into a smart object, and sharpens your gif.
If you’d rather do this step manually, just select all your frames and click “Convert to Video Timeline” in the Timeline menu panel OR click this button:
Then, select all your layers in the right panel, right-click, click “Convert to Smart Object,” and add your sharpening filters.
Again, I’m a huge fan of actions, so I’d rather just hit play on Rizz’s action. It includes two sharpening presets and is super easy to tinker with if you want to add more sharpening or put other filters like Gaussian Blur, Reduce Noise, or Noise on top.
I’ve been using Rizz’s “Sharper” Action and occasionally throw a Gaussian Blur filter set to a radius of 1.0 pixels at 20-40% opacity (or sometimes a Reduce Noise filter), depending on the gif. Here are my usual Reduce Noise settings which I typically set to around 40% opacity:

In this gif, I used Reduce Noise at 40% and Gaussian Blur at 20% lol.
If you prefer using your own sharpening settings but want to use this action for the converting steps, just right-click the Smart Filters under the smart object and click Clear Smart Filters. Then, apply your own sharpening settings.
If you followed TIP C, my 2-pixel “buffer” trick, from Step 1.5, go ahead and delete those extra pixels now! I go to Image > Canvas Size and type in the gif dimensions I want there, 540x350 in this case:

If you had “Delete Cropped Pixels” unchecked, you can move your gif around until you like how your gif is positioned. Your gif should be looking sharp and perfectly sized now, with no weird borders hanging around the edges.
Let’s move on to the fun part!

PHASE 2: Coloring
Disclaimer: this is MY process for coloring, not the be-all and end-all. Everyone has their personal favorite adjustment layers and unique styles, and it’s all preference! The only wrong way to color is by whitewashing, redwashing, etc.
These steps are also just my typical steps, but I always color from scratch and my adjustments always depend on the scene. A dark, yellow-tinted scene from Narcos will be a completely different process from a bright, outdoor scene in Star Wars.
Because an anon asked for it, I’ll be demonstrating my coloring on the gif above from this Bridgerton set. It’ll be a little hard to explain because it’s like a method-to-my-madness, lives-in-my-mind-untranslated thing — but I’ll try my best and mostly use screenshots to demo!
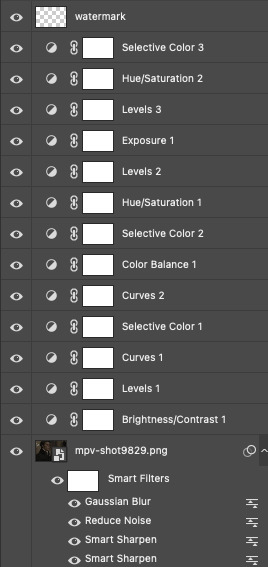
MY LAYERS PANEL OVERVIEW:
2.1 – Brighten + Color Correct
My go-to adjustment layers: Curves, Levels, and Brightness/Contrast (set to screen).
So, like I said, I use 4K/HDR footage which gives me a pretty washed out starting point coloring wise, but I actually love this as a base for coloring! I’m repeating myself but a videographer I work with said he films low-contrast because it provides the best base for natural-looking color grading. And I trust him and myself because I’ve been coloring like this for a long time lol.
ADJUSTMENT 1: Brightness/Contrast 1
When it comes to brightening, I’ve found myself starting to do this neat trick someone from usergif taught me! Literally just slap a Brightness/Contrast layer down, don’t move the sliders, set the blending mode to “Screen,” and lower the opacity to your liking so you don’t start out with a blindingly bright and pixelated gif.

Then, I pretty much always go in with a Curves and Levels adjustment. And I actually do a hint of color-correcting with them too!
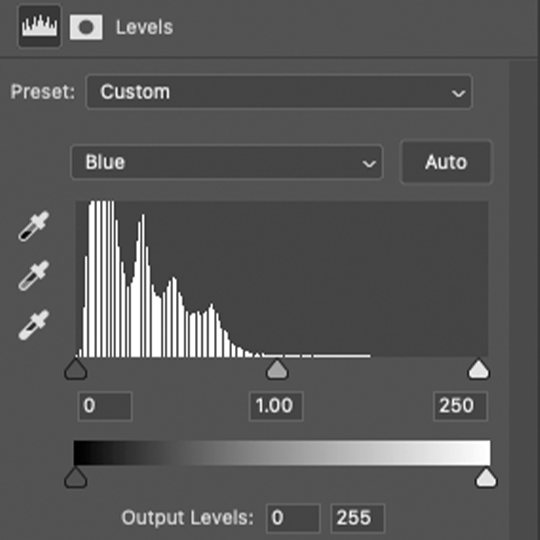
ADJUSTMENT 2: Levels 1
In the RGB channel, I don’t add too much darkness just yet but I definitely bump up the highlights (right slider) a lot. I lift the reds in the Red channel a bit, especially when I’m working on a gif with people. It helps bring back some life to the otherwise washed-out coloring of HDR footage. In this one, I also lifted the greens and blues a bit too! When I say “lift,” I just mean I’m bringing those colors forward or emphasizing them.
ADJUSTMENT 3: Curves 1
I only tinkered with the RGB and Red channels this time — and no fancy S-curves here. But sometimes, I’ll also go into the Green and Blue channels if I didn’t do enough in my first Levels layer. You can see here that I barely even nudged that Red curve up lol. Why do I make such minor adjustments? My brain can’t explain. I just move things, decide if I like it, and stick with it. 🤷🏻♀️

2.2 – Basic Colors + Extra Brightness
My go-to adjustment layers: Selective Color, Curves, and Color Balance.
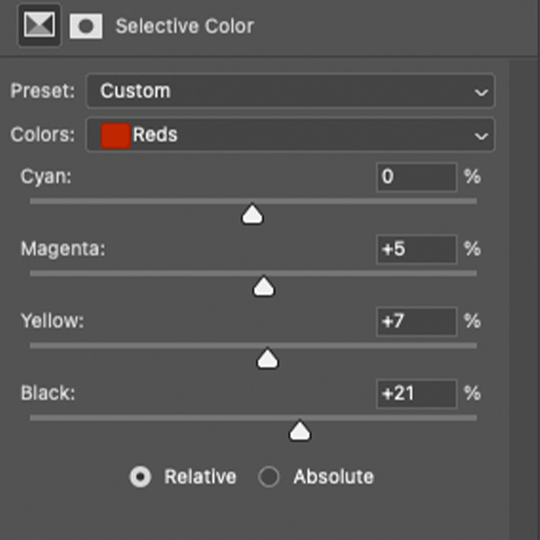
ADJUSTMENT 4: Selective Color 1
Since my gif didn’t have any true green, cyan, blue, or magenta colors, I didn’t play with those channels at all. But there’s a lot of yellow in the background and a variety of reds and yellows in the people’s skin tones which is why I adjusted those two color channels.
You might notice that I increase the blacks in my Red and Yellow channels. I actually do this almost all the time. I kind of think of coloring like makeup?? Idk if that sounds weird. But the blacks kind of add some dimension the way contour would, and my HDR footage naturally lacks this.
Something else I almost always do is bump up the whites in the White channel. I love really bright whites and, with an ideally lit scene, it acts as the highlight makeup lol. It gives me some good dimension on nose bridges, cheekbones, and high planes of the face
I do some overall adjustments in the Neutrals and Blacks channels, but very minor since I have more coloring to do!

ADJUSTMENT 5: Curves 2
Just a teeny tiny curves layer with an itty bitty S-curve (for contrast and so I can see what I’m doing lol)

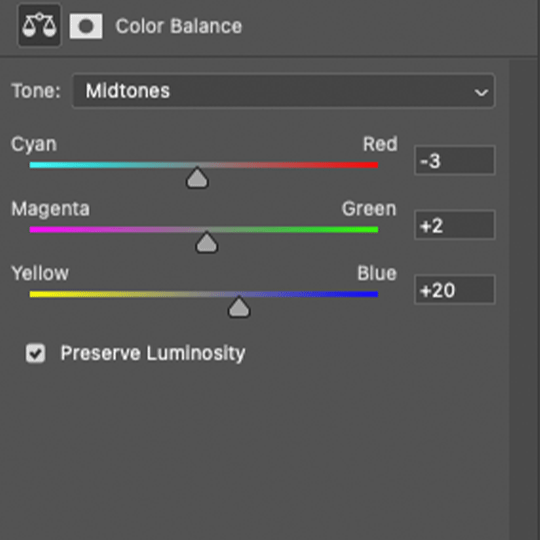
ADJUSTMENT 6: Color Balance 1
I never really know what I’m doing with color balance. There’s no formula I follow or pattern of adjustments I always do. This step is literally the epitome of push the buttons and hope it does something good.
2.3 – Adjust Skin Tones and Other Colors
My go-to adjustment layers: Selective Color and Hue/Saturation.
ADJUSTMENT 7: Selective Color 2
Again, I’m only focusing on the Red and Yellow color channels, adding more blacks to each again. Then, bumping up Whites and doing super minor adjustments in Blacks.
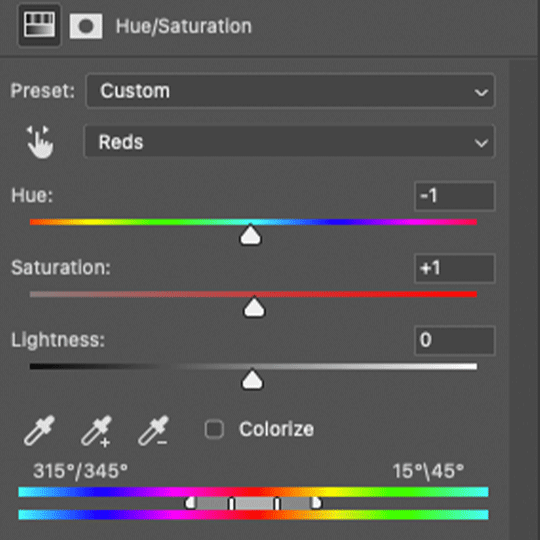
ADJUSTMENT 8: Hue/Saturation 1
Here’s where I do a lot of my skin tone correction. I try to be hyperaware of representing skin tones accurately and naturally, while still having that HQ-looking dimension. By no means am I saying I’m perfect at coloring skin tones, but I do my best using this adjustment.
Again, there aren’t other colors in this scene besides Reds and Yellows, so that’s what I’m tweaking. I do sort of follow a pattern here which is:
Reds Channel: slide down the hue slider a *tad* and I’ll sometimes lower the lightness (I didn’t do that here but I do in the next Hue/Saturation layer)
Yellows Channel: slide down the hue slider so any overly yellow hues move closer to a neutral-magenta hue AND lower the saturation so the skin doesn’t look sallow.
2.4 – Shadows & Light
My go-to adjustment layers: Levels and Exposure.
ADJUSTMENT 9: Levels 2
This is super simple. I’m just adding back some contrast. That’s kind of my trick for HQ-looking gifs. I bumped up the highlights (right slider) a lot again and darkened the shadows (left slider).

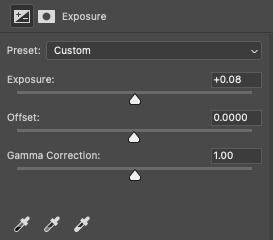
ADJUSTMENT 10: Exposure 1
I only do this sometimes when I want the light parts of my gif to be extra bright, and even then, I barely push the exposure up (I’ve only increased it by 0.08 here lol). Exposure can totally mess up your gif, so be sparing with this if you decide to use it.
2.5 – Repeat as Needed
These are my go-to adjustment layers for basic coloring (i.e. no fancy color palettes or major color manipulation — if you want a tutorial on color manipulation, I made one on usergif right here!). And I tend to add several (but not too many) layers until I get it where I want. Usually, the only additional step I’d do for a color-focused set is add a few Gradient Map layers!
Here are my remaining layers and their settings:

ADJUSTMENT 11: Levels 3
Some final contrast gets added here and some last-minute color correction. For example, if I find I’ve made my subjects’ skin tones too red or yellow, I’ll pull down the left slider in the Red channel to bring back some cyan or bump up the Blues.

ADJUSTMENT 12: Hue/Saturation 2
Only in Reds and Yellows again, I pretty much follow the same principles of my first Hue/Saturation layer. This time, I did lower the lightness in Reds. Their skin was looking a bit too saturated with Red, so this helped me bring it back to a slightly more natural-looking but still high-contrast state and I reduced saturation.

ADJUSTMENT 13: Selective Color 3
Idk why I did this originally... I didn’t bump up the whites and I didn’t touch any other color channels. But I guess my highlights were looking a bit too green-blue, so I bumped up the yellows and magentas a lot and pulled down the cyans.
And here are all the adjustments in action, step by step:

You can see how the middle adjustments were making them look quite red, but the final coloring is more neutral imo.
Now, time to save your gif!
PHASE 3: Exporting the Final Gif
3.1 – Convert Back to Frame Animation + Fix Frame Rate
If you can avoid it, DO NOT export your gif then reopen it to adjust the frame rate. Reopening your gif adds an extra, unnecessary compression step when you already have to go through the unavoidable steps of PS optimizing your gif for web and Tumblr compressing gifs over 3MB.
I love Rizz’s Action Pack mainly for the “Save” action which takes all the guesswork out of this step! Just hit play and your gif will be ready to export in seconds. If you prefer to convert back to frames manually, I’ve written all the steps out here!
Remember to set your looping option to “Forever” and then fix your frame delay aka frame rate (the speed at which your frames play). The generally preferred frame delay among gif-makers is 0.05 seconds (in fact, I’ve heard some blogs won’t reblog your gifs if they don’t appear to be set to this speed!).

But the speed also depends on the FPS of your original file! For example, when I gif video games (like Jedi: Fallen Order) which I believe are at 60 FPS, I tend to make my speed 0.04 (or sometimes faster).

I know that seems like such a minor difference, but as you make more gifs, you’ll be able to tell which speed looks the most natural!
Before exporting, just always be sure to play your gif back, check that you like the speed, and delete any accidental duplicate frames! (Duplicate frames can happen if you animate using keyframes.) They may seem minor, but it’s something I personally can notice even if it’s just one duplicate frame... and it can throw off the entire smooth flow of your gif.
TIP D: MARKETING FOR DISCORD USERS (lol) 🤡
If you share your gifs in a creator server, here’s a fun tip that totally exposes me as a marketer. While you’re in Frame Animation, move your frames around before saving it so that your best-looking frame is Number 1. THIS is the frame people see in your embedded preview link when you share your gifs on Discord. (If your selected frame is in the middle of your gif, just be sure to move all the frames after it too so your gif still loops properly. Like, if you have 10 frames but want frame 5 to be featured in the Discord preview, move frames 5-10 before frames 1-4. Now, your frame sequence is 5, 6, 7, 8, 9, 10, 1, 2, 3, 4 — #5 being the featured frame.)
Your gifs loop anyway, so your first frame doesn’t have to be the first part of your scene :) By being purposeful with your “first” frame, you have control over the still image people see in the server. And if you choose a really good frame, who knows? Maybe more people who aren’t in that fandom will be curious enough to click it because it looks so good and enticing lol
See this preview? That’s actually the end of my gif, but it’s the best part:
(also, not me just realizing I posted this set on 4/20 lmao that was so unplanned a;lsdjk)
3.2 – Save For Web
Go to File > Export > Save for Web (Legacy) to get your gif ready to export!
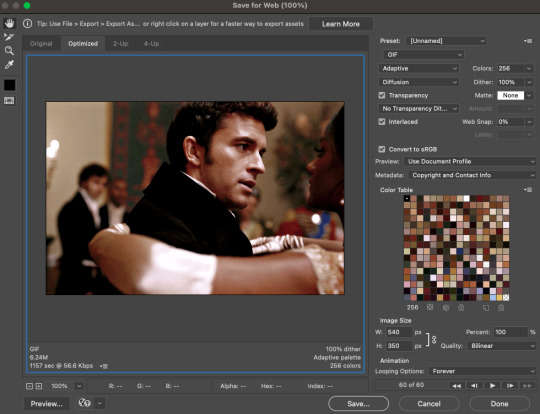
There are still some extra settings to play with here, mainly the Color Reduction Algorithm:
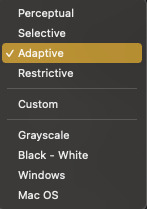
And the Dither Algorithm:

Typically, gif-makers only use Selective or Adaptive and Diffusion or Pattern.
Again, these settings are going to be up to your personal preference. My usual is Adaptive-Diffusion.
On occasion, I’ll go for Selective-Diffusion. And I don’t usually prefer the Pattern dither because I hate seeing the grid lines it produces. But there have been some gifs (like the first one in this set) where I have a solid background color and Pattern yields the best-looking gif. So, I’ll always toggle through the options to see which one I think looks best!
Check out this guide that shows all the setting side by side!
TIP E: How to Keep Your Gif Under 10MB (Tumblr’s current max gif size)
Try to to keep your number of frames as low as possible. I think my average is 60 frames or so. Sometimes I can get away with more depending on the scene.
Make your gif smaller. Obviously, if you’re making a full-width gif, you can’t make it smaller than 540px wide. But you can shorten the height of your gif if your composition allows it!
Add more blacks to your coloring. Idk why this works but it usually does for me. More contrast or something
Try not to use too many adjustment layers (I say this but I don’t usually do this a;slkdjf)
This isn’t my personal preference and I’ll avoid it when possible, but you can add Lossy which is a compression setting that’s available when you do Selective color reduction. It helps reduce the file size, but I’d never go over 10 on Lossy:

3.3 – Upload to Tumblr
Use the Photo Post option not Text Post. Gifs uploaded in a Text Post may look okay on the dash, but they can get very wonky on different themes, create size inconsistencies, and make the gutter wider than the 4-pixel default. (Plus, if you share your gifs in a Discord server — your embedded preview will be all tiny!)

Contrary to some beliefs, uploading to drafts does not mess with the quality of your gif anymore than publishing it instantly. So, go ahead and put your gifs in the drafts so you can see how it’ll all look before posting!
I tend to leave my gifsets in drafts for at least a day so I can criticize myself more 🤡 kidding... a little... but I’ve also heard that keeping your sets in drafts helps them appear in the search/tags faster. I’ve never had problems with my stuff showing up in tags, so maybe that’s true!
And that’s it!
Thanks for reading my dissertation on Tumblr gifs lmao. I hope it was clearer than it was long and ramble-y... and I hope it’s helpful for some beginner gif-makers out there! If not, here are some of the best basic giffing/coloring tutorials I know:
giffing and coloring tutorial by sashafierce
giffing 101 by msmarvel
gif tutorial by kylos
gifmaking for beginners by hayaosmiyazaki
coloring tutorial by magnusedom
and check out usergif’s resource directory here for more help!
[You can also find my other tutorials/resources here]
Before I go, let me just say a few TUMBLR/GIF ETIQUETTE things:
Clearly gif-making is a process. And it is art, whether you use fancy effects or not. So DON’T STEAL GIFS, don’t even use them as a base for your own adjustments. Use this tutorial if you need help making your own gifs from scratch!
Another thing: give credit when credit is due! Trends come and go in gif-making, but you absolutely should link “insp” in the caption of your post (not in the source link and not in the tags). The caption is the most visible and intentional spot, which means it’s the most deliberate acknowledgement of your source of inspiration. If you didn’t come up with a concept yourself (be honest with yourself), just link it! It doesn’t make your post ugly or cluttered. It helps spread awareness to other talented creators that some of your followers otherwise may not encounter in their fandom. And doesn’t it feel good when more people see what you’ve made and celebrate it with you? Give that same feeling to the source of your inspo!
Lastly, remember: don’t let anyone tell you that the gif styles you like aren’t right or aren’t beautiful. Gif-making is about having fun and creating art! As long as you like what you’ve made and it doesn’t harm any person/community or perpetuate problematic behaviors (i.e. whitewashing), then do what you want! It’s your blog!!
Have fun! <3
#photoshop tutorial#gif tutorial#completeresources#dailyresources#userkosmos#usershreyu#uservalentina#useralison#usernums#tuserkay#usercim#userk8#tuserrex#userannalise#useryoshi#userelio#tuserabbie#uservivaldi#resource*#myedit*
2K notes
·
View notes
Text

Holy shit is that Smart Fridge from Phonegram--
Fullbody under the cut cuz tumblr really wants to compress the image so it ends up looking very bad </3
#i uh. i hope you guys like him#i was split between making him a gray fridge or a black fridge so i did a bit of both. imagine hes a gray fridge with a black freezer on to#milgram#phonegram#ocgram#yeah sure this is going in the main tag why not. why not#kanrei reizoko#my posts#my art
53 notes
·
View notes
Text
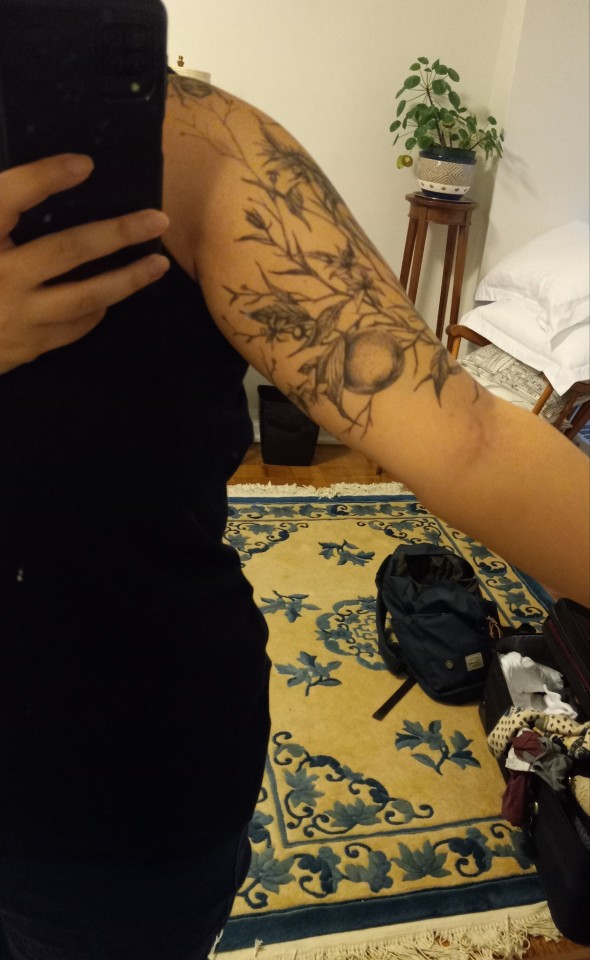
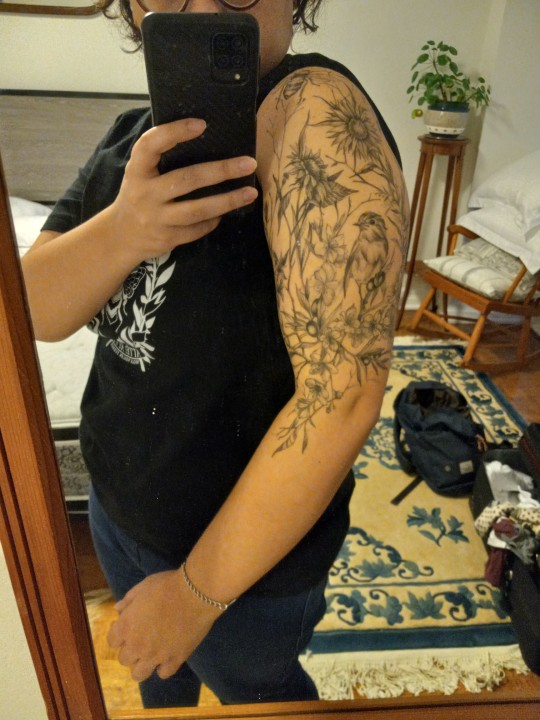

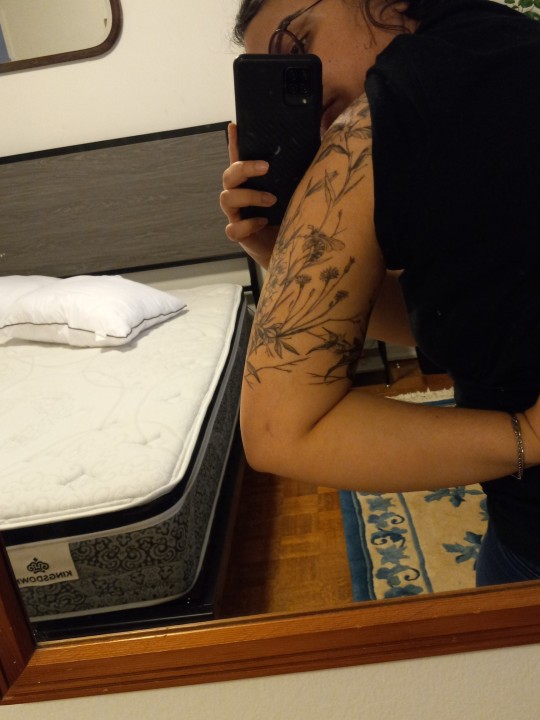
It's real hard to get photos of the back of your arm + my phone camera is Bad + tumblr further compresses the images to a horrible quality, but it's (mostly) healed and NYE seemed like the appropriate time for this as I blast tmg this year on repeat ad nauseam
Maybe it's not perfectly how I imagined and there's things I'd go about differently in the composition but it's meaningful and beautiful and /me/ and fuck it I'm proud of me. For making it long enough to do this. For finally doing it. For making decisions for myself regardless of others' opinions, and in fact in the face of opposition and judgment and despite my compulsive, fearful need to people please.
The gang's all here: sparrow, bee, wasp, plum blossoms, olives, sunflowers, lilies, orange fruit and blossoms, dandelions
#the duality of fran#might have to get a few touch ups done in the new year#but we done! we done!#i want to get the sun on my other inner arm#much smaller. just a patchwork piece#but that will wait til next fall at least#wearing a tshirt with just the bottom half poking out??? fuck i look good. i look like me. i look like how im SUPPOSED to look in my head#it settles smthn in me#all my tshirts are unisex fit. i hate short cap sleeves. so this is just. fuck yes
28 notes
·
View notes
Last Seen Blogs
technicolorthoughts
Technicolor Thoughts

leethotmin
too bad, but it's too sweet
atimof
今日のもふ達

karamelek43
Ayşegül
dreamtoxicatcher
Dreamcatcher42