#new editor tutorial
Explore tagged Tumblr posts
Visit Tumblr Blog
Explore Tumblr blogs with no restrictions, modern design and the best experience.
Last Seen Tumblr Blogs


Fun Fact
Tumblr Inc. is funded by 13 investors.
Text
NEW EDITOR 101: A GUIDE FOR GIFMAKERS by v @shangs
Hi friends! I know I said I would do this way back in April/May when this change was announced but I've been massively busy lately so thank you all for being patient with me :)
Based on the results of this poll, I will be trying my level best to help make a guide for gifmakers to best deal with any problems that have been present with the new editor. However, it's worth noting that I have personally not experienced any of these problems myself and I have no record of any problems from other people that I could send to staff and get guidance on, so for some of these issues I will unfortunately be a broken record.
That being said, I have been using the new editor for a few months now and it hasn't been too bad. So don't be discouraged by the new editor if you still love to make gifs and share them. You may need to adapt a bit, but it's doable!
This is meant to be comprehensive and will be explanation and image heavy. Full guide under the cut.
CONTENTS:
What is the new editor?
Steps to take before posting
Making a post
Troubleshooting
01. WHAT IS THE NEW EDITOR?
Some of you may be asking yourselves what the point of the new editor even is and why it's being implemented in the first place when we already had a (mostly) functional editor. My very limited understanding of it as a CS student is app compatibility and flexibility. I'm not totally clear on the details nor am I 100% certain this is the case, but NPF posts (basically, posts made with the "new editor") first started with the mobile app. I'm unsure if the different post types were simply too unwieldy to transfer to the app - having to make a whole bunch of post types when with the new editor you can now have posts with any elements you want without the rigidity of a set post type - or if it was simply not able to be implemented, but the apps have always used NPF. The majority of Tumblr users are coming from the mobile apps. Then it became a case of having the legacy editor for the web users (which were fewer in number) and the new NPF editor for everyone else. That takes resources to keep around and it's pretty inefficient. Naturally the older editor that was used by less people was going to get the axe, especially since you couldn't tell on mobile that there was even a difference between NPF or legacy posts.
So now here we are and the posts are NPF. This means they're in "Neue Post Format." Basically, every post you make is by default a text post, containing "blocks" of other media - as gifmakers we will primarily be dealing with photos.
I understand that it's frustrating to many to see "our gifs are now rendered as text posts" and ask WHY it's happening when photos should logically be rendered as photo posts - but the fact is, there's now no real delineation between a "text post" and a "photo post." The reason NPF posts are now "text posts" is because that's how they are rendered for desktop themes, not because everyone is going to see your post as text and your gifs are going to be compressed into the quality of a potato (though I know some have seen this issue - more on that later.)
02. STEPS TO TAKE BEFORE POSTING
The long and short of it is that you may have to update your theme. More detail here for those who are interested, but check that your theme supports "new editor posts" or "NPF posts" AND that this is true for original posts (you can read more about why in this ask and, although this may be a bit time-consuming, test it out on your blog). I can say with certainty that my second theme Cygnus supports original NPF posts. This is NOT true of my first theme, though.
You can try to add the NPF Fix by @glenthemes to your own theme (beware if you don't know HTML/CSS) or try this tip by @burningblake for original posts.
Feel free to add theme makers with fully NPF-compatible themes in the notes! I have been happily using my own theme so I can't say to what degree others' themes are NPF-friendly.
03. MAKING A POST
If you're sticking around to post on the new editor and you have trouble ordering your gifs around, here's a little guide on how to post.
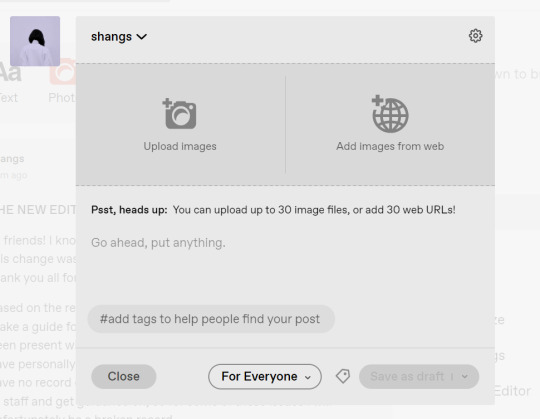
If I click on "Photo" from web and open up the editor, here's how it looks:
I went ahead and added three full-width gifs and the editor put them in like so:
You'll most likely also have to order your gifs around in the way you want them. You can go ahead and hover over your gifs to see the button to orient them (the four dots in the top left corner) and the button for an image description (the three dots in the bottom right corner). I've attached images of all three below:


If you hold the orientation button, move your gif around until you see the blue line that shows where your gif will end up in the spot that you want it. For example, I wanted to move the second gif below the first one, so I oriented it so that the blue line would show the marker between the two gifs:

Now my gifs are oriented nicely! Of course, this is a simpler layout, but the principles still hold.
If you save your gifs as a draft and reopen them or you just notice a large gap like this in between your gifs when you're in the editor, don't worry.

This will not show up in dash view or on a desktop theme that supports original NPF posts. For example, this is how the gifs' gap (without modification) looked in my desktop theme:

With your gifs ordered, the final step is to add alt text. You can read more about alt text and why you should use it here. (Feel free to ignore the sections about the captions on the legacy editor since it is no longer relevant. It's also unnecessary to clearly mark descriptions if they're not in the caption of your post because they will clearly show up under "ALT" on Tumblr.)
If you click the three dots in the bottom right corner as seen above, and click "update image description:"

You can add the description you like and click "update." Your photos' alt text will show up under the "ALT" bubble on Tumblr. This is generally a good practice to get into to make your content more accessible, so I hope you guys will consider using alt text regularly :)
Also, I've noticed that in the editor, if you go back and edit something it will take some time to show up. You may have to refresh the page or load it again after some time, but your edits should be there. I would not go back and edit posts again if you see your posts haven't shown up. I also advise against editing your posts on mobile because it's easier to make a mistake.
And there you go, you've successfully made a post with the new editor!
04. TROUBLESHOOTING
I'm sure you've all been waiting for this. Unfortunately I am probably going to be extremely unhelpful if the editor hasn't been refined in the last few months for those experiencing issues. I'm going to go in the categories that I listed out in my original poll, but keep in mind that I haven't personally seen any of these issues on my end so I haven't been able to contact staff with any evidence that this happened other than my poll.
Dashboard view quality issues: I haven't noticed this issue. I'm not sure if this has been fixed since the original poll was posted. If you're experiencing this issue, this is not something I know how to fix so I would contact staff with screenshots of the issue.
Desktop theme side padding: As noted before, this is a theme issue. If you change themes to something that is NPF-compatible with original posts, there shouldn't be any more issues here.
Small gifs on mobile: In my experience this was happening regardless of what editor was used; it's a bug that seems to have been fixed since this poll was created. If you're still experiencing it, at the risk of sounding like a broken record, I would advise contacting staff.
New editor doesn't accept gifs of size 9.8MB < x < 10MB: I haven't experienced this issue so I would say the only workaround would be to either trim the size of your gif so that it is under 9.8MB or whatever threshold seems to be the cutoff or contact staff (I am so sorry for constantly having to suggest this 😭 unfortunately there's no trick I can offer because the new editor has been taking all my gifs just fine)
Logistical issues ordering gifsets: I hope this guide has been able to answer the majority of questions and shed some light on some of the more buggy behaviors of the new editor, but if you have any more specific questions you can feel free to shoot me an ask!
HTML issues / colored text: Unfortunately it seems colored text may be deprecated entirely? This could be for accessibility purposes because I believe screen readers would read out every single letter of gradient text in captions which I imagine can get quite frustrating for users of this technology. I recommend just using the normal rich text editor. If you want small text, you can highlight and click the <s> button!
Other: If it seems like something I may be able to answer, please feel free to ask me. Otherwise... hound staff 😭
Here's where you can hound staff, btw. If you're having major issues I would advise you guys to submit support tickets. That way if there are any widespread bugs, staff will hopefully be able to fix them.
I hope this guide was helpful to you guys in dealing with the new editor, and happy giffing <3
#gif tutorial#new editor tutorial#completeresources#userphotoshop#resourcemarket#userrobin#userbells#arthurpendragonns#ughmerlin#userbecca#usersameera#usermarsy#alielook#tuserlucie#tutorial
558 notes
·
View notes
Text
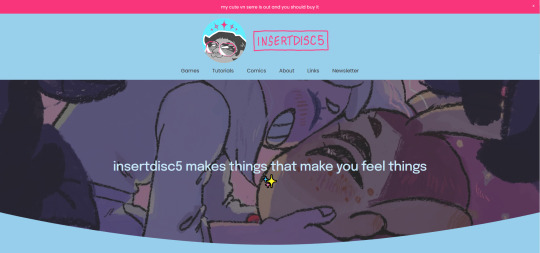
about time i redid my website
#sq*respace's new editor kinda owns ngl......#i also have a tutorial section. lemme know if you need any of my tutorials permanently engraved on my website just in case
170 notes
·
View notes
Text
I realize I have alot of metaseq/mmd knowledge floating around in my head that may not be common knowledge? and tbh I forget alot so. maybe I will post some randomly now and then.
Todays random MMD information is....
Have you ever wondered why some bones merge and some flip when you hit Mirror in PMD editor? Well, I can tell you why! It's important for any bone you want to flip instead of merge have the kanji for Left/Right in the bone name. Any bone with 左 (hidari/left) 右(migi/right) will automatically flip to the other direction when mirrored. if this kanji is not present, and the bone is not manually renamed before merging the sides, the bones will merge into one.

here's an example of my quadroped model that I made the bones for. Although he isn't compatible with mmd motions/is in english. I slapped on that kanji so I didn't have to manually rename anything while mirroring.
As you can see....I'm the kind of person who doesn't name my layers.
#mmd#mikumikudance#tutorial#i guess???#mmd tutorial#pmd editor#I want to help others also create new things instead of gatekeeping information.
2 notes
·
View notes
Video
youtube
Create Unique Avatars from Your Favorite Images using this Canva app!
#youtube#canva#canva design#Canva tutorial#Canva tips#canva app#canva 2024#canva update#canva new feature#tutorial#avatar#photo edit#online photo editor#free avatar#free photo editor#photo to avatar#Avatars
0 notes
Text
Inshot New Lyrics Video Editing Tutorial Telugu
In this Inshot new lyrics video, we are editing and creating a lyrical video with the Inshot app. The app is a cool app for making and editing lyrics videos. We will be using the app to edit, sing, and create a great lyrical video.
If you're looking for a creative way to edit your lyrics, then this Inshot new lyrics video is perfect for you! With the app, you'll be able to edit and sing your lyrics in a fun and stylish way. Plus, the app is simple to use and really makes lyric video creation easy. So if you're looking for a creative way to edit your lyrics, then check out Inshot!
youtube
#inshot#inshot new lyrics video#inshot video editing#inshot video editor#inshot lyrics video editing#Inshot tutorial Telugu#inshot app#Inshot new#instagram viral reels editing#Youtube
0 notes
Text
Introducing the Star Wars Reference Wiki!

Introducing the Star Wars Fic Reference Wiki, a wiki for fic writers by fic writers!
The Star Wars Fic Reference Wiki is intended as a way for fic writers and other fanwork creators to easily look up pertinent information without having to slog through dense paragraphs or comb through categories with dozens or even hundreds of entries with few indicators of what the pages are. Do you want lists? Do you want tables? Do you want easily digestible bullet points? We've got 'em!
We build pages from common questions we or other fic writers have, such as:
All these fics incorporate events from Jedi Apprentice, but what really happened to Obi-Wan Kenobi in Legends?
How do the stories in Revenge of the Sith and The Clone Wars mesh together?
Which characters are LGBTQIA+? Who are some LGBTQIA+ creators who have worked on a Star War? How about a timeline of LGBTQIA+ people and content?
BBY/ABY, BrS/GrS, BFE/AFE... what's the difference between these and all those other calendars? What calendar do characters use before the Battle of Yavin?
What are some idioms or kriffing swears this character could use to sound more Star Wars-y?
Does the GFFA have its own version of a grilled cheese sandwich with tomato soup?
What could be used as a pack animal in one of the many, many deserts?
Why does this fic call him "Yan" or "Glamnor" Dooku? Is her full name Padmé Amidala Naberrie or something else?
How many costumes does Padmé wear? What about other SW costumes?
What are some canonical design options for a Kiffar OC's facial tattoo?
Are these the droids you're looking for?
Are you constantly losing those handy tumblr posts compiling useful resources? We have a permanent page for that!

(Swears in light mode; LGBTQIA+ characters in dark mode)
We've only recently started building the wiki, and are creating new pages all the time! We'd love help or suggestions for new pages. Have you never edited a wiki before? No problem! We have a tutorial for that. Are you not super confident about your English? No worries! Other wiki editors are here to help! We have a Discord server for the wiki, and side channels for things like SW fic recs and general fan chat.
Thank you for initial brainstorming and showing us there was an interest in and audience for this wiki, from us (facingthenorthwind and immithrax) to you: @nimata-beroya, @cacodaemonia, @elismor, @genericficerblog, @seth-shitposts, @takadasaiko, and @virusq!
Many hands make great wikis, so please, come on over and join us, and check back to see what new things we have in store! If you find our pages useful, we'd also love if you could spread the word, so other people can make use of the resources we've worked hard to create.
#star wars#star wars fandom#star wars fic reference wiki#star wars reference#fic research#fic resources#rp resources#fan wiki
2K notes
·
View notes
Text
just spend the last few hrs editing
#and my gosh was it tough lmao#new to the software and it’s an understatement to say that i was intimidated#bc this is essentially my first time editing on the computer 🗿#literally triple checked to make sure i saved everything bc i would cry otherwise lmao#i mean#it’s a learning experience#but i rather not have my work lost lol#this edit is gonna take awhile to finish 💀#i want to have fun with it but there’s just so much i don’t know it’s hard jajaja#i was watching tutorials and was just like 😀😀 the entire time#why is it all so complicated#like there’s graphs and everything bruh#and you got to time it with the axis what#me when im automatically not good at something: 👺🤡#i have a vision of what my edit should be like that#but i have no idea on how to make it happen#ik ik trial and error#but#shoutout to all the editors cuz wth lmao#ne way im just messing around and hoping that it’ll come out decent#i rlly should have taken this time to do actual work tho#eep
0 notes
Text

By popular demand (I saw two people asking) I thought I would throw together a quick guide to using the road editor tool in the newest version of SimPE! You'll see that this is a very easy tool to use, and best of all, goof-proof. If you do mess up (you probably will) it's very, very easy to correct.
Very, very, very important to make a backup of your hood before you ever do any tinkering in SimPE! I also recommend practicing on a test hood you don't actively play in to get a feel for it before you do anything to your main hoods.

We're starting with a vanilla Strangetown. I would recommend going in your game and taking a nice overhead screenshot of the hood like this first to look at for reference of where everything is situated the way that you're used to looking at it.

2. Open SimPE, go to Tools> Neighbourhood> Neighbourhood Browser and open the hood you're wanting to work on. If you're not so familiar with SimPE, opening your hood can take some time. Touch nothing until it's loaded!

3. Once it's all loaded, from the Resource Tree list pick Neighbourhood Terrain Geometry (NHTG). Then you'll see one file populate the Resource List - click that. Make sure on the bottom that you have Plugin View tab selected.

4. Now you should see this map of your hood pop up! There are different things you can toggle, I like to check the Show Lots box when I'm editing the roads. Then click the Road Editor button on the right.

5. To be able to see better, I've pulled this Plugin View window up a bit - it may rearrange the Resource List and Resource Tree windows a bit to accommodate. You can also press the Zoom 2x button to see closer, and then you'll have to use the scroll bars to move around the map and the road editor tool.

6. The road editing tools here will be placed down in the same orientation as the map. So the two parallel roads running through Strangetown from this perspective are the vertical straight road pieces (top row, second from left).
When you select a road tool, above it will indicate which tool you have selected.
Also - I recommend having Handle Stop Signs ticked.

7. Once you have the correct type of road selected for the spot you're working on, simply click on the map - it lays it down one tile at a time. If you miss a spot like shown here, just fill it in.

8. If you want to create an intersection, first delete the section of road where the intersection will go.

9. Then choose the type of junction for the intersection you're making, and add that piece in. You'll see a red circle appear (unsure if this is because it's an intersection or because you have handle stop signs selected, but I recommend you do have that selected either way).

10. Once you're done making all your changes, click Close Editor.

11. This is the part where you save your changes! First click Commit in the top right of the editor. Then, File> Save!

12. Load your game to check! Looks pretty good with all those new roads!

13. However, we have indeed made some mistakes! Which were absolutely for illustrative purposes and not truly an accident.

14. Never fear! Simply reload the hood in SimPE - I've deleted the spot where the T-junction should go and added one in, and deleted where the road just ended abruptly and added a proper end piece.
I have not experimented with what happens if you try to build a road through hood deco - if you have, please let us know in the comments how that went!
I also have barely touched the terrain editing tools, so that's outside the scope of this tutorial.
I hope this helped!
#the sims 2#sims 2#ts2#ts2 maxis match#ts2 simblr#ts2 tumblr#simblr#brightmaple#ts2 tutorial#simpe tutorial#simpe road editor
729 notes
·
View notes
Text
DAVG Extracted Audio Masterlist
All files were extracted by me using Wavenend's Alpha Frosty Mod Editor. Tutorials on how to open and extract audio can be found here and here.
Extracted audio tag: #datv audio
Companion comments:
Companions struggling with the gate during Blood of Arlathan
Companions cheering Rook on and dunking on Illario during his boss fight
What home smells like (Crossroads comments)
Ghilan'nains's comments about Rook's romances at the Crossroads (and their reactions)
Companions being protective of Lucanis during the Bloodbath
Companions reacting to pretending to be Spirits of Disruption during Solas's memory
Final mission deaths:
Teia's comments about companions fallen in the final battle
Evka and Antoine's comments about companions fallen in the final battle
Isabela's comments about companions fallen in the final battle
Illario's comment if Lucanis dies in the final battle
Companions commenting on each other's deaths: Bellara, Davrin, Harding, Lucanis, Neve, Taash, Taash x Harding romance, Neve x Lucanis romance
Mini overworld events:
Taash helping a qunari woman at the Treviso market
Isabela's comment on Emmrich romance
Bellara and Davrin giving money to a poor elven man in Treviso
Bellara recognising (Felassan's?) insignia on the undead at the Crossroads
Cut/inaccessible content:
Varric's cut lines about letters delivered to the Lighthouse
Rook interacting with a wolf at the Fen'Harel altars
Varric's old lines from the intro animatic
Rook using the lyrium dagger as a key
Time limit on the Evanuris altars
Lines for forgiven Illario before the final battle if Treviso was blighted
Cut dialogue from Elgar'nan and Solas's verbal fight during Blood of Arlathan
Dialogue reactivity regarding Rook's race/faction:
Bellara asking Qunari Rook why they can't breathe fire like Taash
Elf Rook understanding Solas's words during the Blood of Arlathan
Rook Mercar and Rook De Riva commenting on spies during Coffee with the Crows
Rare dialogue:
Emmlich and Harding discussing their camping trip
Lucanis's gifts for Davrin, Taash, and Emmrich
Taash's combat lines for romanced Rook after they are rescued from the Regret Prison
The Caretaker commenting on Rook visiting/leaving the island with the fragment of Mythal and the result of the confrontation with her
Differences in the final dialogue with romanced bllighted Bellara if you didn't complete Cyrian's funeral
Lines about the future of the elves you can hear in the final dialogue with Bellara if you completed all her personal quests EXCEPT for Cyrian's funeral
Misc:
Varric notifying Rook about new available companion quests
Companion ambient themes
Inquisitor Character Creation OST - Fade Sacrifice
The Caretaker saying "Enchantment" :)
#flowers.txt#datv audio#do you guys have any idea about how much I like making masterlists#I truly thrive on this website
455 notes
·
View notes
Text

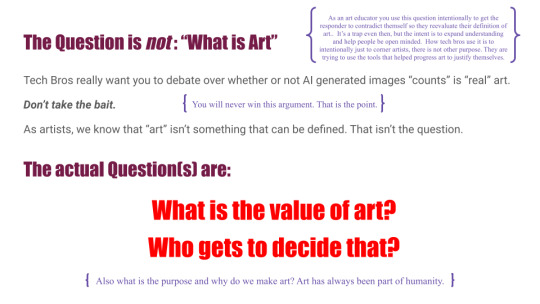

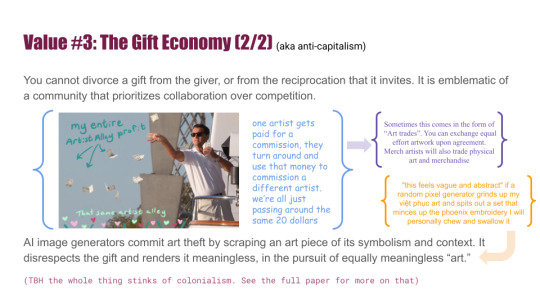
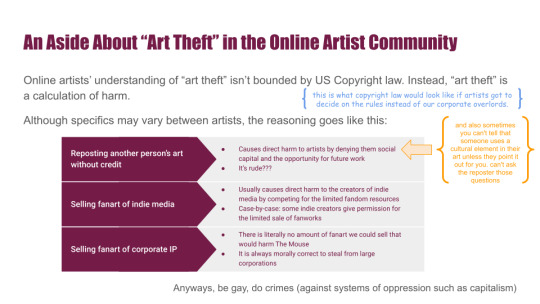
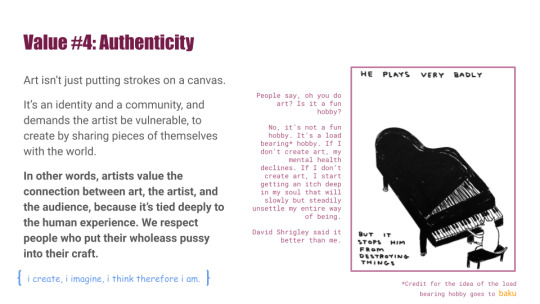
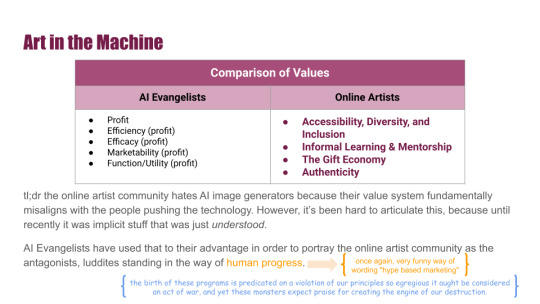
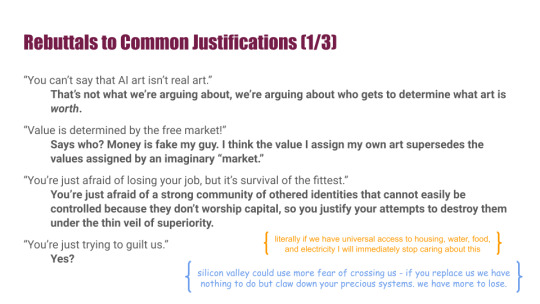
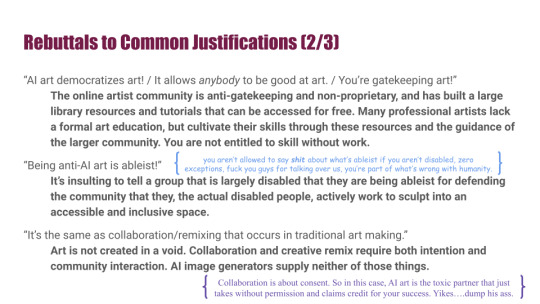
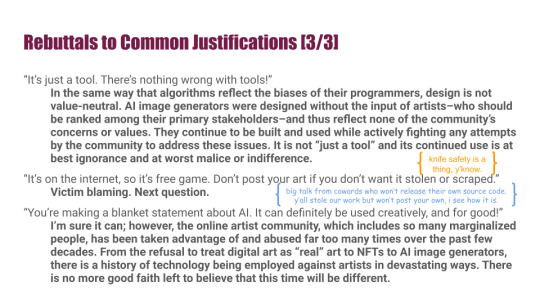
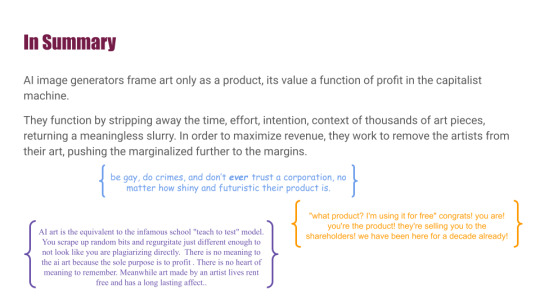

FireflySummers’ Guide to Arguing Against the Use of AI Image Generators
(AKA I hate AI image generators so fucking much that I published a whole ass academic article on it)
Read the Paper: Art in the Machine: Value Misalignment and AI "Art"
Citation: Allred, A.M., Aragon, C. (2023). Art in the Machine: Value Misalignment and AI “Art”. In: Luo, Y. (eds) Cooperative Design, Visualization, and Engineering. CDVE 2023. Lecture Notes in Computer Science, vol 14166. Springer, Cham. https://doi.org/10.1007/978-3-031-43815-8_4
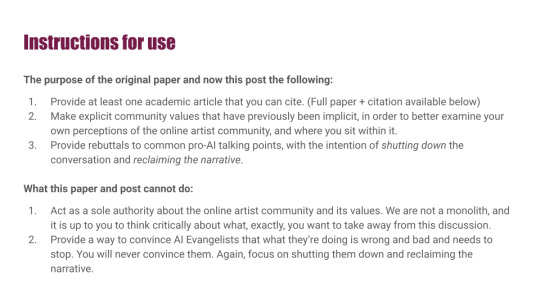
The purpose of the original paper and now this post is the following:
Provide at least one academic article that you can cite. (Full paper + citation available below)
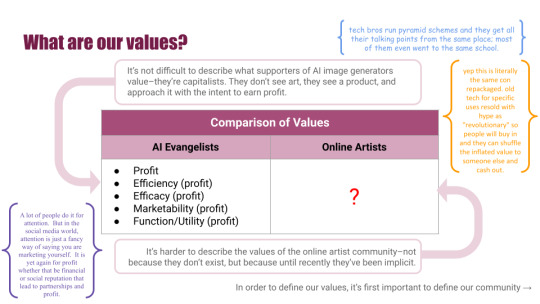
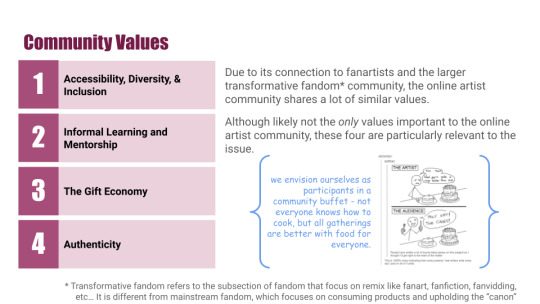
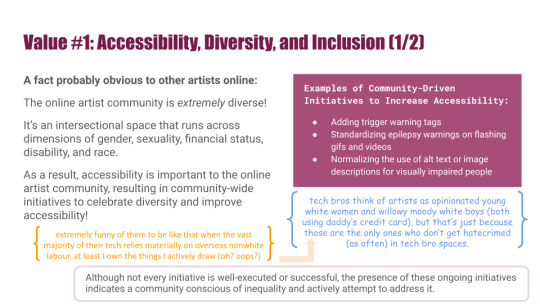
Make explicit community values that have previously been implicit, in order to better examine your own perceptions of the online artist community, and where you sit within it.
Provide rebuttals to common pro-AI talking points, with the intention of shutting down the conversation and reclaiming the narrative.
What this paper and post cannot do:
Act as a sole authority about the online artist community and its values. We are not a monolith, and it is up to you to think critically about what, exactly, you want to take away from this discussion.
Provide a way to convince AI Evangelists that what they’re doing is wrong and bad and needs to stop. You will never convince them. Again, focus on shutting them down and reclaiming the narrative.
Final Disclaimer: I'm a very fallible researcher who is still very much learning how to do academia. I cannot speak for the entirety of the online artist community or fanartist community. We all have different lived experiences. I have done my best to include diverse voices; however if you have concerns or critiques, I am open to hearing them.
If you show up to debate in favor of AI image generators, you will be automatically blocked.
Credits:
Editors, Meme Experts, and Annotators: @starbeans-bags, @b4kuch1n, @cecilioque.
Tutorial Examples: @sabertoothwalrus, @ash-and-starlight, @miyuliart, @hometownrockstar, @deoidesign, @cinnamonrollbakery
If you have read this far, thank you very much. I hope that you have found a constructive lens for approaching the war with AI image generators, as well as a new tool for shutting down debate and reclaiming the narrative.
#anti ai#fuck ai#fuck ai everything#fuck ai bros#anti ai art#ai is theft#ai is a plague#fandom#fandom research#fanart#my academics#that's a new tag for me#long post
3K notes
·
View notes
Text
========================================================
[tutorial: build your own neocities/nekoweb page]
========================================================
a beginner's guide for making your very own home on the indie web—retro, personal, weird, and 100% yours.
this ain’t an average wix, squarespace, or tiktok aesthetic.
we’re talking full html/css with soul and attitude.
[ prerequisites ]
------------------
> an idea
> basic text editor (vscode, notepad++, or even notepad)
> account on https://neocities.org or https://nekoweb.org
> some gifs or tiles you love (dig deep or make your own)
> optional: image host or gif repo (or self-host everything)
[ feeling overwhelmed? read this. ]
-----------------------------------
you do *not* need to know everything.
html is not a mountain. it's a garden.
you plant one tag. then another. then a style. then a button.
you can build your site piece by piece.
and every piece is a portal to somewhere personal.
you are allowed to make broken pages.
you are allowed to use templates.
you are allowed to start over as many times as you want.
this is *your* world. you control the weird.
[ step 1: create an account ]
-----------------------------
> neocities: https://neocities.org
> nekoweb: https://nekoweb.org
register a name, log in, and enter your file manager.
this is where you upload your files and see your site live.
[ step 2: your first file - index.html ]
----------------------------------------
make a new file: `index.html`
basic starter:
<html>
<head>
<title>my weird little corner</title>
<link rel="stylesheet" href="style.css">
</head>
<body>
<h1>welcome to the void</h1>
<p>this is my page. it’s strange. like me.</p>
<img src="mygif.gif">
</body>
</html>
> upload to the dashboard
> boom. you’re live at
https://yoursite.neocities.org
or https://nekoweb.org/u/yoursite
[ step 3: add a style sheet - style.css ]
-----------------------------------------
create a file called `style.css` and upload it.
here’s some nostalgic magic:
body {
background: url('tile.gif');
color: lime;
font-family: "Courier New", monospace;
text-shadow: 1px 1px 0 black;
}
img {
image-rendering: pixelated;
}
marquee {
font-size: 20px;
color: magenta;
}
link it in your html and the vibes activate.
[ step 4: decorate it like a haunted usb ]
------------------------------------------
> use <marquee> for chaos scrolls
> embed gifs from https://gifcities.org/
> steal buttons from https://cyber.dabamos.de/88x31/
> set up a guestbook at https://www.smartgb.com/
> loop audio with <audio autoplay loop>
> add fake errors, 90s web lore, random link lists
[ step 5: resources, themes, and comfort ]
------------------------------------------
> templates & layouts: https://numbpilled-themes.tumblr.com
> glitchy gifs & buttons: https://glitchcat.neocities.org/resources
> layout builder: https://sadgrl.online/projects/layout-builder/
> free tiled backgrounds: https://backgrounds.neocities.org/
> beginner html intro: https://www.w3schools.com/html/
> pixel fonts & cyber assets: https://fontstruct.com/
remember:
you don't need to know js. you don't need to be a coder.
you just need a mood, a direction, a dream.
the html will follow.
[ bonus concept: shrine pages ]
-------------------------------
> a page just for one character you love
> a room to house digital fragments of your identity
> embed quotes, music, images like altars
> call it shrine.html and link it from your homepage
[ closing mantra ]
------------------
you are not here to be optimized.
you are not a brand.
you are a ghost inside the machine,
carving your initials into the silicon void.
welcome to Your website.
========================================================
#webcore#old web graphics#neocities#web graphics#carrd graphics#carrd resources#rentry decor#rentry graphics#carrd moodboard#carrd inspo#neopets#indie#indie web#early web#webdevelopment#web development#web resources#web design#old internet#old web#oldweb#nekoweb#transparent gif#tiny pixels#pixel gif#moodboard#tutorial#html page#html theme#htmlcoding
307 notes
·
View notes
Text
How To Get Started Making Visual Novels
Wanna make a visual novel? Or maybe you've seen games like Our Life, Blooming Panic, Doki Doki Literature Club, etc. and wanna make something like that? Good news, here's a very basic beginners guide on how to get started in renpy and what you need to know going in! Before you start, I highly recommend looking at my last post about writing a script for renpy just to make it easier on you!
LONG POST AHEAD
Obviously, our first step is downloading it from their website

thankfully, its right on the home page of their site. Follow basica program installation steps and run the program. I highly recommend pinning it to your task bar to make it easier to access.
From there, you're met with the renpy app, it's a little daunting at first but let's talk about what all these buttons are for.

Projects
This part is simple, it just lists the current projects in the chosen directory. You probably won't have any in there of your own. You should still see Tutorial and The Question!
Both of those default projects are super helpful in their own ways, i highly recommend testing out the tutorial and playing around with it just to get comfortable with some of the basics.
Create New Project
The first step to actually making your game into a game!
You'll be met with a prompt letting you know that the project is being made in English and that you can change it. You can click Continue.
From here, you'll be asked to input a project name! Put in your games title, or even a placeholder title since this Information can be changed later! (this is also the title the folder will be in your file browser, be sure to name it something you won't overlook)

Now we get to choose our resolution!
If you have no idea what to choose, go for 1920x1080! This is the standard size for most computer monitors and laptops, but it will still display with moderately decent quality on 4k monitors too!
You can choose 3840x2160 as well. This is 2x the measurements of the default, with the same ration. These dimensions are considered 4k. Keep in mind, your image files will be bigger and can cause the game to have a larger size to download.

Now we get to choose our color scheme!
Renpy has some simple default options with the 'light mode' colors being the bottom two rows, and the 'dark mode' colors being the toop two rows.
You can pick anything here, but I like to choose something that matches my projects vibes/colors better. Mostly because depending on how in depth you go with the ui, it minimizes the amount of changes I need to make later.

Click continue and give it a minute. Note: If it says "not responding" wait a moment without clicking anything. It can sometimes freeze briefly during the process.
Now we should be back at our home screen, with our new project showing. Let's talk about allll that stuff on the right now.
Open Directory
This just opens that particular folder in your local file explorer!
game - is all the game files, so your folders for images, audio, saves, and your game files like your script, screens, and more.
base - this is the folder that the game folder is inside of. You can also find the errors and log txt files in here.
images - takes you to your main images folder. This is where you wanna put all of your NON gui images, like your sprites, backgrounds, and CGs. You can create folders inside of this and still call them in the script later. EX: a folder for backgrounds , a folder for sprites for character a, a seperate folder for spirtes for character b, etc.
audio - Takes you to the default audio folder. This is empty, but you can put all your music and sound effects here!
gui - brings up the folder containing all of the default renpy gui. It's a good place to start/ reference for sizes if you want to hand draw your UI pieces like your text box!
Edit File
Simple enough, this is just where you can open your code files in whatever text/code editor you have installed.
Script.rpy - where all of your story and characters live. This is the file you'll spend most of your time in at first
Options.rpy - Contains mostly simple information, like project name and version. There aren't a ton of things in here you need to look at. There is also some lines of code that help 'archive' certain files by file type so that they can't be seen by players digging in code however. Fun if you want to hide some images in there for later or if you just dont want someone seeing how messy your files are. We've all been there
Gui.rpy - where all of the easy customization happens. Here you can change font colors, hover colors, fonts, font sizes, and then the alignment and placement of all of your text! Like your dialogue and names, the height of text buttons, etc. It more or less sets the defaults for a lot of these unless you choose to change them later.
Screens.rpy - undeniably my favorite, this is where all of the UI is laid out for the different screens in your game, like the main menu, game menu, quick menu, choice menu, etc. You can add custom screens too if you want, but I always make my own seperate file for these.
Open Project - this just opens all of those files at once in the code editor. Super handy if you make extra files like I do for certain things.
Actions
last but not least, our actions.
Navigate Script - This feature is underrated in my honest opinion, it's super handy for help debugging! In renpy you can comment with # before a line. However, if you do #TODO and type something after it, it saves it as a note! You can view these TODO's here as well as easily navigate to when certain screens are called, where different labels are (super great if your game is long, and more. It saves some scrolling.
Check Script (Lint) - also super duper handy for debugging some basic things. It also tells you your word count! But its handy for letting you know about some errors that might throw up. I like using it to look for sprites I may or may not have mispelled, because they show up in there too.

Change/Update GUI - Nifty, though once you start customizing GUI on your own, it isn't as useful. You can reset the project at any point and regenerate the image files here. This updates all those defaults we talked about earlier.
Delete Persistent - this just helps you delete any persistent data between play throughs on your end. I like to use it when making a lot of changes while testing the game, so that I can reboot the game fresh.
Force Recompile - Full disclosure, as many games as I've made and as long as I've been using Renpy, i have never used this feature. I searched to see what it does and this is the general consesus: Normally renpy tries to be smart about compiling code (creating .rpyc files) and only compiles .rpy files with changes. This is to speed up the process since compiling takes time. Sometimes you can make changes that renpy don't pick up on and therefore won't recompile. In these cases you can run force recompile to force it. Another solution (if you know what file is affected) is to delete that specific. rpyc file.
The rest of your options on this right hand side are how you make executable builds for your game that people can download to extract and play later!

Sorry gang! that was a whole lot of text obviously the last button "Launch Project" launches an uncompiled version of the project for you to play and test as you go! Hang in tight because my next post is about how to utilize github for renpy, so you can collaborate easier!
590 notes
·
View notes
Text
How To Make Your Own Fanfiction Archive, In Just Ten Easy Steps
As the go-to "person who knows about AO3" for quite a few people who read fanfic but aren't really linked-in to wider fandom culture, I've fielded a lot of questions about how to do certain things on AO3 to which my best answer is "you should really start your own archive!" I think, in general, more fans starting their own small archives would be a net good for fandom. AO3 was never meant to be the only archive for all fandom, or even the main archive, and the more spread out and backed up we are the more resilient we are.
But of course I have to be reminded that a lot of fans these days don't really have any idea how little "you should start your own archive!" really involves. (Also, that I should practice what I preach.) So I am now making my own fanfiction archive, and writing up this post as I do it to tell people how to make theirs!
Go to https://neocities.org/ and sign up for an account. It only needs a username (which will also be your website address), password, and email. Pick a username that will be related to your archive's title!
Choose the free account option (if you ever need more than what the free account offers for a text-only archive, you should probably look into graduating from neocities.) This should take you to a menu of "how to make a website" tutorials. You should do them! They're useful skills. But let's get your archive running first.
Hit the big red Edit Site button, or open the menu under your username and select "Edit Site".
Select the "Index.html" file to edit. You're now in an HTML Editor. Congrats, you're a web developer c. 1999!
Find where it has text between the < title> tags. Delete the filler text, and put in the title of your new archive. This text will be what shows on the tab when people go to your archive.
Find where it has text between the < h1 > tags. This will be big header text at the top of your page. Put the title of your archive here again. If you have no experience with HTML, you should read over the other sample text. It covers the basic basics very well! Once you've done that, you can delete everything else between the < /h1> tag and the < /body> tag. Save your index.html file.
Get an HTML file for a fanfic you would like to add to your archive. If it's on AO3, you can use the html download option built into AO3. If you have it as a word processor/google docs file, you should have the option to save as an html file. Save that html file to your computer.
Go back to Edit Site on Neocities and go to "upload". Find the html file you saved and upload it. (You can also drag and drop files to upload.)
The file you uploaded should now be showing with your other neocities files. Right-click on the title and select "copy link".
Go in to edit index.html again. Under where you put your header text, type < br> < a href=" . Then paste in the link you copied. Then type "> Then put in the title of the fic. Then type < /a> . Then save the index page again when you're done. You can do this for every fanfic you have.
Congratulations! You now have your very own personal private fanfiction archive that you are 100% in charge of and make all the rules for. It's at least as good as half the ones I was reading on when I started reading fanfiction and will serve its function well as a way to let people read your fic. You can link to it from anywhere you want! (Including your AO3 profile.)
Blogpost version, with FAQs and discussion
Anyway, here's my beautiful new fanfiction archive made using this tutorial:
Melannen's Fanfiction Archive
(I am honestly way more disproportionately proud of finally making that than I expected to be. It's nice to have your own archive.)
If you make one, share it here ! I want to see!
#ao3#archive of our own#fanfiction#fanfic archive#how-to#tumblr what are you doing to my angle brackets#why would you do that what's wrong with you
4K notes
·
View notes
Text
For everyone who asked: a dialogue parser for BG3 alongside with the parsed dialogue for the newest patch. The parser is not mine, but its creator a) is amazing, b) wished to stay anonymous, and c) uploaded the parser to github - any future versions will be uploaded there first!
UPD: The parser was updated!! Now all the lines are parsed, AND there are new features like audio and dialogue tree visualisation. See below!
Patch 7 dialogue is uploaded!
If you don't want to touch the parser and just want the dialogues, make sure to download the whole "BG3 ... (1.6)" folder and keep the "styles" folder within: it is needed for the html files functionality (hide/show certain types of information as per the menu at the top, jumps when you click on [jump], color for better readability, etc). See the image below for what it should look like. The formatting was borrowed from TORcommunity with their blessing.

If you want to run the parser yourself instead of downloading my parsed files, it's easy:
run bg3dialogreader.exe, OPEN any .pak file inside of your game's '\steamapps\common\Baldurs Gate 3\Data' folder,
select your language
press ‘LOAD’, it'll create a database file with all the tags, flags, etc.
Once that is done, press ‘EXPORT all dialogs to html’, and give it a minute or two to finish.
Find the parser dialogue in ‘Dialogs’ folder. If you move the folder elsewhere, move the ‘styles’ folder as well! It contains the styles you need for the color coding and functionality to keep working!
New features:
Once you've created the database (after step three above), you can also preview the dialogue trees inside of the parser and extract only what you need:

You can also listen to the correspinding audio files by clicking the line in the right window. But to do that, as the parser tells you, you need to download and put the filed from vgmstream-win64.zip inside of the parser's main folder (restart the parser after).
You can CONVERT the bg3 dialogue to the format that the Divinity Original Sin 2's Editor understands. That way, you can view the dialogues as trees! Unlike the html files, the trees don't show ALL the relevant information, but it's much easier to orient yourself in.


To get that, you DO need to have bought and installed Larian's previous game, Divinity Original Sin 2. It comes with a tool called 'The Divinity Engine 2'. Here you can read about how to unstall and lauch it. Once you have it, you need to load/create a project. We're trying to get to the point where the tool allows you to open the Dialog Editor. Then you can Open any bg3 dialogue file you want. And in case you want it, here's an in-depth Dialog Editor tutorial. But if you simply want to know how to open the Editor, here's the gist:
Update: In order to see the names of the speakers (up to ten), you can put the _merged.lsf file inside of the "\Divinity Original Sin 2\DefEd\Data\Public\[your project's name here]\RootTemplates\_merged.lsf" file path.
Feel free to ask if you have any questions! Please let me know if you modify the parser, I'd be curious to know what you added, and will possibly add it to the google drive.
2K notes
·
View notes
Video
youtube
New Canva feature Change colors in just one click | Change clothes color...
#youtube#Canva#canva tutorial#Canva tips#Canva tips and tricks#Cnav new feature#Canva update#Canva new feature#Canva new feature 2023#canva photo editing#Canva photo edit#Change dress color#Change color#Learn Canva#graphic design#photo edit#photo editing#online photo editing#Free photo editor#Free online photo editing
0 notes
Text

TS2 Light pattern TXMT settings:
color values and tips for CC creators / SimPe users
Additive TXMT settings (stdMatAlphaBlendMode set to 'additive') allow you to create many colorful glowing variants of one gray texture (ExtRaw8Bit format). These are used first and foremost for lights - wall lamps, table lamps, neons.
Top pic features my 'Everglowing Flamingo Neon' recolors, all done with one 8bit texture and TXMT settings.
Here are some RGB values for StdMatDiffCoef + StdMatEmissiveCoef - as shown in the pic below, a combination of these two works best.

Basic colors: green / red / blue / cyan / magenta / yellow - are easy, you just pick the color from the drop-down palette in 'Categorised Properties' tab.
In case of intermediate shades, it's a bit tricky - some colors look almost the same in game - like these three:

Color chart comes in handy:

If you need less saturated shades, you can copy color value to RGB color editor of your choice and desaturate it slightly - then copy that new RGB value into StdMatEmissiveCoef field.

I don't recommend setting darker RGB color values to darken the lightpattern. Instead, you can lower stdMatAlphaMultiplier value - default is 1.000000. Setting alpha to 0.500000 will make it around half less bright.
Alternatively, you can darken the ExtRaw8Bit texture itself. I use "Curves" or "Levels" for that, since simple Brightness sliders tend to lower contrast and texture is slightly dull-looking.
Related tutorials:
How to export/import TXMT settings from one recolor to another.
123 notes
·
View notes