#unreal engine 3.0
Explore tagged Tumblr posts
Visit Tumblr Blog
Explore Tumblr blogs with no restrictions, modern design and the best experience.
Last Seen Tumblr Blogs


Fun Fact
The “We are the 99%” Tumblr blog became the slogan for the Occupy Wall Street movement.
Text
How (older) Skyboxes work!
My wife was asking what skyboxes are, so I thought it would be fun to make a post showing examples of how Skyboxes can be done in Unreal 2.0 and 3.0 games. For demonstration, I'm using Killing Floor 1 (Unreal Engine 2.5) and Killing Floor 2 (Unreal Engine 3.0).
Killing Floor 1 Skyboxes (Unreal Engine2.5)
In Unreal Engine 2.5, a common way of making skyboxes was to actually create the sky scene in a separate room that can't be seen from within the playable level. You'd You would then apply a setting to the walls of the "box" around any out-door parts of the level. In-game, these walls will displayed as a "view portal" into the skybox room, thus creating the illusion of a massive surrounding environment, thus making the world feel much larger and immersive.
Visual examples below!
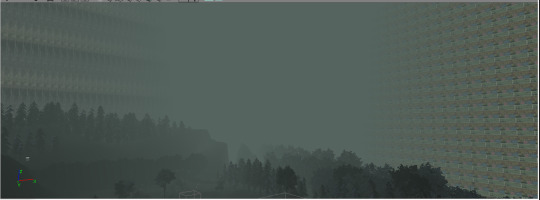
Using my "Zombie estate" map as an example, this is how the sky of the level looks in the editor. The walls are all set to be portals into the skybox.

Here's the skybox room. The half sphere makes the initial cloudy sky, then there's a gradient black ring to give it some more darkness. The little question mark block tells the game engine where to have the skies center perspective from.

The in-game result - Your map has has a nice, massive looking sky to make the world feel bigger and more alive!
Killing Floor 2 Skyboxes (Unreal Engine 3.0)
Possibly due to the increases in both engine power and average computer specs by 2015, making a skybox in Killing Floor 2 is a more straightforward process. The base game includes many "skybox" type models, including a simple massive sphere that you can place over the level you built. Much like in the first game, you can customize the sky area in many different ways, such as adding lighting, fog, distant trees, mountains, buildings, etc.
Visual examples below!

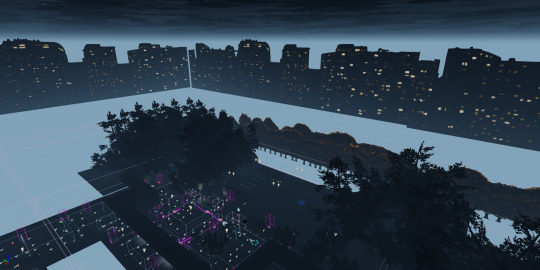
I'll show a few examples of skies in KF2. Here's the sky from Nuked, which is quite massive! The lighting is dark and moody to reflect the aftermath of the nuclear explosion. It's also got some nice mountains, which unlike in KF1, are to scale with everything else.
The skies in the Outpost map are quite pretty, featuring mountains, northern lights and a cold snowy winds. In this clip you can see that the mountains and sky are objects you can click on individually in order to move, scale, rotate or change their texture.
Here is my map Zombie High School, showing a smaller skybox, as only certain portions of the map are outdoors. You can see that I used flat "facade" textures to decorate the background, which look obvious and fake from the high above angle inside the editor...

..But in-game, the background looks more natural and like part of the world!
------
Unlucky is being Develop in Unreal Engine 5.0, and I'm still learning how skyboxes work in this one. The third-person plat former game template comes with a nice looking built in sky that has animated clouds, and I have tested making Killing Floor 2 style sky spheres, which seems doable as well. I'm looking forward to learning more about how skies function in this version of the engine. :) -KrissieFox
#unreal engine#unreal#unreal engine 2.5#unreal engine 3.0#unreal engine 5.0#Unlucky#Unlucky game#kf#kf2#killing floor#killing floor 2#zombie high school#zombie estate#nuked#kf-nuked#outpost#kf-outpost#kf-zombieestate#kf-zombiehighschool#skyboxes#skies#video game graphics#game design#video game art#3d art#game dev#modding#mapping
7 notes
·
View notes
Text
Development Project 02: Red VS Blue. (Update 3.0: Texturing)

Figure 1: UV mapping in Blender.
As previously mentioned, the models were rushed during the weekly development phase and were not given proper UV mapping. To address this, all the remaining modular pieces were carefully UV unwrapped to ensure the textures align correctly and appear believable.
Similar to the previous first development, the viewport settings in each Substance Painter source file were adjusted to match Unreal Engine's viewport, following the steps outlined in the link above. This prevents the need to revisit Substance Painter to fix textures that might look undesirable or inconsistent after importing into Unreal Engine.
The majority of the texturing follows the same guidelines and principles, so the texturing process of the wall model was chosen to explain the overall approach.


Figure 2: Forbidden City. (History To Know, 2020) [Top] Figure 3: Example of texturing phrase. [Bottom]
All assets were textured and baked in Substance Painter. Red and dark red were primarily used for the structural frames, as these colors are commonly associated with the Forbidden City, the largest imperial palace in China. By carrying out several research into traditional Chinese colour theory and reviewing ancient structures it, is revealed that red symbolizes royalty and prestige, aligning with the intended portrayal of the military tower as part of a ruling royal dynasty.
The wall shown in Figure 3 is an asset placed at the base of the tower, Hence, some dirt was painted at the bottom of the wall. A red-painted wall texture with visible damage, sourced from BlenderKit (Othman Othman, n.d.), was chosen to match the established art direction. This texture enhances the weathered, outdoor appearance of the structure while maintaining the royal and historical aesthetic.

Figure 4: Several layers of textures.
The original concrete texture appeared too clean and lacked imperfections caused by the era's old technology or nature elements. To address this, an additional concrete layer with a dirt generator was applied to create a weathered and dirty appearance for the wall. Leaking stains were not added, as the structure's roof is large enough to prevent significant water stains from forming or becoming visible on the walls.
Once satisfied with its appearance, the textures were exported and imported into Unreal Engine.

Figure 5: Imperial Flag utilised.
The flag used in the structure was also textured in red, for the same reasons mentioned earlier. An old artwork of a flag symbol was used as an alpha and placed into the stencil input of a paint layer to apply the symbol onto the flag texture. A larger gold symbol was painted over with a slightly smaller one to create a gold outline around the symbol. This makes the symbol pops out more.
Heavy dirt was added to the flag, as it will be placed on the mountain tower outpost, sticking out from under the roof. Given its exposed position, it makes sense that rain and wind would cause dirt to accumulate on the flag. This detail also reinforces the idea that the tower has been standing for a long time.
The old Chinese character seen in the symbol is "翁" which is my Chinese surname. The decision to use my surname is a way to watermark that this 3D structure belongs to me.

Figure 6: Tower's Plaque.
Chinese structures often feature a wooden plaque at the front entrance or other prominent front-facing locations, serving as a form of signage for everyone to view. I chose the phrase "西望烽楼" (West Lookout Beacon Tower) because ancient Chinese buildings usually don't have a lot Chinese characters to describe the building, usually its shorten to 4-6 characters, as seen in figure 6. The name reflects the tower's location at the far west of the kingdom. The addition of the word "beacon" emphasises its isolation and its unique role as a military structure. Another reason the word "beacon" was chosen is that the tower structure is very tall and large, resembling an actual beacon. Its size and prominence make it a fitting description of its function, further reinforcing its role as a lookout and warning signal. The Chinese characters were painted onto the plaque using the same method as the flag in Figure 5. Heavy dirt stains were added to show the age of the structure. A damaged weathered gold-coloured texture was applied to highlight the words and the frame of the plaque, symbolising the legitimacy of the military tower as part of the ruling royal family's domain.
0 notes
Text
I missed this, but apparently according to leak KH4 will be in 2025.
This seems to be consistent with a leak year prior:
****
Couple of points here:
**Neither leak explicitly states the release window, since 2025 can mean Japanese fiscal Q4 2025, which would be early 2026 (January-March 2026).
***Since the Reddit leak claims early 2025, though, this is likely referring to Q1 2025, so April-June 2025. This would be the same as FF 7 Remake (ie. the first game), but a bit later than usual for KH games, which have always been in Q3, or Q4. However, tentatively you can expect a January release like KH3, and KH2.8.
**As suggested by the leak, the game will be incredibly rushed, due to delays with Missing Link. So I would heavily advise against of you buying it at the release date, unless you want the pre-order merch (in which case, you may want to wait for a month before opening the case, as there will be lots of patches).
***Much like KH3, there will be a DLC obviously after a year, so there will be DLC era patches that will buff the game to a Final Mix-esque level. So again, at day one, you will be playing the inferior version of the product.
**This release window likely has to do with next Xbox coming in 2026. They would want to get this game out in the wild before that happens, so they can release next KH for both it, and PS6.
***Since this game's, and Missing Link's releases will be too close to each other, most of the important lore from Missing Link won't matter until DLC, and even then, won't really matter until the next game (which will likely be title for the next Nintendo console, not a main numbered title).
**Both leaks suggest you shouldn't expect much Disney stuff here. This game will be a smaller experience than usual, basically serving as the launching pad for KH5, where they will probably try to use new machine-learning techniques of the upcoming consoles. This game will just have really pretty lighting due to ray tracing.
***Also, don't expect really eye-popping textures, this will be Nomura's KH team's first Unreal Engine 5 game, so textures will look comparatively bad like first FF7R game. I'm not too optimistic about the model quality either, so don't be surprised if some enemy redesigns look a bit off (kind of inevitable due to different styles each KH game use for each world).
****
Either way, I'm glad we starting this new arc as soon as possible. KH5 now won't come about until 2031 earliest (especially since Missing Link's story will need to be completed, and Nintendo console, and new upcoming handhelds by Microsoft, and Sony will likely have their own games), and fans will complain about the handheld games as usual, so this will somewhat pacify them.
0 notes
Text
Progress / Issue? - Adding DLSS frame interpolation to my game.

Whilst playing my game, I found that my framerate would drastically decrease which effects the speed the game is running at. Most of my code is based off the "Now" node, which uses system time instead of game time, however code that required tick would fall short and make the code out of sync. This is still currently a issue, however is significantly improved by this feature.
Using the DLSS 3.0 plugin for unreal engine 5.3, I managed to enable DLSS for my game, which provided a near 2x increase in fps. The game still runs below the 60fps threshold, however once the game has been built then this shouldn't be a problem.
To install these features, I had to take advantage of the backup I made... multiple times. I was close to giving up with this feature until a idea came to me on how to fix this, which ended up with me having it within my game. For starters, Nvidia provides a project that showcases what DLSS can do. I first opened that project and right clicked the "content" folder and migrated to my current project. You would think that this is the only thing that I was required to do, however you would be mistaken. The project loaded up completely fine through the unreal engine project, however once trying to compile and launch via my IDE (rider), it either made all the code that linked with unreal engine turn red or didn't compile at all. I came to the discovery that it was because I was importing the camera sequences, which caused the compiler to mess up. To fix this, I deleted the project and grabbed my backup and migrated all the files that did not include the sequence. Once doing this, I found that my IDE would load up normally with minimal issues. I then started the compile and was welcomed to another issue... The engine found multiple versions of the plugin, so I had to delete all the references to that plugin from everywhere apart from the current project. Since doing this, I have encountered no problems and are currently experiencing some great performance increases.
A problem that was occurring when testing this out was when using this on my own project, I found that when using frame interpolation it was duplicating the frames rather than figuring out what the next frame should/could be. I was able to avoid this issue by not using it... However it would of been nice to be able to use it...
0 notes
Text

This is the flipbook animation for my score item that I imported into Unreal Engine 5. I changed the frames per second to 3.0 seconds as it is an equivalent to the GIF timeline I made on photoshop.
0 notes
Text
2021 Porsche 911 Review
2021 Porsche 911 Review
Is the 2021 Porsche 911 a great car?
It is a really good car. We give it a Total Cycle Care (TCC) Rating of 7.3 from Ten, a top rating for what's a two seater, one with a high price as well as the acceleration and grip to choose it.
What is new for the 2021 Porsche 911?
The Latest Turbo models and a few additional features improve the eighth generation 911, launched as a 2020 model. For more about https://www.champion-porsche.com/new-porsche-911-pompano-beach-fl
The newest 911 does absolutely nothing to change the classic teardrop-shape, although every 911 usually grows at the haunches. The vintage look continues within the cabin. In spite of the on-slaught of digital display screens, the 911 is also a practical paragon, with physical regulates such as paddle-shifters where they are essential, and digital ones where they are better left from hand.
With an inflexible aluminum intensive body and twin turbo six-cylinder piston engine across the line-up, every 911 has the heavenly performance that eludes some weighty eight-cylinder piston engine competition. It hammers-out, at least 380 horse power and a Zero To Sixty miles per hour time of 3.9 secs.

At the high-end and in its high state of tune, the 911 Turbo-S lasers to Sixty miles-per-hour in 2.7 secs and nails a 206 miles-per-hour high speed in spite of lugging an Eight speed dual clutch automatic and all-wheel-drive (AWD) (of all versions; rear drive models and Seven speed manuals are provided). Acceleration and grip set high standards, despite the present number of electronic-controls for damping, change rates of speed, ride height, torque distribution, and steering heft.
Overall performance
"The Porsche-911 flashes to pass through every thing on the highway."
Points might be gained or lost according to power train performance: handling and ride performance. Extremely fast (Zero To Sixty miles-per-hour in just Five secs) or extremely slow (Zero To Sixty miles per hour in over Ten seconds) can gain or lose one more point. Another point might be given (or lost) for outstanding conditions, i.e., off road ability or super car credentials.
It's considered the best car that is liked by many people and somersaults all around the track with all the telepathic thrill of a Porsche-911. This makes any driver a much better driver. It is a ten here.
How fast is the Porsche-911?
How fast would you like it to be? All versions sport a turbo charged flat-six engine and have at least 380 horse power and 332 pound-feet of torque. Porsche extracts from the 3.0 liter twin turbo flat Six in the 911-Carrera and Carrera 4.
With the trade-mark sonorous whirr, the flat engine kicks out pavement incinerating force with an Eight speed dual clutch automatic, which provides smooth changes in Normal mode and sharp and quick changes in its Sport-modes, by itself or through steering-wheel paddles. Checking out at 3,355 pounds in the base specification, this 911 might hit Sixty miles-per-hour in 3.9 secs because of launch control, as the high speed clicks in at 183 miles-per-hour.
After that, performance-up grades work like some unreal screws being stiffened around the 911 line-up Cabriolet, Coupe, or Targa. The Carrera 4S and S versions occupy the center band of 911 Porsche performance by having an up-rated flat-Six with 444 horsepower and 391 pound-feet of torque. Collectionistas might enjoy this 911's available 7 speed-manual, a joy to change and extremely rare (and fixed with a routinely locking differential as well).
Quality and Comfort
"Small spaces get fine finishes in the 911 Porsche."
Factors might be gained or lost according to comfort and ease in the front-seats, rear seats, or third row seats (when applicable); bad or good interior storage space as well as luggage capacity; and good finish.
The 911 Porsche has "The Automotive Hall of Fame" front seats and fee boxes in the back to fit its small front trunk. However, it is finished with a good eye for fine detail; therefore, we provide a five here, with most of those factors off-setting each other.
The 911 Porsche sits 177.8 inches long on a 96.6-inch wheel-base by numbers.
Low-slung, form fitting seats greet front travelers in the 911-Porsche. Very close to the ground, they provide a great look at the road ahead, with a heavy steering-wheel to frame large analog gauges and partially block the digital display screens that provide a global positioning system as well as other semi critical features. The seats adjust in several ways, so even 6 footers can fit properly.
Storage space is a bug-bear, starting with more people. Two are meant to fit in the rear easily; however, the back nacelles are very small; they are compressed for storage space for big back packs. The front trunk area's 4.8 cu ft of space under scores the 911 mission: work and gun get priority, although undershorts get delivered ahead.
The 911 Porsche's interior talks about wealth without glopping on glitz. The base vehicle's plastic trim below the dashboard might be forgiven; the highly colored leather-based and carbon-trim on the options sheet should not be overlooked.
Safety Features
"Safety technical's here by the ream; however, the 911 Porsche has not been crash tested."
Is the Porsche-911 a safe and secure car?
The expensive, semi exotic Porsche 911 has not been crash tested by the National Highway Traffic Safety Administration or by the Insurance Institute for Highway Safety (IIHS) and most likely won't be. We do not give it a safety-rating without that information.

The 911 Porsche has a lot of common safety tech, including an automatic emergency braking system with walking accident sensors. The 911 might be fixed with blind spot screens, active lane-control, night vision camera systems, adaptable cruise control with stop and go ability, and surround view up the price-ladder. The 911's balance control system is also designed to drive conditions; it provides a Wet mode that manages car systems to help with grip in poor weather, snowfall, or ice.
Which Porsche-911 can I buy?
We prefer more spicy, so that we would choose a 911-S with a limited slip back differential with torque-vectoring, flexible/adaptable dampers, 305/30ZR21 rear and 245/35ZR20 front Pirelli P Zero summer wheels on metal tires, and large 13.9 inch braking system with 6 piston front and 4-piston back calipers. We like the 930 Leather-package, with quilting just like that on Porsche's initial 930-Turbo, too.
How much is a fully packed Porsche 911?
Huge spenders might show-off with the 217,650 $ Turbo-S convertible or cabriolet and include all of the options. The 911 increases close to the $-300,000 mark, and that is before the unique GT-3 can get a price or before customized paint colours and trim.
Gas Mileage
"Germany's icon will get affordable gas-mileage."
Is the Porsche 911 suitable for gas?
It isn't bad, thinking about its outstanding performance. The very best of the line up may be the 911 Carrera-S with the Seven-speed manual and Environmental protection agency rankings of Eighteen miles per gallon city, Twenty-five highway, Twenty one combined. At the bottom, not by much, are all Turbo-models that gather scores of 15/20/17 miles per gallon.
1 note
·
View note
Text
How to Become a Metaverse Developer in the Web 3.0 World?
The web 3.0 world is an exciting new landscape of technology, offering unprecedented opportunities for developers to create virtual worlds for users to explore. Metaverse developers are responsible for building and maintaining these virtual environments, as well as creating content and experiences for those that inhabit them.

Once you have a basic understanding of the technology, you’ll need to start learning about the different programming languages and tools that are used for building virtual worlds. Popular tools include Unity, Unreal Engine, and CryEngine, as well as scripting languages such as Python and JavaScript. You’ll also need to become familiar with 3D modeling and animation programs such as Maya and Blender.
Once you’ve mastered the necessary programming languages and tools, you’ll need to start building your own virtual world. This involves creating assets such as 3D models, textures, lighting, and animations. You also need to create interactive elements such as NPCs and quests, as well as develop the underlying code for your world.
Finally, you’ll need to market your world and attract users. This involves creating promotional materials such as videos and screenshots, as well as writing blog posts and articles about your world. You’ll also need to make sure that your world is secure and compliant with global regulations and standards.
Becoming a Metaverse developer in the web 3.0 world is an exciting and rewarding career path. With the right knowledge and skills, you can create amazing virtual worlds for users to explore, and be part of the future of the internet. If you’re looking for professional Metaverse Game Development Services, then you’re in the right place. We provide high-quality services to help you create and maintain your virtual world.
0 notes
Text
Frostbite game engine platforms

FROSTBITE GAME ENGINE PLATFORMS SOFTWARE
HDR Audio allowed differing sound levels to be perceived by the player whilst Destruction 1.0 allowed players to destroy the environment. 1 The engine was developed with an HDR Audio and Destruction 1.0. The news about Frostbite comes via five job postings for VR engineers, an artist and a creative director, as well as a tweet suggesting the company is “building a small & collaborative VR team. The first iteration of the Frostbite game engine made its debut in the 2008 video game, Battlefield: Bad Company. To be called Frostbite Go, the project is already underway and aims to bring true Frostbite experiences to all mobile platforms. Log In to add custom notes to this or any other game. EA are working with DICE, the creator of the Frosbite game engine that powers the popular Battlefield games franchise, to build a Frostbite game engine to mobile platforms. The engine currently is designed for use on Microsoft Windows, PlayStation 3, Wii U and Xbox 360 platforms and is adapted for a range of video game genres. Hardcore gamers will have no problem naming the biggest title. Frostbite is a game engine developed by EA DICE, designed for cross-platform use on Microsoft Windows, seventh generation game consoles PlayStation 3 and. Frostbite engine coming mobile platforms. Frostbite (game Engine) Frostbite is a game engine developed by EA Digital Illusions CE, creators of the Battlefield series. Those two toolsets were the most easily accessible to developers over the last few years and have been evolving to make it easier to create a VR experience rather than just a game. As an onslaught of console and PC-based VR games are prepared for consumer launch in 2016, Valve’s Source 2 Engine, Crytek’s Cry Engine and now Frostbite from EA are likely to be vying for attention as more developers dive into VR content creation. Apparently, EA is hard at work bringing their Frostbite 3.0 game engine to a new platform.
FROSTBITE GAME ENGINE PLATFORMS SOFTWARE
So far Unity has been used by the vast majority of software developers creating experiences available in the Oculus store on Gear VR, though Gunjack from Iceland-based CCP Games used the Unreal Engine from Epic Games to create the most graphically rich mobile VR game yet. The toolset for creating games joins engines from Epic Games, Unity, Valve and Crytek in evolving to be used in the creation of VR experiences. Frostbite is looking for developers who want to join us in taking our engine to the next level. Electronic Arts subsidiary DICE is putting together a small Sweden-based team to evolve its Frostbite game engine for VR.
0 notes
Text
Keyscape torrent piratebay

#KEYSCAPE TORRENT PIRATEBAY DOWNLOAD#
Since these instruments can be easily transformed into amazing “unreal” sounds with the powerful STEAM Engine® under the hood, Keyscape easily turns these coveted instruments from History into innovative new sounds of the Future. While it’s every performing keyboardist’s dream to have the very best instruments instantly available anywhere, Keyscape is equally useful in the studio for producers and composers. We even went as far as spending years redoing these instruments from scratch again and again until they were totally “right.” This incredible attention to detail and meticulous care given to each instrument allowed us to develop these sounds to a whole new level of authentic tone. The process began with going to the ends of the earth to find and restore each one of these rare and incredibly special instruments with the top technicians and expert craftsmen from each discipline. These compelling and highly expressive sounds will inspire you to PLAY! Ten years in the making, each of these sought-after keyboards was carefully restored and then deeply multisampled by the renowned Spectrasonics Sound Development Team. From “holy grail” pianos to stunning keyboards you didn’t even know existed, this is a keyboardist’s dream come true. KEYSCAPE ® is an extraordinary virtual instrument featuring the largest selection of collector keyboards in the world. LA Custom C7 Grand.db (13.9 GB) Chimeatron.db (502.2 MB) Classic Toy Piano.db (201.8 MB) Clavichord.db (2.2 GB) Dolceola.db (3.0 GB) Dulcitone.db (1.3 GB) Duo Maps Stage.db (10.3 MB) Duo Maps.
#KEYSCAPE TORRENT PIRATEBAY DOWNLOAD#
Omnisphere 2’s factory sample does not have any brass patches or samples – so these will be useful to many different genres of music. Keyscape Soundsources Keyscape Vst Torrent Download Pirate Bay Game Factory Keyscape Vst Torrent Download Pirate Bay Free Keyscape Library Keyboards. The Library also includes over 64MB of new samples including Keyboard (FM electric piano and a couple different grand piano samples) Bass, Pluck Synth (6 different ones) and Brass samples (4 different ones including Octave Brass, Trombones, Trumpets and Trap Brass). It’s very easy to reselect different patches for use – but having a set of sounds loaded can help speed up the process of getting deeper into songwriting. You don’t have to build your own starting template. By calling up one of these 13 Multis, 6 – 8 patches are loaded up – each sound on its own MIDI Channel so that you can start writing. This is the 24th library we have released for Omnisphere but is the first library designed to give songwriters Multiple MIDI Channel MULTIS that are designed for composers to call one up and immediately start writing music in multiple genres spanning over 30 years of popular music.
0 notes
Text
[…] Ora, che cosa succederebbe se un’azienda come NVIDIA creasse un tool che permettesse a sviluppatori e modder di fare delle vere e proprie remastered a costi irrisori (se non nulli) con due semplici click? No, non è fantascienza, è banalmente NVIDIA RTX Remix, il nuovo software dell’azienda basato su NVIDIA Omniverse che permette di ridare in maniera efficace una nuova vita ai videogiochi classici, introducendo DLSS 3.0, ray tracing, NVIDIA Reflex e texture ripensate (grazie a un’intelligenza artificiale).
Come funziona RTX Remix?
RTX Remix è in grado di catturare texture, illuminazione, telecamere e geometrie di un qualsiasi videogioco compatibile con DirectX 8 e DirectX 9. Queste informazioni vengono caricate in un Runtime chiamato RTX Remix Runtime che interpreta il tutto in asset distinti e li riassembla in una scena identica, dopodiché RTX Remix converte tutti gli asset e le scene nel framework 3D, Universal Scene Description (USD), che costituisce la base della piattaforma NVIDIA Omniverse per la creazione e la gestione di pipeline 3D personalizzate.
Essendo RTX Remix interamente basato su NVIDIA Omniverse, le risorse USD possono essere facilmente importate nell’applicazione RTX Remix, comprese tutte le altre applicazioni compatibili con Omniverse come Adobe Substance 3D Painter, Autodesk Maya, 3ds Max, Blender, Unreal Engine e tante altre. In breve, questo consentirà ai modder di avere tutto sotto controllo in maniera decisamente più semplice, avendo un unico flusso di lavoro senza dover necessariamente imparare svariati strumenti diversi.
Ora, per introdurre il ray-tracing in un gioco è necessario che ogni texture e superficie siano pensati con materiali di rendering PBR, questo per fare in modo che riescano a interagire in maniera naturale con luce ray-tracing. Un esempio che fa NVIDIA riguarda banalmente il vetro, che riflette con dettagli chiari, mentre un pavimento laminato presenta riflessi più grossolani. La pietra, invece, pur non offrendo dei riflessi visibili, è in grado di far rimbalzare la luce e quindi agire anch’essa sul mondo di gioco. Il problema è che i giochi classici sono costituiti da semplici texture di colore che non presentano nessuna di queste proprietà.
Quindi, per fare in modo di introdurre il ray tracing, i modder devono operare ricostruendo a mano ogni singolo asset e lavorare con nuovi dettagli geometrici. Inutile starvi a specificare quanto tempo possa richiedere una cosa del genere.
RTX Remix mira proprio a semplificare e accelerare il processo di rimasterizzazione sfruttando l’intelligenza artificiale. AI Super Resolution incrementa la risoluzione delle texture di ben 4 volte, trasformando le stesse in risorse a risoluzione 4K. Oltre a questo, AI Physically Based Masterials analizza l’ambiente di gioco e aggiunge proprietà PBR a tutte le texture prese come riferimento.
Ovviamente i miglioramenti delle texture e dei modelli è solo una parte dell’upgrade offerto da RTX Remix. Titoli come The Elder Scrolls III: Morrowind sono stati sviluppati con tecniche d’illuminazione classiche, ben distanti dalle global illumination moderne. Il software di NVIDIA permette di convertire le luci tradizionali in luci realistiche, quindi di sfruttare il ray-tracing per dare una nuova impronta alla scena, introducendo anche ombre morbide, ambient occlusion e riflessi. Insomma, un vero e proprio spettacolo visivo e tutto effettuabile in maniera praticamente automatica, dove un modder può persino creare luci dinamiche e introdurre la volumetria per rendere la scena più coinvolgente. Ah, dimenticavo, il tutto praticamente a costo zero.
Espresso ciò, siamo d’accordo che questo software potrebbe davvero mettere la parola fine al concetto vetusto e terrificante di “remastered”? Ormai pensato solo per spillare soldi al consumatore con il minimo sindacale del lavoro?
Pensate un tool del genere in mano ai modder che cosa potrebbe generare, quali incredibili titoli classici riusciremo finalmente a rigiocare, magari senza spendere praticamente nulla.
Il punto è però che tutto questo lo vedremo quasi certamente solo su PC, mentre i giocatori console (PlayStation e Switch soprattutto, che vivono da anni dietro a un sistema di remastered piuttosto preponderante) saranno costretti, se nulla cambierà, a pagare ancora profumatamente per i classici tre miglioramenti di cui normalmente un giocatore PC può disporre gratuitamente. A volte rifletto: perché devo pagare 10 euro per fare il passaggio next-gen tra due versioni di God of War o Horizon? Perché Su Xbox un Gears 5, un Halo Infinite o un Forza Horizon 5 si aggiorna in automatico a seconda della console e da altre parti devo spendere soldi? Perché su PC mi basta cambiare settaggi e il gioco è fatto?
Da questo punto di vista, NVIDIA ha certamente ridicolizzato le remastered e magari farà riflettere anche chi si ostina a campare con questo “giochetto” e perché no, magari farà riflettere persino chi spende dei soldi per rigiocare lo stesso titolo con le stesse texture e un upgrade che normalmente dovrebbe essere gratuito.
0 notes
Text
Development Project 01: Nostalgia and Memory. (Update 3.0: Texturing)

Figure 1: Blockout for reference.
Referring to figure 1, the primary assets in close proximity are the bunker wall and sandbags. These objects have a high poly count with textures baked onto the low-poly versions. In contrast, smaller and/or more distant objects are given minimal subdivision, ensuring they appear realistic when viewed from afar. All objects are textured in a similar manner, so I will use the bunker as the base model to explain the texturing process in Substance Painter.
Following Mr. Neil's advice, I adjusted Substance Painter's viewport settings to match those of Unreal Engine 5 by following the steps in the link above. This avoids the need to revisit Substance Painter to re-edit textures that might appear undesirable or inconsistent in Unreal Engine's viewport.

Figure 2: Baking high poly details for low poly model.
To add the concrete sculpt I did earlier for the high poly version of the wall, baking was done to optimise the rendering in Unreal Engine.


Figure 3: Sand dirtiness. (Left) Figure 4: Concrete details. (Right)
In figure 3, A layer of sand dirt starting from the bottom is created as the bunker is built on sand terrain and there should be some sand scatter all over the lower part of the wall. Following up in figure 4, edge damage effect with high contrast was created to create the edge chipping of a rough concrete wall. As defences were built sparingly in Malaya as British high command build majority of their defences on Singapore because they assumed that there will be a Japanese seaborne invasion of Singapore, neglecting the possibility of an attack through the Malayan Peninsula (Lippman, 2004).

Figure 5: Battle of Kota Bharu, Malaya (Ken'ichi, 1943)
Referring to Mr. Ken'ichi's painting, the top left corner depicts a British bunker loosely painted with green camouflage.


Figure 6-7: Two variation of camouflage painting.
Using its unique pattern as a reference, similar designs were recreated on the bunker walls in two variations using masks and a paintbrush. The bottom portions of the paint were then erased with the same brush to simulate the effect of sand and dust accumulating on the surface. The texture was then exported in Unreal Engine packed template then transferred over to Unreal Engine.


Figure 8-9: Normals for the details seen in figure 10-11


Figure 10-11: Rifle Munition Crate.
Trimsheets were considered to be developed but there was only one model that required it and it was only a small part of it. Hence, another method was done to ensure the nail detail is on munition crates. The munition crate's details were modelled then a normal map was baked. The normal detail was imported into Substance painter as a texture then painted onto the model.
Reference
Lippman, D.H., 2004. The Fall of Malaya: Japanese Blitzkrieg on Singapore. Warfare History Network. Available at: https://warfarehistorynetwork.com/article/the-fall-of-malaya-japanese-blitzkrieg-on-singapore/ [Accessed: 5 December 2024].
1 note
·
View note
Text
Top 4 Rendering Engines Used for Multi GPU Rendering
The fast cloud rendering services provider and GPU&CPU render farm, Super Renders farm will share with you 4 rendering engines used for multi GPU rendering.
It is well known that GPU rendering can be performed using a graphics card instead of a CPU to render and can be significantly faster, as GPUs are primarily tailored for fast image rendering. GPU was created to cope with graphics-intensive applications that can burden the CPU and hinder computational performance. The principle of GPU rendering is to run across multiple cores on multiple data, putting parallel processing focused on one specific task, while freeing up the CPU to emphasize different sequential serial processing jobs.
With the reduction in GPU rendering times, there is a wide variety of rendering engines that utilize GPU rendering. In particular, simultaneous rendering using multiple GPUs can be 5 or 10 times faster than a single GPU. As a result, some of the world’s leading brands are focusing primarily on developing products that optimize multi-GPU performance. Maxon and Otoy, which bring great rendering solutions, reduce the rendering time burden for 3D artists, designers, filmmakers, etc.
The multi GPU rendering engines widely used today are Redshift, Octane, Vray, Iray, Fstorm, Eevee, Cycles, which have matured significantly and are outpacing CPU-based rendering engines in terms of both popularity and rendering speed.
Top 4 Multi-GPU Rendering Engines
1. Redshift
Redshift Rendering Technologies Inc was founded in California in early 2012 with the goal of developing production-quality, GPU-accelerated renderers that support biased global lighting technologies that have hitherto been entirely within the CPU domain. Redshift is now part of the Maxon family and is rapidly becoming the first choice of rendering engine for the motion design community. The Redshift rendering engine supports a selection of 3D programs: Autodesk Maya, Autodesk 3Ds Max, Maxon Cinema 4D, Houdini and Katana.
Recommended hardware requirements:
RAM: 16GB RAM or more
CPU: Core i7 or Xeon equivalent, 3.0GHz or higher
Graphics card: with 7.0 or higher CUDA computing power and NVIDIA GPU with 10GB or higher video memory: NVIDIA Quadro, Titan or GeForce RTX GPU for hardware-accelerated ray tracing.
Multiple GPUs
2. OctaneRender
OctaneRender® is one of the world’s first and fastest bias-free, spectrally correct GPU rendering engines, offering quality and speed unmatched by any production renderer on the market. As a product of Refractive Software, Octane was founded by Terrence Vergauwen, the lead developer of LuxRender, and in March 2012, Refractive Software was acquired by Otoy, who also received investment from Autodesk. Now as part of the Otoy family, Octane supports 3Ds Max, Maya, Cinema 4D, Houdini, Daz Studio, Unreal Engine and many other softwares.
Recommended hardware requirements:
RAM: 16GB RAM or more
Graphics: with CUDA computing power 3.0 or higher; and 10GB video memory of NVIDIA GPU: NVIDIA GeForce RTX GPU, GTX, Quadro, Titan
Multiple GPUs
3. EEVEE VS CYCLES
Eevee vs Cycles are the two main GPU rendering engines for Blender, the Blender Foundation’s open source 3D creation software that enables users to handle all aspects of 3D work. It includes modeling, animation, game creation, visual effects and much more. Blender is easy to download, customize and work on your own terms. The software also offers a large number of plugins for creating various types of models, animations, sculptures and more. Ultimately, comparing Evee with Cycles is more or less just comparing real time with ray tracing.
Recommended hardware requirements:
RAM: 16GB RAM or more
CPU: 64-bit quad-core CPU
Graphics card: At least 4GB of video memory
Multiple GPUs
Optimal hardware requirements:
RAM: 32GB RAM or more
CPU: 64-bit octa-core CPU
Graphics: 12GB VRAM or more, RTX GPU, Quadro
Multiple GPUs
4. FStormRender
FStormRender is a new GPU-driven, unbiased renderer with good performance that is quite easy to use. It uses convenient materials and light sources, it is simple, fast and realistic. Currently, FStorm GPU rendering engine is only available for 3Ds Max software. We hope that this amazing renderer will be available for major 3D software in the near future.
The FStormRender has many unique features such as improved tone mapping, glossy reflection shaders, glare effects, light sampling, improved ray tracer and optimized QMC sampling. The FStormRender is deeply integrated into the 3Ds Max environment and supports all necessary and critical features. The built-in scene converter allows easy and careful conversion of any scene from Corona, Octane and Vray renders. Fstorm is interactive, allowing the user to change the scene as it is rendered and to view these changes interactively without reloading. Any scene changes (other than geometry) are automatically reflected. Geometry changes require enabling live geometry updates or pressing the Reload Geometry button. Users can move the camera and get live updates in the frame buffer window.
Recommended hardware requirements:
RAM: 16GB RAM or more
Graphics: NVIDIA Geforce GPU: RTX and GTX series
Multiple GPUs
Source:
https://blog.superrendersfarm.com/news/top-4-rendering-engines-used-for-multi-gpu-rendering/
0 notes
Text
Sumo Digital

Sumo Digital was founded in 2003, and since then it has grown from one team of thirteen people, to having twelve studios internationally. The locations of these studios include; Sheffield, India, Nottingham, Newcastle, Brighton, Leeds, Leamington, Warrington, Poland, and Canada. Sumo Digital is known for making such games as but not limited to; Sega Superstars Tennis, Hasbro Family Game Night 3, Doctor Who The Adventure games, Disney Infinity 3.0: Toy Box Speedway, LittleBigPlanet 3, Sonic & All Stars Racing: Transformed, Moshi Monsters: Katsuma Unleashed, Forza Horizon 2, Hitman 2, Spyder and Little Orpheus.
For the purposes of looking for job listings, I am going to focus on the office in Brighton; also known as The Chinese Room. All locations altogether have over two hundred job offers, while the one in Brighton has a much more manageable number of twelve. These are; Experienced Environment Artist, Senior Environment Artist (twice, one is fixed-term, one is not), Senior QA Tester, Technical Artist, Lighting Artist, Senior Gameplay Programmer, Senior UE Programmer, Animator, QA Tester, Lead VFX Artist and Senior Game Designer. I am going to focus specifically on ‘Senior Gameplay Programmer’.
The role of the job is to assist the lead coder with the design and development of the core gameplay, furthermore being able to write high quality source code. Another aspect is working closely with the game design team to create gameplay experiences that are compelling for the player, and also getting a sense of what the game is fun as well as entertaining. An additional part of the role is being able to author documents for technical designs and best practises for use by the rest of the team and plan work and meet deadlines designated for team projects. The Experience and requirements are as follows:
‘As a seasoned software developer, you understand the creative processes involved in designing and maintaining good code. You have a deep knowledge of current development tools and can learn and adapt to new systems quickly. You’ve got a good feel for great game experience and can communicate your ideas effectively to the rest of the team. A great problem solver that can jump into the code base to help fix the nastiest of bugs. You can think critically and can apply analytical skills in resolving complex issues. You have great code design skills and can mentor juniors in best practices. You’re also a great communicator and love working as part of a team where you play an active role in helping shape the game and its development. You’ve got top notch C++ skills, experience at a senior level of development in Unreal Engine 5, and a passion turning complex code challenges into amazing gameplay experiences.’
The Chinese Room is behind the titles of Dear Esther, Amnesia: A Machine for Pigs, So Let Us Melt, Everybody’s Gone to the Rapture and Little Orpheus. They have had ten BAFTA nominations and three BAFTA wins. With the studio being in Brighton, it adds the opportunity to live in of frequently commute to a place they themselves said to have ‘an amazingly vibrant game development scene and a cultural hotspot with fantastic food, arts, music, shopping and sports’.
0 notes
Text
Best Platforms To Create NFT Game

The gaming industry has openly welcomed NFTs. It offers various benefits in the form of proof of ownership, a steady source of income for players, interoperability, value for scarcity, and immutability. A huge user base can be tapped by launching Play-to-Earn (P2E) games. Do you wish to grab this multi-billion dollar opportunity? NFTICALLY, a white-label NFT marketplace solution provider takes a sneak peek at the best platforms to create NFT game.
Unity
It offers a variety of tools to develop NFT games. Later, the games can be deployed to different platforms like mobile, console, desktop, and AR/VR devices. Unity provides 3 subscription plans, Plus, Pro, and Enterprise. The different features include splash screen customization, in-app purchases, cloud diagnostics, on-demand training resources, and round-the-clock technical support. Hence, Unity covers all stages of game development (from concept to commercialization).
Unreal Engine
It is an advanced 3D creation tool. Recently, Unreal Engine 5 was unveiled. It includes Lumen (an illumination solution to create scenes), Nanite (create experiences with geometric detail), and Virtual Shadow Maps. Unreal Engine 5 also offers built-in character and animation tools, UV editing, and a procedural audio engine.
Unreal Engine ticks the right boxes in terms of cross-platform compatibility, freely downloadable, access to the source code, multiplayer framework, and tools to create MetaHumans.
CryEngine
It is a popular game development platform. CryEngine offers an immersive experience for players. The different features available are in-class visuals, AI-based characters, image-based lighting, a multi-layer navigation mesh, audio occlusion, and physical simulations.
Torque3D
It is an open-source 3D game engine. The key highlights of Torque3D are a modern rendering system (with basic and advanced lighting modes), editors (terrain, shape, road and river, material, and GUI), and a physics plug-in system (body dynamics and destructible objects). It also follows a server authoritative networking model to prevent cheating and exploitation of players.
Akeytsu
It is a 3D animation game development platform. Akeytsu offers an exclusive toolset for creating 3D characters and creatures. The advantages include a friendly user interface, an interactive viewport, and flexible controls.
The different tools are Spinner (circular widget), Direct Model Interaction (viewport picking system), Auto Rig (generate characters), and Cameras (create a cinematic experience).
The various features available are a light rig, joint light display, space switching, interactive blendshapes, skin painting, smart cyclemaker, and breakdown pose editor). Animations made with Akestu can also be integrated seamlessly with Unity and Unreal Engine 4.
Conclusion
Amidst soaring interest in Web 3.0, it is the right time to create NFT game and capture the eyes of players across the world. Use any of the above-mentioned platforms and disrupt the market with your state-of-the-art NFT game.
0 notes
Text
Light and Shadows (Update 3.0: Final Renders)


Figure 1-4: natural (without colour grading or filter), black and white, warm, and cold renders.
Final Render Story:
Portessa has fallen. The land is empty, yet filled with pieces of lives left behind, scattered like memories across nationwide. By day and by night, these belongings lie in quiet anticipation, waiting like faithful companions for owners who will never return.
Reflection:
Thanks to the several online tutorials and explanation, I managed to understand Unreal Engine's lighting system and some foundational lighting concepts that I know will be crucial in every project I take on. From subtle ambient effects to complex shadows, I've learned so much more than I had expected, and it’s exciting to think of the ways I can apply it all moving forward.
Extra:
If more time and resources were given for this project, the following are the additional models or effects I wish to add into the project:
Try out different colour gradings.
Try out different post processing tips and tricks to enhance the renders.
Make background more logical and believable (Background).
Remake exist models as some of it were rushed assets during my Degree final year project period.
1 note
·
View note