#valve plug adjacent
Text
*me taking a long drag from my roommates Blueberry tart vape that’s slightly burnt*
*long exhale*
I want whirl pregnant
I don’t even like pregnancy tropes very often BUT I feel like hed be an amazing mother and he and his two wives would be the best parents (CyWhirlGate being the best elder lesbians known to man would make me weep)
His two wives should take care of him and he should be allowed to be insane and have family
Like. I just think he should be allowed to have a baby
WHIRL 2 FROM RESCUE BOTS IS RIGHT THERE PEOPLE NEED TO WRITE MORE FICS OF THEM AND HER MOTHER DAMNIT
Sorry guys
Blueberry vape makes me emotional
(Can you tell??)
12 notes
·
View notes
Text
How does an F1 Power Unit work?
In light of the new PU regs here's a little overview on how the current ([technically 2014]2022-2026) PU's work and which part does what.
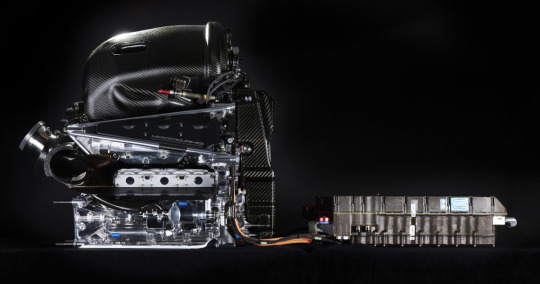
Power Unit parts
The current PU's are made up of multiple parts:
Internal combustions engine -> ICE
Motor generator unit - heat -> MGU-H
Motor generator unit - kinetic -> MGU-K
Turbo charger -> turbo/ TC
Control electronics -> CE
Energy storage -> ES
little extra is the Gearbox but it doesn't actually count to the PU
There are some different ways in which the 4 engine manufacturers can and do combine these parts. So each engine manufacturer makes a different looking engine.
Internal combustion engine

The ICE is the "classic" engine. And in this era of regs it is a four stroke V6 engine.
The 6 stands for the number of cylinders and the V is the shape in which these cylinders are mounted. Other cylinder layouts are all the cylinders in one line, or flat/horizontal. But F1 uses the V.
The ICE internally combusts the fuel as follows:
Four stroke and the cylinders

This GIF shows the four strokes of the piston.
In the 1st phase the fuel and air mixture is injected into the chamber and then the valve closes.
The piston compresses the fuel and it either combusts itself (Petrol, in F1) or it is ignited by the spark plug (Diesel, not in F1). This causes a really tiny explosion.
The tiny explosion generates hot gas that wants to expand and pushes the piston down. This turns the crankshaft.
The outlet valve opens and the crankshaft keeps moving the piston up which pushes the exhaust gases out of the chamber.
These four phases keep repeating.
The crankshaft is both moved by the piston and keeps moving the piston too.
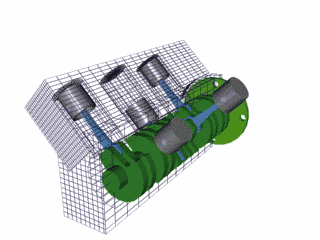
This is GIF of a V4 engine, the F1 V6 just has an extra cylinder on each side of the V. It shows how the cylinders interact. They are in complimentary phases so that the combustion in 2/3 of the cylinders not only rotate the crankshaft so that the car itself moves but also moves the piston in the 1st and 2nd phase of the other cylinders.
This means that the crankshaft is constantly being rotated. This movement is then via the gearbox and so on transferred onto the rear tyres and powers the cars.
RPMs or rotations per minute indicate how often the crankshaft is rotated per minute. And if you step on the throttle then the motion of the pistons just happens faster and faster.
Gearbox
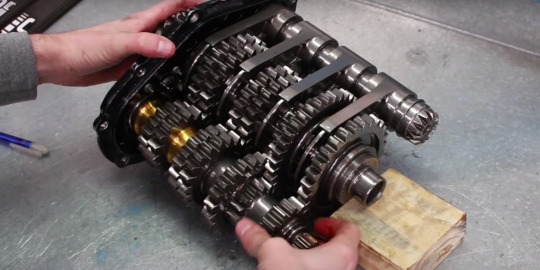
The gearbox isn't actually part of the PU but it is adjacent and I think it's important to talk about for all of this to make sense.
The gearbox also varies from manufactuer to manufacturer but the are all 8-speed semi-automatic sequential units.
8 speed just means 8 gears. Semi-automatic sequential is a little bit more complicated to explain.
While the F1 cars have a clutch the drivers only use the clutch at the start or when they stop the car fully. They don't need to pull the clutch paddle to shift gears which makes the gearbox automatic.
The semi in semi-automatic means that while the clutch is automatic the shifting of gears itself is still manual. And the drivers do this with the two paddles on the steering wheel.
Sequential means that that shifting the gears is only possible in sequence. So no shifting from 1st to 3rd, but the drivers have to shift through all gears to get to the 8th gear and the same going down gears. Hence the sometimes frantic paddle usage when braking into a turn.
But what does changing a gear actually do?
We're taking a little excursion to bicycles. A bike without gears (a fixie) means that your bike is going to be exactly as fast as you are pushing the peddles up and down. So if you want to go really fast you're legs also have to go really really fast.
Gears help changing the ratio of how many rotations you have to do with the pedal to make the wheel rotate. If you shift up a gear you need to move the paddles less to make the wheel do the same amount of rotations.
In cars gears do essentially the same thing. Shifting up a gear allows you to go the same speed at less rpms to for the same speed the crankshaft has to do less rotations per minute.
(I hope this makes sense because this is so hard to explain just with words)
But yeah the rotation of the crankshaft is transferred onto the wheels and the car goes vroom.
Turbo charger
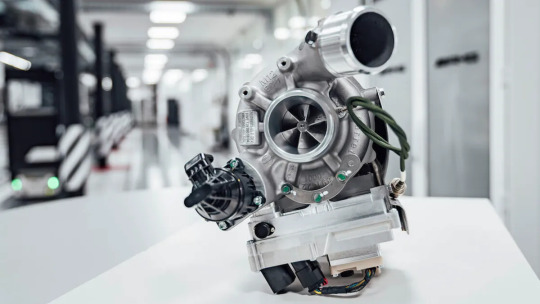
Again, as with all the other parts above also the TC is implemented differently by different teams, some are running split TCs. This will only be a general overview of the principle.
The TC is a turbine that is propelled by the hot exhaust gases. As the gases are pushed out of the ICE they are pushed through the turbo and they rotate this turbine. The energy of the rotation of the turbine is then used to power a compressor.
This sounds a bit weird at first but lets think back to the ICE where we established that the fuel is injected into the cylinders in a fuel + air mixture. The turbo compresses exactly that air and this allows the ICE to run a lot more effectively which means more output for the same amount of fuel.
Turbo lag is a thing that happens because the turbo only really starts spinning and compressing air at higher speeds, because the exhaust gases need to leave the ICE with a certain amount of force and there needs to be a certain amount of gasses for the turbo to work.
So if you are accelerating out of a slower corner, the turbo isn't immediately active but only starts compressing the air and increasing ICE performance at a certain speed. But once it kicks in the car suddenly goes a lot faster.
We don't see turbo lag with the current engines and this is where the MGU-H comes in!
Motor generator unit - heat
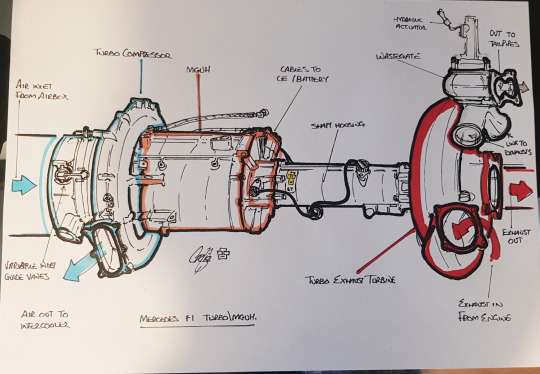
This drawing is not mine it's scarbs
Now we have reached the hybrid system parts! The MGU-H is one of to PU parts that generates and deploys electric energy.
The MGU-H is probably the hardest PU part to develop and the most expensive. (that is part of the reason as to why it'll be gone in 2026)
The MGU-H sits between the compressor and the turbo. It generates electrical energy by magnets that are spun around when the MGU-H is filled by the hot exhaust gases. That energy is then stored. (The magnets generate energy via electromagnetic induction, but that would be too much to get into for this post)
It doesn't only harvest it can also deploy electrical energy and power the compressor and this is used when the exhaust gasses the ICE generates aren't enough to spin the TC turbine. Which means no turbo lag because the compressor is running whether the ICE is already running high enough or not.
Motor generator unit - kinetic
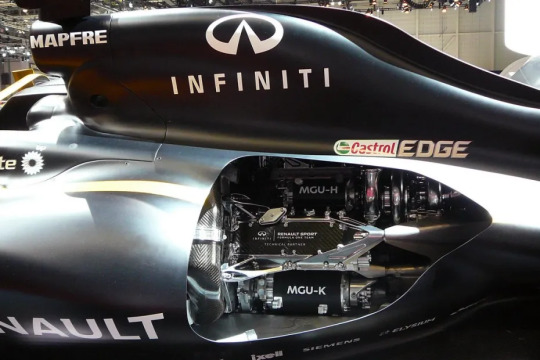
The second PU part that generates electrical energy is the MGU-K. And as it's name suggests it transforms kinetic energy into electric energy. But it also deploys energy.
Much like the MGU-H the MGU-K is also made up of magnets however this time it doesn't work with exhaust gasses but the crankshaft.
When a driver is accelerating, the MGU-K is using electrical energy to spin the magnets which in turn give the crankshaft an extra boost as an electrical motor. Therefore making the car go faster, but it can only be used as a boost here and there.
When the driver brakes the energy deployment stops, so no more electricity that spins the magnets instead the MGU-K stops being a motor and becomes a generator. The crankshaft is still moving when the driver brakes and that movement spins the magnets which generates electricity that is then stored and can be redeployed when accelerating.
The MGU-K actually also helps in slowing the car down a little bit.
Energy storage

The energy storage is quite literally a battery that stores the energy that the MGU-H and MGU-K generate.
Control electronics
The control electronics manage pretty much everything. They manage the PU parts, when electricity is deployed and harvested, the transmission, steering and so on.
But it also does the data logging of things like the telemetry data and all other data that is measured by the sensors on the cars and then send it to wherever the data has to go.
This is a spec part so all teams have to use the same part but they get to run their own software.
#f1#a little excursion into engines#because I like them!#and they are cool#and my beloved MGU-H is going to disappear and I am sad#formula 1
10 notes
·
View notes
Text
How Does 4 Way Valve Work
How Does 4 Way Valve Work
A 4-way valve is a versatile device used for controlling fluid flow in a system. In this article, we’ll take a closer look at how a 4-way valve works and where it is commonly used.
What is a 4-Way Valve?
A 4-way valve is a type of directional control valve that has four ports around its chamber. It is often used in double-acting cylinder applications, as it has the ability to supply pressure to one side of the cylinder while allowing the opposite side to be emptied into the atmosphere. The name comes from the four positions the valve can accommodate.
The Advantages of a 4-Way Valve
One of the key advantages of a 4-way valve is its spool-type design, which provides equal surface areas for the pump and the tank. It also has vertical symmetry, making it an ideal choice for applications requiring the control of a fluid flow. These valves are useful for sequential positioning because they are able to change direction without losing the signal.
The Working Mechanism of a 4-Way Valve
A 4-way valve has a cock plug with two passages that connect adjacent ports. This plug can be cylindrical, tapered, or ball-shaped. Each port has two flow positions, and the plug is normally located centrally. When the valve is in a closed position, the inlet and exhaust ports both remain open.
In actuator applications, a 4-way valve may be left in the block position. In this case, the valve transfers hydraulic pressure from the manifold to the cylinder’s closed port, and the same pressure returns to the reservoir tank.
Applications of a 4-Way Valve
4-way valves are commonly used in double-acting cylinders, pool chemical treatment, and water softener regeneration. They were first used in early double-acting steam engines. The four-way valve consists of two “L”-shaped passages that do not interconnect, one on each side of the plug. The two “L”-shaped passages in the plug are not connected, making it difficult to identify a 4-way valve in an unfamiliar setting.
Conclusion
In conclusion, a 4-way valve is a simple yet versatile device that is commonly used in fluid control applications. Its spool-type design and vertical symmetry provide many advantages, and its ability to supply pressure to one side of a cylinder while allowing the opposite side to be emptied into the atmosphere makes it an ideal choice for double-acting cylinders. Whether you are working with pool chemical treatment or repairing an actuator, a 4-way valve may be just what you need to get the job done.
MAN 7S35MC-MK7 Cylinder Liner from Decho Marine Services
Decho Marine Services (China) Tingting
+86 159-6706-1188
[email protected]
from Decho Marine Services
Decho Marine Services (China) Tingting
+86 159-6706-1188
[email protected]
0 notes
Text
Gm obd1 diagnostic software

#GM OBD1 DIAGNOSTIC SOFTWARE SOFTWARE#
#GM OBD1 DIAGNOSTIC SOFTWARE PC#
#GM OBD1 DIAGNOSTIC SOFTWARE SOFTWARE#
GM MDI GDS2 GM MDI gds tech 2 win software Sata HDD for Vauxhall Opel Buick and Chevrolet (Remote will continue to be available for previous vehicle The GM MDI communicates using all of the existing GM protocols, the same as the GM Tech2:īeginning with the 2008 model year vehicles, Pass-Thru will be the only programming method available. What protocols does the GM MDI 2 support?įor immediate use - At present, vehicles have two buses on the 16 pin connector (high speed and low speed GMLAN). Shop network communications (LAN and WLAN)įuture expandability, including diagnostic applications – Tighten clamps, couplings and connectors as necessary.ĭata transfer and Electronic Control Unit (ECU) reprogramming Visually inspect vehicle undercarriage for looseness, missing components and line routing and clipping, and fluid leaks. Road test on a route with road conditions permitting the proper evaluation of squeaks and rattles.ĭuring this test, check the following items for proper operation and function Tighten clamps and connectors as necessary.Ĭheck all fluid levels engine oil, transmission oil, power steering oil, battery, brake, and cooling system.Ĭheck throttle linkage for freedom at wide open and closed throttle.Ĭheck operation of all interior and exterior lights Tighten clamps and connectors as necessary.Ĭheck power steering gear, lines and hoses for leaks and clearance with adjacent panels, moving or hot parts. Visually inspect for seepage and leaks at hoses and pipe connections, seals, gaskets and plugs. Observe the movement or freedom of movement of linkage, valves and other components.Ĭheck for unusual noises within the engine compartment. To launch the J2534 Configuration Application from SPS, press the "configuration" button on the Diagnostic settings screen.Ĭheck Engine Compartment for components which may be loose kinked or pinched vacuum hoses or electrical connections, and for any other missing or disconnected components.Ĭheck to assure that hoses and electrical wires are properly routed to provide sufficient clearance with adjacent moving or hot parts. In addition, this application provides API Monitoring controls to aid in investigating problems encountered while using any J2534 devices (including the MDI).
#GM OBD1 DIAGNOSTIC SOFTWARE PC#
The J2534 Configuration Application is installed onto your PC at the same time as the MDI Manager software allowing you to control how your TIS 2 Web application will connect to an MDI. The Multiple Diagnostic Interface (MDI) is a J2534 device that connects between your computer and the vehicle’s J1962 DLC connector for pass-thru programming of the vehicle's ECU. * J2534 pass thru offering ECU re-flash and diagnostics for other vehicle manufacturers, when subscribed to their specified software * Programming and installation of new ECU (PCM, ABS, Instrument cluster, air bag, fuel pumps etc.,) * New software flash for existing ECU to fix drivability issues * Complete list of live data streaming for all main ECU GM MDI 2 is the Multi Diagnostics Interface works as the high-quality Vauxhall/Opel dealer diagnostic interface, used with Global TIS, GDS 2, Tech2Win software on a new laptop. This package including item SP163-E GM MDI 2 with WIFI Card + SP163-S1 V2021.10.1 GDS2 Software HDD Pre-installed, plug and play, more convenience save more money! WIFI GM MDI 2 Multiple Diagnostic Interface with V2022.2 GDS2 Tech2Win Software Sata HDD With Software HDD GDS V2022.2 supports Win7, for Vauxhall Opel/Buick and Chevrolet till year 2021 GM MDI 2 Multiple Diagnostic Interface, supports most Vauxhall /Opel 16 pin vehicles.
1 note
·
View note
Text
Sump Pump Repair | Sump Pump Services Toronto
Sump Pump Basics Why You Need A Sump Pump
Sump pumps can lose power during severe storms, so you may wish to consider a battery back-up. They also need to be inspected and maintained according to product specifications to ensure optimal performance. To provide City access to the backwater valve to verify that installation has been completed in accordance with the requirements and conditions of the Program. RCC Waterproofing and Foundation Repairs has been servicing Ontario customers for over 100 years. Their repairs have outlived lifetime warranties by at least two times.
Speak to a contractor about how to find the most ideal location as a compromise between basement usability and sump system effectiveness, and design accordingly. New technology is also on the market today that can alert the homeowner when the pump is not working properly. Home insurance is one way to protect your family against financial losses from accidents.
Find a builder in your area who is building to Mike’s standards. A French Drain is a buried gravel pit designed to allow water to accumulate quickly and dissipate slowly by soaking into the soil. Supply pipes to the sump are clear of clogs and correct sump pump if necessary. Make sure that it is securely plugged into your power outlet and that it wasn't accidentally unplugged. On the other hand, if the pit is too small, your pump will have to come on and off more often, thus wearing it out sooner.
When the switch is moved to the HAND position, the magnetic starter is energized. This is useful for testing the condition of the motor and verifying the direction of rotation. When the selector switch is moved to the AUTO position, the magnetic starter is controlled by the opening or closing of the float-switch contacts. Get a personalized online home insurance quote in just 5 minutes and see how much money you can save by switching to Square One.
For more information about how you can get on the Weeping Tile Disconnection Authorized Contractors list, please contact or call 311. Homes built in new neighbourhoods, since 2005, are connected underground to the stormwater system. This arrangement eliminates issues with adjacent properties. A sump pump can sometimes create issues adjacent to the property.
Most outside drainage offer little to no warranty, ours is a Lifetime warranty. There is costly excavation with outside repairs; such as moving walkways, driveways, decks and landscaping costs. Foundation repair with outside settling of soils it is sometimes harder to see foundation wall defects as opposed to inside where they are more obvious. The sump system includes a quality sump and sump liner. We favour simple, durable, uncluttered liners for our installations. We also have discreet, almost invisible, discharge options available.
0 notes
Text
How to repair leaking bathtub faucets: Old faucets that won't come off

If you don't have a trap door that allows access to your bathtub faucet piping, there's good news: you don't need one to fix a leak. Now a warning: if you damage a corroded faucet while trying to disassemble it to plug a leak, you may need to replace it, and then you'll need a trap door. So it pays to be careful and use the right tools and disassembly techniques.
Screws on the handle
One of the most annoying parts of disassembling faucets is removing stuck handle screws. Coat them liberally with spray lubricant several times and unscrew them with the longest screwdriver you have so you can apply maximum force to the screw head. Even if you do all this, you may end up stripping a screw head, and if that happens, the only way to get it out is with a screw extractor.
Removing the handles
After you remove the screws, the worst is yet to come. If the screws are so corroded that they need to be pulled out, the handles are probably welded to the valve stems by rust or mineral deposits. Attempting to pry off a stuck handle can either break it off or damage the bathtub. A better solution is to use a handle puller, available at plumbing supply stores and rentals. Its central post anchors to the valve stem, while the outer hooks grip the edge of the handle. Tightening the post clockwise applies enough pressure to the handle to disengage it from the valve stem.
Valve Removal and Maintenance
If you have not already done so, be sure to turn off the water before disengaging the valve mechanism and removing the valve. Compression stems are usually held in place by a collar that you unscrew with a wrench, while you may need to pull a retaining pin with pliers to remove a cartridge. You can then replace the worn parts. The culprits are usually the seat washers on compression valves and the valve seat seals and O-rings on cartridge valves. Make note of your valve model to ensure you get the correct replacement parts.
Considerations
If servicing the valve does not fix the leak, the valve seat may be corroded or cracked. Remove it with a shank wrench, a long-handled hex wrench with attachments for most faucet models. It usually makes the most sense to simply replace a damaged valve seat, but if it's just coated with minerals, you can dissolve them in white vinegar overnight. If you notice water on the floor around the bottom of the tub or on the wall where the faucet is installed, there may be a leak behind the wall. If this is the case, you will need an access door. You may need to cut it into the wall of an adjacent room or closet.
The professionals from the Emergency Plumber in Cambridge are 24 hours available. Contact us whenever you want, 01223931160.
0 notes
Text
Principle of Socket Pipe Fittings
The basic principle and performance characteristics of the socket pipe fittings The other is that there is no less to negotiate in the pipeline. Root, also called the root hoop, lock nut, with one end for the short wire buckle, the other end for the long thread buckle short pipe and a root mother, plus an inner wall for the pipe hoop to form a filament, its dip with the live negotiations, used for removable living adjacent, when used in the radiator to fill the heart, the wire pipe hoop can also be omitted; flanges, the two pieces of the push of the composition of a pay, disseminated with the live negotiations. Specifications for the caliber d50mm above, because the large size of the valve at both ends of the flange-type interface, so the flange is also used for pipe and valve adjacent.
The four-pass socket is used for pipe-pass vertical interleaving adjacent place; the diameter of the four-pass, in the pipeline vertically adjacent to two small diameter of the branch pipe when used; the heart is also known as internal and external wire, internal and external diameter, inner silk small, outer silk big, outer silk and other fittings adjoining, internal wire straight continuous with pipe, an adjoining place for a pipe; a short negotiation for an outer screw, used for adjoining two adjacent pipe fittings; short negotiation replace for common lathe spinning, very short negotiation is called the silk, and the plug is called the head, and the plug head is the outer thread, which is used to block the orifice of the pipe. The two of the pipe joints that can be buckled together, mother and adjacent to the public mouth, the mother of the set of female components, the partial buckle with a cushion or asbestos paper cushion to avoid leakage, live negotiations for the pipe in the need to the same diameter pipeline to live adjacent to, that is, the pipe can also be opened apart.
0 notes
Photo

Not all recirculating pump systems are the same. One system places the pump under the sink at the farthest fixture. You have to push a button to start the pump. The trouble with this system is that you still have to wait for hot water. Also, this pump needs high-voltage electricity to operate. It can be a challenge to install an outlet under a sink. Another system activates a remote pump that can be near the water heater. The trouble with this system is that it pumps water through the system whenever the temperature drops at the activation valve. This system wastes energy dollars as it pumps hot water while you sleep or when you're gone. Perhaps the best pump system is one that has a temperature-controlled bypass valve under the farthest fixture sink and a timer on a pump that can be conveniently located adjacent to the water heater. The timer can be set to go on and off at 15-minute intervals, depending on when you feel you need hot water at the fixtures. The pump has a handy extension cord that can be plugged into a nearby outlet. There is no water waste with this pump and it also minimizes energy waste, since it only sends hot water into the supply lines during the programmed times. Gravity hot water recirculating loops that do not require a pump can sometimes be installed after a house is built. Energy loss is a minimum if you insulate the entire hot water loop except for the last 15 feet of pipe as it re-enters the water heater. www.571plumber.com (703) 878-7800 (571) PLUMBEujjdR #woodbridgeva #lakeridgeva #montclairva #dumfriesva #alexandriava #arlingtonva #dalecityva #manassasva #manassasparkva #occoquanva #herdonva #dumfriesva #fairfaxva #annandaleva #springfieldva #cilftonva #tysonscorner #tysonsva #greatfallsva #mcleanva #viennava #burkeva #oaktonva #centrevilleva #northernvirginia #fairfaxcountyva #princewilliamcountyva #plumber #plumbers #plumbing #571plumber https://www.instagram.com/p/B8oIa3rpWEB/?igshid=wznu0i7fw1b0
#woodbridgeva#lakeridgeva#montclairva#dumfriesva#alexandriava#arlingtonva#dalecityva#manassasva#manassasparkva#occoquanva#herdonva#fairfaxva#annandaleva#springfieldva#cilftonva#tysonscorner#tysonsva#greatfallsva#mcleanva#viennava#burkeva#oaktonva#centrevilleva#northernvirginia#fairfaxcountyva#princewilliamcountyva#plumber#plumbers#plumbing#571plumber
0 notes
Text
Next Pool Repair

Two things continue to amaze me about pool and hot-tub repair: 1) It never seems to end, from major to minor 2) to date, I have never failed to find a new part, no matter how tiny or obscure.
It may take a lot of searching and it may be difficult to locate the exact part and get it right, but I’ve always been successful in the end.
This latest fix is an interesting one because of the nature of the problem its fixing.
Going right back to my first pool closing (which was actually at the end of my second season because I didn’t close it in the first season) there was evidence of a problem which I didn’t become aware of until a few seasons later.
I remember the pool guys mentioning in passing that he was not able to empty the pool below the skimmer using the pool pump, but he said it didn’t matter because he had his own pump and that was easier to use anyway. I didn’t think much more about it until I came to do my own first closing last year.
For a pool closing, most pros recommend that the pool level should be lowered to below the level of the skimmer. So when I started to do this, I was pretty much expecting to have a problem once the level dropped below the skimmer and sure enough, when it got to that level, the pump stopped pumping water and was sucking air. This was despite having the diverter switched to the bottom drain only. Previously, I’d kind of suspected that the problem was due to a leak in the underground circulatory system. And indeed, I’d had a leak professionally identified in one of the returns 3 or 4 years ago.
However, rather than dig up the concrete which would be a huge mess, cost thousands of dollars and would probably require ripping up some of the deck - something I definitely want to do having replaced the entire 400 sq ft deck - we installed another diverter which allowed that return to be shut off. This could have been due to damage caused in the first season where there was a very heavy freeze that resulted in ice that was at least 8″ thick and lasted into mid-March.
Having said that - forcing myself to be properly logical about this - a leak on the returns would not cause this problem. The pump works on suction from the bottom drain and the skimmer, either together or separately (depending on how the diverter is set) and to cause the leak would have to be on those lines not the returns and specifically it would have to be on the skimmer line.
Despite not having a theory as to the exact cause of the leak, I figured that if I plugged the skimmer line, then the bottom drain may be able to get proper suction. And sure enough that worked.
I vaguely started to wonder if the problem could be with the diverter valve itself. The diverter valve has a lubrication access point and although I hadn’t realized what is was for, I had taken the valve apart and cleaned and thoroughly lubricated it a while ago. It all looked to be in good shape, but the very fact that it has a lubrication point shows that wear will take place if the valve is not lubricated on a regular basis and it may well have running without proper lubrication for a lot of the time.
I started searching around for a replacement part. After some digging, I did find a few options. Some were a little pricey but I found one that was pretty decent at about $45. I didn’t order it because I was not convinced that this was actually the problem and it seemed a bit pricey if it didn’t fix anything. I left the web site open for months on my backup laptop, along with many other windows, as I tend to do and I’d periodically mull over submitting the order when I looked at it.
When I closed the pool this winter, I waited to see if the pump would suck air once the level dropped below the skimmer and sure enough it did, regardless of what I did with the diverter. I plugged the skimmer line and then the pump worked perfectly.
It was hard to imagine how a slightly worn seal could cause a complete loss of suction, but, regardless, I reasoned that it could be the only cause.
I went back to the laptop but the web page had disappeared even though I restored the tabs that had brought back that tab numerous times. Even using the history search, I couldn’t find anything. I had a few goes before I took of my blinkers and started new searches. I found quite a few options on eBay including one that was only $25.
The advantage of this new part is that it is a teflon seal that doesn’t need lubrication. It will be interesting to see if this fixes the leak.
For draining the pool this doesn’t matter because plugging the skimmer is easy and fixes the issue, but this leak also means that when the skimmer is being used to vacuum the pool - especially at opening - then some of the suction is being lost to the bottom drain, even when the bottom drain is closed - which slows down the cleaning process.
The prior spare parts venture was only 2 weeks earlier. I’d left the pool closing very late as usual. I’d kept it open, partly so that it would be a nice view for Ali when she came to visit especially when using the hot-tub.
I didn’t immediately close the pool after her visit because there was the new challenge of how to deal with rigging up the new pool cover and I wasn’t quite sure how I was going to tackle it.
My main concern from delaying closing was the imminent start of the main leaf drop from the maple adjacent to the pool. The main drop normally runs around mid-November so I still had a couple of weeks to think about. In the meantime, there was ongoing to leaf-drop including a particularly violent storm with high wind gusts. I managed to keep it in check with without too much trouble - the most important thing to avoid is starting off without gloves. Your hands will be blocks of ice in under a minute.
What I wasn’t counting on was a sudden freeze. I’ve closed in mid-November before, but this has never happened before. The pool takes a while to freeze because of the inertia of sheer volume but the equipment can freeze much more quickly and expensive components are at risk from cracking under pressure. This hadn’t occurred to me and I’d left the pump running. I looked out the bedroom window one morning and saw a trail of ice leading from the pump area.
I quickly went out to check it and disabled the pump at the timer. One of the returns was frozen up and the pump had been pumping with no flow. The backup had caused the chlorinator to blow past the seal. Not good for the pump or the chorinator.
I decided to forget about the cover for the time being and instead sort out the pool. I could always remove more leaves later on. The important thing was to winterize the pool.
Pumping out hundreds of gallons of water is not a good idea if the water is going to freeze and create dangerous ice slicks in the street. So, the first thing to do was to reduce the pool level. The temperature had risen above freezing so it was time to get pumping. I dropped the level, blew out the lines and drained the system. Now I was safe from further damage.
Over the next 3 days I set about tackling the new cover. First I got acquainted with how best to set the straps and then adjusted them all according to my measurement chart on the deck. I then realized that my measurements did not allow for the spring tension. It wasn’t worth resetting them especially as I don’t know what the amount of tension should be. I’d put it in place and then tension it later.
Last year, I’d figured out how to install the cover on my own and I set about it. I basically just let the cover sink into the pool and drag the cover up to the far end. I locate the far end anchors first then do the first lateral. The pool covr cannot be moved quickly because of the resistance of the water, but done slowly, it’s easy and the water falls off as each section is anchored.
0 notes
Text
DIY PRESSURE WASHING
Pressure Washing – DIY
Pressure washers are ideal for thoroughly and powerfully cleaning almost any surface that is covered with caked-on dirt, grime, and grease. They are not meant to be used as a garden hose — you have to know how and when to use one so that you get the job done safely and cleanly. Whether it’s your deck, siding or driveway that requires extreme cleaning, pressure washing your home is a great way to keep things looking new and a power washer is a machine you need.
Step 1: Select a Pressure Washer
There are two basic kinds of pressure washers: gas-powered and electric. Gas-powered models are more powerful and mobile because they don’t require an electrical plug and extension cord. Electric models are typically less expensive and lighter to carry and have the trigger-activated engine on/off function.
You want a machine with a pressure level between approximately 1,300 and 1,600 pounds per square inch (PSI) for general cleaning of your home’s exterior surfaces, such as siding, sidewalks, patios and patio furniture. A machine with a pressure level between 1,800 and 3,000 (PSI) is for more serious work like stripping paint or stain off of siding and decks. Some jobs could require more power, though, so do your research to figure out how much power you think you need.

Step 2: Prepare Washer for Use
Prepare the washer for use by assembling it, if needed, as directed by the manufacturer. Read the manufacturer’s instructions carefully before operating the washer. Connect the washer to your water spigot with a garden hose. Be sure that the hose is not kinked and that the connection is tight. Loose connections can be dangerous under pressure. Squeeze the trigger of the washer wand to release any air inside before you turn on the water. Turn the valve on your water spigot so that water turns on. For a gas-powered unit, fill the washer’s reservoir with gasoline to the recommended amount. For an electrical washer model, connect the unit to power.
Step 3: Activate Washer
Select a nozzle for the tip of the wand. Choose a nozzle that is appropriate for the job you’re doing. The nozzle determines the amount of direct force with which the water will be expelled from the washer. Check your owner’s manual for the appropriate suggested uses for each of the nozzles included with your washer. The included nozzles provide you with varying amounts of pressure for the job, from a narrow, laser-like stream to a force a bit more powerful than a garden hose.
If you need to attach an extension wand to reach high or out-of-reach areas, do this before connecting the nozzle. Some home pressure washing jobs may require using chemicals or detergents. Add these before turning on the washer, as directed by the manufacturer.
Set the wand to off or low before starting up the washer to avoid losing control of the wand when water begins to gush. Squeeze the wand trigger and then turn on the washer.

Step 4: Begin Cleaning
Before you begin pressure washing your home, test the spray before hitting your target area. Stand at least 4′ away and gradually move the point of the wand toward the desired cleaning area, making slow, deliberate passes over it. Stop and see if the area has been cleaned or stripped (if you’re using the washer to strip paint). If it is not, move closer and repeat. When you’ve found the ideal distance, begin cleaning again with slow movements of the wand until you’ve cleaned or stripped the desired area.
If you used detergent or chemical, let the solution work into the area and then rinse the area with a water-only stream from the washer, or water from a garden hose. You should always start with a lower pressure when unsure of the effects it may have on surfaces. You can then switch nozzles or change your standing distance to increase pressure if needed. In most cases, it is not advised to hold the wand tip closer than 12″ from the surface you are cleaning. The highest pressures from a washer can be damaging to siding, wood decks or similar surfaces if used incorrectly, while high-pressure settings can be ideal for cleaning surfaces such as concrete.

Step 5: Finish Up
When you’ve completed your home pressure washing tasks, turn the washer off and then turn off the water at the spigot. Squeeze the trigger on the wand until all water has been expelled. Disconnect the garden hose from the washer. After every pressure wash job, especially one where you used chemicals, it’s best to again rinse washed surfaces with a garden hose to ensure that all dirt, debris, and chemicals have been rinsed away. Use your garden hose to rinse off any plants or other adjacent objects that may have been splashed with debris or chemicals.
Great work on pressure washing your home! Now you have the skills and the know-how to properly clean your home’s exterior surfaces with a power washer.
#pressure washing#pressure washer#power washing#houston#pressure washing company#pressure washer near me#power washing company
0 notes
Text
Terrifying Times At Coalton High Part 7
This is long overdue and I apologize for the lateness but here is part 7.
I couldn't believe this I had just woken up from my drugged sleep again for the 2nd time and I was worse off than before. This time I woke up inside of a gigantic nursery there was a babies crib the size of an adults bed with a locking top set of bars. A huge changing table which looked like it could fit 2 adults on it with medical looking restraints at each corner. Underneath the changing table were what appeared to be stacks and stacks of thick fluffy disposable diapers, some were white in color some were white with babyish prints on their surface. Adjacent to the table sat a large cabinet I could only imagine what was inside.
I was bound yet again no surprise there, this time I was secured in a white straightjacket with black rope leading from a D ring on either side of the jacket to some eye hooks in the ceiling, my ankles were also tied spread eagle but with some ankle cuffs fixed with the same rope to eye hooks in the floor spreading my legs far apart. Effectively holding me in place for who knows how long. I tried struggling as hard as I could, twisting and turning and bucking in my bonds, didn't help me break free even a little bit. I felt a little draft on my bum at the same time I could feel a presence behind me.
"Naughty baby girl you are Emma, trying to escape from your mommy. I hope you're ready for your punishment I think you will find it to be rather humiliating."
I tried to shrink into nothing but that is impossible.
"Have you ever been given an enema before baby girl, if you haven't you will be experiencing your very first one."
I had heard of enemas before but never received one I hoped it wouldn't hurt as bad as the caning had. I could feel a finger slide into my ass and wiggle a bit, it was cold and intruding. After she pulled her finger out she replaced it with a hard plastic phallic shaped object. I winced as it entered, as it was bigger than her finger. I heard a hiss sound and felt it grow inside me, which elicited a moan from me. The thing just kept growing until I thought I would be stretched until my hole was damaged, thankfully it stopped before that happened. I sat there for a few minutes waiting for something to happen I could hear Ana behind me wheeling something over to where I stood. I felt her hook something up to the phallic object and then I could feel liquid filling up my ass.
"I am giving you a 3 quart enema baby Emma so you will be nice and clean inside. I hope you enjoy messing your diapers for hours baby girl because this is going to be a lot of water for you to expel into your diapers." After having said that I heard Emma moan with displeasure, that will teach her to disobey me and try to escape. I watched as the bag slowly emptied into the poor girls bottom, I gave her a couple swats on her nice round ass when she tried to sass me. Finally the bag was empty so I removed the hose from the inflatable enema nozzle I inserted into her prior to administering her enema and rolled the bag back to the corner of the room.
I could tell she was having some discomfort, she couldn't expel the enema because the plug had only a one way valve, ensuring she can't release the enema until I let her. I waited for 15 minutes before I decided that was long enough for it to take affect emma seemed to be experiencing cramps so I decided I better hurry and get her ready for the explosion that would happen in her diapers. I grabbed a couple of all white diapers from under the changing table and secured them around her waist. Then I set up the camera I found in her bag so I could record her messing her diapers like a helpless little baby, so she could re-watch it later over and over. I reached down the back of her diapers and deflated the plug and pulled it out as quickly as I could. Seconds after the enema just started shooting out into her diaper creating a massive brown spot that just kept spreading this was going to be a very messy cleanup job.
Emma's POV
I couldn't hold it anymore I was cramping something fierce and when she put her hand down my diapers and pulled the plug out, the enema shot out of me like a cannon I could feel it reaching to every corner of my diapers even going so far as to saturate the front of my diapers with the foul smelling liquid. This whole enema business was strange but also felt kind of nice aside from the cramps. The enema seemed to go on forever my diapers were getting really heavy now, so much so I thought they would eventually drop off but they were still holding on tight. It seemed like I was nearing the end when little spurts would come and go.
I felt Ana place her hand on my diapers and smush my messy diapers into me, I tried wiggling to get her hand off but all she did was laugh and call me a messy baby girl. She went over to the cabinet and pulled out a couple of things I couldn't see. She came back over to me and unzipped a black hood which had only nose holes and slipped it over my head and I heard a click at the back of my neck and only saw darkness after that. I heard her playing with the front of my diapers fastening something to the front. I didn't know what it was until it was turned on and I could feel strong vibrations through my thick messy diapers reaching my pussy making me weak in the knees. I could feel an orgasm coming on when she said something that made me whine with displeasure.
"Baby Emma since you decided to cum without permission earlier and since you're being punished I've decided to leave you tied up with your thick messy diapers for a few hours, I have also added a little enjoyment to your predicament so it won't be all bad at least for a while. You'll eventually be begging me to stop you from cumming after the first 5 orgasms or so."
With that I heard her leave the room and shut the door leaving me to contend with my little friend.
4 notes
·
View notes
Text
BP Oil and Gas Leaks Under Control, but Alaskans Want Answers by Georgina Gustin

Credit: Reuters/Luke MacGregor
Activists want to know what triggered the blowout at BP's Prudhoe Bay oil well and whether 'this is something that could be more pervasive.'
Response crews at a BP well in Alaska's North Slope that began spouting crude oil and methane last week stopped the leak early Monday morning. Now environmental groups are starting their push for answers.
"A big issue now that it's under control is making sure there's a rigorous investigation about what went wrong," said Lois Epstein, who heads the engineer and Arctic program for The Wilderness Society. "That includes looking into whether this is something that could be more pervasive."
BP workers spotted crude oil spraying from the top of the onshore well Friday morning, in the remote Prudhoe Bay region of the Alaskan Arctic, but were able to stop the spraying by closing a safety valve. A second leak of methane, a greenhouse gas, continued venting uncontrolled gas into the air through most of the weekend.
"Last night the Unified Command killed the well and stopped the oil and gas leak," said BP spokeswoman Dawn Patience in an email Monday. "The response operations will continue."
According to the latest report, released Monday from the Alaska Department of Environmental Conservation, an infrared flight indicated that the oil did not leave the gravel pad surrounding the well, but "cleanup responders have not yet confirmed there are no impacts to adjacent tundra."
The state had not determined an estimate for the amount of oil leaked or a cause for the mishap.
The accident occurred as the Trump administration is readying an executive order to reverse the Obama administration's ban on offshore oil drilling in more than 100 million acres in the Arctic and nearly 4 million acres in the north and mid-Atlantic. Halting an oil or gas spill is always difficult, but responders to an accident in the Arctic Ocean would face immeasurable challenges and many unknowns posed by persistent darkness, remote locations and sea ice.
Epstein, an engineer, said that spills in Alaska's remote North Slope are common, but blowouts of this kind are not.
The Department of Environmental Conservation report said that the well "jacked up" during the event, but has since settled by 11 inches. What's unclear, Epstein said, is what triggered that. The cause could be anything from a maintenance problem to the remote possibility that the ground around the well has been impacted by natural gas injections.
"We've been injecting a lot of gas on the North Slope," Epstein said. "We won't know if this is going to happen a lot more until we learn the results of the investigation. We won't know if this is a new hazard."
The last time a methane blowout occurred in the area was in 2012, Epstein said.
According to the state's report, responders attempted to bring the well under control on Saturday, but were unable to because a broken pressure gauge prevented them from pumping fluids into the well to kill it. On Sunday, a well control contractor was able to plug above-ground piping, enabling them to pump a liquid solution into the well.
The leak is the latest example of infrastructure problems in the state's gas and oil industry. Last week, Hilcorp Alaska announced it had stopped a methane leak that had been spewing into the state's Cook Inlet for at least four months.
Hilcorp, one of the biggest privately owned gas companies in the world, buys older gas and oil infrastructure. Most of it, including the natural gas line where the leak occurred, is more than a half century old.
The BP well was built in 1976, shortly after oil development in the North Slope took off. The area produced 2 million barrels of oil at its peak in the 1980s, according to Bloomberg, but now produces about a quarter of that.
2 notes
·
View notes
Text
The Bicycle will show us the way again in the future.
A bicycle is a two-wheeled vehicle. Can notice machines on bicycles. Bicycles originated in Europe in the 19th century. The use of this eco-friendly vehicle is increasing day by day due to its various benefits. By 2003, more than 100 million bicycles had been made worldwide.
Many people claim that bicycles were invented for the first time. However, Carl von Darren of Germany was the first to introduce two-wheeled vehicles to the public. He exhibited his invented vehicle in 1818 in Mannheim, Germany.
History:
Although people in European countries think that the use of Bacillus is a bit of an introduction to the 18th century, its image was first brought by a craftsman from Paris in 1816. Hobby Horse of that instrument, true wooden horse, say before. Quantum Tankers (Paddle) from Patter to Roma Ut Player Inventor Sun 1865 AD. Nested in Paris Town Lalament (Laliment), this device has a velocity (speed). So: A Huddot (bone tremor) this Saturday, the reasons for widespread knowledge, essential improvements to English, French, and American mechanical equipment were given beautifully in 1872, the thinnest son of his iron bar was followed by a 30-inch to 64-inch forward. The exercise and the next to have been about 12 inches in diameter. Commenters have also been fitted with bearings and brakes for additional tablets.
Bicycles have indeed been a technology for the poor of society for many centuries, which has given them freedom. Although, of course, in the beginning, it was cheaper than horses in price. But with the same kind of freedom in terms of use, you could travel a lot of distance.
But this bicycle not only brought about social change, but it also revolutionized industrial production.
In the early nineteenth century, used the U.S. military's armaments to make weapons that were precisely the same size and could be used interchangeably. But the use of such parts in civilian factories was still quite expensive.
In this case, the bicycle did an essential job. The bicycle industry connected the production of high-quality military equipment and complex products for a large population.
In the factories where bicycles were made, invented several simple technologies and techniques. For example, shaping a cold metal sheet can be done at a low cost while maintaining quality. In addition, they invented various technologies for ball bearings, pneumatic tires, gears, and brakes.
Later, however, these technologies of the bicycle industry have been widely used in the car industry. For example, Henry Ford used these technologies and techniques in his factory.
Different parts of a bicycle:
Frame:
An essential part of the bike is its frame. The structure of the frame should be such that its parts can do their job efficiently. The triangular frame of the bicycle and the front and rear tongs are made of hollow, round tubes. The appropriate brackets are then bolted to the corners of the frame. In making a triangular frame, care is taken that the middle lines of its tubes are in the same plane. The lines in the middle of the front steering head are mounted on the frame. The handle and the front tongs will match. The arms of both tweezers should also be symmetrical and parallel to their midline. The midline of the wheel coincides with the midline of the tangs. Else, the bicycle will not be able to move straight in an unbalanced state.
The Wheel:
It is customary to place the saw on the wheels on the sensitive side of the navel. Sensitive Oh, the camouflage forces on the wheel rim can be applied well. Each of the two adjacent arrays is tilted toward the hub flange. Forty on the rear wheel and 32 on the front, so holes are made in its circles and each of the flanges of the hubs, making holes in half the number of circles. When preparing the wheel, the eight multidimensional opposite arrows are first corrected, then the remaining arrows are filled in the same order. In the pictures, the hinges are shown on the left side of the hub, which sits sequentially in the odd-numbered holes of the circle. The flanges on the right will even sit in numbered holes, so their positions will be blank.
Strings made of strings are called tenses because they are always in a state of tension. Even during use, should check the wheels from time to time, no corn should be loose, and no one should be under extra pressure. If everyone is seen playing with fingers, the same sound should come out of them. Otherwise, the wheels will start to twist and break. It is possible to tighten them by rotating the nipples in a circle in the right direction.
Ball & Bearings:
For a bicycle to work correctly, its ball bearings need to be monitored. If a bearing makes even the slightest noise, they must have something wrong. Please open it and count the bullets on both sides, clean it with a cloth. If a bullet breaks, cracks or gets worn out, replace it, then look at the ball-race barley grooves and angles. These should not be worn, cut, or rough. If they are wrong, replace them too. If the ab as mentioned above is not present and the tablets are also of the same number and size, must understand the lack of oil. There should be no debris in any part of the bearing.
Gear:
It is mounted on the rear wheel, allowing the rider to change the speed ratio of the bike according to his wishes and needs. Three-speed gear hubs are more popular nowadays. This type of gear is also made of the navel, applied backward by pedaling the brake. The ratio of the speed between the chain wheel and the navel is changed by pulling a chain with good links between the axis of the navel. By pulling it, the position of the gears inside the navel changes. The work of pulling the chain is done by the driver tightly with his liver, but the act of returning is done automatically by the spring inside the navel. So first, open the navel parts, open the left-hand corner, and then open the ring of bullets on the right.
Free Wheel:
Mounting it on the rear wheel allows the driver to stop driving whenever he wants, but the wheel can continue to spin without hesitation. It is of two types, one with corrosive cylinders and the other with capped teeth. Each freewheel should have properties that the paddle chain does not extend due to the sticking of the inner parts, and when the pedals are driven again, the inner parts work together and do not slip. Also, the structure of the wheel should be impervious to dust and water. Nowadays, freewheels with ratchet teeth are more common. The ratchet's tooth is cut in the inner circumference of its circle, where the poles are fixed, sending the rider's pull through the chain of pedals to the navel of the wheel. The chains stop as soon as the paddles stop, and those canines fall periodically into Rachael's teeth with a spring ball, making a "cut" sound.
If the freewheel starts to slip or gets jammed again, the first way to fix it is to fill the wheel with plenty of kerosene and turn the wheel empty. When all the oil is dry, then lubricating oil is applied. Next, if the air does not go away, must open the cover of the wheel to see if the dog is worn out or if their spine is damaged. Then after it has been thoroughly cleaned from the inside, the broken parts or tablets have been replaced with new ones, the bangles should be carefully straightened straight.
Air Tires:
To keep the tire stable on the wheel, a steel wire or hard rubber knot is made on either side of it, pressed under the curved edge of the wheel, and pressed into the inner rubber tube to stretch the tire and sit in place.
Should fill the inner tube with such pressure, the tire can carry the driver's load, and the wheel should not collide with the road crab. Otherwise, there is a risk of the pipe being crushed and the tire bursting. Excessive inflating reduces the flexibility of the tire to keep the road above the bicycle, but inflating the required amount of air increases the diameter of the wheel to its limit when driving on a smooth road and increases the power from the pedals to a lesser extent. To be applied
Valve:
Bud air valves are often used to fill the internal tube with air, the structure of which is clearly shown in Figure 13. should not crack the rubber valve tube, crushed and rotten. The cap on the top end of the valve plug should always be on. Should firmly attach the base of the valve to the nut. The valve plug should fit into the slot without any obstruction, including the rubber valve tube.
Paddle Crank:
The paddle cracks are attached to the cotters along their axes. If the bicycle falls or due to an accident, if the cracks or axles bend, the cranks should be removed by hammering the crooked end of the cutter with a hammer to break the fungus, but be careful that the bangles are not damaged. The cotter must be hammered under the crank boss with an iron log. Otherwise, it will shake the crank axle or ball bearing. If both cranks are not marginal due to an error, the flat part of the cot should be adjusted by sanding or bending. If the crank is loose, the cotter also works to tighten more deeply. Cycling in a loose hole for a long time can cut the hole of both the hole and the crank and damage the axis's groove. So it is better to change to the new couch. Often the pedal pin becomes crooked due to cycling. In such a situation, should take the tablets in hand by removing the weight cap on the outside of the pedal, removing its adjusting cone. Then, sliding the paddle frame should also take the internal bearing tablets care of. This will make the paddle come out, and the pedal pin will be engaged in the crank. After inspecting it and straightening it on the porch, the paddle should be tied as before.
Driver Chain:
This chain consists of tiny leaf-like links, vines, and rivets. It needs to be kept properly by cleaning, lubricating the oil, and adjusting its expansion. Loosen the rivet joints of the chain and increase the overall length of the roll's wear. The pitch of the teeth of the paddle teeth does not change, so the chain comes off the wheel and gives problems. Its hallmark is to place it in the middle of the arch of contact with the thumb and forefinger and pull it out. If the chain stretches about an inch, that's fine, and if it stretches an inch, it's worn and loose. So it should change.
Hand Brake:
Manual brakes apply pressure to the wheels based on the connection of the lever and the poles. Bowden's brakes are based on a constitutional wire extension connected to a flexible steel tube. Spring breaks work to release. Brakes are the primary safety device, so brake poles should be fitted well, as they do not get stuck in the axle or tires. The poles should be strong as well as easily rotated in pairs. Good looks and parts should also be clean.
Bicycle in Society:
At the time of the rise of superstition was a tool of the upper-middle class. But already, from the beginning of the twentieth century, the bicycle became popular among the rest of the population. However, the price of the bicycle exceeded the monthly salary of a young girl in the countryside.
The bicycle gave greater freedom of movement in public trams, trains, and buses. Since the car was not an economic option for a few, the bicycle was the apparent means of transporting passengers and goods. The popularity grew so much that from 1920 to 1950, the city scene was entirely dominated by bicycles in the street scene.
In 1894, Pope also allowed Catholic priests to conduct the cycle when they needed it. In recent times, bicycles have been church-blessed for their contribution to cycling in a cleaner environment.
Bicycles in Business Context:
Some business work is still done on a large scale by bicycle. This is especially true for courier services in urban areas and businesses with jobs in urban areas.
Bicycle bidding was a profession in the early twentieth century with thousands of employees and companies with a fleet of freight bikes, long-haul, and fast telegraph couriers. In Copenhagen, these bike stalls ran under Sawyers' name and were known for their new shouts to fellow road users. Since 1988, the industry has flourished again with the launch of a new courier service in De Grazon Bude, which later spread to Aharas and Odense. Since then, several other companies have also opened bidding services.
Urban letter carriers often use bicycles to carry the day's mail around. The bike makes it easy to position near individual entrances, and the bike is much cheaper to collect and operate than the car.
Home assistants, who go with most senior citizens every day, often use bicycles from place to place.
Bicycle taxi drivers are found in several large Danish cities, where they often take tourists to various exciting places.
Since 1991, tourists have used "city bikes" in a growing number of Danish cities, starting with Persian and Gray.
Some companies acquire bicycles that employees can use just as you can get transportation discounts if you have more than 24 kilometers between your home and work.
Traffic Policy:
Traffic policy is a topic that can be related to many because concrete solutions often mean that one group of road users has to leave the place, leave the road or wait for another group of road users. For the same reason, there has always been an ongoing debate about the (energy) relationship between public transport, bicycles, and cars.
One of the most frequently raised causes with bicycle traffic is:
Bicycle Paths - are generally considered to help cyclists create more excellent protection and increase the number of cyclists. However, some reports suggest that bike paths may increase perceived safety, but in some cases, more accidents occur at intersections.
Train Carrying Bicycles: Many cyclists wanted to combine the flexibility of bikes with train connections across the country. Challenges associated with cycling on trains are practicalities related to space and profitability.
Signposted Cycle Routes - Aims to determine a safer, more peaceful, or more direct route for cyclists. Signposted cycle routes are available both as passenger routes and recreational routes, and both are built on their route cycle routes, cycle paths, or sidewalks and gravel roads.
Bicycle Helmets - One of the most controversial issues. Wider use of bicycle helmets will reduce head injuries and reduce traffic casualties, according to some studies, but further studies from places where bicycle helmets have been made mandatory indicate that they do not improve safety. Critics also point out that the stress of wearing a bicycle helmet - and especially the need to wear a mandatory helmet - can cause very few people to cycle. As a result, it can miss out on the incredible health benefits that cycling practice provides.
Other issues: Many more issues have been discussed to promote bicycle traffic. For example, bike centers at stations, high-class passenger routes in cities, and the possibility of turning right at traffic lights, even if red, can promote bicycle traffic.
Cultural Differences:
Worldwide, there is a big difference in the popularity of bikes. Bicycles are popular in some developing countries because they enable the general public to travel longer distances and transport goods cheaply. While in other countries, cycling is not a popular means of transportation for cultural reasons.
The same cultural differences apply in Europe and North America, where it is not the economy but the cultural differences that give rise to how popular the bike is. Currently, bicycles in northwestern Europe (Holland, northern Germany, and Denmark) are often used to transport everyday life. In contrast, bicycles in southern Europe are:
Much more toys for children.
A tool for small weekly trips to the park.
A sports equipment tool.
Final Statement:
Only 50 years ago, m made cars and bicycles in almost equal numbers on earth. But then the production of cars started increasing, the production of bicycles started decreasing. At one time, cars made three times more than bicycles. But now times are changing again. The popularity of bicycles is increasing. As a result, the production of bicycles has again doubled compared to cars. About 12 crore bicycles are being made every year.
The bicycle will show us the way again in the future, no matter how strange it may sound.
We are now heading towards an era where driverless cars will be on the road. No one will keep a car anymore, call a car on a smartphone if needed, or rent one.
If that happened, then what would happen to our future?
The answer is straightforward - the bicycle.
There are now over a thousand bike-sharing schemes in the world. Millions of bicycles do not have to be deposited anywhere, which can be easily rented. The number of such bikes is increasing rapidly. Battery-powered bicycles have also arrived.
Ride-sharing company Uber has already announced that they will now focus on electric scooters and bikes in their business instead of cars.
However, a few companies have faced some problems in this bike business. A large number of their bikes have been stolen or damaged. Thrown in different places. As a result, in some cities, they have been forced to close down their businesses.
But this business will grow in the future. It seems because bicycles are the easiest way to get around in congested cities.
Many people do not want to ride a bicycle because of car pollution in big cities. Many are afraid of accidents.
But in the future cities, if a pollution-free electric car runs, a car that no man will drive, and a very careful robot, the popularity of bicycles will increase.
2 notes
·
View notes
Text
Valve Might Be Working on a Steam Cloud Gaming Service
Cloud gaming services are all the rage these days. Microsoft and Google are both making major pushes into the area, joining services like Nvidia’s GeForce Now and PlayStation Now. The exact features of each service differ, however, and they aren’t fungible — the game libraries you can access and the requirements as far as local hardware are different in each case. Now there’s some evidence that Valve might be looking to get in on the action as well, with rumors of a Steam Cloud gaming service popping up in several places.
Valve is working on "Steam Cloud Gaming" according to partner site code update. Partners will need to sign an addendum to their terms.
Could this be a competitor to @GoogleStadia?https://t.co/7AQ9YxCol8
— Steam Database (@SteamDB) November 6, 2019
Steam already supports remote streaming if your hardware supports it, and there’s the mobile Steam Link app you can use for streaming to an iOS or Android device, but the company hasn’t taken the plunge into full-on cloud gaming just yet. In theory, the tremendous back-catalog of titles on Steam could allow for unique streaming experiences you can’t get anywhere else, though the requirements of some of those games (from eras when the mouse and keyboard were the assumed standard for PC gaming in all cases) might be troublesome. Then again, Steam has improved its own controller support significantly and would surely provide a compatibility layer for older games as well.
Update: Last Steam client beta update added more references to Cloud Gaming, and the updates point towards support of multiple cloud providers, in addition to Valve's own.
One of the referenced third-parties is @nvidia (GeForce Now) https://t.co/UYe0o7WoT7
— Steam Database (@SteamDB) November 8, 2019
The idea that the service might run as a companion over other devices is also interesting. Nvidia has services like GeForce Now, which might be seen as running in competition with a hypothetical Steam Cloud Service. Much may depend on how Steam structures its offering. The one major advantage Steam has, of course, is that Steam users have been plugged into the service for over a decade. The anger at the launch of the Epic Game Store was also a demonstration of how much market power Steam practically wields.
Of course, for now, we don’t have any details on how the project might shape up or what kind of service this would be. Anything from a premium add-on to basic existing Steam accounts or a free over-the-top service that gives you more freedom to play your existing library remotely would seem possible, depending on the kind of arrangements Steam wants to draw.
Whether any of these services can attract customers and build stable long-term businesses is still something of an open question. Stadia will launch next week and give us a look at Google’s idea of the future, but so far, most of the success in this field has been from services directly adjacent to the console business. If US customers start signing up for these services en masse, bandwidth caps in the US may suddenly start seeming awful small. The bandwidth requirements for game streaming, particularly game streaming in 4K, can be formidable.
Now Read:
EA Games Are Returning to Steam
New Steam Feature Adds Online Play to All Local Multiplayer Games
Valve Introduces Machine Learning Algorithm to Recommend New Steam Games
from ExtremeTechExtremeTech https://www.extremetech.com/gaming/301873-valve-might-be-working-on-a-steam-cloud-gaming-service
from Blogger http://componentplanet.blogspot.com/2019/11/valve-might-be-working-on-steam-cloud.html
0 notes
Text
Blow-Down Procedure for Marine Boilers
Boiler is one of the most important machinery systems on the ship. An economic and efficient working of a marine boiler on a ship requires timely maintenance and special care in starting and stopping the boiler. Routine cleanup is extremely helpful in increasing the working life of a marine boiler.
In this article we have brought to you one such important procedure – boiler blow down, which has to be performed at a regular interval of times in order to increase the performance of the boiler.
Why Boiler blowdown?
The water which is circulated inside the boiler tubes and drum contains Total Dissolved Solids (TDS) along with other dissolved and undissolved solids. During the steam making process, i.e. when the boiler is in operation, the water is heated and converted into steam. However, these dissolved solids do not evaporate and get separated from water or steam, and they tend to settle at the bottom of the boiler shell due to their weight. This layer will prevent the transfer of heat amid the gases and the water, eventually overheating the boiler tubes or shell.
Related Read: The Science Behind Marine Boiler Water Circulation on Ships
Different dissolved and undissolved solids lead to scaling, corrosion, erosion etc. The solid impurities will also be carried over with the steam into the steam system, leading to deposits inside the heat exchanger surface where the steam is the primary heating medium.
To minimise all these problems, boiler blowdown is done, which helps in removing the carbon deposits and other forms of impurities.
Boiler Blow Down
Boiler blow down is done to remove carbon deposits and other impurities from the boiler.
Blow down of the boiler is done to remove two types of impurities – scum and bottom deposits. This means that blow down is done either for scum or for bottom blow down. Moreover, the reasons for boiler blow down are:
1. To remove the precipitates formed as a result of chemical addition to the boiler water.
2. To remove solid particles, dirt, foam or oil molecules from the boiler water. This is mainly done by scum valve and the procedure is known as “scumming.”
3. To reduce the density of water by reducing the water level.
4. To remove excess water in case of emergency.
Inside a marine boiler, the blowdown arrangement is provided at two levels; at a bottom level and the water surface level known as “scum blowdown”.
Hence, when the bottom valve is used, the procedure is known as boiler blowdown, and when the Scum valve is used, the process is known as “scumming.”
Related Read: Video Tutorial: How Ship’s Boiler and Steam System Works?
The boiler water blowdown can be done in two ways depending upon the type, design, automation used, the capacity and the characteristics of the boiler feedwater system:
Intermittent or Manual blowdown:
When blowdown is done manually by the boiler operator at regular intervals according to the established operating program, it is known as Manual blowdown. This type of blowdown is useful to remove sludge formation or suspended solids from the boiler. This type of blowdown comes handy when there is an oil ingress in the boiler water due to leakage in the heat exchanger. Using manual scumming, the oil present in the water surface can be taken out.
The major drawback of manual blowdown is the heat loss due to hot water going out of the water drum. The valve is opened slightly making a small quantity of water to go into the blowdown. Still, there is significant heat and pressure loss.
Continuous blowdown:
Many modern boilers are nowadays provided with blowdown automation.
They allow the continuous blowdown of the boiler water, which helps in keeping the dissolved and suspended solids under boiler operating limits. This system is known as continuous blowdown.
In this system, the automation monitors the blowdown continuously and in turn checks the quality of feed water and the quality of water inside a boiler shell for dissolved and undissolved impurities. Accordingly, it will automatically open the blowdown valves if the boiler water TDS exceeds the permissible operating limit.
As the blowdown valves are precisely controlled, the water discharged from the blowdown removes the maximum amount of dissolved impurities with minimum heat and water loss from the boiler water, maintaining the boiler efficiency.
Most of the boiler with continuous blowdown automation are fitted with heat recovery systems, i.e. the hot water from the boiler blowdown is first sent to a heat exchanger unit which utilises the heat of the water (e.g. to preheat the feedwater by installing a heat exchanger or heat recovery equipment in the path) before it goes overboard.
The choice of blowdown system, i.e. either manual or continuous and automatic, will depend on various factors and the blowdown valves will be fitted with suitable accessories as per the system.
How to calculate the percentage of blowdown:
quantity blowdown water/quantity feedwater X 100 = % blowdown
Related Read: Choosing A Marine Boiler While Designing A Ship
Procedure for Scumming and Bottom Blow Down
Below is the procedure for the boiler blow down using the blow down valve located at the bottom of the boiler. In order to do scumming, instead of bottom blow down, the scum valve is to be opened.
Steps for blow down procedure are as follows:
Kindly refer the diagram to understand the blow down procedure properly.
A modern boiler should never be blown down while the boiler is steaming at high rates. While performing the blowdown, the shipside valve should always be open first, then the blowdown valve. This will allow control to the operator in case a pipe burst.
1. Open the overboard or ship side valve(1) first.
2. Open the blow down valve (2), this valve is a non-return valve.
3. The blow down valve adjacent to the boiler (2) should be opened fully so as to prevent cutting of the valve seat.
4. The rate of blow down is controlled by the valve (3).
5. After blow down close the valve in reverse order.
6. A hot drain pipe even when all valves are closed indicates a leaking blow down valve.
If the boiler is blown down for inspection, first the firing needs to be stopped and allow the boiler to cool off. Open the boiler vent plug which will allow natural cooling at atmospheric pressure.
Ensure the overboard valve (non-return) is functioning properly so that no seawater can enter the boiler pipeline else it will create a vacuum due to sudden steam cooling leading to a pipe burst.
Once the boiler blowdown is completed, open the belly plug to remove the remaining content in the engine room bilges.
youtube
Advantages of boiler blowdown:
Blowdown of boiler water at regular intervals keeps the total dissolved solid impurities under the rated limits.
The process helps in preventing corrosion as it removes the impurities which accelerate the corrosion process
It helps in preventing scaling of boiler tubes and internal surface
It prevents the carryover of impurities and contaminants with the steam, providing the pure steam
It prevents scaling of internal parts of the heat exchanger where the pure steam goes as a heating medium
Disadvantages of boiler blowdown:
If the procedure is not done correctly with the determined schedule, the blowdown of boiler water tends to increase the heat as well as pressure losses.
The heat and pressure losses from the boiler water blowdown will reduce boiler efficiency.
If the blowdown arrangement is manual, additional work hours needed to conduct the operation
Requirements and Regulation:
If there is oil sheen visible in the boiler gauge glass or hotwell inspection glass. As the oil will be on the water surface, ensure not to do scum blowdown else it will cause oil pollution
The oil leakage inside the boiler water to be stopped and all efforts to be made to clear the oil from hotwell by filling freshwater and removing oil-water.
Ensure the operator knows the Vessel General Permit areas and complies with chapter 12 of VGP and do not discharge any wastewater from the boiler blowdown in the restricted areas except for safety reasons.
The vessel must ensure not to discharge any boiler water via boiler blowdown in port waters. This is because the water consists of different chemicals or other additives which are added to reduce impurities or prevent scale formations.
The boiler blowdown must be done as far from shore as possible.
The Master and the duty officer on the bridge must be informed before commencing the blowdown operation.
The boiler blowdown operation must be recorded in the Engine Room Logbook which must include the starting and the stopping time operation
If the boiler blowdown or hot well water is transferred to the bilges, the same must be recorded in ORB and engine room logbook
The boiler blowdown can be done in territorial water or harbour only in the following conditions:
If the ship is entering the dry dock, it will need to blowdown boiler
For any safety reasons
How to minimise boiler blowdown?
Chemical Treatment:
The main aim of doing a boiler blowdown is to reduce the dissolved impurities in the boiler water, which leads to scale formation.
The scale formation will directly lead to heat transfer within the internal surface of the boiler leading to a reduction in boiler efficiency.
If the boiler water can be tested regularly and accordingly treated effectively using various chemicals in the hot well, the feed water will have fewer impurities making it good for the use.
The need for the boiler blowdown will inturn reduce leading to saving of water and reduction in heat and pressure losses.
Boiler Water Blowdown Reduction:
With an increase in boiler blowdown, the water and fuel consumption of the boiler water will increase. The best practice is to remove the manual blowdown system and to install an automatic boiler water measurement and blowdown system.
This system will effectively monitor the impurities in the boiler and open the discharge blowdown valve accordingly, as explained in the continuous blowdown system above.
You may also like to read: Procedure for Boiler gauge glass maintenance.
Report an Error
from Storage Containers https://www.marineinsight.com/tech/boiler/blow-down-procedure-for-marine-boilers/
via http://www.rssmix.com/
0 notes
Text
Porsche's 8 goals for the 2020 911
https://bestcaritems.com/?p=7219&utm_source=SocialAutoPoster&utm_medium=Social&utm_campaign=Tumblr
Automakers often use focus groups made up of current owners to help them develop the next model of any given vehicle. They want to know what works and what doesn’t, so they “clinic it.”Porsche didn’t bother with that for the 992-generation 911. Motor Authority spoke with August Achleitner, vice president of the 911 and 718 product lines, about what Porsche’s goals were for the 2020 911. “Mr. 911,” as he is known, told us that the company already knew from feedback from owners what it wanted to work on, what the weak points were, and what changes needed to be made due to legal requirements around the world. However, Achleitner was clear on Porsche’s main goal. “When we launch a new 911, it’s a very simple goal. A new 911 has to be better than the old one,” he said. Achleitner got more specific and shared the eight things Porsche wanted to improve on the 2020 911: 2020 Porsche 911 Carrera 4S, Valencia, Spain, January 2019 1) Improve dynamics. “How can we improve the vehicle dynamics again after the big step with the 991 in comparison to the 997 before?,” Achleitner asked rhetorically. One answer was making the car wider. Both the S and 4S models are now wide-body cars, which means the S model gained 1.5 inches of rear track. Up front, both models are wider by 1.8 inches, too. “With a wider track in front and rear, the vehicle dynamics came to a new level,” Achleitner said. The wider track improves traction and lets the rear axle build up more stability. The adjustable adaptive dampers were also updated with new hardware and software. In their firm setting they are now firmer than in the 991-generation car. Porsche says that improves roll stability, steering response, and cornering grip. In my first drive review of the 2020 Porsche 911, I was amazed that Porsche managed to make a brilliant car handle even better. But Porsche did something else to improve the dynamics, and that’s the next point. 2020 Porsche 911 Carrera 2) Enlarge the diameter of the rear wheels. Calculations and simulations showed that enlarging the diameter of the rear wheels would improve dynamics even though it would also add weight. The 2020 Porsche 911 S and 4S now ride on 21-inch wheels at the rear and 20s up front, though the tire sizes haven’t changed at 305/30 rear and 245/35 up front. While this influenced all of the surrounding areas of the suspension and the packaging of the car, Porsche felt it was worth the effort because it would make the handling more neutral and controllable. The company had experience with the practice as the 918 Spider and GT2 and GT3 cars already use staggered wheel sizes, and there are no better handling Porsches than those. Handling becomes more neutral because the bigger rear wheels provide greater rear end stability and grip without having to go with a wider tire. 2020 Porsche 911 3) Improve comfort. Porsche didn’t want to go all out here to create a two-door Panamera, Achleitner said, but the company achieved this goal by giving those adaptive adjustable dampers a wider spread of damping force. Not only can they be firmer as noted above, but they are softer as well. They react much quicker than before—up to 100 times per second—and they react in all stages of damper travel to adapt to road conditions. It’s the first major change to the Porsche Active Suspension Management dampers since they were launched in 2004. According to Porsche, these changes make absorbing quick, short bumps like cobblestone roads much more effective. In my drive, I found the 911 to be comfortable for a sports car, even more so than in the past, but I’ll need more time behind the wheel, especially on bad roads to see just how effective the changes are. 2020 Porsche 911 Carrera 4) Improve interior noise. This didn’t mean reducing total sound in the cabin so much as reducing noise from the wide rear tires, which Achleitner said is just loudness. After all, Porsche owners want to hear the distinct, mid-tonal thrum of their flat-6 engines. They don’t, however, want to hear water and pebbles splash around in their wheel wells or the white noise of tires on rough pavement. To combat noise, Porsche started with a stiffer structure where the rear suspension parts mount to the body, used more-efficient sound insulation in the rear wheel well areas and behind the rear seats, and chose top strut mounts that provide better insulation. Even the larger rear wheels contribute to less tire noise because they can run at a lower air pressure. 2020 Porsche 911 5) Fulfill emissions requirements. Porsche pursued three main strategies to reduce emissions. The engine now uses asymmetrical intake camshafts that allow adjacent valves of a cylinder to open with a different degree of lift (2 and 4.5 millimeters versus a consist 3.6 millimeters in the 991) under partial load. This, combined with other efforts to optimize fuel management and combustion reduce emissions and improve fuel economy. A new particulate filter in the exhaust system also reduces emissions, though it is not included in U.S. cars. An extra gear for the new 8-speed automatic transmission is another fuel- and emissions-savings measure. Finally, Porsche future-proofed the car this time around by developing it with a hybrid in mind—likely a plug-in hybrid—in case regulations change anywhere in the world that require either stricter emissions or zero-emissions zones. 2020 Porsche 911 Carrera 4S, Valencia, Spain, January 2019 6) State-of-the-art connectivity. The 911’s center touchscreen grows from 7.0 to 10.9 inches for the 2020 911 and its hardware and software provide faster processing of inputs and data. As it has since 2017, the system offers Apple CarPlay compatibility and can be controlled with tablet-style stretch, pinch, and swipe gestures. Internet radio, a wi-fi hot-spot, and real-time traffic information for the navigation system were previously available, but a new onboard modem now provides these services, as well as access to smart home functions and Amazon Music. 2020 Porsche 911 active lane control 2020 Porsche 911 rear turn assist 2020 Porsche 911 night vision 7) Improve the assistance systems “Nobody buys the 911 because of the assistance systems,” Achleitner said. However, he noted that the average buyer has three cars in the garage, so they may wonder why the 911 lacked some systems that come on their other cars. With that in mind, Porsche decided to add safety systems and make most of them optional. Forward-collision warnings with automatic emergency braking is not optional. It’s available for the first time, and it’s standard. We think that’s a good thing. A new Wet mode is also standard. It adjusts various vehicle systems, most notably the stability control, to make the 911 safer to drive in the rain or in snowy or icy conditions. Blind-spot monitors and adaptive cruise control with stop-and-go capability carry over as options, but the blind-spot monitors add a new Turn Assist Rear feature that monitors the rear of the car when turning at speeds under about 9 mph to warn if, for example, bicyclists may be approaching. Active lane control with traffic sign recognition, and surround-view and night vision camera systems are optional this year. 2020 Porsche 911 Carrera 8) Emphasize muscular styling. With its rear-engine layout, the 911 has always had a muscular tail, but changes for the 992-generation made it even bolder. Both the S and 4S models are now wide-body cars with wide tires on big wheels. That gives the car natural rear haunches that make it look like a predator ready to pounce. Achleitner pointed out, however, that the wider front track helps, too. We agree. It plays off well with the rear to make the car look wide and sculpted with a hint of the sexy Coke-bottle shape that designers desire. Up front, Porsche added lines to the center of the hood that, in the front view, will be the easiest way to tell the 992 generation from the 991. They are among the very few character lines on a very clean design. Via MotorAuthority
0 notes
Last Seen Blogs

yves29sposts
Sans titre

jesscristabel
Behind Every Glamorous Lady Theres A Sad Clown

beautifulandbright94
Life's Short. Talk Fast.

pfhwrittes
PFH on AO3

dazbooks
Bookish Tingz