#viper4android for android
Explore tagged Tumblr posts
Visit Tumblr Blog
Explore Tumblr blogs with no restrictions, modern design and the best experience.
Last Seen Tumblr Blogs


Fun Fact
Tumblr was acquired by Yahoo for $1.1B in 2013.
Photo

Fuck yeahs! Finally I managed to shoehorn in #twrp and #magisk on my #xiaomimi9! The new version out is easier to install, xiaomi has a strange setup for the recovery. There aren't any good custom roms (yet), but I can install this, ^ #viper4android. The best sound mod for Android, hands down. Kari #android #hacktheplanet #graypower #ghey #haxxor https://www.instagram.com/p/B0Vb-uhIWuZ/?igshid=2ax0enj60ryi
0 notes
Text
Aumento De Graves Y Volumen General

Si debe conectar parlantes externos a su computadora portátil para gozar de la música o ver una película, debe procurar instalar un amplificador de sonido para su computadora portátil en Windows 10. Una cosa en la que todos estarán conforme es en el hecho de que las computadoras portátiles son dispositivos sólidos. y también incluyen partes más pequeñas en comparación con un escritorio y, en consecuencia, la salida se puede ver ahora.
No obstante, el mezclador de audio en Windows diez no siempre produce el sonido inmejorable del que es capaz. Intente emplear el reproductor VLC y observará instantáneamente la diferencia. Sin embargo, si quiere acrecentar el sonido general de su Windows 10 mientras que juega y transmite videos en YouTube, puede decantarse por uno de los amplificadores de volumen para computadoras portátiles con Windows 10 que se enumeran a continuación:
Lista de los ocho mejores amplificadores de sonido para computadoras portátiles y de escritorio con Windows diez, ocho, siete Acá está la lista de los 8 mejores amplificadores de volumen de ordenador para aumentar el sonido de los altavoces:
1. Bum 3D Descargar Boom 3D desde el botón de abajo
Con más de 40 millones de usuarios de la aplicación Boom 3D para macOS y también iOS, la empresa matriz Global Delight Apps decidió finalmente lanzar esta aplicación para Windows 10. La razón del éxito de la aplicación Boom 3D es el hecho de que es simple de utilizar y aumenta el volumen en Windows 10. Esta aplicación está diseñada en 3D Surround Audio Engine Algorithm, que es una tecnología patentada y puede calibrar sensaciones acústicas. Otras peculiaridades que hacen de Boom 3D el mejor amplificador de sonido para portátiles en Windows diez incluyen:
- Preestablecidos predeterminados con personalizaciones disponibles. - Un potente ecualizador. - Compatibilidad con auriculares / audífonos con soporte de sonido envolvente. - Efectos singulares y refuerzo de graves: acepta todos los reproductores y servicios de transmisión de terceros.
dos. FxSound FX Sound es una aplicación increíble para prosperar el sonido en Windows 10 y acepta una salida de baja resolución. Este ecualizador es compatible con todos y cada uno de los métodos de salida, por lo que incluso puede conectar una máquina de discos a su computador y gozar del sonido ajustado. Tiene una interfaz fácil de utilizar y es plenamente compatible con Windows 10. Otras características incluyen:
- Efectos personalizados. - Potente ecualizador. - Preestablecidos basados en géneros. - Incremento de graves y volumen general. Haga click acá para descargar de los mejores impulsores de volumen para computadoras portátiles con Windows diez.
3. Ecualizador APO Si se ha estado preguntando cómo aumentar el volumen de su computadora portátil de manera gratuita, Laptop Equalizer APO es la aplicación para . Es una aplicación de código abierto y liviana y no consume muchos de los recursos de su CPU. Otras peculiaridades de este amplificador de sonido para computadora portátil en Windows 10 incluyen:
Soporte para un número ilimitado de canales. Complementos VST compatibles
Un número infinito de filtros. Sin inconvenientes de latencia
Interfaz compatible con Voicemeeter y Peace. Otra característica que vale la pena mencionar es la interfaz gráfica de usuario, que más bien no está desarrollada para simplificar, y las opciones se ponen como una aplicación sin formato. Sin embargo, para superar este problema, puede instalar Peace Interface, que redefine la interfaz y le da control para progresar el sonido en Windows 10.
cuatro. Potenciador de audio de Fidelizer El amplificador de volumen de Fidelizer para portátiles con Windows diez es una aplicación que optimiza su sistema para mejorar el sonido a un nivel perfecto. Es compatible con la mayor parte del software como YouTube, VLC, Spotify, etc. y admite servicios de transmisión como Qobuz y Tidal. La optimización efectuada solo durará hasta una sesión activa de su computadora. Una vez reiniciada la computadora, deberá regresar a ejecutar la aplicación y optimizarla nuevamente. Otras peculiaridades incluyen:
- Una guía de instalación detallada que explica todo el proceso desde la instalación hasta la personalización está disponible en el sitio web. - No obstruye otros procesos relacionados con el audio. - Aparta los procesos que no son de audio y reduce su prioridad y, por ende, desvía todos y cada uno de los recursos probables de la CPU para acrecentar las ventanas de volumen. - La versión completa deja al usuario seleccionar entre siete perfiles de audio.
Fidelizer está libre en 3 versiones: Fidelizer Plus, Fidelizer Pro y la versión gratis con opciones limitadas.
cinco. Trompeta de oído Ear Trumpet no es precisamente una aplicación separada para aumentar el sonido en Windows diez, sino más bien un complemento del mezclador de audio predeterminado de Windows 10. Permite al usuario controlar el volumen individual de todas y cada una de las aplicaciones abiertas en su sistema. La configuración es bastante simple y con un solo click le permite elegir entre los dispositivos de reproducción. Ear Trumpet está disponible de forma gratuita en Microsoft Store. Otras peculiaridades de este eficaz amplificador de volumen para portátiles con Windows 10 incluyen:
- Mezclador de volumen independiente: establece el sonido predeterminado para todas y cada una de las aplicaciones. - Soporte multilingüe - Modo oscuro. - Actualizaciones automáticas por medio de la aplicación Store. - Se pueden configurar teclas de acceso rápido.
Lea también: diez mejores altífonos de escritorio para su computadora 6. Reunión de voz
Un amplificador de sonido gratis para una computadora portátil con Windows diez, Voice Meeter, puede ajustar todas las transmisiones de audio que se reproducen en su computadora de forma individual. En contraste a Ear Trumpet, que permite a los usuarios solo aumentar o reducir los niveles de volumen de una aplicación individual, Voice Meeter asigna un ecualizador individual a cada aplicación. Asimismo permite a los usuarios grabar el audio del escritorio y dejar de lado cualquier otro sonido y voz. Voice Meeter ofrece posibilidades ilimitadas, mas para comprender y usar esta aplicación de la mejor forma posible, uno debe leer el tutorial o ver YouTube explicando las peculiaridades de esta aplicación. Sin embargo, por el momento, simplemente puede descargarlo gratis y emplearlo para aumentar el volumen en Windows diez.
siete. Viper4Windows Otra resolución sobre de qué forma acrecentar el volumen en su computadora portátil es descargar y también instalar Viper4Windows. Esta aplicación es un proyecto impulsado por la comunidad y ha lanzado dos versiones del software, una para Windows y la otra para Android. Si ha instalado ROMS personalizadas del sistema operativo Android en su móvil, observará que muchas de estas ROM tienen Viper4Android como software de audio predeterminado. Algunas de las peculiaridades que hacen de Viper4Windows uno de los mejores impulsores de volumen para portátiles con Windows 10 incluyen:
- 3 modos: modo de música, modo de película y estilo libre. - Refuerzo de graves natural. - Claridad y purificación de sonido. - Múltiples modos de sonido envolvente - Compresor de sonido - Avisa si ha estado escuchando demasiado tiempo. - Ecualizador - Eco
ocho. Retocador de audio Si busca un amplificador de sonido simple para una computadora portátil con Windows 10, entonces Audio Retoucher es probablemente la aplicación que busca. Se desarrolló teniendo en cuenta a los usuarios que no son expertos en tecnología y solo les preocupa aumentar el volumen en Windows diez. Las características más esenciales incluyen:
- Configuraciones simples. - Calibrar parámetros de sonido. - Establece la intensidad del tono, el tempo y el nivel de graves. - Amplifica el sonido existente en Alta Frecuencia. - Mide BPM con precisión. - Estiramiento del tiempo
Haga clic acá para descargar. Su elección sobre los mejores amplificadores de sonido para computadoras portátiles y de escritorio con Windows diez.
Depende totalmente de elegir la mejor aplicación para acrecentar el sonido de su Windows 10. No obstante, al acrecentar el volumen del audio, puede acrecentar los graves y agudos solo, como introducir efectos como eco, configurar modos conforme con géneros y considerablemente más. Para resumir, puede crear una experiencia increíble con una simple pieza musical. Este software normalmente no consume gran parte de los recursos de la CPU, mas permite que los parlantes incorporados de su computadora portátil produzcan salida a su máxima capacidad, algo para lo que fueron diseñados en primer lugar.
1 note
·
View note
Text
Download Viper4Android
Download Viper4Android FX Apk and Install
Hello, Friends, Today I am Really glad to be here for imparting My insight to you. Presently, I am will examine How To Download Viper4Android FX and Install on Android. This is the best Tool for balancing Sounds in our Entire Android Device. Not just this you can observe more Facilities with this App when you have downloaded and Installed.

Viper4Android FX is an Excellent Sound Operating App on Android Device. You can get Cinematic Sound framework with Headset. We can without much of a stretch change Audio Frequencies, in our coveted Range on Rooted Android Mobile. On the off chance that you need to utilize your Android in Desired Sound Levels then this is simply the Perfect Article to control. In any case, It is popular in light of the fact that this App has Pretty Sound Settings.
You can oversee Entire Android Device sound frameworks through this App. What's more, No other application will work like this Features. Thus, introduce this Immediately and begin Enjoying with great capable of being heard sound Levels through your Device. Above all else, You have to check a portion of the accompanying Features, App Info, Compatibility at that point Go for Download and Install Steps.
Application Info:
Name of the App Viper4Android FX.
Class – Sound Settings Manager for showing signs of improvement impacts.
Old form XHiFi, New Version FX.
The keep going refresh has discharged on 1 September 2016.
By and by running form is v2.5.0.5.

Similarity:
Look at your Compatibility before going to get download and introduce this. Along these lines, Find your Device form is Available in it or not. In the event that it alright, at that point go additionally steps:
Android 2.3, Android 4.0-4.1-4.2-4.3-4.4, Android 5.0, Android 6.0, Android 7.0.
Intriguing Features:
Presently, Everybody appreciates with HiFi sound System on Headset.
You can Make music records with the lossless great yield.
Its base is extremely decent I think you never experienced.
Folks, Viper20 is changed to Viper FX yet no difference in the Name. In this way, You can appreciate with all the old Features obviously.
Great User interface, so you can without much of a stretch oversee settings.
This will bolster Internet Facility.
You can ready to associate with another Device by means of Bluetooth.

Pre-Requisite:
Folks, If you like Features and Readied to download this App, in this way, look at Following Tools you have or not else, It ends up hard to get this App.
Established Android of Any adaptation.
SuperUser App and Busy box App.
Custom Recovery Tools.
Web association.
Viper4Android Fx Apk. (V4A)
Download Viper4Android FX:
This is additionally informal App, So, It isn't accessible on Official Stores like Play Store or Amazon. In any case, We are continually making so less demanding to you by giving download joins. So also for this App likewise you can download from the beneath given connection. Here, we are Providing just most recent Version of Viper4Android FX. In any case, If you get a kick out of the chance to download old adaptations, you can get them from Google directily. What's more, One thing you have to recall is You should utilize Custom Recovery to introduce Viper4Android FX. Else, It to some degree hard to Install.
The majority of the Users supposing Why Installation Failed?
This is going on, Most regularly on the grounds that It was Due to Improper Rooting or Not Installing SuperUser Tool.
How to Install Viper4Android FX Apk:
To get Viper4Android Fx, You have to Install Busy Box. So First We will talk about how to Install Busy Box on Android Then We should go for How To Install Viper4Android FX Apk:
1) Install Busy Box:
In this way, Download Busy box, utilizing this connection.
Introduce Busy box while downloading wrapped up.
Dispatch occupied Box App, It open with an Install catch Tap on that To Root Your Android Device.
In this way, Tap on Install Button, and Ensure to Root When It Raises a Notification.
When It has Installed Perfectly, You can close this Application.
Before the End of Busy Box App establishment, Your gadget is Perfectly Rooted.

In this way, Now you can Ready to Install Viper4Android FX to Set your Desired Frequency of the Sound Modulations. To see that take after the beneath focuses:
2) Install Viper4Android FX:
Companions, When you have every one of the Files Required to Viper4Android FX through the Busy Box, we believe it's Time to Install this Apk on your Smartphone. In this way, take after the beneath portrayed
the methodology deliberately:
Keeping in mind the end goal to Install Apk File, Download It from the Above Prescribed Link under Download Viper4Android FX.
Presently, Start the Installation procedure by Tapping on it.
After that Launch the Application on Android, a notice will Raise with "Refresh Driver Options, Accept it and be tolerant till it has finished.
Here, Once Again You got a notice to Root your Android, Just Accept it and Wait till it has stacked with All drivers. When it has Done A message will show that All drivers are Installed Successfully.
Keep in mind to Rename the Existing records as appeared on Image unmistakably.

How to Fix Bugs on Viper4Android FX Apk:
As a matter of first importance, check your Android Device is Rooted Properly or Not. Something else, Once Again Root as we recommended in ABove Installing Steps. Counting Root, you ought to introduce SuperSU or SuperUser which is settling the Minor Bugs. Look at you are directly utilizing the Valid Viper4Android Apk or Not. This Apk must be Compatible with your Android Version. Indeed, even you tailed me precisely, as yet getting this Bugs at that point Follow underneath Prescribed Points:
Just Uninstall Viper4Android App on your Android including its Drivers.
Presently, Install SuperUser App with V4A when Rooted Perfectly.
After this, Open Sound Settings and go to Music Effects at last select V4A and Test it.
In the event that it was not working at that point go to Sound Settings and Turn on Force Enable.
All things considered, not Working at that point Go for Bug Reporting to the Support.
In this way, Guys, Till now, You have figured out How To Install V4A and Fix the Bugs while utilizing this App. In this way, It's Your Turn. How about we begin Enjoying…
#Download Viper4Android#Viper4Android FX Apk#Install Viper4Android FX#Viper4Android FX#download viper4android ios#viper4android pc#viper4android for android
0 notes
Text
What is OEM Unlock in Android? and How to enable it?

Indeed, by opening maximum capacity I mean opening bootloader, introducing custom recuperation, introducing custom ROM and obviously establishing and redoing your android telephone.
In this way, if you need to do any of above, then, at that point, you need to begin your excursion by empowering OEM opening of your android gadget.
Don't have any idea what is OEM opening? For what reason do you have to open OEM? Or then again how to enable oem unlocking ?
What is OEM Unlocking?
Android gadget has a ton of potential, yet this potential is restricted by the maker of the gadget. They limit the usefulness of the gadget utilizing a product switch.
This is done to keep clients from coincidentally wrecking their gadget.
However, what might be said about individuals like you and me?
Imagine a scenario in which a client intentionally needs to push past these impediments.
This is where OEM Unlocking becomes possibly the most important factor.
Whenever you flip that "OEM Unlock" switch on, it sets the "unlock_ability" banner to: "1". This banner remaining parts steady regardless of whether you reboot your gadget or play out a production line reset. This choice will remain empowered except if you switch it off physically.
OEM Unlock choice is typically concealed in android gadgets to forestall any unplanned access.
Empowering OEM Unlock as opposed to Unlocking Bootloader
Frequently these words (Enabling OEM open and Unlocking Bootloader) are utilized conversely, however they are not exactly the same thing.
Prior to jumping profound into this, we should initially comprehend the significance of bootloader.
What is a bootloader in Android?
The working framework dwells away and should be stacked into memory for you to utilize it.
Whenever a gadget begins (boots up), it has no projects in its memory which makes it unequipped for getting to parts like capacity or I/O gadgets.
Here's where bootloader becomes possibly the most important factor.
Bootloader instates the equipment and raises the bit (the center piece of the working framework which speaks with the equipment).
Piece then, at that point, continues to instate the working framework.
Since bootloader sits among programming and equipment, it gives clients booting choices, for example, going into fastboot mode or recuperation method of the gadget.
If you have any desire to find out about recuperation and best custom recuperation accessible for your android gadget, then head over to my best custom recuperation post.
The Manufacturer of the gadget locked the bootloader to forestall any inadvertent harm to the gadget.
Thus, to roll out any improvements to bootloader (for instance: introduce a "custom recuperation"), you need to open it and by empowering "OEM Unlock", you are permitting the bootloader to be opened.
Presently you know the importance of OEM open and opening Bootloader, we should assemble all pieces.
How about we see the whole course of establishing android gadget all together.
1. Opening OEM - Turning on a switch that permits us to run "fastboot" orders to open the bootloader. (Without empowering OEM open, you can't utilize fastboot orders to open bootloader)
2. Opening Bootloader - That permits us to introduce custom recuperation on android gadget.
3. Introducing Custom Recovery (like TWRP) - Custom Recovery permits us to streak outsider pictures, which the default recuperation doesn't consider (model Magisk, Viper4android and so on.).
4. Blazing Magisk - Magisk is a set-up of open source instruments for altering essential pieces of Android which incorporates "root".
Presently you know, empowering OEM open isn't same as opening the bootloader. They are two distinct advances which you need to consecutively perform.
To see the whole cycle in real life, then head over to my Root Moto G5s Plus and introduce custom recuperation post where I have opened bootloader, introduced TWRP and Rooted my moto G5s Plus gadget.
How to Enable OEM Unlock in Android Device?
At long last, it's the ideal opportunity for some down to earth stuff.
How about we perceive how to empower OEM open on your android gadget.
Reinforcement Important Stuff
Presently, it's smart to take a reinforcement of your significant documents prior to continuing. Empowering OEM open deletes no information, yet on the off chance that you continue further to opening the bootloader (which you will), everything on your gadget will be eradicated.
Empower Developer Options on Android
The choice to empower OEM open is concealed under engineer choices of the gadget. To unhide it, follow the underneath steps:
1. Explore to Settings.
2. Go to About Phone.
3. Click on Build Number multiple times.
From that point forward, you will see an onscreen message expressing that you are currently an engineer.
4. Return to Settings.
5. Go to System.
6. There you will observe the Developer Options which recently was not there.
Significant Note: Different telephones have various menus in Settings. Simply make sure to search for the form number choices some place in your gadget and snap on it multiple times. The equivalent goes for the engineer choices as well, you might find designer choices in Settings however in android Nougat and fresher renditions, it's under Settings > System.
Last Words on OEM Unlock
In certain gadgets, you may not observe the android developer options oem unlocking. All things considered, simply continue with opening bootloader.
Additionally in certain gadgets, you might need to get open information from the actual maker (like with Motorola gadgets).
I trust now you comprehend the whole idea of OEM opening. In the event that you have any inquiries, tell me in the remarks.
On the off chance that you like this post, follow Techsphinx on Facebook and Twitter for additional stunts, tips and instructional exercises.
0 notes
Link
Hi friends, MIUI V12.5 MODDED ROM for Redmi Note 8 Pro on Android 11 is being rolled out by us today. So basically we are releasing the 2nd version of MIUI 12.5 Modded version for Redmi Note 8 Pro with several modifications over a china beta rom. As we got good response after the first release of MIUI Mod. We have done several changes to the MIUI this time and hope you like it . Base MIUI version that have been used is MIUI China Beta 12.5 v21.7.21.
Changelog:
• Pre-Rooted with Magisk • Gapps Inbuilt • Dolby and Viper4Android • Selinux Permissive • Spectrum Profile Support • Added Always on Display • Added Super Wallpapers • Moderately Debloated • No need of disable twrp replace • Flash Safetynetfix zip only to pass safetynet • MiuiCamera -Old changes + Pro mode video recorder added • Removed ads by adding host file • Game turbo with voice changer and display improvement feature. • Miui launcher modded to give Google feeds support. • Faster Charging then MIUI official (mean it might heat while Charging) • Slow charging support ( Enable battery profile in spectrum while you feel device overheating while charging) • Security App with Performance , Balanced and battery saver for system. • Memory Extension Enabled but doesn’t seems working but looks good for show case. • Partial Language support Added • Gboard Added. • Xiaomi secure keyboard disabled • Fixed keyboard issue. • Fixed Theme Manager issues. • Changed Recovery to BRP 3.0 • Added Back MiVideo to fix gallery not playing video • Added Global FM Radio • MIUI Gallery modded – Added phone frame support – More options in recommended section • Added Screen Recorder with Higher Fps
Steps to Flash MIUI V12.5 MODDED ROM for Redmi Note 8 Pro:
You must have question which recovery to use. Answer is as follows
Bootloader must be Unlocked
MIUI V12.5 MODDED ROM for Redmi Note 8 Pro
If you already have any custom recovery working right now on your Redmi Note 8 Pro, then, Just use it. else if you do not have any custom recovery, Check MIUI version If MIUI version is MIUI 12 Android 10 or Custom rom using MIUI 12 firmware images then Flash BRP 2.7 If MIUI version is MIUI 12.5 Android 11 or Custom rom using MIUI 12.5 firmware images then Flash BRP 3.0
Wipe Data, System, Vendor, Cache and Dalvik-Cache
Flash rom
Format data(if already on previous version then no need)
Reboot
Download Link For MIUI V12.5 MODDED ROM for Redmi Note 8 Pro:
miui_BEGONIA_21.7.21_8bc03ba6a7_11.0_11092021.zip by Santoshhh000
Screenshots For MIUI V12.5 MODDED ROM for Redmi Note 8 Pro:
faster charging miui mod
MIUI V12.5 MODDED ROM
MIUI V12.5 MODDED ROM memory extension
MIUI V12.5 MODDED ROM Google feeds
MIUI V12.5 MODDED ROM play store
performance mode MIUI V12.5 MODDED ROM
MIUI V12.5 MODDED ROM Spectrum support
MIUI V12.5 MODDED ROM Safety net pass
MIUI V12.5 MODDED ROM Screen Recording 60 fps
Phone Frame MIUI V12.5 MODDED ROM
MIUI V12.5 MODDED ROM language support
The post MIUI V12.5 MODDED ROM for Redmi Note 8 Pro Android 11 – 11/09/2021 appeared first on AllTricks.
https://ift.tt/eA8V8J
0 notes
Photo

https://ift.tt/35Ezbdo [APP] [FIX] 100% working Viper4Android for all Android 11 roms and some complicated Android 10 roms via /r/Android
0 notes
Text
You Can’t Find These Fantastic Sideloaded Android Apps on the Google Play Store
Google Play Store is undoubtedly the best place for mobile apps. It offers a massive collection of apps from the most popular developers. Its security features are truly top-notch; you can’t find this experience anywhere else. It is also true that you can’t find every single app you want to install on the Google Play Store; it’s not possible. There are some decent sideloaded apps also not allowed on Google Play. Well, we exactly don’t know the reasons for not being these apps on the Google Play Store, but here is the list of the apps.

APKMirror
APKMirror is technically not an app but a website that offers a bunch of apps to sideload. The best thing about this website is it provides you with the new or beta versions of the apps you usually get on the Google Play Store. Still, it also has the older versions of the apps that you can install and use if the newer version is not working correctly or you don’t like the newer version. The website is highly reliable, and you don’t have to worry about malware or anything like that. It’s an excellent website for sideloaded apps or various other APKs.
Cerberus
Cerberus is a find my phone app used to be on the Google Play Store, but then Google made some changes in its rules regarding certain permissions, and Cerberus was removed from it. But you can still download the Cerberus app from its official website; it is reasonably a good app in its category. The app offers you a lot of features such as it can snap photos of people if they try to get into your phone, it can even show and text you its location, and do a variety of other functions. You can use this app, but you will have to take its subscription that will cost you $5 per year; you can even get access for up to 10 people, but it will cost you $43 for a year.
F-Droid
F-Droid is another pretty amazing app to sideload; it is an app store similar to Google Play. However, it only contains FOSS (Free and Open Source Software) apps. F-Droid is undoubtedly an excellent place to download apps for privacy and security concerned people because each app has to post its open-source code somewhere on the internet. You can’t get tons of popular apps here, but you can find replacements of some less trustworthy apps. It is quite easy to use, and you can use it entirely for free.
Google Camera Ports
Google Camera is available in two places; one is on Google Play Store, and the other one you have to sideload. The Google Play Store version of Google Camera is good, but the actual Google camera ports that you have to sideload offer a lot of features, including an Astro Mode, and outstanding post-processing of Pixel devices with Night Sight, and many more features you don’t get on the Play Store version. Well, there are plenty of devices that support Google Cam ports, but it doesn’t work on some devices, so before you sideload this app, make sure that your device is compatible with it.
Humble Bundle
Humble Bundle is one of the few outstanding game sales services outside of the Google Play Store. You can simply buy a bunch of games here at affordable prices, and you also get a charity option attached on Humble Bundle, so you can also donate a few bucks to help others if you want. It even offers ebooks and audio stuff. It supports cross-platform, too, and is truly straightforward. Humble Bundle is available for free with in-app purchases.
Tachiyomi
Tachiyomi is a fantastic manga reader for Android, but it is quite complicated. It provides you with a massive collection of manga, including NSFW stuff and many more. It even boasts extensions, and these are APKs that you generally install; because of this, Tachiyomi is not available on the Google Play Store. Fortunately, the official website of Tachiyomi still has the app, and you can easily install and use it entirely for free. It contains so much content, but it’s quite tedious.
There are a few other apps also out there, such as ViPER4Android (root only), Magisk Manager (root only), etc. You can try a few of the apps mentioned in the list. Thank you!
Source-Sideloaded Android Apps on the Google Play Store
0 notes
Text
Stormviper Presets

Stormviper™ are leaders in custom audio presets producer for Viper4android and JamesDSP audio efx app on the android platform. All our presets consist of Original IRS Convolvers, DDC matched with our unique blend of audio efx settings and configuration!
For Telegram users they can browse ang join our Telegram Channel: https://t.me/stormaudio
0 notes
Link
If you are also that curious tech enthusiast who always tries something new and does experiments with his device by using and testing the latest features and functioning. If you are also interested in customizing your Android device to have a brand-new look. So for sure, you are also trying to install Substratum themes on Android 10/Q, most of the Android 10 users have a doubt regarding how to install Substratum themes on the latest Android version, i.e. Android 10/Q right now (Android 11 is in its beta version and yet to be released).
So, if you are also confused or have any doubts regarding installing the substratum theme on your Android device (especially Android 10/Q). So, don't worry, here in this article we are going to guide how you can install substratum themes on Android 10/Q. So, let's get started
Substratum
A substratum is a theming tool that can be used to apply various themes with or without rooting. The Substratum theme is started with an extremely popular custom ROM Cyanogen Mod, which has a theming engine that made it so easy to apply themes. However, Cyanogen Mod has failed and not in use anymore, but somehow Substratum theme rises from there and becomes an immensely popular theming engine.
At first, it was used for rooted devices only, but after Android 8/Oreo came into the picture, the Substratum theme can also be used without root. Again, with Android 9/Pie Google said that OMS (Overlay Manager Service) is intended to be used by device manufacturers only, so OMS in the current form is not designed to be a generic feature.
Then Again, with Android 10/Q Google has changed so many features and other things, and most of them are related to the internals of the system. Android Q itself provides various features and customization options, so Android 10 has eliminated the need for a substratum theme, but the substratum theme is so much better and has many customization options than Android 10 in some aspects. So, let's get started and install substratum themes in Android 10/Q with root.
Also Read: How to Install ViPER4Android on Android 10/Q
How to Install Substratum Themes on Android 10/Q
Before you Start
Before getting started with the installation procedure, here are some important instructions you should know and follow before getting started with the method to install substratum themes on Android 10/Q
First of all, before starting to install substratum themes on Android 10/Q, make sure that your device is rooted using Magisk, running on Android version 10/Q.
Install Substratum Lite.
Install any Android 10 compatible theme.
Related Article
How to Root Your Android Device
[Top]10 Best Magisk Modules For Your Rooted Phone
Why Magisk Over SuperSU for Rooting your Android Device?
Some Android 10 Compatible Substratum Theme
You should first purchase a compatible theme to install substratum themes on Android 10/Q. Here is some best substratum themes, you can purchase and install them from the Play store.
Outline
Ethereal
Valerie
Flux White
PitchBlack
Also Read: How to Enable Always-on Display on Any OnePlus Phone
Method
This is a complete step-by-step guide, by following each step carefully this you can easily install substratum themes on Android 10/Q, and also set up the theme in the device.
Make sure your device is rooted and running on Android 10/Q.
Go to Google PlayStore, and install any of the themes of your choice. (In this article, we are using Pitch Black theme)
Download and Install the Substratum from the Google Play Store.
Open the Substratum app from the app drawer.
It will ask you for Superuser permission, grant the permission.
If it doesn't ask superuser permission or somehow you unable to grant the permission
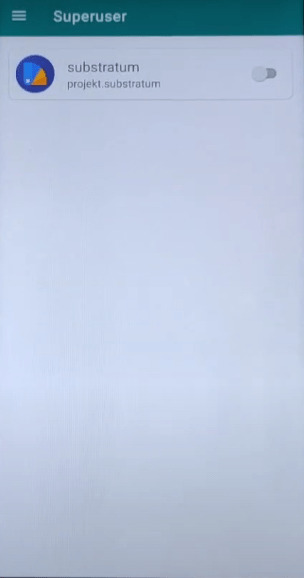
So, open the Magisk Manager.
Tap on hamburger menu from the top-left corner and go to Superuser.

Enable the toggle on in front of Substratum (if it was disabled).
Also Read: How to Fix Magisk Install Error 1 in TWRP Recovery
Clear all the recent apps, from the background.
Again, Open Substratum, A welcome screen will be displayed (skip it if you want)
Allow all the required permission.
And here, you will see the theme which you have purchased and installed from the Play Store.
Click on the theme.
In the Overlay tab, click on the arrow (facing downward) select Android 10 from it.

Enable the Toggle just beside the arrow, it will select all the app.

Also Read: How to Fix Error 70 While Installing Gapps in TWRP
Or you can manually choose the apps from the app list below.
Make suitable customization.
After customizations, tap on the circular icon at the bottom-right corner.

Here, enables the toggle in front of Disable other themes, to avoid conflict between themes. (You can always perform experiments so you can also disable it).
Now tap on Build and Install.

Also Read: How to Fix Error 7 in TWRP While Flashing any Custom ROM?
It will take a while to overlay all the apps.
After successful building and installing, reboot your device.
After rebooting, open the substratum again.
Go to the manager tab.
Enable the toggle on in front of Select to bottom all overlays (or choose the apps manually). To apply the theme in respective apps.

Again, tap on the circular icon at the bottom-right corner.
Tap on Change overlay states.

It will reboot the system UI automatically.
Now if you unlock your device, so all the changes would be saved.
That's it from our side and I hope you have successfully installed substratum themes on Android 10/Q. If you like the content and found this article useful so, please share your valuable reviews in the comment box. Also, if you have some more suggestions so please let us know in the comment section.
[su_box title="More Like This" box_color="#000000"]
How to Enable Live Captions on Android 10 Phones [ROOT]
How to Run Android APK Files in Windows 10?
How To Remove Youtube Ads on Android? [No Root]
[/su_box]
via TechLatest
0 notes
Text

TEST COMPLET DU
AUDIO TECHNICA ATH-M40X
1-FINITION ET ERGONOMIE
Ce casque audio technica ATH-M40X à utilisation de studio d'origine peu faire à peu près tout pour les maltraiteurs, ce tordre, pivoter a 90 degrés ou se rabattre vers l'intérieur.

En se rabattant, on entend un petit clic qui moi me rend adictif à entendre mais certains pourrais le trouver très plastique et le casque est fait entièrement de plastique abs mais on peut saluer audio technica d'avoir mis une belle couche ce qui le rend solide.
Là où je suis personnellement septique est sur la connectique vers le casque qui est détachable et c'est une prise propriétaire en jack 2.5 mm mais avec une protubérance qui a une grande utilité car elle permet en la tournant de verrouiller le connecteur afin de pas avoir de mauvaise surprise.
Le câble est un câble monstrueux de 4,4 mm et les audiophiles seront aux pays du rêve de le savoir qu'il est fourni avec le casque deux câble de 3 m dont un droit et un torsadé que j'appelle le téléphonique car il me fait rappeller les câbles des téléphones fixe de l'époque et j'apprécie beaucoup et vous aurez aussi un adaptateur 6,35 mm pour les musiciens où les amplis dac comme le Xduoo XD-05 qui supporte ce jack beaucoup plus résistant.
Le design est totalement subjectif et je ne m'avancerai pas sur ce point mais mon opinion sur ce design est que je le trouve fort sympathique même si il faut dire qu'il fait très basique.
Je dis souvent que les choses les plus simples sont les meilleurs et le M40X remplie mes critères.
2-LE RENDU SONORE
2.1-RENDU GÉNÉRAL
C'est bien pour ça qu'on achète un casque avant tout pour ses performances sonore.
Tout mes tests de son seront fait à l'oreille avec pour base un schéma fréquentielle du produit et seront basé sur la neutralité la plus proche pour voir les colorations plus facilement.
Et bien ce casque audio technica M40X à une signature sonore poussé légèrement sur les medium et les aigu mais sinon il est très neutre.
La scène sonore est large sans aller dans les excès et il est très dynamique, néanmoins, on pourrait dire que cette neutralité le rend froid.
C'est un faux problème qu'on verra dans l'onglet réaction au modification.
Les tests de son ont été fait avec le Sony Xperia T3 rooter avec VIPER4ANDROID, le Samsung galaxy J3 2016 et l'application hiby musique et pour pousser le casque plus loin j'ai branché le T3 sur une table de mixage BOSS BX-16 de fin des années 80 ainsi qu'une interface midi TC ELECTRONIC M-ONE car je juge que le matériel de l'époque est suffisant pour la majorité des personnes et c'est bien plus résistant que les nouveaux produits.
2.2-LA BASSE
La basse du ATH-M40X est très profonde et donne un impact dans l'ensemble et je trouve que c'est très vibrant quand on entend des effets spéciaux de basses fréquences si vous aimez le pop/rock comme moi.
Je trouve cette basse très amusant mais elle ne va jamais empiéter sur le reste des fréquences.
Sur le Samsung malheureusement sans l'EQ, c'est une bassofonie que j'appelle ce qui rend l'écoute très désagréable pour moi qui n'apprécie pas les basses envahissantes. Certains aimeront mais mon avis personnel est fait et dans la suite nous verrons qu'un téléphone n'est pas le meilleur moyen d'écouter dans toute sa splendeur la musique.
Sur le sony T3, la basse est légèrement en retrait sans la modification sonore si on le compart au J3 et le rendu est très clair avec une basse qui est sec et rapide.
Et c'est là que le M40X est dans son élément, dans le matériel studio.
Avec le Sony pour source sans modification du son et l'interface BOSS, l'audio technica est vraiment impressionnant sur la qualité du son produit et la basse est totalement différente.
Plus haut j'ai indiqué que le son avait un rendu froid mais avec le BOSS BX-16 et le
M-ONE elle a une texture qui la rend chaleureuse et ouverte même plus que ça, j'ai eu l'impression que la scène sonore c'est agrandi et l'ampleur de la basse était vraiment impactante et saisissante.
C'était un pur bonheur d'écouter le M40X avec cette interface et cette table et c'est une preuve que rien ne sert à investir dans du nouveau matériel coûteux alors que celui ci est largement suffisant pour la plupart des personnes.
2.3-LES MEDIUMS
Je suis quelqu'un d'origine qui aime quand la voie a du corps et qu'elle s'exprime dans toute sa splendeur et je vais vous le dire directement que ce casque est la perfection pour les voix féminines, elles ont un impact et une chaleur qui est présente comme si l'artiste murmurait nos oreilles et j'ai trouvé ça magnifiquement retranscrit à quelques détails près.
Avec le J3, pour commencer le pire, c'est étouffer j'ai constaté qu'il y a un effet brouillon et de la sibillance (les sons "ss" qui deviennent "ch").
J'ai écouté le M40X avec un Samsung galaxy S8+ en mode hi-fi (le dac activé) très rapidement et je n'avais pas cette effet là de ce que j'ai pu remarqué.
Je pense que c'est un problème avec la puce son qui est de mauvaise qualité car vous le verrez dans le test que c'est sur la totalité du spectre sonore qu'il y a un comportement étrange.
Sur le sony Xperia T3, le medium était dans un univers chirurgicale ou chaque détail de la voix et certains instruments compte mais en gardant la clarté du son. Les voix féminines sont très belles et celle des hommes ont de la profondeur mais pas aussi expressif que celle des femmes.
Avec le duo BX-16&M-ONE et le sony pour source le M40X produit des voix très chaleureuses qui sont très envoûtante et remarquablement retranscrit.
Sans aucun trop ou pas assez, c'est le juste équilibre.
2.4-L'AIGU
Un aigu analytique aux micro détails dans beaucoup de situation.
Les détails produits sont d'une précision folle et selon moi, certains pourrais peut être le trouver fatiguant à l'écoute et je respecte l'avis de ces personnes mais selon moi c'est une force de l'audio technica ath-M40X car entendre les touches d'un piano, la clop qui tombe à 100 mètres de ma position ou encore les vibrations d'une batterie acoustique est une chose que j'apprécie beaucoup car c'est ce qui rend l'écoute unique de chaque musique.
Sur les inséparables BX-16&M-ONE le soucis du détail est pousser à l'extrême et des micros détails ne seront pas manqué.
Le détail est ample et large et j'apprécie la finesse du son produit par le M40X.
Le sony Xperia T3 produit avec le M40X un aigu fin mais parfois légèrement criard, j'ai remarqué cela dans 3 musiques sur une écoute de 50 musiques.
Mais dans l'ensemble, c'est plutôt un bon "baladeur" pour le M40X et si je réussi à mettre la main sur un ampli à lampe nomade, je ferai une mise à jour du test.
Le Samsung galaxy J3 est hors course car faute de la basse, les aigus sont très brouillon et je peux pas le conseiller avec le M40X si vous ne savez pas réglé le son car vous allez voir après que ça va être étonnant.
2.5-REACTION AU MODIFICATION SONORE
Les réglages seront fait au cas par cas mais le duo BX-16&M-ONE n'auront pas de réglage car ils sont fait directement depuis le sony Xperia T3 avec VIPER4ANDROID.
Le J3 qui m'a déçu au début à passer au crible fin de l'EQ de hiby musique et que l'EQ car j'ai constaté que le son ne faisait que empirer si j'utilisais des réglages plus poussés.
Que vaut le J3 et le M40X avec l'EQ?
C'est franchement impressionnant par rapport au son de base.
Il y a toujours la sibillance mais dès que l'on baisse un peu la basse qu'on rehausse le reste, en formant un W pour plus de chaleur et une homogénéité dans les fréquences, c'est bluffant la différence de son produit et je pèse mes mots car je peux garantir que l'expérience sans toucher au réglages était mauvaise pour moi mais j'ai apprécié de l'utiliser par la suite avec l'EQ.
Une vraie surprise.
Le sony Xperia T3 rooter avec VIPER4ANDROID est un atout de poids car viper modifie le kernel Android afin de mettre son propre kernel.
J'ai utilisé diverses impulse response et j'ai réglé en effet de casques sur un HD800 qui à ouvert la scène sonore du M40X et je suis agréablement surpris de l'ampleur et de la qualité produits.
Je vous conseille vivement VIPER4ANDROID si vous avez un appareil rooter car vous ne trouverez pas mieux en terme de qualité audio sur smartphone.
3-CONCLUSION
Je suis quelqu'un qui aime la musique et la qualité sonore est mon premier critère dans mon choix et ce choix de prendre le audio technica ATH-M40X comme casque personnel à été un des meilleurs que j'ai fait.
Son grand frère le M50X est un des meilleurs et reconnu du secteur professionnels du mastering et je l'ai eu dans mes petites oreilles exigentes grâce à un de mes proches.
Est-ce ce que le M40X vaut ses 90€ oui largement et je pense que pour ceux qui n'ont pas assez pour acheter un M50X qui ne va pas aller sur toute les têtes du fait de sa taille et de son prix de 130€ pour les petites différences qu'il offre de plus, le audio technica ATH-M40X est un excellent rapport qualité prix pour celui qui veut un son de haut niveau à petit prix.
--Les magasins où le trouver--
Thomann.de
Amazon.fr
Woodbrass.fr
Sonovente.fr
0 notes
Text
10 essential Magisk Modules for Android Devices
10 essential Magisk Modules for Android Devices
Among the lots of different methods of rooting android devices Magisk is a better method that we can identify. It can be categorized as a systemless method, so it doesn’t change the device system partition. The advantage of this systemless method is we can unroot the device in a point-even.
We can enhance and add some functionality to our device with the support of magisk modules which are tiny…
View On WordPress
#Android#App Systemizer#ARcore#ARCore/ Playground Patcher#Bixby Button Remapper#Call Recorder#CloudflareDNS4Magisk#install Magisk Modules#ios12.1 Emoji#magisk#Pix3life#Uninstall Magisk Modules#Viper4Android FX#Xposed Framework
0 notes
Text
10 essential Magisk Modules for Android Devices
New Post has been published on https://trendyport.com/10-essential-magisk-modules-for-android-devices/
10 essential Magisk Modules for Android Devices
#Android#App Systemizer#ARcore#ARCore/ Playground Patcher#Bixby Button Remapper#Call Recorder#CloudflareDNS4Magisk#install Magisk Modules#ios12.1 Emoji#magisk#Pix3life#Uninstall Magisk Modules#Viper4Android FX#Xposed Framework
0 notes
Photo

http://bit.ly/2WJTShV ViPER4Android 2.7 is finally here! via /r/Android
0 notes
Text
Viper4Android İçin Büyük Güncelleme Geldi
Viper4Android İçin Büyük Güncelleme Geldi
Android üzerinde uzun yıllardır bulunan, şahsi zevklerinize göre özelleştirilebilir bir müzik dinleme tecrübesi yayınlayan Viper4Android, yeni aldığı güncelleme ile çok daha ilerlemiş özelliklerle kullanıma sunuldu.
Viper4Android güncellendi
Android bir cihazınız varsa ve müzik dinleme tecrübesini daha da özelleştirmeyi düşünüyorsanız, bulabileceğiniz en kapsamlı ve en tanınmış çözüm olan Viper4A…
View On WordPress
0 notes
Text
Viper4android For iOS
Make ViPER4Android To take a shot at any Marshmallow Device

ViPER4Android itself needs root get to. So there's no point of saying that your gadget must have root benefits.
Get ViPER4Android's most recent APK from here and introduce it on your Marshmallow gadget.
Presently open it and let it introduce the driver for your gadget.
When you get the introduce finish message, just reboot the telephone.
After bootup, Install Terminal Emulator App from here and introduce it on your telephone.
Open it and play out the accompanying charges one after one
Close the terminal and check the driver status on ViPER4Android application, it should show this way.

The Enable and Processing status will consequently change to Yes once you actuate the ace power alternative and begin playing music on your earphone/speaker. In the event that this technique doesn't work for you, you can streak the ViPER4Android Marshmallow ZIP record. It changes the SELinux from Enforcing to Permissive.
#viper4android apk#viper4android#viper for android#download viper4android apk#viper4android apk download
0 notes