#what is default password for mysql
Explore tagged Tumblr posts
Visit Tumblr Blog
Explore Tumblr blogs with no restrictions, modern design and the best experience.
Last Seen Tumblr Blogs


Fun Fact
In Q3 of 2020, 31% of US users access the Tumblr app daily.
Text
What are the steps to install OpenEMR for a clinic?
Introduction
Healthcare practitioners use OpenEMR as a strong open-source application that functions as an Electronic Medical Records (EMR) system together with practice management capabilities. The clinic needs to follow several vital steps to install OpenEMR, which we will describe in the following section. As a step-by-step guide, it will provide you with a straightforward path to set up OpenEMR while maximizing its available features.
Step 1: Download and Extract OpenEMR
1.Download OpenEMR
Users should retrieve the most up-to-date version of OpenEMR (openemr-7.0.2.zip) through Source Forge from the OpenEMR website.
You should enable your browser to allow downloading files without interruption.
2.Extract the OpenEMR Archive
Right-click and open the downloaded zip file through the Properties dialogue box available on your operating system.
The file extraction process depends on selecting "Unblock" in the Windows Properties box in order to prevent file blocking.
Extract the zip file to a folder on your computer (e.g., C:\OpenEMR).
3.Rename the Directory (Optional)
You should rename the directory to openemr if you wish to simplify its name.
Step 2: Download and Install XAMPP
1.Download XAMPP
Users should navigate to the Apache Friends official website and retrieve the newest version of Windows XAMPP from this page.
2.Install XAMPP
Launch the XAMPP installer through the download and execute the built-in instructions to perform the setup.
The default installation settings should remain selected unless you require custom modifications.
Step 3: Move OpenEMR to the XAMPP Directory
You need to place OpenEMR files at the XAMPP home directory.
1.Navigate to the XAMPP Directory
The XAMPP is typically located at C:\xampp\htdocs.
2.Move OpenEMR Files
After extracting the OpenEMR folder, you should cut it before placing it inside XAMPP's htdocs directory.
The openemr directory should be located at C:\xampp\htdocs\openemr.
Step 4: Configure XAMPP
1.Start XAMPP Services
Users should start the XAMPP Control Panel to begin the Apache and MySQL services.
2.Verify Services
The services must operate without producing any errors.
Step 5: OpenEMR Setup via Web GUI
Users can establish OpenEMR through the web.
1.Access OpenEMR Setup
You should access OpenEMR through the web browser by going to http://localhost/openemr.
2.Follow Setup Instructions
Multiple steps of the setup process installation include the creation of a new database and configuration tasks.
Check all file system permissions for correctness before continuing forward.
3.Create Database
When prompted, you will decide to either establish a new database or pick one from the existing collection.
Perform the necessary actions using the instructions provided by the interface.
4.Finalize Configuration
You must finish the setup operations by creating your first login details, including username and password.
Step 6: Clinic Setup
1.Enter Global Settings
Users should configure the application settings of OpenEMR through these steps to establish the interface theme and date/time presentation.
2.Enter Facility-Specific Settings
During setup, users must provide practice and business identifiers together with tax information and insurance numbers.
3.Create User Accounts
All users accessing OpenEMR need to receive accounts during the setup process.
4.Enter Contact Information
The user can add their contact information and business account contact details.
5.Practice Settings
Configure pharmacy and insurance company information, along with accepted document formats.
Step 7: External Data Loads
1.Load Codesets
The implementation of ICD10, RXNORM, and SNOMED and CQM_VALUSET codesets through import processes will enhance the clinical documentation system.
2.Calendar Configuration
The system requires configuration to define appointment types together with the providers' planned availability times.
Step 8: Useful Configurations
1.Customize Templates
Tailor notes templates to your practice’s needs.
2.Integrate with Other Systems
OpenEMR should be connected to lab systems, billing software, and telehealth platforms.
Troubleshooting Tips
The Apache server must possess correct permissions that allow file reading and writing operations in the OpenEMR directory.
Check MySQL settings to resolve any database connection issues by verifying proper database configuration.
Service disruptions of XAMPP require users to reset both Apache and MySQL components.
Real-World Examples and Case Studies
The clinic based in Vermont utilized OpenEMR Cloud on AWS, which resulted in a 70% reduction in server maintenance expenses while also enabling better scalability during busy patient periods.
A Texas-based large hospital decided to run OpenEMR on-premises for customized data security which delivered smooth integration with their hospital infrastructure.
Conclusion
To implement OpenEMR at a clinic, administrators need to follow multiple steps that start with software download and then proceed through configuration and clinic-specific setup. OpenEMR users can achieve operational streamlining and patient care improvement while maintaining regulatory standards through their robust features and by following the specified guidelines.
FAQs
Q1: What are the system requirements for installing OpenEMR on Windows?
Your system requirements for OpenEMR installation are Windows Server 2012 and later versions or Windows 10/11 together with XAMPP or WampServer and Apache HTTP Server running PHP 7.4 or higher with essential extensions alongside MySQL version 5.6 or above.
Q2: How do I troubleshoot common issues during OpenEMR installation?
Verify the system permissions while also checking for database configuration accuracy before restarting XAMPP service operations.
Q3: Can I use OpenEMR on other platforms besides Windows?
The OpenEMR system functions on Linux and macOS operating systems with server setups that include XAMPP and LAMP.
0 notes
Text
webdev log 5 grahhhh
guestbook added and... she's up... I'm still waiting for my SSL certificate but...
here's the link!
edit: SSL... activated... but I think it takes a while so if you get the "secure connection failed" error just change the url from https to http
EDIT 2: NOOO THE CSS IS WEIRD DON'T LOOK DON'T LOOK I don't know what's wrong with it..
Edit 3: my genius knows no bounds (it's fixed)
I was gonna buy a custom domain name and maybe I still will in the future since a long url always looks sketch but also it's kinda funny so maybe I'll keep it..... plus it's free.
I don't know if there's anything funky after deployment... SO...... for those who are interested in doing a little testing:
if you leave a comment and I don't approve by tomorrow or something let me know, because then something must be amiss.. but I tested it myself both logged in and out so it should work.
and let me know if you see "document" as the page title anywhere. I'm bad with keeping up with adding titles... and let me know if I left any generic "testing!" comments anywhere... last time I checked the database there are only three and there should only be three...... but I miss things a lot
also haven't tested uploading... if it doesn't work then fuck me!!!! 🤓
and I know the search button is different on both the stories and art section I don't care to fix it because I am SO TIRED.
anyways, now for some comments and final thoughts under cut
this was........... a journey. honestly, most of it was copy and pasting code because I'm a poser and can't think for myself. but it was still really hard and the code is messy but I do wanna improve in the future since I plan on building something for my partner too.
deploying was a nightmare I didn't use mysql but everything loves mysql. sqlite is the default for laravel and I didn't know better but I am so never using it again. I kind of don't want the database within the files itself and would like to connect it to my host's mysql database thingy.
I literally have xampp! I should've just used mysql grahhhhh.....
I don't know how safe it is to have a database within the files like that, but I'll probably back it up every once in a while and if someone hacks or whatever like pervert I literally do not care because my password is completely unique to that site and not reused for any social media and also it's encrypted... and there's not a trace of other sensitive information that I know of that I added.
so it's not worth anyone's time.
anyways webdev is so hard. I literally cannot imagine doing this from scratch. I am worshiping the black box that is laravel.....
but I did learn a lot. I think I'm a top-down learner..... I gotta know the big idea before the details make sense. I didn't even know what the fuck MVC was until yesterday. no idea that that's what I was even doing. I hate learning anything in school because it's all about the small stuff first @_@ I forget everything so quickly that information cannot be "built up"... you gotta give me the whole building and a hammer and let me break it down
I think because of this experience I can learn more about the actual lower level details... :> I will keep on expanding. it's fun! keeps my brain all soft and gooey.....
a lot of code is inconsistent because I learned more as I went but I was very lazy and didn't want to go back and clean stuff up if it still works..... 😎👍
for the future, I'm going to probably try to be more organized with my tables and try to read more on database design.. luckily my site is very simple. I probably won't make anything more complicated than this ever but it'd still be good to learn.
I need to learn how to write shorter more efficient code and not make things so hard for myself...... and I should have uhhhh written more comments. I always forget comments and then I go back and look at my code like
😀❔
too lost in the sauce......
but yeah, baby's first website with a ~BACK END~...... happy birth, kuaikuai.great-site.net! be gentle, she's fragile and made from cardboard, sleep deprivation, and frustration.... long live! ......hopefully!
4 notes
·
View notes
Text
Master WordPress: Setting up your local Development Environment
WordPress is a popular and powerful platform for creating websites, blogs, and online stores. But before you can start building your WordPress site, you need to set up a development environment where you can work on your site without affecting the live version.
A development environment is a safe and private space where you can install WordPress, test new features, experiment with plugins and themes, and debug any issues. It also allows you to work offline, without relying on an internet connection or a web server.
In this article, I will show you how to set up a local development environment for WordPress using a free tool called Local by Flywheel.

Local by Flywheel is an easy-to-use application that lets you create and manage multiple WordPress sites on your own computer.
What You Need to Set up a Local Development Environment for WordPress
To set up a local development environment for WordPress, you need the following:
A computer running Windows, Mac, or Linux.
A web browser such as Google Chrome, Firefox, or Microsoft Edge.
A text editor or an integrated development environment (IDE) such as Visual Studio Code, Atom, or Sublime Text. (I personally prefer VS Code because easy to customize and use 😁)
A local server stack that includes PHP, MySQL, and Apache or Nginx. This is what powers your WordPress site locally.
A WordPress installation package that includes the core files and the database.
You can download and install all these components separately, but that can be time-consuming and complicated. That’s why I recommend using Local by Flywheel, which bundles everything you need in one convenient package.

How to Install Local by Flywheel
Local by Flywheel is a free application that you can download from the official website: https://localwp.com/
To install Local by Flywheel, follow these steps:
Download the installer for your operating system from the website.
Run the installer and follow the instructions on the screen.
Once the installation is complete, launch the application and create an account or log in with your existing account.
You will see the main dashboard of Local by Flywheel, where you can create and manage your local WordPress sites.
How to Create a Local WordPress Site with Local by Flywheel
To create a local WordPress site with Local by Flywheel, follow these steps:
Click on the + button at the top left corner of the dashboard.
Choose a name for your site and click on Advanced Options to customize the domain name, path, and environment type. You can leave the default settings if you want.
Click on Continue to proceed to the next step.
Choose a username, password, and email address for your WordPress admin account. You can also choose whether to install WordPress multisite or not.
Click on Add Site to start creating your site. This may take a few minutes depending on your internet speed and computer performance.
Once your site is ready, you will see it listed on the dashboard. You can click on Admin to access the WordPress dashboard, or click on Open Site to view the front-end of your site in your browser.
How to Work on Your Local WordPress Site
Now that you have created your local WordPress site, you can start working on it as you would on any other WordPress site. You can install plugins and themes, create posts and pages, customize settings, and more.
Some of the benefits of working on a local WordPress site are:
You can work faster and see changes instantly in your browser.
You can work offline without needing an internet connection or a web server.
You can test new features and updates without affecting the live version of your site.
You can experiment with different plugins and themes without worrying about breaking your site or losing data.
You can debug any issues more easily using tools such as WP_DEBUG or Query Monitor.
How to Make Your Site Live
Once you are happy with your local WordPress site, you may want to make it live so that other people can access it on the internet. To do this, you need to migrate your site from your local environment to a web hosting service.
There are different ways to migrate your site from Local by Flywheel to a web host, but one of the easiest ways is to use the Connect feature of Local by Flywheel.
The Connect feature allows you to connect your local site to a web host such as WP Engine or Flywheel (both owned by the same company as Local by Flywheel) and push or pull changes between them.
To use the Connect feature of Local by Flywheel, follow these steps:
Click on the name of your local site on the dashboard and go to the Connect tab.
Choose a web host that you want to connect to. You will need to have an account with them and create a site on their platform first.
Follow the instructions on the screen to link your local site and your web host site.
Once the connection is established, you can push or pull changes between your local site and your web host site. Pushing changes means sending your local site to your web host site, while pulling changes means receiving your web host site to your local site.
You can also choose whether to push or pull the entire site or only specific parts such as the database, files, or plugins and themes.
Conclusion
Setting up a local development environment for WordPress is a smart and efficient way to work on your WordPress site. It gives you more control, flexibility, and security over your site.
Using Local by Flywheel, you can easily create and manage multiple WordPress sites on your own computer, without needing any technical skills or extra software.
You can also migrate your site from Local by Flywheel to a web host using the Connect feature, and sync changes between them.
I hope this article helped you learn how to set up a local development environment for WordPress using Local by Flywheel. If you have any questions or feedback, feel free to leave a comment below. Happy WordPressing!

#wordpress#wordpress development#webdevelopment#localenvironment#flywheel#blogging#tutorial#techniki tantram#technikitantram#wordpressdeveloper
1 note
·
View note
Text
What is MySQL?
What is MySQL, My is the daughter’s name of MySQL’s co-founder, Monty Widenius. The name of My/SQL is the combination of My and SQL, MySQL. What is mysql database MySQL is a DBMS (database management system) that allows you to manage RDBMS (relational databases). My/SQL is open-source Database software backed by Oracle. It means you can use My/SQL without paying money. In addition, if you want,…

View On WordPress
#what is default password for mysql#what is difference between mysql and mariadb#what is domain in mysql#what is localhost in mysql#What is MySQL#what is mysql database#what is mysql server#what is mysql used for#what is mysql workbench#what is the difference between sql and mysql
0 notes
Text
How To Make Your Own Website and Monetize it?

By following up with me in less than twenty-four hours, you will be ready to launch a Website that will undoubtedly earn you thousands of dollars every month! How to generate the money? Well, the website that we make will be offering SAAS service.
What is a SAAS service?
A SAAS (Software As A Service) service is essentially an online software or service that you pay to use.
For example, Mailchimp.com, which is a SAAS service, provides email marketing services that you pay for.

A SAAS service is anything you pay for to get an online service.
Now you can be the owner of a SAAS service, you will have your own Website, and people will subscribe to your service and pay you monthly recurring payments.
Let’s say you have 100 customers who use your SAAS service, and your service costs about $10 a month; you’d make $1000 per month!
All you have to do is sit at home and watch your passive income develop on your computer screen. It’s a fantastic and easy way to earn money.
How to get a SAAS service?

“How can I get my own SAAS service or software?” you might be wondering. The good news is that you don’t have to create one, learn to program, or even employ a programmer to do so.
You can simply buy it Online for $40–$60. You can buy software from a website called codecanyon
You can simply visit the website, click on the php scripts and search for SAAS and choose what kind of SAAS service that you preferred.
There are several types of SAAS applications available for purchase. Discount networks, accounting and billing software, email marketing systems, and employee management software are only a few examples. Take your time browsing the services and choose the one you like best, the one that fits you and you feel that you can be successful with.
Hosting Your Service
After you’ve created your SAAS service, the next move is to host it and make it public. To host it online, you’ll need a domain name and a server.
Now it is sounds hard since you don’t have any technical background in this term. Don’t worry, it is actually a simple and easy steps.
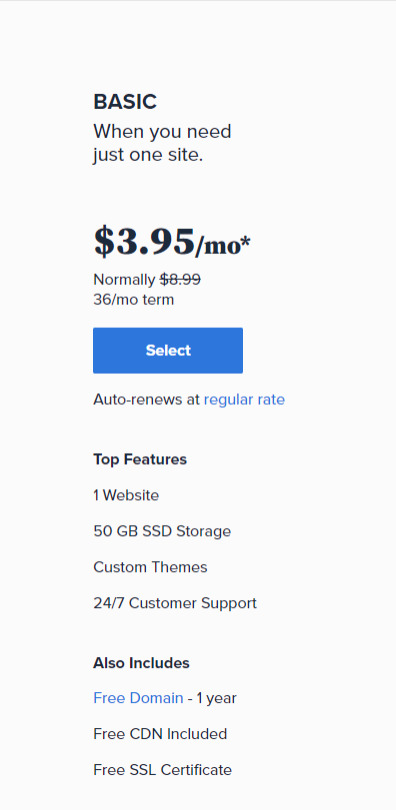
First you need a VPS server, you can visit and buy a cheap one from Bluehost. its only $3,95 permonth with and they give you free domain for 1 year! Check the price below. Buy the “LAMP” administration.
So What is VPS server? We do what we call “online hosting” when we want to publish a PHP page, script, or some other web application. This basically means uploading the files and database to a public server so that it can be accessed over the internet. On simple word, the place where you put the file is from VPS server.
In this tutorial we will used the shared server from Bluehost. Shared server only means that your server will be host with others website.
Now everything is ready, the only things that matter is how to install it. Let get to it.
Getting Started
After having your own server and domain on Bluehost, you need to connect them. Your VPS Server can be accessed now your Bluehost profile, but of course, we don’t want to access our website though an IP! we want to use our domain name. So simply, we are going to map the domain name to our VPS IP, so then we access the VPS and the WordPress website through both the domain and the IP.
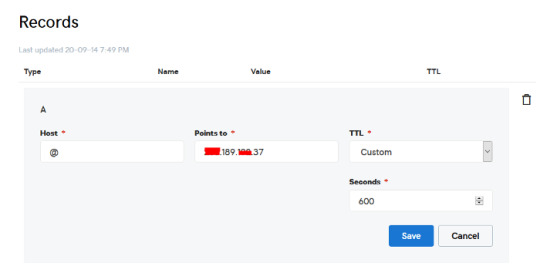
Configure your DNS Records
Simply open DNS management zone in your Domain Provider and edit the main A record.
Than we need to create MySQL database for the application. So Let’s Create one. Connect to your VPS server using any SSH client like putty. and Let’s start!
Just open Putty and enter the Server IP or Name, and Press Open. It will ask you to login, just enter “root” as the user, then enter your password which is sent to you by email.
Note: while typing the password, putty will now show it for security reasons, but It’s there, just type it!
What’s nice, is that we have MySQL installed already as part of the LAMP Stack, but we need to create a database and a user for out application.
Note: Every MySQL statement must end in a semi-colon (;)
To get started, log into the MySQL root (administrative) account by issuing this command:
mysql -u root -p
You will be prompted for the root password, just write or paste it and press Enter.
First, create a separate database that your PHP application will use. You can call this whatever you want, but we will be using TestDb in this guide to keep it simple. Create the database by running this command:
CREATE DATABASE TestDb DEFAULT CHARACTER SET utf8 COLLATE utf8_unicode_ci;
Next, we are going to create a separate MySQL user account that we will use exclusively to operate on our new database. Creating one-function databases and accounts is a good idea from a management and security standpoint. We will use the name DbUser in this guide. Feel free to change this if you’d like.
We are going to create this account, set a password, and grant access to the database we created. We can do this by typing the following command. Remember to choose a strong password here for your database user:
CREATE USER 'DbUser'@'localhost' IDENTIFIED BY 'enter_a_custom_password_here';GRANT ALL ON TestDb.* TO 'DbUser'@'localhost';
You now have a database and user account, each made specifically for Your PHP application. We need to flush the privileges so that the current instance of MySQL knows about the recent changes we’ve made:
FLUSH PRIVILEGES;
Exit from it by typing :
EXIT;
Upload The Script Files To The Server.
To upload the files, you need an application called WinSCP.
It is a free tool and you can download it from here.
Connect to Your VPS Server using WinSCP, and Update the PHP Files to the server to this path: “/var/www/html”
In most cases, the files would be zipped, so we need to extract them.
Again to Putty SSH CLient and Let’s install the unzip utility using the following command:
sudo apt-get install unzip
Clear putty screen to make in clean using the following command:
clear
Change directory to /var/www/html using the following command:
cd /var/www/html
Unzip the “.zip” file using the following command:
unzip YOURFILENAME*.zip
*Note: the file name may be different in your case, so replace YOURFILENAME with your file name.
Now, Move the latest folder content to the upper directory so it can be accessed directly -> use WinSCP Just copy all the files inside “YOURFILENAME” folder and paste them directly in html folder.
Configure Apache to Publish PHP Website
Well Done, Now your files are uploaded and placed in the html folder, we just need to configure apache so we can our Publish PHP Website and access our script using our domain name. To do so, open WinSCP again and navigate to this directory: /etc/apache2/sites-available/
Now, create a new empty file and name it “yourdomain.conf” . You can replace “Scriptname” with any name you want
Open yourdomain.conf Then copy and paste the content below into the file and save.
<VirtualHost *:80> ServerAdmin admin@YOUDOMAINNAME DocumentRoot /var/www/html ServerName YOUDOMAINNAME ServerAlias YOUDOMAINNAME <Directory /var/www/html/> Options +FollowSymlinks AllowOverride All Require all granted </Directory> ErrorLog ${APACHE_LOG_DIR}/error.log CustomLog ${APACHE_LOG_DIR}/access.log combined </VirtualHost>
Replace with your own domain, in my case its “YOURDOMAINNAME”
Enable your script configuration in apache and restart the service.
Now simply, run the following commands to finish the setup:
sudo a2ensite yourdomain.conf sudo a2enmod rewrite sudo systemctl restart apache2.service
ALMOST DONE!
Connect to MySQL Database.
Open your web browser now and navigate to your server name.
Continue the setup by entering the database info and your admin login information. In our example, the database name is TestDb and the user is DBUser with the password set.
That simple!
Setup cronjobs.What are cronjobs?
cron is a Linux utility which schedules a command or script on your server to run automatically at a specified time and date. A cron job is the scheduled task itself. Cron jobs can be very useful to automate repetitive tasks.
For example, you can set a cron job to delete temporary files every week to conserve your disk space. Some PHP web applicaitons, may require you to set up a cron job to perform certain functions.
Setup cronjobs.
To setup cronjobs, you need to add all required jobs to the server. This depends on your script, so if you bought a script from code canyon, the script owner should provide the cronjobs.
To do this, open WinSCP and got to /etc Open crontab file using the editor And paste all the jobs from your script to this folder. (cronjobs are listed in the app documentation)
Make sure each job is on a line and an empty line in the end.
Secure with a Free SSL.
SSL certificates are used within web servers to encrypt the traffic between the server and client, providing extra security for users accessing your application. Let’s Encrypt provides an easy way to obtain and install trusted certificates for free.
Connect to your Server using Putty SSH client. and Let’s Start!
Install the Let’s Encrypt Client
Let’s Encrypt certificates are fetched via client software running on your server. The official client is called Certbot.
First, add the repository to install Certbot:
sudo add-apt-repository ppa:certbot/certbot
You’ll need to press ENTER to accept.
Then, Update the package list to pick up the new repository’s package information:
sudo apt-get update
Install Certbot’s Apache package:
sudo apt install python-certbot-apache
Certbot is now ready to be used.
Set Up the SSL Certificate
Generating the SSL certificate for Apache using Certbot is quite straightforward. The client will automatically obtain and install a new SSL certificate that is valid for the domains provided as parameters.
Simply run the following command: (change the domain)
sudo certbot --apache -d YOUR_DOMAIN_NAME
You will be asked to provide an email address for lost key recovery and notices, and you will be able to choose between enabling both http and https access or forcing all requests to redirect to https. It is usually safest to require https, unless you have a specific need for unencrypted http traffic.
That’s it!
Test your website now and it should be SSL encrypted.
This tutorial I used are originated and made by Hasan By H-educate, you can check his link Here : https://h-educate.com/ or check his youtube on H-educate.
Other tips to make money online, check here : https://ricky-kartiyanta.medium.com/
Cheers!!
#website#saas solutions#saas#monetize#passive income#business#workfromanywhere#easy money#gettingrichfromhome
2 notes
·
View notes
Text
Recover Table Structure From InnoDB Dictionary
When a table gets dropped, MySQL removes the respective .frm file. This post explains how to recover the table structure if the table was dropped. You need the table structure to recover a dropped table from the InnoDB tablespace. The B+tree structure of the InnoDB index doesn’t contain any information about field types. MySQL needs to know that in order to access records of the InnoDB table. Normally, MySQL gets the table structure from the .frm file. But when MySQL drops a table the respective frm file removed too. Fortunately, there’s one more place where MySQL keeps the table structure. It’s the InnoDB dictionary. The InnoDB dictionary is a set of tables where InnoDB keeps information about the tables. I reviewed them in detail in a separate InnoDB Dictionary post earlier. After the DROP, InnoDB deletes records related to the dropped table from the dictionary. So, we need to recover deleted records from the dictionary and then get the table structure. Compiling Data Recovery Tool First, we need to get the source code. The code is hosted on GitHub. git clone https://github.com/twindb/undrop-for-innodb.git To compile it, we need gcc, bison and flex. Install these packages with a package manager (yum/apt/etc). Then, time to compile. # make cc -g -O3 -I./include -c stream_parser.c cc -g -O3 -I./include -pthread -lm stream_parser.o -o stream_parser flex sql_parser.l bison -o sql_parser.c sql_parser.y sql_parser.y: conflicts: 6 shift/reduce cc -g -O3 -I./include -c sql_parser.c cc -g -O3 -I./include -c c_parser.c cc -g -O3 -I./include -c tables_dict.c cc -g -O3 -I./include -c print_data.c cc -g -O3 -I./include -c check_data.c cc -g -O3 -I./include sql_parser.o c_parser.o tables_dict.o print_data.o check_data.o -o c_parser -pthread -lm cc -g -O3 -I./include -o innochecksum_changer innochecksum.c Recover The InnoDB Dictionary Now, let’s create dictionary tables in the sakila_recovered database. The data recovery tool comes with the structure of the dictionary tables. # cat dictionary/SYS_* | mysql sakila_recovered The dictionary is stored in the ibdata1 file. So, let’s parse it. ./stream_parser -f /var/lib/mysql/ibdata1 ... Size to process: 79691776 (76.000 MiB) Worker(0): 84.13% done. 2014-09-03 16:31:20 ETA(in 00:00:00). Processing speed: 7.984 MiB/sec Worker(2): 84.21% done. 2014-09-03 16:31:20 ETA(in 00:00:00). Processing speed: 8.000 MiB/sec Worker(1): 84.21% done. 2014-09-03 16:31:21 ETA(in 00:00:00). Processing speed: 4.000 MiB/sec All workers finished in 2 sec Now, we need to extract the dictionary records from the InnoDB pages. Let’s create a directory for the table dumps. # mkdir -p dumps/default And now we can generate table dumps and LOAD INFILE commands to load the dumps. We also need to specify the -D option to the c_parser because the records we need were deleted from the dictionary when the table was dropped. SYS_TABLES # ./c_parser -4Df pages-ibdata1/FIL_PAGE_INDEX/0000000000000001.page -t dictionary/SYS_TABLES.sql > dumps/default/SYS_TABLES 2> dumps/default/SYS_TABLES.sql SYS_INDEXES # ./c_parser -4Df pages-ibdata1/FIL_PAGE_INDEX/0000000000000003.page -t dictionary/SYS_INDEXES.sql > dumps/default/SYS_INDEXES 2> dumps/default/SYS_INDEXES.sql SYS_COLUMNS # ./c_parser -4Df pages-ibdata1/FIL_PAGE_INDEX/0000000000000002.page -t dictionary/SYS_COLUMNS.sql > dumps/default/SYS_COLUMNS 2> dumps/default/SYS_COLUMNS.sql SYS_FIELDS # ./c_parser -4Df pages-ibdata1/FIL_PAGE_INDEX/0000000000000004.page -t dictionary/SYS_FIELDS.sql > dumps/default/SYS_FIELDS 2> dumps/default/SYS_FIELDS.sql With the generated LOAD INFILE commands it’s easy to load the dumps. # cat dumps/default/*.sql | mysql sakila_recovered Now we have the InnoDB dictionary loaded into normal InnoDB tables. Compiling sys_parser ys_parser is a tool that reads the dictionary from tables stored in MySQL and generates the CREATE TABLE structure for a table. To compile it we need MySQL libraries and development files. Depending on distribution, they may be in -devel or -dev package. On RedHat based systems, you can check it with the command yum provides “*/mysql_config” . On my server it was the mysql-community-devel package. If all necessary packages are installed, the compilation boils down to a simple command: # make sys_parser /usr/bin/mysql_config cc `mysql_config --cflags` `mysql_config --libs` -o sys_parser sys_parser.c Recover Table Structure Now sys_parser can do its magic. Just run it to get the CREATE statement in the standard output. # ./sys_parser sys_parser [-h ] [-u ] [-p ] [-d ] databases/table It will use “root” as the username to connect to MySQL, “querty” – as the password. The dictionary is stored in SYS_* tables in the sakila_recovered database. What we want to recover is sakila.actor. InnoDB uses a slash “/” as a separator between database name and table name, so does sys_parser. # ./sys_parser -u root -p qwerty -d sakila_recovered sakila/actor CREATE TABLE `actor`( `actor_id` SMALLINT UNSIGNED NOT NULL, `first_name` VARCHAR(45) CHARACTER SET 'utf8' COLLATE 'utf8_general_ci' NOT NULL, `last_name` VARCHAR(45) CHARACTER SET 'utf8' COLLATE 'utf8_general_ci' NOT NULL, `last_update` TIMESTAMP NOT NULL, PRIMARY KEY (`actor_id`) ) ENGINE=InnoDB; # ./sys_parser -u root -p qwerty -d sakila_recovered sakila/customer CREATE TABLE `customer`( `customer_id` SMALLINT UNSIGNED NOT NULL, `store_id` TINYINT UNSIGNED NOT NULL, `first_name` VARCHAR(45) CHARACTER SET 'utf8' COLLATE 'utf8_general_ci' NOT NULL, `last_name` VARCHAR(45) CHARACTER SET 'utf8' COLLATE 'utf8_general_ci' NOT NULL, `email` VARCHAR(50) CHARACTER SET 'utf8' COLLATE 'utf8_general_ci', `address_id` SMALLINT UNSIGNED NOT NULL, `active` TINYINT NOT NULL, `create_date` DATETIME NOT NULL, `last_update` TIMESTAMP NOT NULL, PRIMARY KEY (`customer_id`) ) ENGINE=InnoDB; There are few caveats though. InnoDB doesn’t store all information you can find in the .frm file. For example, if a field is AUTO_INCREMENT, the InnoDB dictionary knows nothing about it. Therefore, sys_parser won’t recover that property. If there were any field or table level comments, they’ll be lost. sys_parser generates the table structure eligible for further data recovery. It could but it doesn’t recover secondary indexes, or foreign keys. InnoDB stores the DECIMAL type as a binary string. It doesn’t store the precision of a DECIMAL field. So, that information will be lost. For example, table payment uses DECIMAL to store money. # ./sys_parser -u root -p qwerty -d sakila_recovered sakila/payment CREATE TABLE `payment`( `payment_id` SMALLINT UNSIGNED NOT NULL, `customer_id` SMALLINT UNSIGNED NOT NULL, `staff_id` TINYINT UNSIGNED NOT NULL, `rental_id` INT, `amount` DECIMAL(6,0) NOT NULL, `payment_date` DATETIME NOT NULL, `last_update` TIMESTAMP NOT NULL, PRIMARY KEY (`payment_id`) ) ENGINE=InnoDB; Fortunately, Oracle is planning to extend the InnoDB dictionary and finally get rid of .frm files. I salute that decision, having the structure in two places leads to inconsistencies. Image credit: m.khajoo https://twindb.com/recover-table-structure-from-innodb-dictionary-recover-table-structure-from-innodb-dictionary/
1 note
·
View note
Text
Installing Nginx, MySQL, PHP (LEMP) Stack on Ubuntu 18.04

Ubuntu Server 18.04 LTS (TunzaDev) is finally here and is being rolled out across VPS hosts such as DigitalOcean and AWS. In this guide, we will install a LEMP Stack (Nginx, MySQL, PHP) and configure a web server.
Prerequisites
You should use a non-root user account with sudo privileges. Please see the Initial server setup for Ubuntu 18.04 guide for more details.
1. Install Nginx
Let’s begin by updating the package lists and installing Nginx on Ubuntu 18.04. Below we have two commands separated by &&. The first command will update the package lists to ensure you get the latest version and dependencies for Nginx. The second command will then download and install Nginx.
sudo apt update && sudo apt install nginx
Once installed, check to see if the Nginx service is running.
sudo service nginx status
If Nginx is running correctly, you should see a green Active state below.
● nginx.service - A high performance web server and a reverse proxy server Loaded: loaded (/lib/systemd/system/nginx.service; enabled; vendor preset: enabled) Active: active (running) since Wed 2018-05-09 20:42:29 UTC; 2min 39s ago Docs: man:nginx(8) Process: 27688 ExecStart=/usr/sbin/nginx -g daemon on; master_process on; (code=exited, status=0/SUCCESS) Process: 27681 ExecStartPre=/usr/sbin/nginx -t -q -g daemon on; master_process on; (code=exited, status=0/SUCCESS) Main PID: 27693 (nginx) Tasks: 2 (limit: 1153) CGroup: /system.slice/nginx.service ├─27693 nginx: master process /usr/sbin/nginx -g daemon on; master_process on; └─27695 nginx: worker process
You may need to press q to exit the service status.
2. Configure Firewall
If you haven’t already done so, it is recommended that you enable the ufw firewall and add a rule for Nginx. Before enabling ufw firewall, make sure you add a rule for SSH, otherwise you may get locked out of your server if you’re connected remotely.
sudo ufw allow OpenSSH
If you get an error “ERROR: could find a profile matching openSSH”, this probably means you are not configuring the server remotely and can ignore it.
Now add a rule for Nginx.
sudo ufw allow 'Nginx HTTP'
Rule added Rule added (v6)
Enable ufw firewall.
sudo ufw enable
Press y when asked to proceed.
Now check the firewall status.
sudo ufw status
Status: active To Action From -- ------ ---- OpenSSH ALLOW Anywhere Nginx HTTP ALLOW Anywhere OpenSSH (v6) ALLOW Anywhere (v6) Nginx HTTP (v6) ALLOW Anywhere (v6)
That’s it! Your Nginx web server on Ubuntu 18.04 should now be ready.
3. Test Nginx
Go to your web browser and visit your domain or IP. If you don’t have a domain name yet and don’t know your IP, you can find out with:
sudo ifconfig | grep -Eo 'inet (addr:)?([0-9]*\.){3}[0-9]*' | grep -Eo '([0-9]*\.){3}[0-9]*' | grep -v '127.0.0.1'
You can find this Nginx default welcome page in the document root directory /var/www/html. To edit this file in nano text editor:
sudo nano /var/www/html/index.nginx-debian.html
To save and close nano, press CTRL + X and then press y and ENTER to save changes.
Your Nginx web server is ready to go! You can now add your own html files and images the the /var/www/html directory as you please.
However, you should acquaint yourself with and set up at least one Server Block for Nginx as most of our Ubuntu 18.04 guides are written with Server Blocks in mind. Please see article Installing Nginx on Ubuntu 18.04 with Multiple Domains. Server Blocks allow you to host multiple web sites/domains on one server. Even if you only ever intend on hosting one website or one domain, it’s still a good idea to configure at least one Server Block.
If you don’t want to set up Server Blocks, continue to the next step to set up MySQL.
4. Install MySQL
Let’s begin by updating the package lists and installing MySQL on Ubuntu 18.04. Below we have two commands separated by &&. The first command will update the package lists to ensure you get the latest version and dependencies for MySQL. The second command will then download and install MySQL.
sudo apt update && sudo apt install mysql-server
Press y and ENTER when prompted to install the MySQL package.
Once the package installer has finished, we can check to see if the MySQL service is running.
sudo service mysql status
If running, you will see a green Active status like below.
● mysql.service - MySQL Community Server Loaded: loaded (/lib/systemd/system/mysql.service; enabled; vendor preset: enabled) Active: active (running) since since Wed 2018-05-09 21:10:24 UTC; 16s ago Main PID: 30545 (mysqld) Tasks: 27 (limit: 1153) CGroup: /system.slice/mysql.service └─30545 /usr/sbin/mysqld --daemonize --pid-file=/run/mysqld/mysqld.pid
You may need to press q to exit the service status.
5. Configure MySQL Security
You should now run mysql_secure_installation to configure security for your MySQL server.
sudo mysql_secure_installation
If you created a root password in Step 1, you may be prompted to enter it here. Otherwise you will be asked to create one. (Generate a password here)
You will be asked if you want to set up the Validate Password Plugin. It’s not really necessary unless you want to enforce strict password policies for some reason.
Securing the MySQL server deployment. Connecting to MySQL using a blank password. VALIDATE PASSWORD PLUGIN can be used to test passwords and improve security. It checks the strength of password and allows the users to set only those passwords which are secure enough. Would you like to setup VALIDATE PASSWORD plugin? Press y|Y for Yes, any other key for No:
Press n and ENTER here if you don’t want to set up the validate password plugin.
Please set the password for root here. New password: Re-enter new password:
If you didn’t create a root password in Step 1, you must now create one here.
Generate a strong password and enter it. Note that when you enter passwords in Linux, nothing will show as you are typing (no stars or dots).
By default, a MySQL installation has an anonymous user, allowing anyone to log into MySQL without having to have a user account created for them. This is intended only for testing, and to make the installation go a bit smoother. You should remove them before moving into a production environment. Remove anonymous users? (Press y|Y for Yes, any other key for No) :
Press y and ENTER to remove anonymous users.
Normally, root should only be allowed to connect from 'localhost'. This ensures that someone cannot guess at the root password from the network. Disallow root login remotely? (Press y|Y for Yes, any other key for No) :
Press y and ENTER to disallow root login remotely. This will prevent bots and hackers from trying to guess the root password.
By default, MySQL comes with a database named 'test' that anyone can access. This is also intended only for testing, and should be removed before moving into a production environment. Remove test database and access to it? (Press y|Y for Yes, any other key for No) :
Press y and ENTER to remove the test database.
Reloading the privilege tables will ensure that all changes made so far will take effect immediately. Reload privilege tables now? (Press y|Y for Yes, any other key for No) :
Press y and ENTER to reload the privilege tables.
All done!
As a test, you can log into the MySQL server and run the version command.
sudo mysqladmin -p -u root version
Enter the MySQL root password you created earlier and you should see the following:
mysqladmin Ver 8.42 Distrib 5.7.22, for Linux on x86_64 Copyright (c) 2000, 2018, Oracle and/or its affiliates. All rights reserved. Oracle is a registered trademark of Oracle Corporation and/or its affiliates. Other names may be trademarks of their respective owners. Server version 5.7.22-0ubuntu18.04.1 Protocol version 10 Connection Localhost via UNIX socket UNIX socket /var/run/mysqld/mysqld.sock Uptime: 4 min 28 sec Threads: 1 Questions: 15 Slow queries: 0 Opens: 113 Flush tables: 1 Open tables: 106 Queries per second avg: 0.055
You have now successfully installed and configured MySQL for Ubuntu 18.04! Continue to the next step to install PHP.
6. Install PHP
Unlike Apache, Nginx does not contain native PHP processing. For that we have to install PHP-FPM (FastCGI Process Manager). FPM is an alternative PHP FastCGI implementation with some additional features useful for heavy-loaded sites.
Let’s begin by updating the package lists and installing PHP-FPM on Ubuntu 18.04. We will also install php-mysql to allow PHP to communicate with the MySQL database. Below we have two commands separated by &&. The first command will update the package lists to ensure you get the latest version and dependencies for PHP-FPM and php-mysql. The second command will then download and install PHP-FPM and php-mysql. Press y and ENTER when asked to continue.
sudo apt update && sudo apt install php-fpm php-mysql
Once installed, check the PHP version.
php --version
If PHP was installed correctly, you should see something similar to below.
PHP 7.2.3-1ubuntu1 (cli) (built: Mar 14 2018 22:03:58) ( NTS ) Copyright (c) 1997-2018 The PHP Group Zend Engine v3.2.0, Copyright (c) 1998-2018 Zend Technologies with Zend OPcache v7.2.3-1ubuntu1, Copyright (c) 1999-2018, by Zend Technologies
Above we are using PHP version 7.2, though this may be a later version for you.
Depending on what version of Nginx and PHP you install, you may need to manually configure the location of the PHP socket that Nginx will connect to.
List the contents for the directory /var/run/php/
ls /var/run/php/
You should see a few entries here.
php7.2-fpm.pid php7.2-fpm.sock
Above we can see the socket is called php7.2-fpm.sock. Remember this as you may need it for the next step.
7. Configure Nginx for PHP
We now need to make some changes to our Nginx server block.
The location of the server block may vary depending on your setup. By default, it is located in /etc/nginx/sites-available/default.
However, if you have previously set up custom server blocks for multiple domains in one of our previous guides, you will need to add the PHP directives to each server block separately. A typical custom server block file location would be /etc/nginx/sites-available/mytest1.com.
For the moment, we will assume you are using the default. Edit the file in nano.
sudo nano /etc/nginx/sites-available/default
Press CTRL + W and search for index.html.
Now add index.php before index.html
/etc/nginx/sites-available/default
index index.php index.html index.htm index.nginx-debian.html;
Press CTRL + W and search for the line server_name.
Enter your server’s IP here or domain name if you have one.
/etc/nginx/sites-available/default
server_name YOUR_DOMAIN_OR_IP_HERE;
Press CTRL + W and search for the line location ~ \.php.
You will need to uncomment some lines here by removing the # signs before the lines marked in red below.
Also ensure value for fastcgi_pass socket path is correct. For example, if you installed PHP version 7.2, the socket should be: /var/run/php/php7.2-fpm.sock
If you are unsure which socket to use here, exit out of nano and run ls /var/run/php/
/etc/nginx/sites-available/default
... location ~ \.php$ { include snippets/fastcgi-php.conf; # # # With php-fpm (or other unix sockets): fastcgi_pass unix:/var/run/php/php7.2-fpm.sock; # # With php-cgi (or other tcp sockets): # fastcgi_pass 127.0.0.1:9000; } ...
Once you’ve made the necessary changes, save and close (Press CTRL + X, then press y and ENTER to confirm save)
Now check the config file to make sure there are no syntax errors. Any errors could crash the web server on restart.
sudo nginx -t
nginx: the configuration file /etc/nginx/nginx.conf syntax is ok nginx: configuration file /etc/nginx/nginx.conf test is successful
If no errors, you can reload the Nginx config.
sudo service nginx reload
8. Test PHP
To see if PHP is working correctly on Ubuntu 18.04, let’s a create a new PHP file called info.php in the document root directory. By default, this is located in /var/www/html/, or if you set up multiple domains in a previous guide, it may be located in somewhere like /var/www/mytest1.com/public_html
Once you have the correct document root directory, use the nano text editor to create a new file info.php
sudo nano /var/www/html/info.php
Type or paste the following code into the new file. (if you’re using PuTTY for Windows, right-click to paste)
/var/www/html/info.php
Save and close (Press CTRL + X, then press y and ENTER to confirm save)
You can now view this page in your web browser by visiting your server’s domain name or public IP address followed by /info.php: http://your_domain_or_IP/info.php
phpinfo() outputs a large amount of information about the current state of PHP. This includes information about PHP compilation options and extensions, the PHP version and server information.
You have now successfully installed PHP-FPM for Nginx on Ubuntu 18.04 LTS (Bionic Beaver).
Make sure to delete info.php as it contains information about the web server that could be useful to attackers.
sudo rm /var/www/html/info.php
What Next?
Now that your Ubuntu 18.04 LEMP web server is up and running, you may want to install phpMyAdmin so you can manage your MySQL server.
Installing phpMyAdmin for Nginx on Ubuntu 18.04
To set up a free SSL cert for your domain:
Configuring Let’s Encrypt SSL Cert for Nginx on Ubuntu 18.04
You may want to install and configure an FTP server
Installing an FTP server with vsftpd (Ubuntu 18.04)
We also have several other articles relating to the day-to-day management of your Ubuntu 18.04 LEMP server
Hey champ! - You’re all done!
Feel free to ask me any questions in the comments below.
Let me know in the comments if this helped. Follow Us on - Twitter - Facebook - YouTube.
1 note
·
View note
Text
How to Make a WordPress Website Secure?

A question of security always comes in mind while running a website. No matter what kind of website you have, security is mandatory to keep you safe from several cyber attacks. WordPress is the most popular Content Management System (CMS) made by PHP and MySQL and powers more than 34% websites. It can also be under the attacks in the event that you don’t take proper measures to protect your site. So, everything related to the security solutions you need to know about. There are a lot of things you can do to secure your WordPress site by preventing hacking and different vulnerabilities.
In this article, we will talk about the best techniques to keep your WordPress website secure.
Regular Backup
Keeping regular backup for your website is very important to make it secure. You must not want to lose the website with all its data. So, you need to keep a weekly or monthly on-site and off-site backups of everything before the worst happening. You have many good backup solutions such as some plugins like Jetpack, that comes with a premium version at an affordable price. There's also a free alternative, ‘Updraftplus’.
Update Everything
Keep your WordPress up to date with the latest version that will help to make your website secure. Running a website with outdated software, themes and plugins easily compromise with the security vulnerabilities. Updates are downloaded by default in WordPress and shown in every system that needs to be updated. Just update them in a few seconds.
Rename WordPress login URL
During WordPress installation, most of the time we use wp-admin or wp-login.php as our login URL as it is set by default. As a result, hackers can easily discover the login page and attack spontaneously. If hackers get the login page URL, they will try to do the brute force attack. In this case, changing the login URL will reduce the possibility of this attack by 90%.
Limit login attempts & use a strong password
WordPress usually does not limit users to make unlimited login attempts. Frequent login attempts can easily open you to the brute force attacks and let hackers have easy trials to get unauthorized access to our website. You can set a fixed number of login attempts by using certain specialized plugins such as ‘Login LockDown’ and ‘WP Limit Login Attempts’ which are free to use. You should not set up more than 5 retries.
You should not use a common password like ‘123456’, ‘your name’, your birthday’ and so more which are easily guessable. The password should be as strong as possible and changed often to avoid all bad practices.
Two Step Authentication
Only changing the login URL, username or using a strong password cannot be the ultimate security solution. The utmost way to get rid of it is to enable two-step authentication. It needs to use two devices to log in to the site. In this process, after entering the username and password into the login panel, a message will be sent to the device set previously. This message will contain a code that has to be used in the main device from where the login attempt is actually performed. After authenticating the code, you can enter the site successfully.
To do so, you can use two certain free plugins such as WP Two Factor Authentication (2FA) and Rublon Two-Factor Authentication.
Use SSL Certificates
Security Socket Layer (SSL) is used to secure data transactions between the web browser and the server though it won’t make your website secure against hacking attempts. SSL is mandatory for those websites that process sensitive information and credentials like passwords, credit card details and so more. By using SSL, all sensitive data is encrypted before its transmitting. This makes the data unreadable to the hackers and secures your site. To set up SSL for WordPress websites is not so difficult. Almost every web hosting service provider offers a free SSL or you can pay for this if you have more sensitive information to transfer.
Hide wp-config.php and .htaccess files
When you are serious about security, it’s the best solution to hide your wp-config.php and .htaccess files from getting accessed by hackers. These files actually contain all sensitive data and information about your WordPress and technically care of your WordPress site. So, if something bad happens to these files, you won’t be able to run your website normally. You can do so simply by using a number of plugins like ‘iTheme Security’, ‘WordFence’, ‘Sucuri Security’, ‘Hide My WordPress’ which are free to use with one click installation. You can also try their paid versions to get extra more facilities.
The security plugins will not be 100% hacker proof but you can do much better with them. Both the paid or free version will provide you an additional layer of protection to prevent the automated cyber attacks.
Choose a good hosting provider
The most important way to keep your website secure is to choose a good web hosting service provider that will provide the multiple layers of security for your website. There are many hosting companies that are highly recommended for providing the best services ever. By using a good WordPress hosting with necessary security features, it’s much possible to speed your WordPress site smoothly.
To Sum Up
One of the most important parts of a website is to maintain your WordPress security properly by preventing the malicious practices of hackers. It’s not so hard to do as you have many free options. Paid versions are for advanced users. By doing so, you can easily maintain the security of your WordPress site and protect from hacking.
1 note
·
View note
Text
VeryUtils Ecommerce Shopping Platform is an Online Ordering System based on PHP and SQLite
VeryUtils Online Ordering System is a user-friendly and efficient platform for businesses looking to establish an online presence and start selling their products online. This system is built using PHP and SQLite, making it a reliable and robust solution for e-commerce websites. VeryUtils Online Ordering System is easy for both businesses and customers to navigate, with clear categories and a simple process for adding items to the shopping cart and checking out. This makes it an ideal solution for small businesses that want to start selling online without the need for complex and expensive systems.

In addition to its ease of use, VeryUtils Online Ordering System also offers a range of advanced features to help businesses manage their online store. These include the ability to add and edit products, manage orders and customers, and track inventory. This means that businesses can easily keep track of their sales and make informed decisions about their products and pricing.
VeryUtils Online Ordering System is a reliable and user-friendly platform for businesses looking to sell their products online. Its intuitive interface, advanced features, and secure design make it an excellent choice for businesses of all sizes. Whether you are a small business owner just starting out in e-commerce or an established retailer looking to expand your online presence, VeryUtils Online Ordering System is a smart and cost-effective solution.
Demo Link: https://veryutils.com/demo/php-online-ordering-system/
Admin Login URL: https://veryutils.com/demo/php-online-ordering-system/admin/
Default Admin Login Detail: username: admin password: admin123
The VeryUtils Online Ordering System is a web application that includes two main modules: the Admin Module and the Customer Module. The Admin Module is designed for business managers to manage and track products, inventory, and orders from customers. The Customer Module allows customers to browse and purchase products, adding items to their virtual shopping cart and completing orders. When a customer checks out, the system calculates a delivery fee and adds it to the total order cost, which will be payable when the order is delivered. This system also generates a simple sales report that can be printed out.
VeryUtils Online Ordering System is built using PHP and SQLite, and upon purchase, the full source code is provided for users to deploy on their own servers. This allows businesses to offer their products or services for online ordering through their website. This system is suitable for businesses of all sizes, from small local shops to large corporations.
There are numerous benefits to using VeryUtils Online Ordering System. One major advantage is that it allows customers to place orders at any time, 24/7. This is especially useful for businesses with a large customer base that may not be able to visit the physical storefront during regular business hours. Additionally, the system allows businesses to offer a wider range of products or services to their customers. For example, a restaurant can offer a larger menu online than what can physically fit in the restaurant, and a retail store can offer a wider range of products for customers to shop from their own homes.
Online Ordering System highlight features:
Easy order placement through website or mobile.
Multiple payment methods supported.
Order tracking and updates.
Viewable order history.
Customizable orders.
Inventory management.
Customer account management.
Mobile compatibility.
Detailed analytics and reporting.
Based on PHP and SQLite, without depend on MySQL database.
Cross Browser Compatibility.
Responsive Layout.
Thumbnail for Product.
Support Unlimited Categories.
Unlimited Products.
100% Customizable Shopping Cart.
Online Ordering System features for both Admin Side and Customer Side, Admin Side:
Secure Login/Logout
Home Page
Manage Category List
Manage Delivery Charges/Fee per Location
Manage Product List
Manage Order List
Manage Customer List
Generate Printable Sales Report
Manage System Users List
Manage Account Credentials
Logout
Customer Side:
Secure Login and Registration
Explore Products
Search Products
Filter Product by Categories
Add Product to Shopping Cart
Checkout
List all Orders
View Order Details
Manage Account Credentials
Logout
System Requirements:
PHP
MySQL or SQLite
0 notes
Text
Laravel vs Yii: Best PHP Framework for Web Development

PHP is a popular general-purpose programming language that is excellent for creating websites and can be incorporated into HTML. 3,090,319 active websites are still utilizing PHP, according to Built with. Other than PHP's fundamental functionality, developers have other options when it comes to building useful web applications. Laravel is a straightforward PHP framework originally developed as a superior alternative to Code igniter, which is often used for developing web-based or web applications. An open-source PHP framework called Yii Framework allows for the quick development of contemporary Web applications. Despite being both extensions of the PHP language, the two frameworks each have unique features that provide them a competitive advantage.
Components of Laravel
Some of the integral components of Laravel Framework are:
● Artisan, a command-line tool, makes it easier to create models, controls, schedule tasks, and execute a wide range of custom commands.
● Eloquent is a database interaction framework for Object-Relational Mapping (ORM).
● Supports all database formats using packages.
● Allows for versioning and database updates after migrations.
● Simple PHP code may be used in views thanks to Blade Template Engine.
● There are hundreds of Laravel standard libraries available.
● Extensive and practical government material that is constantly updated.
Components of Yii
Some of the key components of the Yii Framework include:
● DBMS that supports a wide range of DBMS, including PostgreSQL, MySQL, SQLite, Oracle, and others.
● Support for third-party template engines.
● Strong community support with several tutorials and official documentation.
● Gii extension accelerates coding to produce code automatically.
Key Differences between Laravel vs Yii
Although both frameworks are excellent at what they do and essential for web development, there are significant differences between them, including:
Installation
Both frameworks are compatible with PHP 5.4 or newer. Yii has all the required extensions built-in, thus all that is needed to install it is to unpack the package into a web-accessible subdirectory. Laravel, on the other hand, may be installed using Composer or the Laravel installer and needs extra extensions like PHP JSON and MCrypt PHP.
Client-side and scenario-based Validation
While Yii allows users to validate models in both forms, Laravel does not support either sort of validation.
Routing Capabilities
Resource routing is supported by Laravel, but all controllers must specify the routes for each route. Yii's framework by default selects the routes automatically.
CRUD Generation
Only Yii enables automatically producing frequently used interactive code snippets using a specialized plugin called Gii.
Extension Support
Compared to Yii, which only supports a meagre 2800 extensions, Laravel provides a powerful extension support for over 9000 extensions.
Migrations
Both frameworks make migrations relatively simple since they both have methods for ensuring that no data is lost when switching from one database structure to another.
Testing Capabilities
Yii offers PHPUnit and Codeception out of the box, while Laravel offers PHPUnit and various Symfony testing components like Httpkernel, DomCrawler, Browserkit, etc., for detecting and debugging any bugs in operations.
Security
For password security, authentication, defence against SQL Injections, Cross-Site Scripting, and other security risks, Yii and Laravel both provide solutions. While Laravel needs third-party plugins, Yii's role-based access control mechanism is more feature-rich.
Documentation
Yii does not have a high learning curve, however it does not have particularly good documentation. Laravel has a vast, organized documentation with in-depth information but the complexity makes it difficult to find the correct information quickly.
Wrapping Up
When it comes to audience, Laravel is a fairly narrowly focused framework that solely targets web developers. On the other hand, Yii has a wider clientele and offers support for system administrators, novice web developers, and other users. Vindaloo Softtech can create strong, feature-rich web apps and websites to fulfil the complicated demands of organizations with shorter response times since they have both Yii and Laravel engineers on their staff.
#Laravel vs Yii#Laravel#Yii#PHP Development#Laravel Web Development#Laravel Framework#Yii Framework#Web Development#PHP Framework#Web App Development
0 notes
Text
Welcome to our guide on how to install Zabbix Server 5.0 on CentOS 7 Server. Our previous guide was on the installation of How to Install Zabbix Server on Ubuntu. Zabbix is a powerful open source monitoring solution used to monitor server applications, systems, Network devices, Hardware appliances, IoT devices, e.t.c. Its backend is written in C and Java while the user web interface written in PHP. Zabbix Architecture (Server & Client) Zabbix works in a Client/Server model. The server communicates to the native software agents available for various Operating systems like Linux, NIX, and Windows. For systems without an agent, generic monitoring protocols such as Simple Network Management Protocol (SNMP) or Intelligent Platform Management Interface (IPMI) can be used. Install Zabbix Server 5.0 on CentOS 7 Zabbix Server depends on the following software applications: Apache web server PHP with required extensions MySQL/ MariaDB database server MySQL or MariaDB can be a remote server, but php and httpd need to be installed on the Zabbix server. It is possible to run Apache web server in reverse proxy mode. It is recommended to have SELinux in permissive mode unless you know how to fix its issues: sudo setenforce 0 sudo sed -i 's/^SELINUX=.*/SELINUX=permissive/g' /etc/selinux/config Step 1: Install and Configure Apache httpd server Install Apache web server on CentOS 7 server by running the command: sudo yum -y install httpd vim After installing Apache, configure basic security by allowing Prod ServerTokens only on./etc/httpd/conf/httpd.conf Add the following line at the end of the file: $ sudo vim /etc/httpd/conf/httpd.conf ServerSignature Off ServerTokens Prod The directive ServerTokens configures what is returned as the Server HTTP response. Valid options are Full | OS | Minimal | Minor | Major | Prod. Set ServerName: $ sudo vim /etc/httpd/conf/httpd.conf ServerName zabbix.example.com Set Server Admin to receive an email in case of issues. $ sudo vim /etc/httpd/conf/httpd.conf ServerAdmin [email protected] Restart apache web service after making the changes: sudo systemctl restart httpd If you have a firewalld firewall installed and enabled, allow access to port 443 and 80: sudo firewall-cmd --add-service=http,https --permanent sudo firewall-cmd --reload Step 2: Install MariaDB Database server Install MariaDB database server on CentOS 7 server using our guide: How to Install MariaDB 10.x on CentOS 7 Once Database server is installed, you need to create a database for Zabbix user: export zabbix_db_pass="StrongPassword" mysql -uroot -p Users > Admin > Password > Change Password Configure Monitoring Target host Now that we have our Zabbix server ready for monitoring, you can start configuring first monitoring target host. By default, Zabbix server is added to monitoring. To add other host devices, login to Zabbix admin dashboard with the username admin and click on Configuration > Hosts. After a few minutes, monitoring data will start flowing in, to check host graphs go to Monitoring > Screens > Server name.
0 notes
Text
Uppercase on gogle docs

Uppercase on gogle docs install#
Uppercase on gogle docs password#
You need to send parameters to either via GET or POST (remember to URL-encode parameters if via GET). Authentify either with login/password or using a secure passwordless mechanism.Output format: JSON, XML, or simple raw text.Get some statistics about your links: top clicked links, least clicked links, newest links.Generate or get existing short URLs, with sequential or custom keyword.There are numerous tips and guides on the Documentation, be sure to read them.Add them to your own config.php if you know what you're doing. File includes/Config/Config.php contains a few more undocumented but self explanatory and commented settings.
Uppercase on gogle docs install#
You can install YOURLS behind a firewall or a proxy: see Proxy Support.
If YOURLS_NOSTATS is set to true, redirects won't be logged and there will be not stats available. To do so, define with: define('YOURLS_PRIVATE_API', false) If YOURLS_PRIVATE is set to true, you can still make your API public. To do so, define with: define('YOURLS_PRIVATE_INFOS', false) If YOURLS_PRIVATE is set to true, you can still make stat pages public. Define here negative, unwanted or potentially misleading keywords Example: 'porn', 'faggot', 'sex', 'nigger', 'fuck', 'cunt', 'dick' See FAQ for more explanationsĪ list of reserved keywords that won't be used as short URLs. Passwords can either be in plain text, or encrypted: see for more information. Hint: generate a unique one at Example: define( 'YOURLS_COOKIEKEY', ) Ī list of username(s) and password(s) allowed to access the site if private Tip Use our text tool to convert any text from uppercase to lowercase. Select All uppercase, All lowercase, First letter capitals, Invert case, Sentence case, or Title case, depending on your needs. You don't have to remember it, make it long and complicated. In the menu, click Add-ons, and then Change Case. Set to true to allow only one pair of shortURL/longURL (default YOURLS behavior), or to false to allow creation of multiple short URLs pointing to the same long URL (as bit.ly does) Example: define( 'YOURLS_UNIQUE_URLS', true ) Ī random secret hash used to encrypt cookies. Example: define( 'YOURLS_PRIVATE', true ) Īllow multiple short URLs for a same long URL Private means the admin area will be protected with login/pass as defined below. If you pick the non-www version of your domain, don't use the www version in your browser (and vice-versa) Example: define( 'YOURLS_SITE', '' ) Your (hopefully short) domain URL, no trailing slash, lowercase. The name prefix for all the tables YOURLS will need Example: define( 'YOURLS_DB_PREFIX', 'yourls_' ) The database host Example: define( 'YOURLS_DB_HOST', 'localhost' ) The database name Example: define( 'YOURLS_DB_NAME', 'yourls' )
Uppercase on gogle docs password#
Your MySQL password Example: define( 'YOURLS_DB_PASS', 'MySeCreTPaSsW0rd' ) Your MySQL username Example: define( 'YOURLS_DB_USER', 'joe' ) Tap the alignment and font icon (an 'A' with lines next to it). This plugin is included by default in Create React App.➤ Configuration (in user/config.php) ➤ MySQL settings Move the cursor to a location where you want to enter your exponent. You can add this plugin to your project if you’d like to try it: We released an ESLint plugin called eslint-plugin-react-hooks that enforces these two rules. ✅ Call Hooks from custom Hooks (we’ll learn about them on the next page).īy following this rule, you ensure that all stateful logic in a component is clearly visible from its source code.✅ Call Hooks from React function components.(If you’re curious, we’ll explain this in depth below.) Only Call Hooks from React Functionsĭon’t call Hooks from regular JavaScript functions. That’s what allows React to correctly preserve the state of Hooks between multiple useState and useEffect calls. By following this rule, you ensure that Hooks are called in the same order each time a component renders. Instead, always use Hooks at the top level of your React function, before any early returns. We provide a linter plugin to enforce these rules automatically: Only Call Hooks at the Top Levelĭon’t call Hooks inside loops, conditions, or nested functions. Hooks are JavaScript functions, but you need to follow two rules when using them. They let you use state and other React features without writing a class.
0 notes
Text
Uninstalling bitnami magento stack

UNINSTALLING BITNAMI MAGENTO STACK INSTALL
UNINSTALLING BITNAMI MAGENTO STACK SOFTWARE
How To Find your Server’s Public IP Address If you see this page, then your web server is now correctly installed and accessible through your firewall. You will see the default Ubuntu 18.04 Apache web page, which is there for informational and testing purposes. You can do a spot check right away to verify that everything went as planned by visiting your server’s public IP address in your web browser (see the note under the next heading to find out what your public IP address is if you do not have this information already): your_server_ip To allow incoming HTTP and HTTPS traffic for this server, run: You can check that UFW has an application profile for Apache like so:ĭescription: Apache v2 is the next generation of the omnipresent Apache web Next, assuming that you have followed the initial server setup instructions and enabled the UFW firewall, make sure that your firewall allows HTTP and HTTPS traffic. Press Y and hit ENTER to confirm, and the installation will proceed.
UNINSTALLING BITNAMI MAGENTO STACK INSTALL
Once the cache has been updated, you can install Apache with:Īfter entering this command, apt will tell you which packages it plans to install and how much extra disk space they’ll take up. If this is your first time using sudo in this session, you’ll be prompted to provide your regular user’s password to validate your permissions. It’s well-documented and has been in wide use for much of the history of the web.įirst, make sure your apt cache is updated with: The Apache web server is a popular open source web server that can be used along with PHP to host dynamic websites. Step 1 - Installing Apache and Updating the Firewall To set this up, you can follow our initial server setup guide for Ubuntu 18.04. In order to complete this tutorial, you’ll need to have an Ubuntu 18.04 server with a non-root sudo-enabled user account and a basic firewall configured. In this guide, we’ll install a LAMP stack on an Ubuntu 18.04 server. The site data is stored in a MySQL database, and dynamic content is processed by PHP. This term is actually an acronym which represents the Linux operating system, with the Apache web server.
UNINSTALLING BITNAMI MAGENTO STACK SOFTWARE
A “LAMP” stack is a group of open-source software that is typically installed together to enable a server to host dynamic websites and web apps.
0 notes
Text
Datagrip sql

Datagrip sql driver#
Datagrip sql full#
Datagrip sql software#
Datagrip sql trial#
Datagrip sql full#
The SQL syntax is standard Spark SQL so we are free to use the full capabilities of the language. This style of working makes it really easy to explore our data as we're building our pipelines. Click on a table to view the records from that component.The DataGrip catalog should be filled in, with each Dataflow should be present as a different schema with each component mapped as a table.
Datagrip sql trial#
DOWNLOAD A 30-DAY TRIAL FOR DATAGRIP One of the most important activities for anyone working with databases is writing SQL. It supports PostgreSQL, MySQL, SQL Server, Oracle, and many other databases. It even analyzes your existing databases and helps you write. DataGrip is a universal tool for dealing with databases. It has auto completion support for SQL language. Although this article will go through the setup. DataGrip is a SQL database IDE from JetBrains. Click the database connection, select “ All schemas”, then hit the "Refresh" icon. Using Ascends JDBC / ODBC Connection, developers can query Ascend directly from SQL tools like DataGrip.
By default DataGrip does not include any schemas.
Switch to the Options tab to enable the connection as "Read-only".
Test the connection to ensure the setup is correct.
Enter the Username and Password from an API Token linked to a Service Account.
Fill in the host with your Ascend domain in the format.
If you encounter difficult connecting, you will likely need to download the Hive Standalone JAR for 2.3.7 from Maven Central and use that JAR instead of the one embedded in DataGrip.
Datagrip sql driver#
The Apache Hive Driver that ships with DataGrip is version 3 and Spark is only compatible up to version 2.3.7. For the data source type, prefer Apache Spark if present, otherwise use Apache Hive. "You get what you pay for" - The paid tools are worth the cost if you can use it to full extent. You can get a connection to SQLite going very easily though, and unlike other databases it doesn't require a server per se (or to be more correct the server is self contained in the driver). To create an instance, run SqlLocalDB create 'DEVELOPMENT' 14.0 -s. A cross-platform IDE that is aimed at DBAs and developers working with SQL databases. You will see a list of available LocalDB instances on the server. What is DataGrip A database IDE for professional SQL developers. Locate SqllocalDB.exe and run the SqllocalDB.exe i command in a terminal. And as a first step, check if your LocalDB instance is ready for a connection. dBeaver - SSMS, Azure Data Studio, Oracle development studio - Snowflake UI, GBQ Builtin UI DataGrip is still a great tool for learning SQL, but there's generally some additional setup involved in getting a server running that they simply don't cover. You can easily connect to your LocalDB instance with DataGrip. The tools native to the system are more than enough. Select the Databricks driver that you added in the preceding step. On the Data Sources tab, click the + ( Add) button. VSCode - Pycharm + DataGripįree tools should not be ignored as they get the job done well. Use DataGrip to connect to the cluster or SQL warehouse that you want to use to access the databases in your Databricks workspace. This means, the development environment should cater to general needs and/or scripting. I'll summarize some of the response:įor general DE needs, a scripted approach seems to be consensus.
Datagrip sql software#
MY RECOMMENDED READING LIST FOR SOFTWARE DEVEL. Toad, data grip, dbeaver etc.Īny recommendations / opinions on IDE & why?Įdit: Thanks for the feedback. Wondering if you should buy Jetbrains DataGrip Learn if its worth the price tag in this super quick review. I have been using sublime and atom as text editors with syntax highlighting but I have been looking into full fledged IDEs e.g. Just curious about the IDE's that other people use.
0 notes
Text
Bitnami mean stack document root

Bitnami mean stack document root install#
You can download the latest version of BitNami LAMPStack for Linux at. It is self-contained, it makes no modifications to your system and can be uninstalled easily.
Bitnami mean stack document root install#
Option 2: BitNami LAMPStack and Joomla! What is BitNami LAMPStack? īitNami LAMPStack is a free, easy to install package that bundles every piece of software (dependency) necessary to setup a LAMP (Apache, MySQL and PHP for Linux) environment up and running for development or production purposes. You can manage the Joomla! database with phpMyAdmin easily. Using the manager tool is easy to start/stop the Apache and MySQL servers. Click "Finish" to launch the application. Joomla! is now set up and ready to be used. Wait a minute while the installer copies the files and configures your Joomla! installation. The installer allows you to configure an email account so Joomla! can send notifications via email. Type in the name you want to use for your Joomla site, and click "Next". The user and password you provide here will be used to create the admin account in Joomla! Click "Next" when you are done. Provide the location where you want to install the BitNami Joomla! stack and click "Next" when you are done. Now it will ask where do you want to install the program. If you are not sure, leave the default components checked. Select the components you want to install. If you are using Linux you will have to give executable permissions to the file first, using this command:Ĭhmod +x /path/to/n Double click on the icon to launch the installer. Regardless of which operating system you are running (Windows / Linux / Mac), the install process is the same.ĭownload the latest version of Joomla! Stack from the BitNami website.įind the installer you just downloaded (the filename will be similar to n. AMP(Apache HTTP Server, MySQL, & PHP) environment installed. This method assumes you already have a ( Windows/ Linux/ Mac). 2 Option 2: BitNami LAMPStack and Joomla!.1 Option 1: Joomla! stack (Recommended).
0 notes