#wondervillenyc
Photo

From Bit Rot : Join us at @wondervillenyc for an awesome chiptune show featuring: 🎧Double XP Weekend 👾craphazzard (@coykitten69) 🎛️LOW STAKES (@10kfreemen) 🎸@nmlstyl with visuals by Claire Kwong (@aeraquena) Tickets available here! 👇 https://ift.tt/pdTXDH3 ... #chiptune #chiptunes #chiptuneshows https://instagr.am/p/Cq6KKIntgAh/
1 note
·
View note
Photo


Today I’m putting the finishing touches on Ziggurat of the Titan Beetle, the game I’ve been creating as a backer reward for the Wonderville Kickstarter.
It’s a party roguelike for 4 players with art by Chris Hernandez.
Some features:
🐞Bugs
🐞Abilities
🐞Too much fire
🐞Yelling
🐞Time pressure
🐞A store where whoever buys stuff first gets to spend the group's money
It will be exclusive for a full year to backers of the Kickstarter along with 12 other games made by amazing devs.
I’m really happy with how this one turned out and may try to build it into something bigger once the year is up.
5 notes
·
View notes
Photo
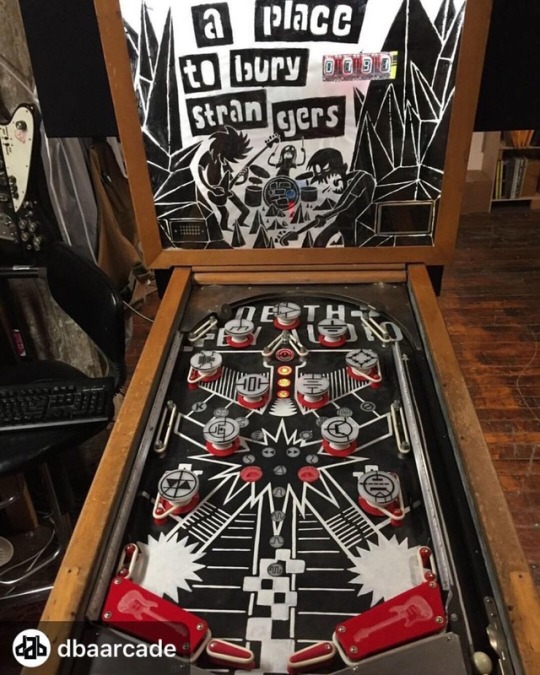
Support #wonderville #Repost @dbaarcade with @download_repost ・・・ We don't just make arcade videogames at Death By Audio Arcade! We work on a variety of installation games. This past year we dove in and made a pinball machine for A Place To Bury Strangers that includes a strobe and a fog machine! You can support the creation of new arcade experiences like this one by donating to the #wondervilleNYC Kickstarter! #gamedev #pinball #indiearcade (at Brooklyn, New York) https://www.instagram.com/p/Bu_LdzHBz9y/?utm_source=ig_tumblr_share&igshid=lkrdqg2r4a53
4 notes
·
View notes
Photo

Tonight! Come through in person or on Twitch for some Jackbox games. Win a lil prize if you fib better than Cromchy the Champ, or if you are the life of the Trivia Murder Party. The lies start at 8pm with Fibbage 3. http://www.twitch.tv/MsSoleSurvivor https://facebook.com/events/s/jackbox-games-with-mssolesurvi/186607105865936/?ti=as #twitch #jackboxgames #wondervillenyc #trivia #prizes #games (at Wonderville) https://www.instagram.com/p/B86jSazDWf9/?igshid=x9vx7u3kgiqs
0 notes
Photo

#Repost from @mssolesurvivor with @regram.app ... I do want to give my heart felt thanks to @everyone that came into the chat to hang out. We got so many compliments about what an amazing community you all are and I know I keep saying it, but it's true we have the best community on Twitch. I love you folx. I want to also thank everyone at @wondervillenyc for being amazingly accommodating and for setting up everything brilliantly. Lastly, BIG thanks to everyone who showed up for a great night of Jackbox Games. Much love to the @officialnycgaymers folx and events team who came out and gave the support I desperately needed. I love you ALL, SO MUCH! #twitch #jackboxgames #wondervillenyc #irl #NYCGaymers #gaymers #gaming (at Wonderville) https://www.instagram.com/p/B3XOsn5nhm8/?igshid=e1cg9a013kte
0 notes
Photo

Massive thanks to everyone that came out last night to the 808 Day Workshop! It was a pleasure meeting all of you. Thank you to @femalefrequency @soundgirls and @wondervillenyc for having me. I look forward to doing again! 🎛 @prettyhybrid and @rosanacaban you both are so talented! 🖤 Looking forward to getting into the studio with you this week! . Posted @withrepost • @femalefrequency Thanks to everyone that came out to our 808 workshop at Wonderville with Soundgirls! Also, thanks to Trovarsi and Josie Carr of Pretty Hybrid for teaching and performing and to Cosas Cosas for performing. Sign up to be a member for free at soundgirls.org and femalefrequency.com to find out about our upcoming events and workshops. . . #workshop #808day #liveperformance #hardware #808 #roland #elektron #digitakt #modularsynthesizer #drummachine #brooklyn #live #wondervillenyc #trovarsiofficial (at Wonderville) https://www.instagram.com/p/B09OJ8FAuyJ/?igshid=1pinuurh3jich
#workshop#808day#liveperformance#hardware#808#roland#elektron#digitakt#modularsynthesizer#drummachine#brooklyn#live#wondervillenyc#trovarsiofficial
0 notes
Photo

At 7:30 on the @wondervillenyc discord, I will be presenting Chonky and Friends with its current gameplay! Join their discord to check it out! #wonderville #chonkyandfriends #gameplay #testing #gamedev #tabletop #tabletopsimulator https://www.instagram.com/p/B-cqKhIhraW/?igshid=9r37w0wvqea7
1 note
·
View note
Photo

Loved seeing people play Synergy as a Service at @wondervillenyc! So glad I could realize a fun and weird game about corporate meetings for their #WonderBundle 👩🏾💼 https://catt.wtf/2VdtYTp
1 note
·
View note
Video
instagram
Woke up like 🙄 let’s get weird. Daily Ritual 🎶🤘🏻! 808 Workshop: Thursday, 8/8✔️ the link 😬 come out! Nerd out to some cool gear and some modular performances. @femalefrequency @primitiveheart_ @trovarsiofficial @rosanacaban @wondervillenyc . . . #rsvp #knobs #newmusic #djs #dowhatyoulove #creators #musicproducer #undergroundmusic #lovewhatyoudo #minimaltechno #knobs #techno #bekindtoothers #loveisfree #Tribaltech #housemusic #letsparty #nyc #nightlife #afrohouse https://www.instagram.com/p/B005gdJg33w/?igshid=12c34owy6jzl0
#rsvp#knobs#newmusic#djs#dowhatyoulove#creators#musicproducer#undergroundmusic#lovewhatyoudo#minimaltechno#techno#bekindtoothers#loveisfree#tribaltech#housemusic#letsparty#nyc#nightlife#afrohouse
1 note
·
View note
Photo

@todaysfuturesound #GlobalBeatCypher #TGR = The Great Reunion NYC at @wondervillenyc Together For The First Time (#TFTFT) NYC Fundraiser Day 3 November 12th, 2021 1186 Broadway, Brooklyn NY 11221 9pm-2am $10 cover at door $10 cover presale ticket Purchase advanced tickets here: https://bit.ly/TGRNYC *Proof of Vaccination required for entry, free masks will be provided Hosted by Knotts & Phillipdrummond (Dr. x Dr.) Djs: @Farbeon @Phillipdrummond The Soviets (Jeff Spec x Chaix) Live open beat cypher beat showcases featuring: @dokbrass (NYC) @yume_soul (NYC) @_casis_ (NYC) @Balakaybeats (NYC) @chaix__ (Toronto) @ytcmusic (NJ) Vicky Casis(NYC) @d3signer.dr3ams (NYC) @mistalowseekz (NYC) @jhersheymusic (NYC Akonglomerate) @spicyworldstar (ATX) @Caskeyboardproducer Open beat cypher at 9pm, bring your beats! To sign up email [email protected] or DM @todaysfuturesound (at Wonderville) https://www.instagram.com/p/CWE-dHYMUp_/?utm_medium=tumblr
0 notes
Photo

#Repost @phillipdrummond ・・・ I’m very excited about @todaysfuturesound #GlobalBeatCypher #TFTFT = Together for the First Time NYC Beats Festival Day 1 at @thesamplerbk Hosted by @phillipdrummond DJed by @djdacel & @dustinmhodges Live sets by: @dokbrass @yume_soul @urban_acoustics @psthegreat @mickey.breeze @tl.reigns @mistalowseekz @darapnerd @d3signer.dr3ams @brownjewel.beats @fifthpdouble @nicolasluna One on one beat battles: @chaix__ vs. @agentmbeats @matt.e.j vs. @ytcmusic and day 3 at @wondervillenyc sunsets sept 5th! https://www.instagram.com/p/CTNkjalre-U/?utm_medium=tumblr
0 notes
Photo

🎃Need Halloween week plans?🎃 @Battlemodemusic is opening for ATL synthwave legend, @watchoutforsnakestheband Fall tour for Boston and NYC shows! 100% spoop guaranteed or your money back *both shows are free* ☠Boston Show 10/25 - @thejunglecmc with @____expletive FREE! ☠NYC show 10/29 - @wondervillenyc with @hedonismbit FREE! .... #chiptune #chiptuneshows #micromusic #8bit #breakcore #breakbeat #gameboy #trackermusic #atari #amiga #commodore #VGM #nanoloop #digitalfusion #pcmusic #MIDI https://instagr.am/p/CUQKn5jsKBx/
0 notes
Text
Creating Custom RGB Pushbuttons for Circumnavigators
It’s summer, and because Juno and I are both teachers, that means we have some time to work on our physical arcade game, Circumnavigators!
In this post, I want to focus on a hardware upgrade that I’m pretty pleased with: After about a month of on-and-off experimenting I made a set of light-up buttons who’s color can be controlled via code. For reasons I’ll get into, this was more complex than just buying a set of RGB buttons like this one.

But before we talk about how let’s cover why we wanted this in the first place. Circumnavigators is a physical game where players run around a circular play-field attempting to keep their glowing dot safe while sabotaging other players. The buttons on the top are used to shift the obstacles on the board. You can check out the trailer Juno made to see it in action.
vimeo
Design Problem: What’s Going On?
Circumnavigators is fun, but has a high bar for understanding. The LED strip display doesn’t leave much room for instructions (just the name takes up the entirety of the display). Furthermore, it is asking some unusual things from players: the buttons are shared and don’t belong to any one player & players are expected to actually move around the device during the game. Both of these things require players to break out of a typical arcade mindset, which is fun but unintuitive.
The other big issue we had was getting players to identify with their “character” in the game: the blue, yellow or orange dot that they are trying to keep safe. Up until now, the instruction has been to “pick one as the game starts,” meaning that the game would simply put all three characters in and it was up to the players to decide for themselves who was who. While players eventually figure this out, it really throws folks as there is never any interaction with device to select your color. It would often take a few rounds before players knew what they were supposed to do. Obviously some players walked away during this time.
This is how we got to RGB addressable LEDs in the buttons. While adding some color to the top is obviously nice from an aesthetic standpoint--and it allows us to match the button colors with the obstacle colors as you can see above--it also allows us to create a more deliberate interaction to start the game. With the new hardware, players press one of three colored buttons and that dot joins the game. This simple character select seems to do a lot to help players identify which color they are and to stand in the right place at the start of the game. Making a game intuitive is always important, but this is especially true in a game that bucks a lot of other arcade conventions.
Existing Solutions
If we need buttons where we can set the color, the most obvious solution is to buy buttons that already do this. The issue is that these buttons typically have a standard RGB LED inside of them. A single one of these LEDs requires 3 pins (one each for red, green, and blue) plus ground. We simply did not have nearly enough pins on our Teensy microcontroller to support this for all 8 buttons.
The way we are handling the LEDs around the perimeter of the game is with a set of DotStar strips. These strips have an embedded microcontroller in each LED that allows the entire strand to be controlled from a single pin. Perfect!

What we needed was a set of buttons with something like the DotStar setup inside. But that doesn’t exist (yet).
Researching A New Solution
So we need a strand of addressable LEDs that live inside a set of pushbuttons. I figured there had to be some way to jam individual LEDs into arcade buttons and connect ‘em.
There is a slightly older/better known product similar to the DotStar called NeoPixel. After doing some research, I found a few options for individual NeoPixel LEDs that could be soldered together. I tried a few, but ultimately the NeoPixel Mini PCB and NeoPixel 5050 seemed most promising.

At the same time, I picked up a few different types of illuminated push buttons to try and see which ones might be able to hold the NeoPixels. I only went with standard (not RGB) LED buttons because I knew I would be removing what was already in there and because buttons with RGB LEDs cost significantly more.

Most of the buttons proved to be unworkable, but this one (center in the image above) seemed perfect. After popping the base of the button out, the stalk holding the white LED it came with could be removed leaving a plastic ring almost the exact size of an individual NeoPixel Mini.


Building A New Solution
I wasn’t sure if any of the parts I bought would yield anything promising, but I was happily surprised at how well the NeoPixel Mini fit into the button! Wiring it up was still an issue, though. The button came with two metal legs that attached to the existing LED (you can see them coming down on either side of the button switch in the above photos). However each NeoPixel requires a lot more. Each one needs power, ground & data in as well as out (to the next NeoPixel). This is a total of 6 connections coming in and out versus the two built into the button.
The next step for me was to wire up a test and see if I could successfully cram that many wires into the button.

It was tight, but ultimately, all of the wires could fit snugly against the edges of the switch, meaning I did not have to drill additionally holes into the button stalk. I honestly doubt my ability to do that well so I’m glad I could avoid it.

I wrote some quick Arduino code to test and we were off the the races!
Here is a diagram of how each buttons is wired up.

One of the nice things about this setup is that only the first button’s LED needs to be connected to the board. After that, they just chain together.
Getting Ready for Installation
Having made two buttons to test the process, I decided that it was stable enough to move forward with. Juno and I bought a few more of the buttons that worked and at Mark’s suggestion, picked up some molex connector wires to keep things tidy and to allow us to disconnect the buttons from the board when we need to.

This part was important because the top of Circumnavigators comes off when we work on it and the wiring needs to be able to disconnect from the base without us having to take everything apart. These snap connectors accommodated that nicely while also keeping our wires tidy.
Here is the top, separated from the base while in the process of replacing the buttons. You can see my other round arcade game, Bleep Space in the background.

And here I am, mugging with the game. I was working on it behind the projection screen at Wonderville while a tournament was happening which bathed the whole space in a weird light.

Updating the Software
After the new buttons were installed, Juno and I met up to discuss various changes we want to make to the game. And the buttons aren’t the only hardware upgrade: Juno has started working on getting sound going in the game which I am incredibly excited for!
One of the big topics, of course, was how to utilize the new addressable buttons. Matching the button colors with the obstacle they controlled was obvious, but we had to brainstorm about what we wanted from the join screen. We knew we needed it, but there were a lot of ways to go about it.
What we settled on was this: after a button is pressed to get past the title screen, the game goes to a new state (which we called “Join”). In this state, all of the top buttons turn off except for three that get the color of the three potential players. These buttons pulse to make themselves more inviting. The LED strips also go mostly blank except for two green arrows directing players towards the part of the ring with the pulsing buttons. All of this is meant to bring the players towards the starting location of the game.

When one of the buttons is pressed a bright column of that player’s color appears and their button stops pulsing, staying bright. Once all three players are in, the game starts the same way it has previously. Eventually we will add a timer so that once two players have joined, if there is no third player the game will start automatically.
Next Steps
We’re in the process of really incorporating the buttons into all parts of the game. It’s a fun design challenge but there are some technical issues. The buttons sometimes flicker or lose their colors. Luckily, this behavior is predictable and reproducible, meaning that it is most likely a software issue but it does limit the types of effects we can do with the buttons.
Overall, though, I’m very happy. I brought the game out at a playtest event at Wonderville last night (we’re running free playtest events every other Wednesday!) and the new join screen worked like a charm. Players still needed to figure things out, but the time it took was drastically lower. Likewise, people by and large knew where their players would start thanks to the positions matching the buttons.
Circumnavigators is frequently shown at Wonderville in Brooklyn, so come out and say hi if you want to check it out! It is not setup every night because it requires a lot of space, but it has been making a lot of cameos at events. And now that it has some new bells and whistles I bet we’ll be showing it even more!
2 notes
·
View notes
Photo

You: Bringing your wonderful self and your phone to Wonderville. Me: Bringing the games and running commentary. Us: Having a great time trying to live through Trivia Murder Party 2. Can't make it in person? Find us on Twitch! https://facebook.com/events/s/jackbox-games-with-mssolesurvi/186607105865936/?ti=as #events #brooklyn #bushwick #bedstuy #jackboxgames #wondervillenyc (at Wonderville) https://www.instagram.com/p/B8wRMMzD2AM/?igshid=1qfela7rbcvwq
0 notes
Photo

🎉🎆 Congratulations 🎆🎉 The fundraiser to Save the Arcade for @dbaarcade and @wondervillenyc brought in just over $40k, which will keep my beloved spot open through the winter to a time where we can hopefully safely gather again for good times and great vibes! @eyesonbedstuy was proud to do what I can and donate a pair of sunglasses to auction off for the event. Congrats to the winner of these awesome shades, a pair designed by @hideo_kojima and @jfreyofficial for the game Death Stranding. You can view a recap of the entire magical event at https://m.twitch.tv/videos/844215805 www.twitch.tv/WondervilleNYC (at Wonderville) https://www.instagram.com/p/CJGj9qZhcln/?igshid=66nhoptkcjtm
0 notes
Photo

Next show with my band @theophobia is at @wondervillenyc - its a benefit show for #SwipeItForward and it’s hosted by the one and only Rev. Jen! With special guests @jasontrachtenburg @badtechno and MAGGOT WATER! Picture by @disposablily and @hartstopbk https://www.instagram.com/p/B9F6KZYlIqp/?igshid=dcnoas7e849z
0 notes
Last Seen Blogs

soicauloto247
Sans titre

magic-fruit-t
Under Orange Trees With Art & Poetry

servusx
♔♘perierat♘♔

s-ashaesthetic
Sasha 🗡️

sorrowsofsatan
Semrush importance