#wordpress debugging mode
Explore tagged Tumblr posts
Visit Tumblr Blog
Explore Tumblr blogs with no restrictions, modern design and the best experience.
Last Seen Tumblr Blogs


Fun Fact
Tumblr has 16.74 million mobile monthly users in the US.
Text
Where To Put Google Tag Manager Code In Google Site?
If you're running a website on Google Sites and want to streamline your tracking, marketing, and analytics setup, you've probably asked yourself: Where To Put Google Tag Manager Code In Google Site? Google Tag Manager (GTM) is a powerful tool that allows you to manage multiple tags such as Google Analytics, Facebook Pixel, or AdWords Conversion Tracking without editing your site's code repeatedly.
But here’s the kicker: Where To Put Google Tag Manager Code In Google Site isn't as intuitive as it might be on platforms like WordPress or custom HTML websites. In this blog, we’ll walk you through where to put Google Tag Manager code in Google Site, step by step, while also covering why it’s essential for modern digital tracking and campaign management.
What is Google Tag Manager?
Before we dive into where to put Google Tag Manager code in Google Site, let’s briefly explain what GTM is. Google Tag Manager is a free tag management system that allows you to quickly and easily update measurement codes and related code fragments collectively known as "tags" on your website or mobile app. Instead of manually inserting different code snippets, GTM gives you one consolidated snippet you can manage through a user-friendly interface.
Why Use Google Tag Manager in Google Sites?
You might wonder why you'd even bother figuring out where to put Google Tag Manager code in Google Site when you can insert individual tracking codes. Here are some reasons why GTM is a smarter choice:
Efficiency: GTM reduces manual effort by allowing centralized management of all tags.
Speed: Faster page loading due to asynchronous tag firing.
Testing: You can preview and debug tags before they go live.
Flexibility: Easily add, remove, or adjust tags without accessing the code every time.
Clearly, knowing where to put Google Tag Manager code in Google Site can be a real game-changer for your tracking setup.
Step-by-Step: Where To Put Google Tag Manager Code In Google Site?
Let’s now get to the core of the topic: Where To Put Google Tag Manager Code In Google Site. Follow these steps carefully:
Step 1: Create Your Google Tag Manager Account
Go to tagmanager.google.com.
Sign in with your Google account.
Click "Create Account."
Fill in your Account Name, Container Name (your website URL), and select "Web" as the target platform.
Click “Create” and accept the GTM Terms of Service.
Once your container is created, GTM will give you two code snippets:
One for the section.
One for the section.
Both are essential if you want GTM to function optimally.
Step 2: Access Your Google Site
Now that you’ve got your GTM code snippets, the next question is: Where To Put Google Tag Manager Code In Google Site?
Note: This method works for the new version of Google Sites (not Classic Google Sites).
Open your site in Google Sites.
Click the gear icon in the top-right corner and choose “Settings.”
From the left panel, select “Custom code.”
You'll see two sections:
Head
Body (end)
Step 3: Paste Your GTM Snippets
Copy the head snippet from GTM and paste it into the Head section of Google Sites.
Copy the body snippet and paste it into the Body (end) section.
Click “Save.”
That’s it! You’ve successfully figured out where to put Google Tag Manager code in Google Site.
Verifying the Installation
After adding your GTM code, it's crucial to ensure everything is working properly.
Go back to tagmanager.google.com.
Click on your container.
Click “Preview” and enter your site URL.
A new tab will open with your site in debug mode.
You’ll be able to see if your tags are firing correctly. This not only confirms that you’ve figured out where to put Google Tag Manager code in Google Site but also that it's working effectively.
Common Issues and Fixes
1. Tag Not Firing
If your tag isn’t firing, double-check that you placed both snippets in the correct fields: one in Head and one in Body (end). Misplacement is a common error when determining where to put Google Tag Manager code in Google Site.
2. Custom Code Disabled
Sometimes, the “Custom code” option may not appear. Ensure you're using the new Google Sites and not Classic Sites.
3. Conflicting Scripts
Too many conflicting scripts can slow your site or prevent GTM from working correctly. Always test after adding any new tag.
Alternatives to Google Tag Manager
If you're not ready for GTM, Google Sites allows some other basic analytics setups. But if you're serious about understanding user behavior, GTM is the gold standard.
Many businesses hire a Google Analytics consultant to properly set up GTM, as even a small mistake can skew your entire data setup.
B2B Applications: A Quick Look
If you run a business-to-business site, especially one built with Google Sites as a landing page or intranet, understanding where to put Google Tag Manager code in Google Site is vital. It allows your marketing and analytics teams to capture data effectively for lead generation, user engagement, and campaign performance.
Some companies even rely on a b2b web design agency to ensure that GTM and other performance tools are integrated properly within Google Sites and other platforms.
Final Thoughts
So, to wrap it all up where to put Google Tag Manager code in Google Site is not as complex as it seems. You simply add the GTM <head> code in the “Head” section and the <body> code in the “Body (end)” section within the Google Sites Settings menu.
Once installed, you unlock the door to better analytics, smarter tag management, and a more efficient workflow. Whether you're an individual blogger or managing a corporate landing page, understanding where to put Google Tag Manager code in Google Site is a key step toward optimizing your digital presence.
And remember: GTM is just the beginning. Make sure you regularly review your tag performance, A/B test your tags, and keep refining your tracking for the best results.
If you’ve ever asked where to put Google Tag Manager code in Google Site, now you know. So go ahead install it, test it, and start making smarter marketing decisions today.
0 notes
Text

How to Set Up Your Local Development Environment for WordPress
Setting up a local development environment is one of the best ways to experiment with and build WordPress websites efficiently. It offers you a safe space to test themes, plugins, and updates before applying changes to a live site. Whether you’re a beginner or an experienced developer, having a local environment is essential in streamlining your workflow and minimizing website downtime.
Before we dive into the technical steps, it’s worth mentioning the benefits of WordPress for your business website. WordPress offers unmatched flexibility, scalability, and user-friendliness, making it an ideal platform for businesses of all sizes. When paired with a solid local development setup, WordPress becomes even more powerful in enabling fast and secure site builds.
Step 1: Choose Your Local Development Tool
There are several local development tools available that cater specifically to WordPress users:
Local by Flywheel (now Local WP): Extremely beginner-friendly with features like SSL support and one-click WordPress installs.
XAMPP: A more general-purpose tool offering Apache, MySQL, PHP, and Perl support.
MAMP: Ideal for macOS users.
DevKinsta: Built by Kinsta, it offers seamless WordPress development and staging capabilities.
Choose the one that suits your OS and comfort level.
Step 2: Install WordPress Locally
Once you’ve chosen your tool:
Install the software and launch it.
Create a new WordPress site through the interface.
Set up your site name, username, password, and email.
After setup, you’ll get access to your WordPress dashboard locally, allowing you to install themes, plugins, and begin your customizations.
Step 3: Configure Your Development Environment
To ensure an efficient workflow, consider these configurations:
Enable Debug Mode: Helps in identifying PHP errors.
Use Version Control (e.g., Git): Keeps your changes tracked and manageable.
Database Access: Tools like phpMyAdmin help manage your WordPress database locally.
If your project requires dynamic functionality, leveraging PHP Development Services during the setup phase can ensure custom features are implemented correctly from the beginning.
Step 4: Customize Themes and Plugins Safely
With your local environment set up, now's the time to begin theme development or customization. You can safely create or modify a child theme, experiment with new plugins, and write custom code without any risk of affecting your live site.
For those unfamiliar with theme structures or WordPress standards, it’s often wise to hire a professional WordPress developer who understands best practices and can ensure clean, maintainable code.
Step 5: Syncing to a Live Server
After building and testing your site locally, you'll eventually want to push it live. Popular methods include:
Using a plugin like Duplicator or All-in-One WP Migration
Manual migration via FTP and phpMyAdmin
Using version-controlled deployment tools
Syncing should always be done carefully to avoid overwriting crucial data. Regular backups and testing are essential.
Step 6: Maintain Your WordPress Site Post-Launch
Launching your website is only the beginning. Ongoing updates, security patches, and performance optimization are critical for long-term success. Enlisting website maintenance services ensures your site remains fast, secure, and up-to-date.
Services can include:
Core, plugin, and theme updates
Malware scans and security hardening
Site performance monitoring
Regular backups
Final Thoughts
A local WordPress development environment not only speeds up your development process but also protects your live website from unintended changes and errors. With tools and strategies now more accessible than ever, there's no reason not to use one.From learning the basics to running advanced builds, setting up locally gives you the confidence and space to grow your WordPress skills. And if you want to see real-world examples or follow along with tips and tricks I share, feel free to check out my work on Instagram for practical inspiration.
0 notes
Text
User Registration Using Contact Form 7 Pro

The User Registration Using Contact Form 7 Pro plugin allows you to seamlessly integrate user registration forms into your WordPress site using the popular Contact Form 7 plugin. With this powerful tool, users can easily register or sign up on your site through a customizable form. Whether you’re managing a membership site or just looking to simplify the user sign-up process, this plugin is the perfect solution.
Features include easy form integration, custom field support, automatic user role assignment, and more. This plugin also supports popular integrations like Google Reviews WordPress Plugin, enabling businesses to showcase their reviews directly on their site. Save time, improve usability, and make user registration hassle-free for your visitors.
Features: Profile Dashboard: Access a centralized hub where you can view key information and manage your account efficiently.
Edit Profile: Easily update and customize your profile information to ensure it's always accurate and up to date.
Change Password: For enhanced security, conveniently change your password whenever needed, ensuring your account remains protected.
Social Sign Up + Login: Enable users to sign up and log in using popular social media platforms such as Google, Facebook, and Apple.
Push Notifications: Set up push notifications to be sent to registered users on your site, keeping them informed and engaged.
Compatibility with Multi-Step for Contact Form 7: Ensure seamless integration between Contact Form 7 and the Multi-Step extension, allowing you to create intuitive and user-friendly multi-step forms.
Auto Generate Password: An email consisting of an auto-generated password will be sent to the users after their registration is completed on the site.
Debugging: There is a debug mode option for debugging.
Woo-Commerce : All WooCommerce field integration for the users to collect the data.
Validation : You can set custom validation message for reset password and forgot password.
Password Features : Option to use for forgot password and reset the password.
Auto-login : After registration you can set auto-login and user redirect on defined page with login into the site.
Social Sign Up + Login: Enable users to sign up and log in using popular social media platforms such as Google, Facebook, and Apple.
Email Templates for Contact Form 7: Customize email templates for Contact Form 7 or bypass the default email notifications entirely. This allows you to send personalized registration and login email notifications.
Multilingual Support: Provide support for multiple languages on your site, enabling users to view and interact with content in their preferred language.
Advanced Custom Field Mapping: Create advanced custom fields for user profiles, with only text and textarea options, and map them to corresponding Contact Form 7 fields. This allows for a more personalized user experience.
New Features: WooCommerce Field Mapping
BuddyPress Registration Compatibility
Compatibility of WordPress VIP.
0 notes
Text
Fixing WordPress Update Errors: A Simple Guide for Non-Tech Users

Keeping your WordPress website updated is essential for staying secure, fast, and compatible with the latest features. But when updates fail—especially if you’re not a tech expert—it can feel frustrating and even risky.
The good news? Most update failures are common, predictable, and fixable without needing advanced coding knowledge. This guide will walk you through the most frequent reasons WordPress updates fail and how to resolve them safely and confidently—even if you’re not “techy.”
Why WordPress Updates Sometimes Fail
Before diving into solutions, it helps to know why things go wrong. WordPress is made up of the core platform, plugins, and themes. When any part of that system is out of sync, updates can fail.
Here are the most common causes:
✅ Poor internet connection
✅ Plugin conflicts
✅ Incompatible themes
✅ Server resource limits (like low memory)
✅ Incorrect file permissions
✅ Corrupted or incomplete update files
Once you know the cause, you’re halfway to the solution.
How to Fix WordPress Update Failures – Step by Step
1. Always Start with a Backup
Even if nothing seems broken, backing up your site is the smartest first step. Use plugins like UpdraftPlus or BackupBuddy to save your full site (files + database). That way, you can restore everything if anything goes wrong during troubleshooting.
2. Clear Your Cache (Browser and WordPress)
Sometimes the update goes through—but your browser still shows the old version.
Here’s what to do:
Clear your browser cache.
If you use caching plugins (like WP Super Cache or W3 Total Cache), clear your site cache too.
Then try updating again.
3. Troubleshoot Plugin Conflicts with Safe Mode
Conflicting plugins are a common culprit. To test this safely:
Install the free Health Check & Troubleshooting plugin.
Enable “Troubleshooting Mode.” This temporarily disables all plugins for your session only.
Try updating again. If it works, re-enable plugins one at a time to find the one causing the issue.
This protects your live site while you debug.
4. Check Hosting Resource Limits
Some shared hosting plans have tight restrictions that block larger updates.
Check with your hosting provider:
Is your PHP memory limit too low? (It should be at least 256MB)
Is the maximum execution time too short?
Can they upgrade your hosting plan or adjust settings?
Your host can often resolve this quickly with a simple support request.
5. Manually Update WordPress (It’s Not as Hard as It Sounds)
If the automatic update isn’t working, do it manually:
Download the latest WordPress version from wordpress.org.
Unzip it on your computer.
Connect to your site using FTP (FileZilla is a good option).
Upload the new wp-admin and wp-includes folders, replacing the old ones.
Do NOT touch your wp-content folder (your themes/plugins are safe there).
Visit your site—WordPress may prompt you to update your database.
Follow each step carefully, and your site will be updated safely.
6. Check File Permissions
Wrong file permissions can block updates.
To fix:
Use the WP File Manager plugin or your hosting control panel.
Set folders to 755 and files to 644.
If you’re unsure, ask your host’s support team to help.
These settings ensure your site stays secure and functional.
7. Stuck in Maintenance Mode? Here’s How to Exit
If your site says “Briefly unavailable for scheduled maintenance,” the update process got interrupted.
Fix it like this:
Log into your hosting account (via cPanel or file manager).
Open your site’s root directory.
Delete the .maintenance file.
Refresh your site—it should be back to normal.
When You Should Ask for Help
Sometimes, even after trying all the steps, the issue persists. That’s okay.
You can contact:
Your hosting provider’s support team
A professional WordPress developer
A trusted WordPress maintenance company
If your website is important for your business, it’s worth having someone reliable to handle technical issues so you can stay focused on running your operations.
Conclusion: You’re Not Alone—Websenor is Here to Help
WordPress update failures can feel intimidating, but you don’t need to be a developer to fix them. With the right approach, tools, and guidance, most issues can be resolved quickly—no coding required.
Always start with a backup, clear your cache, check for plugin conflicts, and review your hosting environment. These simple steps can save you time, money, and stress.
If you're feeling stuck or don’t want to go it alone, Websenor is here for you. As a trusted WordPress development and maintenance company, we help non-tech users manage, protect, and grow their websites without the headaches.With Websenor by your side, WordPress becomes simpler—so you can focus on what really matters: growing your brand.
0 notes
Text
How to Set Up Google Tag Manager for Your Website (Step-by-Step)
Google Tag Manager (GTM) simplifies the process of managing and deploying marketing tags on your website without requiring direct code modifications. With GTM, you can efficiently track user interactions, improve analytics accuracy, and streamline your digital marketing efforts. This step-by-step guide will walk you through setting up Google Tag Manager on your website.

Step 1: Create a Google Tag Manager Account
Go to Google Tag Manager and sign in with your Google account.
Click "Create Account."
Enter your Account Name (e.g., your business name).
Choose your Country and decide if you want to share data with Google.
Click "Continue."
Step 2: Set Up a Container
Enter a Container Name (usually your website URL).
Select the Target Platform (Web, iOS, Android, AMP).
Click "Create" and agree to the GTM terms and conditions.
Step 3: Install the GTM Code on Your Website
After creating the container, Google Tag Manager provides two code snippets:
First code snippet (placed inside the <head> section of your website).
Second code snippet (placed immediately after the opening <body> tag).
Copy and paste these codes into your website’s HTML.
If using a CMS like WordPress, install the Google Tag Manager plugin or add the code in your theme settings.
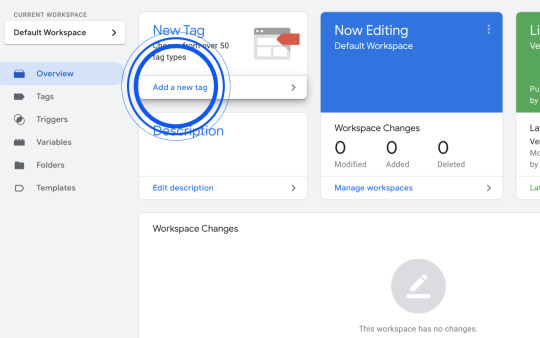
Step 4: Configure Tags, Triggers, and Variables
1. Setting Up a Tag
Click "Tags" in the GTM dashboard.
Click "New" → Give your tag a name.
Click "Tag Configuration" and select a tag type (e.g., Google Analytics, Facebook Pixel).
Enter the necessary details (e.g., Tracking ID for Google Analytics).
2. Creating a Trigger
Click "Triggering" → "New."
Choose a trigger type (e.g., Page View, Click, Form Submission).
Set conditions to specify when the tag should fire.
3. Using Variables
Go to "Variables" → "Configure."
Enable built-in variables like Click URL, Page Path, and Form ID to enhance tracking.
Step 5: Preview and Debug Your Setup
Click "Preview" in GTM to open Debug Mode.
Open your website in a new tab to test if the tags fire correctly.
Check the GTM Debug Console to verify if triggers and variables are working as expected.
Step 6: Publish Your Container
Once everything is set up and tested, click "Submit" in GTM.
Add a version name and description (optional) to keep track of changes.
Click "Publish."
Conclusion
Setting up Google Tag Manager on your website enhances your ability to track user behavior, optimize marketing efforts, and deploy analytics tools efficiently. Following these steps ensures a seamless integration, allowing you to manage all your tracking codes from a single interface.
Start using GTM today and take control of your website's analytics and marketing performance!
0 notes
Video
youtube
2 Method, Enable or Disable Debug Mode in WordPress - Step-by-Step Tuto...
0 notes
Text
[Vọc Playwright] UI mode
https://playwright.dev/docs/test-ui-mode Giới thiệu UI Mode giúp bạn xem, chạy và debug các test dễ dàng hơn. Có rất nhiều tiện ích: filter, thanh timeline tiện lợi. Continue reading [Vọc Playwright] UI mode

View On WordPress
0 notes
Text
CMSC216 Project 3: Assembly Coding and Debugging
1 Introduction The functions in this problem are identical to a previous assignment in which code to support digital thermometer was written. These functions are: int set_temp_from_ports(temp_t *temp) Read global variables corresponding to sensor and mode information and set the fields of a temp_t structure accordingly. int set_display_from_temp(temp_t temp, int *display) Given a temp_t…

View On WordPress
0 notes
Text
Visual Studio Code: Running a ASP.NET Core and Angular/React/Vue site at the same time in debug mode
There’s a good chance if you are working on the SPA (Angular/React/VUE) and a back end like ASP.NET Core site. How do you get both these to run at the same time in debug mode. Here’s a easy way. In your .vscode folder let’s add a launch.json file Create two nodes. compounds configurations Under Configurations add these and change the folder locations: "configurations": [ { "name": ".NET…

View On WordPress
0 notes
Text
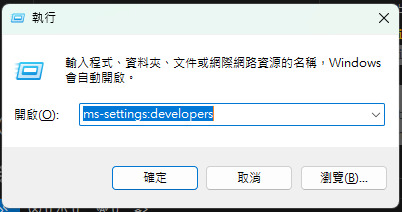
解決 Flutter 編譯 Windows 程式出錯 Exception: Building with plugins requires symlink support
在編譯成 Windows 程式時,若偵錯主控台出現如下般錯誤: Launching lib\main.dart on Windows in debug mode...Exception: Building with plugins requires symlink support.Please enable Developer Mode in your system settings. Run start ms-settings:developersto open settings. 則可循該錯誤訊息的指示,開啟 Windows 的開發者模式,以便其能順利執行偵錯 1. [Win]+[R] 開啟執行視窗,輸入ms-settings:developers 2. 啟用[開發人員模式]即可
View On WordPress
0 notes
Text
Which tools are used for web development?
Web development involves a variety of tools across different stages of the development process. Here are some commonly used tools for web development:
Text Editors and IDEs:
Examples: Visual Studio Code, Sublime Text, Atom, PhpStorm
Purpose: Writing and editing code efficiently.
Version Control:
Examples: Git, GitHub, GitLab
Purpose: Managing and tracking changes in code, collaboration.
Web Browsers:
Examples: Google Chrome, Mozilla Firefox, Safari
Purpose: Testing and debugging web applications.
Command Line Tools:
Examples: Command Prompt, Terminal, PowerShell
Purpose: Running scripts, managing dependencies.
Package Managers:
Examples: npm (Node Package Manager), yarn
Purpose: Installing and managing project dependencies.
Graphics and Design Tools:
Examples: Adobe Photoshop, Sketch, Figma
Purpose: Creating visual assets, designing user interfaces.
Frontend Frameworks:
Examples: React, Angular, Vue.js
Purpose: Building interactive and dynamic user interfaces.
Backend Frameworks:
Examples: Django (Python), Ruby on Rails, Express.js (Node.js)
Purpose: Building server-side logic and APIs.
Database Management:
Examples: MySQL Workbench, PostgreSQL, MongoDB Compass
Purpose: Managing and interacting with databases.
API Testing:
Examples: Postman, Insomnia
Purpose: Testing and debugging APIs.
Text and Code Editors:
Examples: Sublime Text, Visual Studio Code, Atom
Purpose: Writing and editing code efficiently.
Task Runners and Build Tools:
Examples: Grunt, Gulp, Webpack
Purpose: Automating repetitive tasks, optimizing builds.
Content Management Systems (CMS):
Examples: WordPress, Drupal, Joomla
Purpose: Simplifying content creation and management.
Responsive Design Testing:
Examples: Browser Developer Tools, Responsive Design Mode
Purpose: Testing how websites look on different devices.
Performance Monitoring:
Examples: Google Lighthouse, GTmetrix
Purpose: Analyzing and optimizing website performance.
Collaboration and Communication:
Examples: Slack, Microsoft Teams, Trello
Purpose: Facilitating communication and project management.
Security Tools:
Examples: OWASP ZAP, SSL/TLS Certificates
Purpose: Ensuring web application security.
Continuous Integration/Continuous Deployment (CI/CD):
Examples: Jenkins, Travis CI, CircleCI
Purpose: Automating testing and deployment processes.
These tools cater to different aspects of web development, and the choice of tools often depends on the specific requirements of the project and the preferences of the development team.
1 note
·
View note
Text
[solved] Launching lib/main.dart on iPhone 14 Pro in debug mode after firebase packages I added to my application... Flutter launching... mode
[solved] Launching lib/main.dart on iPhone 14 Pro in debug mode after firebase packages I added to my application... Flutter launching... mode
After adding Firebase packages to your Flutter application, launching the app on an iPhone 14 Pro in debug mode involves several steps. In this guide, we’ll walk through the process and provide a detailed explanation of each step. First, let’s make sure we have the required Firebase packages installed in our Flutter project. To use Firebase in a Flutter app, we need to add the following…
View On WordPress
0 notes
Text
HAproxy Configuration to AD Active Directory Servers
Quick configuration to proxy AD requests through another server. Set the following on the proxy server. Note the frontend server is on port 443 whereas the backend server is on port 389: # vi /etc/haproxy18/haproxy.cfg global log 127.0.0.1 local0 debug stats socket /var/run/haproxy.sock mode 0600 level admin # stats socket /var/lib/haproxy/stats maxconn 4000 user haproxy group…
View On WordPress
0 notes
Text
Unlocking Secrets: How to Enable Debug in Yandere Sim
Dive deep into the heart of Yandere Simulator, an intricate and darkly captivating game that has captured the imaginations of stealth and strategy fans alike. As players navigate the complex world of love and rivalry, there’s an enigmatic layer that often goes untapped: the invaluable Debug Mode. In this little-known game feature lies the power to alter realities within the game’s…

View On WordPress
0 notes
Text
Understanding WordPress Debug Mode: A Comprehensive Guide
In the dynamic world of website development, ensuring that your WordPress site functions flawlessly is of paramount importance. WordPress Debug Mode is a valuable tool that can help developers identify and troubleshoot issues effectively. In this article, we will delve into the intricacies of WordPress Debug Mode, and how you can use it to enhance your website’s performance. what is WordPress…

View On WordPress
0 notes