#workbench for mysql
Explore tagged Tumblr posts
Visit Tumblr Blog
Explore Tumblr blogs with no restrictions, modern design and the best experience.
Last Seen Tumblr Blogs


Fun Fact
There are dozens of funny blogs to kill time on Tumblr.
Text
Learn how to seamlessly connect MySQL databases via MySQL Workbench with our comprehensive step-by-step guide for easily managing your database management.
#mysql workbench connect to database#how to connect mysql workbench#how to connect to a database in mysql workbench#workbench connect to mysql server
0 notes
Text
Create DB ER Diagram using MySQL Workbench
reference https://medium.com/@tushar0618/how-to-create-er-diagram-of-a-database-in-mysql-workbench-209fbf63fd03
ensure DB is present
click Database > Reverse Engineer
select stored connection and click Next
on Connect to DBMS completion, click Next
on Select Schemas page, select target schema and then Next
on Retrieve Objects completion, click Next
on Select Objects, keep target tables for the ER diagram ON THE LEFT panel. Tables moved to the right panel will be excluded.
keep "Import MySQL Table Objects" checked
keep "Place imported objects on a diagram" checked
after selecting tables, click Execute
on Reverse Engineering Progress completion, click Next
to create image, File > Export As Png
0 notes
Text
SysNotes devlog 1.5 (backend edition)
Hi all! In this post I will continue the development of my plurality management web-app SysNotes. Today I will be focusing mostly on setting up the databases for the app, as currently test data is stored in the code itself. This severely limits the interactivity and features of the web-app, so it is time to separate it.
In this devlog, I will explain the basics of databases and how the Laravel framework interacts with them to give you an idea of what goes on on my screen and in my brain while I code. This will just be an overview of some technical behind the scenes, nothing will have changed on the front end of the app.
If you missed the first devlog, you can find it here.
What is a database?
A database at the most basic level is a type of file format that has tables. You can think of it as a "spreadsheet file" like the ones you can open in Excel or Google Sheets. The main structural difference between a database and a spreadsheet is that in a database the tables can have relationships. For example, the relationship between a users table and a posts table is that one user can make many posts, and a post can only belong to one user. This is a one-to-many relationship. You can ask the database to give you all the posts related to a specific user. In my app, each user account will have multiple alter profiles, for example. When a user logs in, the app will only fetch the alter profiles that this user created, and show the profiles to them. You can do a whole bunch of other things with databases, that's why I like them! The main functional difference between a database and a spreadsheet is that a spreadsheet is used for data analysis and manipulation, like a fancy calculator, while a database is used to store data. Each table stores data related to one type of object/person/place. Like how spreadsheets can be opened in Excel, database tables can be opened in database software such as MySQL Workbench or HeidiSQL, which is what I'm using since it came with Laragon.
(What my Heidi DB looks like at the end of the devlog)

Plan for today
The users table already exists in my app as a result of installing the Laravel Breeze starter kit, so I don't have to worry about designing this table. With that out of the way, I can think about adding feature-related tables. The first feature I'm adding to my app is the ability to create alter profiles and to fill in the sections on the profile page. The first step is therefore to create an "alter profiles" table and to normalize it (more on that in a bit).
Setting up the database tables (and why it's a pain)
Migration files
When using the Laravel framework, you're not supposed to create a new table or edit an existing table through the database itself - it has to all be done through code. This is done using a file called a database migration. The migration specifies the table name, what columns it should have, what data types the columns should be, and what other tables this table may be related to. This is done so that if you give the code to another person and they download and ran it, their database will be set up the exact same way is yours. Therefore, the migration file makes your database changes portable, which is especially useful when copying code from your personal computer onto the server where the web-app is running. You don't want to set up your local database and then find out that it doesn't work the same way as the one that runs the actual app! Migrations aren't just for creating a new table. You also need to make a migration file for every structural change you want to make for that table, such as adding a new column or changing a column's name. Updating a table's structure after it's already been set up and filled with data has a chance of corrupting the data. Therefore, I always impose this expectation of myself of always getting the database structure right on the first try (i.e. in just one migration).
(My migration file for the alter profiles table at the end of this devlog)

Normalization
Normalization is the act of splitting up a table into 2 or more tables in order to simplify the data structure, reduce duplication, and make database queries more efficient. To illustrate, let's consider the alter profiles table. An alter can have several traits, such as "energetic" or "nervous" and so on. Let's say we should store it in a "traits" column like so:

Now let's say we decide that the word "sad" isn't quite the right descriptor, and we want to change it to "melancholic". To do that, we would need to edit every instance of this word in the table. In this example, it would only be in 2 places: on Benji's profile and on Colin's profile. But what if there were many melancholic alters? That sounds like a lot of work! What if you misspell it on accident somewhere? You won't be able to filter alters by trait properly! Instead what would be better to do is to split (haha) the alter profile table into that and a traits table. Now we will have:


So if you wanted to change the word "sad" to "melancholic", you could do it in just one place, which makes it easier and more maintainable. This is just one small example of what normalization can be. There are actually like 7 levels of it, and even I don't remember them all. In fact, what I will be doing in my app is a step further than the example and use something called a "pivot table" - a whole new type of headache! The point is, figuring out the architecture of database tables is a whole science in on itself 😩
Actually doing the coding
After brainstorming how to normalize it, the alter profile will need to be separated into several tables: alter profiles, alter characteristic types (traits, likes, dislikes, an triggers), alter characteristic values, and alter statuses (such as active, dormant, and unknown). Each profile can then reference the characteristics and statuses tables. This way, alters can like or dislike the same thing, creating the ultimate modularity!

The (pretty technical) steps are as follows:
Create the (model with) migrations for the individual tables and specify their table structure
Create a pivot table and set foreign IDs to point to the individual tables
Define the relationships in the model files
It took me a few tries to get past migration errors, and I accidentally rolled back my migrations too many times, losing my users table 🤦♂️ As i don't yet have any alter data in the database, I just re-registered my account and nothing was lost. Heart attack simulator lol.
Seeding data
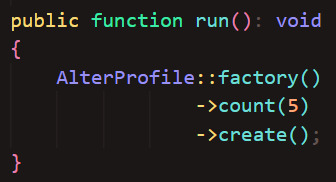
As I'm just working with test data, I don't really care exactly what words and images are used where as long as it works. I also don't want to pain-stakingly input test data into every field for every profile every time I have to delete (drop) and remake (migrate) a table. That's where seeding comes in. Seeding is an automated process that generates dummy data and inserts it into the database, ready for me to test. I'll admit I've never done seeding before - at work I've always worked with a copy of an existing database that has been filled by years of use. But it's never too late to learn! I used seeding to create dummy data for alter profiles and trait values (trait types and statuses has to be manually inputted because they have pre-defined values). I couldn't quite figure out how to seed pivot tables, as they define relationships rather than data. So I had to add those manually too. I still have a ways to go until I'm a real developer lol.
(My Alter Profile factory at the end of the devlog - i left pronouns blank because I wanted them to somewhat match the names, so I added them manually afterwards)

(My Alter Profile seeder at the end of the devlog)
And here are my seeded tables! The faker is limited to using Latin words so I couldn't get the characteristics to look realistic. But it will be fine for test data.
(I have changed the alter names to match the names from the previous devlog)


...All this just for the profile page! But when designing a database's architecture, it is important to anticipate ways in which the database will grow and facilitate new relationships from the start. This was a tiring coding session but it has paved the way for the new and more exciting features!
What next?
This devlog was just for setting up the database tables - in the next devlog we'll get to actually use them in the app! The plan is:
Pull data from the database into the profile pages to display the freshly generated dummy data
Add a way to create new profiles using the New Profile form
Edit the profile information
0 notes
Text
What is MySQL?

MySQL is an open-source relational database management system that is widely used for web development, data analytics, and enterprise applications. It is known for its high performance, reliability, and ease of use. Built on Structured Query Language (SQL), MySQL allows users to efficiently manage large volumes of structured data in real time.
Popular among developers and startups, MySQL powers dynamic websites, content management systems like WordPress, and scalable backend applications. With strong support for cloud integration, MySQL is often paired with modern technologies such as PHP, Python, and Node.js. Its compatibility with popular platforms like AWS, Google Cloud, and Azure makes it a top choice in cloud-native and microservices architecture.
Ideal for both small businesses and large enterprises, MySQL ensures secure data storage, fast transaction processing, and advanced database management through tools like MySQL Workbench.
0 notes
Text
Advanced Database Design

As applications grow in size and complexity, the design of their underlying databases becomes critical for performance, scalability, and maintainability. Advanced database design goes beyond basic tables and relationships—it involves deep understanding of normalization, indexing, data modeling, and optimization strategies.
1. Data Modeling Techniques
Advanced design starts with a well-thought-out data model. Common modeling approaches include:
Entity-Relationship (ER) Model: Useful for designing relational databases.
Object-Oriented Model: Ideal when working with object-relational databases.
Star and Snowflake Schemas: Used in data warehouses for efficient querying.
2. Normalization and Denormalization
Normalization: The process of organizing data to reduce redundancy and improve integrity (up to 3NF or BCNF).
Denormalization: In some cases, duplicating data improves read performance in analytical systems.
3. Indexing Strategies
Indexes are essential for query performance. Common types include:
B-Tree Index: Standard index type in most databases.
Hash Index: Good for equality comparisons.
Composite Index: Combines multiple columns for multi-column searches.
Full-Text Index: Optimized for text search operations.
4. Partitioning and Sharding
Partitioning: Splits a large table into smaller, manageable pieces (horizontal or vertical).
Sharding: Distributes database across multiple machines for scalability.
5. Advanced SQL Techniques
Common Table Expressions (CTEs): Temporary result sets for organizing complex queries.
Window Functions: Perform calculations across a set of table rows related to the current row.
Stored Procedures & Triggers: Automate tasks and enforce business logic at the database level.
6. Data Integrity and Constraints
Primary and Foreign Keys: Enforce relational integrity.
CHECK Constraints: Validate data against specific rules.
Unique Constraints: Ensure column values are not duplicated.
7. Security and Access Control
Security is crucial in database design. Best practices include:
Implementing role-based access control (RBAC).
Encrypting sensitive data both at rest and in transit.
Using parameterized queries to prevent SQL injection.
8. Backup and Recovery Planning
Design your database with disaster recovery in mind:
Automate daily backups.
Test recovery procedures regularly.
Use replication for high availability.
9. Monitoring and Optimization
Tools like pgAdmin (PostgreSQL), MySQL Workbench, and MongoDB Compass help in identifying bottlenecks and optimizing performance.
10. Choosing the Right Database System
Relational: MySQL, PostgreSQL, Oracle (ideal for structured data and ACID compliance).
NoSQL: MongoDB, Cassandra, CouchDB (great for scalability and unstructured data).
NewSQL: CockroachDB, Google Spanner (combines NoSQL scalability with relational features).
Conclusion
Advanced database design is a balancing act between normalization, performance, and scalability. By applying best practices and modern tools, developers can ensure that their systems are robust, efficient, and ready to handle growing data demands. Whether you’re designing a high-traffic e-commerce app or a complex analytics engine, investing time in proper database architecture pays off in the long run.
0 notes
Text
🚀 Power BI MySQL Integration: The Ultimate No-Code Guide to Real-Time Analytics
📈 Why Power BI MySQL Integration is a Game-Changer
In today’s data-first world, real-time insights are more than a luxury—they’re a necessity. According to recent studies, 80% of companies are investing in data analytics to gain a competitive edge. Without accurate, up-to-date data, business decisions can miss the mark.
That's why integrating your MySQL database with Power BI can be a total game-changer.
Imagine pulling live sales data from MySQL straight into Power BI dashboards—no manual exports, no code, no delays. It’s not just about saving time (though it can cut reporting time in half)—it’s about making better, faster, smarter decisions.

🔍 What is Power BI and MySQL? Why Should You Care?
Before jumping into the “how,” let’s understand the “why.”
💡 Power BI: The Visual Storyteller
Power BI is a powerful data visualization tool by Microsoft. It helps you create interactive dashboards, reports, and analytics that help decision-makers see the bigger picture.
🗃️ MySQL: The Backbone of Your Data
MySQL is one of the world’s most popular open-source relational database systems. It can handle massive amounts of structured data—and it’s the go-to for many organizations' back-end systems.
🤝 The Magic of Integration
By connecting Power BI to MySQL, you combine MySQL’s data storage strength with Power BI’s visualization brilliance. That means:
Real-time reporting
Automated dashboards
Zero manual effort
And the best part? With Konnectify, you don’t need to write a single line of code to get started.
⚙️ What You Need for Power BI MySQL Integration
To get your integration up and running, you’ll need:

🧩 How to Connect Power BI to MySQL (Step-by-Step)
Let’s walk through how to get everything set up—whether you’re a data novice or a pro.
Step 1: Download MySQL Workbench
Start by managing your MySQL databases with MySQL Workbench. You can download it from the official MySQL site.
Step 2: Install the MySQL ODBC Connector
You’ll need the MySQL ODBC driver so Power BI can connect to your MySQL database.
Go to MySQL's official site and download the ODBC Connector for Windows or Mac.
Install it and take note of the DSN name you create.
Step 3: Connect MySQL to Power BI Desktop
Open Power BI Desktop
Click Get Data > MySQL Database
Enter your server address and database name
Authenticate using your credentials
Click Connect, and boom—your MySQL tables are now visible in Power BI
🔄 Automate Data Sync Between Power BI and MySQL with Konnectify
Manual syncing is a thing of the past. Here’s how to automate the entire workflow using Konnectify:
Step-by-Step Konnectify Setup
Log into Konnectify Go to your Konnectify dashboard and sign in.
Choose MySQL from the App Marketplace
Set Your Trigger Example: "New data entry in MySQL."
Create Your Action Example: "Create row in Power BI dashboard."
Customize Workflow Use Konnectify’s visual editor to map fields, add filters, and set conditions.
Activate It Click "Activate" and your workflow starts running 24/7.
Now, every time your MySQL database updates, Power BI reflects it instantly—zero manual work.
🔎 Real-World Use Cases for Power BI and MySQL Integration
Let’s explore how different departments can use this integration to transform workflows and drive results.
1. 📊 Automate Financial Reports in Power BI
With Konnectify pulling MySQL data into Power BI:
Financial dashboards update automatically
No need to manually extract CSV files
Get real-time metrics like revenue, expenses, and profit margins
Organizations using real-time analytics saw a 20% increase in operational efficiency.
2. 💸 Analyze Sales Performance with Live MySQL Data
Sales teams can monitor:
Conversion rates
Customer acquisition cost
Regional performance
Power BI helps visualize this sales data and spot trends or bottlenecks—all in real-time, thanks to MySQL integration.
3. 🏷️ Manage Inventory with Real-Time Dashboards
Inventory dips below minimum stock? Trigger alerts.
With Power BI + MySQL:
Track current stock levels
Monitor restocking needs
Visualize inventory turnover
Set up Power BI dashboards that refresh automatically as MySQL updates your stock records.
4. 🛠️ Track Customer Support KPIs
Integrate your helpdesk MySQL tables and watch:
Response times
Ticket resolution rates
SLA compliance metrics
All of this is visualized in Power BI without pulling a single report manually.
5. 📅 Project Management & Timelines
By integrating MySQL with Power BI:
Track project deadlines
Monitor team performance
Visualize tasks at risk of delay
Project managers can act faster using data-driven alerts and Gantt-style dashboards in Power BI.
📅 How to Set Up Real-Time Dashboards in Power BI
Once your integration is live:
Go to Power BI Service
Create a dashboard using your connected MySQL data
Pin visuals and set refresh schedules
Optional: Set up alerts for KPIs
With Konnectify automating your backend sync, your Power BI dashboards are always accurate.
🔒 Is It Secure to Integrate Power BI with MySQL?
Yes if you follow best practices:
Use secure credentials (OAuth or 2FA if possible)
Install the latest ODBC Connector versions
Limit data access to essential users
Monitor logs via Konnectify’s dashboard
Both Power BI and MySQL are enterprise-grade platforms with robust compliance and encryption standards.
✨ Why Konnectify is the Best Tool for Power BI MySQL Integration
Konnectify is more than just a connector. It’s a complete automation platform that lets you:
Connect 150+ apps, including CRMs, email tools, cloud storage, and ERPs
Build visual workflows with drag-and-drop logic
Monitor errors, delays, and sync status
Save hundreds of hours on manual tasks
And yes no coding required.
🧠 FAQs: Power BI MySQL Integration
Q1: Is Power BI compatible with MySQL? ✅ Yes. Power BI supports MySQL through ODBC and native connectors.
Q2: Do I need a premium Power BI account? ❌ No. Power BI Desktop works with MySQL even on the free tier.
Q3: Can I connect multiple MySQL databases? ✅ Yes. Konnectify allows multiple workflows across various databases.
Q4: What if MySQL has sensitive data? 🔐 Use encryption, access control, and filtered queries to secure data.
Q5: Will the integration slow down MySQL? ❌ No. With proper indexing and sync schedules, performance remains stable.
Q6: Is Konnectify safe to use? ✅ Absolutely. It uses encrypted tokens, secure OAuth, and follows GDPR compliance.
🏁 Final Thoughts: It’s Time to Sync Smarter
Gone are the days of juggling spreadsheets, exporting CSVs, or waiting on IT teams to build custom connectors. With Power BI MySQL integration via Konnectify, you unlock:
Real-time analytics
Fully automated dashboards
Insights that move your business forward
Stop manually syncing data—start automating it today.
#it services#saas#saas development company#saas platform#information technology#saas technology#b2b saas#software#software development#ipaas
0 notes
Text
Các công cụ cần có để quản trị VPS Windows hiệu quả
VPS Windows là một trong những lựa chọn phổ biến cho doanh nghiệp và cá nhân cần một môi trường máy chủ mạnh mẽ, dễ quản lý. Tuy nhiên, để vận hành VPS Windows hiệu quả, bạn cần trang bị các công cụ hỗ trợ giúp giám sát, tối ưu hiệu suất và bảo mật hệ thống. Trong bài viết này, chúng ta sẽ cùng khám phá những công cụ cần thiết để quản trị VPS Windows hiệu quả nhất.
Công cụ giám sát hiệu suất VPS Windows
Task Manager: Task Manager là công cụ mặc định của Windows giúp theo dõi tài nguyên hệ thống như CPU, RAM, ổ đĩa và mạng. Đây là công cụ cơ bản nhưng rất quan trọng để quản lý hiệu suất VPS.
Resource Monitor: Resource Monitor cung cấp cái nhìn chi tiết hơn về các tài nguyên hệ thống đang được sử dụng, giúp bạn phân tích các tiến trình đang chạy, mức độ sử dụng bộ nhớ và dung lượng ổ cứng.
Performance Monitor: Performance Monitor cho phép bạn tạo biểu đồ và báo cáo chi tiết về hiệu suất hệ thống theo thời gian thực, giúp theo dõi các thông số quan trọng như tốc độ CPU, mức sử dụng RAM và hiệu suất đĩa cứng.
Công cụ quản lý từ xa
Remote Desktop Connection (RDP): Remote Desktop Connection là công cụ mặc định của Windows, giúp bạn kết nối và quản lý VPS Windows từ xa một cách dễ dàng.
AnyDesk: AnyDesk là một phần mềm điều khiển từ xa nhẹ, tốc độ nhanh và bảo mật cao, giúp bạn truy cập VPS Windows từ bất kỳ đâu.
TeamViewer: TeamViewer là một công cụ phổ biến khác để kết nối và quản lý VPS từ xa, phù hợp cho những ai cần hỗ trợ kỹ thuật hoặc quản trị nhiều máy chủ cùng lúc.
Công cụ bảo mật và quản lý tường lửa
Windows Defender Firewall: Windows Defender Firewall là giải pháp tường lửa tích hợp trong Windows, giúp ngăn chặn các cuộc tấn công và bảo vệ hệ thống khỏi phần mềm độc hại.
Bitdefender GravityZone: Bitdefender cung cấp giải pháp bảo mật mạnh mẽ giúp bảo vệ VPS khỏi virus, malware và các mối đe dọa trực tuyến.
Snort: Snort là một hệ thống phát hiện xâm nhập (IDS) mạnh mẽ, giúp phát hiện và ngăn chặn các cuộc tấn công mạng vào VPS Windows.
Công cụ sao lưu và phục hồi dữ liệu
Windows Server Backup: Windows Server Backup là công cụ sao lưu miễn phí tích hợp sẵn trên Windows Server, giúp bạn sao lưu và khôi phục dữ liệu nhanh chóng.
Veeam Backup & Replication: Veeam là một trong những phần mềm sao lưu hàng đầu, hỗ trợ sao lưu định kỳ và khôi phục dữ liệu dễ dàng trên VPS Windows.
Acronis Cyber Protect: Acronis cung cấp giải pháp sao lưu dữ liệu toàn diện, giúp bảo vệ VPS khỏi các sự cố hệ thống hoặc mất dữ liệu do tấn công mạng.
Công cụ quản lý cơ sở dữ liệu
Microsoft SQL Server Management Studio (SSMS): SSMS là công cụ mạnh mẽ giúp quản lý cơ sở dữ liệu SQL Server trên VPS Windows, cung cấp giao diện trực quan và nhiều tính năng hữu ích.
MySQL Workbench: Nếu bạn sử dụng MySQL trên VPS Windows, MySQL Workbench là công cụ không thể thiếu để quản lý, thiết kế và tối ưu hóa cơ sở dữ liệu.
phpMyAdmin: phpMyAdmin là công cụ web-based giúp quản lý cơ sở dữ liệu MySQL trên VPS Windows dễ dàng thông qua trình duyệt.
Công cụ tối ưu hóa và dọn dẹp VPS Windows
CCleaner: CCleaner giúp dọn dẹp file rác, registry lỗi và tối ưu hóa hệ thống để VPS Windows hoạt động nhanh hơn.
Process Explorer: Process Explorer là công cụ thay thế Task Manager, cung cấp thông tin chi tiết về các tiến trình đang chạy trên VPS.
WinDirStat: WinDirStat giúp phân tích dung lượng ổ cứng, tìm kiếm và xóa các file chiếm nhiều không gian trên VPS.
Công cụ quản lý web server
IIS Manager: IIS Manager là công cụ quản lý dịch vụ web server trên Windows, giúp thiết lập và cấu hình website chạy trên VPS.
XAMPP: XAMPP cung cấp môi trường máy chủ web gồm Apache, MySQL, PHP, rất hữu ích cho việc phát triển và kiểm tra ứng dụng web trên VPS Windows.
Docker for Windows: Docker giúp triển khai và quản lý các ứng dụng container trên VPS Windows, hỗ trợ xây dựng môi trường phát triển linh hoạt.
Kết luận
Việc quản trị VPS Windows hiệu quả không chỉ phụ thuộc vào kỹ năng của quản trị viên mà còn cần đến sự hỗ trợ của các công cụ phù hợp. Từ giám sát hiệu suất, bảo mật, sao lưu dữ liệu đến tối ưu hóa hệ thống, mỗi công cụ đều đóng vai trò quan trọng trong việc đảm bảo VPS hoạt động ổn định và an toàn. Hãy lựa chọn và kết hợp các công cụ trên để quản trị VPS Windows một cách chuyên nghiệp và hiệu quả nhất.
Tham khảo thêm: https://vndata.vn/vps-windows-gia-re/
0 notes
Text
MySQL insights: Database Management for Beginners and Experts
Databases form the backbone of every online application, from social media platforms to e-commerce stores. MySQL stands out as one of the most widely used relational database management systems (RDBMS) globally. Whether you are a beginner looking to learn MySQL or an expert seeking advanced database management techniques, this blog will provide valuable insights into MySQL's capabilities, features, and best practices.
What is MySQL?
MySQL is an open-source relational database management system (RDBMS) that organizes data into tables. Developed by MySQL AB and now owned by Oracle Corporation, MySQL is widely used for managing structured data efficiently. It is known for its reliability, scalability, and ease of use, making it the preferred choice for small businesses, startups, and large enterprises alike.
Why Choose MySQL?
Open-Source & Free: MySQL is open-source, meaning it is free to use and modify.
High Performance: It is optimized for speed and handles large amounts of data efficiently.
Scalability: MySQL can scale from small applications to large enterprise solutions.
Secure: Features like encryption, authentication, and access control make MySQL a secure choice.
Cross-Platform Support: Runs on multiple operating systems, including Windows, Linux, and macOS.
Integration with Popular Technologies: Works seamlessly with PHP, Python, Java, and more.
MySQL Installation Guide
To install MySQL on your system, follow these steps:
Download MySQL: Visit the official MySQL website and download the latest version for your OS.
Run the Installer: Open the installer and follow the setup wizard instructions.
Configure MySQL: Choose the server type and set a root password.
Start MySQL Server: Use the MySQL Workbench or command line to start the MySQL service.
MySQL Basic Commands for Beginners
If you are new to MySQL, here are some essential SQL commands to get started:

Advanced MySQL Techniques
1. Indexing for Performance Optimization
Indexing is crucial for improving the speed of database queries. Without indexes, MySQL scans the entire table, which slows down performance.
CREATE INDEX idx_users_email ON users(email);
2. Using Joins to Combine Data from Multiple Tables
Joins help retrieve data from multiple related tables efficiently.

3. Stored Procedures for Automation
Stored procedures help automate complex queries and improve efficiency.

4. MySQL Replication for High Availability
Replication allows data to be copied from one server to another, ensuring high availability and load balancing.

START SLAVE;
Common MySQL Errors & Troubleshooting
Error: Access Denied for User 'root'@'localhost' Solution: Reset MySQL root password using the command line.
Error: MySQL Server Has Gone Away Solution: Increase the max_allowed_packet size in the MySQL configuration file.
Error: Table Doesn't Exist Solution: Check the table name and ensure it exists in the database.
MySQL vs Other Database Management Systems

Best Practices for MySQL Optimization
Use Indexing Efficiently to speed up queries.
Normalize Your Database to avoid redundancy.
Avoid Using SELECT* to reduce unnecessary data load.
Regularly Backup Your Database to prevent data loss.
Monitor Performance Metrics using MySQL Workbench.
Future of MySQL in Database Management
With the rise of cloud computing, MySQL continues to evolve. Cloud-based solutions such as Amazon RDS, Google Cloud SQL, and Azure Database for MySQL make it easier to deploy and manage databases at scale. New features like JSON support, improved indexing, and machine learning integration further solidify MySQL’s position as a leading database solution.
Conclusion
MySQL remains a powerful and versatile database management system for both beginners and professionals. With its ease of use, scalability, and extensive community support, it continues to be a preferred choice for web developers, data analysts, and businesses worldwide. By mastering MySQL’s features and best practices, you can build high-performance applications that handle data efficiently.
0 notes
Text
蜘蛛池需要哪些调试工具?TG@yuantou2048
在进行蜘蛛池的调试过程中,选择合适的调试工具可以大大提高效率。以下是一些常用的调试工具及其用途:
蜘蛛池需要哪些调试工具?TG@yuantou2048
1. 日志分析工具:用于监控和分析爬虫运行时产生的日志信息,帮助开发者快速定位问题。常用的工具有Logstash、ELK Stack等。
2. 代理管理工具:由于爬虫经常需要使用代理来避免被目标网站封禁IP,因此一个好用的代理管理工具是必不可少的。例如,ProxyRack、Smartproxy等工具可以帮助管理和测试代理的有效性。
3. 性能监控工具:如New Relic或Prometheus,这些工具能够实时监控爬虫的运行状态,确保爬虫稳定高效地工作。
4. 抓包工具:如Wireshark或Fiddler,它们可以帮助你查看网络请求和响应,对于调试爬虫非常有帮助。
5. 数据库管理工具:如果爬虫将数据存储到数据库中,那么一个好用的数据库管理工具(如DBeaver或MySQL Workbench)可以帮助你更好地管理和优化数据库查询。
6. 代码调试器:Python的pdb或者Chrome DevTools,可以帮助你调试代码,找出程序中的错误或瓶颈。
7. 分布式任务调度系统:Scrapy-Redis或Celery,用于处理大规模爬取任务的调度与执行。
8. 自动化测试工具:Selenium或PyTest,用于模拟用户行为并验证爬虫是否正确抓取了所需的数据。
8. 版本控制工具:Git,用于版本控制和协作开发。
9. 反爬虫检测工具:有些网站会设置反爬虫机制,使用像Selenium这样的工具可以帮助模拟浏览器行为,绕过一些简单的反爬虫策略。
8. 数据分析工具:如Jupyter Notebook,它支持Python脚本的编写和调试,特别适合处理复杂逻辑和数据清洗。
9. 网页抓取工具:如Scrapy,它是一个强大的爬虫框架,内置了对HTTP请求的处理,方便调试和维护爬虫项目。
10. 数据可视化工具:如Tableau或Power BI,用于分析爬取到的数据,确保数据的准确性和完整性。
11. API接口测试工具:Postman,用于测试API接口,确保爬虫能够正确解析和提取数据。
12. 虚拟化环境:如Docker,用于创建隔离的开发环境,确保不同环境下的表现一致。
13. 代码质量检查工具:如PyLint或Flake8,确保代码质量和稳定性。
14. 并发测试工具:如Locust,用于模拟大量并发请求,确保爬虫在高负载下的表现。
15. 日志记录工具:如Loguru,用于记录和追踪爬虫的运行情况,便于调试和故障排查。
16. 静态代码分析工具:如PyCharm或VSCode,提供代码编辑、调试功能,提高开发效率。
17. 异常捕捉工具:如Sentry,用于监控爬虫运行时的异常情况,确保爬虫在面对动态加载内容时能正常工作。
18. 数据抓取工具:如BeautifulSoup或Scrapy,用于解析HTML页面,提取所需数据。
19. 性能测试工具:如Apache JMeter,用于性能测试,确保爬虫在多线程或多进程环境中稳定运行。
希望以上工具列表对你有所帮助!
加飞机@yuantou2048

Google外链购买
EPS Machine
0 notes
Video
youtube
How To Restore an Amazon RDS DB Instance from a DB Snapshot
Restoring an Amazon RDS DB instance from a snapshot is a crucial process for disaster recovery, testing, or duplicating a database for development. In this step-by-step guide, you'll learn how to restore an RDS database instance from a snapshot using the AWS Management Console and AWS CLI.
🔹 What is an RDS DB Snapshot? An Amazon RDS DB Snapshot is a backup of your database instance that captures the entire DB state at a specific point in time. You can restore an RDS instance from a snapshot to recover lost data or create a duplicate database for testing.
🔹 Step 1: Access the AWS Management Console 1️⃣ Sign in to the AWS Management Console. 2️⃣ Navigate to Amazon RDS service. 3️⃣ In the left panel, click Snapshots under Backups. 4️⃣ Locate the DB snapshot you want to restore.
🔹 Step 2: Restore the RDS Instance from a Snapshot 1️⃣ Select the snapshot and click Restore snapshot. 2️⃣ Configure the New DB instance settings: - DB instance identifier: Enter a unique name for the new instance. - DB instance class: Choose the compute and memory capacity. - VPC & Security Group: Ensure it's in the correct VPC and security settings. - Storage Type & Size: Adjust based on your needs. - Availability Zone: Choose or let AWS assign automatically. - Encryption: Enable if needed. 3️⃣ Click Restore DB instance to start the process.
📌 Note: The restored database will be in the "creating" state. Once completed, it will be "available".
🔹 Step 3: Restore RDS DB Instance Using AWS CLI You can also restore the snapshot using the AWS CLI.
📌 Command to Restore from a Snapshot: ```bash aws rds restore-db-instance-from-db-snapshot \ --db-instance-identifier my-restored-db \ --db-snapshot-identifier my-db-snapshot \ --db-instance-class db.t3.medium \ --engine mysql ``` ✅ Replace `my-restored-db` with the new DB name and `my-db-snapshot` with the snapshot name.
🔹 Step 4: Connect to the Restored Database Once the restoration is complete: 1️⃣ Navigate to Amazon RDS → Databases and locate your restored instance. 2️⃣ Copy the Endpoint under Connectivity & security. 3️⃣ Connect to the DB using a client like MySQL Workbench, pgAdmin, or DBeaver: ```bash mysql -h mydb-instance.endpoint.rds.amazonaws.com -u admin -p ``` 4️⃣ Enter your credentials and verify data integrity.
🔹 Step 5: Update Application and Security Configurations After restoring, update: 🔹 Security groups & IAM roles for access control. 🔹 DNS configurations if applications rely on the old DB. 🔹 Parameter groups for performance tuning.
🎯 What’s Next? 🔹 Learn how to automate RDS backups and snapshots. 🔹 Set up Multi-AZ for high availability. 🔹 Optimize RDS performance with Performance Insights.
📢 Subscribe to ClouDolus for More AWS & DevOps Tutorials! 🚀 🔹 ClouDolus YouTube Channel - [https://www.youtube.com/@cloudolus] 🔹 ClouDolus AWS DevOps - [https://www.youtube.com/@ClouDolusPro]
*THANKS FOR BEING A PART OF ClouDolus! 🙌✨*
#youtube#AmazonRDS RDSBackup RDSRestore AWSDatabase AWS CloudComputing RDSSnapshot AWSBackup DatabaseRecovery AWSManagement DataProtection CloudStora
0 notes
Text
How to Link Power BI with MySQL Database
Data is a big thing today. In order to design your next big business move, having the correct data at the correct time is of utmost importance. And due to that 80% of businesses are spending on data analytics to stay ahead of the game
If you link your MySQL database directly to Power BI, you can see data in real-time. Sounds incredible, isn't it?
Automating syncs can save you 50% of time used for manual reporting.
In this tutorial, I'll take you through how you can create an integration between MySQL and Power BI and give you some real-world examples that'll make your analytics life a whole lot simpler without writing a single line of code!
Why Integrate Power BI with MySQL?
Before jumping into the steps, let’s quickly talk about why this integration is worth your time. Both Power BI and MySQL are powerhouse tools in the data world:
Power BI: It is a data visualization tool with dynamic reports and dashboards that make dat-driven storytelling possible.
MySQL: A super popular, open-source database that can handle massive amounts of data.
When you integrate Power BI MySQL, you experience the best of both: MySQL's rock-solid data storage with Power BI's incredible visuals. Envision real-time insights, reports automated, and a hundred times smoother workflow—without toggling between platforms.
Data integration challenges 40% of the organizations, but due to Konnectify, you know setting it up is really not a hassle!
Step-by-Step Guide on How to Connect MySQL to Power BI
Let's take this step by step so you'll be good to go in no time.
What Do I Need to Connect Power BI to MySQL Database?
Active Power BI and MySQL accounts.
MySQL ODBC Connector to serve as the intermediary between Power BI and MySQL database.
A Konnectify account to manage the magic of automation.
How to Download MySQL Workbench for Power BI Integration
Ensure that you have MySQL Workbench installed for convenient handling of your MySQL database. You can obtain the MySQL software download from the official website.
How to Automate Data Sync Between MySQL and Power BI Using Konnectify
Here's where Konnectify makes it easy:
Step 1: Sign in to your Konnectify account.
Step 2: Select MySQL from the app marketplace.
Step 3: Create a trigger such as "New data entry in MySQL."
Step 4:Create an action like “Create row in Power BI dashboard.” This way, updates in MySQL automatically appear in Power BI service—hands-free.
Step 5: Customize your workflow with Konnectify’s visual builder and hit "Activate."
Just like that, you’ve got a live connection between Power BI and MySQL.
How to Install MySQL ODBC Connector for Power BI
Go to the MySQL website and download MySQL for Windows, if you haven't done so. Then, install the MySQL ODBC Connector—it's what allows Power BI to talk to your MySQL database.
You can use a detailed documentation by Microsoft on the Power BI MySQL Connector here.
How to Connect MySQL Database to Power BI Desktop
Launch Power BI Desktop.
Navigate to Get Data and choose MySQL Database.
Enter your server credentials and details.
Click Connect to fetch tables from your MySQL.
5 Game-Changing Use Cases for Power BI and MySQL Integration
Still not sure how this combination can assist? Let's see some practical scenarios where Power BI MySQL integration can revolutionize your business.
1. How to Automate Financial Reports in Power BI Using MySQL Data
Establish data query automations to have Power BI extract new data from the MySQL community server and create real-time financial dashboards. This way, your finance team will always be working with the most up-to-date figures since real-time data analytics has the potential to increase operational efficiency by as much as 20%.
2. How to Analyze Sales Data in Power BI by Connecting to MySQL
Sales figures can be a treasure trove if you understand how to interpret them. Linking your MySQL database to Power BI, let's business analysts easily visualize statistics such as customer acquisition and churn rates.
3. How to Monitor Inventory in Real-Time Using Power BI and MySQL
Inventory management is a pain. But with MySQL and Power BI report builder, you can create dashboards that track stock levels in real-time and even send alerts in Power BI when your inventory falls below minimum stock.
4. How to Track Customer Support Metrics in Power BI Using MySQL
Monitoring customer support metrics? Integrate MySQL studio with Power BI to see support ticket metrics such as response times and resolution rates by creating automated dashboards in Power BI so you can monitor trends and ITSM spend.
5. How to Enhance Project Management by Integrating MySQL with Power BI
Streamline project management by synchronizing MySQL and Power BI with automations to alert project managers and project engineers in case any tasks are behind schedule so that proactive measures can be taken.
How Do I Automate MySQL Data Sync in Power BI Dashboards?
Create a workflow to update Power BI whenever a new record is found in MySQL. This will enable you to have your reports always synchronized with the latest data.
Konnectify is no-code automation and integration software, allowing companies to link more than 150 apps to automate workflows—all in one location.
Konnectify for Power BI and MySQL Integration
No one enjoys exporting and importing data manually for hours. Konnectify links other just like how it links MySQL to Power BI with these awesome features~
Try Power BI + MySQL Connector for Free
Frequently Asked Questions (FAQs) on How to Integrate Power BI with MySQL
1. Can I Integrate Power BI with MySQL Without Coding?
Yes! Using Konnectify, you can establish a no-code integration of Power BI and MySQL. Simply connect the apps, define your triggers, and let the automation handle the rest.
2. How Do I Have Real-Time Updates in Power BI from MySQL?
Install Konnectify to automate syncs. Any updates in MySQL are reflected immediately in your Power BI dashboards—no stale data.
3. How is Konnectify beneficial to use with Power BI and MySQL?
Automate the entire process, achieving accuracy in data and time savings. It is the ideal solution for Power BI reporting automation with MySQL data.
1 note
·
View note
Text
Backing Up Your Localhost WordPress Site: Methods and Tools
Creating backups of your localhost WordPress site is an essential practice for safeguarding your work and ensuring you can recover from unexpected errors or data loss. Whether you are testing themes, developing plugins, or building a new website, a reliable backup process can save you time and stress. This blog outlines effective methods and tools to back up your localhost WordPress site.

Why Backup Your Localhost WordPress Site?
Prevent Data Loss
Unintentional file deletions, database errors, or hardware failures can result in losing hours of work.
Streamline Testing
Backups enable you to revert to a previous state if something breaks during theme or plugin testing.
Ease Migration
Backing up your localhost site simplifies the process of moving it to a live server or another environment.
Experiment Freely
Knowing you have a backup allows you to experiment with code or settings without fear of permanent damage.
Components to Back Up
A WordPress site consists of two primary components:
WordPress Files
These include core files, theme files, plugin files, and uploaded media stored in the wp-content folder.
Database
The database stores your website’s content, settings, and user data. It is usually managed through tools like phpMyAdmin or MySQL Workbench.
Methods for Backing Up Localhost WordPress Sites
1. Manual Backup
Steps:
Copy WordPress Files
Navigate to the directory where your WordPress installation resides (e.g., htdocs in XAMPP).
Copy all files and folders to a secure location, such as an external hard drive or cloud storage.
Export the Database
Access phpMyAdmin or your database management tool.
Select your WordPress database and click on the "Export" option.
Choose the "Quick" export method and save the .sql file.
Advantages:
Complete control over the backup process.
No additional tools required.
Disadvantages:
Time-consuming and prone to human error.
2. Using Plugins
Many WordPress backup plugins work seamlessly on localhost installations. Here are some popular choices:
UpdraftPlus
Schedule and automate backups for both files and databases.
Store backups locally or on cloud platforms like Google Drive, Dropbox, or OneDrive.
Duplicator
Create complete site backups, including files and databases.
Ideal for migrating your localhost site to a live server.
All-in-One WP Migration
Export your site’s files and database into a single file.
Easily import backups to restore your site.
Steps to Use a Plugin:
Install the chosen plugin on your localhost WordPress site.
Follow the plugin’s setup instructions to create and save backups.
Store the backups in a secure location.
Advantages:
Automated and user-friendly.
Additional features like scheduling and cloud integration.
Disadvantages:
Some advanced features may require a premium version.
3. Using Command Line Tools
If you are comfortable with the command line, tools like WP-CLI can streamline the backup process.
Steps:
Backup Files
Use commands to compress your WordPress directory into a zip file:zip -r backup.zip /path/to/wordpress
Backup Database
Export your database using WP-CLI:wp db export backup.sql
Advantages:
Fast and efficient for advanced users.
Scriptable for regular backups.
Disadvantages:
Requires familiarity with the command line.
4. Using Localhost Management Tools
Tools like Local by Flywheel and DevKinsta come with built-in backup options, making the process simpler.
Steps:
Locate the backup feature in your chosen tool.
Follow the instructions to create and store a backup.
Restore the backup if needed.
Advantages:
Integrated with the localhost environment.
Minimal setup required.
Disadvantages:
Limited to specific tools.
Best Practices for Backing Up Localhost WordPress Sites
Schedule Regular Backups
Set a schedule to ensure backups are created consistently.
Use Multiple Storage Locations
Keep backups in at least two locations, such as an external drive and cloud storage.
Test Your Backups
Regularly restore backups to verify their integrity and functionality.
Document Your Process
Maintain a clear record of your backup and restoration steps for future reference.
Secure Your Backups
Encrypt sensitive backups and limit access to authorized users.
Conclusion
Backing up your localhost WordPress site is a vital step in ensuring the safety and continuity of your work. Whether you choose manual methods, plugins, or advanced tools, the key is consistency and reliability. By implementing these best practices, you can safeguard your projects and work with confidence, knowing that you’re prepared for any challenges that come your way.
0 notes
Video
youtube
How to connect MySQL workbench to a running MySQL Docker Container | Ja...
1 note
·
View note
Video
youtube
How to Install and Upgrade MySQL Server 5.7 and Workbench on Windows
1 note
·
View note
Text
How to Connect MySQL to Power BI (Without Writing a Single Line of Code!)
Data is a big deal. No, scratch that data is everything when it comes to making smart business moves. And that’s exactly why 80% of companies are investing heavily in data analytics.
If you’re still stuck manually exporting and importing data between MySQL and Power BI, you’re wasting valuable time. The good news? You can automate the entire process and get real-time insights without writing a single line of code. Sounds amazing, right?
This guide will walk you through how to integrate MySQL with Power BI, automate data syncs, and level up your analytics game effortlessly.

Why Should You Connect Power BI with MySQL?
Before we jump into the steps, let’s break down why this integration is a game-changer.
Power BI & MySQL: A Perfect Match
🔹 Power BI → A top-tier data visualization tool that helps you create stunning dashboards and reports.
🔹 MySQL → One of the most widely used open-source databases, perfect for handling massive amounts of structured data.
When you connect MySQL to Power BI, you get the best of both worlds—rock-solid data storage with real-time, interactive visualizations. Imagine not having to manually refresh reports or pull CSV files every time your data updates.
The best part? Thanks to SaaS integration platforms like Konnectify, you don’t need a developer to make it happen.
💡 Fact: Automating data syncs can save up to 50% of the time spent on manual reporting.
How to Connect MySQL to Power BI (Step-by-Step Guide)
What You’ll Need
✔️ A Power BI account ✔️ A MySQL database ✔️ MySQL ODBC Connector (This acts as the bridge between MySQL and Power BI) ✔️ A Konnectify account to automate the integration
Step 1: Install MySQL ODBC Connector
1️⃣ Head over to the MySQL official website and download MySQL Workbench if you don’t have it. 2️⃣ Install the MySQL ODBC Connector this is what allows Power BI to talk to MySQL.
Step 2: Connect MySQL Database to Power BI
1️⃣ Open Power BI Desktop 2️⃣ Click on Get Data → MySQL Database 3️⃣ Enter your server details and credentials 4️⃣ Click Connect to pull in your MySQL tables
🚀 Boom! Your data is now inside Power BI. But let’s take it a step further—let’s automate the entire process so you never have to manually refresh again.
Automate MySQL Data Sync with Power BI Using SaaS Integration
Here’s where Konnectify makes life ridiculously easy.
Instead of manually updating reports, Konnectify automates everything with zero coding.
How to Set Up Konnectify for MySQL → Power BI Automation
1️⃣ Log into Konnectify 2️⃣ Select MySQL from the app marketplace 3️⃣ Set up a trigger like “New data entry in MySQL” 4️⃣ Choose an action like “Create row in Power BI” so your reports update automatically 5️⃣ Customize your workflow with Konnectify’s drag-and-drop builder and hit Activate
And that’s it! Your Power BI dashboard now updates in real-time whenever MySQL gets new data. 🎉
💡 Real-World Example: A finance team using MySQL to store transactions can automatically generate financial reports in Power BI without touching a spreadsheet.
🔗 Want a more detailed walkthrough? Check out this step-by-step guide from the Konnectify blog.
5 Game-Changing Use Cases for Power BI + MySQL Integration
Still wondering why this setup is worth it? Here’s how real businesses are using it:
1. Automate Financial Reports 💰
Sync MySQL’s financial data with Power BI to auto-generate revenue dashboards and track expenses in real-time.
✅ Fact: Real-time analytics can boost operational efficiency by 20%.
2. Analyze Sales Data 📊
Use Power BI to visualize sales trends, customer acquisition costs, and churn rates straight from MySQL.
3. Manage Inventory in Real-Time 📦
No more stockouts! Set up dashboards to track inventory levels and trigger alerts when stock is low.
4. Monitor Customer Support Performance 🎧
Track response times, ticket volume, and resolution rates with live MySQL data in Power BI.
5. Improve Project Management 🚀
Connect Power BI and MySQL to track deadlines, workloads, and team performance all automated!
Frequently Asked Questions (FAQs)
1. Can I Connect Power BI to MySQL Without Coding?
Yes! With SaaS integration via Konnectify, you can set up MySQL-Power BI sync without writing a single line of code.
2. How Can I Get Real-Time Updates in Power BI from MySQL?
Automate it using Konnectify. Any updates in MySQL will instantly reflect in Power BI dashboards no manual refresh needed.
3. Why Use Konnectify for MySQL + Power BI?
No coding needed—anyone can use it
Automates reporting so you don’t have to
Works with 150+ apps, making it the best SaaS integration tool for automation
Final Thoughts
Let’s be real—manual data exports are a waste of time. If you want real-time Power BI dashboards, integrating MySQL is a must. And with SaaS integration tools like Konnectify, you can set up automated syncs in minutes—no coding required.
🔗 Want to see how it works? Check out the full guide here: How to Connect Power BI to MySQL Database.
Now go automate your analytics and thank yourself later! 🚀
#it services#saas development company#saas platform#saas#saas technology#software#b2b saas#information technology#software development#ipaas
0 notes
Text
How to Clean a Table in MySQL Workbench.
Como Limpiar Una Tabla en MySQL Workbench.
👉 https://blog.nubecolectiva.com/como-limpiar-una-tabla-en-mysql-workbench/

#software development#100daysofcode#web development#developerlife#web developers#developers#devs#worldcode#developers & startups#backenddevelopment#mysql#database
0 notes