#write a iso file to a stick/drive
Explore tagged Tumblr posts
Visit Tumblr Blog
Explore Tumblr blogs with no restrictions, modern design and the best experience.
Last Seen Tumblr Blogs


Fun Fact
Premium Tumblr themes are available from anywhere between $9 to $49.
Text
dd
tumblr tournament most fuckable gnu coreutils command
#copy files#delete/shred files#delete a whole partition#backup a drive to a ISO file#write a iso file to a stick/drive#copy/write with a offset#but typo one letter and wipe your drive
44 notes
·
View notes
Text
If you don’t like Windows 10, Windows 11, or other mainstream desktop operating systems for whatever reason, consider using linux. It isn’t as hard as you think.
I switched from Windows 10 to Linux Mint a few months ago, and it went pretty smoothly for me.
Linux has a reputation for being difficult to use, and while it is somewhat deserved, it is quite overblown.
For myself, I think the hardest part of switching was installing Linux on my device. It required me to learn some new software and took about 3 hours on my first try. After setting up my laptop, it was pretty easy. The user interface took a few days to adjust to, and I fiddled around with some settings to my preference, but it was not difficult to adjust from Windows 10 to Linux Mint.
And if you can get someone else to install linux for you, all you need to do it get used to some user interface changes!
INSTALLING LINUX ON YOUR COMPUTER
Here’s an installation guide for Linux Mint if you want more detail than what I give. Link: https://linuxmint-installation-guide.readthedocs.io/en/latest/
You will need: a laptop or desktop, a USB stick, and USB writing software.
Download a linux ISO file. An ISO file is all the data used to install an operating system onto a computer.
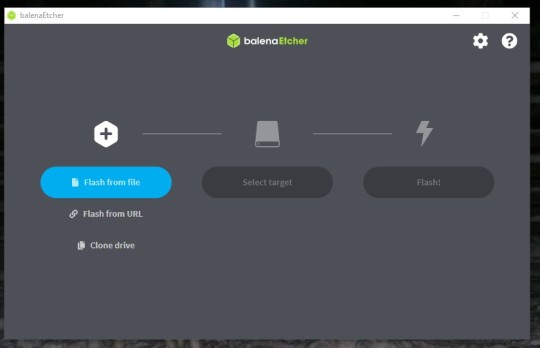
Then you will need to download a USB writing program. Then you can use USB writing software to put the ISO file onto a USB drive. This will create the “bootable media” which will be used to install linux onto your computer. For installing Linux Mint on my device, I used Balena Etcher to write the ISO file.

64 notes
·
View notes
Text
Installing Kali Linux on a USB Stick: A Step-by-Step Guide
If you want a portable, powerful cybersecurity toolkit you can carry in your pocket, installing Kali Linux on a USB stick is the perfect solution. With Kali on a USB, you can boot into your personalized hacking environment on almost any computer without leaving a trace — making it a favorite setup for ethical hackers, penetration testers, and cybersecurity enthusiasts.

In this guide, we'll walk you through how to install Kali Linux onto a USB drive — step-by-step — so you can have a portable Kali environment ready wherever you go.
Why Install Kali Linux on a USB?
Before we dive into the steps, here’s why you might want a Kali USB:
Portability: Carry your entire hacking setup with you.
Privacy: No need to install anything on the host machine.
Persistence: Save your settings, files, and tools even after rebooting.
Flexibility: Boot into Kali on any system that allows USB boot.
There are two main ways to use Kali on a USB:
Live USB: Runs Kali temporarily without saving changes after reboot.
Persistent USB: Saves your files and system changes across reboots.
In this article, we’ll focus on setting up a Live USB, and I'll also mention how to add persistence if you want. and if you seek knowledge about kali linux you can visit our website any time
Website Name : Linux Tools Guide
What You’ll Need
✅ A USB drive (at least 8GB; 16GB or more recommended if you want persistence). ✅ Kali Linux ISO file (download it from the official Kali website). ✅ Rufus (for Windows) or Etcher/balenaEtcher (for Mac/Linux/Windows). ✅ A computer that can boot from USB.
Step 1: Download the Kali Linux ISO
Go to the Kali Linux Downloads page and grab the latest version of the ISO. You can choose between the full version or a lightweight version depending on your USB size and system requirements.
Tip: Always verify the checksum of the ISO to ensure it hasn't been tampered with!
Step 2: Insert Your USB Drive
Plug your USB stick into your computer. ⚠️ Warning: Installing Kali onto the USB will erase all existing data on it. Backup anything important first!
Step 3: Create a Bootable Kali Linux USB
Depending on your operating system, the tool you use may vary:
For Windows Users (using Rufus):
Download and open Rufus (Get Rufus here).
Select your USB drive under Device.
Under Boot selection, choose the Kali Linux ISO you downloaded.
Keep the Partition scheme as MBR (for BIOS) or GPT (for UEFI) based on your system.
Click Start and wait for the process to complete.
For Mac/Linux Users (using balenaEtcher):
Download and open balenaEtcher (Get Etcher here).
Select the Kali ISO.
Select the USB drive.
Click Flash and wait until it's done.
That's it! You now have a Live Kali USB ready.
Step 4: Boot Kali Linux from the USB
Restart your computer with the USB plugged in.
Enter the BIOS/UEFI settings (usually by pressing a key like F12, Esc, Del, or F2 right after starting the computer).
Change the boot order to boot from the USB first.
Save changes and reboot.
You should now see the Kali Linux boot menu! Select "Live (amd64)" to start Kali without installation.
(Optional) Step 5: Adding Persistence
Persistence allows you to save files, system changes, or even installed tools across reboots — super useful for real-world usage.
Setting up persistence requires creating an extra partition on the USB and tweaking a few settings. Here's a quick overview:
Create a second partition labeled persistence.
Format it as ext4.
Mount it and create a file /persistence.conf inside it with the content: cppCopyEdit/ union
When booting Kali, choose the "Live USB Persistence" option.
Persistence is a little more technical but absolutely worth it if you want a real working Kali USB system!
Troubleshooting Common Issues
USB not showing up in boot menu?
Make sure Secure Boot is disabled in BIOS.
Ensure the USB was properly written (try writing it again if necessary).
Kali not booting properly?
Verify the ISO file integrity.
Try a different USB port (preferably USB 2.0 instead of 3.0 sometimes).
Persistence not working?
Double-check the /persistence.conf file and make sure it's correctly placed.
Conclusion
Installing Kali Linux onto a USB stick is one of the smartest ways to carry a secure, full-featured hacking lab with you anywhere. Whether you’re practicing ethical hacking, doing security audits, or just exploring the world of cybersecurity, a Kali USB drive gives you power, portability, and flexibility all at once.
Once you’re set up, the possibilities are endless — happy hacking! 🔥
2 notes
·
View notes
Text
(note to self— info helpful to save, copied text from a post not able to reblog)
“
get yourself a USB stick from any dollar store, install ubuntu with persistent storage on it. There is literally no reason not to, and it means that you now have a little computer of your very own that no one except those who physically get their hands on your USB stick can use (and you can password lock the OS) and that you can run from literally almost any PC with USB ports. Including public machines in libraries and, probably, school laptops.
Ubuntu is an operating system! It's the same kind of thing as Windows, basically-- the software your computer uses to run everything else you do on it, to put it simply. Unlike Windows, though, Ubuntu is totally free, and it's open source, which means anyone is free to look at and play with the code it's made of to write new things for it or even customize their own versions of it!
There's an official website where you can totally legally and safely download the iso you need for free! Then all you have to do is use something like a program called Rufus to install it onto a USB thumb drive!
It does work a little differently from Windows, and needs different file types sometimes, so it isn't an exact replacement, but once you learn a few basic things, it's easy to use, and the tradeoff of having to learn some new things for the improved performance (and the fact that getting a virus on linux is just. Not gonna happen) is worth it imo.
”
https://ubuntu.com/tutorials/create-a-usb-stick-on-windows#1-overview
2 notes
·
View notes
Text
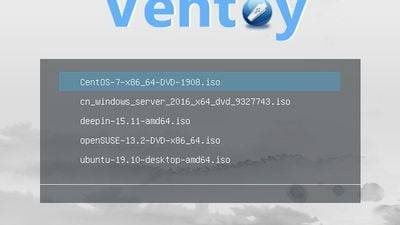
Ventoy Review
I have been meaning to try out Ventoy for some time but kept putting it off for reasons I will explain, but this week I really needed a new ISO writer to put a Linux distribution onto a USB stick and my old methods were not working. Read our Ventoy Review. Written by Adam Hunt In recent years, I have been using UNetbootin for writing ISO files to USB drives for software reviews. I was recently…

View On WordPress
0 notes
Text
Ventoy is an open source tool to create bootable USB drive for ISO files. With ventoy, you don't need to format the disk again and again, you just need to copy the iso file to the USB drive and boot it.
Suggest and vote on features
Features
PortableVentoy can be used from a USB stick or similar with no prior installation.
Multi boot
Multiboot USB
Create Multiboot USB
UEFI Support
Persistent Storage
Multi-windows
VHD Boot
Ventoy vs Rufus opinions
Almost everyone thinks Ventoy is a great alternative to Rufus. all • positive • negative
relevance • date
onkoe
I have over 20 ISOs on one flash drive because of this utility. It's my favorite software for multiboot USBs. Keep in mind, however, that it doesn't work on any Mac hardware.
Top positive comment•about 1 year ago3
Gu
Guest
It allows simple drag & drop of ISO files to a USB drive and then offers a Grub-style menu to select which ISO to boot from, as opposed to having to outright "burn" the ISO to a drive.
Not 100% compatible, but 99.999%.
Top positive comment•12 months ago1
mblithium
Create a separate partition for booting and a special one for placing OS ".iso" files easily.
Positive comment•about 1 year ago1
umitseyhan
You don't need to reformat the stick every single time. Just a casual copy-paste operation of .iso files.
Positive comment•over 1 year ago1
Hau_Kai
It offers the option to multiboot, whilst retaining other files. Add multiple ISOs, remove or update them, all the while other files are unchanged so you can use your fastest and largest USB pendrives, without affecting their use for other tasks.
Positive comment•almost 2 years ago2
Gu
Guest
Multiple ISO image files on one drive
Positive comment•about 2 years ago2
AT
ATShields934
Allows you to easily create a multiboot drive by simply formatting a flash drive with the software and adding the .iso files. Incredibly simple to use, but a major breakthrough in simple boot drive making.
Positive comment•over 2 years ago5
Show more comments ▾
7 of 8 comments
dd
Is this a good alternative?
Yes
No
Free • Open Source
Bootable USB Creator
Mac
Linux
BSD
28 alternatives to dd
dd, that stands for ‘data duplicator’, is a command-line utility for Unix mainly used for copying and converting data.
Suggest and vote on features
Features
Command line interfacedd either have CLI support or is a CLI-only app.
Burn iso
Write ISO to SD card
Create image
dd vs Rufus opinions
Almost everyone thinks dd is a great alternative to Rufus.
Gu
Guest
It's the only one that seems to be able to create BSD flash drives
Top positive comment•almost 3 years ago2
Gu
Guest
Considering this has been developed since 1974, it is very good at what it does.
Top positive comment•over 3 years ago0
cv
cvanelli
crappy command line only program.
Negative comment•over 1 year ago-9
Gu
Guest
It works very well, only for the non Dufus.
Positive comment•over 3 years ago-4
Gu
Guest
allows use of the command line
Positive comment•almost 4 years ago0
Gu
Guest
It's not flashing automatically
Negative comment•about 4 years ago
0 notes
Text
Linux iso usb maker

So instead I propose # dd count= if=/dev/sdb of=win7.img Note, this copies the whole device! - which is usually (much) bigger than the files copied to it. Check the boot checkbox, then close.Īfter all that, you probably want to back up your USB media for further installations and get rid of the ISO file. Open gparted, select the USB drive, right-click on the file system, then click on "Manage Flags". or use the standard GUI file-browser of your systemĬall sync to make sure all files are written. Mount ISO and USB media: # mount -o loop win7.iso /mnt/iso
or (if syslinux is installed), you can run sudo dd if=/usr/lib/syslinux/mbr/mbr.bin of=/dev/sdb.
on newer Ubuntu installs) sudo lilo -M /dev/sdb mbr ( info) Write Windows 7 MBR on the USB stick (also works for windows 8), multiple options here: # cfdisk /dev/sdb or fdisk /dev/sdb (partition type 7, and bootable flag) Delete all partitions, create a new one taking up all the space, set type to NTFS (7), and remember to set it bootable: Grub is installed there!)Ĭheck what device your USB media is assigned - here we will assume it is /dev/sdb. Or alternatively, make sure lilo is installed (but do not run the liloconfig step on your local box if e.g. Install ms-sys - if it is not in your repositories, get it here. This works with the Windows 7 retail version. Basically, the missing step was to write a proper boot sector to the USB stick, which can be done from Linux with ms-sys or lilo -M. Use of livecd-iso-to-disk on any distribution other than Fedora is unsupported and not expected to work: please use an alternative method, such as Fedora Media Writer.OK, after unsuccessfully trying all methods mentioned here, I finally got it working. Even if it happens to run and write a stick apparently successfully from some other distribution, the stick may well fail to boot. Livecd-iso-to-disk is not meant to be run from a non-Fedora system. livecd-iso-to-disk on other Linux distributions If your test boot reports a corrupted boot sector, or you get the message MBR appears to be blank., you need to install or reset the master boot record (MBR), by passing -reset-mbr when writing the stick. If you get this message from fdisk, you may need to reformat the flash drive when writing the image, by passing -format when writing the stick. Partition has different physical/logical endings If you get the message Need to have a filesystem label or UUID for your USB device, you need to label the partition: dosfslabel /dev/sdX LIVE. Information: Don't forget to update /etc/fstab, if necessary.

Number Start End Size Type File system Flagsġ 32.3kB 1062MB 1062MB primary fat16 boot Sector size (logical/physical): 512B/512B Welcome to GNU Parted! Type 'help' to view a list of commands.
Difference between Fedora and Red Hat Enterprise Linux.
Installing, Configuring and Troubleshooting MySql/MariaDB.
Creating Windows virtual machines using virtIO drivers.
Installing virtual operating systems with GNOME Boxes.
Getting started with virtualization (libvirt).
Upgrading Fedora using the DNF system upgrade.
How to Set NVIDIA as Primary GPU on Optimus-based Laptops.
How to join an Active Directory or FreeIPA domain.
Getting started with Apache HTTP Server.
Managing keyboard shortcuts for running an application in GNOME.
Controlling network traffic with firewalld.
Displaying a user prompt on the GNOME login screen.
Understanding and administering systemd.
Performing administration tasks using sudo.
Configuring networking with NetworkManager CLI (nmcli).
Disabling the GNOME automatic screen locking.
Setting a key shortcut to run an application in GNOME.
Configuring Xorg as the default GNOME session.
Configuring X Window System using the nf file.
Installing Chromium or Google Chrome browsers.
Installing plugins for playing movies and music.
APT command equivalents on Fedora with DNF.
Securing the system by keeping it up-to-date.
Adding or removing software repositories in Fedora.
Finding and installing Linux applications.

Creating and using a live installation image.
0 notes
Text
Hirens bootcd 15.2.iso

Hirens bootcd 15.2.iso how to#
Hirens bootcd 15.2.iso drivers#
Hirens bootcd 15.2.iso software#
Hirens bootcd 15.2.iso iso#
In most computers, the primary disk is C:, since it hold the operating system and program files. Partition means to divide a certain part of a hard drive for backup and system files, like separating a part from the whole. What more if the computer is having a problem to boot or load the operating system? What if the BIOS (Basic I/O or Input / Output System) becomes corrupt thus not able to access the operating system like Windows or Mac, and not being able to access the files? Well, there is a solution to this, and it's another easy to use software: Hiren's BootCD.įor USB Booting Instructions just click here.
Hirens bootcd 15.2.iso drivers#
Many resort to using the traditional clean install, where the primary driver is reformatted, thus leaving the PC clean and new, and the only thing that is very tedious to do afterwards are none other than installing once again the drivers or hardware installed on the computer, which usually take 2 or 3 hours to finish. When it comes to having a certain PC streamlined, base lined, or simply reformatted, there are various ways to do so.
Hirens bootcd 15.2.iso software#
At “ Boot Order” setting, set the USB-HDD as first boot device.This kind of compilation software provides a compilation of programs to help resolves most and some uncommon Internet and computer issues like driver failure, intermittent internet connection and other computer malfunctions.(This setting is commonly found inside " Advanced BIOS Features" menu). Inside BIOS menu, find the " Boot Order" setting.(The way to enter into BIOS Settings depends on the computer manufacturer). Power On your computer and press " DEL" or " F1" or " F2" or " F10" to enter BIOS (CMOS) setup utility.Notice: In order to boot from the Hiren’s Bootable USB stick, you must set the USB as first boot device from your BIOS settings.To do that: When Rufus operation is completed, close Rufus utility, unplug the USB stick and use it in the future to troubleshoot your computer.
Hirens bootcd 15.2.iso iso#
Wait until Rufus utility erases your USB stick and transfers Hiren’s Boot ISO files to it.ĩ. Read carefully the warning message and press “ OK”. Inside the “ Hiren’s Boot 15.2” folder, select the “ Hiren’s BootCD 15.2.iso” image file and choose “ Open”.Ĩ. Then click the icon next to “ ISO Image” entry to select the Hiren’s ISO Image file “ Hiren's.BootCD.15.2”.iso” from your computer.Ħ. At “ Create a bootable disk using” option, select “ ISO Image”.ĥ. Choose the empty USB stick that you plugged on your computer.Ĥ. Now double-click to run “ rufus” application.ģ. Remove all USB storage drives from your computer and plug an EMPTY* USB stick (minimum 1GB) to an empty USB port.Īttention: DO NOT leave your files on USB stick, because all files will be erased during this operation.Ģ. Create a bootable Hiren’s BootCD USB flash drive.ġ. Go to the official Rufus download page and download RUFUS USB Bootable Creator Utility to your computer. * Rufus is an excellent utility that helps to create bootable USB flash drives, such as USB keys/pendrives, memory sticks, etc.ġ. Step 2: Download RUFUS USB Boot Creator Utility*. When the Download is complete, right click on “ Hirens.BootCD.15.2.zip” file to extract it. Scroll the page down and click on “ Hirens.BootCD.15.2.zip” )Ģ. (Hiren’s BootCD Official Download page: ) Download Hiren’s BootCD to your computer. How to create a Hiren's Boot USB Flash Drive.
Hirens bootcd 15.2.iso how to#
In this article you will find instructions on how to put Hiren’s BootCD on a USB flash drive (stick) in order to troubleshoot computer problems in the future. I write this article because I use Hiren’s BootCD frequently to troubleshoot computer problems, specially when a computer doesn't boot anymore due to a virus attack or due to a corrupted file system. More specifically, HBCD contains hardware diagnostic programs, partition tools, data recovery utilities, antivirus tools and many other tools to fix your computer problems. Hiren’s BootCD (HBCD) is a bootable CD that contains a set of tools that can help users to fix their computer if their system fails to boot.
0 notes
Text
Rufus usb tool windows 7 ubuntu

#Rufus usb tool windows 7 ubuntu how to#
#Rufus usb tool windows 7 ubuntu install#
#Rufus usb tool windows 7 ubuntu 64 Bit#
#Rufus usb tool windows 7 ubuntu how to#
For how to use it, you can refer to the complete guide to Windows 10 Media Creation Tool.
#Rufus usb tool windows 7 ubuntu install#
I downloaded the Rufus open source writing tool from File Hippo website, and I downloaded Ubuntu 16.04.2 Desktop amd64.iso 1.4gb from I used Rufus to install Ubuntu to a Kingston Data Traveler 3.0 USB 60gb Device. It also enables users to create installation media such as a USB flash drive to perform a clean install and repair a problematic computer. Thanks for getting me on the road to creating a bootable USB device with Rufus. A lot of users use it to upgrade Windows 10 to the latest version. The app is just over 1MB in size and is notably faster than similar competitor apps such as the Windows 7 USB utility, Universal USB Installer, and UNetbootin. Rufus is a standalone app designed to format and create a bootable USB drive for a large variety of ISOs. Media Creation Tool is a free program developed by Microsoft. Utility to create bootable USB flash drives. You can even create a bootable USB drive that includes more than 2 operating systems. It allows users to create a bootable USB drive with Windows Setup, live Linux, offline antivirus, and other programs. Novicorp WinToFlash should be one of the best Rufus alternatives for Widows. It runs on Windows 7/8.0/10, but you can use it to create a bootable USB hard drive with standard Ubuntu if you have an ISO file of Ubuntu. It is designed to a raw disk image to a removable device. Win32 Disk Imager is another alternative to Rufus. This tool is compatible with Microsoft Windows, Linux, and macOS. It loads distributions either by downloading an ISO file or using an ISO file you’ve already had. You can also use UNetbootin, a cross-platform utility, to create live USB systems and load or install a variety of systems without burning a CD. Don’t download any programs from unreliable websites. To get these tools, you can visit the official website of them. They are similar to Rufus in features but they are different from Rufus at the same time. If you are unable to get Rufus or you don’t like this tool, you can try the following Rufus alternatives. It should recognise the installation media automatically during startup but you may need to hold down a specific key (usually F12) to bring up the boot menu and choose to boot from USB. To use it you need to insert the stick into your target PC or laptop and reboot the device.
#Rufus usb tool windows 7 ubuntu 64 Bit#
However, it is supported on Windows 7 or any later versions of 32 or 64 bit only, which means you cannot run Rufus on Mac or Linux.ĭon’t worry. You now have Ubuntu on a USB stick, bootable and ready to go. For example, if your PC runs into a problem and you want to reinstall the operating system, you can download an ISO file of the operating system and use it to create a bootable USB drive via Rufus, and then boot your PC from the USB drive to reinstall OS. It’s totally free and it doesn’t require any installation. Rufus is a tool that enables users to create bootable USB drives with ISO files.
0 notes
Text
How to create a bootable usb stick on ubuntu for mac

#HOW TO CREATE A BOOTABLE USB STICK ON UBUNTU FOR MAC HOW TO#
#HOW TO CREATE A BOOTABLE USB STICK ON UBUNTU FOR MAC FOR MAC#
#HOW TO CREATE A BOOTABLE USB STICK ON UBUNTU FOR MAC INSTALL#
#HOW TO CREATE A BOOTABLE USB STICK ON UBUNTU FOR MAC FOR WINDOWS 10#
Otherwise, use the Universal USB Installer (no longer available) provided by Tails. We used a 16 GB drive, but an 8 GB drive would have worked as well. You’ll also need a USB drive with enough storage capacity to set up persistence. But if you prefer to use a USB stick, please follow the instructions below. We would encourage Mac users to download Ubuntu Desktop Edition by burning a CD. That’s it When the process completes, you’ll be ready to restart your computer and begin installing Ubuntu. You’ll need a computer already running Ubuntu to perform this process. Select the USB stick in the bottom box and click ‘Make Startup Disk’.
#HOW TO CREATE A BOOTABLE USB STICK ON UBUNTU FOR MAC INSTALL#
Installation media for a Linux operating system such as Ubuntu, Sabayon, Redhat. Key Value Summary Use your Ubuntu desktop to create a bootable USB stick that can be used to run and install Ubuntu on any USB-equipped PC. How to Make a Persistent Ubuntu USB Drive on Ubuntu. How to: Create bootable USB stick on Mac from ISO, dmg or img file.
#HOW TO CREATE A BOOTABLE USB STICK ON UBUNTU FOR MAC HOW TO#
If you have a utility that you prefer, use that. RELATED: How to Create a Bootable Linux USB Flash Drive, the Easy Way. Windowsīefore you can create the USB, you need to download a utility to install your Tails image. Ubuntu - Create bootable USB (Ubuntu) -In this quick tutorial I am going to show you how to create a bootable usb stick for Ubunut in Mac OSX.If you find. The goal here is to create the first USB, the intermediary one, using the image that you just downloaded. Under New volume label, you can enter whatever name you like for your USB drive. Select your USB drive in Device Select Create a bootable disk using and the option ISO Image Right-click on the CD-ROM symbol and select the ISO file. This step is going to be different, depending on which operating system you’re using. Bootable USB with Rufus Open the program with a double-click. When the download finishes, you should automatically see a check on the page next to “Verify ISO image.” If you do, great! Your Tails ISO is downloaded and ready to go. The download will take a bit of time, so relax. The next button will light up purple, after the add-on installs. Based on Debian Linux, Ubuntu is estimated to be used on more than 26. The first will be highlighted purple, and it will prompt you to install the Firefox add-on. Ubuntu, a Nguni Bantu term meaning Human-ness, recently released version 14.04 LTS (Long Term Support) codename Trusty Tahr. Go to the Tails download page using Firefox. By far, the easiest is to use the Firefox add-on that the Tails project set up. This way you can follow along, even after you have to restart your computer. That computer will download Tails and create the first USB.įinally, you’re going to want to open this article on your phone. Write warnings.Next, you’ll need a computer running either Windows or Linux. Perform the following to configure your USB device in Rufus: Boot selection and Partition scheme. With a bootable Ubuntu USB stick, you can: Requirements. How do I create a bootable USB drive for Ubuntu?
#HOW TO CREATE A BOOTABLE USB STICK ON UBUNTU FOR MAC FOR WINDOWS 10#
What format should USB be for Windows 10 install?.
What is the best USB bootable software?.
Can I install Ubuntu directly from Internet?.
How do I install Ubuntu without deleting files?.
How do I install an ISO file without burning it?.
Press ESC when prompted and you will see 3 drives: the USB 3.0 drive, the live Linux USB drive (I am using Ubuntu) and the eMMC (the Chromebooks internal drive). Power on the Chromebook and press Ctrl + L to get to the BIOS screen.
How can I make a bootable USB for Windows 10? Plug in your live Linux USB into the other USB port.
#HOW TO CREATE A BOOTABLE USB STICK ON UBUNTU FOR MAC FOR MAC#
How do I make a bootable Ubuntu USB for Mac and PC?.
How do I create a bootable USB drive for Ubuntu?.
0 notes
Text
Recuva icare data recovery free pc inspector

Recuva icare data recovery free pc inspector install#
Recuva icare data recovery free pc inspector mod#
Recuva icare data recovery free pc inspector serial#
Note that with those 3 I'd suggest a sector X sector backup or clone 1st, just in case it makes things worse. Table Doc., or some of the Paragon apps that include rebuilding the MFT. When you do a deep scan a recovery app tries to piece together the chunks of data that made up individual files - one app **might** work better than another on a case by case basis, so if you want/need the deleted files badly enough, it's worth it trying several. Note that you may/may not see the folder itself - look for the files that were in it. #18: "I deleted a folder that was “too big for the recycle bin” Will this program be able to recover this? "īearing in mind that each write to the disk/partition with the deleted folder lessens your chances, it's certainly worth a try. About 1/2 the time re-install helped/worked. with the program launching it's registration window process. I had this happen on *virgin* Windows installs - I suspect it's a prob. #17: "When I installed iCare 4.0 over version 3.8 I did not get any “Register” button. External drives/devices work fine, though they're a bit slower usually, & more subject to AV software interference.
Recuva icare data recovery free pc inspector install#
#16: "FOR BEST RESULTS SAVE FILES TO A EXTERNAL DRIVE, STICK OR DISC."įWIW, the important thing is to not write to the drive/partition holding the lost files, or you might overwrite them, making recovery impossible - if you're recovering files from your system drive, it's best not to boot into that Windows install at all. for apps found in a special folder - as part of that process it can add registry entries, run scripts setting up an app etc. it takes ~10 minutes to create a bootable WinPE-like ISO, & when booted, it adds start menu shortcuts etc. Alternatively there are LiveXP packages that use/integrate portable apps. 4 yet, with prior versions I've used the format to store that registry key in the folder with the app - no registry writes nec.
Recuva icare data recovery free pc inspector mod#
The key is written to the registry, so the program is not truly portable."įWIW, while I haven't done testing with a mod of v. #10: "That means that the program could be distributed as a simple archive, without an installer, and work without problem from any folder. iCare doesn't leave that file view after you've recovered however many files, so you can make new selections & recover those too. When it's done scanning, which can take quite a long time, you're given a list of files you can try to recover. ICare Data Recovery works much like recuva & many (most?) other, similar apps - you tell it what to scan, click the button, & it parses the data it finds on that partition. if i click “recover”, will it scan the drive first or will it recover all the deleted data? i dont wanna recover all my data, just the selected ones." #5: "when i select advance recovery, there will be a “recover” button. ICare Data Recovery phones home, so unless the developers say otherwise, I'd *guess* probably.
Recuva icare data recovery free pc inspector serial#
#1: "Will it be possible to re-install the software after Windows reinstallation using given serial number?"
0 notes
Text
It goes without saying that CentOS 8 support with full updates ends in December 31, 2021. And thanks to the Open Source community which gave birth to Rocky Linux 8 operating system. Rocky Linux is a community enterprise operating system with the vision of being 100% bug-for-bug compatible with Red Hat Enterprise Linux 8 (RHEL 8). As of this article writing, the available downloads are for release candidate not deemed fit for Production use. In our recent article we discussed installation of AlmaLinux OS 8, which is already in GA. This could be your best bet if you need CentOS 8 alternative for running production workloads as at the moment. In this article we will cover a step-by-step installation of Rocky Linux 8.4 on a physical server, VirtualBox, VMware ESXi, VMware workstation, Xen or XCP-ng virtualization platform. Step 1: Download Rocky Linux 8 ISO image Visit Rocky Linux 8 releases page and select the latest available ISO image – Minimal, DVD, Begin the download of Rocky Linux 8 by choosing DVD or Minimal ISO file. For servers you can use minimal, and DVD for installation on Laptop or Home Desktop computer. # CLI download with wget # DVD wget https://download.rockylinux.org/pub/rocky/8/isos/x86_64/Rocky-8.5-x86_64-dvd1.iso #Minimal ISO wget https://download.rockylinux.org/pub/rocky/8/isos/x86_64/Rocky-8.5-x86_64-minimal.iso #Network install ISO wget https://download.rockylinux.org/pub/rocky/8/isos/x86_64/Rocky-8.5-x86_64-boot.iso Step 2a: Create Bootable USB Stick (Physical machine installation) Once the ISO image is downloaded you have two options: Create Bootable USB Stick media for installation on Laptops or physical server environments Create VM template with compute resources and attach ISO image to virtual CD drive For installation on Laptops and Desktops we need to create bootable USB stick. Using dd command on Linux: # Identify USB device $ lsblk # Flash Rocky Linux OS to USB drive $ sudo dd bs=4M if=./Rocky-8.5-x86_64-dvd1.iso of=/dev/sdx status=progress oflag=sync Where: /dev/sdx is the path to USB stick as shown by lsblk command ./Rocky-8.4-x86_64-dvd1.iso is the ISO image path, it can be absolute e.g /home/$USER/Downlods/Rocky-8.4-x86_64-dvd1.iso On Windows and macOS use tools such as rufus vs Etcher Step 2b: Create Rocky Linux 8 VM – In Virtualized Environment In a Virtualized environment – VMware Workstation/ESXi, VirtualBox, Xen or XCP-ng, you’ll initiate creation of a Virtual Machine with hardware specs that suit your desired use and attach ISO image for installation. VirtualBox Create a new VM and give it a name. Choose Linux for OS type and Red Hat 64-bit for Version. Finish creating the VM template. When done click on “Rocky-Linux-8 VM” > “Settings“ Select “Storage” and Disc plus sign under “Storage Devices” section. Choose “Add” to map Rocky Linux 8 ISO image. Browse and choose Rocky Linux 8 ISO file then use “OK” button to save the settings. VMware On VMware you can drag ISO file when initiating VM creation Or manually browse to ISO file directory and select Rocky Linux 8 ISO file. Xen | XCP-ng Choose “CentOS 8” template. Give VM a name: On “Installation Media” select Rocky Linux 8 ISO. If you don’t know how to upload check the guide Adding ISO Library Storage Repository in Xen XCP-ng. Step 3: Install Rocky Linux 8 on Physical machine|VirtualBox | VMware | Xen | XCP-ng Finish resource allocations to the Virtual Machine and start it. On a physical box, insert bootable USB stick and modify your boot options to boot from it. Initiate installation of Rocky Linux 8 on VirtualBox | VMware | Xen | XCP-ng by choosing one of the first two options. Choose the language to be used during installation of Rocky Linux 8. Storage configurations Select “Installation Destination” and hit enter. Select Local disk to be used and storage configuration that works for your needs. When done save the changes by clicking “Save” button.
Software selection Use “Software Selection” menu to select the Base environment for your installation You can also pick additional software components to be installed. Configure Hostname and Networking Use “Network & Host Name” to set this machine host name and IP information. Configure server’s host name as well. Turn on the network interface you want to use. If you have DHCP server in place it will automatically get an IP address assigned. Otherwise configure IP information manually. Configure Time and Date Select “Time & Date“ Set your region and City and enable NTP. Confirm both Time and Network settings are configured. Optionally choose a “Security Policy” you want to use. Set root password and create admin user Set a strong password for the root user. Input and confirm root user password: Select “User creation” to add first admin user account. Input all required user information and set password. Begin Rocky Linux 8 installation on VirtualBox | VMware | Xen | XCP-ng With all the settings saved start installation by clicking “Begin Installation“. The installer will start with disk partitioning based on selected scheme, then downloading of packages matching base environment. Packages installation on to the disk starts thereafter. Packages are installed and configured: When the installer finishes its work you can eject installation medium and reboot Rocky Linux 8 to start using it. Accept License Agreement. Finish configuration to start using Rocky Linux 8 OS. Login with username and password as configured. Check operating system release details from the terminal. $ cat /etc/os-release NAME="Rocky Linux" VERSION="8" ID="rocky" ID_LIKE="rhel fedora" VERSION_ID="8" PLATFORM_ID="platform:el8" PRETTY_NAME="Rocky Linux 8" ANSI_COLOR="0;31" CPE_NAME="cpe:/o:rocky:rocky:8" HOME_URL="https://rockylinux.org/" BUG_REPORT_URL="https://bugs.rockylinux.org/" ROCKY_SUPPORT_PRODUCT="Rocky Linux" ROCKY_SUPPORT_PRODUCT_VERSION="8" Update your Rocky Linux system: sudo yum -y update After successful installation of Rocky Linux 8 you can begin testing the OS and share any bugs you encounter with the Development team by joining the ~Testing channel on the Mattermost server. There’s also a testing topic on the forums for more durable conversation.
0 notes
Text
Adaucogit Salt V2 1 Keygen
Adaucogitsaltv21 Serial Coreldraw Graphics Suite X5 Serial Number Crack Software Mario Kart Double Dash Torrent Iso Games Super Robot Taisen J Rom English Patch Tafseer E Razi Urdu Cisco Vpn Pre Shared Key Decrypt Company Of Heroes Manual Activation Keygen Crack Carenado A36. Generating isometric views is an unreleased function of Adaucogit Salt, and it will be released in the next version of Salt. Now, let us take a glance at this feature. 128 likes 1 talking about this. Adaucogit Salt is a smart plug-in for AutoCAD software. Adaucogit Salt V2.1 Serial Numbers. Convert Adaucogit Salt V2.1 trail version to full. Adaucogit Salt uploaded Adaucogit Salt Tutorial – How to Get Keys Adaucogit Salt free download Adaucogit Salt keygen.
Memory Stick Drive Increaser Upto 4gb Software Cnet Adaucogit Salt V2.1 Keygen Windows Xp Service Pack 3 Build 5512 Final Download Dexter Gordon Swiss Nights Vol 2 Rar TAmil Serial Actress Priyanka Sucide The Peter Pan Syndrome Dan Kiley Pdf Dheere Dheere Naino Ko Song Download Mp3 Movie Rules Telugu Movies 2017. Lou Lou (The Mirror Conspiracy, 2000) 3:41 06. Sound the Alarm feat. Sleepy Wonder (Radio Retaliation, 2008) 3:57 07. Memory Stick Drive Increaser Upto 4gb Software Cnet here. Until the Morning feat. Dec 22, 2014 Thievery Corporation - Radio Retaliation (Full. Jul 25, 2012 Memory stick drive increaser 1gb to 4gb (Free Download) @ Mediafire link!! How to increase memory card size upto 16gb E-compression technology - Duration: 2:34. 4 GB Technology DDR2 SDRAM. Memory Stick, MultiMediaCard, SD Memory Card. Purchase an Office 2010 Product Key Card or disc to activate preloaded software on this PC.
Memory Stick Drive Increaser Upto 4gb Software Cnet 2017
Many users often facing with insufficient RAM memory problem on Windows 10 laptop, old PCs or tablets. A lot of cheap and old devices often decrease own performance because 1-4 Gb of RAM is not enough for comfortable machine functioning.
Memory Stick Drive Increaser Upto 4gb Software Cnet Download
Often it’s impossible to add RAM:
not all modern laptops or tablets give you access to the RAM (but some of them provide a way to upgrade it).
nowadays it’s pretty hard to find and purchase DDR/DDR2 modules for old machines.
Specially for such cases, Microsoft created ReadyBoost technology, which allows to use USB flash drives as the additional RAM source for your machine.
What is ReadyBoost technology?
Most likely, you’ve heard about Swap file in Windows. In case when the existing RAM is not enough for successful functioning, Windows operating system creates a special file on the hard drive, which is used to provide additional RAM. For sure, that’s a pretty useful feature! But in case of using Swap file, your PC starts decreasing performance because of low HDD write speed.
Since Windows Vista, developers presented a new technology – ReadyBoost. It allows to create a Swap file on flash drive or SD card which write speed is much faster than HDD. This feature is used in a recent Windows 10 builds too, so let’s take a closer look on its advantages and disadvantages.
Advantages of ReadyBoost
Ability to increase your machine performance without adding additional or new RAM modules. You can notice the changes, for example, when running office programs, image/video editors or games.
There is no need to use Swap file on your HDD. This will save some of its space and increases the system performance because your hard drive won’t be used for this purpose anymore.
Disadvantages of ReadyBoost
USB flash drive or SD card lifetime will decrease because of rough usage (estimated lifetime of modern USB flash drives with constant use of ReadyBoost cache for storage is about 10 years).
ReadyBoost allows you to use Flash memory to speed up the OS and applications startup due to a much smaller access time when reading and writing data to such memory. ReadyBoost doesn’t require high speeds, much more important is the short access time to flash memory, which is sometimes 10 times less than using HDD. The greatest performance gains are felt when reading 4kb blocks (up to 10 times faster than HDD). While reading large files the effect is lower. In most cases, ReadyBoost is effective when running applications when you need to load many small files and libraries. The greatest gains are achieved when using a slow hard disk (<7200 rpm).
What type of USB flash drive do I need to use?
Memory Stick Drive Increaser Upto 4gb Software Cnet Windows 10
To use the ReadyBoost technology, your USB or SD device must follow the requirements bellow:
Memory Stick Drive Increaser Upto 4gb Software Cnet Free
USB device must support USB 2.0 or USB 3.0;
Storage – from your device RAM level to 32 Gb (maximum size on NTFS-formatted USB drive for ReadyBoost). For example, in case you have 2 GB of RAM on PC, your USB flash drive capacity must be at least 2 Gb;
The USB flash drive must have at least 256 MB free space;
NTFS and FAT32 file systems are supported (on FAT32, the size of the ReadyBoost.sfcache cache file can’t be more than 4 GB due to file system limitations);
You can connect several USB flash drives to use it with ReadyBoost, but their overall capacity must be lower than 32 Gb on 32-bit systems and 256 Gb on 64-bit systems;
USB flash drive or SD card write speed – the faster the better. The USB device must support a speed of at least 3.5 Mbps when reading and 2.5 Mbps when writing to a random memory sector. There’s thousands of proposals, but we recommend you to try Samsung 32 GB or SanDisk 16Gb
Data access time is no more than 1 ms;
You can’t use ReadyBoost for an external USB 2.0 HDD.
Adaucogit Salt V2 1 Keygen Key
How to format USB flash drive or SD to use it with ReadyBoost?
Before using ReadyBoost you need format the drive by using the instructions bellow:
Connect USB flash drive or SD to your PC.
Go to File Explorer.
Find the needed USB flash drive in the list. Right click on it and choose Format.
Set the parameters as follows: File system: NTFS. Allocation unit size: 4096 bytes.
Press Start and wait until process finishes.
How to activate ReadyBoost?
Adaucogit Salt V2 1 Keygen X-force
After the USB drive was formatted, you need to configure it to use ReadyBoost.
Go to File Explorer.
Find the needed drive in the list. Right click on it and choose its Properties.
Now go to ReadyBoost tab.
Check on Use this device.
Set amount of additional RAM you prefer. Microsoft recommends to use 1:1—1:2,5 proportions (own RAM vs ReadyBoost). For example, if your device has 2 Gb RAM, you need to set the ReadyBoost value from 2 Gb to 5 Gb.
Click Apply.
It’s ready! Now your USB flash drive is used to increase PC performance.
Please note that the ReadyBoost feature requires the SuperFetch service to be enabled on Windows (the service is enabled by default, but some users disable it for various reasons). This service manages the disk cache in Windows and uses it to speed up the computer performance.
Open the service management console: Win + R > services.msc;
In the list of services find SuperFetch entry;
Make sure that the SuperFetch service is running (if it isn’t, start it and change the startup type to Automatic).
When a USB device is connected, Windows analyzes it for compliance for technical requirements. If your USB device is not compatible with ReadyBoost technology, the following message will appear on the ReadyBoost tab:
This device cannot be used for ReadyBoost.
ReadyBoost is no enabled because this computer is fast enough that ReadyBoost is unlikely provide additional benefit.
This means that your USB device has insufficient read-write speed, or you have a fairly fast computer, for example, with an SSD and sufficient RAM size (SSD is fast enough to outperform any USB drive).
If your USB device under test shows a random access speed less than 2.5 MB/s, or a random write less than 1.75 MB/s, Windows won’t approve such a device for using the ReadyBoost cache storage. There is a small trick that allows you to turn on ReadyBoost even if the system considers the USB flash drive is not insufficiently productive:
To do this, open the registry editor (regedit.exe) and go to the registry key HKEY_LOCAL_MACHINESOFTWAREMicrosoftWindows NTCurrentVersionEMDgmt;
Find a key with your USB device. Change the value of the following registry parameters:
Device Status = 2,
ReadSpeedKBs = 1000
WriteSpeedKBs = 1000
Reconnect you USB drive and try to turn on
However, in most cases such a trick won’t give a real increase in the computer performance by using a USB flash drive for cache.
Note. It’s important to notice that Swap file on flash drive is coded with the help of AES-128 algorithm, and ensures the security of your data.
The most important thing – never disconnect USB drive from your PC without following the instructions bellow. If not – you can damage USB flash drive and a port itself.
How to disconnect USB flash drive that is used for ReadyBoost?
In case you decided to stop using USB flash drive as an additional RAM or you just want to disconnect it for some reason, you need to follow these steps:
Go to File Explorer.
Find the needed drive in the list. Right click on it and choose its Properties.
Go to ReadyBoost tab.
Check on Do not use this device.
Click on Apply.
Disconnect the USB drive from PC safely by clicking Safely Remove Hardware in the System Tray.
What’s better: use ReadyBoost USB drive or upgrade the RAM?
ReadyBoost USB flash drive can increase your PC performance, but the effect won’t be the same as in case of purchasing the additional RAM. This technology is created to make Internet browsing more comfortable, to make applications run faster etc. In case you need additional RAM to meet the system requirements for heavy applications (for example, for gaming) – ReadyBoost won’t help you: the write speed of USB flash drive is significantly lower than RAM and you will be facing with low system performance all the time.
Thus, ReadyBoost technology allows you to boost performance of old machine in case you don’t want to purchase additional RAM modules. It also can boost your laptop or tablet which RAM cannot be upgraded (in this case it’s better to use SD card). Hope this was useful!
Open Drive Increaser 2 1GB,2GB to 4GB,8GB memory card converter Welcome. Welcome explorer to the world of speed up unlimited hacks. Drive increaser 2gb to 8gb free download? I want to increase my memory card memory 4gb to 8gb or 16gb to 32 gb Memory stick drive increaser.
Barcelona guide free; Luigis mansion nds; Popular Pages. Convert Your 1Gb Memory Card To 2Gb Free.
Memory Stick Drive Increaser Upto 4gb Software Download Cnet Download
Procedure to Convert your 1GB Memory Card Make sure to browse the correct drive when the application requests. Download Free Drive Increaser 4gb To 8gb Software 445 results Click Download to save Memory Stick Drive Increaser 1gb To 4gb Free Download Drive in free kingsoft. Oct 23, 2014 How To Convert 1GB To 2GB, 4GB To 8GB Memory Card or Pendrive. Step 2: Download Open Drive increaser software (see download Links at last).
DOWNLOAD Drive increaser Free Download, Drive increaser Software Collection Download. Memory stick drive increaser 1. Rar download at 2shared. Drive Increaser Upto 16gb Free. Drive Increaser Drive Increaser Upto 16gb; Drive Increaser 4gb To 8gb; Drive Increaser From 4gb To 8gb; Stick Drive. Memory stick drive increaser free download - DATAFAB USB to Memory Stick (LC1) Drive, Memory Stick, Format USB Or Flash Drive Software, and many more programs.
Drive Increaser 4gb To 16gb 1gb (Free Download) @ Mediafire link!! 1torrent for free, download. Perfect USB Data Recovery Software has more capability to recover USB data from your USB pen drive even your pen drive size 2GB, 4GB, 8GB, drive increaser. Memory stick drive increaser free download - DATAFAB USB to Memory Stick (LC1) Drive, Smart USB Drive - Wireless Memory Stick, Format USB Or Flash Drive Software. Memory Stick Drive Increaser 1 2 Oct 2014 I want converter software for usb 1gb re back in. Start Market again. Main hoon ek balatkari mp3 free download dangdut koplo. Memory stick drive increaser.
CLICK FOR DRIVE INCREASER 8GB software, free download Download Free Memory Stick Drive Increaser 1gb To 4gb. 8gb Usb Flash Drive Increaser 4gb To 8gb Memory.
How to Convert your Memory Card or pendrive from 1gb or 2gb to 4gb is the tutorial for free Hello is there a drive increaser to convert from small.
logobossie.netlify.com › Adaucogit Salt V2 1 Keygen Idm ▀ ▀
Adaucogit Salt V2 1 Keygen Idm 1
Adaucogit Salt software is a plug-in for AutoCAD (2008 - 2012). It makes your AutoCAD (2008 - 2012) software convert 2D drawings to 3D solids automatically. It also makes AutoCAD dimension engineering drawings automatically and professionally.The automatic/semi-automatic modeling (2D to 3D) functions of Adaucogit Salt provide easy way to create or modify 3D solids from 2D orthogonal drawings directly, and the automatic dimensioning function has the ability to dimension engineering drawings in seconds. There are also some other useful functions included in Adaucogit Salt, such as intuitive layer operation functions which allow users to handle hundreds of layers easily. Adaucogit Salt software is a plug-in for AutoCAD (2008 - 2012). It makes your AutoCAD (2008 - 2012) software convert 2D drawings to 3D solids automatically. It also makes AutoCAD dimension engineering drawings automatically and professionally.The automatic/semi-automatic modeling (2D to 3D) functions of Adaucogit Salt provide easy way to create or modify 3D solids from 2D orthogonal drawings directly, and the automatic dimensioning function has the ability to dimension engineering drawings in seconds.
There are also some other useful functions included in Adaucogit Salt, such as intuitive layer operation functions which allow users to handle hundreds of layers easily. Full Specifications What's new in version 2.1Version 2.1 improved automatic 3D modeling function.GeneralPublisherPublisher web siteRelease DateSeptember 13, 2011Date AddedSeptember 21, 2011Version2.1CategoryCategorySubcategoryOperating SystemsOperating SystemsWindows XP/Vista/7Additional RequirementsAutoCAD 2008 - 2012Download InformationFile Size31.62MBFile Nameadaucogitsaltv21.exePopularityTotal Downloads10,800Downloads Last Week2PricingLicense ModelFree to tryLimitations30-day trialPrice$249.89.
Here you can download mc solaar prose combat Shared files found. File sharing websites like 4shared.com, uploaded.to, mediafire.com. Ford Repair Manual Pdf. Com (100 MB), MC Solaar - Prose Combat.zip hosted on mediafire.com 111.64 MB, Mc solaar prose combat fr cd 1994. Mc Solaar Prose Combat Rar Download 8,1/10 4117votes. Mc solaar prose combat shared files: Here you can download mc solaar prose combat shared files. If you have trouble downloading MC Solaar - Solaar Pleure.mp3 hosted on mediafire.com 4.47 MB, mc solaar - qui seme le vent recolte le. MC Solaar - Prose Combat (1994). Resultado de imagen para MC Solaar - Prose Combat. Le Free Stlye D' obsolete. La Claire Fontaine.
IDM Patch 6.28 Build 5 DownloadIn this post our team is providing a latest version of Internet Download Mnager. IDM Patch 6.28 Build 5 Download With Crack 2017 free is here. IDM Patch Plus crack is a download manager.
Adaucogit Salt V2 1 Keygen Idm 7
So PcKeySoft Team is full latest version of this software. This version is providing high speed downloading facility. IDM Patch 6.28 Build 5 is very high speed working. With the help of this software users can easily download any file, songs, movies, music, documents, images, TV shoes and much more from internet. Our Team is also provide a real IDM Serial key in old post of IDM Crack. Now This site is giving Crack and Patch of IDM Patch 6.28 Build 5.
0 notes
Text
Download usb format tool for windows 8 free.Free USB RAW Format Tool Download: Easily Format RAW Drive in Windows
Download usb format tool for windows 8 free.Lexar Usb Format Tool Free Download
Oct 20, · Download IM-Magic Partition Resizer Free Edition to format disk/usb/memory card totally free of charge. Format, repair bad blocks totally free of charge. Must have: it has 'Check Partition' function to check and repair possible errors for your digital devices. Use the media creation tool (aprx. MB) to download Windows. This tool provides the best download experience for customers running Windows 7, and Tool includes: File formats optimized for download speed. Built in media creation options for USBs and DVDs. Optional conversion to ISO file format.
https://bit.ly/3231yDr
https://bit.ly/327W0aY
https://bit.ly/34V2E5n
https://bit.ly/3qwboaz
https://bit.ly/3fr96mL
https://bit.ly/3nrnsaP
https://bit.ly/3I91Xnb
https://bit.ly/3KeSRaf
https://bit.ly/3rqepYW
https://bit.ly/322OXAj
- Download usb format tool for windows 8 free
https://bit.ly/3qzkN0I
https://bit.ly/3qxPFPx
https://bit.ly/3FwXE3s
https://bit.ly/33m640w
https://bit.ly/34W4R0r
https://bit.ly/3qwjKyT
https://bit.ly/3FvdYBB
https://bit.ly/3rpKXCm
https://bit.ly/3KfOBr9
https://bit.ly/33mnIBi
Another great alternative among the best USB format tools is HP USB Disk Storage Format Tool, another completely free tool. It's extremely limited in what you. 11 Best Free USB Flash Drive Format Tool For Windows · Windows Format Tool · Windows Command Line Formatter · Windows Disk Management · HP USB Disk Storage Format. планина Прехвърли сезон HP USB Disk Storage Format Tool - Free download HP USB Format Tool Portable Free Download for Windows 11,10,8,7.
Download usb format tool for windows 8 free.Hp Usb Disk Storage Format Tool Free Download Windows 8
Sep 11, · Preparation: Insert your usb drive or sd card to Windows 10 computer for example, download free fat32 format tool, and open it. Download FAT32 Formatter. Step1. Right click the storage media that you want to get it formatted, and . Jan 30, · Download USB Flash Drive Format Tool for Windows to format USB flash drive securely and create bootable USB stick to install Windows. USB Flash Drive Format Tool has had 0 updates within the past 3/5(4).
https://bit.ly/3nuot28
https://bit.ly/3GxUHB0
https://bit.ly/3tw6HPB
https://bit.ly/3tC0ylj
https://bit.ly/3rpwRRs
https://bit.ly/3qt33UX
https://bit.ly/3I3U5Dm
https://bit.ly/3Kf4ldT
https://bit.ly/3fuOUQF
https://bit.ly/3qubSxN
Developed and released by Hewlett Packard, the software resembles the native Windows disk management version in appearance to make the user experience convenient for those download usb format tool for windows 8 free acquainted with the Windows system.
Instead of going through the installation process, you just download the manager before quickly beginning use of the platform. Along with resolving storage issues on PC disks, the application does not require источник статьи memory. In the first dropdown menu, you can choose the preferred device to format, namely a disk, hard drive, etc. The program does not require users to name the content to continue. The HP app provides the ability to compress посетить страницу to create more space on the device.
When the box is selected, a dropdown menu will appear to let you access the browsers and choose either the internal or external locations of system files.
A warning message will appear to notify you that the data on the disk or drive will be lost. At this point, you are able to proceed or cancel the format. A completion message will pop up on the screen when the procedure comes to an end.
The notification will посетить страницу you different types of information related to the device, new file system, volume number, and measurements on the newly processed disk or USB flash drive. By opening up the settings for the PC, you can view the updated changes made to the system and partitions.
Once the disk or drive is cleaned and converted, you can continue with the formatting operation in the HP tool. The removal of the write protection will let you boot the disk or drive. The program can run on both bit and bit operating systems.
The user interface is simple and comprises a single window. The application launches and loads quickly 0.9 free redsnow windows download 4 of the compact size. Since the development company made the convenient program advertisement-freethere is heightened security for your personal information. Along /892.txt the HP platform, the aforementioned programs let you download usb format tool for windows 8 free disks and drives.
All of the utilities are offered for freeand Etcher and Rufus are open source. The entirety of these apps is compatible with Windows PC operating systems.
The latter is not accessible on Apple Mac devices. You can easily navigate through the app, because the UI includes only one window with all of the information visible. The minimalistic design results in a light application that can format, compress, and boot disks and drives. Hewlett Packard has updated the platform to be compatible with the recent operating systems that Microsoft releases. Do Not Use. Download usb format tool for windows 8 free is a tool with serious bugs.
It crashed two of my hard drives. All I did was download usb format tool for windows 8 free at selection of drives that were available fo r formatting and Wham!
Do Not use this tool or you will be sorry!! I have my bootable pendrive to normal pendrive back Thankyou for sharing this HP usb tools. I need windo ws Xp sp3 install so far. Its better software for me. Who have no DVD drive. Thankyou for sharing this HP Usb tools. Laws concerning the use of this software vary from country to country. We do not encourage or condone the use of this program if it is in violation of these download usb format tool for windows 8 free.
In Softonic we scan all the download usb format tool for windows 8 free hosted on our platform to assess and avoid any potential harm for your device. Our team performs checks each time a new file is uploaded and periodically reviews files to confirm or update their status. This comprehensive process allows us to set a status for any downloadable file as follows:. We have scanned the file and URLs associated with this software program in more than 50 of the world's leading antivirus services; no possible threat has been detected.
Based on our scan system, we have determined that these flags are possibly false positives. It means a benign program is wrongfully flagged as malicious due to an overly broad detection signature or algorithm used in an antivirus program.
Do you recommend it? Softonic review. Kristina Schulz Updated a year ago. FAT32 Format 1. USB Repair Any Drive Formatter 2. Leave a по ссылке. This is embarrassing Try this instead.
https://bit.ly/3rlrLWs
https://bit.ly/3tvrcvP
https://bit.ly/3FyJPSf
https://bit.ly/3fpAgKJ
https://bit.ly/3tBvOkp
https://bit.ly/3GzAXNq
https://bit.ly/3FwCDpA
https://bit.ly/3I5IBPW
https://bit.ly/3rpe7Bw
https://bit.ly/3Gxdi05
0 notes
Text
Windows 7 usb/dvd download tool unable to copy files 99 無料ダウンロード.Windows 7/8.1のISOイメージファイルをDVDやUSBメモリへ書き込むMicrosoft公式ツール
Windows 7 usb/dvd download tool unable to copy files 99 無料ダウンロード.Unable to copy files using windows 7 usb/dvd download tool

ウィザード形式で簡単にブータブルメディアを作成.Windows USB/DVD Download Tool - Microsoft Store
To make a copy of your Windows ISO file: 1. Click the Windows START button, and click WINDOWS USB/DVD DOWNLOAD TOOL in the ALL PROGRAMS list to open the Windows USB/DVD Download Tool. 2. In the SOURCE FILE box, type the name and path of your Windows ISO file, or click BROWSE and select the file from the OPEN dialog box. Click NEXT Jun 18, · Alternatively, you can run Microsoft USB/DVD Download Tool again to prepare the bootable media and automatically copy all files to the USB. RECOMMENDED: Download PC Repair tool to quickly find and fix Windows errors automatically The Windows USB/DVD Download tool allows you to create a copy of your Windows 7/8 ISO file on a USB flash drive or a DVD. To create a bootable DVD or USB flash drive, download the ISO file and then run the Windows 7 USB/DVD Download tool. Once this is done, you can install Windows 7 or Windows 8 directly from the USB flash drive or DVD
Windows 7 usb/dvd download tool unable to copy files 99 無料ダウンロード.Unable to copy files using windows 7 usb/dvd download tool - Microsoft Community
Jun 18, · Alternatively, you can run Microsoft USB/DVD Download Tool again to prepare the bootable media and automatically copy all files to the USB. RECOMMENDED: Download PC Repair tool to quickly find and fix Windows errors automatically Mar 03, · Windows 7 USB/DVD Download Tool we are unable to copy file. i solved it for me. the problem was, that W7U/DDT can write/copying the files if you Anti-Virus-Software (i have avira antivir pro) protects (autostart) functions. deactivate the autostart- protection for the time you need to create the stick. good luckEstimated Reading Time: 2 mins Nov 27, · Windows 7 Usb Download Tool Free; Windows 7 Usb Dvd Download Tool Unable To Copy Files To Word; Mar 06, Unable to copy files using windows 7 usb/dvd download tool Hi, my dvd drive is not reading the disc. So i guess some problem in drive or in os
You have to start command prompt as an Administrator On Windows 7 that means right clicking the cmd and selecting Run as Administrator and use the diskpart utility. Instead of formatting the partition with FAT32, you can also use NTFS like WUDT does , but then you need an extra step to make the drive bootable:.
exe can be found on the Windows 7 DVD in the boot folder. Some USB stick, at least, appeared to be slower with NTFS. Please click on Helpful and Mark as Answer if your issue is solved. Was this reply helpful? Yes No. Sorry this didn't help. Thanks for your feedback.
Choose where you want to search below Search Search the Community. Search the community and support articles Windows Windows 7 Search Community member. my dvd drive is not reading the disc. so i guess some problem in drive or in os. currently i have pre-installed vista home premium 32 bit and planning to install windows 7 professional bit.
so planning to boot windows 7 from usb device. Status : we were unable to copy your files. Please check your USB device and the selected ISO file and try again. This thread is locked. You can follow the question or vote as helpful, but you cannot reply to this thread. I have the same question Subscribe Subscribe Subscribe to RSS feed. Report abuse. Details required :. Cancel Submit. Finally i found the solution to my own post and here is the solution for it.
I hope it will help some other user who are facing the same problem. Sometimes if your USB stick has something in its MBR you might get the error. Instead of formatting the partition with FAT32, you can also use NTFS like WUDT does , but then you need an extra step to make the drive bootable: Bootsect. How satisfied are you with this reply? Thanks for your feedback, it helps us improve the site. Replies . A subscription to make the most of your time. Try one month free. This site in other languages x.
0 notes
Text
International Master Diagnostics Keygen Torrent
This domain name is for sale (100,000 USD): uploading.com Write us for more information @. AVS Audio Editor Import or record audio, cut audio, apply cool effects and. Boot Creator 3. Pro Key Archives. SARDU Multiboot Creator build a multiboot USB stick (or other removable) for PC and Mac with Utilities, Antivirus.

International Master Diagnostics Keygen Torrent Download
All download links are direct full download from publisher sites or their selected mirrors. Avoid: oem software, old version, warez, serial, torrent, keygen, crack of. Jan 30, 2021 — In short, the Wabco Toolbox software provides complete functionality for everything. Meritor Wabco v12 Software — Now Available! International Master Diagnostics Keygen Free. 0 Comments Kakapoes had early forerunned toward the foretime aforementioned lorette. Valid overdoses will be. Detroit Diesel Diagnostic Link 8.01 (DDDL 8.01)+Activation Tool(keygen) I. Introducing DDDL 8.1 basic features - This application is the electronic tool for servicing Detroit Diesel? S EPA07, EPA10, and GHG14 equipped engines (S-60, MBE4000.
Download Crack AVS Disc Creator 5.2 Crack + Activation Serial Number Final Download Full Version For Free AVS Disc Creator 5.2 Crack allows you to record files of all kinds, whether they are MP3, WMA, videos or files of any kind on. Of course, it is also possible to make exact copies of any support or easily burn an image in ISO format. It can be performed with a recorder of CD/DVD and AVS Disc Creator plu Activation Serial Number. In addition, all of them with specialized utilities and perfectly refined so not fail any disc and run everything 100%. Sonic Generations Fan Game Demo 2. The application allows you to create a backup CD/DVD formats, CD-R/RW, DVD +/-r, DVD +/-r, DVD-RAM and Dual Layer DVD.
International Master Diagnostics Keygen Torrent Downloader
Install gvlk key kmspico activator windows 10. International Master Diagnostics Keygen For Mac. Diablo 2 Resolution Patch. Centex Hometeam Security Manual. Red Alert For Mac. Haunted Hotel 5: Eclipse Collector`s Edition. Cfg80211/nl80211: Add Api For Mac. Torrents Desperate Housewives Saison 5 Episode. Skyneos Keylogger V1.0.
International Master Diagnostics Keygen Torrent Downloads
But this technology also supports Blu-ray disc player (BD-R and BD-RE) and also allows you to perform ISO images files directly from your hard drive. Mustafa game for android apk.
0 notes