#xfce4-power-manager
Explore tagged Tumblr posts
Visit Tumblr Blog
Explore Tumblr blogs with no restrictions, modern design and the best experience.
Last Seen Tumblr Blogs


Fun Fact
Tumblr was the first site to host the blog for President Barack Obama in 2011.
Text
i love my computer because have i spent countless hours tweaking little things like my vim tab spacing? yes. did i also only just get a lockscreen working? also yes
28 notes
·
View notes
Text
Editar descripcion del plugin xfce4-power-manager
Hace mucho tiempo vengo utilizando el entorno de escritorio XFCE, principalmente por su bajo consumo de recursos, versalitidad y personalización. Esto me ha llevado a múltiples inconvenientes que he tenido que resolver. Uno de los que más me hizo sudar está relacionado con el famoso plugin de la batería xfce4-power-manager.
Resulta que este plugin presenta el icono de una batería a secas. Al menos así era en las distros que había probado. Pero me topé en un momento con que al desconectar la laptop del tomacorriente, dado que ya tenía batería suficiente, me apareció como por arte de magia el tiempo restante de carga de la batería y el porcentaje de la misma. Hay quienes esto le pueda ser útil, pero la realidad es que a mi me resultaba molesto porque en una netbook con pantalla de 10 pulgadas ocupaba mucho espacio en la barra de aplicaciones.

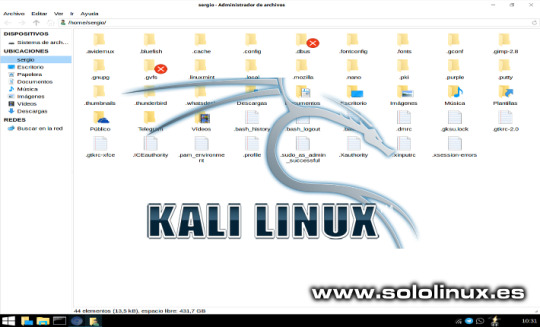
Así es como se visualizaba el plugin
Ante esto encontré dos posibles soluciones, una gráfica y otra por consola.
1. Solución gráfica
Nos dirigimos al Editor de configuración de XFCE (en la sección Configuración del menú de aplicaciones), o bien tipeando xfce4-settings-editor en una terminal. Creo que la ventana es por demás sencilla de entender. Buscamos en la columna Canal donde dice xfce4-power-manager, como muestra la imágen a continuación:

Marcada la opción a editar
Una vez seleccionada, vemos del lado derecho una opción dentro de este canal, el cual es show-panel-label. Ahora nos centraremos en la columna Valor. Y aquí va una breve explicación:
Valor 0: El plugin solo mostrará el ícono de la batería
Valor 1: El plugin mostrará el ícono de la batería y el porcentaje de carga
Valor 2: El plugin mostrará el ícono de la batería y el tiempo de carga restante (cuando esté desconectada del tomacorrientes)
Valor 3: Muestra todo, ícono de la batería, porcentaje de carga y tiempo de carga restante
Simplemente queda editar el valor que prefieras, clickeando el botón Editar o haciendo click en la casilla del valor a modificar, en mi caso le coloqué 0, dado que solo quería el ícono.
NOTA: En mi caso no pude usar la opción gráfica, dado que no me aparecía dentro del canal la opción correspondiente. No te alarmes, la opción que sigue muy probablemente solucione el inconveniente.
2. Solución por consola
Lo primero como podrás adivinar es abrir una terminal. Una vez dentro, el comando que utilizaremos es el siguiente:
xfconf-query -c xfce4-power-manager -p /xfce4-power-manager/show-panel-label --create -t int -s 0
Vamos a explicar rapidamente de qué trata todo esto. Para eso que mejor que consultar la ayuda al comando tipeando xfconf-query --help.
Uso: xfconf-query [OPCIÓN…] - Utilidad de línea de órdenes del Servicio de configuración de Xfce Opciones de ayuda: -h, --help Mostrar opciones de ayuda Opciones de la aplicación: -V, --version Información de versión -c, --channel El canal a consultar/modificar -p, --property La propiedad a consultar/modificar -s, --set El nuevo valor a establecer para la propiedad -l, --list Listar propiedades (o canales si -c no se especifica) -v, --verbose Salida detallada -n, --create Crear una nueva propiedad si aún no existe -t, --type Especificar el tipo de valor de la propiedad -r, --reset Restablecer propiedad -R, --recursive Recursivo (usar con -r) -a, --force-array Forzar vector incluso si solamente hay un elemento -T, --toggle Invertir una propiedad booleana existente -m, --monitor Monitorizar un canal para encontrar cambios de propiedades
En resumen, estamos creando dentro del canal xfce4-power-manager la propiedad show-panel-label (si es que no existe) y asignandole un valor del tipo entero de 0 (cero). ¡Lo mismo que en modo gráfico! Pero en una sola línea de código.
Como dije en la sección anterior, el último valor puede ser modificado a nuestro antojo de acuerdo a lo que querramos. Por ejemplo, si queremos que además del ícono de la batería se visualice el porcentaje de carga de la misma, el comando debería variar levemente de la siguiente forma:
xfconf-query -c xfce4-power-manager -p /xfce4-power-manager/show-panel-label --create -t int -s 1
Eso es todo por hoy. Espero les sea de utilidad, no olviden compartir con sus amigos linuxeros y nos vemos cuando me lean!
3 notes
·
View notes
Text
Xfce4 power manager

#XFCE4 POWER MANAGER HOW TO#
Uname -a: Linux Hermes 4.8. Version-Release number of selected component (if applicable): xfce4-power-manager- How reproducible: always Steps to Reproduce: 1. If I kill the process, my script works fine. there is no xfce4-power-manager running but it is xfce4-power-man pgrep xfce4-power-man 657. This power manager for the Xfce desktop enables laptop users to set up a power profile for two. 00:00:00 /bin/sh /etc/xdg/xfce4/ xinitrc - vt 00:00:00. Required packages Xfce Power Manager depends on the following packages: - Gtk 2.24 or above. and then starts the session manager xfce4-session. In addition, xfce4-power-manager provides a set of freedesktop-compliant DBus interfaces to inform other applications about current power level so that they can adjust their power consumption. Are you certain the xfce4-power-manager is running pgrep xfce4-power-manager. 8.6 Starting Xfce Xfce is a lightweight desktop environment based on GTK+ it is particularly well.
#XFCE4 POWER MANAGER HOW TO#
The problem is, regardless of whether I check the box in xfce4-power-manager, the former sets up keybindings for the brightness keys that I do not know how to overwrite. If logind-handle-lid-switch is false then what you do to nf shouldn't have an effect. If you use with purge options to xfce4-power-manager package all the configuration and dependent packages will be removed. I want to make my own script to handle brightness.
0 notes
Text
Xfce4 power manager

XFCE4 POWER MANAGER WINDOWS
On the other hand, have you seen it’s popup menu? it goes on till infinity (well, not really it’s much more concise then your typical app’s menubar, but the popup six submenus, one subsubmenu (which is comparable to Nauti’s menubar)).
XFCE4 POWER MANAGER WINDOWS
ROX-Filer’s iconplacement is unclutterable (that is, you can’t disable autoarrange), and by default new windows replace old ones (configurable or you can middle click). I find that to be the case with Nautilus. Some people like it (much, much faster-no need to aim for anywhere, just click less screen real estate stolen more internally consistent because there’s only one menu) others don’t (not discoverable jarring switch from entirely context-sensitive introduced by former Risc OS pogrammers/users into Microsoft Word aka less externally consistent unless all you need to do is extract archives, manage files, view images, browse the web w/out CSS, and edit text files am surprised that you find ROX-filer UI cluttered. Because there’s no menubar, everything that would be in the menubar in a typical application either cannot exist or has to go into the pop-up. For instance, there is no menubar only a pop-up menu. I think you’re getting confused by the fact that ROX has a different UI from what you’re used to. (And the small nature of the ROX community means it’s able to move very quickly, and it adopts many fd.o standards before either KDE or Gnome (I don’t know what Xfce is like in that is only slightly faster, and it’s user interface is cluttered and inconsistent, IMHO.” They both use GTK+, they both put the default button on the right, they both use instant apply, they both aim to comply with ’s standards. Which is not to say it’s totally independent. If Gnome adopted ROX-Filer, Gnome would become a fork of ROX, or ROX-Filer would lose what makes ROX-Filer ROX-Filer. ROX-Filer is the centrepiece of the ROX Desktop it does not and never will comply with the Gnome HIG, instead complying with the ROX Style Guide, for instance. Secondly, ROX-Filer could never be in Gnome unless ROX and Gnome merged. (Though your distribution’s version of Gnome might have done it differently.) Just as Epiphany replaced Galeon as the default browser under GNOME.įirstly, Galeon as never the default browser under Gnome. I would recommend that it be made the default file manager for GNOME instead of Nautilus if there are no licensing issues.
0 notes
Video
youtube
Manjaro 18.0 XFCE Edition - See What's New
Manjaro 18.0 Xfce Edition is official Manjaro Linux flavour with XFCE 4.13 as default desktop environment include Xfce4 component.
Powered by the latest Long-Term Support of Linux Kernel 4.19, include pamac version 7.3. in manjaro 18.0, The Manjaro Settings Manager (MSM) now provides an easy-to-use graphical interface for installing and removing the many series of kernels. At the time of this release, eight kernel-series are available directly from our binary repositories, from 3.16 series to the latest 4.19 release.
Manjaro 18.0 Xfce Edition : https://manjaro.org/download/xfce/
7 notes
·
View notes
Text
Cómo instalar el modo Kali Undercover en cualquier linux
Cómo instalar el modo Kali Undercover en cualquier linux con XFCE. Si recuerdas el articulo donde presentamos la ultima versión de Kali, vimos la novedosa opción anti-miradas Kali Undercover. Tal vez te resulte gracioso lo de anti-miradas, pero la verdad es que es muy útil. Estas a la espera de un vuelo, en el tren, en un restaurante, y tu con Kali linux. Lo bueno de esto, es, que solo tu sabes el sistema operativo que utilizas, las miradas indiscretas pensaras que eres otro de tantos con su windows 10. Comprobado personalmente con resultados óptimos, jajaj. Con esta herramienta, obtienes una apariencia prácticamente igual a windows (modo encubierto de Kali), y tan solo haciendo click en un icono que encontraras en tu menú de aplicaciones. Lo bueno del modo Kali Undercover es que lo puedes instalar en cualquier distribución linux siempre que utilices el entorno de escritorio XFCE. Observa el antes y el después en las siguientes imágenes. Kali Undercover sin habilitar:
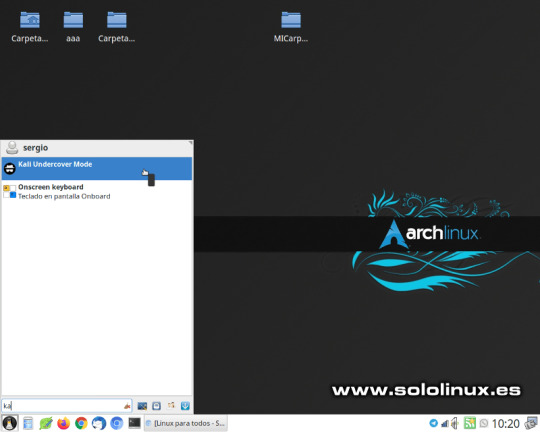
Activar modo Kali Undercover Kali Undercover habilitado:

Kali Undercover habilitado Impresionante verdad?. En este articulo vemos como instalar Kali Undercover en cualquier distribución linux que haga uso del entorno de escritorio XFCE.
Cómo instalar el modo Kali Undercover
Antes de comenzar la instalación conocemos sus principales características. Fabuloso tema imitando Windows 10 creado en GTK por B00merang-Project. Iconos como los de Windows 10. Fondo de pantalla de Windows 10. Opera con un script Bash y dos Python que modifican temporalmente algunas configuraciones del escritorio Perfil personalizado de Xfce. Configuración del menú personalizada como en Windows. Instalar Kali Undercover Si eres usuario de Ubuntu, Debian, Linux Mint y derivados, estás de suerte. Solo debes abrir está pagina y descargar la ultima versión, en nuestro ejemplo kali-undercover_2020.1.0_all.deb. Una vez descargado el archivo haces clic para instalar. y listo.

Instalar Kali Undercover Instalar el modo Kali Undercover en otras distribuciones linux, también es tarea sencilla, lo único es asegurarte de que tienes instaladas las siguientes dependencias (verifico que en Manjaro vienen instaladas por defecto). fonts-liberation, gir1.2-glib -2.0, libnotify-bin, procps, psmisc, xfce4, xfce4-power-manager-plugins, xfce4-pulseaudio-plugin y xfce4-whiskermenu-plugin Ademas necesitas tener instalado GIT, si no recuerdas como revisa esta anterior articulo. Una vez instalado GIT, clonamos el repositorio oficial. git clone https://gitlab.com/kalilinux/packages/kali-undercover Desde la consola /terminal abre la carpeta donde clonaste el repositorio, y ejecutas los siguientes comandos. sudo cp -r share /usr/ sudo cp bin/kali-undercover /usr/bin/ Ya lo tienes instalado, ahora tan solo debes ejecutar el icono desde tu menú de aplicaciones, para salir del modo Kali Undercover debes operar de la misma forma. Desde el menú de aplicaciones de tu flamante Windows 10, jajajaj, pulsas en otras, y Kali Undercover mode.

Salir de Kali Undercover Apúntate a nuestros canales de Telegram: SoloLinux y SoloWordpress. Espero que este articulo te sea de utilidad, puedes ayudarnos a mantener el servidor con una donación (paypal), o también colaborar con el simple gesto de compartir nuestros artículos en tu sitio web, blog, foro o redes sociales. Read the full article
#debian#distribucionlinux#git#InstalarKaliUndercover#kali#KaliUndercover#LinuxMint#Manjaro#modoKaliUndercover#ubuntu#windows#windows10#xfce
0 notes
Text
Simple power manager daemon?
Simple power manager daemon?
[ad_1]
Does anyone know of a simple and customizable daemon that could: – manage power settings – automatically lock the screen after a timer – suspend/hibernate on battery level …?
I'm running dwm and would like something simple without dependencies on gnome, kde or xfce subsystems.
For instance, xfce4-power-manager seems simple enough but you have to run the xfconfd daemon too and it seems like…
View On WordPress
0 notes
Text
Fényerő szabályozás Xubuntu 18.04-ben
Probléma: Frissítés vagy telepítés után nincs lehetőség a laptop kijelzőjének fényerő szabályozására a panelről. Megoldás: Az xfce4-power-manager-plugins telepítése után adjuk hozzá a panelhez az Energiakezelő bővítményt. Ezután a szokott módon, egérgörgővel állítható a kijelző fényereje.
0 notes
Text
Google Gains Approval to Launch Project Soli, Sony's New 3D Sensors for Face Recognition, the GIMP Team Looks Back at 2018 and Shares Plans for 2019, Thunderbird Also Publishes a Retrospective and Look Forward, and xfce4-panel 4.13.4 Was Released
News briefs for January 2, 2019.
Google has received approval from the FCC to launch Project Soli, a radar-based motion-sensing device. Reuters reports that the FCC "would grant Google a waiver to operate the Soli sensors at higher power levels than currently allowed. The FCC said the sensors can also be operated aboard aircraft. The FCC said the decision 'will serve the public interest by providing for innovative device control features using touchless hand gesture technology.'" Originally Facebook had voiced concern that "the Soli sensors operating in the spectrum band at higher power levels might have issues coexisting with other technologies."
Sony is set to produce the "next generation of visual-processing chips with a set of new 3D sensors". According to The Verge, "the most intriguing aspect of this new tech would appear to be a better form of face identification than we currently have". In addition, Sony's 3D sensor "is said to deploy laser pulses, which, much like a bat's echolocation, creates a depth map of its surroundings by measuring how long a pulse takes to bounce back. Sony's sensor chief argues this produces more detailed models of users' faces, plus it apparently works from as far away as five meters (16 feet)."
The GIMP team has posted look back at 2018 and an outline showing future plans for GIMP, GEGL and babl. Development has been focusing on refactoring, usability, smart colorization, extension management and more. The team plans to ship 2.10.x updates throughout 2019 and version 2.10.10 should be out this month or next. See the blog post for ways you can contribute.
The Thunderbird team has also published a 2018 retrospective and a look at what's ahead for the new year. The team has added more full-time staff members, and they are focusing on "making Thunderbird fly faster" and making a "more beautiful (and useable) Thunderbird". See the Mozilla blog for all the details.
xfce4-panel 4.13.4 was released today. According to the Simon's Secret blog post, this release includes a new plugin icon size feature, correct menu positioning, tasklist fixes and small theming updates. You can get it from here.
Google
Sony
GIMP
Thunderbird
XFCE
News
http://bit.ly/2AqnJmb via @johanlouwers . follow me also on twitter
0 notes
Video
youtube
MX Linux 18 Continuum - See What's New
MX Linux 18 codename Continuum has been released, this release features Xfce 4.12 as default environment include xfce4 component, based on Debian 9.6 scratch and powered by Linux Kernel 4.19 series.
MX Tools graphical tool to make user easy to access most system tasks was improved. selectable themes for installed system grub boot menu and Plymouth boot-splash via MX-boot-options, system-keyboard and system-locale options allow easy access to configuration of system default keyboard and locales management.
the MX Package Installer updates, including faster performance, flatpaks support, and Popular Apps entries, including many popular 3rd party applications (Google Chrome, Skype, discord, etc...). MX-installer (based on gazelle-installer) now includes LUKS encrypted root, home, and swap partition options.
mx-codecs updated to install updated S3 texture packs (important for Valve/Steam games in particular) many, many, many additional packages and ISO repository mirrors via mx-repo-manager.
Download MX Linux 18
0 notes