#zerosievert
Explore tagged Tumblr posts
Visit Tumblr Blog
Explore Tumblr blogs with no restrictions, modern design and the best experience.
Last Seen Tumblr Blogs


Fun Fact
In 2020, Tumblr had 29.4 million users in the US.
Text
Wish version of John Wick Pt.3 NEW VIDEO: https://youtube.com/shorts/ad8ylj9sQKE
#funny#shorts#memes#gaming#roblox#gameplay#funny shit#masterkairobot#horror#youtuber#shorts youtube#shorts feed#playing#zerosievert#funnyshorts
2 notes
·
View notes
Link
ZERO Sievert, il nuovo titolo sviluppato dallo team italiano CABO Studio e pubblicato da Modern Wolf, è ora disponibile nella sua versione 1.0, dopo un periodo in Accesso Anticipato, su PC (Steam).
0 notes
Text
youtube
ZERO Sievert - 1080p Gameplay, Walkthrough. ▲One Hour Gameplay #ZEROSievert #1080p #Gameplay #Walkthrough #OneHourGameplay
0 notes
Link
Kickstarter Project: ZERO Sievert
Game Geeks News is proud to bring you another amazing Kickstarter project. Since Luca Carbonera was a child, he always had a passion for video games and as he grew up, so did his passion for creating them. ZERO Sievert was born as a personal project inspired by the STALKER series of games.
https://gamegeeksnews.com/kickstarter-project-zero-sievert/
0 notes
Text
ZERO SIEVERT Medication Guide

Welcome to our ZERO SIEVERT Medication Guide. This guide will show you how Radiation, Wounds and Bleeds work, how to treat them and what medicines are best to take!
ZERO SIEVERT Medication Guide
#ZEROSIEVERT This guide will show you how Radiation, Wounds and Bleeds work, how to treat them and what medicines are best to take! We know that there are people who have a hard time finishing the ZERO Sievert game. If you are one of those who find it difficult to finish the game, let's take you to our ZERO Sievert guide. Status Effects Explained In addition to helping you restore HP, Zero Sievert Medication can also be used to treat dangerous status conditions that could end your life in an instant. What you need to know is as follows: - Wounds : As you suffer damage, wounds accumulate and permanently lower your HP bar. Unless they are treated with the proper medication or by sleeping on a bed, they won’t go away. - Bleeding : If bleeding is not halted, it gradually depletes your health. By using the right medication, bleeding can be stopped. - Radiation : As of version 0.26, radiation doesn’t cause damage on its own. However, until your radiation levels return to safe levels, bleeding will repeatedly occur on its own due to high radiation levels. The right medication can be used to treat radiation, or you can treat it by going back to the bunker. If you don’t have the proper medication to treat them, no amount of HP-restoring things will help. Don’t forget to bring some basics! How Medication Works Medication in Zero Sievert can be used to either heal your HP, alleviate bad status effects, or both as you might expect. To use a medication in your inventory, just click on it. Remember that some medications cause you to move more slowly or not at all, so make sure you’re in a secure area before you take them. Medication can be kept in your inventory below your equipment on the Hotbar. When you can, put your medication there to assist you conserve some valuable inventory space. (Unfortunately, Medication on your Hotbar continues to contribute to your overall weight). How to Get In Zero Sievert, there are three ways to obtain medication: 1.Crafting it - Be aware that various Base Modules or Skills may be necessary in order to craft some medications. 2.Buying it from the doctor in the bunker 3.Taking (looting) it from dead enemies or chests What Medications Should You Bring with You? You should at the very least have a Bleeding Stopper and an HP Healer with you in Zero Sievert. For your first few runs, a few improvised medical kits and a few bandages ought to be plenty. However, later levels bring new dangers and require more time to explore. Once you begin exploring locations beyond the Forest, such the Makeshift Camp and Industrial Area, it is a good idea to regularly carry anti-radiation pills because radiation poses a much greater threat in later zones. ZERO SIEVERT The Best Medication - HP : The Modern Medkit, which restores 100 HP, is the best HP-healing medication. - Bleeding : Anti Bleed Gel is the greatest medication for bleeding since it can treat two bleeding wounds at once. - Wounds : The Professional Medikit is the greatest medication for treating wounds. It completely heals 40 wounds. - Radiation : The Teal Injector is the greatest medication for radiation treatment. It boosts your defense against Rads and kills off one Rad every second. ZERO SIEVERT Medication List - Anti Bleed Gel > Stack Size: 3 > Kg: 0.1 / 0.2 > Sell Price: 500 / 1,500 > Duration: 0.5 > Movement: Yes > Movement Speed: 50% > Effect: Bleed -2 > Crafting Recipe: 2 bandage, 4 Scrap Medicine, Infirmary Lvl 1, Medicine Lvl 3 - Anti Rad Pills > Stack Size: 4 > Kg: 0.05 / 0.2 > Sell Price: 200 / 800 > Duration: 2 > Movement: Yes > Movement Speed: 50% > Effect: Radiation -0.5 > Crafting Recipe: 5 Scrap Medicine, Infirmary Lvl 1, Medicine Lvl 1, Stack of 2 - Bandage > Stack Size: 4 > Kg: 0.05 / 0.2 > Sell Price: 120 / 480 > Duration: 4 > Movement: Yes > Movement Speed: 100% > Effect: Bleed -1 > Crafting Recipe: 3 Scrap Medicine - First Aid Medikit > Stack Size: 1 > Kg: 0.5 > Sell Price: 800 > Duration: 10 > Movement: No > Movement Speed: N/A > Effect: Wounds – 15 > Crafting Recipe: 2 Medikit T-000, 2 bandage, 4 Scrap Medicine, Infirmary Lvl 1, Medicine Lvl 4 - Improvised Medikit > Stack Size: 3 > Kg: 0.2 / 0.6 > Sell Price: 560 / 1,680 > Duration: 3 > Movement: Yes > Movement Speed: 50% > Effect: Health + 40 > Crafting Recipe: 2 bandage, 6 Scrap Medicine, 1 Syringe, Surgical Scissors, Infirmary Lvl 1, Medicine Lvl 2 - Injector (Blue) > Stack Size: 1 > Kg: 0.1 > Sell Price: 1000 > Duration: 10 > Movement: N/A > Movement Speed: N/A > Effect: Hunger + 8 sg / Thirsty + 8 sg > Crafting Recipe: 3 Fire Crystals, 8 Scrap Medicine, 20 Scrap Food, 1 Syringe, Infirmary Lvl 1, Pharmacist Lvl 3 - Injector (Green) > Stack Size: 1 > Kg: 0.1 > Sell Price: 1600 > Duration: 240 > Movement: N/A > Movement Speed: N/A > Effect: Max Stamina + 30 / Stamping Regeneration + 12 sg / Hunger -12 / Thirsty -20 > Crafting Recipe: 2 Chemical Crystals, 10 Scrap Medicine, 1 Syringe, Infirmary Lvl 1, Pharmacist Lvl 3 - Injector (Pink) > Stack Size: 1 > Kg: 0.1 > Sell Price: 200 > Duration: 300 > Movement: N/A > Movement Speed: N/A > Effect: Max Weight + 20 / Hunger +10 / Thirsty + 15 > Crafting Recipe: 2 Chemical Crystals, 1 Electric Crystal, 18 Scrap Medicine, 1 Syringe, Infirmary Lvl 1, Pharmacist Lvl 5 - Injector (Red # 1) > Stack Size: 1 > Kg: 0.1 > Sell Price: 1600 > Duration: 90 > Movement: N/A > Movement Speed: N/A > Effect: Max HP + 30 / Stamina Regeneration – 0.3 sg / Hunger -5 / Thirsty -20 > Crafting Recipe: 2 Chemical Crystals, 2 Fire Crystal, 14 Scrap Medicine, 1 Syringe, Infirmary Lvl 1, Pharmacist Lvl 4 - Injector (Red # 2) > Stack Size: 1 > Kg: 0.1 > Sell Price: 1600 > Duration: 30 > Movement: N/A > Movement Speed: N/A > Effect: HP Regen / + 3 sg / Hunger -5 / Thirsty – 10 - Injector (Teal) > Stack Size: 1 > Kg: 0.1 > Sell Price: 1360 > Duration: 120 > Movement: N/A > Movement Speed: N/A > Effect: Radiation Regeneration / + 1 sg / Radiation Defense + 250 > Crafting Recipe: 3 Fire Crystals, 8 Scrap Medicine, 1 Anti-Rad Pill, 1 Syringe, Infirmary Lvl 1, Pharmacist Lvl 2 - Injector (Yellow) > Stack Size: 1 > Kg: 0.1 > Sell Price: 1000 > Duration: 120 > Movement: N/A > Movement Speed: N/A > Effect: Fast Bleed Recovery /Second / Bleed Inmune > Crafting Recipe: 3 Fire Crystals, 10 Scrap Medicine, 1 Syringe, Infirmary Lvl 1, Pharmacist Lvl 0 - Medikit T-000 > Stack Size: 3 > Kg: 0.25 / 0.75 > Sell Price: 400 / 1,200 > Duration: 8 > Movement: No > Movement Speed: N/A> Effect: Health + 50 > Crafting Recipe: 1 bandage, 5 Scrap Medicine, 1 Sterilized Bandage, 1 Surgical Scissors, Infirmary Lvl 1, Medicine Lvl 1 - Modern Medikit > Stack Size: 2 > Kg: 0.3 / 0.6 > Sell Price: 960/ 1920 > Duration: 1 > Movement: Yes > Movement Speed: 50% > Effect: Health + 100 / Bleed -1 - Professional Medikit > Stack Size: 1 > Kg: 0.5> Sell Price: 1200 > Duration: 12 > Movement: No > Movement Speed: N/A > Wounds – 40 - Standard Medikit > Stack Size: 2 > Kg: 0.2 / 0.4 > Sell Price: 760 / 1520 > Duration: 2 > Movement: Yes > Movement Speed: 50%> Effect: Health + 60 / Bleed -1 - Sterilized Bandage > Stack Size: 4 > Kg: 0.05 / 0.2 > Sell Price: 240 / 960 > Duration: 4 > Movement: Yes > Movement Speed: 50%> Effect: Health + 14 / Bleed -1 > Crafting Recipe: 1 Bottle of Water, 3 Bandage, Make Stack of 3 Read the full article
0 notes
Text
Wish version of John Wick
VIDEO: https://youtube.com/shorts/Wuq_hYF7FmY
1 note
·
View note
Text
Zero Sievert Crafting Guide

Welcome to our Zero Sievert Crafting Guide. This guide will show you how to Craft, how to Scrap objects, and what you can Craft to prepare for the wasteland from our Zero Sievert Crafting Guide.
Zero Sievert Crafting Guide
#ZeroSievert This guide will show you how to Craft, how to Scrap objects, and what you can Craft to prepare for the wasteland from our Zero Sievert Crafting Guide. We know that there are people who have a hard time finishing the ZERO Sievert game. If you are one of those who find it difficult to finish the game, let's take you to our ZERO Sievert guide. How Crafting Works In Zero Sievert, only at your base inside the bunker is crafting possible. When you are in one of the game’s zones for exploration, there is no option to craft anything. In Zero Sievert, you can craft the following items: - Interact with the workbench by going to the bunker’s left side. - Choose an item category that you want to craft. - To view the ingredients of an item you want to craft, click on it. - To craft the object, click “Craft.” 4-1.For the purpose of crafting some items, you might need particular Skills or installed Modules. When you try to craft something while one of these Skills or Modules is lacking, you’ll receive a message. How Scrap Items In Zero Sievert, you can Scrap items by entering your inventory, clicking the item, and selecting “Scrap.” If the item is especially valuable, you can receive a confirmation dialogue. What you can get by scrapping items is as follows: - Weapons – Scrap Weapon - Armor – Scrap Material - Ammo – Scrap Ammo - Food – Scrap Food - Medication – Scrap Medication - Generic Items – Scrap Material Keep in mind that not all items can be scrapped. Backpacks, task items (like paperwork), and a few other items can only be sold or thrown away. What Can You Craft? Zero Sievert only allows you to craft the following items; you cannot craft anything else. - Medication - Ammo - Food - Modules Weapons, attachments, and armor cannot be made. However, using the crafting workbench, you can repair both weapons and armor. Additionally, you can customize your weapons with attachments at the crafting workbench. Read the full article
1 note
·
View note
Text
ZERO Sievert Tips For Hunters

Welcome to our ZERO Sievert Tips For Hunters guide. Follow the tips in this guide and become an experienced hunter in every raid through every biome in the game.
ZERO Sievert Tips For Hunters
#ZEROSievert Here is a survival guide we discovered in the bunker when cleaning up a hunter’s cache if you want to die less frequently (even if it’s fairly exciting). How did the hunter fare? That is not important. We know that there are people who have a hard time finishing the ZERO Sievert game. If you are one of those who find it difficult to finish the game, let's take you to our ZERO Sievert guide. Read the full article
0 notes
Text
ZERO Sievert Mission List
Welcome to our ZERO Sievert Mission List guide. Brief Mission List and their item requirements so you don't accidentally sell what you've would've need next mission. We know that there are people who have a hard time finishing the ZERO Sievert game. If you are one of those who find it difficult to finish the game, let's take you to our ZERO Sievert guide. #ZEROSievert
ZERO Sievert Mission List
Brief Mission List and their item requirements so you don't accidentally sell what you've would've need next mission. Missions Notes: A semi-collection of the missions I've been able to to record, so some are missing. Ver 0.26.1 Materials - Conductor (Bunker) - 40 scrap material - 20 screw nuts - 20 nail - 1 screwdriver - 1 drill - 1 propane tank Meat for Igor - Igor (Forest) - 10 Raw meat Grigory’s Ring - Mr. Junk (Makeshift camp) - Collect Grigory’s ring (Swamp) Eyes Everywhere - Reynard Shepard - Place purchased CCTV in library
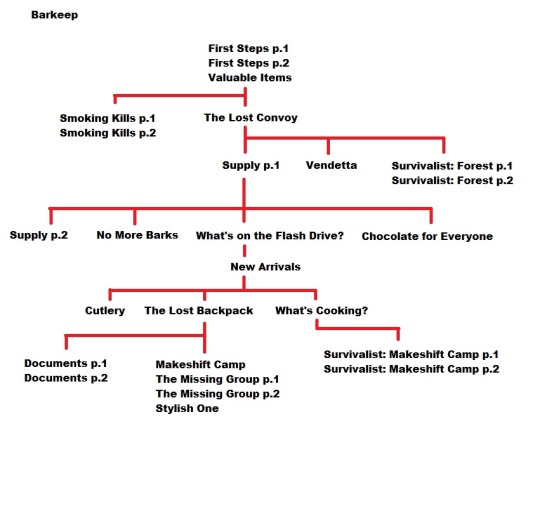
Barkeep- First steps p.1 - Skill book - Survive forest (Forest) First steps p.2 - Kill 5 bandit in Forest - Kill 5 Wolf in Forest Valuable Item - Retrieve item south village (Forest) Smoking Kills p.1 - 8 Molbaro cigarette - 10 Matches - 3 Lighter - 2 Zippo lighter Smoking Kills p.2 - Skill book - 8 Wilfon cigarette - 1 Golden zippo The Lost Convoy - Find lost convoy (Forest) Supply p.1 - 5 Bread - 5 Water - 1 MRE Vendetta - Kill 20 Bandit Survivalist: Forest p.1 - Survive Forest with 200exp/8000 roubles Survivalist: Forest p.2 - Storage - Survive Forest with 350exp/15000 roubles Supply p.2 - 8 Tushonka - 8 Canned Fish - 3 Pasta No More Barks - Kill 15 wolf (Forest) Chocolate for Everyone - 8 Generic chocolate - 4 Premium chocolate What’s on the Flash Drive? - 2 USB New Arrivals- Police/Standard CP00 armor - Investigate port (Industrial) More ZERO Sievert Mission List Cutlery - 8 Fork - 8 Spoon - 8 Knife What’s Cooking? - 4 Cooking pot - 30 Salt - 30 Pepper The Lost Backpack - Retrieve equipment (Forest, Makeshift camp) Documents p.1 - Find missing Hunter (Makeshift camp) Documents p.2 - Skill book - Retrieve document (Forest) Makeshift camp - Skill book - Survive 3 time, kill 15 bandits (Makeshift camp) The Missing Group p.1 - Find missing group (Swamp) The Missing Group p.2 - Eliminate target (Swamp) Stylish One - Kibba armor - Kill 15 Kibba (Mall) Survivalist: Makeshift Camp p.1 - Survive Forest with 250exp/8000 roubles Survivalist: Makeshift Camp p.2 - Survive Forest with 400exp/16000 roubles
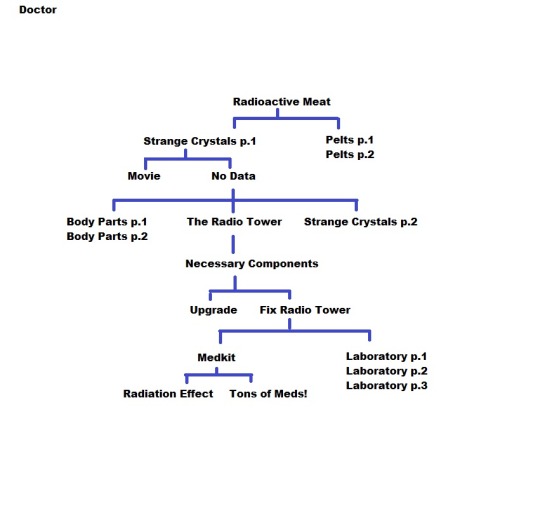
Doctor- Radioactive Meat - 12 raw meat Strange Crystals p.1 - 4 Fire crystal Pelts p.1 - 10 Rabbit Pelts No data - Attachment - Retrieve Analyzer (Forest) Movies - 4 DVD drives - 5 Multi-plug - 5 Power outlets Pelts p.2 - 8 Wolf pelt - 6 Boar pelt Body parts p.1 - 8 Boar fangs - 12 ghouls tentacles Body parts p.2 - Fook0/Police armor - 5 Spider eye - 5 Spider web - 10 Blink claw The Radio Tower - Locate Radio Tower (Makeshift camp) Necessary Components - 10 Wires - 6 Relays - 5 Hard disk Strange Crystals p.2 - Storage Module - 4 Chemical crystal - 6 Fire crystal - 2 Electrical crystal Upgrade - 3 CPU - 1 SSD drive - 1 Military Circuit - 8 Bulbs Fix Radio Tower - Skill Book - Bring Armor repair to Radio Tower (Makeshift camp) Medkit -Storage module - 20 Scrap medicine - 4 Anti bleed gel - 4 Standard medkit - 2 Modern medkit Laboratory p.1 - Retrieve lab key (Industrial zone) Laboratory p.2 - 6 Wires - 4 CPU - 5 Smartphone - 3 Relay - 2 SSD More ZERO Sievert Mission List Laboratory p.3 - Find strange flesh sample (requires purchase lab keys) Radiation Effect- Fook2 armor - Reach orange level of radiation Tons of Meds! - Skill book - 50 scrap medicine -

General Artemovich- Secret Documents- Standard Headlamp - Retrieve documents (Forest) Sawmill p.1 - Find the sawmill The Oldman- Storage Module - Kill Igor Sawmill p.2 - 1 USB from Sawmill (Forest) Equipment p.1 - 250 scrap ammo - 180 scrap weapon Equipment p.2- Skill book - 45 5.45x39mm BT - 20 7.62x54Rmm SNB - 30 9x39mm SP-5 The Lair - Find ghoul lair (Forest) Destroy the Ghoul’s Lair - Destroy lair using purchased dynamite Cleaning p.1 - Kill 10 Hunter Cleaning p.2 - Kill Lazar More Bandits - Kill 25 bandit Mark a Working Truck - Put purchased GPS on working truck Ghoul Destroyer p.1 - Kill 12 Ghoul Ghoul Destroyer p.2 - Kill 40 Ghoul Motel p.1 - Find entrance to motel (Makeshift Camp) Motel p.2 - Skill book - Eliminate infestation at motel (Makeshift Camp) Always in the Way - Kill 6 Hunters (Makeshift Camp) Weird Phenomena p.1 - Recover flight recorder (Swamp) Preparing for Battle - 200 Scrap ammo - 150 Scrap weapon - 8 Bandage - 5 Medkit T-000 - 6 Vodka Clear the Swamp - Clear the Swamp Inspect the Village - Inspect the Village Read the full article
0 notes
Text
ZERO Sievert Module Cheat and Item List

Welcome to our ZERO Sievert Module Cheat and Item List guide. A quick cheat guide for crafting items to build Basic Modules. We know that there are people who have a hard time finishing the ZERO Sievert game. If you are one of those who find it difficult to finish the game, let's take you to our ZERO Sievert guide. #ZEROSievert
ZERO Sievert Module Cheat and Item List
A quick cheat guide for crafting items to build Basic Modules. Cheat Sheet ZERO SIEVERT MODULE LIST - ( V0.26.1 )

About ZERO Sievert The world has ended. ZERO Sievert charges you with scavenging equipment across multiple areas, all set in an atmospheric fictitious post-apocalyptic Eastern Europe setting. Your base of operations, the bunker, is filled with traders, modding stations, and areas to make your own, providing you with progression across your excursions into the wild. Once you’re out in the wilds of the wasteland, however, the situation becomes a lot less secure. Across the five biomes of the game, you’ll initially be armed with little more than a gun and a bottle of water, after which point it’s up to you to recover items, take out bandits, and most importantly, get back alive. And be warned; the nuclear fallout may have impacted some of the local wildlife… A wasteland to explore Procedurally generated maps make every journey to the Forest, Mall, or Makeshift Camp different, with ever-changing hiding spots, loot locations, and layouts. Adapt and learn the secrets of each map to get in, get out, and get better. Full weapon modification Hunt in a way that suits your playstyle, with over 30 unique guns and 150 mods that can be combined to make you the biggest threat in the wastes of ZERO Sievert. Create a weapon that suits your style or focus on stats to become the ultimate hunter. Looting and questing Multiple questlines guide you through the world of ZERO Sievert. Through talking with a range of characters you’ll slowly unravel information and lore about the world that’s been left behind. Alongside this, there are more than 100 different items to loot which can be used to craft new items, upgrade your own base, and trade. Read the full article
0 notes
Text
ZERO Sievert Beginners Guide

Welcome to our ZERO Sievert Beginners Guide. Just a simple guide for new players to hopefully make your experience easier. Tips come from personal experience in the game. #ZEROSievert
ZERO Sievert Beginners Guide
Just a simple guide for new players to hopefully make your experience easier. Tips come from personal experience in the game. Spawning In You can do these in any order just make sure you do all of them. *I recommend doing this first* Go to the bar (Middle Left) and trade with the barkeep to buy rotten bread and non-purified water. These can be crafted into bread and water that aren't irradiated. Talk to the barkeep to get his quest. (Middle Left) Talk to the doctor to get his quest. (Bottom Right) Go outside of the bunker and talk to the train conductor for his quest. Head to your base/room (all the way to the middle left) and putting extra items into the stash/storage. You only need one food item (bread), one water, and all the meds you spawn with. Put the rest into the stash. When your ready talk to the train conductor to head into the zone. Make sure you have meds, food, and water! Choose the forest map. (Makeshift camp is not worth going to) People/Animal/Creatures People: The people you encounter when killed will always drop the gun they're currently using and sometimes have meds, ammo, or food/drink. Green Army (Neutral) Human with Green Helmet and Armor. Will shoot creatures/enemies. Will turn Hostile if shot. Scientist (Neutral) Human with yellow suites that spawn in or around anomalies. Will shoot creatures/enemies. Will turn Hostile if shot. Bandit (Hostile) Human with Gray clothing and helmet. Run if you see one as they're never alone. Pretty easy to take out from a distance. Hunter (Hostile) Human with red-ish/tan clothing and helmet. Typically I would run away as they usually have snipers/rifles that do alot of damage. Often alone. Animals: Rabbit (Passive) Brown bunny that runs away from player. Good source of pelt and raw meat to sell. Wolf (Hostile) Gray wolf that runs away from the player when alone and towards its pack. (4-5 wolves) Good source of raw meat and wolf pelt. If you encounter a pack stay far away and shoot as they just stand there for some reason. Boar (Hostile) Big pig with large tusks that will charge the player. Very fast and high damage. I recommend running away unless you have a good amount of ammo and sprint bar. Drops raw meat, boar tusk, and boar pelt. Creatures: Ghoul (Hostile) White ghoul that only spawns in the town. Very fast and hard to shoot. Hard to deal with without a weapon with high fire rate. They're the reason why I would avoid the town early in the game. Buildings/Anomalies - ZERO Sievert Beginners Guide Buildings Be very careful when approaching buildings as sometimes they may have enemies nearby. (Enemies are never inside surprisingly) Abandoned Shack/Shed/House: Run down shack in the woods. Sometimes has a fence around it that you can't see over. Sometimes has loot inside or outside in a box. Good source of materials and food. You might bump into a passive human named Igor who will give you a quest inside one of these buildings. Doing his quest will have him loot for you and place it in a box in his house. Bandit Base: A wooden fenced off box with watchtowers. The main way to tell that it's a bandit base is the red/rusty barricades at the entrances. Typically guarded by 2-3 bandits (Usually two inside and one outside) Green Army Base: A wooden fenced rectangle/square area. If you don't see red/rusty barricades it usually is the green army. You can walk in and loot their stuff and they won't care. Town: Location marked as gray on the map. Has quest items inside but very dangerous without good equipment. Avoid until your ready. Anomalies Honestly not worth going after as it uses alot of meds. Red Crystal: Area where there's a red crystal surrounded by invisible flame mines essentially. Avoid if you don't have enough meds but the crystal is worth alot of money. Green Crystal: Area where there's a green crystal surrounded by invisible poison mines essentially. Avoid if you don't have enough meds but the crystal is worth alot of money. Tips for the Zone -Do not walk near the train as it's leaving it will kill you. (I tried it :P) -Personally I turned off dynamic grass and decrease grass amount to zero (video settings) so I can see movement better. -Make sure you listen carefully as you can sometimes hear enemies nearby. -Make sure to equip meds into the hotbar. -Bandages stop bleeding. -Improvised Medkit and T-300 heal health. -White Medkit closes wounds for health that can't be healed (wound closure). -Pressing J (default key) will bring up a pip-boy for you to see tasks. -You can hold left click to aim now sights and see further away. -You can unload guns from corpses by right clicking. -If you happen to find any of the EC guns they're very good with good accuracy, mag size, and fire rate. Ammo is more common for them as well. -Starting out I would avoid the town (gray in the middle of the map) until you have at least two guns and a decent amount of ammo. -If you come across a gun fight stay back and wait for the people to finish. Then slowly head in and take out the enemies. This is a good way for good loot and what I did for most of my runs. -You don't have to loot everything! Being greedy killed alot of my runs. Being slow in this game is a death sentence. -If your almost full carry weight head to an extraction point and leave. Extraction and Back to Base Extraction: When you decide to leave you need to head to the green circles on the map (m key) to leave. Take your time getting there and don't just run. Upon reaching the circle text should show up saying extracting in 5 and count down. Just stand still and wait. Back to Base: Once you get back to base put loot into the storage, sell items to the barkeep, and have the doctor repair your armor. *You actually have multiple tabs in the stash!* Good items to sell are raw meat, pelts, and technology. (USB drives, power banks, watches, etc) Everything else you can scrap. Use the beds at the top of the bunker to sleep and recharge your energy. I do recommend making sure that you sleep the night off as entering the zone at that time is just a death sentence. (Dark and low vision) Nighttime is from 8pm - 8am (20:00 - 08:00) Read the full article
0 notes