
Statistics
We looked inside some of the posts by techswings and here's what we found interesting.
Average Info
Notes Per Post
3
Likes Per Post
3
Reblog Per Post
0
Reply Per Post
0
Time Between Posts
24 days
Number of Posts By Type
Text
17
Last Seen Tumblr Blogs


Fun Fact
Post activity is at the highest at 4:00 pm EDT; notes peak at 10:00 pm EDT.
Text
Programmable Mouse vs. Auto Clicker: A Comparison
When it comes to automating repetitive tasks on your computer, both programmable mice and auto clickers offer viable solutions.
However, the choice between these two tools depends on the specific requirements of the task at hand. In this article, we'll compare programmable mice and online auto clicker, highlighting their advantages and limitations.
Ultimately, we'll show why an opautoclicker might be the superior choice for those looking for efficiency, customization, and ease of use.

What is a Programmable Mouse?
A programmable mouse is a high-end peripheral device that allows users to customize buttons to perform specific tasks. These tasks can range from simple actions like a single click to more complex commands involving multiple steps. Programmable mice are popular among gamers and professionals who need quick access to specific functions without relying on keyboard shortcuts.
What is an Auto Clicker?
An autoclicker is software that automates mouse clicks at specified intervals and locations on the screen. Unlike a programmable mouse, which is hardware-dependent, an auto clicker operates purely in software. It can be used for a variety of tasks, from gaming to data entry, and offers extensive customization options to suit any repetitive task.
Key Comparison: Programmable Mouse vs. Auto Clicker
Let's explore the key differences between programmable mice and auto clickers in terms of functionality, flexibility, ease of use, and overall efficiency.
1. Functionality
Programmable Mouse: Programmable mice are designed with multiple buttons that can be assigned specific functions. These functions are usually limited to single actions or simple macros. While useful for basic tasks, the functionality of a programmable mouse is restricted by the number of buttons and the complexity of the actions it can perform.
Auto Clicker: Auto clickers offer far greater functionality compared to programmable mice. With an auto clicker, you can automate virtually any clicking task, regardless of complexity. Auto clickers allow for precise control over the click interval, location, duration, and type. This level of functionality makes auto clickers ideal for tasks that require repetitive actions, such as in gaming, software testing, or data entry.
Winner: Auto Clicker Why: Auto clickers provide superior functionality by allowing users to automate complex tasks without the limitations imposed by hardware.
2. Flexibility
Programmable Mouse: While programmable mice are useful for assigning specific functions to buttons, they lack the flexibility to handle more complex or varied tasks. The number of programmable buttons is limited, and each button can typically only perform a single function or a simple macro. This makes programmable mice less suitable for tasks that require a high degree of customization or repetition.
Auto Clicker: Auto clickers are highly flexible tools that can be customized to suit any task. Whether you need to click a specific location at regular intervals, simulate clicks in multiple locations, or perform complex sequences of actions, an auto clicker can be configured to meet your needs. This flexibility extends to the ability to save and load different configurations, allowing users to switch between tasks easily.
Winner: Auto Clicker Why: The flexibility of an auto clicker far surpasses that of a programmable mouse, making it the better choice for handling a wide range of tasks with varying levels of complexity.
3. Ease of Use
Programmable Mouse: While programmable mice are relatively easy to use, the process of setting up and configuring the buttons can be cumbersome, especially for users unfamiliar with the associated software. Additionally, the need to remember which function is assigned to which button can be challenging, particularly if you have multiple configurations.
Auto Clicker: Auto clickers are designed to be user-friendly and easy to configure. Most auto clickers come with intuitive interfaces that allow users to set up and customize their clicking tasks with just a few clicks. The ability to save and load presets further enhances ease of use, making it simple to switch between different tasks without the need for constant reconfiguration.
Winner: Auto Clicker Why: Auto clickers offer a more straightforward setup process and are easier to manage, especially when dealing with multiple tasks or complex configurations.
4. Efficiency
Programmable Mouse: While programmable mice can increase efficiency for certain tasks, their utility is often limited by the number of buttons and the simplicity of the actions they can perform. For highly repetitive or complex tasks, the efficiency gains offered by a programmable mouse are relatively modest.
Auto Clicker: Auto clickers excel in maximizing efficiency for repetitive tasks. By automating clicks with precise timing and positioning, auto clickers eliminate the need for manual intervention, allowing tasks to be completed more quickly and with less effort. This is particularly beneficial in environments where time is of the essence, such as in competitive gaming or large-scale data processing.
Winner: Auto Clicker Why: The ability of an auto clicker to automate repetitive tasks with precision and speed makes it a far more efficient tool than a programmable mouse.
Why an Auto Clicker is the Superior Choice?
After comparing the key aspects of programmable mice and auto clickers, it becomes clear that auto clickers offer several advantages that make them the better choice for most users. Here are the reasons why an auto clicker outshines a programmable mouse:
Unlimited Functionality: Unlike programmable mice, which are limited by the number of buttons and the complexity of actions they can perform, auto clickers offer virtually unlimited functionality. Whether you need to automate simple clicks or complex sequences, an auto clicker can handle it all.
Greater Flexibility: The flexibility of an auto clicker allows you to customize it for any task, regardless of complexity or repetition. This makes it suitable for a wide range of applications, from gaming to professional work.
User-Friendly Interface: Auto clickers are designed to be easy to use, with intuitive interfaces that simplify the setup process. This makes them accessible to users of all skill levels, from beginners to advanced users.
Enhanced Efficiency: By automating repetitive tasks with precision and speed, auto clickers significantly boost efficiency. This is particularly important in environments where time and accuracy are critical.
Cost-Effective: Unlike programmable mice, which can be expensive, auto clickers are generally available as free or low-cost software. This makes them a cost-effective solution for anyone looking to automate tasks without investing in specialized hardware.
Conclusion
While programmable mice offer some benefits, particularly in gaming and professional environments, they simply cannot match the functionality, flexibility, ease of use, and efficiency provided by an auto clicker. For users who need to automate repetitive tasks or perform complex sequences of actions, an auto clicker is the superior choice. By opting for an auto clicker, you'll enjoy greater control over your tasks, improved productivity, and a more streamlined workflow.
In the battle between programmable mice and auto clickers, the auto clicker emerges as the clear winner. If you're looking for a tool that can handle any clicking task with precision and efficiency, an auto clicker is the way to go.
0 notes
Text
The iCal CapCut Template: A Comprehensive Guide
CapCut has emerged as a go-to tool for both amateur and professional editors in the dynamic world of video content creation. Among its diverse templates, the iCal CapCut template stands out as a favorite for creators focusing on productivity, scheduling, and time-based content.
This guide will explore the iCal template's intricacies, features, best practices, and tips for creating engaging, informative videos.
Understanding the iCal Template
The iCal CapCut template draws inspiration from digital calendars and scheduling apps. It offers a clean, organized aesthetic that's perfect for showcasing time-related information. The template is designed to present schedules, routines, and events in a visually appealing and easy-to-understand format.

Key Features:
Clean, Minimalist Design: The template typically features a sleek, uncluttered layout reminiscent of modern digital calendars.
Animated Date and Time Overlays: Dynamic displays of dates, times, and durations add a professional touch to your videos.
Transition Effects: Smooth transitions often mimic flipping through calendar pages or scrolling through a digital interface.
Customizable Color Schemes: The template's easily adaptable color palettes allow you to match it to your brand or content theme.
Text Animations: Elegant animations for adding event titles, descriptions, and text-based information.
Timeline Visualizations: Many versions include animated timelines or progress bars to illustrate duration or progression through a schedule.
How to Use the iCal Template?
To make the most of this versatile template, follow these steps:
Download the Template: Visit https://getcapcuttemplate.in/ to download the iCal CapCut template. Our site offers a wide selection of high-quality templates, including this popular option.
Plan Your Content: Before editing, outline the schedule or events you want to showcase. This pre-planning will help you organize your video effectively.
Import Your Footage: Select video clips or images representing the events or periods you're highlighting. These could be clips of activities, location shots, or stock footage.
Arrange Your Clips: Place your media into the template's timeline, aligning them with the appropriate date or time slots.
Customize Text: Replace the placeholder text with your event titles, descriptions, and time information. Ensure accuracy and clarity in your text entries.
Adjust Colors: Modify the color scheme to match your brand or the theme of your content. Consistency in color use can greatly enhance the visual appeal of your video.
Fine-tune Animations: Adjust the timing and style of animations to ensure smooth transitions and readable text.
Tips for Creating Engaging Videos with the iCal Template
Keep It Concise: While it's tempting to include every detail, focus on the most important events or time slots to maintain viewer engagement.
Use Consistent Imagery: If possible, maintain a consistent style of imagery throughout your video to enhance the professional look.
Incorporate Icons: Use simple icons to represent different types of events or activities. This can add visual interest and improve quick comprehension.
Balance Text and Visuals: Ensure that your text doesn't overwhelm the visuals. Use concise language and let the imagery speak for itself when possible.
Add Personal Touches: Include brief clips of yourself or team members to add a human element to your schedule or routine videos.
Use Color Coding: Assign different colors to various types of events or time periods to make your schedule easier to understand at a glance.
Include Progression Indicators: If showcasing a routine or process, use progress bars or other visual indicators to show advancement through the timeline.
Customizing the iCal Template
While the pre-set design of the iCal template is effective, personalizing it can make your content stand out:
Modify Fonts: Choose fonts that align with your brand while ensuring readability.
Adjust Transition Speeds: Tailor the transitions' pace to match your content's energy.
Add Your Logo: Incorporate your brand logo subtly into the design for consistent branding.
Experiment with Layouts: Try different text and visual element arrangements while maintaining the calendar-inspired design.
Integrate Custom Graphics: Add icons or small illustrations to make the template uniquely yours.
Common Mistakes to Avoid
Information Overload: Avoid cramming too much information into one video. Keep it focused and digestible.
Inconsistent Time Scales: Ensure your time representations are consistent throughout the video to avoid confusion.
Poor Color Contrast: Make sure your text is easily readable against your chosen background colors.
Neglecting Mobile Viewers: Remember that many viewers may watch on mobile devices. Test your video on smaller screens to ensure legibility.
Forgetting a Call-to-Action: If your schedule or routine video is meant to inspire action, don't forget to include a clear call-to-action at the end.
Why Choose the iCal Template?
The iCal CapCut template offers several advantages for content creators:
Professional Appearance: The clean, organized look of the template instantly elevates the perceived quality of your content.
Versatility: While perfect for schedules and routines, this template can be adapted for various types of time-based content.
Time-Saving: The pre-designed elements allow you to create polished, informative videos quickly.
Improved Information Retention: Visual representations of time and events can help viewers better understand and remember the information presented.
Brand Consistency: Easy customization allows you to maintain a consistent brand look across multiple videos.
Creative Uses for the iCal Template
While primarily designed for schedules and routines, the iCal template can be creatively applied to various types of content:
Product Launch Countdowns: Build anticipation for a new product or service release.
Event Promotion: Showcase the timeline of an upcoming event or festival.
Historical Timelines: Present historical events or biographical information in an engaging format.
Goal Tracking: Illustrate progress towards personal or business goals over time.
Recipe or DIY Instructions: Break down step-by-step processes with clear time allocations.
Travel Itineraries: Plan out and present travel schedules in an visually appealing way.
Workout Routines: Design easy-to-follow fitness schedules with clear time blocks for each exercise.
Conclusion
The iCal CapCut template is more than just a digital calendar lookalike; it's a powerful tool for presenting time-based information in a clear, engaging, and visually appealing. Whether you're a productivity guru sharing your daily routine, an event planner promoting upcoming attractions, or a business owner outlining project timelines, this template offers the flexibility and professionalism to elevate your content.
Remember, the key to creating impactful videos with the iCal template lies in balancing information with visual appeal. Strive for clarity in your presentation, be judicious with the amount of information you include, and always keep your audience's needs and viewing experience in mind.
Other Popular CapCut Templates
While the iCal template is excellent for time-based content, CapCut offers a variety of other templates that might suit your creative needs. Here are a few popular options you might want to explore:
Healing Thailand CapCut Template Perfect for travel vloggers and wellness content creators, this template features:
Soft, warm color grading reminiscent of tropical sunsets Dreamy transitions between clips Overlay effects like light leaks and lens flares Placeholders for location names or inspirational quotes Soothing background music options
Ideal for: Travel vlogs, spa and wellness videos, meditation guides, or any content aiming to evoke a sense of tranquility and rejuvenation.
Happy Birthday CapCut Template Bring joy to celebration videos with this festive template. Key features often include:
Vibrant animations with confetti, balloons, or fireworks Cheerful color schemes Dynamic text animations for names and wishes Upbeat background music Transitions that create a party atmosphere
Perfect for: Birthday greetings, party invitations, anniversary celebrations, or any joyous occasion that calls for a fun, energetic video.
Camera Lenta CapCut Template "Camera lenta" means "slow camera" in English. This template is designed for creating dramatic slow-motion effects:
Pre-set slow-motion timing for footage Smooth transitions between regular and slow-motion segments Cinematic color grading options Text overlays for emphasis or context Music tracks that complement slow-motion aesthetics
Great for: Sports highlights, emotional moments in vlogs, dance performances, or any content where you want to emphasize specific actions or expressions.
To explore and download these templates and many more, visit https://getcapcuttemplate.in/. Our site offers a curated selection of high-quality CapCut templates to elevate your video content across various styles and themes.
Whether creating time-based content with the iCal template, showcasing serene landscapes with the Healing Thailand template, celebrating special moments, or highlighting dramatic actions in slow motion, we have the perfect template to bring your vision to life.
0 notes
Text
Unlocking Optifine's Advanced Features: Elevate Your Minecraft Experience
If you're a passionate Minecraft player, you're probably already aware of Optifine's reputation as a must-have mod. Not only does it improve graphics and performance, but it also comes packed with a plethora of advanced features that can truly elevate your Minecraft experience.
In this article, we'll delve into the world of Optifine's advanced features, uncovering hidden gems that will revolutionize the way you play and enjoy the game.
1. Better Weather Effects for Realism
Optifine's advanced weather effects bring a new level of immersion to your Minecraft world. Say goodbye to the old repetitive rain and snow, as Optifine introduces realistic weather with improved particle effects and smoother animations.
Experience gentle drizzles that create soft ripples on water surfaces, or witness intense downpours that make the landscape glisten with water droplets. Snow now accumulates realistically on blocks, creating a winter wonderland that makes you feel truly connected to the season.
2. Custom Biome Colors for Unique Environments
With Optifine's custom biome color feature, you can unleash your creativity and craft unique environments like never before. Tweak the hues and saturation of each biome to create distinct visual styles for forests, deserts, mountains, and more.
Transform lush biomes into vibrant emerald paradises, turn arid lands into golden deserts, and make mysterious swamps ooze with eerie colors. Each biome becomes a canvas for your creativity, immersing you in a world that feels tailor-made for your adventures.
3. Better Sun and Moon for Stunning Skies
Optifine enhances celestial bodies in the Minecraft sky, adding beauty and realism to every day-night cycle. Experience breathtaking sunrises and sunsets as the sun and moon gradually rise and set on the horizon.
The transition from day to night becomes a visual treat, with stunning hues painted across the sky. The dynamic movement of the sun and moon adds a touch of realism to the passage of time, making your Minecraft world feel alive and ever-changing.
4. Dynamic Water Animations for Realism
Water in Minecraft comes to life with Optifine's dynamic water animations. Rivers flow with a gentle current, waterfalls cascade with grace, and oceans shimmer with realistic waves.
Dive into underwater worlds and witness the mesmerizing dance of dynamically moving water bodies. The lifelike water animations add a sense of fluidity and realism to your surroundings, enhancing both the aesthetic and immersive aspects of your Minecraft adventures.
5. Performance-Enhancing Caching
Optifine utilizes intelligent caching techniques to optimize loading times and memory usage. Experience smoother world loading and reduced lag when exploring new areas or transitioning between dimensions.
The optimization provided by Optifine ensures that you spend more time enjoying your gameplay and less time waiting for chunks to render. As you traverse vast landscapes or teleport between dimensions, the improved performance keeps you immersed in the action.
6. Better Entity Models for Immersion
Entities in Minecraft gain a new level of personality with Optifine's improved entity models. Animals come to life with realistic animations, imbuing them with lifelike movement and behavior. Mobs and creatures showcase enhanced designs, making encounters with them more engaging and thrilling.
From the graceful movements of wolves to the menacing stride of zombies, the improved entity models deepen your connection to the Minecraft world and its inhabitants.
7. Dynamic Grass and Leaves for Realistic Environments
Optifine introduces dynamic grass and leaves that sway gently in the wind, adding a touch of realism to your surroundings. Lush grass fields now undulate in the breeze, and tree canopies sway gracefully with the wind's rhythm.
The dynamic movement of vegetation breathes life into your Minecraft world, making it feel more vibrant and alive.
8. Advanced Video Settings for Fine-Tuning
Take full control of your visual experience with Optifine's advanced video settings. Customize render distances, adjust anti-aliasing, and fine-tune other graphics options to match your hardware capabilities and personal preferences.
Whether you prioritize visual fidelity or smooth performance, Optifine empowers you to find the perfect balance, ensuring a gaming experience tailored to your liking.
9. Custom Entity Rendering for Unique Visuals
Optifine's custom entity rendering feature allows resource pack creators to unleash their creativity and design unique visuals for mobs, animals, and characters. Immerse yourself in a world where creatures sport creative and diverse appearances, adding a layer of enchantment to your Minecraft adventures.
Encounter mobs with intricate designs, animals with unique characteristics, and characters with a distinct style. The custom entity rendering option expands the possibilities of customization, giving you a truly personalized experience.
10. Compatibility with Other Mods for Endless Possibilities
Optifine's flexibility and compatibility with various Minecraft mods open up endless possibilities for customization and gameplay. Combine Optifine with other mods to create a unique and personalized experience that caters to your specific interests and preferences.
Enhance your Minecraft world with additional content, game mechanics, and visual enhancements that complement Optifine's features, allowing you to craft the perfect Minecraft adventure that aligns with your vision.
11. Better Weather Effects for Realism
Optifine's advanced weather effects bring a new level of immersion to your Minecraft world. Say goodbye to the old repetitive rain and snow, as Optifine introduces realistic weather with improved particle effects and smoother animations.
Experience gentle drizzles that create soft ripples on water surfaces, or witness intense downpours that make the landscape glisten with water droplets. Snow now accumulates realistically on blocks, creating a winter wonderland that makes you feel truly connected to the season.
12. Custom Biome Colors for Unique Environments
With Optifine's custom biome color feature, you can unleash your creativity and craft unique environments like never before. Tweak the hues and saturation of each biome to create distinct visual styles for forests, deserts, mountains, and more.
Transform lush biomes into vibrant emerald paradises, turn arid lands into golden deserts, and make mysterious swamps ooze with eerie colors. Each biome becomes a canvas for your creativity, immersing you in a world that feels tailor-made for your adventures.
13. Better Sun and Moon for Stunning Skies
Optifine enhances celestial bodies in the Minecraft sky, adding beauty and realism to every day-night cycle. Experience breathtaking sunrises and sunsets as the sun and moon gradually rise and set on the horizon.
The transition from day to night becomes a visual treat, with stunning hues painted across the sky. The dynamic movement of the sun and moon adds a touch of realism to the passage of time, making your Minecraft world feel alive and ever-changing.
14. Dynamic Water Animations for Realism
Water in Minecraft comes to life with Optifine's dynamic water animations. Rivers flow with a gentle current, waterfalls cascade with grace, and oceans shimmer with realistic waves. Dive into underwater worlds and witness the mesmerizing dance of dynamically moving water bodies.
The lifelike water animations add a sense of fluidity and realism to your surroundings, enhancing both the aesthetic and immersive aspects of your Minecraft adventures.
15. Performance-Enhancing Caching
Optifine utilizes intelligent caching techniques to optimize loading times and memory usage. Experience smoother world loading and reduced lag when exploring new areas or transitioning between dimensions.
The optimization provided by Optifine ensures that you spend more time enjoying your gameplay and less time waiting for chunks to render. As you traverse vast landscapes or teleport between dimensions, the improved performance keeps you immersed in the action.
16. Better Entity Models for Immersion
Entities in Minecraft gain a new level of personality with Optifine's improved entity models. Animals come to life with realistic animations, imbuing them with lifelike movement and behavior. Mobs and creatures showcase enhanced designs, making encounters with them more engaging and thrilling.
From the graceful movements of wolves to the menacing stride of zombies, the improved entity models deepen your connection to the Minecraft world and its inhabitants.
17. Dynamic Grass and Leaves for Realistic Environments
Optifine introduces dynamic grass and leaves that sway gently in the wind, adding a touch of realism to your surroundings. Lush grass fields now undulate in the breeze, and tree canopies sway gracefully with the wind's rhythm.
The dynamic movement of vegetation breathes life into your Minecraft world, making it feel more vibrant and alive.
18. Advanced Video Settings for Fine-Tuning
Take full control of your visual experience with Optifine's advanced video settings. Customize render distances, adjust anti-aliasing, and fine-tune other graphics options to match your hardware capabilities and personal preferences.
Whether you prioritize visual fidelity or smooth performance, Optifine empowers you to find the perfect balance, ensuring a gaming experience tailored to your liking.
19. Custom Entity Rendering for Unique Visuals
Optifine's custom entity rendering feature allows resource pack creators to unleash their creativity and design unique visuals for mobs, animals, and characters. Immerse yourself in a world where creatures sport creative and diverse appearances, adding a layer of enchantment to your Minecraft adventures.
Encounter mobs with intricate designs, animals with unique characteristics, and characters with a distinct style. The custom entity rendering option expands the possibilities of customization, giving you a truly personalized experience.
20. Compatibility with Other Mods for Endless Possibilities
Optifine's flexibility and compatibility with various Minecraft mods open up endless possibilities for customization and gameplay. Combine Optifine with other mods to create a unique and personalized experience that caters to your specific interests and preferences.
Enhance your Minecraft world with additional content, game mechanics, and visual enhancements that complement Optifine's features, allowing you to craft the perfect Minecraft adventure that aligns with your vision.
Conclusion
In conclusion, Optifine isn't just a graphics optimization mod; it's a gateway to unlocking a world of advanced features that can transform your Minecraft adventures into an unparalleled gaming experience.
From stunning visual enhancements and improved performance to customization options that cater to your creative flair, Optifine empowers you to craft a Minecraft world that is uniquely yours.
Embrace the power of Optifine's advanced features and embark on your ultimate Minecraft journey. Happy crafting and exploring!
0 notes
Text
Kalyan Panel Chart Analysis: Winning Strategies and Pitfalls
The Kalyan Panel Chart holds a treasure trove of historical data on the world of Satta Matka gambling. As a visual representation of the results of the Kalyan Matka game, it offers valuable insights to players seeking to decipher patterns and trends in the numbers drawn. Similarly, the Sridevi Night Chart serves as an essential tool for players analyzing night-time game results, helping them track number sequences and make informed decisions.
This article delves into the art of Kalyan Panel Chart analysis, exploring how players can leverage historical data to identify potential winning strategies and pitfalls, as well as understanding the limitations of relying solely on past results in the unpredictable game of Satta Matka.
Understanding Kalyan Panel Chart Analysis
Kalyan Panel Chart analysis is a process through which players extract valuable insights from the historical data recorded in the chart. The article provides a step-by-step overview of how players engage in this analysis.
First, players carefully study the opening and closing numbers along with the corresponding panel of three digits. They examine the sequences of these numbers over time to identify any recurring patterns or trends. For instance, certain numbers may appear more frequently, or specific digit combinations might have a higher occurrence rate.
The analysis allows players to formulate betting strategies based on the historical trends they observe. For example, if a particular number has been appearing consistently over time, players may decide to place bets on that number in future games. Similarly, if they notice certain digit combinations that occur frequently, they might use this information to predict potential winning combinations.
The Role of Probabilities and Statistics
Probabilities and statistics play a crucial role in Kalyan Panel Chart analysis. Players utilize various mathematical concepts to evaluate the likelihood of certain outcomes occurring in future games.
For instance, they calculate the probability of specific numbers being drawn based on their frequency in the historical data. Additionally, players analyze distribution patterns to understand the spread of numbers across the chart.
Statistical analysis aids players in making informed decisions about their betting strategies. It enables them to assess the probability of success for various bets and helps in managing their expectations regarding potential outcomes. However, it is essential to remember that probabilities are not certainties, and Satta Matka remains a game of chance.
Pitfalls of Overreliance on Historical Data
While Kalyan Panel Chart analysis is valuable, the article cautions against overreliance on past results. Past outcomes do not guarantee future results in Satta Matka, as each draw is entirely independent and random. Placing excessive faith in perceived patterns may lead players to fall into the "gambler's fallacy," assuming that past outcomes influence future ones, which is not the case in a random game.
It is crucial for players to understand the limitations of historical data and not be misled by patterns that may arise purely due to chance. Responsible gamblers use historical data as one of several factors in their decision-making process, but they also recognize the element of unpredictability inherent in the game.
The Importance of Responsible Gambling
Responsible gambling practices are paramount when engaging in Satta Matka based on Kalyan Panel Chart analysis. The article emphasizes that players should set clear limits on their bets, both in terms of the amount they wager and the frequency of their plays. Setting a budget ensures that players do not risk more than they can afford to lose.
Additionally, responsible gamblers avoid chasing losses, as this can lead to reckless decisions and financial difficulties. They approach the game with a balanced mindset, understanding that winning and losing are both part of the gambling experience. Responsible gambling fosters a healthy and enjoyable gaming environment while mitigating potential negative consequences.
Incorporating Other Factors
While Kalyan Panel Chart analysis is an essential tool, players must consider other factors that may influence the game. The article explores how external factors, such as changes in the game's rules or market dynamics, can impact the outcomes.
For instance, modifications in the way the game is conducted may alter the odds of certain numbers being drawn. Moreover, unexpected events can introduce unpredictability into the game.
Players are encouraged to be aware of these factors and incorporate them into their betting strategies. A comprehensive approach considers not only historical data but also the broader context in which the game operates.
Balancing Analysis with Intuition
Successful players strike a delicate balance between data-driven analysis and intuitive decision-making. The article discusses the importance of trusting one's instincts and intuition, even when historical data may suggest otherwise. While analysis provides valuable insights, intuition can offer a unique perspective that complements the data.
Experienced gamblers know when to rely on their gut feeling and when to follow the patterns they observe in the Kalyan Panel Chart. Intuition allows players to adapt to the dynamic and unpredictable nature of the game, helping them navigate the intricacies of Satta Matka more effectively.
Conclusion
Kalyan Panel Chart analysis is a powerful tool that allows players to gain insights from historical data to inform their betting strategies in Satta Matka gambling.
The role of probabilities and statistics aids in assessing the likelihood of specific outcomes, while responsible gambling practices promote a balanced and enjoyable gaming experience.
However, players must exercise caution in relying solely on historical data, as the game remains unpredictable, and each draw is independent of previous results.
By incorporating other factors and balancing analysis with intuition, players can enhance their understanding of the game and make more informed decisions while enjoying the excitement and thrill of Satta Matka.
0 notes
Text
PuTTYgen and Key-Based Authentication: A Secure Approach to Remote Server Access
In the realm of secure remote server access, key-based authentication has emerged as a superior alternative to traditional password-based methods.
PuTTYgen, a crucial component of the PuTTY suite, plays a vital role in generating and managing SSH key pairs, enabling users to leverage the power of key-based authentication.
In this article, we explore the benefits of key-based authentication, walk through the process of using PuTTYgen to generate SSH keys, and demonstrate how this approach enhances security and efficiency in remote server access.

Understanding Key-Based Authentication
Key-based authentication, facilitated by PuTTYgen, offers a secure method of verifying users without passwords. It uses cryptographic pairs of public and private keys, generated by PuTTYgen, to authenticate access to remote systems.
The public key is stored on the server, while the private key remains on the user's local machine. This approach enhances security, eliminates password complexities, and allows for seamless automation and scripting.
Embracing key-based authentication with PuTTYgen ensures a safer and more efficient method for accessing remote servers.
Exploring PuTTYgen and Its Features
PuTTYgen is a user-friendly tool within the PuTTY suite that enables users to generate and manage SSH key pairs for secure authentication. It offers a graphical interface that simplifies the process of generating cryptographic keys.
Users can choose from different key types, and lengths, and add passphrase protection for enhanced security.
PuTTYgen's key generation capabilities empower users to create both public and private keys, ensuring a secure foundation for remote server access.
Generating SSH Key Pairs with PuTTYgen
Generating SSH key pairs with PuTTYgen is a straightforward process. First, open PuTTYgen and select the desired key type and length.
Click "Generate," and the tool will create the public and private keys. Save both keys securely, and optionally, add a passphrase for additional protection.
The public key is copied to the remote server, while the private key remains on the local machine. This key pair enables secure and passwordless authentication when accessing remote systems.
Importance of Securely Storing Private Keys
Securely storing private keys is crucial for preventing unauthorized access to remote systems. PuTTYgen offers password protection and encryption options to safeguard sensitive key material.
Password protection adds an extra layer of security, while encryption ensures the key file remains confidential and unreadable to unauthorized individuals.
By utilizing these features, PuTTYgen users can minimize the risk of unauthorized access and protect their private keys from potential data breaches.
Configuring Key-Based Authentication on Servers
Configuring key-based authentication on remote servers involves the following steps:
Generate SSH Key Pair: Use PuTTYgen to generate an SSH key pair (public and private keys) on your local machine.
Copy Public Key to Server: Copy the contents of the public key (usually found in a file named "id_rsa.pub") to the server's ~/.ssh/authorized_keys file. If the file doesn't exist, create it.
Set Appropriate Permissions: Ensure the correct permissions are set for the ~/.ssh directory (700) and the authorized_keys file (600) on the server. This restricts access to the authorized keys.
Configure SSH Settings: Edit the SSH server configuration file (/etc/ssh/sshd_config) on the server. Set the "PasswordAuthentication" option to "no" to disable password-based logins.
Restart SSH Service: Restart the SSH service on the server to apply the changes.
With key-based authentication configured, you can now access the server securely and passwordlessly.
When you attempt to log in, the server will challenge your local machine to provide the private key's signature, verifying your identity.
If the signature matches the public key on the server, you will be granted access without the need for a password. This method enhances security and streamlines the login process for remote server access.
Key Revocation and Renewal
Key revocation and renewal are crucial security measures to maintain the integrity of SSH communication. If a private key is compromised or if there are personnel changes, it's essential to revoke and renew SSH keys promptly. PuTTYgen simplifies this process:
Key Revocation: If a private key is compromised or no longer needed, it can be revoked. Remove the corresponding public key from the server's ~/.ssh/authorized_keys file. Revoking the key ensures that even if the private key falls into the wrong hands, it cannot be used for unauthorized access.
Key Renewal: To renew an SSH key, generate a new key pair with PuTTYgen on the local machine. Follow the same process as initial key generation. Once the new key pair is created, copy the public key to the server's ~/.ssh/authorized_keys file. Users can then securely access the server using the new key, ensuring continuous secure communication.
By revoking compromised keys and renewing with new key pairs generated by PuTTYgen, users can maintain a strong security posture and safeguard against potential unauthorized access or data breaches. Regularly updating SSH keys is a best practice to reinforce the security of remote server access.
Conclusion:
PuTTYgen streamlines SSH key generation and management, providing users with a secure and effective way to authenticate remote server access.
Embracing key-based authentication enhances security, reduces password vulnerabilities, and fosters smoother connections.
With PuTTYgen's intuitive interface and powerful features, users can bolster their cybersecurity posture, ensuring peace of mind when accessing remote servers.
0 notes
Text
The Magic 8 Ball: From Toy to Nostalgic Icon
The Magic 8 Ball, a mystical and iconic fortune-telling toy, has etched its enigmatic responses and distinctive design into the annals of popular culture.
Since its inception as a novelty item, the Magic 8 Ball has evolved into a symbol of nostalgia, traversing generations and captivating the hearts and minds of people around the world.
In this article, we embark on a journey to explore the profound cultural impact of the Magic 8 Ball, uncovering its pivotal role in shaping pop culture and its enduring legacy as a cherished relic from the past.

1. Rise to Pop Culture Prominence
We delve into the Magic 8 Ball's journey, tracing its trajectory from its introduction in the 1950s to its meteoric rise in popularity during the latter half of the 20th century.
Unearthing the clever marketing strategies employed, we discover how the toy swiftly carved its place in the hearts of millions worldwide, becoming a must-have item in the realm of fortune-telling and amusement.
2. Fortune-Telling in Entertainment
The Magic 8 Ball's mystique and allure have inspired its appearances in various forms of entertainment.
We examine how it has been featured in movies, TV shows, and literature, portraying the toy as a whimsical source of guidance, lighthearted whimsy, and even comic relief. Its role as a mystical oracle in fictional worlds adds to its enchanting allure.
3. The Magic 8 Ball in Music and Art
Delving into the world of art and music, we explore the Magic 8 Ball's presence in song lyrics, album covers, and art installations.(https://www.pinterest.com/pin/310396599322965959)
We decipher the symbolism it represents and analyze how artists have used it as a nostalgic motif, evoking feelings of wonder, uncertainty, and sentimentality through their creative works.
4. The Digital Age and Nostalgia
As technology advances, the Magic 8 Ball adapts to the digital age with virtual versions and mobile apps.
We investigate the resurgence of interest in vintage toys, and how the Magic 8 Ball embodies a sense of nostalgia and sentimentality in the fast-paced, digital world, resonating with those seeking a connection to simpler times.
5. The Magic 8 Ball as a Collectible
Stepping into the world of collectors, we explore the realm of rare editions, limited releases, and vintage finds of the Magic 8 Ball.
Discover the passion that drives enthusiasts to preserve and treasure these tangible relics of the past, signifying their cultural and sentimental significance.
6. The Magic 8 Ball's Influence on Language and Slang
We examine how the Magic 8 Ball's enigmatic responses have permeated popular culture and entered our everyday language.
Phrases like "Signs point to yes" and "Outlook not so good" have become embedded in the cultural lexicon, demonstrating the toy's remarkable influence on language and slang.
7. The Magic 8 Ball as a Social Experience
Discussing the magic of human interaction, we delve into the joy of using the Magic 8 Ball in social settings.
Whether among friends, at parties, or as an icebreaker, we analyze how the toy fosters camaraderie, sparks laughter, and creates memorable moments that form lasting connections.
8. The Enduring Legacy
Concluding with contemplation, we reflect on the Magic 8 Ball's enduring legacy as a symbol of nostalgia and its timeless appeal.
In a fast-paced, digital world, it stands as a humble reminder of the human desire for magic, mystery, and the comfort of cherished memories, continuing to resonate with people of all ages.
Conclusion
The Magic 8 Ball's cultural impact reaches far beyond its toy-like appearance and whimsical answers. It has woven itself into the fabric of pop culture, shaping our language, inspiring creativity, and invoking a sense of nostalgia for simpler times.
As it stands the test of time, the Magic 8 Ball remains an enduring reminder of the human longing for magic, mystery, and the delight of cherished memories, a symbol of wonder that continues to captivate hearts and minds around the world.
0 notes
Text
OBS Studio Best Practices: Elevating Your Content Creation
As the world of content creation continues to evolve, OBS Studio (Open Broadcaster Software) has emerged as a powerful and versatile tool for live streaming and recording.
To achieve professional and engaging content, it is essential to adopt best practices when using OBS Studio.
In this comprehensive guide, we will explore a wide range of tips and recommendations to help you make the most of OBS Studio and elevate your live streams and recordings to the next level.

1. Plan Your Content
Before going live or recording, plan your content carefully. Consider the following:
Theme and Focus: Determine the theme and focus of your content. Whether you're streaming games, tutorials, or creative activities, a clear theme helps build a dedicated audience.
Storyboarding: Create a storyboard or outline to organize your scenes and sources, ensuring smooth transitions and a structured presentation.
Engaging Introductions: Start your streams with captivating intros that hook your audience and set the tone for the rest of the content.
2. Optimize Your Settings
Efficient OBS Studio settings are crucial for a seamless content creation experience. Consider the following optimizations:
Output Settings: Adjust output resolution, bitrate, and framerate based on your internet connection and desired video quality.
Hardware Acceleration: Enable hardware acceleration if your system supports it to offload some processing tasks from the CPU.
Use Scenes and Sources Wisely: Organize your scenes and sources to minimize clutter and confusion during your streams or recordings.
youtube
3. Audio Quality Matters
Audio is a critical aspect of content creation. Pay attention to the following audio best practices:
Microphone Quality: Invest in a good-quality microphone to deliver clear and crisp audio to your viewers.
Noise Suppression: Use OBS Studio's noise suppression filters to minimize background noise and enhance audio clarity.
Audio Balance: Ensure a proper balance between game audio, voice commentary, and background music.
4. Visual Appeal with Overlays
Engage your audience visually by using appealing overlays:
Custom Overlays: Create custom overlays that reflect your brand and add a professional touch to your streams.
Alerts and Widgets: Integrate alerts for followers, subscribers, and donations to acknowledge and appreciate your audience's support.
5. Master Transitions
Smooth scene transitions create a polished presentation:
Fades and Cuts: Use subtle fades or quick cuts between scenes for smooth transitions.
Stinger Transitions: Implement stinger transitions with dynamic video effects for a professional touch.
6. Engage with Your Audience
Building a connection with your audience is vital for content creators:
Interactive Elements: Add chat integration and interact with your viewers to create a sense of community.
Respond to Chat: Engage with your viewers by responding to their messages and questions during your streams.
7. Monitor Performance
Keep an eye on your OBS Studio performance to ensure a seamless streaming experience:
Performance Stats: Use OBS Studio's performance statistics to monitor CPU usage, dropped frames, and streaming bitrate.
Test Runs: Conduct test runs before going live to check the audio, video quality, and transitions.
8. Consistency is Key
Establishing a consistent schedule builds trust with your audience:
Regular Streams: Stick to a consistent streaming schedule to let your audience know when to expect your content.
Content Variety: Offer a mix of content to keep your viewers engaged and interested.
Conclusion
OBS Studio's best practices are fundamental to creating professional, engaging, and polished content.
By planning your content, optimizing settings, focusing on audio quality, using captivating visuals, mastering transitions, engaging with your audience, monitoring performance, and maintaining consistency, you can elevate your content creation game with OBS Studio.
Embrace these best practices and unlock the full potential of OBS Studio to connect with your viewers and build a dedicated community around your content. Happy streaming and recording!
3 notes
·
View notes
Text
Popular 3D Scanner, Polycam, Uses AI to Complete the 3D Picture
Polycam, the most popular scanning app on the Apple store—and perhaps in the world has found an ingenious way to use AI in its scanning. Polycam users will be able to create a totally immersive view with the ease of creating a panorama. The normal process for getting an immersive view involves moving the camera up and down while rotating, what another iPhone-using scanner refers to as a “painting the wall” approach. But Polycam is able to take the panorama and guess the rest, as it were.
You can get a full 360 degree view of an outdoor scene in less than a minute.
Polycam uses a process it has named “stable diffusion complete,” which is based on “stable diffusion,” the technology similar to one used by media sensation, DALL-e, to generate fanciful pictures, except stable diffusion uses your computer rather than the cloud. To use stable diffusion, users must have a GPU and 8GB of VRAM. While DALL-E and stable diffusion generate images, inpaints and outpaints (more on that later), Stable Diffusion Complete appears to generate a picture based on the image itself, essentially guessing what the rest of the sky or ground would look like, and turns what is normally a low-resolution thin strip of images stitched together and puts you in the center of a full resolution, 360-degree view about the vertical axis (that’s the yaw axis if you are flying a plane), where you can also have a full 180-degree up and down view (the pitch axis).
Meeting Elliott
If Elliott Spelman, cofounder of Polycam, doesn’t strike you as the typical Silicon Valley startup founder, it’s because he is not. Spelman is a designer by education with a master’s in fine arts from Stanford. Being at the helm of a cutting-edge imaging technology is fun for Spelman.
Out for a spin is Elliott Spelman, cofounder of Polycam.
Spelman wants scanning to be fun for everyone—not just professionals with expensive LiDAR rigs. We watch Spelman’s short instructional video that demonstrates how simple it is to take a full 360-degree image.
Sure enough, that is all that is needed to record a full 360-degree immersive image. Polycam may have ruined panoramas forever. After seeing the big picture that Polycam can create, a breathtaking sky-to-ground and all-around seamless (almost) shot, could you ever go back to a thin, distorted, low-resolution image you got from Apple?
How?

Polycam creates this magic with AI, explains Spelman in a Teams meeting. We expect no less from a company with AI in its domain name.
Although several 360 imagers have the ability to create a high-resolution immersive view (e.g., Matterport, Envisioneer, Luxolis), all of them require that your camera view includes the sky and the ground.
I take it out of the office for a spin. Polycam uses the full resolution of the iPhone’s camera and its image stabilization to take a series of pictures on its own as I rotate in place. The images are uploaded and Polycam returns with what at first looks like any other picture taken with an iPhone. And then you press on the image with your finger, and lo and behold, it’s a full 360-degree, immersive image. Polycam has added a fake sky and ground. It’s pretty good fakery. You have to squint to see where reality stops and fakery starts. The ground below is an excellent guess at what would be underfoot—without me having to extricate myself from the picture.
The stitching together of images in the 360-degree sweep is not perfect—though, in all fairness, that may be Apple’s imperfection. It’s a rare overcast May day in the Bay Area and the sky looks darker suddenly from left to right in one place. But overall, the result is impressive and the process effortless. The scan took less than a minute. I didn’t have to wait more than a minute for the processing. Studying the image, I see that tilt has been magically added to the pan. The sky and ground were completely filled in.
“It’s called inpainting,” says Spelman.
Outpainting would be more appropriate, but okay.
How well does it work inside? I ask.
The AI has its limitations, Spelman admits. It can create ceilings, but it may have trouble in the Sistine Chapel.
Should you, though? There are only a million pictures of the Sistine Chapel’s ceiling, snapshots shared on Instagram, for example. In fact, Autodesk was able to create 3D models of the statues destroyed by the Taliban from publicly available photos on Google. Surely, your AI could use photos similarly?
Spelman tolerates impertinent questions graciously. He could have reminded me that Autodesk has over 10 thousand employees, whereas Polycam has but 15. It is another sign that he is not your typical hyper, type A startup founder.
But the lightweight Polycam punches above its weight. Its reality capture is easier to use than Autodesk’s ReCap Pro. Instead of clicking away and taking photos, Polycam takes pictures continuously as needed all on its own. And it generates better images faster than the “pop-up” metaverse seen at PTC’s recently held LiveWorx conference.
Better Than LiDAR?
While having the LiDAR scanner in your pocket, as with the latest iPhones, is initially exciting, the lack of accuracy is somewhat of a detriment. Also, the images from the camera look better.
Responding to a less-than-favorable review of LiDAR scanning in our first look at Polycam, Spelman has a quick solution.
“You should have used the photo mode.”
It’s unexpected that LiDAR is less accurate than photogrammetry, but here we are, with the result of the iPhone, even the biggest one being too small for multiple, accurate LiDAR sensors, leaving the iPhone with plus or minus one-inch accuracy. Professional LiDAR systems, on the other hand, command mm-level accuracy.
Why not have professional quality LiDAR on Apple’s much larger iPad, I have to wonder.
About Polycam
Spelman and Polycam’s other founder, the equally boyish-looking Chris Heimrich, left a scanning company to create an app for simple, easy-to-use scanning. They have taken a page out of the Autodesk playbook, essentially democratizing a sophisticated process available to the elite. Anyone can take their smartphone and create a 3D picture with Polycam. And have they ever. The Polycam site (“3D capture for anyone”) gives them all gallery space.
Yet, Spelman insists that Polycam is useful for the professional. It outputs its LiDAR and photogrammetry data to standard formats—for example, DXF for AutoCAD.
It was the iPhone’s ability to store the images that made all the difference. Otherwise, there is too much lag in the shooting if you have to wait for each photo to upload.
Also, unlike every other startup, Polycam is now profitable. Polycam’s revenue model is simple, $79.99 a year for unlimited use. There is a free version, which has usage and export format limits.
The free intro. version encourages engagement, and the all-you-can-eat price promotes continued use. Other pricing schemes I have seen, such as price per square foot, discourage continued use.
0 notes
Text
Ill-Fated Titan Submersible Was Based on an Unproven Design

OceanGate’s CEO and founder Stockton Rush had a problem. He wanted to take passengers to see the Titanic shipwreck. They would pay an enormous amount of money ($250,000/person) for the opportunity. But the wreck lay on the ocean floor almost 4,000 meters below the surface and his passenger-carrying submersible could only go to a depth of 500 meters. The pressure at 4,000 would crush the Cyclops fa
A video from WABASH using a tanker trailer, a shell with stiffener rings, which shows the speed and suddenness of an implosion. The severity at the depths the Titan was at would have caused a much greater pressure differential, but its walls were thicker than the tanker trailer’s. Also, the behavior of carbon fiber in an implosion is far different than it is for metal and it is uncertain whether the collapsed carbon fiber hull would have stayed in one piece. Video: YouTube.
But the swashbuckling Rush, a former commercial pilot with an aerospace engineering degree, had a solution: a thick wall cylinder held together with carbon fiber composite. Why not? Carbon fiber had worked for the Boeing 787 Dreamliner.
Never mind that every deep ocean submersible before it had shied away from carbon fiber for behavior in compression that is problematic and unpredictable. Some had been quite outspoken about using the material. Rush prided himself on breaking rules.
The task of designing the carbon fiber-enforced hull, now under scrutiny as a likely cause of the submersible’s failure, fell to Spencer Composites, led by Brian Spencer. Spencer, with his multiple engineering degrees, including a PhD from the University of Nebraska in engineering mechanics and publications galore, was an expert on filament winding, a technique he had already applied to many a land-based and aerospace product—and most important to this story—for Steve Fossett’s DeepFlight Challenger, so named because it appeared to be more like an airplane than a submersible.
Millionaire adventurer Steve Fossett, who was the first to fly a hot-air balloon around the world and the first to fly around the world without refueling, was already a legend. He planned to add to his achievements by going to the bottom of the Mariana Trench, the deepest known point in the ocean, past 19,500 meters.
Fossett was given the task of designing a carbon fiber hull for the DeepFlight Challenger. Spencer had analyzed it using COSMOS/M, by Structural Research and Analysis Corp (now incorporated into Dassault Systèmes and branded SOLIDWORKS Simulation). He had built it on a 4-axis CNC machine adapted for filament winding.
The result, a simple-looking thick-walled cylindrical pressure chamber (with the pressure on the outside, of course) in which Fossett was to lie hid a carefully placed network of carbon fibers, each placed precisely either tangentially or axially to the cylinder. Spencer’s composite design for the hull involved alternate double layers of wound carbon fiber around a core (acting against the compressive hoop stress) and a layer of fibers laid axially (against the compressive axial stress that would develop from the pressure on the hemispherical endcaps, according to a 2010 CompositesWorld.
Similarities to the carbon fiber composite in this video of the Titan’s hull are similar to what was described in the design of Fossett’s DeepFlight Challenger: 2 layers of wound carbon fiber for each layer of axially oriented fiber. Video: OceanGate via YouTube.
Because Spencer Composites was contracted a few years later by OceanGate to design the hull of the Cyclops 2 (renamed the Titan), we will assume the same wound and axial fiber composite design was used in OceanGate’s carbon fiber hulls1. A big difference, and perhaps a fatal one, is the DeepFlight Challenger needed to accommodate only one person, so it would have had less surface area, and therefore less compressive forces due to pressure, even though was designed to go to depths 5x deeper than the Titan.
Never mind that the DeepFlight Challenger’s use of a carbon fiber hull was unproven. Spencer had to use the same carbon fiber construction it had suggested for the DeepFlight Challenger for OceanGate’s submersibles. And the clock was ticking. Spencer was given 6 weeks and told he had to meet a few design constraints—a length of 2.54 m, 1.676 m outside diameter, service pressure of 6,600 psi (roughly the pressure at 4,000 meters), and a safety factor of 2.25, according to a 2017 article in CompositeWorld.
Spencer Composites’ first design of the OceanGate submersible used carbon fiber for all the structure, the hemispherical endcaps as well as the cylindrical body, according to an interview with Rush found on the University of Washington’s website. The Applied Physics Laboratory at the University of Washington, Seattle, near OceanGate’s headquarters (which Rush referred to as OceanGate’s “engineering partner”) ran pressure tests on a scale model of the Titan with carbon fiber cylinder and was at the time considering making all of the Titan’s main structure out of carbon fiber, including the hemispheric domes. However, the carbon fiber domes failed, letting water through at 3,000 meters. This probably led to the titanium domes that were actually used in the Titan.
0 notes
Text
Additive Manufacturing Takes Electronics to New Heights-and Depths
The advent of printed circuit boards (PCBs) in the 1950s revolutionized electronics. Gone were the days of painstakingly soldering circuit components by hand, point to point. A new era of automation was born that dramatically increased production rates and circuit reliability. Fast forward nearly a century and by all indications, additively manufactured electronics (AME) is poised to cause a similar disruption in the 21st century.
As the name indicates, AME is an emerging technology that leverages additive manufacturing to create electronic components. Although this general idea is quite simple, its implications are vast.
Printed, but Not 3D Printed
A PCB begins its life as a block of clean substrate. Copper is applied to this entire substrate and then removed in areas using a variety of processes including etching and milling to create the conductive path. Electronic components can then be soldered, manually or automatically, in their designated spots on this outline.

The conductive outline on a PCB eliminates the need to solder each component directly to the next. This paved the way for miniature electronics that would have been impossible otherwise. Source: © Raimond Spekking/CC BY-SA 4.0 via Wikimedia Commons.
High-end applications sometimes require multiple PCB layers. In these cases, sticky resin is used to attach multiple PCBs together. Each board contains an independent circuit, so to establish interconnectivity, a hole, or “via,” is drilled through the boards. The via is then metallized or coated in conductive material so it can carry electrical signals from one layer to the next.
Multilayered PCBs are essential to avoid sprawling, wasteful circuit designs but vias incur a substantial cost on the fidelity of the signal. When an electrical signal travels between layers, it faces a change in impedance between the trace on one layer and the via structure and then again between the via structure and the trace on the other layer. These impedance changes can cause a host of problems, such as signal reflection and electromagnetic interference.

Vias allow communication between stacked PCBs. Source:
A New Dimension
AME does away with the board paradigm entirely. Using nanoscale 3D inkjet printers, AME uses conductive and nonconductive ink to create both the housing and conductive outlines of a circuit. And because the process is additive rather than subtractive, AME can create smooth three-dimensional pathways that would be impossible to create using conventional subtractive methods. AME circuits sort of look like miniature cities straight out of the “Tron”franchise.

An AME circuit design, not Tron concept art. Source: 3DEXPERIENCE World 2023.
AME’s tremendous potential extends beyond its futuristic aesthetic. With the ability to print both conductive and nonconductive materials within the same 3D printing system, AME can create three-dimensional circuits that are directly embedded into their housing. This enables designers to utilize space much more efficiently than would be possible with flat PCBs, leading to tantalizing miniaturization potential. Printing the entire system in one go also means that less assembly is required and eliminating the conventional subtractive manufacturing process makes the circuits less wasteful and more environmentally friendly. Think of all the copper that will no longer be lost to etching.
That’s not all. With the ability to create 3D coaxial lines, vias become almost entirely redundant. This will lead to improved signal fidelity because impedance mismatches are no longer an issue. AME also reduces the need for connectors and cables. With 3D coaxial cables in your toolkit, electrical signals can flow from one functionality to the next within shielded coaxial cables. This allows signal-carrying lines to be brought closer together without fear of interference and crosstalk, leading to even more space efficiency.
If miniaturization is the name of the game in electronics—and it most certainly is—you can see how the buzz around AME is warranted.

An AME-built drone. The electronics are embedded within the mechanical structure, making it exceedingly sleek and lightweight. Source:
Designing for AME
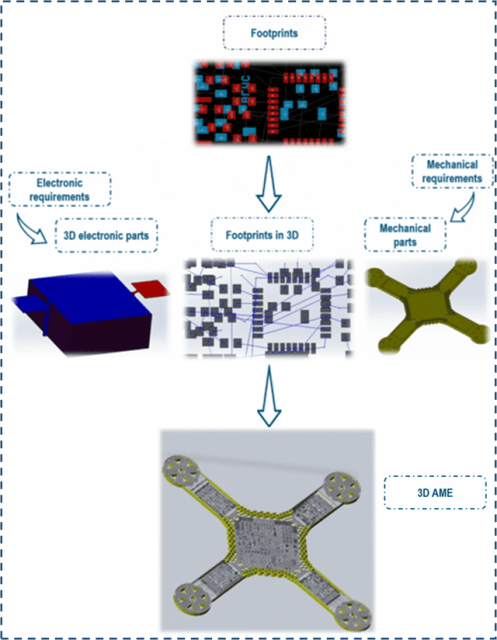
So, what does the design process for AME look like? Rolf Baltes, head of Engineering at J.A.M.E.S (Jetted Additively Manufactured Electronics Sources), recently summarized the design flow at the conference 3DEXPERIENCE World 2023.
First, he described the conventional PCB design process, which begins by simply creating a list of all the circuit’s electronic requirements, that is, what the circuit will need to accomplish. The designer can then use this list to create a schematic, which provides an overview of all the circuit’s required components and the connections between them. Next, this circuit diagram is converted into “footprints,” where symbols on the schematic are changed into drawings of actual circuit components. This introduces information about the dimensions and physical location of the components. Finally, footprints are changed into a circuit layout, which fills in the gaps with information about connectors, cables, vias and so on.

Traditional electronic design workflow, as presented by Rolf Baltes at 3DEXPERIENCE World 2023.
AME design flow looks very similar early on. “The schematic is the same,” says Baltes. “We also need the information at the footprint.” But the design flows diverge drastically here. Instead of using the footprints to generate a layout, AME requires conventional footprints to be converted to 3D footprints. J.A.M.E.S. engineers currently use DXF or ODB++ to generate these 3D footprints and to begin mapping out wiring. At this stage, you may need to add additional 3D electronic components such as antennas, capacitors or coils because these are not typically included in a conventional layout.

On the left is a conventional circuit layout. The circuit is made up of two stacked boards—blue components are on one layer and red components are on another, with vias shown in green. On the right is a collection of 3D footprints for AME. Stacking is no longer required—the assets exist in 3D space and are connected directly. Source: Rolf Baltes, 3DEXPERIENCE World 2023.
Critically, the creation of 3D footprints must consider the mechanical requirements of the system because the circuit and its housing will be printed simultaneously. The mechanical design of the system must go together with the electronic design and AMEs are an interdisciplinary venture by nature. The design process is a juggling act with factors like heat dissipation, electrical conductivity and structural integrity all up in the air.
Finally, the mechanical design and 3D footprints are combined in, say, SOLIDWORKS, and 3D connections between all circuit pads are created. The result is a computer design that incorporates both the mechanical and electronic structures into one.
Proposed AME design flow by Rolf Baltes, which he presented at 3DEXPERIENCE World 2023.
Fresh Challenges and How to Overcome Them
Like all emerging technologies, AME has its growing pains. Many of the challenges are common to additive manufacturing in general. For starters, the available range of conductive materials suitable for 3D printing is still relatively narrow. Determining ideal process parameters is still an arduous task because there are no established norms. Market inertia means that environmental tests and qualifications are slow to be established. The technology is not yet scalable to mass production—something that general additive manufacturing processes still struggle with. And, of course, accessibility remains an issue, with only the most well-off researchers and organizations able to secure the required tech for AME research and development.
Baltes believes that the key to overcoming these challenges is to build up a collaborative online community that would in essence “crowdsource” the development of AME. Establishing and maintaining this online community is the primary directive of J.A.M.E.S. Its growing AME community currently features AME periodicals, technical documents and forums. “A big part of our platform right now is education,”, says Baltes and a big part of education is connecting experts and enthusiasts across the world. This will accelerate the development of process parameter standards, environmental tests and so on as the whole community will be able to benefit from every trial and experiment. Soon, the platform will also feature printer services to improve accessibility. Researchers will be able to upload their designs to the platform and request quotations from printer service providers, enabling folks to explore the technology without taking a major financial plunge. This AME community is located at https://j-ames.com/partners/partners/community. There’s even a fledgling subreddit you can check out at https://www.reddit.com/r/AMElectronics/.
If you are an electronics expert, entrepreneur, or just a tech afficionado, you can bet this won’t be the last you hear of AME. Its prospects are simply too tantalizing and are sure to overcome its challenges.
0 notes
Text
Troubleshooting Gigabyte Motherboard LED Error Codes [Quick Fixes]

Is your GIGABYTE motherboard tossing bizarre blunder codes at you? Stressed that your PC could detonate? Try not to overreact!
These are called motherboard blunder codes and they're intended to assist you with diagnosing issues and make your PC ready again on account of some disappointment.
In this article, I'll investigate why you may be seeing them and afterward assist you with sorting out some way to tackle the most well-known blunder codes that your motherboard could toss at you!
What Are Motherboard Blunder/POST/Blare Codes? At the point when you power on your PC, your motherboard goes through a progression of tests to ensure that each part associated with it is working appropriately.
These tests are called POST or Power-On Individual tests.
Your motherboard efficiently goes through each part to check whether there's anything off-base and afterward conveys a code as signals or Driven lights to tell you of any issue.
Think about it like the check motor light in your vehicle.
Getting one of these codes can be baffling, however they make investigating equipment issues such a great deal more straightforward.
Rather than hauling stuff out haphazardly and trusting that it some way or another beginnings working, you can essentially follow the POST code to sort out what the specific issue may be!
What Are GIGABYTE Driven Troubleshoot Codes? GIGABYTE Drove troubleshoot codes are a convenient element accessible in some better quality GIGABYTE motherboards.
Fundamentally a little Driven show is generally situated close to the 24-pin ATX power connector — the presentation is frequently named as "Debug_LED" or something to that effect.
When your motherboard is turned on, you'll probably see a few codes blazing on the Drove show. This isn't intrinsically a reason to worry! Not the codes are all blunder codes.
Some are only there to show that everything is running as it ought to or that it's done with every one of the checks — codes like "AA" or "AF" demonstrate a fruitful boot succession.
Sad Drove troubleshoot codes aren't a pillar in more motherboards.
They're an exceptionally valuable device with regards to investigating, and are far superior to counting blares individually like you're attempting to interpret Morse code.
Where Do I Find All the GIGABYTE Troubleshoot Codes for My Motherboard? The most effective way to find all the troubleshoot codes for any motherboard is to reference its manual. The manual is the most probable spot to have every one of the accessible codes.
In the event that you for reasons unknown don't approach your manual, don't worry. GIGABYTE, and some other maker so far as that is concerned, gives free admittance to manuals on their site.
Basically look for your motherboard model and download the manual. You'll get a PDF, and in it, you will for the most part track down the codes toward the finish of the manual.
In case the manual doesn't help, the best strategy is to attempt to find support from online discussions like r/buildapc or our own special gathering!
The Most Widely recognized GIGABYTE Troubleshoot Codes and What They Mean Code 00 is an irritating one to sort out on account of how dubious it is. For the most part, it springs up when your computer chip is confronting an issue of some kind or another.
Everything from a broken central processor, twisted pins, or a dusty attachment could make this blunder show.
Thus, the primary game-plan I'd recommend is to reseat your central processor and check whether there are any actual imperfections with either the computer chip or the attachment.
In the event that that doesn't work, give testing a shot your computer chip with an alternate motherboard to check whether your central processor truly is the issue here.
On the off chance that that is impractical for you to do, the best thing to do is to efficiently disengage and reconnect different parts that are associated with your motherboard, similar to the Smash, GPU, PSU, and so on, to check whether they're causing the issue — the 24-pin or the 8-pin computer processor power link particularly could be the guilty party.
In the event that you're 100 percent sure that the motherboard is the weak spot, RMA-ing it is the best game-plan. Nonetheless, in the event that your motherboard is out of the RMA range, the main other choice is to carry it to an expert equipment professional.
These mistake codes regularly seem when your PC's Profiles can't instate the framework memory during the boot cycle.
The principal offenders behind these mistakes are in many cases flawed or contradictory Slam modules, ill-advised establishment, or even a harmed motherboard.
To begin investigating them, have a go at reseating the Slam modules and guaranteeing they are viable with your framework first.
You can do this via looking for the model of your motherboard, going to the authority site, and afterward going to the "Backing" area.
GIGABYTE normally has the QVL data either in its own part called "Memory Backing Rundown" or in a PDF under the "Backing Rundown" segment.
A Certified Merchants Rundown (QVL) from GIGABYTE
In the event that the issue continues, have a go at utilizing a solitary module at an at once on the off chance that one is flawed.
Moreover, check for any Profiles refreshes accessible from the motherboard producer, as this might address similarity issues with your Smash modules.
D2/D4 - PCI Allotment Mistake This blunder ordinarily springs up when your motherboard has an issue conversing with the Fringe Part Interconnect (PCI) device(s) associated with your framework.
Misconfiguration, equipment contrariness, or flawed parts can bring about this mistake.
By and large, no one purposes PCI-based gadgets any longer. Present day motherboards quite often have just PCIe openings. Notwithstanding, the above mistake actually applies to them. Things, for example, GPUs, network cards, and other extension cards that speak with your PC's motherboard consider PCI gadgets.
My investigating tips is first reseat the culpable PCI gadget. Make a point to check the PCIe space and the connector in your gadget for any noticeable harm or trash — and get over the garbage. Then reinsert the gadget and verify whether it fixed the blunder.
On the off chance that it didn't, I'd recommend interfacing the gadget to an alternate free PCIe opening and checking if that works.
In the event that it does, that could imply that your motherboard has a flawed PCIe space. The main sensible method for fixing an issue like that would be to RMA the motherboard.
I'd likewise reset the Profiles/update it to the furthest down the line form to check whether that makes a difference.
56 - 57 - Invalid computer processor Type or Speed/computer chip Confuse These blunder codes address issues connected with the computer chip.
In particular, these blunders demonstrate that there is either an invalid central processor type or speed (mistake 56) or a computer chip jumble (mistake 57) distinguished by the motherboard's Profiles.
They can be set off by an obsolete Profiles, mistaken settings, or a harmed/inconsistent computer processor.
The principal thing I'd do is reseat the computer processor to ensure that there's nothing out of sorts there — essentially, follow what I framed for mistake 00.
I'd likewise ensure that there aren't any bowed pins on either the computer chip or the motherboard. In the event that that is the situation, you'll need to RMA them or take them to an expert.
On the off chance that you're actually disposed, you could attempt to change the pins yourself, however it very well may be perilous, and assuming you mess up, you could aggravate it.
62 - Establishment of the PCH Runtime Administrations Code 62 by and large springs up when there's an issue with either your Slam or GPU.
I suggest reseating every part independently first — significance, reseat one part, verify whether it works, reseat the other, etc. Ensure all power links are appropriately gotten also.
You ought to check your Smash by following the means framed in 50-54. In the case of nothing changes, then, at that point, the GPU likely's wrecking everything.
Assuming your computer processor has an incorporated GPU or "iGPU", you can take your devoted GPU out and check whether that fixes anything — make sure to interface the screen to a showcase connector on the motherboard first!
In the event that the framework runs fine, your GPU is no doubt the issue. To affirm it, I'd recommend testing your GPU with one more PC to check whether it works there.
Contingent upon how that goes, you might have to consider RMA-ing your GPU or motherboard or buying new ones altogether.
99 - Super IO Instatement This mistake by and large springs up when something is off about the peripherals associated with your motherboard.
I'd propose turning off all auxiliary links like charging links, console/mouse links, and so on, and afterward checking whether it boots.
Have a go at reseating show links, PSU links, and so on, on the off chance that that doesn't work. I'd recommend doing the investigating steps framed in code 00 too.
In the event that you're turning the framework on interestingly, you could get this mistake on the off chance that you don't have a console associated too. So you could have a go at interfacing a console that you know to be working and check whether it works.
A0 - IDE Introduction Is Begun At long last, one of the great ones. By and large, A0 is one of those codes that you'll see each time you turn on your PC, regardless of whether it checks out.
It implies that all is running well and your motherboard is giving control to the operating system.
So assuming you see this one glimmering, nothing remains to be stressed over!
A2 - IDE Recognize In the event that you've run into this blunder, you're likely an information hoarder. A straightforward blunder's essentially letting you know that your motherboard is struggling with managing all the stockpiling drives associated with it and sorting out which crash to boot into.
The most straightforward method for addressing this issue is to just introduce the drive with your operating system in it or introduce the drive you will place an operating system into first. Then, at that point, restart and introduce your other drives.
Your motherboard ought to have been naturally sorted out the boot request as of now, yet in the event that it hasn't, you can physically transform it in the Profiles.
FAQ
Do All Motherboards Have Beep Codes?
Most motherboards have beep codes, but not all of them. Unless you’re using ancient technology, your motherboard will most likely have beep codes.
This isn’t to say that you’ll hear them though. Motherboards back in the olden days had small speaker components that created the beeps, but you don’t have them these days.
You generally need to have connected the motherboard to some speakers or headphones to hear the beep codes now.
0 notes
Text
How To Tell Your SSD Is Failing

Ever wondered how to tell your SSD is failing? You’ve come to the right place.
In this article, I’ll be telling you what warning signs to look out for concerning your SSD, and ways to troubleshoot or even fix the problems you’re having with your SSD.
Let’s not waste any time, and dive right in!
A Brief on SSD and HDD Failure Rates
So, a little-known fact: SSDs are actually less likely to fail than traditional HDDs!
Early-age SSDs weren't exactly as refined for a long existence of activity as HDDs, yet nowadays the assumption is that under normal use, either drive type ought to endure as long as a decade.
SSDs are even viewed as more sturdy than HDDs, since their absence of moving parts* makes them less inclined to flop because of clatter or actual shock.
*The "no moving parts" part of SSDs is precisely exact thing makes them Strong State Stockpiling.
How To Tell If Your SSD Is Failing: 5 Warning Signs
1. Noticeably Slower Performance
The clearest reason to worry would be assuming your SSD starts having recognizably more slow execution. While this could be brought about by completely filling a SSD, this lull being available even with stockpiling to extra could be demonstrative of an issue with your strong state drive.
The whole mark of a SSD contrasted with a HDD is to make your PC as fast fire as conceivable while sending off applications — even on low-end machines, a SSD can perceptibly further develop the client experience.
Assuming your SSD-prepared PC is less responsive than it used to be, that could possibly be an indication of capacity issues.
2. Boot Issues
One more significant issue for a SSD would be boot issues (postponed boot times, hindered boots), especially in the event that you are involving your SSD as your Working Framework Boot Drive.
SSDs are focused on as boot drives, even in frameworks utilizing at least one HDDs, since sending off the working framework is normally the most tedious thing a PC can do. Particularly in the periods of HDDs or (god prohibit) 5400 RPM PC HDDS, sending off a PC without a SSD used to require genuine minutes contrasted with the fast hours of kickoff standard on the present gadgets.
3. Mandatory File System Repairs
One more sign that something might be the matter with your SSD is assuming you're compelled to do record framework fixes.
A capacity, as a rule, drive's document framework is typically an extremely set-and-fail to remember thing. You design your capacity drive either while you're introducing the working framework in the first place, or in the wake of introducing the new drive close by your unique boot drive. This shouldn't bring about any drawn out issues.
In this manner, constrained record framework fixes might be an indication of forthcoming equipment disappointment or programming/equipment gives somewhere else in your PC slowing down the activity of your Strong State Drive.
4. The Read-Only Error
Thus, this is a significant issue, yet in addition something of a redeeming quality on the off chance that you're ready to get your hands on another capacity drive or reinforcement your most significant records somewhere else.
A "read-just mistake" is essentially precisely exact thing it seems like: your SSD can never again compose records, just read them.
This implies you ought to in any case have the option to boot into Windows and such, however refreshing the operating system, downloading new documents, or altering current records will not be accessible to you except if you have another capacity drive accessible.
5. A Blue Screen of Death
As creepy as a Blue Screen of Death (BSOD) is, without anyone else, it isn't really a reason to worry, particularly in the event that it doesn't end up repeating.
A BSOD can likewise be brought about by essentially any part in your framework at a given time.
The cutting edge PC working framework is a mind boggling animal with a ton of moving parts (in programming), and a BSOD happens when, for reasons unknown, those parts quit cooperating appropriately. Assuming you're fortunate, you'll just see it once and be permitted to forget about it.
Be that as it may, a common BSOD is a reason for serious concern. In the event that this is going on to you, it's critical to make note of the mistake code given to you with the BSOD, since this will give you the most understanding concerning how to analyze which part or application in your framework is causing the issue.
Utilizing Windows' Occasion Watcher is likewise a decent choice, gave you're ready to boot into Windows without blue-screening.
6. Bad S.M.A.R.T Health Score or Failure
While the above signs might indicate a SSD issue, the guilty party can without much of a stretch untruth somewhere else too. To really check your SSD's wellbeing, it's ideal to utilize a designated instrument that can truly dissect and gauge assuming your SSD is probably going to fizzle or is now coming up short.
S.M.A.R.T (represents Self-Checking, Examination, and Detailing Innovation) is such a framework set up to watch out for a bunch of markers in how a SSD has been utilized up to this point and helps us extrapolate and eventually forestall a SSD disappointment by supplanting it before it's past the point of no return.
This is the way to peruse your SSD's S.M.A.R.T score and wellbeing status:
0 notes
Text
What Kind of Computer Do You Need?

Are you thinking about buying a new Computer or Laptop, or want to upgrade your existing one, but don’t really know where to start?
In this 4-Step Beginner’s Computer Guide you will find out what type of Computer you should get, by answering just a few important questions:
Type: Do you want a Desktop PC or a Laptop?
Purpose: What will you be using your brand new PC for?
Budget: How much are you willing to spend?
Assemble! Order a Pre-Built PC or build it yourself?
I'll address questions, for example, "What PC would it be advisable for me I purchase?" and the sky is the limit from there.
In the event that you like, you can likewise make a plunge further and realize what explicit parts you really want to construct a PC and how you fabricate a PC without any preparation.
You'll observe that building your own PC is simple and tomfoolery, and you'll have the option to streamline your parts for most extreme execution in your particular jobs.
Yet, this moment, we should begin straightforward by responding to the principal Question in tracking down the right sort of PC for you:
1. Do you want a Desktop PC/Workstation or a Laptop?
If you already know the answer, great! You might want to skip this section and Continue at 2. If not, read on:
Desktop PC
A Work area PC as a rule sits on top of your work area (thus the name) or under your work area.
It as a rule arrives in a pinnacle size and measures around 20x40x50cm (8x16x20 inches), very much like the one you can find in the picture beneath.
The purported PC-Case is generally dark, dim, or white and can come in a wide range of varieties, with side-entryways, glass boards and different elements that you may or probably won't require.
The Work area PC is intended to be fixed and is just moved in uncommon cases. Moreover, you'll require a Screen, Console, and Mouse to finish your Work area PC and have the option to work with it.
A Work area PC is substantially more remarkable than a PC, at a similar price tag.
Given its size and the capacity for lodging bigger parts, better cooling, and a power supply associated straightforwardly to the wall and not to a battery - this seems OK.
So on the off chance that you are anticipating taking care of undertakings that require exceptionally elite execution, (for example, happy creation or very good quality gaming), you ought to think about a Work area PC over a PC.
A Work station can likewise be overhauled substantially more effectively on the grounds that the entrance and format of PC-Parts within the PC-Case are based around the capacity to effortlessly trade out and assemble your own PC.
Laptop
The primary advantage of a PC is its portability.
You can get a PC and take it with you significantly more effectively than a Work area PC. It likewise has a screen, touchpad and console coordinated straightforwardly, meaning you just need to heft around one thing to change your work environment.
Tragically, in light of the fact that a PC is such a ton more modest than a work area PC, it likewise makes them cool and power restricts that it needs to stick to.
This implies lower execution, as the implicit parts in a PC must be worked to run on less power and more fragile cooling, meaning they likewise convey less execution.
Assuming Portability is of most extreme significance to you yet you actually need outrageous execution, there are Workstations that offer comparative speed to Work area laptops, yet they are very weighty and become boisterous exceptionally quick.
This is primarily on the grounds that they attempt to compensate for more vulnerable cooling with quicker turning fans.
Redesigning a PC to more grounded parts is typically very troublesome, with the Capacity Drive and Slam generally being the main two parts that you'll have the option to trade out.
Whatever else, a computer chip, GPU, or Mainboard are incorporated into the PC as it were, that makes updating them extremely challenging.
Dealing with a PC is restricted to the in-constructed, more modest Screen (except if you have additional Screens where you work), and chipping away at the touchpad can dial you back a ton.
Content editing, Perusing, Coding, straightforward Movement Plan, basic Activity, and essential Video and Photograph Altering should be in every way possible on PCs.
In the event that you work on complex ventures however, you will be extremely grateful to have a Work area Workstation. Particularly assuming you do GPU/computer chip Delivering and other Handling work that requires strong parts.
Laptop vs. Desktop PC Summary:
Pick a Laptop for Mobility
Pick a Desktop PC for maximum Performance
2. Purpose of the PC/Laptop, What will you be using it for mostly?
Why will you utilize this PC, and particularly, what sort of Programming and Jobs will you run on an everyday premise?
We should investigate some famous Use-Cases and what they involve (Go ahead and skirt a portion of these parts until you find your Utilization Case):
0 notes
Text
Troubleshooting Gigabyte Motherboard LED Error Codes

Is your GIGABYTE motherboard tossing abnormal blunder codes at you? Stressed that your PC could detonate? Try not to overreact!
These are called motherboard blunder codes and they're intended to assist you with diagnosing issues and make your PC ready again on account of some disappointment.
In this article, I'll investigate why you may be seeing them and afterward assist you with sorting out some way to settle the most well-known mistake codes that your motherboard could toss at you!
What Are Motherboard Error/POST/Beep Codes?
At the point when you power on your PC, your motherboard goes through a progression of tests to ensure that each part associated with it is working appropriately.
These tests are called POST or Power-On Individual tests.
Your motherboard methodicallly goes through each part to check whether there's anything off-base and afterward conveys a code as signals or Driven lights to inform you of any issue.
Think about it like the check motor light in your vehicle.
Getting one of these codes can be baffling, however they make investigating equipment issues such a great deal more straightforward.
Rather than hauling stuff out haphazardly and trusting that it some way or another beginnings working, you can essentially follow the POST code to sort out what the specific issue may be!
What Are GIGABYTE LED Debug Codes?
GIGABYTE Drove troubleshoot codes are a convenient component accessible in some better quality GIGABYTE motherboards.
Essentially a little Driven show is generally situated close to the 24-pin ATX power connector — the presentation is frequently named as "Debug_LED" or something to that effect.
When your motherboard is turned on, you'll probably see a few codes blazing on the Drove show. This isn't innately a reason to worry! Not the codes are all mistake codes.
Some are only there to show that everything is running as it ought to or that it's done with every one of the checks — codes like "AA" or "AF" demonstrate an effective boot grouping.
Sad Drove troubleshoot codes aren't a pillar in more motherboards.
They're an exceptionally helpful instrument with regards to investigating, and are far superior to counting blares individually like you're attempting to unravel Morse code.
Where Do I Find All the GIGABYTE Debug Codes for My Motherboard?
The most ideal way to find all the investigate codes for any motherboard is to reference its manual. The manual is the most probable spot to have every one of the accessible codes.
In the event that you for reasons unknown don't approach your manual, don't worry. GIGABYTE, and some other maker so far as that is concerned, gives free admittance to manuals on their site.
Essentially look for your motherboard model and download the manual. You'll get a PDF, and in it, you will for the most part track down the codes toward the finish of the manual.
In case the manual doesn't help, the best strategy is to attempt to find support from online discussions like r/buildapc or our own personal gathering!
The Most Common GIGABYTE Debug Codes and What They Mean
00 – Not Used
Code 00 is an irritating one to sort out in view of how unclear it is. By and large, it springs up when your computer processor is confronting an issue of some kind or another.
Everything from a broken computer processor, bowed pins, or a dusty attachment could make this blunder show.
In this way, the principal strategy I'd recommend is to reseat your computer chip and check whether there are any actual imperfections with either the central processor or the attachment.
In the event that that doesn't work, give testing a shot your central processor with an alternate motherboard to check whether your computer chip truly is the issue here.
In the event that that is unrealistic for you to do, the best thing to do is to efficiently detach and reconnect different parts that are associated with your motherboard, similar to the Smash, GPU, PSU, and so on, to check whether they're causing the issue — the 24-pin or the 8-pin computer processor power link particularly could be the offender.
In the event that you're 100 percent sure that the motherboard is the weak spot, RMA-ing it is the best strategy. Nonetheless, on the off chance that your motherboard is out of the RMA range, the main other choice is to carry it to an expert equipment specialist.
0 notes
Text
What You Need to Know About GPU-Accelerated Workstations

Designing workstations should stay aware of new equipment and programming advancements that are becoming crucial for PC helped plan (computer aided design) and PC supported designing (CAE) experts. Large numbers of these arising advances wouldn't be imaginable without the register power conveyed by illustrations handling units (GPUs).These GPU-helped innovations incorporate high goal 4K showcases, expanded and augmented reality (AR/VR), photorealistic delivering direct from computer aided design records, man-made brainpower (artificial intelligence) includes that convey already unfathomable help to engineers, intuitive CAE utilized forthright in the plan cycle, and generative plan (transformative algorithms).Choosing the right GPU can futureproof your designing workstation over the normal lifecycle of proprietorship, permitting you to increment efficiency, support item development, and embrace arising advancements with negligible disturbance.
Why GPUs Matter to Engineers
GPUs are driving in-silico reproduction and plan approval, which is progressively dislodging the requirement for tedious and exorbitant actual models. This can bring about decreased costs and abbreviated plan cycles while conveying prevalent items.
Strong GPUs are expected for item planners utilizing AR, VR, or blended reality (MR) to lead configuration surveys or assess ergonomics.
GPUs will keep on assuming a major part in supporting remote endlessly telecommute, which will proceed with even after the pandemic decreases. Reevaluating 3D plan work processes to be adaptable, extensible, and efficiency helping will require new GPU-controlled programming advances. The requirement for progressing remote work with geologically scattered groups requires expanding GPU use for video conferencing devices like Zoom or Microsoft Groups the entire way to industry driving instruments for computer aided design, CAE, and 3D plan visualization.GPUs can address time-to-showcase challenges by empowering strong innovations like delivering, intelligent CAE, and generative plan. These GPU-based advances help designing experts in investigating new assembling strategies to create imaginative plans with energizing new highlights.
Capabilities of Modern GPUs
Current GPUs should be essential for a versatile sped up figuring foundation fit for dealing with each responsibility — whether dealing with server farm computer based intelligence, edge man-made intelligence, huge information examination, information science reenactments, or expert perception of all kinds.The best contemporary GPUs convey constant beam following, which supports proficient representation, movement, and club or customer gaming. GPUs with specific equipment for AI calculations can utilize artificial intelligence to quickly denoise renders, give predominant enemy of associating, or convey novel elements that can't be accomplished without simulated intelligence. These elements engage designing experts by changing their GPUs from a framework part to a functioning assistant.For case, six workstation illustrations cards inside the NVIDIA RTX line (the A6000, A5500, A5000, A4500, A4000 and A2000 12GB) can convey constant photorealistic beam following with their specific RT Centers. These cards likewise highlight Tensor Centers for man-made intelligence speed increase and loads of cutting edge GDDR6 ECC memory to guarantee the GPU has better admittance to the information it needs.
Basic Building Blocks that Every Engineering Workstation Needs
The following features are basic building blocks that every engineering workstation needs:
Access to massively parallel processing power.
High-performance networking for remote work, design reviews, and large models or designs.
High-capacity, high-performance storage, with a RAID implementation for backing-up critical design data.
The Essential Business Metrics of Engineering Workstations
It is important to consider the following business metrics when selecting an engineering workstation:
Cost of possession: Does it give areas of strength for an on venture (return on initial capital investment) and unsurprising future expenses? Adaptability: Does it uphold fa assortment of figure, illustrations, and simulated intelligence concentrated jobs? Biological system joining: does it incorporate principles based hardware and driving programming that completely takes advantage of the capacities of GPUs? Versatility: Is it simple to overhaul and effectively adaptable (for example with GPU memory pooling) with the capacity to incorporate into complex work processes? Efficiency: Does it offer liquid, intuitive execution that empowers imagination and permits extra or new plan prospects to be completely investigated? Imagination: Does it have the exhibition to "move" of the innovative strategy and permit clients to plan or reproduce various methodologies in-silico before actual models are created? return for capital invested of scaling: Could it at any point uphold GPU responsibility data transmission prerequisites yet in addition scale out in a layered stockpiling framework? Many designing apparatuses now require extra handling execution and capacities that main GPUs can give. The right GPU futureproofs designing workstations by allowing them to oblige developing and continuous designing patterns.
0 notes
Text
Are M3 MacBooks worth it / worth the wait? [2023 Update]


TABLE OF CONTENTS
Apple ARM-based MacBooks took the world by storm back in Q4 of 2020 and, needless to say, they’ve upended and disrupted the entire market in a myriad of different — and hugely important — ways.
M1- and M2-based Macs are some of the best and most spectacular laptops money can buy and, frankly, it’s not even up for debate. They excel at pretty much everything other than gaming.
They’re insanely efficient, incredibly powerful, and have a kind of battery life that can easily get you through two days’ worth of work.
0 seconds of 0 secondsVolume 0%

Image Credit: Apple
Once you combine this with top-notch craftsmanship, a best-in-class trackpad, a stellar keyboard, a beautiful 16:10 display, and an unrivaled set of speakers, you get a killer combination of features and computational prowess — one that has resulted in record-breaking sales.
And so, one could argue that Apple’s sort of competing with itself at this point. No other manufacturer covers as many proverbial bases and ticks as many boxes as Apple does at this point in time.
Interestingly enough, though, this Cupertino-based tech giant had such a tremendous “winner” on its hands that it sort of overdelivered.
Apple’s M1 Was Too Good
Mac sales as a whole have plummeted to such a degree that Apple opted to halt the production of its M2 line of SoCs. That’s essentially unheard of given the sheer popularity of Apple’s entire product stack.
The M2 is, essentially, a stopgap solution. It was never designed to provide that big of an improvement over the M1, and everyone knew it — the reviewers, industry insiders, and, by the looks of it, the customers, too.
The entire world is in a recession, which means that luxurious spending is no longer a possibility for a vast number of people.
And, frankly, the fact that Apple’s entire M2 line-up is only marginally better than its predecessor means that people don’t really have that big of a need to upgrade.
Heck, even the M1-based MacBook Air — which, by the way, is the de facto best laptop for under a thousand dollars — is powerful enough for basically any rational task you might want to throw its way.

Image Source: Apple
Those who needed a fair bit more power naturally opted for the M1 Pro and M1 Max machines and are happy and satisfied beyond belief with what they got for their money’s worth.
And so, if all those laptops still perform exceptionally well, if they’re still incredibly silent and powerful, why would anyone even buy the M2 models? That’s a very real issue for Apple and, by the looks of it, they know it as well.
That’s also why the entire M3 line-up is bound to make one heck of a splash.
Are M3 MacBooks Worth It & Worth the Wait?
They absolutely are. The M3 will be based on TSMC’s 3-nanometer process which will bring tremendous performance and efficiency improvements.

Image Credit: TSMC
The M3 will most likely feature more CPU and GPU cores (alongside numerous other refinements) which will allow it to outperform even the most powerful of Apple’s previous SoCs.
After crunching some numbers, YouTuber Vadim Yuryev surmised that Apple’s base M3 chip will deliver the following numbers in Geekbench 6:
Single-core: 3472
Multi-core: 13676.
Now, it’s still obviously way too early to give out any guarantees, but his logic and reasoning seem good and are actually based on the previous processing-related gains which Apple was able to attain.
The jump from 5nm to 3nm is absolutely huge, so while these numbers might seem a bit too unrealistic, they do have a fair bit creedence.
And, frankly, even if the SoC doesn’t end up being as powerful as we expect it to, it’ll still offer a tremendous level of performance — one that’ll, at worst, match the M2 Pro in multi-core performance whilst leaving in the dust in regards to single-core.
Now, one might argue that Apple would never deliver such an incredible gen-on-gen upgrade as it would inevitably cannibalize its own sales.
Then again, if Apple no longer sees the point in manufacturing M2 SoCs, then they obviously have big plans for the future — they need to deliver big time in order to not only bring new buyers in but also incentivize previous customers to upgrade.
That’s why this SoC, in particular, is such a big deal. TSMC’s 3nm node is stupendously expensive but also incredibly advanced, too. Apple needs a home run in order to correct course and, by the looks of it, a home run is all but guaranteed.
When Are M3 MacBooks and Mac Devices Coming Out?
That, unfortunately, is still unknown. They were supposed to come out in Q4 of 2023, but that no longer seems to be the case.
According to recent reports, TSMC — despite its prowess — hasn’t been able to ramp up production fast enough in order to meet all of Apple’s demands.
The A17 Bionic (which will be housed within the forthcoming iPhone 15 Pro and 15 Pro Max) is also based on a 3nm node but its development requires a slightly different process — it requires a different number of chips per wafer.
Moreover, TSMC’s yield rate is supposedly just above the 50% mark which is rather unimpressive. The company does expect to reach 70% in the future, but that improvement isn’t going to come as soon as Apple would like.

Source: Wikichip
This obviously isn’t the kind of result this venerable company wanted, especially considering the fact that it has spent an astounding amount of money in order to become TSMC’s first and only 3nm customer (for the time being, at least).
And, unfortunately, because Apple makes the grunt of its profits through iPhone sales, it might be forced to push the release of all M3-based Macs to Q1 of 2024 or, at worst, Q2.
This is the worst-case scenario, but there’s still hope that Apple will find a way to release the M3 MacBook Air and MacBook Pro this Fall.
If TSMC’s issues persist, Apple will also have to lower the performance targets of both the A17 Bionic and the M3 (and, most likely, its more powerful Pro and Max variants).
Apple Is Prioritizing iPhones Over MacBooks
Apple will, most likely, have to prioritize either the A17 Bionic or, alternatively, the M3.
And while this certainly is an issue they didn’t expect to face, one would have to argue that the writing’s already on the wall: iPhones sell in much larger volumes than any other product in Apple’s portfolio.
The following earnings report says it all:
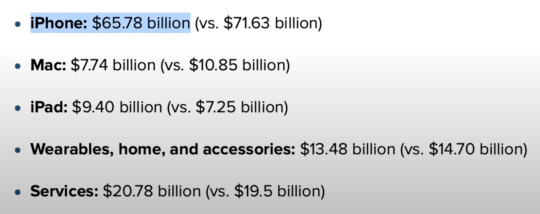
Source: Max Tech
Mac devices are no longer in high demand, so if Apple really does end up having to choose one over the other (as in: choose between the A17 Bionic and M3), it’s pretty clear which direction they’re going to lean towards.
And, well, naturally so.
What’ll end up happening still remains to be seen but, if things pan out as we now expect them to, Apple’s M3 MacBooks will most likely get pushed back by a couple of months.
There’s still a slim chance of them being released this Fall but, even if that does end up being the case, they’ll nonetheless face extremely limited stock and availability.
Conclusion
If you’re in the market for an Apple Silicon Mac device — be it a MacBook, an iMac, or a Mac Mini — you should, by all means, wait for the M3 to come out as it’ll provide a tremendous boost in both performance and efficiency.
0 notes
Text
NEW TRANSLUCENT XBOX ONE CONTROLLER
Microsoft is celebrating the 20th birthday of Xbox with a couple of new, translucent accessories, including a wireless controller and a wired gaming headset. They’ll launch on November 15th, 2021 — marking 20 years to the day — and preorders are available now.

Starting with the controller, Microsoft says its translucent look is a callback to the see-through controllers that shipped with the original Xbox debug kits. There are splashes of the brand’s signature green on the Xbox home button, as well as around the D-pad and rear grips. Microsoft colored the components silver so they’d be easier to see through its casing. Internally, though, it’s the same model as the one that ships with the Series S and Series X consoles, with Bluetooth support for connecting to mobile devices and PCs. This controller costs $69.99 to preorder through the Microsoft Store, as well as Amazon.
The wired Xbox stereo headset is also getting the translucent treatment, but on a smaller level. Its ear cups are see-through, with a green 20th anniversary marking on the left ear cup. There are also bright green accents on the grilles between the ear pads and cups, as well as on the microphone. This special-edition headset will cost $69.99 from the Microsoft Store and Amazon, as well, which is $10 over the standard model’s pricing. You can read more about this model (sans the cool 20th anniversary design) in our previous coverage here.
0 notes