
Hey there how are you doing? I am Satheesh, a mobile apps developer by career. I love programming and am addicted to code. Apple fanboy, iOS freak, gadget maniac, perfecting the task of being a perfect geek, talk to me all day about technology and you are my BFF. Valar Morghulis :)
Don't wanna be here? Send us removal request.
Statistics
We looked inside some of the posts by thecodeninja and here's what we found interesting.
Average Info
Notes Per Post
30
Likes Per Post
25
Reblog Per Post
5
Reply Per Post
0
Time Between Posts
2 months
Number of Posts By Type
Text
9
Note
3
Last Seen Tumblr Blogs


Fun Fact
Users from the US are the majority of Tumblr visitors.
Text
iOS 10 Notifications (What is new) - Part 1
I must admit that I have a huge crush on the notifications API regardless of the platform (oh yeah I really like the notifications API in Android too) and I have never shut up about it since iOS 7 now in iOS 10 things get even better. There is a new framework altogether to handle notifications both remote and local, the UserNotifications framework. Previously all the notifications API were bundled within the UIApplication class of UIKit and Apple has realized that notifications play a crucial part in the way users interact with the platforms which is evident in all the WWDC sessions and no wonder they plugged a lot of things out. Not just plugging out has happened but there is a lot of new features too.
If you have been using the UILocalNotification class as you have been doing since ages we need to move on to the new UserNotifications framework. Yes here comes the truth UILocalNotification is deprecate since iOS 10.
If you go see the UILocalNotification class you would find this,
@available(iOS, introduced: 4.0, deprecated: 10.0, message: “Use UserNotifications Framework’s UNNotificationRequest”) public class UILocalNotification : NSObject, NSCopying, NSCoding
Even the way we were receiving notifications are changed, we need to move on to the new framework.
@available(iOS, introduced: 4.0, deprecated: 10.0, message: “Use UserNotifications Framework’s -[UNUserNotificationCenterDelegate willPresentNotification:withCompletionHandler:] or -[UNUserNotificationCenterDelegate didReceiveNotificationResponse:withCompletionHandler:]”)
optional public func application(_ application: UIApplication, didReceive notification: UILocalNotification)
After seeing all this it was pretty much clear that the whole of UILocalNotification is going to be flushed away from iOS 10.
So after going through all the sessions and with my experience with notifications in iOS I am pretty sure that I need to make a lot of changes in the existing code and was pretty surprised of the many changes done here.
So coming to the new features that have been introduced, apps can now send notification with enriched content and users can see the content without even opening the app. The most important types of attachments that were talked about are,
Images
Videos
Audio
Last but not least GIFs!
The other new feature worth mentioning is the custom UI that apps can now show during notification presentation yes you can modify the UI format in which notifications are presented in your app. Hmmmmm I guess that is a pretty big topic and lets just cover that in another post, please!!
Ok then I just started tinkering with local notifications using the UNUserNotificationCenter class in the UserNotifications framework and tried to send some notifications with attachments,
So lets get our hands dirty with some code to send a simple notification with the UserNotification APIs,
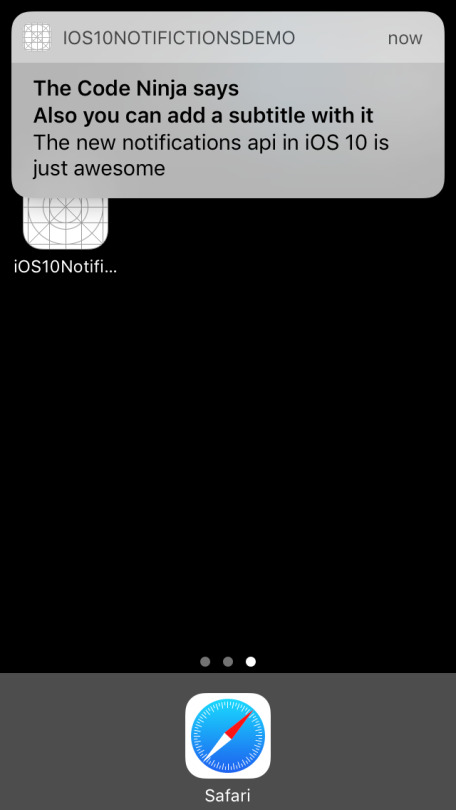
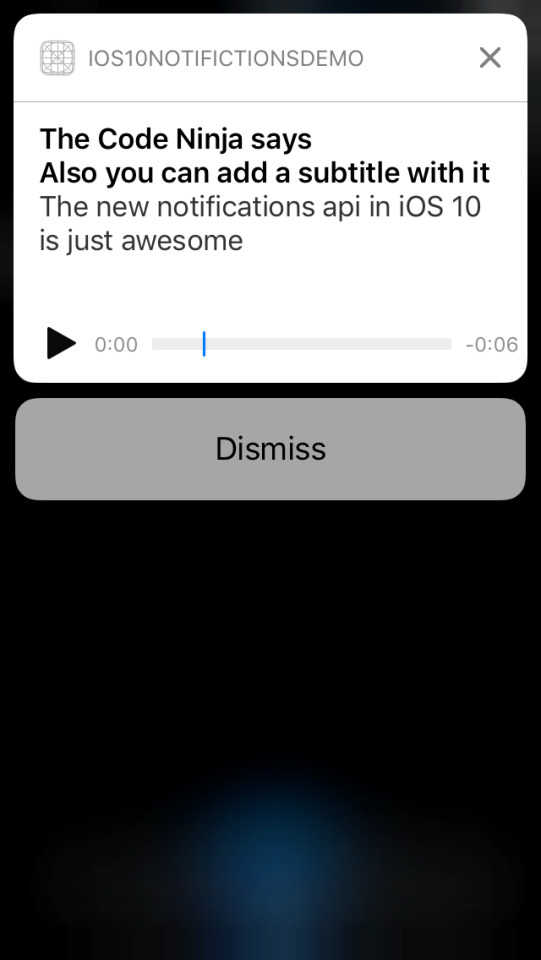
///Creating a UNMutableNotificationContent object that will specify the notification content details let content = UNMutableNotificationContent() ///Setting the title content.title = "The Code Ninja says" ///Setting the body content.body = "The new notifications api in iOS 10 is just awesome" ///Setting the subtitle property, this is new for iOS 10 alone. content.subtitle = "Also you can add a subtitle with it" ///Setting the trigger time let trigger = UNTimeIntervalNotificationTrigger(timeInterval: 5, repeats: false) ///Setting the identifier to identify different types of notifications let requestIdentifier = "TheCodeNinja_Identifier" ///Creating a UNNotificationRequest object with the identifier, content and the trigger object let request = UNNotificationRequest(identifier: requestIdentifier, content: content,trigger: trigger) /// last step, Adding the request to UNUserNotificationCenter.current()'s queue so that it presents the notification when the trigger happens. UNUserNotificationCenter.current().add(request) { (error) in}
I ran the app, BOOM I got a notification with an image like below,
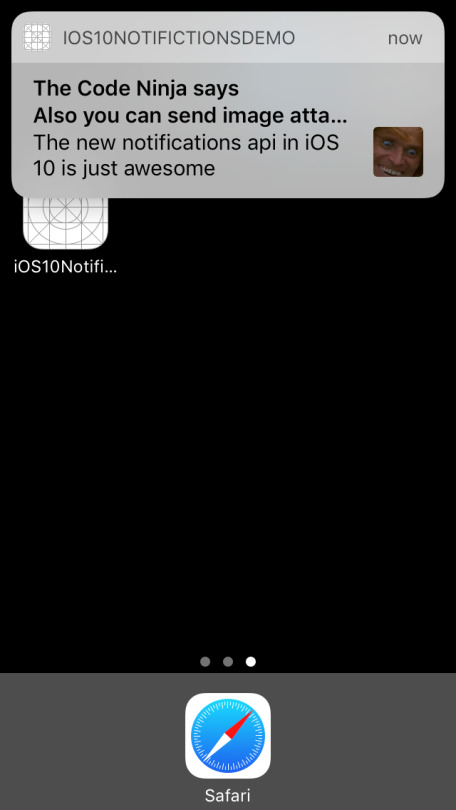
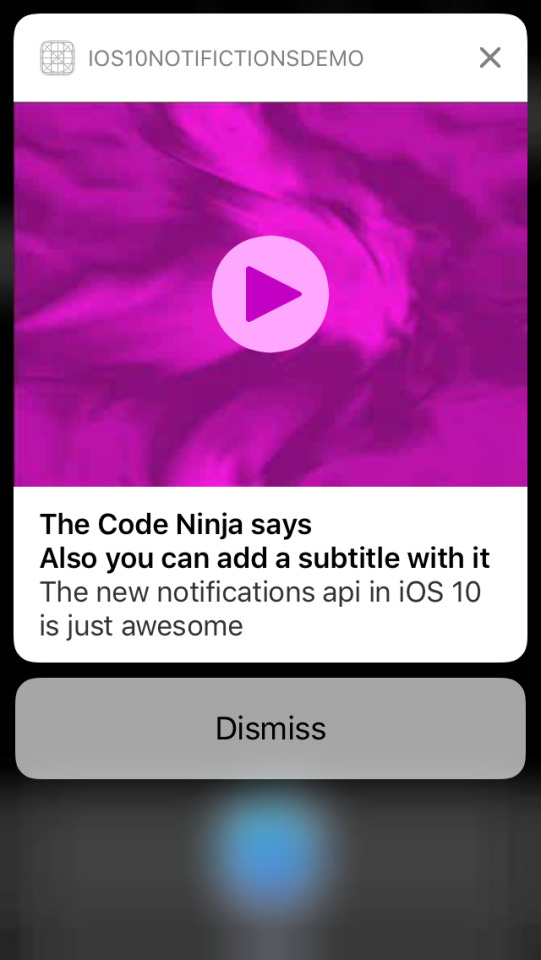
Now let us try a bit more interesting, we’ll try to add an image attachment to the notification, to do that add the below code before sending the notification
/// Creating a image URL from bundle let imgURL = Bundle.main().urlForResource("notification", withExtension: "jpg") /// Creating an attachment object let notificationImageAttachment = try UNNotificationAttachment(identifier: "jpg_identifier", url:imgURL! , options: nil) content.attachments = [notificationAttachment!]
Hit Run, you will get something like below…
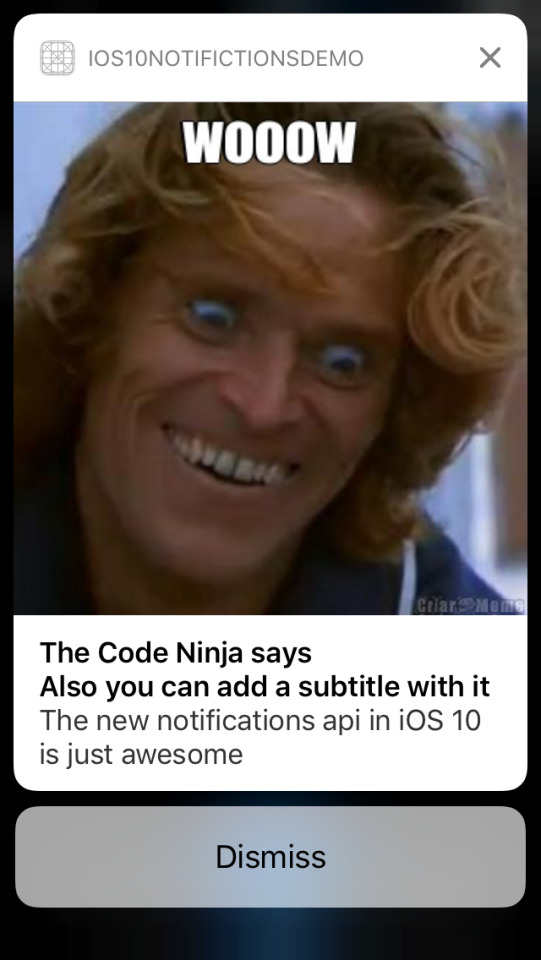
Isn’t that just great, but I was running in the simulator and could not interact much with the attachment but if you have a device with 3D touch you could try out how will you can interact with the notification attachment.
I tried different types attachments like audio, video and GIF’s but could not test all on the simulator and the framework automatically tries to crack the file type for you, if you are trying to do anything apart from common file formats then you can specify the file type like below mentioning the hint key to the API,
let notificationOptions = [UNNotificationAttachmentOptionsTypeHintKey:kUTTypeMP3] /// Creating an attachment object let notificationImageAttachment = try UNNotificationAttachment(identifier: "audio_identifier", url:imgURL! , options: notificationOptions)
All the code I have been doing so far is here. See you all for now, will post more soon on my discoveries on the new notifications API.
UPDATE 1
The code has been upgraded to the changes in Xcode 8 beta 2.
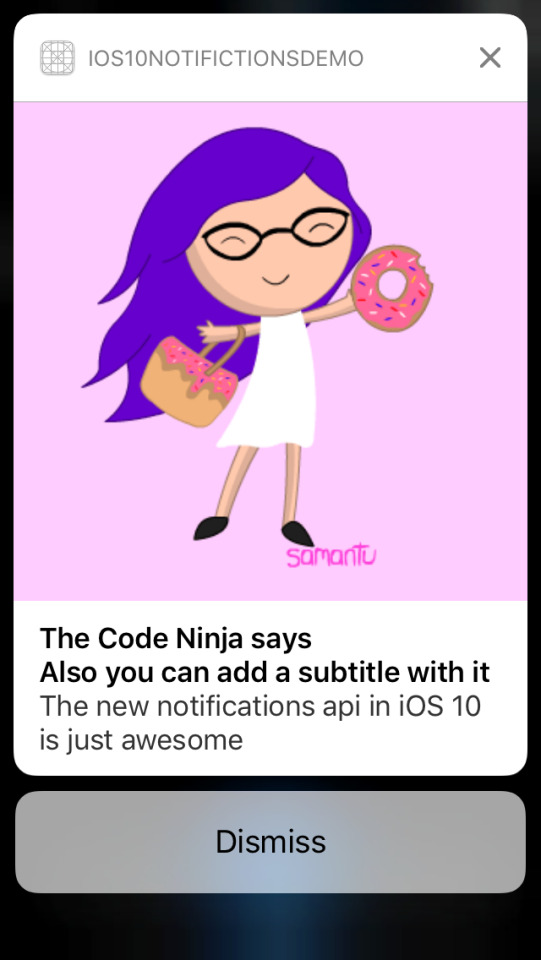
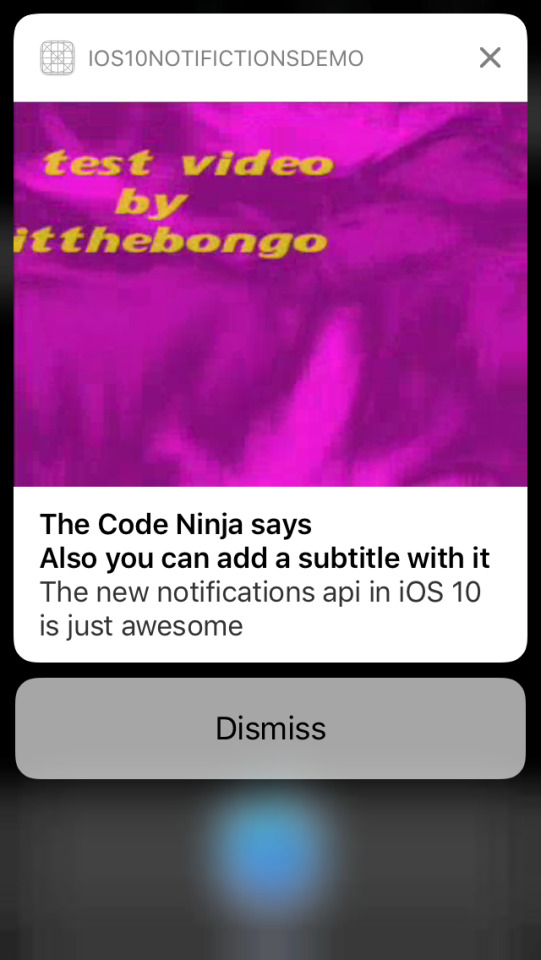
Screenshots of the various attachments I tried, so to view notification attachments the user needs to swipe down the notification banner and he can see the notification attachment.
Image Attachment
GIF (the GIF starts to play when the user swipes down)
Audio Attachment (the user is given a play/pause button and a seek bar to control the audio)
Video attachment (the user is given a play/pause button and a seek bar to control the video)
See you soon guys!!
#unusernotification#ios10#usernotifications framework#unnotificationattachment#unusernotificationcenter#unnotificationrequest#untimeintervalnotificationtrigger#unmutablenotificationcontent#unnotificationattachmentoptionstypehintkey#import usernotifications
6 notes
·
View notes
Note
why i get a problem in local notification reminder app in iphone 6 plus phone but it works in simulator.
What is the problem you are facing..let me know.
2 notes
·
View notes
Note
You should probably confront the author of this blog, they've "borrowed" from you without giving you credit and google ranks them higher...: www topcoder com/blog/notifications-in-ios-8-using-swift/
Oh really?? I never knew it, let me see..
1 note
·
View note
Text
iOS 10 - Building a sticker app for iMessage in less that 30 seconds
Hi all it has been a very long time since I posted anything but now I am back with a bang!! I was so badly wrapped with so much mess at work and was not able to follow up on main iOS sessions except for the keynote and the awards. so lately have been watching interesting WWDC 2016 videos.
I was watching this session (https://developer.apple.com/videos/play/wwdc2016/204/) about sticker apps in iMessage and was really surprised to see that the person who did the demo did not write a single LOC but he had an app that was ready to ship. WTH!!!
So I challenged my wife that I would create a sticker app for iOS in less that 30 seconds (she did not know it was that easy :P) and here we go, let me narrate the 30 seconds for you,
Seconds 1-5: Opened Xcode and created a new project, selected the “Sticker Pack Application” template, gave it a name, created a project folder...


Seconds 5-15: downloaded a set of 5 images of the legendary Tamil, Indian comedian Vadivelu and had it ready.

Second 16: Dragged and dropped these images to the sticker pack folder in the assets file.

Second 17-20: Ran the “Sticker Pack Extension” target in the simulator

Second 21-23: Waited for the Xcode process selector to show up the Messages app

Second 23-25: iMessage app loaded up

Second 25-37: Clicked on the App store icon to see the list of all applicable sticker apps.

Seconds 27-30: Tapped on my demo app and voila the sticker was ready!!!!

Then I was like....

Then I went on to play around with the app I made and Messages team have done a real good job of adding a dummy conversation with two participants on the same simulator to test our messages extension and while running the app only took me to one of the conversations.
Sending a sticker from one thread,

Receiving it on the other end

Replying back on a stronger note!!!

Getting it back on the original thread.

That’s it I have made a static sticker extension for the Messages app that contains few images in the assets folder. I take a moment here to thank the whole Messages team to have made it so insanely easy to create a sticker apps like this, I mean even a dummy can collect a set of images and make some cash out of it, right?
One of the disadvantage of this way of doing this is, if you want to update the set of stickers or assets for your sticker app you need to update your existing extension and the user should download the update. For dynamically fetching images and to make your custom UI we need to implement a messages app using the “Messages app” template in Xcode. Don’t worry I will be doing that as well and will be back soon.
The whole app is uploaded here, please feel free to fork it.
FYI: I did it in less than 30 seconds the first time but to take all the screenshots I had to do it once more.
#ios 10#ios 10 beta 1#ios 10 features#iOS10-messages#imessage#iMessagestickers#iOS10Tutorial#iOS10MessageStickerTutorial#iOSSticker#iOSStickerTutorial
0 notes
Text
Notifications in watchOS 2 - Quick Inline reply for notifications.
So in my previous post we tried to post notifications with inline reply options on the iPhone with iOS 9, doing the same on watch OS2 is very simple. As we know that all local notifications or remote notifications are routed to the watch when the iPhone is locked, the watch is on the wrist. So to do that we need to make a very small change in the watch app’s storyboard, yes trust me just adding a key in storyboard would make everything work well.
Steps:
1. Make sure you have notifications target for your watch app.
2. In the notifications windows just edit the entry identifier to match the one given in the phone in our case, “INVITE_CATEGORY.”
3. Run the app on the watch simulator, nothing will show up, obviously we ain't did anything on the watch yet.
4. Go to the iPhone simulator, launch our iPhone app(just for our viewDidLoad method to fire and schedule a notification) and lock the simulator shortcut (Cmd+L)
5. Wait for sometime, Tada you get the notification on the watch with the reply button action in the notification.


All the code that I have written so far is here, enjoy!!
0 notes
Text
Notifications in iOS 9 - Quick Inline reply for notifications.
In iOS 8 Apple introduced the quick way of replying to text messages/iMessages by just swiping down the notification when a message is recived, a lot of apps especially chat apps would have made great use of this feature - whatsapp, Messenger etc. A lot of cydia tweaks have already brought in this feature.
We don't have to do all that since iOS 9 apps can have the inline reply option right under their remote and local notificaitions. This is pretty much covered in theWhat's new in notifications - WWDC 2015 session. I am just going to write something that I did to put all of the code that was shown in the session into a working demo.
To create a inline reply notification you have to create a UIMutableUserNotificationAction object that has a new property introduced since iOS 9 called behavior
// The behavior of this action when the user activates it. @available(iOS 9.0, *) var behavior: UIUserNotificationActionBehavior
The enum has two types - Default and TextInput, so pretty obvious to you all we should use TextInput!!
@available(iOS 9.0, *) enum UIUserNotificationActionBehavior : UInt { case Default // the default action behavior case TextInput // system provided action behavior, allows text input from the user }
Here is how you create a inline reply action
//creating the inline reply notification action let replyAction = UIMutableUserNotificationAction() replyAction.title = "Say Something" replyAction.identifier = "inline-reply" replyAction.activationMode = .Background replyAction.authenticationRequired = false replyAction.behavior = .TextInput
Embedd all such actions into a category and give it a identifier,
//creating a category let notificationCategory:UIMutableUserNotificationCategory = UIMutableUserNotificationCategory() notificationCategory.identifier = "INVITE_CATEGORY" notificationCategory .setActions([replyAction], forContext: UIUserNotificationActionContext.Default)
Finally register the notification,
//registerting for the notification. application.registerUserNotificationSettings(UIUserNotificationSettings(forTypes:[ UIUserNotificationType.Sound, UIUserNotificationType.Alert, UIUserNotificationType.Badge], categories: NSSet(array:[notificationCategory]) as? Set<UIUserNotificationCategory>))
All done right?? No now we have to write some boiler plate code to fire a notification and test whether stuff works, lets do it.
Go to your ViewController class or even in the AppDelegate and paste the below code,
let localNotification:UILocalNotification = UILocalNotification() localNotification.alertAction = "Testing inline reply notificaions on iOS9" localNotification.alertBody = "Woww it works!!" localNotification.fireDate = NSDate(timeIntervalSinceNow: 15) localNotification.category = "INVITE_CATEGORY"; UIApplication.sharedApplication().scheduleLocalNotification(localNotification)
Put the app to background and wait for 15 seconds (lowe the timer if you are impatient!), Tada!! got a notification now swipe down on the notificaion and see a tex field with title "Say Something".

Now coming to another important part of handling the text entered by the user - go to your AppDelegate class and add the delegate method given below
//method available only from iOS 9 func application(application: UIApplication, handleActionWithIdentifier identifier: String?, forLocalNotification notification: UILocalNotification, withResponseInfo responseInfo: [NSObject : AnyObject], completionHandler: () -> Void){ if identifier == "inline-reply"{ if let response = responseInfo[UIUserNotificationActionResponseTypedTextKey], responseText = response as? String { NSLog(responseText) //do your API call magic!! } } completionHandler() }
The text entered by the user is available in the "responseInfo" dictionary for the key "UIUserNotificationActionResponseTypedTextKey".

So we are done with the phone notification but you can do the same with watchOS 2 as discussed in the WWDC session, we will look into that in the next post
All the code that I have written so far is here, enjoy!!
2 notes
·
View notes
Text
WatchKit fetching all contacts on the watch/phone using the new Contacts Framework
I know we developers are well versed with the AddressBook framework which helped us in interacting with the device contacts easily but with iOS 9 and watchOS 2 there is a new framework called Contacts.framework which pretty much does the same thing but with a ton of extra features like unified contacts from different accounts on the device. A very simple example to fetch all contacts with contact name, thumbnail image data, nickname would be like.
import Contacts let store = CNContactStore() do{ try store.enumerateContactsWithFetchRequest(CNContactFetchRequest(keysToFetch: [CNContactGivenNameKey, CNContactFamilyNameKey,CNContactImageDataKey,CNContactThumbnailImageDataKey,CNContactNicknameKey])) { (contact, status) -> Void in print(contact.givenName) print(contact.thumbnailImageData) print(contact.nickname)}
catch { }
0 notes
Note
Hi, In LocalNotification the sound is not playing. I have assigned sound property to UserNotificationDefaultSound still sound not playing. Can you please help me to resolve this.
Can you please post some code bro??
0 notes
Text
iOS 8 Building A Custom Keyboard Extension
It has been a while since I posted something on #TheCodeNinja, I could not catch up with all the work I had. I had this idea long back but it may be too late but yet I am writing this,
Well we all know that we can build custom keyboards starting from iOS 8 (sad but true this feature was introduced in Android years back). There are some really good custom keyboards in the market too like,
SwiftKey (http://swiftkey.com/en/keyboard/ios/)
Swype (http://www.swype.com/product-features/ios/features.html)
and many more.
For this tutorial we will just go with a small idea for our keyboard, let us build a "SLANG KEYBOARD" that has a list of most commonly used English urban slang words and acronyms.
Ok lets start cooking code, fire up XCode and create a new project lets call it SlangKeyboard. Now go click the + under targets and add a new target, select Application Extension and select Custom Keyboard, lets name it SlangKeyBoardTarget.

Click Activate!


We would find two files KeyboardViewController.h and .m, we cannot do all the coding for the keys by ourselves come on, who does that right??? Lets add a XIB file and name it SlangKeyboardView.

Make sure you change the file owner to KeyboardViewController class and resize the view to 320*216.

Next add a couple of buttons to the view that we would like to show on our keyboard.

Add this code under all the previously existing statements in viewDidLoad method.
[self.inputView setBackgroundColor:[UIColor redColor]]; UIView *layout = [[[NSBundle mainBundle] loadNibNamed:@"SlangKeyboardView" owner:self options:nil] objectAtIndex:0]; [self.view addSubview:layout];
Add the following methods to the KeyboardViewController class
- (IBAction)buttonPressed:(id)sender { UIButton *senderButton = (UIButton *)sender; [self.textDocumentProxy insertText:senderButton.titleLabel.text]; } - (IBAction)newLinePressed:(id)sender { [self.textDocumentProxy insertText:@"\n"];} - (IBAction)spaceBarPressed:(id)sender { [self.textDocumentProxy insertText:@" "]; } - (IBAction)nextKeyboardPressed:(id)sender { [self advanceToNextInputMode]; } - (IBAction)deleteButtonPressed:(id)sender { [self.textDocumentProxy deleteBackward]; }
Now Lets map these with the already places buttons.

Now run the app, I mean run the target we created. Xcode will ask you for which app we want to test our extension, select any app or just safari.

Go to Settings->General->Keyboards and do the following changes,


Come to the main app and add a text view to it, just to see how our custom keyboard works. Run the main app once, then select the SlangKeyboard target and hit run. Now choose our app to debug the extension.

If you our keyboard in our application, well we are done else please don't bother to disturb me by commenting.

Here is all the code we have done so far. See you in the next post!!
1 note
·
View note
Text
iOS 8 Features Round up and hidden-cool features
There have been a lot of posts detailing the list of changes and new features in iOS 8, this is just a comprehensive one that combines all of those posts into one.
Lets start with the coolest and the newest from the beta releases.
Send last location to Apple before your battery dies
If you've ever lost your iPhone, this new feature allows your iPhone (or iPad) to send its last known location to Apple when the battery drains to a critical level. iCloud presently holds this information for 24 hours, but this new setting will allow Apple to access location information for a lost device for a longer period of time.
Identify songs
Siri now includes Shazam integration. If you ask Siri, "What song is playing?", it will cause her to listen to the ambient sound, using Shazam to identify music.
Credit card scanning (probably OCR)
In iOS 8's web browser (Safari), you can utilize the camera to scan in credit card numbers when making online purchases, rather than manually entering your credit card number.
Hide images from Photos app
Images and videos in the Photos app can now be hidden from the Moments, Collections, and Years view in the Photos app. Holding your finger on a photo will bring up an options menu and selecting "Hide" will keep it from being visible in those sections. Hidden photos are still visible in the albums view, however, in new "Hidden" album.
Phone calls over Wi-Fi
iOS 8 includes an option for WiFi calling, allowing you to place phone calls over WiFi when connected to a WiFi network, which is handy when your carrier signal is low. Several carriers,including T-Mobile, have already announced support for the feature. As of iOS 8 beta 3, this feature is available for T-Mobile users.In beta 5, when WiFi calling is enabled, it is labeled T-Mobile WiFi at the top of the iPhone screen.
Find which app is using the most battery life
iOS 8 includes a new Settings option that allows you to view battery usage by app, monitoring the battery drain of specific apps so those that draw a lot of power can be shut down. As of beta 2, it also displays how much battery is drained when there's no cellular coverage.
Get Tips on Using iOS 8 (beta 4)
iOS beta 4 brought a new Tips app, which was first hinted at during WWDC. The Tips app offers iOS 8 users information about all of the new features in the operating system.
Real Time Talk-To-Type (beta 4) - In iOS 8 beta 4, the Talk-to-Type option on the keyboard used in apps like Messages and Notes began displaying spoken text in real time rather than waiting for an entire spoken line to be completed before displaying text.
SIRI
Faster voice recognition - Siri now displays what is being spoken on the iPhone or iPad display as it is said, allowing users to get immediate feedback on what the voice assistant is hearing.
Voice activation - Saying "Hey Siri" while an iOS device is plugged in will activate Siri, allowing users to give hands-free commands.
Download Apps via Siri - Users can now ask Siri to download an app from the App Store, which will initiate an App Store search. Currently Siri cannot open the App Store.
PHOTOS
New smart Photo Albums
The Photos app has received new organizational options, including two albums for "Recently Added" and "Recently Deleted." The Recently Deleted section temporarily displays images that have been removed from the app in case of accidental deletion and in iOS 8 beta 3, a timer was added to display the amount of time remaining before a photo is deleted. The date and time a photo was taken is also displayed.
Black and white smart adjustments (beta 3)
The smart editing tools in the Photos app were updated to add a section for black and white adjustments in iOS 8 beta 3, letting users choose from several black and white presets and adjust Intensity, Neutrals, Tone, and Grain for a customized look.
iCloud Photo Library (beta 4)
It's now possible to select a length of time when pausing iCloud Photo Library in the iCloud section of the Settings app.
Migration from iPhoto (beta 4)
Users with iPhoto are being notified that they will need to transition their iPhoto data to the new Photos app that will be built into iOS 8. Users will not be able to migrate Journals, Book Layouts, or Slideshows from the iPhoto app.
Last Updated (beta 5)
Photos now displays a "Last Updated" notification to let users know when images were last synced to iCloud. There's also an iCloud Photo Settings option to store full resolution photos solely in iCloud while keeping device-optimized versions available on the iPhone to save storage space.
Photo location (beta 5)
As of iOS 8 beta 5, the Photos app displays the location where a photo was taken above the photo itself. Photo below depicts photo bar before iOS 8 beta 5 was installed and after.
CAMERA
Time-lapse photography
The Camera app has gained a new Time-Lapse mode, which captures a series of images and then compiles them into a time-lapse video. There are also new manual exposure controls, which allow exposure to be selected when taking a photo, and a self-timer mode that can be set for three or 10 seconds.
Panoramic mode for iPad - Panoramas, previously only available on the iPhone, can now be captured with the iPad with a new Panorama mode in the Camera app on the iPad.
Focus controls - iOS 8 separates focus and exposure, allowing users to swipe up or down on the focus box to change the exposure of photos when taking pictures on the iPhone or iPad.
Timer mode
There's a new timer function for photos that can be set for three or 10 seconds.
Recover deleted photos
In the camera app, when the small preview icon at the bottom of the screen is tapped, it opens up a view that allows previously deleted photos to be recovered. A photo can be retrieved by tapping on the trash can (delete) icon. This menu can be cleared by emptying the new "Recently Deleted" album in the Photos app.
SAFARI
Request desktop site in Safari
Safari now includes an option to "Request Desktop Site," which will load the desktop version of a site rather than the mobile version.
More private search
Users can now opt to select DuckDuckGo as their default search option in Safari. DuckDuckGo is known for its anti-tracking stance, opting not to profile its users.
RSS feeds
The Shared Links section in Safari now allows users to add RSS feed subscriptions.
App Store ad blocking (beta 2)
According to the release notes, Safari will now block ads fromautomatically redirecting to the App Store without user interaction. Safari also includes a new pinch to tab view.
Bookmarks icon (beta 4)
In beta 4, Apple slightly tweaked the look of the Bookmarks icon in Safari.
MUSIC
Swipe to delete albums
It is now possible to delete albums from the music app with a left swipe. In iOS 7, it was not possible to delete an album. Left swipe delete also works in Songs and Artists.
Add songs to Playlists from other Playlists
Users can now add songs to Playlists from already existing Playlists. In iOS 7, it was only possible to add content from the Songs, Artists, Albums, Composers, and Genre tabs.
MESSAGES
Automatically delete messages
Along with several improvements to group message management, there are now options to remove stored messages after a set period of time of 30 days or one year, which will allow users who have extensive iMessage threads to free up valuable space.
Storing photos and videos (beta 3)
iOS 8 beta 3 added a new option to automatically save the quick audio and video messages that were introduced with the new OS. Normally, these messages are deleted after a short period of time to save space. And in beta 4, photos and videos save settings were split into two separate options.
Quick access to recent photos - When adding an image to a message, there's a new feature that displays recent photos for quick insertion.
Icons (beta 2)
Icons for the camera and the microphone in Messages are now gray rather than blue and there's a new setting to mark all messages read.
Batch save attachments - A new Details menu for contacts within Messages shows displays all of the photos and attachments that have been sent in a conversation. It's possible to save/delete all images at once by holding down on a single image to bring up a "More" option that allows multiple attachments to be selected at once and saved or deleted.
WEATHER
The Weather Channel - Apple is now using weather data from The Weather Channel instead of Yahoo.
Longer forecast - The Weather app now displays a nine day weather forecast, up from the previous five day forecast.
More weather information
There's a new weather summary at the bottom of the Weather app, along with info on sunrise/sunset times, humidity, wind speed, visibility, UV index, pressure, and more. In iOS 7, only humidity, wind, rain chance, and "feels like" are available. In iOS 8 beta 3, the Weather app saw a slight redesign to make this extra information more streamlined.
OTHER APPS
Add photos to Notes
Photos can be inserted into the Notes app from the Photos app for the first time in iOS 8. Notes has also gained rich text editing.
iBooks Features
iBooks now comes preinstalled on iOS devices with iOS 8. Previously, it was a separate download in the App Store. There's also a new auto night mode and an organization option to group books from a series together.
Mail notifications per thread
Swiping left on an email message in the inbox of the Mail app will allow users to delete/archive it, flag it, or access a "More" tab that includes an option to receive a push notification whenever a reply is sent to that particular email thread. These new Mail gestures gained a setting that allows them to be changed in iOS 8 beta 4.
Calendar
There are new options for alternate Calendars, including Chinese, Hebrew, and Islamic. There's also an option to display week numbers. Calendar events can also be declined with a comment.
FaceTime
FaceTime has a different look on the iPad, with the preview window now located on the right side of the screen instead of the left side, along with a new look for contacts. FaceTime on iPhone also has a new look, which does away with the Favorites, Recents, and Contacts bar on the bottom.
Podcasts (beta 2)
Following iOS 8 beta 2, the Podcasts app is a default iOS app that comes pre-installed on iOS devices. This means it can no longer be deleted.
Health (beta 5)
In iOS 8 beta 5, Apple's Health app was updated to collect Spirometry data. Spirometry tests measure lung function, tracking the volume and flow of air when inhaling and exhaling. The app also gained several new icons, the ability to export Health data, and a "Show When Logged" option to display Medical ID on the lock screen. Privacy settings for Health were also added to the Settings app.
LOCATION SERVICES
Quick access to apps based on your location
The App Store in iOS 8 uses location to display apps on the lock screen at relevant locations. For example, when at the Apple Store, the Apple Store app is displayed on screen, and at a Starbucks, the Starbucks app is shown. Tapping the icon for an installed app will open it, while tapping an icon for an app that is not yet installed opens the App Store.
Background location usage App notifications
iOS 8 has new popups that will notify users of apps that access Location information while running in the background. The popup asks users if they want to continue to allow the apps to access the information or turn it off, giving users more information on apps that could potentially be using a lot of battery life.
Choose when an app can use location data
There are new settings within Location Services that allow users to permit apps to access location information "Never," "While Using the App," or "Always." Previously, location services in each app could only be toggled on or off.
System services
There are new toggles for Find my iPad, Location-Based Alerts, Spotlight Suggestions, and Share My Location, all related to new features within iOS 8. Spotlight now includes location-based information like Movie times, while Share My Location allows location information to be inserted into Messages. Combined, all of the new location settings offer far more control over privacy and location sharing in iOS 8.
PASSCODE
Easier access to notifications
In the Passcode settings, there are new toggles that allow users to access Today and Notifications View on the lock screen. Previously, these toggles were located within the Notifications settings. Control Center access on the lock screen is still controlled via the Control Center menu.
NOTIFICATION CENTER
New Settings look
Several Notification Center settings have been moved elsewhere in the Settings menu, giving that section a more streamlined look. There are no longer options to disable Today Summary, Calendar Day View, Reminders, or Tomorrow Summary.
Allow Notifications (beta 2)
There's a new "Allow Notifications" setting available for each app, which works as a sort of global mute to let users to mute notifications from an app on an individual basis. Previously, there was only an option to disallow apps from showing notifications in Notification Center.
ACCESSIBILITY
Grayscale mode
There are several new Accessibility options, including a new "Grayscale" mode that shifts the entire operating system into shades of black and white. There's also Improved Zoom option.
Improved zoom
There are quite a few new options within the Zoom menu, with new toggles for Follow focus, Detach Zoom Controls, and Leave Keyboard Unzoomed. There are also new options for Lens Mode (windowed and full screen) and Lens Effects (grayscale, grayscale inverted, and inverted).
Speak Screen
A new option within the Speech section of Accessibility lets users choose to Speak Screen, a function that will speak the contents of the screen with a two finger swipe gesture. Hebrew speech output is also an option as of beta 3.
OTHER FEATURES
Improved Wi-Fi Privacy
iOS randomizes the MAC addresses of iOS devices when scanning for WiFi networks, which makes it more difficult for companies to track and gather location data on a customer. Each iOS device has a unique MAC address, which could previously be used for location tracking and data collection via WiFi scanning. iOS 8 will use random, locally administered MAC addresses that "may not always be the device's real (universal) address."
Share sheet customizations
When sharing an image, website, or other type of media, users can now customize their sharing options. The list of apps where content can be shared can be rearranged and disabled, as can the media options like Copy, Print, and AirPlay. Some sheet icons also have a new look that eliminates the black border in iOS 7.
iOS to Mac screen capture
It is now possible to capture video from an iOS device directly on a Mac. A device running iOS 8 plugged into a Mac will show up as a camera, which can then have its screen recorded using QuickTime.
iTunes Radio in Control Center
When playing a song on iTunes Radio, the Control Center will now offer a "Buy" button to give users a quick way to purchase a song. The sun icons for the brightness controls have also been tweaked and are now black rather than outlines.
Control Center Redesign (beta 4)
iOS 8 beta 4 introduced a redesign of the Control Center that removes the black borders around the icons and turns icons white when activated.
Peer-to-peer AirPlay
A new peer-to-peer AirPlay feature in iOS 8 will allow iOS devices to stream content to the Apple TV without the need for a shared network connection.
Privacy (beta 2)
There's a new Home Data section within the Privacy menu of the Settings app.
Keyboards
There are new Filipino, Marathi, Slovenian, and Urdu keyboards available.
iCloud Drive (beta 3)
There's a new popup window in beta 3 giving users the option to upgrade to iCloud Drive. Introduced at WWDC, iCloud Drive lets users store any type of file. There's also new section for iCloud Drive settings within the iCloud portion of the Settings app. Though iCloud Drive can be turned on, it does not appear to be fully functional at this time.
Handoff (beta 3)
There's a new Handoff setting in the General menu of the Settings app that allows users to toggle Handoff on and off. Handoff allows users to seamlessly transfer tasks between iOS and OS X. When a Handoff task or website is available, it is displayed in the App Switcher, accessed by double tapping the home button on the iPhone or iPad.
Suggested Apps (beta 4)
The Handoff setting in the General menu was expanded to include Suggested Apps in beta 4, which are used to offer app suggestions relevant to location.This setting can be used to show only installed apps, or both installed apps and App Store apps.
SMS Relay (beta 5)
In iOS 8 beta 5, users began getting a popup asking them to use their iPhones for SMS Relay on their MacBooks, one of the new Continuity features between OS X Yosemite and iOS 8.
Display Settings (beta 4)
There's a new Display & Brightness section that's been unbundled from Wallpaper, with options to adjust screen brightness, text size, and activate bold text. In iOS 8 beta 5, screen brightness controls were removed entirely from the Wallpaper section of the Settings app and moved solely to the Display Settings section.
Contacts in App Switcher (beta 4)
Under the Mail, Contacts, and Calendars heading in the Settings app, there's a new option to toggle off Favorites and Recents for Contacts within the App Switcher.
Emoji keyboard icon (beta 4)
The icon for Emoji on the keyboard has been updated with a happier smiley face.
iCloud icons (beta 5)
In beta 5, iCloud Drive, Backup, and Keychain in the Settings app received new icons. The overall iCloud icon has also been updated, featuring a white cloud on a field of blue.
Predictive text (beta 5)
Beta 5 added a new option on the keyboard to toggle on predictive text, also known as QuickType. Apple began referring to QuickType as predictive text during the beta testing period. iOS 8 beta 5 also saw predictive type animations speed up somewhat.
Spotlight Search speed (beta 5)
The animation for pulling down on the screen to access Spotlight Search in iOS 8 was sped up in iOS 8 beta 5.
Shortcut to Contacts
You will now see photos of your recent and favourite contacts on the multi-tasking screen (accessed by pressing the home button twice). You can tap on each contact to make a call or send a message.

New features in Mail Apple has taken pointers from popular third-party email apps like Mailbox and Triage, and introduced a new set of features in its default mail app. These include the introduction of swipe gestures to mark an email as read or flag it for later action. The app will also automatically recognise dates, addresses, phone numbers and flight reservation details in emails so that you can add them to your calendar/phone book with a single tap.


New features in Messages iOS 8 will enable you to add voice and video messages and location details from within the Messages app itself. You can also create groups within the Messages app and add or remove contacts from the groups.


Family Sharing In iOS 8, you will be able to share stuff that you bought from iTunes and the App Store with six other people without needing to share your account details. Parents will also be able to approve a purchase made by a child on another device and the entire group (or 'family' as Apple calls it) will also be able to contribute to a single Family photo album. The 'Find my iPhone/iPad' feature has also been extended to the 'family' and family members will be able to help each other find their misplaced devices.


iOS 8 For Developers (The real change)
Safari password sharing
iOS 8 will make it easier to set up and login to apps with a set of new APIsthat allow apps to access passwords stored in Safari. For example, if a user has signed into Gmail in Safari and saved the password, Google's Gmail iOS app will be able to access the password for one tap sign ins.
Indoor mapping
iOS 8 adds the M7 processor and iPhone motion sensors to the CoreLocation API, allowing venue owners to create indoor positioning systems that can be used to display directions and floor numbers to direct users to points of interest in areas like airports, museums, and shopping malls.
Custom cursor location (beta 3)
Developers are now able to move the cursor location with a custom keyboard in iOS 8 beta 3.
App Extensions
iOS 8 lets you extend select areas of the system by supplying an app extension — code that enables custom functionality within the context of a user task. iOS supports app extensions for the following extension points.

The list of app extensions that developer can build are,
Share extension
Photo Editing extension
Custom Actions
Today view extension
Storage Provider extension
Document Picker extension
Custom Keyboard extension
Touch ID
Your app can now use Touch ID to authenticate a user before accessing some or all content in your app. Fingerprint data is protected and never accessed by iOS or other apps.

PhotoKit
PhotoKit provides new APIs for working with photo and video assets, including iCloud Photos assets, that are managed by the Photos app, so your app can edit photos directly in the Camera roll without having to import them first. Key features include a thread-safe architecture for fetching and caching thumbnails and full-sized assets, requesting changes to assets, observing changes made by other apps, and resumable editing of asset content.

Manual Camera Controls
The AVFoundation framework makes it easier than ever for users to take great photos. Your app can take direct control over the camera focus, white balance, and exposure settings. Your app can also use bracketed exposure captures to automatically capture images with different exposure settings.
HealthKit
HealthKit allows apps providing health and fitness services to access shared health-related information in one place. A user’s health information is stored in a centralized and secure location and the user decides which data should be shared with your app.
Your app can access any shared health-related information and can provide information about the user without you needing to implement support for specific fitness-tracking devices. Information can come from devices connected to an iOS device or manual entry by the user.

HomeKit
This is a new framework for communicating with and controlling connected devices in a user’s home. Your apps can enable users to discover devices in their home and configure them, or you can create actions to control those devices. Users can group actions together and trigger them using Siri.


CloudKit
Leverage the full power of iCloud and build apps with the new CloudKit framework. Now you can easily and securely store and efficiently retrieve your app data like structured data in a database or assets right from iCloud. CloudKit also enables your users to anonymously sign in to your apps with their iCloud Apple IDs without sharing their personal information.
With CloudKit, you can focus on your client-side app development and let iCloud eliminate the need to write server-side application logic. CloudKit provides authentication, private and public databases, and structured and asset storage services — all for free with very high limits.
Handoff
Using a simple API in Foundation, your app can participate in Handoff to let users start an activity on one device and seamlessly resume the activity on another device.

Last but not the least Actionable notifications are one feature that is worth mentioning, which I have discussed in detail in my previous posts.

Gaming
Apple also paid special attention to game developers by introducing three new game developement tools: SpriteKit, for light 2D games; SceneKit, for casual 3D games and; Metal, for high-performance 'console'-level games.

I will keep adding more whenever I find anything new.
Sources:
http://www.macrumors.com/
https://developer.apple.com/ios8/
2 notes
·
View notes
Text
Notifications in iOS 8 Part 2 (Using Swift) - What is new, Interactive Notifications?
So well we got to know that the application should register itself for sending any kind of notifications to the user in part 1 of this post. Now let us get into something interesting and new that was introduced in iOS 8, Interactive Notifications (Yummy!!!!) with quick reply and toggle options that appear right underneath the notification banner like below.
How cool would it be to do something like this so without getting into much of the implementation details lets do it, open up the old project mentioned in the previous post and just copy paste this snippet onto AppDelegate.swift
var notificationActionOk :UIMutableUserNotificationAction = UIMutableUserNotificationAction() notificationActionOk.identifier = "ACCEPT_IDENTIFIER" notificationActionOk.title = "Ok" notificationActionOk.destructive = false notificationActionOk.authenticationRequired = false notificationActionOk.activationMode = UIUserNotificationActivationMode.Background var notificationActionCancel :UIMutableUserNotificationAction = UIMutableUserNotificationAction() notificationActionCancel.identifier = "NOT_NOW_IDENTIFIER" notificationActionCancel.title = "Not Now" notificationActionCancel.destructive = true notificationActionCancel.authenticationRequired = false notificationActionCancel.activationMode = UIUserNotificationActivationMode.Background var notificationCategory:UIMutableUserNotificationCategory = UIMutableUserNotificationCategory() notificationCategory.identifier = "INVITE_CATEGORY" notificationCategory .setActions([notificationActionOk,notificationActionCancel], forContext: UIUserNotificationActionContext.Default) notificationCategory .setActions([notificationActionOk,notificationActionCancel], forContext: UIUserNotificationActionContext.Minimal) application.registerUserNotificationSettings(UIUserNotificationSettings(forTypes: UIUserNotificationType.Sound | UIUserNotificationType.Alert | UIUserNotificationType.Badge, categories: NSSet(array:[notificationCategory]) ))
instead of
application.registerUserNotificationSettings(UIUserNotificationSettings(forTypes: UIUserNotificationType.Sound | UIUserNotificationType.Alert|UIUserNotificationType.Badge,categories:nil))
And one more change in the place where we actually post the notification in ViewController.swift, add the below piece of code before posting the notification object.
localNotification.category = "INVITE_CATEGORY";
So the updated code would look like,
var localNotification:UILocalNotification = UILocalNotification() localNotification.alertAction = "Testing notifications on iOS8" localNotification.alertBody = "Woww it works!!" localNotification.fireDate = NSDate(timeIntervalSinceNow: 30) localNotification.category = "INVITE_CATEGORY"; UIApplication.sharedApplication().scheduleLocalNotification(localNotification)
So now let us run the app, wait for the view to load and then close it immediately. Lets wait for few seconds.
Voila, we got an interactive notification with two buttons in it. See how beautiful it looks in the pull down menu
and how awesome on the lock screen
Thats cool, right?? So what all did we do to get this sort of a behavior. We added some piece of code to do all this, lets get into some technical details. We used two classes in the above code namely, UIMutableUserNotificationAction and UIMutableUserNotificationCategory.
UIMutableUserNotificationAction (apple docs explanation)
A UIMutableUserNotificationAction object represents a modifiable version of the UIUserNotificationAction class. When a notification is delivered, the system displays a button for each custom action associated with the notification. Tapping a button launches your app (either in the foreground or background) and gives you a chance to perform the indicated action. You use this class to configure the details about the button that is displayed and the information your app needs to perform the corresponding action. To associate custom actions with a local or remote notification, create one or more instances of this class and use them to configure one or more UIMutableUserNotificationActionSettings objects
So every button that we would actually see with the notification would be one of these UIMutableUserNotificationAction objects and creating one of these would be like,
var notificationActionOk :UIMutableUserNotificationAction = UIMutableUserNotificationAction() notificationActionOk.identifier = "ACCEPT_IDENTIFIER" notificationActionOk.title = "Ok" notificationActionOk.destructive = false notificationActionOk.authenticationRequired = false notificationActionOk.activationMode = UIUserNotificationActivationMode.Background
Let me try and explain few of the properties of the notificationActionOk object that we have created above,
identifier - The identifier of the action, must be unique.
title - The title of the button or the action.
destructive - Specifies whether the button dismisses or cancels the notification, just like our destructive button title that we have in UIActionSheets.
authenticationRequired - Useful during notifications when the phone is locked, if set to yes then the notification action is available only when the phone is unlocked. So those actions that are set authenticationRequired as YES would not be available on the lock screen (security 101)
activationMode - Tells whether the action should be performed in the foreground mode, thereby launching the app or performed in the background mode, without launching the app (pretty neat huh?)
UIMutableUserNotificationCategory(apple docs explanation)
A UIMutableUserNotificationCategory object encapsulates information about custom actions that your app can perform in response to a local or push notification. Use instances of this class to customize the actions included in an alert when space onscreen is constrained.
After creating an instance of this class using the standard alloc/init pattern, use it to modify the actions or category name as needed. The most common use of this class is to specify the subset of actions to display when the size of the alert is relatively small.
var notificationCategory:UIMutableUserNotificationCategory = UIMutableUserNotificationCategory() notificationCategory.identifier = "INVITE_CATEGORY" notificationCategory .setActions([notificationActionOk,notificationActionCancel], forContext: UIUserNotificationActionContext.Default)
Looking at the properties and the setters, it is quite simple. You give an identifier to each category and you set an array of actions to the category for particular contexts (Default - is the context where space is not a problem while displaying the notification and minimal - is the context where space is a problem and has to be managed perfectly i.e, setting up minimum number of buttons/actions because all of them cannot be displayed)
Setting up the category in notification settings
application.registerUserNotificationSettings(UIUserNotificationSettings(forTypes: UIUserNotificationType.Sound |UIUserNotificationType.Alert|UIUserNotificationType.Badge,categories:NSSet(array:[notificationCategory])))
The category is to be passed as an NSSet object to the notification settings, so it is better to create all the notification categories that the application would use at one place and initialize the permission object accordingly with the created categories. I would suggest this should happen during the first time launch of the application.
Handling notification actions
Actions with destructive property set to YES work automatically by canceling or making the notification disappear, so other actions which would have some tasks to be performed can be done using the below method
@optional func application(_ application: UIApplication!,handleActionWithIdentifier identifier: String!, forLocalNotification notification: UILocalNotification!, completionHandler completionHandler: (() -> Void)!)
You got to set the action an identifier so that it can be uniquely identified in the above AppDelegate's method and handled accordingly.
I read the What's New in iOS Notifications PDF and the video to get to know all of this. It is always a pleasure to read WWDC stuff!!!
Enough talk here is the project containing all of the code we did so far! Enjoy see you in the next post.
#ios#ios8#ios 8 beta#ios 8 features#ios8notifcations#ios8interactivenotifications#ios8quickactionnotifications#swiftprogramminglanguage#UIUserNotificationSettings#UIUserNotificationCategory#UIUserNotificationAction
4 notes
·
View notes
Text
Notifications in iOS 8 Part 1 (Using Swift) - What is new?
I have always been a great fan of notifications in iOS, especially UILocalNotifications. From iOS 7 developers had the capability of executing code in the background using the background fetch capability, so developers can post any number of notifications without asking any prior permission from the user (although you can go to settings and disable the feature or silent that particular app that buzzes all the time!).
So I was executing an earlier project using local notifications built for iOS 7 for the first time on iOS 8 and no notifications were fired. Damn! I was like,

So I spent some time and found the issue but let me explain what was the actual problem and how to solve it.
Let us create a new application in XCode, let it be a single view application and the programming language be Swift.
Now let us go into the file ViewController.swift and get our hands dirty. Lets type in a simple code snippet in swift for firing a local notification 30 seconds from now.
var localNotification:UILocalNotification = UILocalNotification() localNotification.alertAction = "Testing notifications on iOS8" localNotification.alertBody = "Woww it works!! localNotification.fireDate = NSDate(timeIntervalSinceNow: 30) UIApplication.sharedApplication().scheduleLocalNotification(localNotification)
So we are all set, let us run the app. I ran the app, waited for it to load up and then minimized it to see my beautiful notification (I love the way banners pop up in iOS 7). Again there was no notification but this time I had a keen look at my console, I got this error log.
2014-06-26 11:59:46.507 NotificationsforiOS8[705:15907] Attempting to schedule a local notification {fire date = Thursday, June 26, 2014 at 12:00:16 PM India Standard Time, time zone = (null), repeat interval = 0, repeat count = UILocalNotificationInfiniteRepeatCount, next fire date = Thursday, June 26, 2014 at 12:00:16 PM India Standard Time, user info = (null)} with an alert but haven't received permission from the user to display alerts
Ok now we get it, something else has to be done on iOS 8. After a lot of reading, I ended up at this StackOverflow question , I saw this comment saying you got to use this method registerUserNotificationSettings, SWEET!!!
So I went to my AppDelegate.swift class and typed out the code to register for sending notifications.
func application(application: UIApplication, didFinishLaunchingWithOptions launchOptions: NSDictionary?) -> Bool { //registering for sending user various kinds of notifications application.registerUserNotificationSettings(UIUserNotificationSettings(forTypes: UIUserNotificationType.Sound|UIUserNotificationType.Alert |UIUserNotificationType.Badge, categories: nil) // Override point for customization after application launch. return true }
So now when I run my app I get something like this, the user is being asked for permission to send notifications with sounds etc.
I say Ok and then I again re-run the app(since we did not wait for the user permission to be given and had all our code in viewDidLoad()). Lets wait for the view to load and then minimise the app, fingers crossed!
voila we get a local notification!!
Objective C syntax
Registering user notification settings,
- (BOOL)application:(UIApplication *)application didFinishLaunchingWithOptions:(NSDictionary *)launchOptions { [application registerUserNotificationSettings:[UIUserNotificationSettings settingsForTypes:UIUserNotificationTypeAlert|UIUserNotificationTypeBadge|UIUserNotificationTypeSound categories:nil]] // Override point for customization after application launch. return YES; }
Enough Talk, gimme the code
12 notes
·
View notes