#usernotifications framework
Explore tagged Tumblr posts
Visit Tumblr Blog
Explore Tumblr blogs with no restrictions, modern design and the best experience.
Last Seen Tumblr Blogs


Fun Fact
Celebrities use Tumblr as well.
Text
Giả lập Push Notification trên iOS Simulator
Phiên bản Xcode 11.4 đã cho phép giả lập push notification trên iOS Simulator. Sau đây là hướng dẫn của mình về tính năng mới này.
Yêu cầu
Xcode version >= 11.4
Sample app với chức năng request push notification permission
APNS (Apple Push Notification Service) Payload File
Giả lập push notification bằng cách kéo thả
1. Download Xcode 11.4
Vào thời điểm của bài viết này (23/2/2020), Xcode 11.4 mới ra bản beta, bạn có thể download ở đây.
Nếu bạn đọc được bài viết này vào khi Xcode 11.4 đã release bản chính thức, bạn lên Mac App Store mà download nhé
2. Tạo sample app và request permission để nhận push notification
Trong AppDelegate, import UserNotifications framework:
import UserNotifications
Request permission trong application(_:didFinishLaunchingWithOptions:):
UNUserNotificationCenter.current() .requestAuthorization(options: [.alert, .sound]) {(granted, error) in print("Permission is granted: \(granted)") }
Chạy app và grant permission khi hiện thông báo.
3. Đưa sample app vào background
Nhấn tổ hợp phím Shift + ⌘ + H để đưa app chạy ở background. Để banner của push notification hiển thị trên màn hình, bắt buộc phải thực hiện bước này.
Chúng ta sẽ thực hiện việc hiển thị push notification khi simulator ở foreground sau.
4. Tạo APNS payload file và kéo vào iOS Simulator
APNS payload file là một JSON file chứa các thông tin hiển thị của push notification. Tìm hiểu thêm ở đây.
Đây là file APNS mình tạo cho sample app này.
{ "aps": { "alert": { "title": "Hello", "body": "This is an push notification", "sound": "default" }, "badge": 10 }, "Simulator Target Bundle": "com.tumblr.whoistuanhai.PushNotificationDemo" }
Lưu ý: Giá trị của key Simulator Target Bundle chính là bundle identifier của project.
Giờ thì chỉ việc kéo thả file vừa tạo vào simulator thôi.
Giả lập push notification sử dụng Terminal
Đầu tiên, cần tìm identifier của simulator đang chạy. Trong Xcode, nhấn tổ hợp phím Shift + ⌘ + 2 để cửa sổ "Devices and Simulators". Right click vào simulator đang sử dụng trong list các simulator, chọn Copy Identifier.
Lấy được identifier rồi, chạy câu lệnh sau trong Termial:
xcrun simctl push <simulator-identifier><bundle-identifier><path-to-apns-payload-file>
Nếu muốn bỏ qua bước tìm identifier của simulator và simulator của bạn đang chạy, chạy lệnh sau:
xcrun simctl push --booted <bundle-identifier><path-to-apns-payload-file>
Lưu ý: Nếu APNS payload file đã có key Simulator Target Bundle thì có thể bỏ qua trong câu lệnh.
Ngoài ra, developer @twannl có viết ra Poes - một command line tool giúp ta dễ dàng giả lập push notification mà không cần phải tạo APNS payload file.
Cài đặt Poes sử dụng Mint:
mint install AvdLee/Poes
Send notification:
Poes --bundle-identifier <your-app-bundle-identifier> --verbose
Giả lập push notification khi app đang ở foreground
Implement userNotificationCenter(_:willPresent:withCompletionHandler:) function của UNUserNotificationCenterDelegate protocol trong AppDelegate:
func userNotificationCenter(_ center: UNUserNotificationCenter, willPresent notification: UNNotification, withCompletionHandler completionHandler: @escaping (UNNotificationPresentationOptions) -> Void) { print("Push notification received in foreground.") completionHandler([.alert, .sound, .badge]) }
Set AppDelegate là delegate của UNUserNotificationCenter trong application(_:didFinishLaunchingWithOptions:):
UNUserNotificationCenter.current().delegate = self
0 notes
Text
iOS app crashes on iOS 9 after implementing the Urban Airship SDK
Recently, I implemented the Urban Airship SDK into an iOS app.
The main feature in the latest SDK was the added support for iOS Rich Notifications and content extensions (for iOS 10+).
Every time I ran the app on iOS 9, the app would crash and I would get the following error in the console:
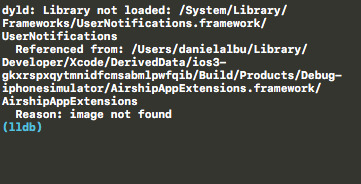
dyld: Library not loaded: /System/Library/Frameworks/UserNotifications.framework/UserNotifications
Referenced from: /Users/danielalbu/Library/Developer/Xcode/DerivedData/ios3-gkxrspxqytmnidfcmsabmlpwfqib/Build/Products/Debug-iphonesimulator/AirshipAppExtensions.framework/AirshipAppExtensions
Reason: image not found
(lldb)
It’s quite noticeable that the main issue is that UserNotifications.framework isn’t loaded.
Given that it’s an iOS 10 feature, it’s understandable why it won’t be available on iOS 9, but the question was: why is Urban Airship SDK trying to load an iOS 10 specific API on iOS 9?
Another look at the error shows us that AirshipAppExtensions.framework is the source of the call to the UserNotifications framework, so I went to the target settings -> General -> Linked Frameworks and Libraries and there I set the status of AirshipAppExtensions.framework to Optional (instead of Required):
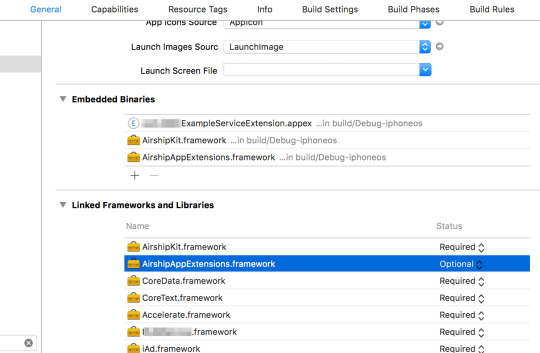
Optional linking is useful if you're targeting older OS versions where a certain framework might not be available yet, which is exactly our case...
But that didn’t help.
The app was still crashing!
I remembered that during the implementation of the SDK, the AirshipAppExtensions framework was imported as a standalone project, which means that it is compiled locally during the compilation of my app.
I went and reviewed the Build Settings of that project and I saw that the iOS Development Target was set to iOS 10.
It was something that was configured automatically once I imported the project into XCode, so given that it’s not documented in the Urban Airship documentation I didn’t give it a second though upon importing.
So, I changed the iOS Development Target to iOS 9 and voilà, the app doesn’t crash on iOS 9 anymore:

[Update: October 31st, 2017]: The SVP Product & Engineering at Urban Airship was kind enough to inform me that the docs were updated and clarified according to my feedback: https://twitter.com/mherrick66/status/925411303363051521
4 notes
·
View notes
Text
Significant factors to consider while selecting app development framework!

Mobile application development isn’t an easy task. However, if the right tools are chosen, it can be simplified to a certain level. The selection of a suitable framework is one of the key factors in success of app development process. However, there are a number of frameworks available in the market, as mentioned below:
Flutter
React Native
Ionic
Xamarin
PhoneGap
Corona
JQuery Mobile
Intel XDK
Mobile Angular UI
Appcelerator Titanium
All of these frameworks support different features and may not meet your specific business requirements. So, to choose the right framework, you will have to consider some parameters like your target audience, platform- Native or cross-platform, speed of development, etc. This article will guide you through such factors for choosing the appropriate mobile app development framework.
Points to remember while choosing mobile app development framework
Platform- Native or Cross-Platform:
You first need to decide the platform for your app- whether Native or Cross-platform. Native apps will provide optimum performance, better user-experience, higher technical aspects, etc. However, they function only on a single platform. Comparatively, cross-platform apps can function on multiple platforms but they have restricted functionality. If you want to reach wider audience at once and have a low-budget, it is good to choose a framework that supports app development for multiple platforms. On the other hand, if you want to develop a high-quality app on Native platforms like Android or iOS, choose the frameworks accordingly.
For example, React Native, Ionic, Xamarin, PhoneGap, etc. are used for cross-platform app development. UIKit, StoreKit, CLLocation, MapKit, AVFoundation, UserNotifications, CoreData, etc. are iOS frameworks for Native iOS application development.
Monetary constraints:
Depending on your budget, you can choose a free or a paid version of the frameworks. In free versions, there are limited features available. Yet, some of the free versions of frameworks allow building several types of apps like mapping and navigational, social media, gaming apps, etc. However, if you want to develop a feature-packed app that has good compatibility, go for Native app development and the framework that supports it.
Security:
Security is of utmost importance today as data is the biggest asset. Native apps are comparatively secure while cross-platform apps have security issues as adding layers of security requires time and money. Depending on your security requirements, you can decide Native or cross-platform and then the framework accordingly.
Feature support:
What features do you want to embed in your app? Make a list of the features you want to use while the mobile app development process and then select the framework that supports the required features.
Speed:
If you want to release your app at the earliest in the market, you should prefer the framework which is easier to work with and supports fast development of apps.
Updates:
The latest frameworks allow updating of a number of features in them. However, old frameworks do not allow updating of the features and so, becoming out-dated gradually. To develop a highly-competitive app, it is wise to go for the new-age frameworks which continually update themselves with advanced features and functionalities.
Conclusion:
There are a number of frameworks available in the market for mobile application development. However, every framework contains different features and functionalities. So, ensure that you decide your target audience, business needs, etc. factors and consider all the above-mentioned points before choosing the framework.
Looking for developing a cutting-edge app? Biz4Solutions is a leading mobile app development company based in Texas. We create bespoke mobility solutions for our clients across the globe. We have developed 100+ Native as well as Cross-platform apps for diverse industries. Our team has a vast experience in frameworks like Ionic, Angular, ReactJS, React Native, Xamarin, etc.
Talk to us today, for all your app development queries. We can be your trustable technology partner!
0 notes
Text
Daily Reminder Local Notification Swift 5.2
Daily Reminder Local Notification Swift 5.2
Implementing a Daily Reminder Local Notification (UNUserNotification) and build an iOS Application | Xcode 11 | Swift 5.2
No real device. No Certificate. No Provisioning profile.
Here I used UserNotification framework and implemented UNCalendarNotificationTrigger, DateComponents to set notification on every day at 12 pm.
View On WordPress
#Code with kathir#Code with kathiresan#code with ktr#Code with ktrkathir#Daily reminder#Ios#iOS 10#iOS 11#iOS 12#iOS 13#iOS 13.6#iOS Swift#iOSSwift#kathir#kathiresan#kathiresan murugan#KathiresanMurugan#ktr kathir#ktrkathir#step by step#swift#swift 5.2#Tutorials#UNNotificationCenter#UNNotificationRequest#UNUserNotification#UNUserNotificationCenter#video#video publish#Video tutorial
0 notes
Text
April 07, 2020 at 10:00PM - iOS 10 Projects: Build Amazing Apps with Apple’s Newest iOS (55% discount) Ashraf
iOS 10 Projects: Build Amazing Apps with Apple’s Newest iOS (55% discount) Hurry Offer Only Last For HoursSometime. Don't ever forget to share this post on Your Social media to be the first to tell your firends. This is not a fake stuff its real.
Description
The mobile app industry is constantly innovating and growing, and one of the biggest splashes recently is the launch of Apple’s iOS 10. It’s essential that developers stay ahead of the curve if they want to be successful, and this course will take you on a coding journey to discover all of the new APIs in iOS 10. After building these 7 projects, you’ll be ready to start creating your own apps that capitalize on the new opportunities offered in iOS 10.
Access 77 lectures & 10.5 hours of content 24/7
Create a Rich Media Photo Album using iOS 10’s voice transcription & search functionality
Build a Group Scheduling app that integrates w/ Messages
Integrate a Ride-Sharing app w/ SiriKit for voice activation
Design an iOS 10 Lock Screen Widget that helps language learners memorize new vocabulary
Create a Daily Alarm Planner using the new UserNotifications framework
Code your own Board Game that implements an AI opponent, using the new GKMonteCarloStrategist from GameplayKit
Build a Tank War Game using SpriteKit’s powerful new Node Tiling system
from Active Sales – SharewareOnSale https://ift.tt/2XjobPp https://ift.tt/eA8V8J via Blogger https://ift.tt/34kQNJh #blogger #bloggingtips #bloggerlife #bloggersgetsocial #ontheblog #writersofinstagram #writingprompt #instapoetry #writerscommunity #writersofig #writersblock #writerlife #writtenword #instawriters #spilledink #wordgasm #creativewriting #poetsofinstagram #blackoutpoetry #poetsofig
0 notes
Text
Local Notification iOS Tutorial
Local notifications are a way for an application that isn’t running in the foreground to let its users know it has information for them. In iOS 10 Apple introduces rich notifications, which can include different type of media . In this tutorial we will create a local notification including an image. This tutorial is made with Xcode 10 and built for iOS 12.
Open Xcode and create a new Single View App.
For product name, use IOSLocalNotificationTutorial and then fill out the Organization Name and Organization Identifier with your customary values. Enter Swift as Language and choose Next.
Go to the Storyboard and drag a Button to the Main View and give it a title of "Send Local Notfication". Select the Resolve Auto Layout Issues button and select Reset to Suggested Constraints.
The Storyboard should look like this.
Open the Assistant Editor and make sure the ViewController.swift file is visible. Ctrl and drag from Button to the ViewController class to create the following Action.
Go to the ViewController.swift file and import the UserNotifications framework
import UserNotifications
Change the viewDidLoad method to
override func viewDidLoad() { super.viewDidLoad() UNUserNotificationCenter.current().requestAuthorization(options: [.alert]) { (granted, error) in if granted { print("yes") } else { print("No") } } }
The UNUserNotificationCenter manages the notification-related activities. To use the notification the user needs to be asked for permission with the requestAuthorization method.
An image will be used as an attachment of the notification. Download the image and drag it inside the project folder. Next, implement the sendNotification action method
@IBAction func sendNotification(_ sender: Any) { // 1 let content = UNMutableNotificationContent() content.title = "Notification Tutorial" content.subtitle = "from ioscreator.com" content.body = " Notification triggered" // 2 let imageName = "applelogo" guard let imageURL = Bundle.main.url(forResource: imageName, withExtension: "png") else { return } let attachment = try! UNNotificationAttachment(identifier: imageName, url: imageURL, options: .none) content.attachments = [attachment] // 3 let trigger = UNTimeIntervalNotificationTrigger(timeInterval: 10, repeats: false) let request = UNNotificationRequest(identifier: "notification.id.01", content: content, trigger: trigger) // 4 UNUserNotificationCenter.current().add(request, withCompletionHandler: nil) }
The UNMutableNotificationContent object contains the data of the notification.
The UNNotificationAttachment object contains the media content of the notification.
An UNNotificationRequest is generated which will trigger at the timeinterval of 10 seconds.
The notification is scheduled for delivery.
Build and Run the Project. The user will be asked for permission.
Select Allow, select the "Send Local Notification" Button to schedule the Notification. Press the Home button in the Simulator(Shift + Command + H). Within 10 seconds the Notfication will be delivered.
You can download the source code of the IOSLocalNotificationTutorial at the ioscreator repository on Github.
0 notes
Text
90% off #iOS 10 Advanced Projects: Build Amazing Apps with Swift 3 – $10
Stay Tech Forward and Learn all about the new iOS 10 API’s
Intermediate Level, – 13 hours, 95 lectures
Average rating 4.4/5 (4.4 (46 ratings) Instead of using a simple lifetime average, Udemy calculates a course’s star rating by considering a number of different factors such as the number of ratings, the age of ratings, and the likelihood of fraudulent ratings.)
Course requirements:
Xcode 8 is needed
Course description:
Build 7 complete projects that teach you the new features in iOS 10
As well as 5 technique projects that reinforce your iOS 10 knowledge for building apps.
Featuring apps built by the award winning programmer, Paul Hudson. Paul has many years of coding experience, and received high praise from the creator of the Swift language, Chris Lattner, for his outstanding Swift tutorials and coding website, so you know your getting the best of the best here. Check out his Swift instructional videos, books, as well as other products, at hackingWithSwift,com
Please note: These are intermediate to advanced projects, and this course will not teach you the Swift language, or how to code, you should already have completed Paul Hudson’s Swift tutorials at HackingWithSwift.com, or my Swift Mastery Course, or have written your own existing Swift apps.
Project 1: Create a Rich Media Photo Album using iOS 10’s voice transcription and search functionality. Project 2: Build a Group Scheduling app that integrates with Messages. Project 3: Create a Ride-Sharing app that integrates with SiriKit for voice activation. Project 4: Build an iOS 10 Lock Screen Widget that helps language learners memorize new vocabulary. Project 5: Create a Daily Alarm Planner using the new UserNotifications framework. Project 6: Code your own Board Game that implements an “AI” opponent, using the new GKMonteCarloStrategist from GameplayKit. Project 7: Build a Tank War Game using SpriteKit’s powerful new Node Tiling system. Featuring apps built by the award winning Swift programmer Paul Hudson Learn about the new iOS 10 animations Work with Swift 3’s new measurement classes called “Units” Learn about the new and improved “Core Data” in Swift 3 Work with the new “Raw Photography” classes See how to use the new image rendering API Learn about the new “Warp Geometry” classes, and build a simple app with them
Full details Work with Apple’s newest API’s for iOS 10 This course is meant for intermediate and advanced programmers as it does not teach the Swift language, or how to code
Reviews:
“I’m a beginning Swift programmer so I really appreciated that the application was built from “scratch”, meaning he created the program using Xcode without starting from a template. I got to see how a programmer would create a program from the beginning. It was a very good lesson. While this project was not about the ins and outs of using Interface Builder to create an app, I would find such a course valuable. One of the reasons I bought this course was to learn about Core Data. Unfortunately there is no project for Core Data. There is a nice screen that talks about the difference between Swift 2.2/ iOS 9 and Swift 3.0/ iOS 10 but I was really wanting a project that talks about how to use Core Data and JSON to store use information.” (James Slone)
“I like the way that he teaches and have taken a few of his courses. He answers questions all the time and updates his courses regularly. I also like the way that he doesn’t talk over the code as he writes it when there is a lot of code to input. I don’t feel like I miss something then I can follow inputing the code and then stop if I need to but still not miss anything and not feel rushed. Love his coursers they are the best and I recommend them to everyone.” (OneCar Wood)
“Stephen has a way of teaching that really takes you step by step into the code. He also answers questions with full explanation. I highly recommend all his classes. He is a personable instructor and very knowledgeable about iOS. Take his class!” (Annabelle Ramos)
About Instructor:
Stephen DeStefano
My name is Steve DeStefano, a long time iOS developer / instructor, and i’ve taken my passion for coding and building apps, and put together a series of comprehensive instructional courses, that will guide you through the process of creating apps in iOS. I stay current with the Swift language, and update it as it continues to evolve. I’ve worked with top programmers in the field, and offer a unique way of teaching IOS programming, which is to present the material in a concise and thoroughly explained manner, with the help of diagrams and highlighting, all to make it easy to follow the path of the code. If your think this might be too difficult, think again, and then come code along with me, and see how easy it is to learn swift and app creation. Go from a newbie to an Apple Dev in a short amount of time, and see your own unique creations on the App Store, and in the hands of thousands of people.
Instructor Other Courses:
Swift 3 Mastery and iOS 10 – Novice to Pro – Build 17 Apps Stephen DeStefano, iOS Developer / Swift Instructor (31) $10 $150 iOS 9 Swift Games and Techniques – Swift 2 Next level Coding The Swift 3 Cookbook of Code …………………………………………………………… Stephen DeStefano coupons Development course coupon Udemy Development course coupon Mobile Apps course coupon Udemy Mobile Apps course coupon iOS 10 Advanced Projects: Build Amazing Apps with Swift 3 iOS 10 Advanced Projects: Build Amazing Apps with Swift 3 course coupon iOS 10 Advanced Projects: Build Amazing Apps with Swift 3 coupon coupons
The post 90% off #iOS 10 Advanced Projects: Build Amazing Apps with Swift 3 – $10 appeared first on Course Tag.
from Course Tag http://coursetag.com/udemy/coupon/90-off-ios-10-advanced-projects-build-amazing-apps-with-swift-3-10/ from Course Tag https://coursetagcom.tumblr.com/post/157480830628
0 notes
Text
iOS 10 Notifications (What is new) - Part 1
I must admit that I have a huge crush on the notifications API regardless of the platform (oh yeah I really like the notifications API in Android too) and I have never shut up about it since iOS 7 now in iOS 10 things get even better. There is a new framework altogether to handle notifications both remote and local, the UserNotifications framework. Previously all the notifications API were bundled within the UIApplication class of UIKit and Apple has realized that notifications play a crucial part in the way users interact with the platforms which is evident in all the WWDC sessions and no wonder they plugged a lot of things out. Not just plugging out has happened but there is a lot of new features too.
If you have been using the UILocalNotification class as you have been doing since ages we need to move on to the new UserNotifications framework. Yes here comes the truth UILocalNotification is deprecate since iOS 10.
If you go see the UILocalNotification class you would find this,
@available(iOS, introduced: 4.0, deprecated: 10.0, message: “Use UserNotifications Framework’s UNNotificationRequest”) public class UILocalNotification : NSObject, NSCopying, NSCoding
Even the way we were receiving notifications are changed, we need to move on to the new framework.
@available(iOS, introduced: 4.0, deprecated: 10.0, message: “Use UserNotifications Framework’s -[UNUserNotificationCenterDelegate willPresentNotification:withCompletionHandler:] or -[UNUserNotificationCenterDelegate didReceiveNotificationResponse:withCompletionHandler:]”)
optional public func application(_ application: UIApplication, didReceive notification: UILocalNotification)
After seeing all this it was pretty much clear that the whole of UILocalNotification is going to be flushed away from iOS 10.
So after going through all the sessions and with my experience with notifications in iOS I am pretty sure that I need to make a lot of changes in the existing code and was pretty surprised of the many changes done here.
So coming to the new features that have been introduced, apps can now send notification with enriched content and users can see the content without even opening the app. The most important types of attachments that were talked about are,
Images
Videos
Audio
Last but not least GIFs!
The other new feature worth mentioning is the custom UI that apps can now show during notification presentation yes you can modify the UI format in which notifications are presented in your app. Hmmmmm I guess that is a pretty big topic and lets just cover that in another post, please!!
Ok then I just started tinkering with local notifications using the UNUserNotificationCenter class in the UserNotifications framework and tried to send some notifications with attachments,
So lets get our hands dirty with some code to send a simple notification with the UserNotification APIs,
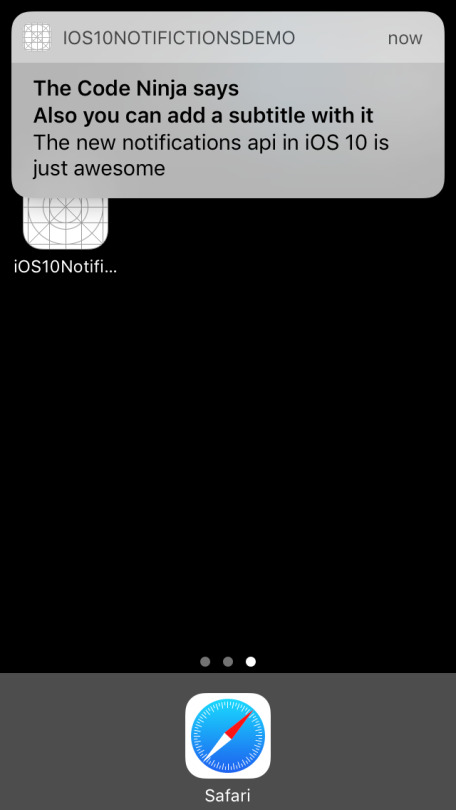
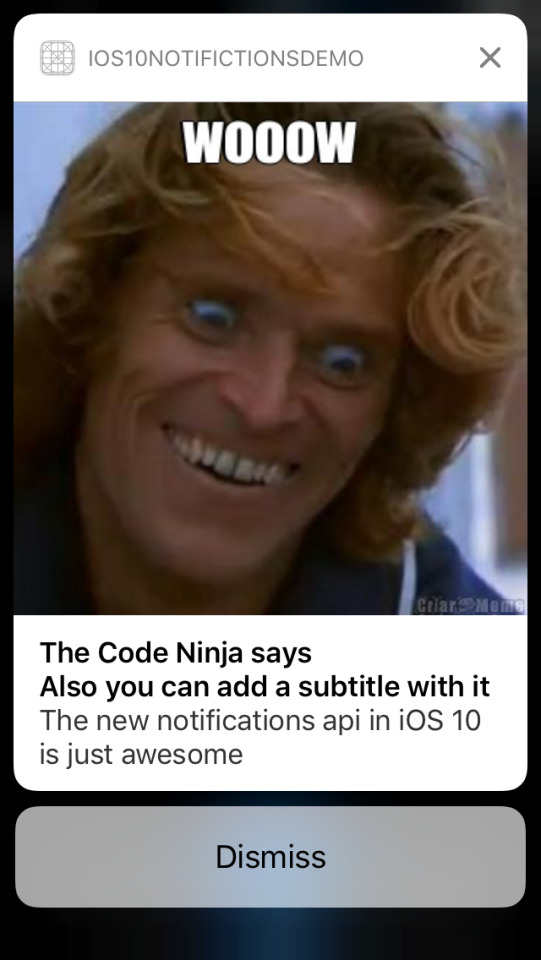
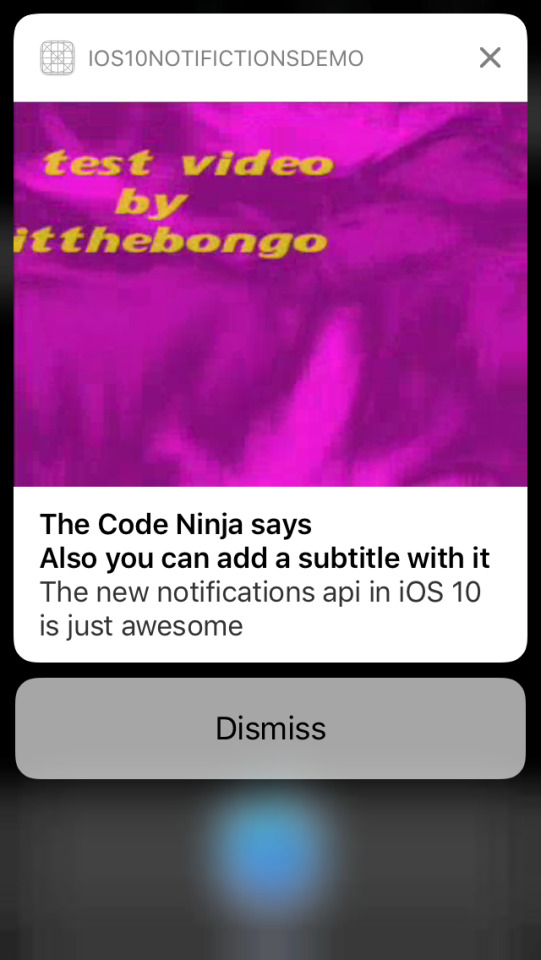
///Creating a UNMutableNotificationContent object that will specify the notification content details let content = UNMutableNotificationContent() ///Setting the title content.title = "The Code Ninja says" ///Setting the body content.body = "The new notifications api in iOS 10 is just awesome" ///Setting the subtitle property, this is new for iOS 10 alone. content.subtitle = "Also you can add a subtitle with it" ///Setting the trigger time let trigger = UNTimeIntervalNotificationTrigger(timeInterval: 5, repeats: false) ///Setting the identifier to identify different types of notifications let requestIdentifier = "TheCodeNinja_Identifier" ///Creating a UNNotificationRequest object with the identifier, content and the trigger object let request = UNNotificationRequest(identifier: requestIdentifier, content: content,trigger: trigger) /// last step, Adding the request to UNUserNotificationCenter.current()'s queue so that it presents the notification when the trigger happens. UNUserNotificationCenter.current().add(request) { (error) in}
I ran the app, BOOM I got a notification with an image like below,
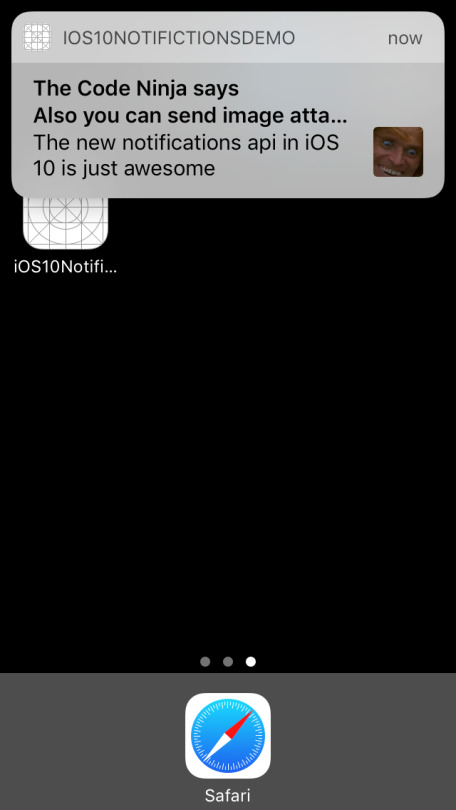
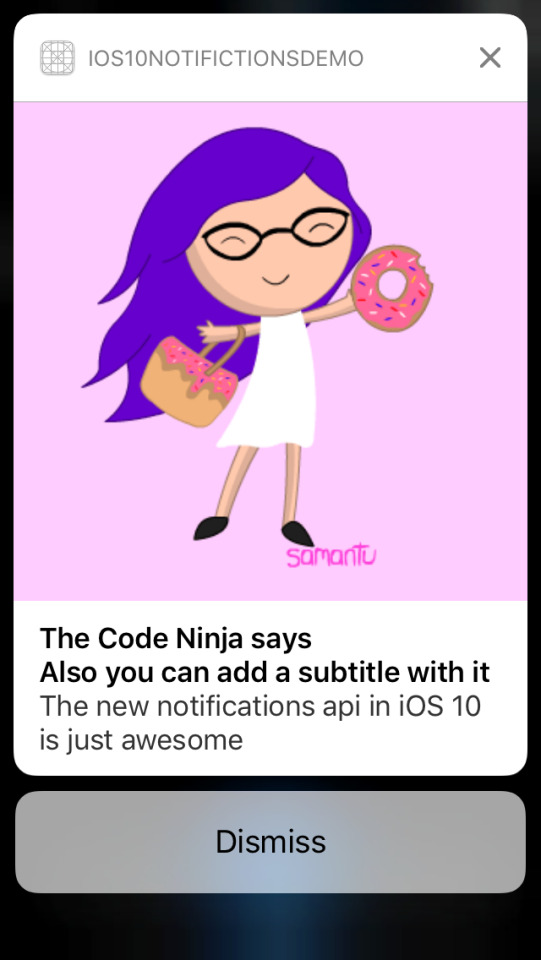
Now let us try a bit more interesting, we’ll try to add an image attachment to the notification, to do that add the below code before sending the notification
/// Creating a image URL from bundle let imgURL = Bundle.main().urlForResource("notification", withExtension: "jpg") /// Creating an attachment object let notificationImageAttachment = try UNNotificationAttachment(identifier: "jpg_identifier", url:imgURL! , options: nil) content.attachments = [notificationAttachment!]
Hit Run, you will get something like below…
Isn’t that just great, but I was running in the simulator and could not interact much with the attachment but if you have a device with 3D touch you could try out how will you can interact with the notification attachment.
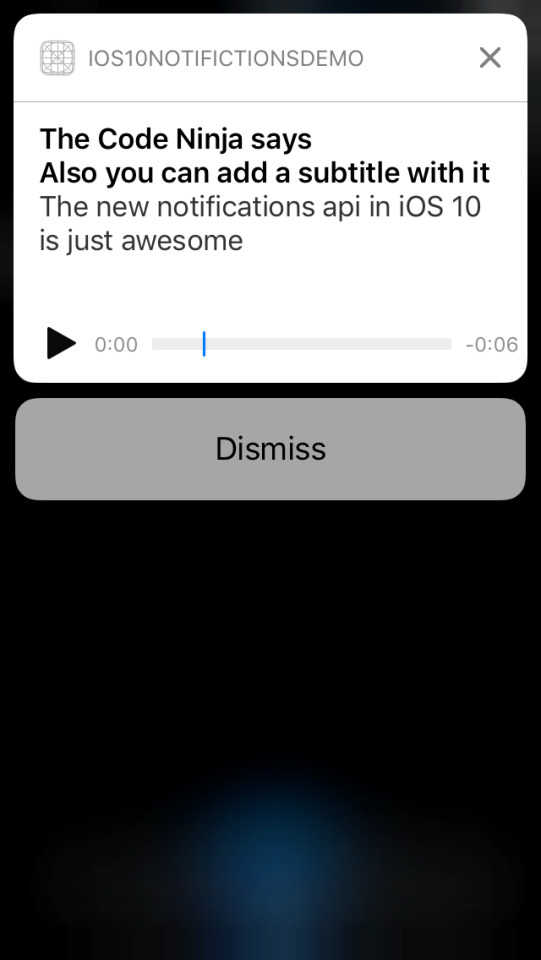
I tried different types attachments like audio, video and GIF’s but could not test all on the simulator and the framework automatically tries to crack the file type for you, if you are trying to do anything apart from common file formats then you can specify the file type like below mentioning the hint key to the API,
let notificationOptions = [UNNotificationAttachmentOptionsTypeHintKey:kUTTypeMP3] /// Creating an attachment object let notificationImageAttachment = try UNNotificationAttachment(identifier: "audio_identifier", url:imgURL! , options: notificationOptions)
All the code I have been doing so far is here. See you all for now, will post more soon on my discoveries on the new notifications API.
UPDATE 1
The code has been upgraded to the changes in Xcode 8 beta 2.
Screenshots of the various attachments I tried, so to view notification attachments the user needs to swipe down the notification banner and he can see the notification attachment.
Image Attachment
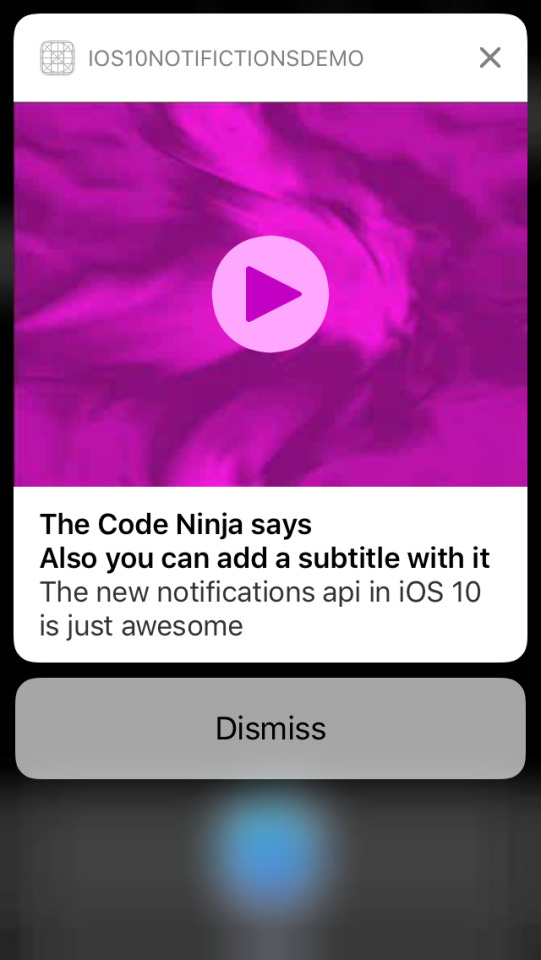
GIF (the GIF starts to play when the user swipes down)
Audio Attachment (the user is given a play/pause button and a seek bar to control the audio)
Video attachment (the user is given a play/pause button and a seek bar to control the video)
See you soon guys!!
#unusernotification#ios10#usernotifications framework#unnotificationattachment#unusernotificationcenter#unnotificationrequest#untimeintervalnotificationtrigger#unmutablenotificationcontent#unnotificationattachmentoptionstypehintkey#import usernotifications
6 notes
·
View notes