
UserManual providing user friendly way to read manuals online.User manuals are traditionally provided in a PDF format, but this format can be difficult to use on a mobile device or with a low-bandwidth connection.
Don't wanna be here? Send us removal request.
Statistics
We looked inside some of the posts by usermanualplus and here's what we found interesting.
Average Info
Notes Per Post
24
Likes Per Post
23
Reblog Per Post
1
Reply Per Post
0
Time Between Posts
6 hours
Number of Posts By Type
Text
17
Last Seen Tumblr Blogs


Fun Fact
Tumblr was attacked by a cross-site scripting worm deployed by the Internet troll group GNAA on Dec 3, 2012.
Text
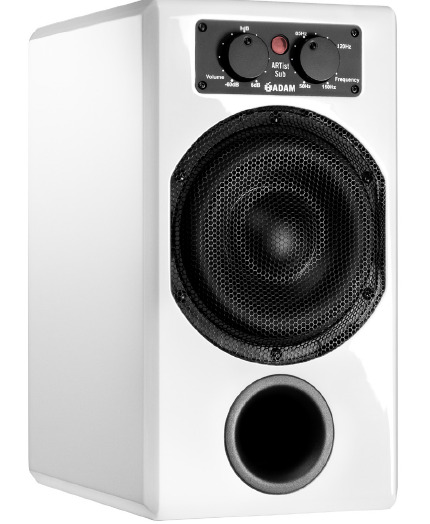
Adam Artist Subwoofer Specification and Manual
Connecting the Subwoofer
Connections On the rear side of the speaker you can find balanced (XLR) and unbalanced (RCA) connectors. For professional use the XLR connectors will be the first choice. However, as RCA connections are widely used in home entertainment environments we have included an RCA jack as well.
Input Connect the left and right line-level signal from your signal source (audio interface, mixer, etc.) to the LEFT and RIGHT INPUT jacks. Use either XLR (balanced) or RCA (unbalanced) cables.
Satellite Out Connect the LEFT and RIGHT SATELLITE OUT jacks to the inputs of the left and right main powered speakers or the inputs of the amps powering the main speakers.
Read More
10 notes
·
View notes
Text
Savaria Omega Inclined Lift Specification and Manual
Ensure that only an authorized Savaria Dealer installs and services the OMEGA Curved Incline Platform Lift. Under no circumstances is anyone other than a Dealer with Savaria training and authorization to install, adjust, service or modify any mechanical or electrical device on this equipment. Failure to follow this warning can result in safety system compromises or defeat; this can result in serious injury or death. Savaria Corporation accepts no liability for property damage, warranty claims or personal injury, including death, in this circumstance. Passenger safety is the result of countless details in the equipment design, manufacture, and installation. After installation, reliable operation and continual safe operation requires regular inspection and maintenance as outlined in this manual, or more frequently where usage, environment, or local jurisdiction requires. As the Owner, you are responsible for ensuring that regular inspections and maintenance occur in a timely manner. Refer to this manual for unit description, setup, operating instructions, and a maintenance schedule for the OMEGA Curved Incline Platform Lift. Upon completion of installation, the Dealer must provide you with the following information and ensure it is recorded in this manual. In addition, either the Dealer or yourself must keep any service and/or maintenance records in the Maintenance Record section of this manual.
Read More
0 notes
Text
Quad Drone I sight Drone Camera Specification and guide

Specifications
1. Back
2. Take a picture
3. Take a video
4. Picture & video check
5. Control mode for gravity sensor
6. ON/OFF
7. Speed selection
8. Flips
9. Rotary screen
10/11. Forward/backward trim
12/13. Sideways flying trim
14/15. Turning trim
16. Up/down
17/18. Turn left/right
19/20. Sideways fly
21/22. Forward/backward
Read More
0 notes
Text
Meta-Quest-Virtual-Reality-Headset-Manual and Specifications
How to wear the headset?
Loosen the side straps and then the top strap.
Starting from the back, put on your headset.
Make sure to pull the back strap down until it cradles the base of your head.
If you’re wearing glasses, put on the headset from the front first.
Tighten the side tabs and then top strap.
Make sure that the straps aren’t too tight. The headset should fit comfortably and not apply too much pressure on your face and head.
Read More
0 notes
Text
Whirlpool Self Cleaning Cooler Specification and Manual

PRODUCT FEATURES of Whirlpool Self Cleaning Cooler
Congratulations! You have chosen an Advanced Technology State of the Art Water Cooler. To provide consistently cold water, this water cooler forms an “Ice Bank” in the cold tank. Formation of the initial “Ice Bank” can take up to 6 hours. WHEN THE UNIT IS PLUGGED IN FOR THE FIRST TIME IT CAN TAKE UP TO 6 HOURS BEFORE THE “ICE BANK ” FORMS AND THE UNIT CAN PROVIDE THE COLDEST WATER.
KEY INFORMATION FOR FUTURE USE
Please register your dispenser immediately at www.electrotemp.com For future support, please record your serial number (located on the label at the back of the dispenser) and purchase date. Staple your receipt to the manual. You will need this information to obtain warranty service.
SPECIFICATIONS
Power Supply: 8Amp.
Refrigerant Type: R-134A
Cold Water Power: <100 Watts
Cold Capacity / Hour: 6 Litres / 1.59 Gallon
Cold Temperature: 3°C – 10°C / 37.4°F – 50°F
Hot Water Power: 870 Watts
Hot Capacity / Hour: 8 Litres / 2.11 Gallon
Hot Temperature: 80°C – 92°C / 176°F – 197.6°F
Dimensions: 1028 H x 320 W x 382 D (mm) 40.5 H x 12.6 W x 15 D (inch)
Net Weight: 36.2 Ibs / 16.4 Kg
Read more
0 notes
Text
Whirlpool WRS588FIHB Refrigerator Specification and Manual

Refrigerator Control:
Press Refrigerator Temp to view the current set point for the refrigerator.
Press Refrigerator Temp again to adjust the set point. The setting will increase by 1 bar with each press of the button, returning to 1 bar after reaching 5. After 2 minutes of inactivity, any changes will be saved and the display will return to the home screen.
Freezer Control:
Press Freezer Temp to view the current set point for the freezer.
Press Freezer Temp again to adjust the set point. The setting will increase by 1 bar with each press of the button, returning to 1 bar after reaching 5. After 2 minutes of inactivity, any changes will be saved and the display will return to the home screen.
DISPENSER LIGHT
When you use the dispenser, the light will automatically turn on. If you want the light to be on continuously, you may turn on the light. Press Light again to turn off the dispenser light. The dispenser lights are LEDs that cannot be changed. If it appears that your dispenser lights are not working, see online “Troubleshooting” for more information.
DISPENSER LOCK
The dispenser can be turned off for easy cleaning or to avoid unintentional dispensing by small children and pets. NOTE: The lock feature does not shut off power to the refrigerator, to the ice maker, or to the dispenser light. It simply deactivates the controls and dispenser lever. To turn off the ice maker, see the “Ice Maker and Storage Bin” section in the Owner’s Manual.
Press and hold Lock for 3 seconds to lock the dispenser.
Press and hold Light a second time to unlock the dispenser. The display screen indicates when the dispenser is locked.
Read More
3 notes
·
View notes
Text
Whirlpool WRT112CZJB Refrigerator Specification and Manual
INSTALLATION INSTRUCTIONS
Unpack the Refrigerator
WARNING : Excessive Weight Hazard Use two or more people to move and install refrigerator. Failure to do so can result in back or other injury.
Remove the Packaging
IMPORTANT: Do not remove the white foam air return insert from behind the control panel on the ceiling of the refrigerator. If the insert is removed, ice may migrate down from the freezer and cause icicles to form.
Remove tape and glue residue from surfaces before turning on the refrigerator. Rub a small amount of liquid dish soap over the adhesive with your fingers. Rinse with warm water and dry with a soft cloth.
NOTE: Do not use sharp instruments, rubbing alcohol, flammable fluids, or abrasive cleaners to remove tape or glue. These products can damage the surface of your refrigerator. For more information see “Refrigerator Safety”.
When Moving Your Refrigerator: Your refrigerator is heavy. When moving the refrigerator for cleaning or service, be sure to cover the floor with cardboard or hardboard to avoid floor damage. Always pull the refrigerator straight out when moving it. Do not wiggle or “walk” the refrigerator when trying to move it, as floor damage could occur.
Install Levelers
IMPORTANT: Lay down the refrigerator ONLY to your left-hand side (as you are looking at the front of the refrigerator) to avoid damaging the refrigerator.
Read More
6 notes
·
View notes
Text
Whirlpool WRT311FZDM Refrigerator Specification and Manual

INSTALLATION INSTRUCTIONS
Unpack the Refrigerator
Remove the Packaging
Remove tape and glue residue from surfaces before turning on the refrigerator. Rub a small amount of liquid dish soap over the adhesive with your fingers. Wipe with warm water and dry.
NOTE: Do not use sharp instruments, rubbing alcohol, flammable fluids, or abrasive cleaners to remove tape or glue. These products can damage the surface of your refrigerator. For more information, see “Refrigerator Safety.”
Dispose of/recycle all packaging materials.
IMPORTANT: Do not remove the white foam air return insert that is located behind the control panel on the ceiling of the refrigerator (on some models). The insert is part of the refrigerator and not part of the packing material. If the insert is removed, ice may migrate down from the freezer and cause icicles to form.
When Moving Your Refrigerator: Your refrigerator is heavy. When moving the refrigerator for cleaning or service, be sure to cover the floor with cardboard or hardboard to avoid floor damage. Always pull the refrigerator straight out when moving it. Do not wiggle or “walk” the refrigerator when trying to move it, as floor damage could occur.
Clean Before Using
After you remove all of the package materials, clean the inside of your refrigerator before using it. See the cleaning instructions in “Refrigerator Care.”
Important information to know about glass shelves and covers: Do not clean glass shelves or covers with warm water when they are cold. Shelves and covers may break if exposed to sudden temperature changes or impact, such as bumping. Tempered glass is designed to shatter into many small, pebble-size pieces. This is normal. Glass shelves and covers are heavy. Use both hands when removing them to avoid dropping.
Location Requirements
IMPORTANT: This refrigerator is designed for indoor household use only.
To ensure proper ventilation for your refrigerator, allow for ½” (1.25 cm) of space on each side and at the top. Allow for 1″ (2.54 cm) of space behind the refrigerator. If your refrigerator has an ice maker, allow extra space at the back for the water line connections. When installing your refrigerator next to a fixed wall, leave a 2″ (5.08 cm) minimum space on the hinge side (some models require more) to allow the door to swing open.
NOTE: This refrigerator is intended for use in a location where the temperature ranges from a minimum of 55°F (13°C) to a maximum of 110°F (43°C). The preferred room temperature range for optimum performance, which reduces electricity usage and provides superior cooling, is between 60°F (15°C) and 90°F (32°C). It is recommended that you do not install the refrigerator near a heat source, such as an oven or radiator.
Read More
0 notes
Text
AmpliVox wireless battery system Specification and Guide

AmpliVox wireless battery system
POWER – Push POWER switch (middle of panel) to ON . All accessories have separate ON / OFF power switches.
WIRELESS MIC – Turn volume dial clockwise to turn on. Select channel using the up/down buttons. Turn Handheld Micro-phone or Bodypack on and set to same channel. Channel must match channel on microphone and receiver.
BLUETOOTH PLAYER – Turn volume dial clockwise to turn on.
WIRED MICROPHONES: Up to 2 wired XLR type microphones can be used. Separate Volume control for each microphone to adjust sound.
LINE IN: (1/8″ jack) Use for plugging other Audio Devices into PA.
LINE OUT: (1/4″ jack) Use for sending Audio out to external PA or recording devices.
EXT SPKR: (1/4″ jack) Use for connecting a non-powered pas-sive speaker.
3 LED’s provides battery information. Charge 24 hours before first use. GREEN – Fully charged, YELLOW – Half level, RED – Low charge.
Read More
0 notes
Text
2GOability BOOST Scooter Specification and manual

Control panel: Key Switch This switch turns the power on and off to your scooter.
Insert the key into the key switch;
Turn the key 90 degrees clockwise to turn on your scooter´s power;
Turn the key back to the vertical position to turn off your scooter’s power.
Speed Control
The speed adjustment dial allows you to preselect the maximum top speed of your scooter;
Turn the dial counterclockwise to operate your scooter at the lowest speed level;
Turn the dial clockwise to increase the operational speed of your scooter;
We recommend that you select a speed setting at which you feel comfortable, safe, and in control of your scooter.
Forward / Reverse
To move forward push the lever on the right side;
To move backwards push the lever on the left side.
Read More
0 notes
Text
Bose Home Speaker 500 Specification and Manual

CONNECT THE SPEAKER TO POWER
Connect the power cord into the power connector on the speaker.
Plug the other end of the power cord into an AC (mains) outlet. The speaker powers on and the light bar glows solid amber.
NETWORK STANDBY
The speaker transitions to network standby when audio has stopped and you have not pressed any buttons for 20 or more minutes. To wake the speaker from network standby:
Tap any button on the speaker.
Play or resume audio using your mobile device or using the Bose Music app.
Talk to Amazon Alexa or Google Assistant.
Read More
0 notes
Text
Whirlpool WRT311FZDM Refrigerator Specification and Instructions Manual
Unplug refrigerator or disconnect power.
Turn OFF main water supply. Turn ON nearest faucet long enough to clear line of water.
Locate a ½” to 1¹⁄₄” (1.25 cm to 3.18 cm) vertical cold water pipe near the refrigerator.IMPORTANT:
Make sure it is a cold water pipe.
Horizontal pipe will work, but drill on the top side of the pipe, not the bottom. This will help keep water away from the drill and normal sediment from collecting in the valve.
Determine the length of copper tubing you need. Measure from the connection on the lower left rear of refrigerator to the water pipe. Add 7 ft (2.1 m) to allow for cleaning. Use ¹⁄₄” (6.35 mm) O.D. (outside diameter) copper tubing. Be sure both ends of copper tubing are cut square.
Read More

0 notes
Text
Whirlpool WRT112CZJB Refrigerator Specification & Installation Manual

INSTALLATION INSTRUCTIONS
Unpack the Refrigerator
WARNING : Excessive Weight Hazard Use two or more people to move and install refrigerator. Failure to do so can result in back or other injury.
Remove the Packaging
IMPORTANT: Do not remove the white foam air return insert from behind the control panel on the ceiling of the refrigerator. If the insert is removed, ice may migrate down from the freezer and cause icicles to form.
Remove tape and glue residue from surfaces before turning on the refrigerator. Rub a small amount of liquid dish soap over the adhesive with your fingers. Rinse with warm water and dry with a soft cloth.
Read More
0 notes
Text
NETGEAR Wi-Fi Range Extender Specification and Manual

Use the Extender in Extender Mode
Place the extender, apply power, and connect it to your WiFi network. Place the Extender and Apply Power
Place your extender in the same room as your WiFi router. Proximity to the WiFi router is required only during the initial setup process.
Plug the extender into an electrical outlet. Wait for the Power LED to light green. If the Power LED does not light, press the Power On/Off button on the extender.
Connect to an Existing WiFi Network To extend the range of your WiFi network, you must connect the extender to your existing WiFi network. You can do this in one of two ways:
Connect with WPS. For more information, see Connect with WPS on page 7.
Connect with web browser setup. For more information, see Connect with Web Browser Setup .
0 notes
Text
WAHL Clipper Dog Grooming Kit guide and Manual

Regularly apply a few drops of oil to the blades during clipping/trimming. Clipper oil lubricates the blades and will ensure your clippers or trimmers perform to their maximum capacity. Without oil, friction is increased therefore generating heat. If blades are getting hot then insufficient oil is being applied or the blades need cleaning or sharpening.
Always ensure the animal coat is dry, as clean as possible and brushed to remove tangles, grease and dirt particles from the hair.
During operation, take time to regularly brush hairs and dirt from the blades.
We recommend use of Wahl Hygienic Spray to ensure grease and dirt particles are flushed from the blade surface. DO NOT use water to clean the blades.
Always oil the blades after cleaning.
Read More
0 notes
Text
Cisco AVS3180 Pill Reminder Specification and Manual

The AVS 3180 is shipped in a protective shipping carton. It is shipped as a self-contained chassis; no components can be added or removed. Follow these steps to unpack the AVS 3180:
Remove the AVS 3180 accessories from the shipping carton. Save the packing materials in case you need to repack the AVS 3180 later.
Check the configuration of the AVS 3180 and the accessories against the items listed on the packing slip. Report any discrepancies as described in “If the Product is Damaged”.
Before installing the AVS 3180, review the information outlined in Chapter 2, “Preparing for Installation”
Installing Your AVS 3180
Place the AVS 3180 in the desired location. You can mount it in a rack for your convenience, or place it on a solid, stable surface. If you do not plan to install the AVS 3180 in an equipment rack, proceed to the “Installing the AVS 3180 on a Workbench or Tabletop” section on page 3-10. Racks are marked in vertical increments of 1.75 inches (4.45 cm). Each increment is referred to as a rack unit (RU). A 1-RU device is 1.75 inches (4.45 cm) tall.
Read More
5 notes
·
View notes
Text
E-PIL Med-Time Pill Reminder Manual and Guide

SET UP YOUR e-pill Med-Time XL AUTOMATIC PILL DISPENSER Your e-pill Med-Time XL contains two programming modes, A and B, to program system functions (see below). When you first remove the battery strip, the Med-Time XL display reads 12:00 am and is automatically in the Menu option A mode.
NOTE:
After you complete the set-up of either Menu A or B functions, press Button 1 for three seconds to store the settings and return to normal operating mode.
If you press no Buttons for 30 seconds, Med-Time XL automatically returns to normal operating mode (automatic time-out).
Read More
0 notes