
welcome-to-craftyland
welcome to craftyland
Welcome to Craftyland is an arts, craft, and design blog for teenagers and young adults. The arts & craft ideas here focus on sustainability, curious experimentation, design thinking, and the importance of play. Welcome to Craftyland is also a book, coming soon.
about
18 posts
Don't wanna be here? Send us removal request.
Last Seen Blogs

corinthiaxno
Louco Por Ti, Corinthians

official-ostberlin
ostberlin

plantsworld67
Untitled

steelanchorranch
Untitled

palartie
Palartie
Text

typographic map poster
This simple map project makes a lovely poster that is a great custom gift for a friend or family member, or just as a reminder of an important place in your life.
Trace the outline of a city with a pencil on a big piece of paper. Use art supplies to fill in the map with many words and phrases in different lettering styles. Use newspaper headlines, song lyrics, poetry, neighborhood names, interesting facts, or anything that gives words to the city you love. Use an eraser to lightly remove any pencil marks. I scanned mine and made a neat poster, printed on 11 x 17 paper.

Also: If the area of the world you picked doesn't have large bodies of water or a coastline to paint, you can always do the city or county boundaries or border!
#welcome to craftyland#diy projects#design projects and book arts#craft project#poster project#maps#seattle
0 notes
Text

mini accordion books!
Accordion books (or concerta books) are books constructed without staples or stitching, made out of a long continuous piece of paper folded zig-zag into a book. A few ideas for the inside of your book: draw a really long wiener dog! Use it as a home for your most precious sticker collection. Illustrate all your dream slushie flavors. Make a list of bugs!

Use a knife and a ruler to cut a long strip of paper.
Fold the paper into a zigzag, I always like to use a metal ruler to make tiny pencil marks on the top and bottom every 11/2 or so inches. Fold the paper using a bone folder. Cut the excess with your craft knife.
Cut out two pieces of cardboard for the cover. I just used a box from some crackers, and made the covers the same size as the front and back of the book.
Using some white craft glue, brush glue onto the book covers and stick them to the paper, setting beneath some heavy books on top until it dries. I put some wax paper around my little book so I wouldn’t get glue on anything. Let dry completely before using!
Supplies:
- Paper
- Metal ruler
- Craft knife
- Cracker box from the recycling
- White glue
#welcome to craftyland#design projects and book arts#craft project#easy crafts#mini book#recycled crafting#concerta book craft#book arts for teens
0 notes
Text

fold some zines!
I’m a big zine collector – they’re fun to make and easy to collect, distribute, and trade with fellow zinesters and DIYers.
Zines are self-published small circulation magazines or books. They often showcase literary work, artwork and illustration, political themes, work related to specific media or fan-content, & many other themes and topics.
These foldable zines are great since they only use one piece of printer paper, and fold so you have a cover, a back, and six inside pages to decorate to your heart’s desire.

Start off with a piece of regular 8.5 x 11” printer paper.
Fold the paper in half, top to bottom. A bone folder (folding tool) makes this a little easier.
Next, fold this in half once again, left to right.
Fold once more, left to right. It should be pretty small. Next, unfold the paper.
You should have eight even sections. Fold the paper again, short end to short end.
Use scissors or a craft knife to cut the center line.
Fold the paper top to bottom again, and hold the paper at either end to fold it into a mini booklet. See illustration.

Use art supplies to customize the little blank book. Make a cool cover! Write and illustrate a short comic! Make a cute playlist, collaborate with a friend. One great thing about these little folded zines is that they can be unfolded and photocopied, so you can produce a bunch and distribute them to people around you. Trade zines with a pal! Make your own little personal zine library!

#welcome to craftyland#design projects and book arts#diy projects#zines#folding zines#zines how to#zinesters
10 notes
·
View notes
Text

recycled plastic phone case hack
I love sticking random stickers and paper scraps into the back of my clear phone case, and if you have a translucent phone case and some clear plastic from the recycling bin, this easy project can make it even easier to change out your cellular designs.
Trace your phone case on a piece of clear plastic. Make sure it fits neatly inside, cutting around the part where your camera is. Here I’m using a random piece of plastic scrounged from the recycling bin.
Collect stickers and small bits of paper ephemera like movie tickets, cool tags from packaging, dried leaves and flowers, etc.
If you have anything not already sticky, use a thin layer of glue to attach. Add stickers and stuff until you’re satisfied with the layout.
Let dry completely before putting the piece in your clear phone case, and you’re all done! Now you can switch it out without ruining your stickers or potentially damaging your phone!
Supplies:
- Clear phone case
- Translucent plastic from the recycling
- Stickers
- Ephemera
- Scissors
#welcome to craftyland#home stuff and apparel#diy projects#easy crafts#recycled craft#phone case stickers#phone case craft
1 note
·
View note
Text

the wonderful world of fixing your own clothes
There’s many ways to mend and repair your clothes, Here’s a bunch of visible mending ideas to save your beloved clothing and extend the lifespan of your stuff!
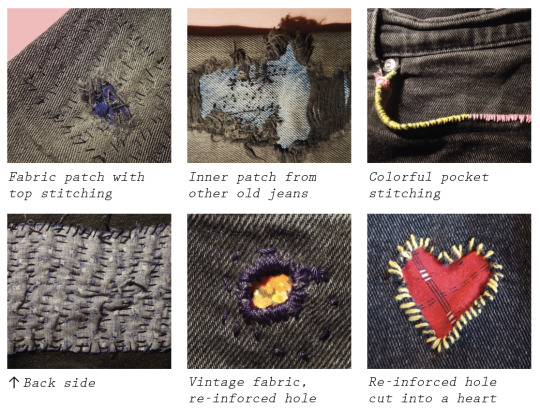
#welcome to craftyland#home stuff and apparel#diy projects#mending ideas#mending clothes#sustainable practices
3 notes
·
View notes
Text

DIY découpage light switch cover
I always keep wrapping or tissue paper from birthdays or holidays, so put it to good use and spruce up a switchplate!
First, make a glue mixture of half white glue and half water. Cut out your tissue paper so it’s about an inch larger than your switchplate.
Use a foam brush or paintbrush to coat the light switch cover in your glue mixture. Place your tissue paper on top, smoothing out any wrinkles or bubbles with your fingers.
Cut the corners and brush the back with glue, and then fold them over.
Use a craft knife to cut an X in the center, so you can glue and fold them to the back as well.
I used a needle (any sharp tool works) to poke some holes in the part where the screws go.
Let dry completely, then you’re all done! Grab a flathead screwdriver and install your lovely switchplate!

Supplies:
- Foam brush or paintbrush
- Switch plate
- White glue
- Tissue paper
#welcome to craftyland#home stuff and apparel#diy projects#craft project#easy crafts#light switch cover#tissue paper crafts#decopage
0 notes
Text

make a weird little apple felt pin!
Grab some felt, thread, & a safety pin and make a strange little felt apple pin!
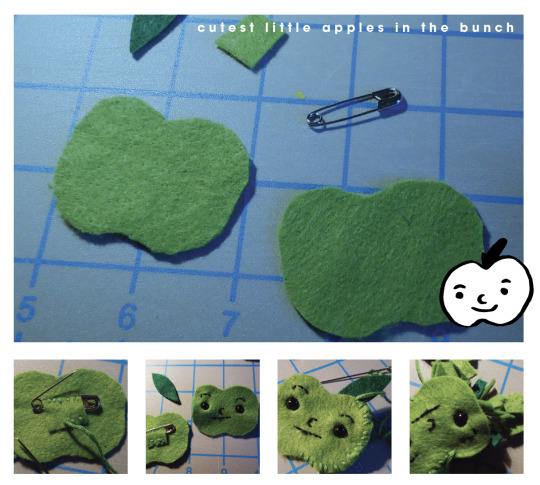
First, cut out all the felt shapes you’ll need. I made a paper template and cut out two identical apple shapes, one leaf, and a little square to attach the pin with.
Sew the little square on the back of one of the apple shapes. Secure the safety pin inside the square and stitch both sides to secure it.
Next, I added plastic eyes and embroidered the face details with black thread. I like to split my embroidery thread in half for smaller details.
Stitch the two sides together, making sure the side with the pin and the side with the face are facing out.
When you get to the top, add the leaf and keep sewing through it, securing it in place.
When you’re halfway around the apple shape, add some felt scraps to stuff the shape. Continue sewing around.
Tie your knot off, and I like to tuck the thread inside the body by threading the ends through the plush with a needle.
Supplies:
- Felt
- Needle
- Embroidery thread
- Safety pins or metal pinbacks
- Plushie eyes or buttons
#home stuff and apparel#welcome to craftyland#diy projects#craft project#easy crafts#felt project#felt pins#DIY pins#apple crafts
0 notes
Text

DIY cardboard fried egg for your wall
Have you ever fried an egg and thought to yourself, “wow, I sure wish I could just stick this beautiful egg right on my wall.” Dig some cardboard out of your recycling, grab some yellow and white paint, and you can make yourself as many eggs as you want.
Cut out your blobby egg shapes. These really don’t have to be perfect, just a larger blob for the white of the egg & some roundish shapes for the yolks.
I used white acrylic paint and a nice yellow gouache to paint the cardboard cut outs, & set them aside to dry.
Once those egg parts are all dry, glue them together. I used hot glue, but white glue also works great.
Let dry and you’re all done! I hung them up by poking a hole in the back so I could put them up with a nail.

Supplies:
- Glue
- Scissors
- Cardboard
- Acrylic or gouache paint
#home stuff and apparel#welcome to craftyland#diy projects#craft project#easy crafts#fried egg#cardboard crafts
0 notes
Text

DIY felt banner pin display
If you collect enamel pins or cool old brooches like I do, it’s nice to have a place where they can all live together. This pin display is a tiny lil felt banner made from scrap felt and a chopstick.

Fold a piece of felt top to bottom. Fold the felt in half again and cut the bottom to make the pointed shape.
Make sure the chopstick fits, and trim it down if you need to. Next, I pinned the sides together, folded over the dowel.
Use a simple running stitch to secure the dowel at the top of the banner. Next, sew all around the edges of the banner using a blanket stitch.
Tie a string or twine for hanging on each side of the dowel. Hang it up and you’re all done! It’s ready for all your favorite pins to move on in.

Supplies:
- Chopstick
- String
- Needle & thread
- Nice felt
- Scissors
- Sewing pins
#home stuff and apparel#welcome to craftyland#DIY pin display#felt project#pin collector ideas#enamel pin craft
0 notes
Text
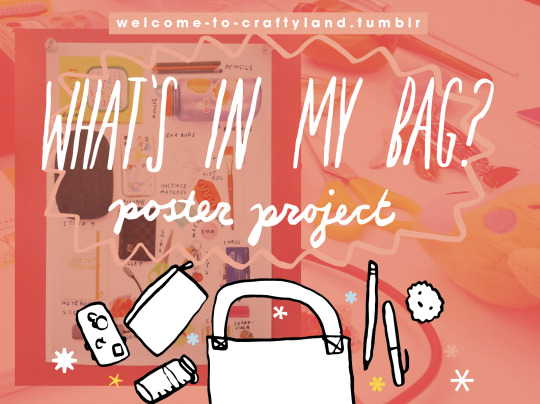
what's in my bag? poster project
The random things we carry with us every day says a lot about us. Empty everything onto a table, think about any themes or consistencies in your everyday items. Flat lay photographs are pictures taken from a top-down perspective of various objects arranged nicely. Take a pic of your items, and use it either as a starting point for an illustrated poster, or print the photo out on a piece of 11x17 paper to make a print.

My finished poster, edited in Photoshop & I added text in Procreate.
0 notes
Text

grid collage technique tutorial 🔪
This neat collage technique involves using a ruler and sharp craft knife to evenly slice images and arrange them back together into a grid.

Print out your image, or find a good picture from a magazine to cut out.
Using a metal ruler and a cutting mat, start cutting out even strips of paper. I eyeball it most of the time, just make sure they’re all about the same thickness. Keep them in order and organized nearby so you don’t get them all jumbled.
Once they’re all cut out, rearrange the strips however you’d like. Here, I put each strip upside down, but kept them in the original order.
Using clear tape, tape everything together on the back side, making sure there’s no big gaps or overlapping paper. You can finish it here, or slice and rearrange the whole thing once again like I did for an even wilder effect!
Supplies:
- Clear tape
- Sharp craft knife
- Cork backed metal ruler
- Cutting mat
- Printed out photo / magazine pic
#art illustration and printmaking#welcome to craftyland#collage art#collage idea#craft project#experimental collage#diy projects
0 notes
Text

bead soup gift idea 🥣
Care for a bowl of bead soup? Bead soup is an eye-catching collection of beads and charms all mixed together. This project turns this idea into a lovely little gift for any creative friend or family member. ^___^

Supplies:
- Cute lil bag
- Gift wrapping materials
- Beads, charms, & trinkets
Tip: An affordable way of collecting a bunch of cool beads is taking apart thrift store jewelry!

Once I had a variety of beads and charms, I packaged them up neatly with tissue paper and a bunch of washi tape and stickers. I made a little name tag with scrap paper and taped it on.
#welcome to craftyland#art illustration and printmaking#bead soup#beads#gift wrapping idea#gift idea#craft project#diy projects
0 notes
Text

type expedition design project
Using your phone or a digital camera, take pictures found letters in the world around you. Does that tree outside make a perfect letter Y? Look at cool packaging, at street signs, at graffiti.
Find some sort of camera – your phone works just fine if ya have one with a camera or get an old digital camera at the thrift store.
Go on a walk! Go out, looking for the way that letters show up in the natural world. Look around inside too, how are the objects in your space creating accidental letterforms?
Once you have a good amount (A-Z if possible), save all the photos and compile them all together using an image editing software of your choice. I placed mine in a grid that fits on an 11x17 piece of paper, which I printed out to make a poster.

Supplies:
- Phone or digital camera
- Some sort of software to compile ur pix
- World
#welcome to craftyland#design projects and book arts#typography craft#design projects for teens#type design#easy crafts#diy projects
1 note
·
View note
Text

starry paper ceiling decor craft! ⭐️
With just some cardstock, paint, glue, and a string, a cosmic galaxy with floating mountains can emerge from your bedroom ceiling.
Use paint and whatever other illustration tools to decorate a few pieces of bristol paper. I made a bunch of stars, mountains, and little dots. Cut out two of each, so you can sandwich them together on the string.
Tie a little loop at the end of some string for hanging. To attach the cut-outs, add a dollop of hot glue on the back of a shape, and sandwich the string between the shapes with the hot glue. Be careful not to burn your fingers!
Supplies:
- Hooks for ceiling
- String / thread
- Cardstock or bristol paper
- Paint and illustration supplies
- Hot glue
- Pencil
- Scissors
#home stuff and apparel#welcome to craftyland#room decor idea#DIY room decor#craft project#paper craft
1 note
·
View note
Text
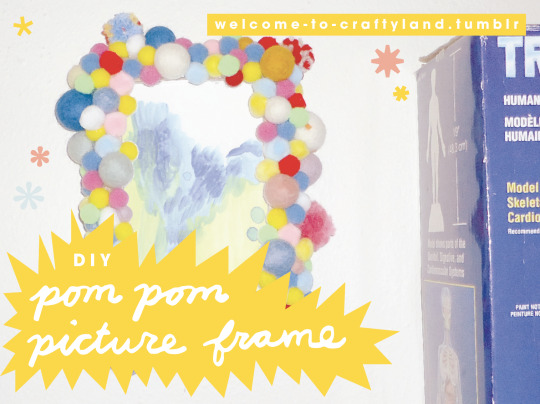
DIY pom pom picture frame! 🖼
Make any old picture frame just so rad and fresh with this simple pom pom craft.
Collect an assortment of pom poms and felt balls.
Remove the glass while you’re gluing pom poms, so you don’t accidentally get any on the glass. Using hot glue, attach the pom poms all around the frame, filling in any gaps.
It is complete! Make sure the glue is dry before putting the glass and picture back in. ( ˆ _ -) /🖼
Supplies:
- Pom poms or felt balls
- Old picture frame
- Hot glue and glue sticks
2 notes
·
View notes
Text

DIY picture frame pin display! 🖼
This great pin display idea is simple - find an old picture frame around the house or at the thrift store, and replacing the glass and image with some cork to stick your pins in.

Take apart your picture frame, set aside the backing for use later. Paint the frame if you’d like, but I just left mine.
Using the cardboard frame backing as a template, trace the shape onto the cork sheet and cut it out. I used a metal ruler and a pair of scissors.
Glue the cardboard onto the piece of cork, evenly spreading it out. I put mine under a book to dry flat.
Put everything (except for the glass) back into the frame, and you’re all done! You can hang it up on the wall or stand it up on your desk or dresser. Keep a small jar nearby for any loose pinbacks.
Supplies:
- Thin cork sheet or cork placemat
- Thrift store picture frame
- Scissors
- White glue
- Cardboard
#home stuff and apparel#welcome to craftyland#DIY pin display#thrift store crafts#easy pin display#enamel pin collection
1 note
·
View note
Text

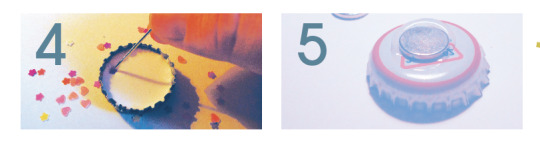
bottle cap magnet craft! 🫙
(+ bonus project: glue a magnet on anything!)
Have miscellaneous bottle caps laying around? Dig through your recycling and craft these super fun customizable magnets.

Start by collecting a bunch of bottle caps, which for me is always very easy given my ongoing junk drawer situation.
Cut your image to fit snugly inside the bottle cap. I found that a quarter made the perfect template, using a pencil to trace where I’ll cut.
Cut out the photos you’d like to use & glue them to the inside with a big blob of glue. Set aside to dry a bit. You can set them aside to let dry for 24 hours if you have patience, but if you’re like me just watch a movie and come back to it when you’re done.
When that’s dry, coat the entire image inside the bottle cap with a glob of glue (make sure it will dry clear), making sure the sides and everything is covered and sealed. Here, I also added some small pieces of confetti or glitter, using a needle to push them under the wet glue. Pop any bubbles that form. This part takes the longest to dry, I always leave them overnight.
When the glue has cleared up and it’s all dry, use some strong craft glue to attach a small magnet to the back. Wait until that’s dry to put the magnet anywhere. All done!
Supplies:
- Bottle caps
- Scissors
- Strong glue
- Clear drying craft glue
- Small magnets
- Printed scaled down images, or
- Magazine photos
- Confetti or glitter (optional)
bonus craft: glue a magnet on anything!
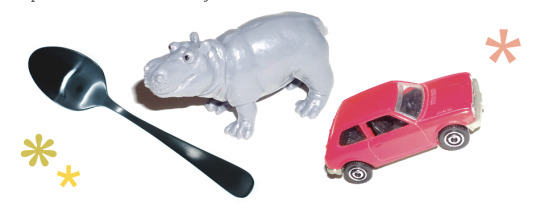
Using a super strong craft glue, attach magnets on anything your heart desires. Toy cars, plastic animals, spoons, game pieces, whatever you want!
Hot tip: It’s much easier to make stuff into magnets if the object has at least one flattish side!

#home stuff and apparel#magnet craft#recyclable crafting#bottle cap crafts#DIY projects#easy crafts#DIY#welcome to craftyland
2 notes
·
View notes