#Adobe Best Practices
Explore tagged Tumblr posts
Visit Tumblr Blog
Explore Tumblr blogs with no restrictions, modern design and the best experience.
Last Seen Tumblr Blogs


Fun Fact
Tumblr was attacked by a cross-site scripting worm deployed by the Internet troll group GNAA on Dec 3, 2012.
Text
AEM Component and Template Auditor
The "Component and Template Auditor" allows you to analyze your project, identifying components and templates with zero references. This knowledge empowers you to make informed decisions regarding whether to keep or remove them.
Problem Statement: How can we effectively assess whether the components and templates within our project structure are actively used on web pages? This knowledge is crucial for making informed decisions regarding component and template maintenance. Introduction: When organizations undertake AEM upgrades or migrations, they often introduce new components and templates following revised project…

View On WordPress
#Adobe Best Practices#Adobe Recommendations#AEM#AEM Upgrades#Component and Template Management#Component Audit#Component Cleanup#Component Maintenance#Component Optimization#Development Tools#Git Repository#Migration Strategies#Project Maintenance#Project Structure#Template Audit#Template Management#Unused Components#Version Control#Web Development#Web Page References
0 notes
Text
Exploring the Latest Trends in Software Development
Introduction The software is something like an industry whose development is ever-evolving with new technologies and changing market needs as the drivers. To this end, developers must keep abreast with current trends in their fields of operation to remain competitive and relevant. Read to continue .....
#analysis#science updates#tech news#technology#trends#adobe cloud#business tech#nvidia drive#science#tech trends#Software Solutions#Tags5G technology impact on software#Agile methodologies in software#AI in software development#AR and VR in development#blockchain technology in software#cloud-native development benefits#cybersecurity trends 2024#DevOps and CI/CD tools#emerging technologies in software development#future of software development#IoT and edge computing applications#latest software development trends#low-code development platforms#machine learning for developers#no-code development tools#popular programming languages#quantum computing in software#software development best practices#software development tools
0 notes
Note
Hey, would you be willing to elaborate on that "disappearance of the Anasazi is bs" thing? I've heard something like that before but don't know much about it and would be interested to learn more. Or just like point me to a paper or yt video or something if you don't want to explain right now? Thanks!
I’m traveling to an archaeology conference right now, so this sounds like a great way to spend my airport time! @aurpiment you were wondering too—
“Anasazi” is an archaeological name given to the ancestral Puebloan cultural group in the US Southwest. It’s a Diné (Navajo) term and Modern Pueblos don’t like it and find it othering, so current archaeological best practices is to call this cultural group Ancestral Puebloans. (This is politically complicated because the Diné and Apache nations and groups still prefer “Anasazi” because through cultural interaction, mixing, and migration they also have ancestry among those people and they object to their ancestry being linguistically excluded… demonyms! Politically fraught always!)
However. The difficulties of explaining how descendant communities want to call this group kind of immediately shows: there are descendant communities. The “Anasazi” are Ancestral Purbloans. They are the ancestors of the modern Pueblos.
The Ancestral Puebloans as a distinct cultural group defined by similar material culture aspects arose 1200-500 BCE, depending on what you consider core cultural traits, and we generally stop talking about “Ancestral Puebloan” around 1450 CE. These were a group of people who lived in northern Arizona and New Mexico, and southern Colorado and Utah—the “Four Corners” region. There were of course different Ancestral Pueblo groups, political organizations, and cultures over the centuries—Chaco Canyon, Mesa Verde, Kayenta, Tusayan, Ancestral Hopi—but they generally share some traits like religious sodality worship in subterranean circular kivas, residence in square adobe roomblocks around central plazas, maize farming practices, and styles of coil-and-scrape constructed black-on-white and black-on-red pottery.
The most famous Ancestral Pueblo/“Anasazi” sites are the Cliff Palace and associated cliff dwellings of Mesa Verde in southwestern Colorado:
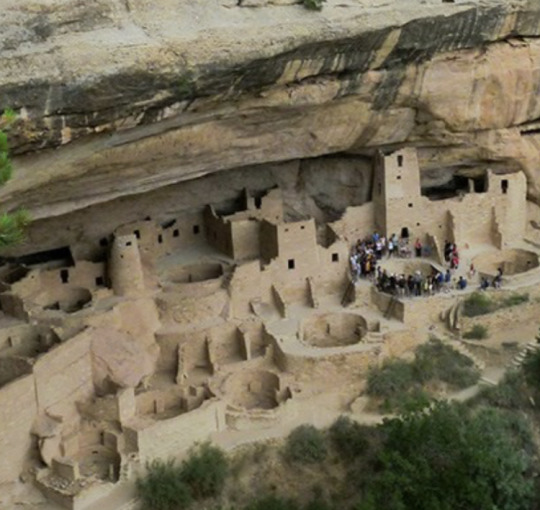

When Europeans/Euro-Americans first found these majestic places, people had not been living in them for centuries. It was a big mystery to them—where did the people who built these cliff cities go? SURELY they were too complex and dramatic to have been built by the Native people who currently lived along the Rio Grande and cited these places as the homes of their ancestors!
So. Like so much else in American history: this mystery is like, 75% racism.
But WHY did the people of Mesa Verde all suddenly leave en masse in the late 1200s, depopulating the whole Mesa Verde region and moving south? That was a mystery. But now—between tree-ring climatological studies, extensive archaeology in this region, and actually listening to Pueblo people’s historical narratives—a lot of it is pretty well-understood. Anything archaeological is inherently, somewhat mysterious, because we have to make our best interpretations of often-scant remaining data, but it’s not some Big Mystery. There was a drought, and people moved south to settle along rivers.
There’s more to it than that—the 21-year drought from 1275-1296 went on unusually long, but it also came at a time when the attempted re-establishment of Chaco cultural organization at the confusingly-and-also-racist-assuption-ly-named Aztec Ruin in northern New Mexico was on the decline anyway, and the political situation of Mesa Verde caused instability and conflict with the extra drought pressures, and archaeologists still strenuously debate whether Athabaskans (ancestors of the Navajo and Apache) moved into the Four Corners region in this time or later, and whether that caused any push-out pressures…
But when I tell people I study Southwest archaeology, I still often hear, “Oh, isn’t it still a big mystery, what happened to the Anasazi? Didn’t they disappear?”
And the answer is. They didn’t disappear. Their descendants simply now live at Hopi, Zuni, Taos, Picuris, Acoma, Cochiti, Isleta, Jemez, Laguna, Nambé, Ohkay Owingeh, Pojoaque, Sandia, San Felipe, Santa Clara, San Ildefonso, Tamaya/Santa Ana, Kewa/Santo Domingo, Tesuque, Zia, and Ysleta del Sur. And/or married into Navajo and Apache groups. The Anasazi/Ancestral Puebloans didn’t disappear any more than you can say the Ancient Romans disappeared because the Coliseum is a ruin that’s not used anymore. And honestly, for the majority of archaeological mysteries about “disappearance,” this is the answer—the socio-political organization changed to something less obvious in the archaeological record, but the people didn’t disappear, they’re still there.
455 notes
·
View notes
Text
Corp Zomphis, 2020s Design Speculation
I want to talk about Corp Memphis again— that corporate style of gangly, dead-eyed characters trapped in a neoliberal purgatory, posed between pot plants and spreadsheets.
I don't need to go too far into describing it. Heaven knows there are already so many takes on it that you're probably sick of hearing about it. However, I think a succinct description of it can be found at the end of that Wired magazine article from a few years back:
Wired: Corporate Memphis: The Tech Industry’s Favourite New Art Style
"But, despite all this, it may not be worth lamenting the immense reach of Corporate Memphis or the design possibilities we’ve been deprived of because of it. The style is, after all, simply a reflection of big tech, and how it has constructed a world with users on one side and executives on the other.
A more interesting and visually rich digital space would mean more than coming up with a new illustration style—it would require a change in how the tech economy is run. Until then, Corporate Memphis is likely to stick around, bendy arms and all."
This touches on why Corporate Memphis looks the way it does: it's a reflection of the material reality it's made in and the economic conditions it serves.
To work in a design job today often involves being a "multi-practitioner"— corp speak for a jack of all trades. You might have multiple platforms to manage, need to create a mix of media (motion graphics, branding, illustrations, etc.), and produce multiple pieces of content, all for some pointless product consumed by placated consumers.
And that’s all in a day's work, to be repeated the next. It's gruelling, unforgiving, mind-numbing work—especially if you take pride in what you do. Life doesn't become easier, but it does become bearable if the medium you're working in isn't fighting against you. A style that can work across platforms, can be easy enough for anyone in the department to use, but versatile enough to allow effort when there's time and money. It's homogeneous to the point where the messy, qualitative complications of art direction don't come into play. You can download a vector stock or make it in-house with relative ease and speed, and it looks good enough. The consumer, despite being fatigued by it all, seems to find it good enough. And that's what marks the style really: it's "good enough." It's a style linked to speed and practicality in the face of intense demand and pressure, low industry wages, accessible skills for entry levels, and high corporate barriers as everything's locked within Adobe's infrastructure.
But its strength as this homogeneous vector glob style, with its lack of any real individual identity, is also its biggest weakness. Although I'm sure some designers might enjoy working in this style, it's not really a style designed for creative individual expression. It's called "corporate" for a reason. If you want something different, you might be tempted to try freelancing...
Outside the corporate design department, you might think you're finally free to create in your own style, no longer having to work in that dreaded Corporate Memphis one anymore. But it’s hard enough to work in your own individual style under the best of circumstances. That's because the whole economy is based on the same structures of endless content production for algorithmically optimised consumption that allowed Corp Memphis to thrive, so you're still facing familiar obstacles—creating vast amounts of content, quickly, for wide and insatiable consumer audiences. So, in a way, we have this algorithm-enforced market of content, favouring those who have optimised their style to be better seen by it. It's no wonder Corporate Memphis has endured past its welcome.
However, despite all that, illustrators and artists still plod on. They end up making stuff, somehow navigating these systems— either playing them like a fiddle, outright rejecting them, or going accelerationist about it, like with something such as Corecore. Self-expression can take many forms, and that potential untapped capital value is tantalisingly mouthwatering to corporate capitalists.
Corp Memphis is optimised to a fault. It's too polished, too automated, and fits too well with the well-oiled design apparatus. Thus, it's developed a semiotics to reflect this—it's cheap and it's perceived as cheap. That's why an art director (typically) won’t just stick some Corp Memphis imagine on an album cover or use it to illustrate a particular lifestyle magazine. It wouldn't suit it, it's signalling the wrong stuff. Culture, art, ideas, aesthetics are reflected in work created by practitioners with an artistic vision, or that taps into what's going on in the present. And this is reflected in their art style, something Corp Memphis can't easily do, if at all.
That's why there's still a kind of fringe freelance industry with a speciality in design identity, otherwise known in the industry as "creatives", albeit small and closely gatekept by the likes of legacy institutions such as Goldsmiths and corporate industry leaders like The HudsonBec Group. If a corporation needs design to be spiced up with some kind of creative identity, it'll turn to these agencies or freelancers from this background rather than use Corp Memphis.
But the sad thing is how a corporation doesn't have total control over the process and thus can't control the value and pricing since they have to deal with hiring these pesky freelancers. But how does a corporation even know who to hire? With moodboards, of course! It’s easier to hire someone in-house with "good taste," who can simply curate hot practitioners to hire, like a dragon collecting .png gems. Although a corporation will try to get the best deal it can, these pesky freelancers can potentially negotiate a price for themselves, especially if they’re some big shot who holds a lot of cultural capital.
But another benefit of a moodboard is that it can be converted into a design guide. Simply share the sorts of designers and illustrators that a corporation dreams of hiring but with a cheaper designer, and ask if they can copy the desired style for less. Failing that, they can just outright steal the style anyway. If the creator is small enough, who cares?
But the value and cultural capital that corporations must seek outside their infrastructure, the very thing Corp Memphis cannot do, comes at the price of what Corp Memphis can do. Freelancers are annoying to corporations. They’re inconsistent, outside their remit, and expensive—since any level of lost capital is an expense. And worse of all, they don’t own them. Work made in-house in a corporation is completely theirs to be used forever, however they see fit. A freelance gig is limited to the contract, and typically you have to keep paying for different uses, or pay a lot if it’s expected to be used for something big.
How dare these skilled workers... sorry, freelancers, leverage themselves. If only we, the corporation, could control and treat the work of freelanced art direction like we do Corporate Memphis. Well, maybe we can—with AI.
AI is a whole can of worms of its own. But I will outline how AI shares a lot with Corp Memphis in terms of mechanics, but it's not "good enough" like Corp Memphis is in terms of its aesthetics.
Let's put it like this, if Corp Memphis is above a stock image, which is above clip art, which is above a farting Elsa asset-flip mobile game, then AI-generated images are below that, sharing the same disdainful semiotics of a YouTube thumbnail. AI renders are synonymous with trash, with viewers combing over images seeking out any sniff of AI to decry it. This is, of course, unfortunate for corporations, because AI is wonderfully cheap and efficient to produce. The problem with even "the best" AI is that it still reeks of AI, because it's trained on relatively limited data sets that are the wrong semiotics that corporations typically use and that their consumers are typically familiar with. It's not consistent with typical standards and trends. But even the AI art styles synonymous with AI are really that of unfortunate ArtStation artists whose work has been stolen, scraped, and trained into these models. But none of it is directed, follows trends, or should I say, reflects trends favoured by brands.
Design industry standard work is also bolstered by their industry standing. Their "credibility" sets them apart from, as Mark Zuckerberg puts it, the worthless creators and publishers who ‘overestimate their value’. Sure Zuckerberg might say design is worthless, but let's not forget that Facebook Alegria, the design language developed for Facebook by the mega studio Buck Design in 2017, pretty much started Corp Memphis! I don't know how much that would have cost Zuck, but given how huge Buck is, I don't know, close to $1 million if I had to speculate. So what Zuck is actually saying is you are worthless, without your titles and industry standing, and are ripe for the scrapping.
I still think it would appear crass to the wider public if someone as tactless as Zuck were to steal wholesale from something like It’s Nice That's list of featured artists, due to the "prestigious" tutelage and culture capital of such trendy practitioners. Good luck if you're on your own though.
There's also the issue of copyright. I've no idea how litigious David Rudnick is, maybe he wouldn't even mind, but perhaps it would be legally safer to just hire a copycat of him rather than train an AI on his work. There's no shortage of copycats of him after all, and they'd probably do a better job than AI anyway.
No, a corporation if it wants to avoid all this mess will instead use AI this way:
Step One: Moodboardism
Directed by their little Pinterest moodboards and Instagram saves, a corporation will find the next latest and strongest trend that they want to utilise, be it Y2K or whatever's current on the human ant colony-as-algorithm site, Carri Institute's aesthetics.
Step Two: The Sellout
Hire an on trend freelancer with a large sack of money marked with a dollar sign to do a year's worth of graphic content in a particular on trend style. This is all then fed into their in-house AI database model.
Step Three: Rise and Grind
It's then handed over to the in-house sweatshop graphic designers as the latest toolset that they have to use. They're now tasked with grinding out prompts in this trendy style with the consistency, efficiency, and speed once only achievable with Corp Memphis.
So congratulations, now we have AI that isn't generic Facebook shrimp Jesus trash; it'll be its own unique trash. And sure, perhaps some AI artefacts might come through, but that's what the in-house graphic designers are for— to Photoshop those fingers. The corp no longer needs to put up with some meddlesome expensive freelance art director, as the AI model is consistent enough that someone in-house can direct it, just like Corporate Memphis. And even then, if it still comes across as AI-ish, the hope is that for the general public, it's "good enough", just like Corp... You get the idea.
And this is possible because a freelancers' perceived autonomous strength as corporate mercenaries is also their biggest weakness. They think they can dance with the devil and win, making essentially veneers for capitalists, never once thinking the corporations will one day come to extract capital from them too. Corporate Memphis is never going to die; it's going to mutate into a corporate zombie... Corp Zomphis?
Why bother hiring individual skilled freelancers to do a job in a specific style when you have a year's worth of art, seeded by one of them, to prompt out your own "unique" designs in their style. It's more efficient and cheaper to approach design as a egragore hungry for its next feed, rather than pay for a single illustration. But you'll just have to trust me when I say that I'm not making this up; annual hires to train their own ai is genuinely what big corporation are doing.
But what about the industry, are they just gonna let it happen? I don't know. But I think freelancers don't typically see themselves as a working class, but instead as individualistic, competitive even, little businesses. This is why I think corps will be able to steamroll over freelance designers and illustrators with AI driven Corp Zomphis, because there's no solidarity amongst designers and illustrators, unlike US animators with their union and perception of themsleves as workers. If one freelancer rejects that devil deal to make the annual quantity of prompt feed for a corp, then the next hire will. I remember even hearing the AoI stressing how it wasn't a union, as if union was a dirty word. Instead its existence is to help one interface with their corporate client overlord. Well, soon enough that interfacing will be about betraying your industry freelance brethren to a corporate egragore, basically turning everything into a potential Corporate Memphis reskin. If Corporate Memphis is the design logic of the economy of the 2010s, then I wouldn't be surprised to see people nostalgic for it in the future, if the speculative 2020s model I've described turns out to be true.
100 notes
·
View notes
Text
How I was taught to cleanse with fire
Many cultures around the world use smoke and fire for cleansing and purification rituals. New Mexico is not different in that manner, as often I see curanderos (and spiritual leaning Catholics) burning a variety of herbs, woods, and resins to cleanse themselves and their spaces. Sometimes we even use mezcal to cleanse by spraying it from our mouths. While not necessarily ‘fire’, it does have that flame element to it. Spraying mezcal from the mouth is often done to cleanse the body or mind of someone, rather than a space.
I grow a variety of herbs on my property and I often find myself inclined to use them over store bought bundles or incense as it feels more traditional, and connects me to the earth and to my ancestors. My grandma taught me how to burn desert sage to purify a space, which is one of my favorites to use spiritually for cleansing. It brings an energy of healing and calmness when you burn it, and also works great for purification. I think of it as the lavender of sages due to its warm hug-like energy it brings.
To begin cleansing with desert sage, you first must hold the sage in your hands, and close your eyes. Envision happiness, and warmth, and hugging your own abuelita. Think about the warm yellow energy of the desert sage and how it brings that feeling of walking through a winter landscape knowing that you will be home soon. Enjoy the feeling and scent of the unburnt sage. Once you feel ready to begin, open your eyes, and take one deep breath in and out. Now, you must open the front door of the place you are cleansing, and optionally more windows if the space is large enough. The thick adobe of my grandmothers house wouldn’t allow any spirits to leave if you didn’t allow them to exit somehow. Begin by walking around the space with the unlit sage, feeling the energies of the space and finding spots that you need to focus on. Once you have identified the dense spots, you can light the sage. I always light the largest end of the desert sage bundle as I find it is the easiest to work with, allowing you to hold it by the smaller portion. Allow a large ember to form, about the size of a dime. Then, while walking through the space blow on the ember allowing the smoke to fill the direction you are blowing into, as this brings life and soul into the sage you burn. While doing this be intently focused on removing ‘anything bad’ as my grandmother would say. Be sure to blow the smoke into each of the four corners of your house too, to fortify and protect your space. I usually include the outdoor corners too, if the weather is calm enough outside to allow my sage to burn. Once you have hit all of the dense spots with your smoke, place the desert sage into a cooking pot in the kitchen or living room until it ceases to burn. This allows the smoke to do any remaining work it needs to. Once complete, thank the spirit of the sage by holding it again in your hands, giving it a sort of hug, and verbally thanking it. You may leave an offering at the bush you collected it from if you harvested the sage itself, otherwise you could also leave the offering near your favorite plant, I suppose. Once complete store your sage respectfully until the next time you need to purify your space.
Allow the front door and any open windows to remain open for at least 30 minutes after the final ember went out. Remember to always practice fire safety and never leave a sage bundle burning unattended.
If desert sage does not grow near you, look into if it would be able to successfully grow in your plant hardiness zone. If not look into using a native sage variety that grows in your area! In my opinion it is always best to use herbs that are from the region you live in over imported ones any day. And of course, do your best, because no one is perfect. If store bought is all that is available to you then use it! Or, if you already have a store bought herb bundle go ahead and use that. Be resourceful, and stay safe out there!
#brujeria#new mexico#witchblr#witchcraft#folk magic#folklore#green witch#grimoire#polytheist#witchcore#witch tips#paganblr#pagan blog#paganism#pagan#pagan witch#herbalremedies#herbalism#energy cleansing#reclaiming spirituality#spiritual cleansing#magic#folk healing
85 notes
·
View notes
Text
"Major technology companies signed a pact on Friday to voluntarily adopt "reasonable precautions" to prevent artificial intelligence (AI) tools from being used to disrupt democratic elections around the world.
Executives from Adobe, Amazon, Google, IBM, Meta, Microsoft, OpenAI, and TikTok gathered at the Munich Security Conference to announce a new framework for how they respond to AI-generated deepfakes that deliberately trick voters.
Twelve other companies - including Elon Musk's X - are also signing on to the accord...
The accord is largely symbolic, but targets increasingly realistic AI-generated images, audio, and video "that deceptively fake or alter the appearance, voice, or actions of political candidates, election officials, and other key stakeholders in a democratic election, or that provide false information to voters about when, where, and how they can lawfully vote".
The companies aren't committing to ban or remove deepfakes. Instead, the accord outlines methods they will use to try to detect and label deceptive AI content when it is created or distributed on their platforms.
It notes the companies will share best practices and provide "swift and proportionate responses" when that content starts to spread.
Lack of binding requirements
The vagueness of the commitments and lack of any binding requirements likely helped win over a diverse swath of companies, but disappointed advocates were looking for stronger assurances.
"The language isn't quite as strong as one might have expected," said Rachel Orey, senior associate director of the Elections Project at the Bipartisan Policy Center.
"I think we should give credit where credit is due, and acknowledge that the companies do have a vested interest in their tools not being used to undermine free and fair elections. That said, it is voluntary, and we'll be keeping an eye on whether they follow through." ...
Several political leaders from Europe and the US also joined Friday’s announcement. European Commission Vice President Vera Jourova said while such an agreement can’t be comprehensive, "it contains very impactful and positive elements". ...
[The Accord and Where We're At]
The accord calls on platforms to "pay attention to context and in particular to safeguarding educational, documentary, artistic, satirical, and political expression".
It said the companies will focus on transparency to users about their policies and work to educate the public about how they can avoid falling for AI fakes.
Most companies have previously said they’re putting safeguards on their own generative AI tools that can manipulate images and sound, while also working to identify and label AI-generated content so that social media users know if what they’re seeing is real. But most of those proposed solutions haven't yet rolled out and the companies have faced pressure to do more.
That pressure is heightened in the US, where Congress has yet to pass laws regulating AI in politics, leaving companies to largely govern themselves.
The Federal Communications Commission recently confirmed AI-generated audio clips in robocalls are against the law [in the US], but that doesn't cover audio deepfakes when they circulate on social media or in campaign advertisements.
Many social media companies already have policies in place to deter deceptive posts about electoral processes - AI-generated or not...
[Signatories Include]
In addition to the companies that helped broker Friday's agreement, other signatories include chatbot developers Anthropic and Inflection AI; voice-clone startup ElevenLabs; chip designer Arm Holdings; security companies McAfee and TrendMicro; and Stability AI, known for making the image-generator Stable Diffusion.
Notably absent is another popular AI image-generator, Midjourney. The San Francisco-based startup didn't immediately respond to a request for comment on Friday.
The inclusion of X - not mentioned in an earlier announcement about the pending accord - was one of the surprises of Friday's agreement."
-via EuroNews, February 17, 2024
--
Note: No idea whether this will actually do much of anything (would love to hear from people with experience in this area on significant this is), but I'll definitely take it. Some of these companies may even mean it! (X/Twitter almost definitely doesn't, though).
Still, like I said, I'll take it. Any significant move toward tech companies self-regulating AI is a good sign, as far as I'm concerned, especially a large-scale and international effort. Even if it's a "mostly symbolic" accord, the scale and prominence of this accord is encouraging, and it sets a precedent for further regulation to build on.
#ai#anti ai#deepfake#ai generated#elections#election interference#tech companies#big tech#good news#hope
148 notes
·
View notes
Note
That National Geographic leather binding for Yellowstone is fucking Gorgeous!!! (Pardon my Language)
How long have you been binding, and what would you recommend to someone who wants to try it for themselves?
hello and thank you so much!! I worked really hard on that one (and no pardon needed haha)!
I started binding in February of 2021, which means in a few months I'll have reached 4 years. It's been an awesome journey!!
If you'd like to try it for yourself, I'd recommenda few things!
1) You can 100% try out the basics with near free or cheap materials. People typeset in Word or Google Docs or Pages. You can print on printer paper & use regular sewing thread & scavenge board from old books or notebook backs or do a limp leather binding & use no boards at all. You can make paper pamphlets. Any comments I make following this are about my preferences for best results. The most expensive part that cannot be avoided is printing. On the other hand expenses can wildly escalate if you're committing to it; once you are doing leather it becomes somewhat unavoidably expensive.
2) Check out some tutorials from SeaLemon or DAS Bookbinding on YouTube for the physical construction. SeaLemon is really clear for a beginner starting out, but then I'd move to DAS for better technique (DAS also has a beginner series though). I watched DAS Bookbinding videos for three weeks straight before I was able to start, & while that doesn't maybe work out for everyone I do think it gave me a pretty strong basis of understanding for structural techniques. DAS is *really* good at explaining why he thinks you should do something. The structure of the NatGeo bind is basically DAS's video on a rounded & backed bradel binding (but with leather & sewn on recessed cords). There is some good stuff on Tiktok/IG, but watch short-form videos/reels with caution. They move a little fast and I've seen a couple give instructions that can result in structural flaws (not that this is unique to the form, cross-referencing on instructions from any source is a good practice). They are good for if you're looking for a specific technique (particularly modern decorative ones, like cricut use, edge gilding, HTV application). There are also published books you can buy or maybe request through your library, such as Hollander's Introduction to Bookbinding. Renegade Bookbinding Guild runs a whole bunch of technique-specific in-house zoom classes annually.
3) Look to other fanbinders for tutorials on how to format the text (this is because most pro bookbinders do not do both text design & book creation! it's a pretty unique feature of fanbinding). @renegadeguild has some publically provided resources on our website here and more typesetting tutorials for a whole host of softwares (Affinity Publisher is my choice - one time purchase, fuck you very much Adobe InDesign) located in the discord server. Anyone 18+ can join the Discord. The NatGeo inspired book (text & dust jacket) was created in Affinity Publisher.
4) Join a community of fanbinders! It's really lovely. The space has exploded & there are tons of people to be friends with, trade tips, & cheer each other on. I'm part of @renegadeguild and we do a whole bunch of events throughout the year, and we have an in-person retreat every other year. I've met with over 20 different renegaders so far, in three different countries, and it's been such a blast. Definitely the community helps keep up the motivation. Renegade isn't the only community out there though! There's groups more rooted in IG/tiktok circles that have their own discords, plus a number of FB groups. I do think most people who are comfortable on tumblr enjoy Renegade's vibe.
5) While I learned most of what I do online, some things really benefit from in-person learning. If you want to do leather binding I would really recommend trying to take an in-person class. I did two attempts at a leather binding on my own before I decided to hold off until I'd had at least one in-person class. Leather binding can be extremely frustrating, especially when you can easily end up with a book that looks worse than a cloth binding at your same skill level but for double the cost. Imo this is mostly because the leather specific skills like paring, warp management, and assessing a random piece of leather for bookbinding suitability are all pretty tactile experiences, all of which are difficult to assess through a screen and can result in an unpleasantly bulky/stiff/shapeless book if ignored. For example- while this book of mine is a pretty popular post, I don't enjoy holding it and reading it, especially in contrast to the NatGeo bind. Part of this was the material I chose; part was not being able to adhere to the instructions quite well enough; part was just not knowing enough about what I was doing; part is they're different constructions. This might just be a me thing though; I'm sure others have had success with online only tutorials for leather.
6) I'm not going to get into specific tools bc that could be a whole post, but some things are necessary (printer access), some things are necessary depending on style, some things are "makes life easier but only drop the money if it's stopping you from making books out of frustration", some things are just technique-specific tools. Examples - sewing frames are often brought up but are never necessary unless sewing on cords; cricuts & cutting machines are commonly used in fanbinding circles but I don't have one (& don't intend to atm).
7) Don't be shy to offer the author a copy!! Like other fan activities, fanbinding is part of our fandom community ecosystem. Your fanbinding is in communication with the author's story. Giving a bind to the author is a great way of keeping the ecosystem going. I tend to think of binds as a combo of comment, fic rec, and fan art inspired by the fic.
8) Paper grain sounds stupid but it IS IMPORTANT! My personal hierarchy of give-a-fuck for grain: Board grain, spine card grain, endpaper grain, cover paper grain, text block grain, book cloth grain. The only thing I personally sometimes ignore is book cloth grain; but many people will not worry too much about text block paper grain.
Gonna stop there for now. If you've got specific questions or want elaboration, feel free to ask. As with all things, YMMV, this is my own opinions/experience and may not apply in all cases. There's a whole lot of different techniques out there, and it's hard to ever say something is wrong, per se - but I think it's important to understand if a method has an outcome you may want to avoid. Prioritize your goals & adapt for them - what's your goal? Longevity, readability, aesthetics? You might make different choices depending on them. My choices influence the techniques I chose to focus on, the tools I buy, and thus the final aesthetic of my binds.
32 notes
·
View notes
Text
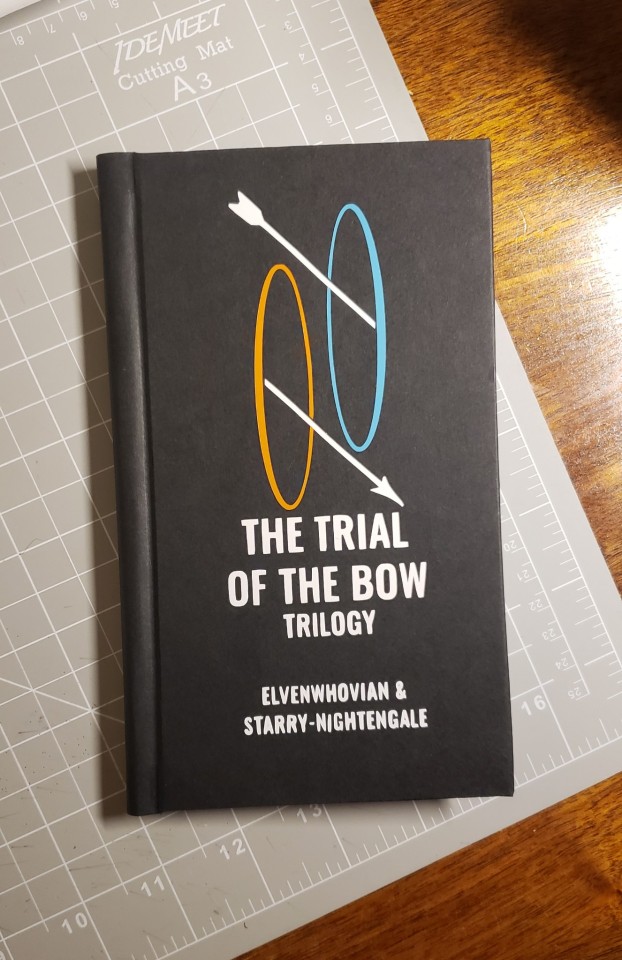
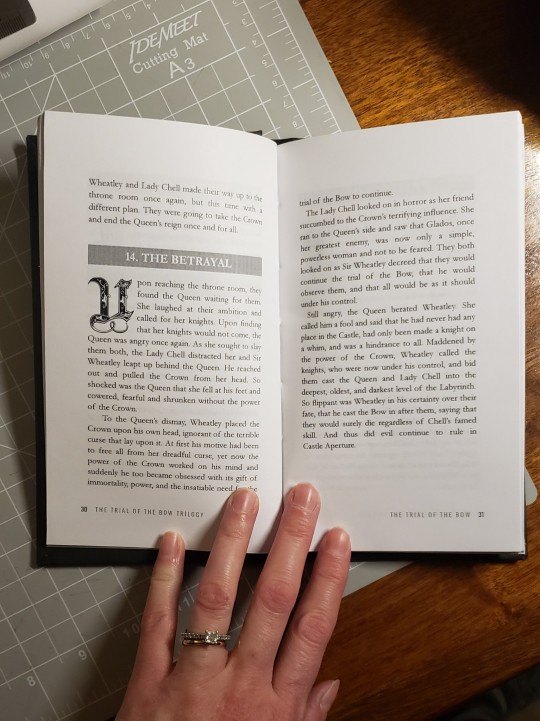
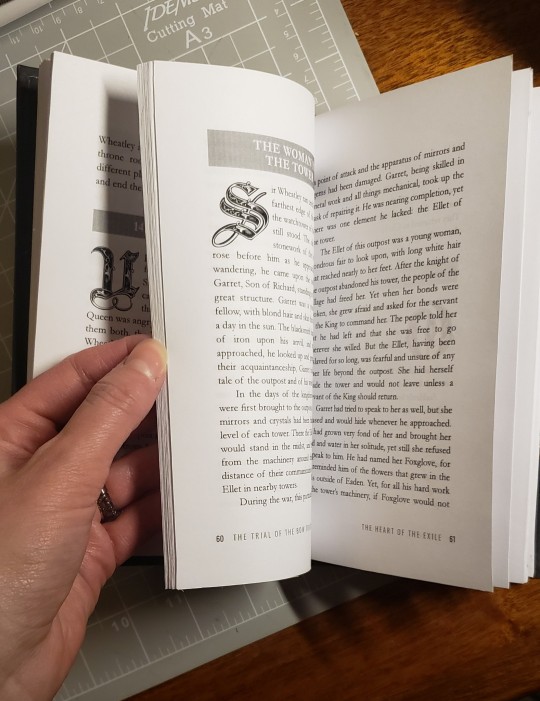
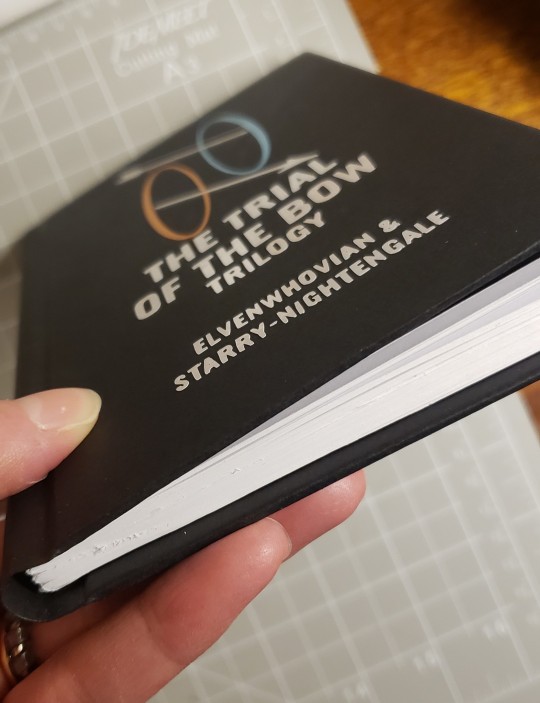
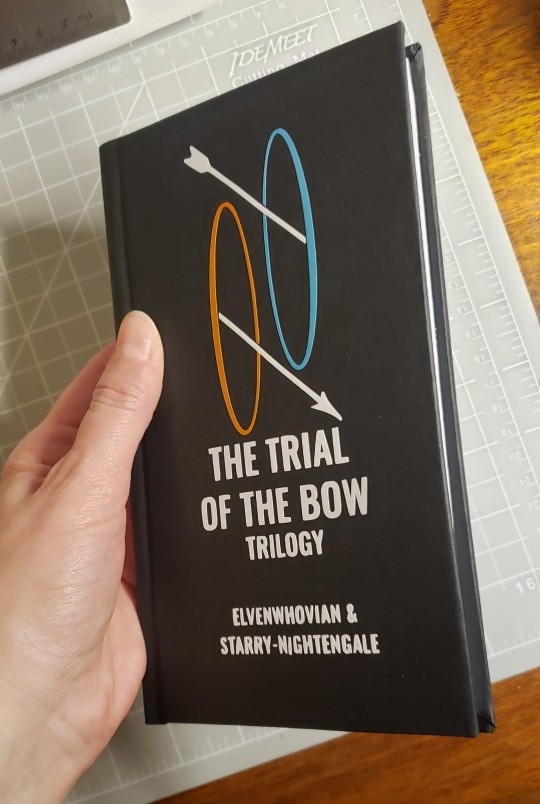
A recent hobby I've added to my never-ending list of hobbies is bookbinding. I'm still learning with each attempt, but I'm pretty proud of this one. My page trimming needs practice, but the decal I made on my Cricut turned out better than I had hoped :) Now I have a nice hardback edition of the fanfiction trilogy @starry-nightengale and I wrote almost 10 years ago. I can't wait to read it to my son when he is old enough to not try to chew on it :P
Also this is the first book I've laid out in Affinity Publisher (sadly, since I no longer work full-time, the Adobe programs don't jive with my budget anymore). Indesign is still the best of the best, but I'm impressed at the features Affinity has.
168 notes
·
View notes
Note
How did you get so good at animating and drawing? Aside from practice, what techniques do you use? What software do you use?

I only know the basics/fundamentals of both drawing and animation.
For drawing, I've carried out lessons about the Elements and principles of design, the history of graphics design, traditional drawing techniques, color theory, anatomy, character design, blah blah blah. Lots of info I still do my best to practice/put in my art. If y'all notice me animating gifs then it's bc I have time to do so... ( I'm in term break until late July ) They're likely short, but it's through animation blocking, timing, and incorporating both in-betweens and tweening.
I've used Adobe Animate/After Effects for school projects, sometimes for doodles only, I currently use Clip Studio Paint bc it's where I'm more comfy with ^^ Maybe someday I'll be able to afford Toon Boom hehe.
#messyr#always morally correct to pirate adobe products guys trust me in this one#anyway it's not that im THAT GOOD- I just expose myself to so much media consumption + my unquenchable thirst for art is just something#I still have a lot of flaws in my works from mediocre to average in professionals/industry's eyes. Theres still so much to learn and try#Considering my course as a multimedia student- also feeds the 'I want to learn everything and anything' mindset.#born to animate forced to be a mixed package: honestly im not even gonna complain AHAHAHHA#im actually surprised im not burnt out after 2d animation finals in 1st year and film production finals 2nd year#MANIFESTING TO GRADUATE AS JACK OF ALL TRADES / MASTER OF NONE#pls dont percieve me as easy going or envy shit- i work TWICE as hard in everything I do bc imindubitably so dumb at times#not only that but almost always handicapped as if God decides to nerf patch my life every damn time
122 notes
·
View notes
Text
Please Start Archiving in the US
With current events, I think it is prudent that everyone, that is able to, needs start archiving shit. I am a former library worker but I do not know much about cybersecurity. If you do want to go down that route please research and keep you and your archive safe :). The more copies that are preserved, then the more likely it is that the media will survive. Even if you save only 2 files that is still important!
First, I will list how to create an computer archive and best practices, then I will provide a list of known targets and suggested materials to add.
You need somewhere to store your data most people will use their computer's storage drive but you need to have backups! Do not rely on cloud storage solutions, they require internet connection are vulnerable to data breaches, and the companies that store that data must follow any laws that the government may decide to pass. USBs or external hardrives are best options. CDs can be used in a pinch, but are more likely to degrade as well as having lower storage capacity then the previous options. Use whatever you have lying around, you do not need to spend money if you don't want to.
When saving data use file formats that are common and able to be read without use of a special software. (that means no .docx) PDF/A is the gold standard for archiving. It is a subtype of pdf that contains metadata, such as typefaces and graphical info, that ensure the files are read properly in the future. Adobe Acrobat is able to save and convert documents into PDF/A. PDFTron, DocuPub, and Ghostscript are all free or have free versions that create pdf/a files. PNG, JPEG2000, .txt, MP3, wav, are other common file types that the Smithsonian recommends for data storage. For a full list of types to use and avoid, see the sources cited at the bottom.
What are we archiving?
Please gather both fiction and nonfiction resources. Nonfiction collection ideas: Current news clips, local history of marginalized communities, interviews, biographies, memoirs, zines, and art pieces. Saving scientific research is incredibly important! In 1933, one of the first places they targeted was the Institute of Sexual Science. Lots of what was stored there was never recovered. Environmental science, trans and intersex health, and minority history will likely be targeted first. For fiction, the most commonly challenged books last year were: 1) GenderQueer by Maia Kobabe 2) All Boys Aren't Blue by George Johnson 3) This Book is Gay by Juno Dawson 4) The of Being a Wallflower by Stephen Chbosky 5) Flamer by Mike Curato 6) The Bluest Eyes by Toni Morrison 7) Me and Earl and the Dying Girl by Jesse Andrews 8) Tricks by Ellen Hopkins 9) Let's Talk about it (Teen guide to sex, relationships, and being a human) by Erika Moen and Matthew Nolan 10) Sold by Patricia McCormick I present this list so you have an idea of what is normally targeted. Books that describe racism and queer identities are most common, but other targets include any depictions of violence, drugs, sex. Use your personal archive to accumulate data that you personally are passionate about. The more niche a topic the more likely it is that other people will not have it in their storage.
Lastly, please remember as an archivist you are not there to determine if a piece is worthy of being saved. Just because you do not like or agree with the message does not mean it will be saved from being banned. All artworks amateur or professional are worthy of being archived.
Sources: ALA 2023 Banned Books https://www.ala.org/bbooks/frequentlychallengedbooks/top10
How to create a PDF/A file https://www.research.gov/common/attachment/Desktop/How_do_I_create_a_PDF-A_file.pdf
Smithsonian Data Management Best Practices and File Formats https://siarchives.si.edu/what-we-do/digital-curation/recommended-preservation-formats-electronic-records https://library.si.edu/research/best-practices-storing-archiving-and-preserving-data
21 notes
·
View notes
Text
So you want to make gifs but have no idea where to start? I'm here to help!
In this guide I'll go over how to get videos, what software I use, the basics of gifmaking and editing, and how to post your sets to get the maximum interaction. This is an incredibly detailed guide that might all seem really intimidating but I promise with a little patience and practice you'll soon be making all the gifs you want!
A few things before I start:
Everything in this guide is based on my own style of gifmaking and what I personally use to make them. I will include some other options here and there but this guide will be primarily focused on what I do/use. Feel free to explore programs and styles to find what fits you best
I'm by no means a gifmaking expert. I still have lots to learn and I welcome imput from other gifmakers.
All gifmakers do things a little differently. There's no wrong way to make a gif. Feel free to experiment and find the ways that work best for you. This guide is just the ways that work best for me.
I wanted to add more photos to help illustrate my points but I am hindered by tumblr's stupid 30 image limit. Annoying
I'm happy to answer questions. If you're trying to make a gifset and get stuck and need help feel free to shoot me a message. If I can help, I will.
Table of Contents:
What you need
Getting your videos
Taking screencaps
Making the gif
Editing the gif
Saving the gif
Uploading gifset to tumblr
As this got very long it is all underneath the cut
1. What Do I Need?
There are three things you need to make gifs. You need a way to download videos, a screencapping software, and Photoshop (or an online program that's similar).
Video Downloader - There are several ways you can download your videos such as torrents, direct downloads from streaming sites, downloading using a computer program, downloading from a website using an browser extension, etc.
Torrenting. I dislike using torrents because my internet connection is unreliable and can't sustain a VPN and I can't afford to pay for a good VPN anyway so I don't use torrents. Torrenting is, however, the most popular way to download videos so that's definitely a good option if you have a quality internet connection and a good VPN
If you're like me and can't torrent, try online direct downloading. Some websites I use have a direct download button that can be pretty reliable but be wary as they can contain malware. Otherwise I use a third party extension/program to download a video directly from a website
I use the chrome browser extension Cococut to download videos off of streaming sites. I don't know if this is available on other browsers or not but I'm sure there are other video downloaders on them you can use too. Cococut downloads in high quality. It can be a bit slow but totally worth it in my opinion. Cococut also has a youtube downloader
Downloads programs are also an option.
4K Video Downloader is a good computer program option to download 4K youtube videos.
DVDs are also a great option
KMPlayer - a video player that will easily allow you to take consecutive screencaps
I love this video player because it plays a variety of formats like mp4, mkv, wmv, avi and more.
Free to download
Very easy to make screencaps with very few steps
Photoshop - I use Photoshop CC 2014 on a Windows laptop to make all my gifs.
You can get it directly from Adobe by paying for it or...
You can be like me and get it through a little 🏴☠️🏴☠️🏴☠️
There are tons of links to download photoshop throughout tumblr. The one I used is no longer working but if you do a search on tumblr you can find links for a variety of versions like this post here or this blog.
It doesn't really matter what version you download so long as it has video timeline available.)
-------------------------------------------------------
2. Getting Your Videos
First of all, to make a good quality gif, you need a good quality video. Nothing less than 720p unless you really really can't find anything in higher quality. I prefer 1080p or higher but 720p is acceptable.
Note: MAKE SURE YOU HAVE AN ADBLOCKER WHEN DOWNLOADING FROM STREAMING SITES!!!
So where do I find videos?
DVDs
Dvds are always good if you already have what you want to gif in dvd. Check your local library if you don't. If you don't have a dvd of the video you need then you've got other options.
2. Torrents
Now I don't torrent so I can't speak to this much and I know the big torrent site is gone now. I'm not sure where the new places are. Torrenting is the easiest way to get super high quality videos to gif from and is the go to way for a lot of gifmakers. But it does require another program to use as well as the need to have a VPN.
To learn more about torrenting click here. or read this guide
3. Screen Recording
Screen recording is my last option to get my videos because it often results in lower quality, choppy, inconsistent videos if your internet isn't that great and that makes giffing harder. But if you can't download in any other way this is an option for you.
You can use VLC to record your screen. See this tutorial for that.
I use a browser extension called REC - high quality screen video Recorder which is super simple and does a pretty good job.
4. Direct Downloading
Your other option is to download from either youtube or a streaming site.
The streaming websites I use changes all the time as they get shut down (rip soap2day i miss you) but the ones I'm currently using (as of november 2023) are sflix.to, fmoviesz.to, goojara.to, bstsrs.one, and 123movies (literally lost the site that I use all the time while i typed this jeezus). Reddit is a good place to look for new sites if these aren't working for you.
Okay so my go to for downloading videos is either direct from the website or Cococut. Let me show how I do that.
Bstsrs.one is a websites that provides links to watch your episode/movie. Mixdrop is my favorite link to use because you can right click and save or use the download link provided safely. I've never had a problem with mixdrop
The other sites are streaming with a few server options to choose from. I tend to go to one of those and cococut to download the video.
So let's do this!
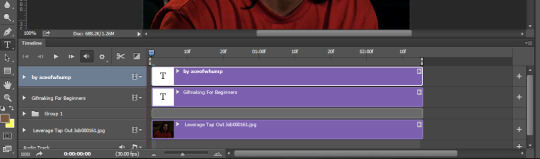
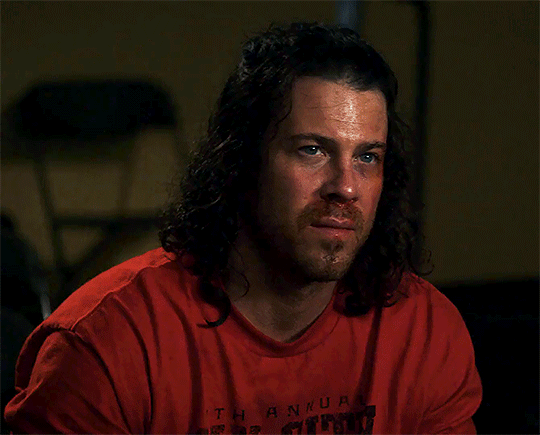
We'll go to sflix.to and I feel like making some Leverage gifs so we'll do a search for Leverage and find the episode I want. We'll go with The Tap Out Job (good ole beaten up Eliot)
Once you've chosen a server (the first one is usually just fine) and clicked the play button, click the cococut downloader extension button. A little window will pop up with options to choose. On the first link click the first button:
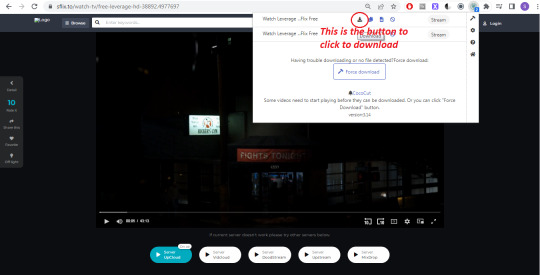
This will open the page for the downloader. Now you just have to wait for it to finish downloading. As you download you'll see a progress bar and a pause and resume button. When the download is done those two buttons will change to a green save button. Click that button to download the file to your computer
And tada! You've downloaded your video!
---------------------------------------------
3. Screencapping
So when using photoshop to make a gif you have two options which is either A) import video frames to layers which is when you upload a video and select the portion of the video which photoshop will then turn into frames for you or B) load files into stacks which is when you load screencap images of the scene you want to gif. In my opinion loading files into stacks/screencapping is so much easier. When you try importing a video and the video is huge it can be really really hard to narrow down the specific scene you want and then it can take forever to upload the frames. Screencapping makes it much easier to narrow your focus on just what you want to gif and doesn't take as long to upload.
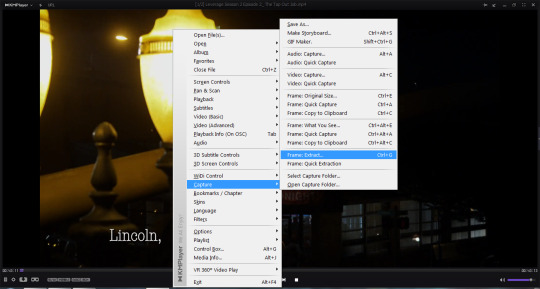
So we are going to learn how to screencap our video.This is where KMPlayer comes in.
Open your video in KMPlayer and pause it while we get all of our settings ready.
Right click --> Capture --> Frame Extract (or you can hit Ctrl G for a shortcut)
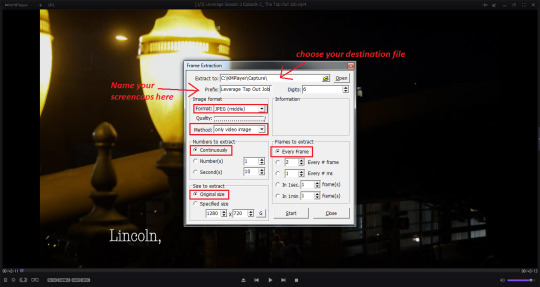
This box is all your screencapping settings. Feel free to just imitate mine. Select your destination file where the screencaps will be saved, give a name to the individual files, make sure it's set to every frame and original size. I often use the "every # frame" option as well if I domt want every si gle frame giffed which can take up a lot of space. Feel free to do this option too just set the number to 2 and it'll take every other frame instead of every frame. There's really no difference in gif quality but I find it can be better for storage space and for uploading frames to photoshop.
Once all that is set up click outside the box to make that go away (Don't hit the close button cause then you'll have to start over when you open the box again) and find the location of the scene you want to cap keeping the video paused once you've found it. When you've got the video set to where you want to start capping reopen the box using Ctrl G and hit the start button. Then go ahead and start playing your video. Your box will go away when you hit play but it's okay it's taking the screen caps. You can open it at any time using CTRL G to see it. When you've reach the end of the scene you want giffed pause your video, reopen the box again, and hit the stop button.
Double check that it worked by opening up the file location
Congrats! You've just made screencaps!
---------------------------------------------
4. Making A Gif
There are few different programs you can use to make a gif. I will be going over how to use Photoshop because I think that's the best way to get a quality gif. However if you don't have photoshop and are uncomfortable downloading it I do have a few alternate websites you can take a look at.
Photopea is like a web version of photoshop and you can find a tutorial on how to make gifs on it here
ezgif.com, giphy.com, imgflip.com, and makeagif.com are all super easy to use gifmaking websites that let you use either a video or screencaps. The only thing about these sites are that they are very limited when it comes editing and there will be a watermark of the website somewhere on the gif. It decreases your quality a bit but all are are wonderful, quick, easy ways of getting started in gifmaking. I made my start with ezgifs before I got photoshop.
Now I use Photoshop CC 2014 to make all of my gifs so this guide is gonna focus on using that program.
Loading Screencaps
Open photoshop and select File --> Scripts --> Load files into stacks
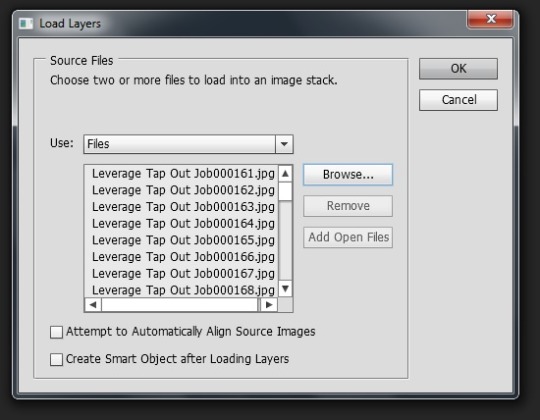
2. Click "Browse" and navigate to the location your screencaps are saved in. Select all the frames you need and click open. I try to keep each gif between 30 and 80 frames. 50 would be ideal. Anything more than 80 increases your chances that the gif will be too large to upload to tumblr. Sometimes 80 is even pushing it depending on the coloring and editing layers. This is why I tend to cap every other frame. Helps keep it all in one gif. So shoot for around 50 images.
Click okay when you've got all your screencaps in the box
3. Wait for all the images to load. This can take some time depending on how many you've selected. You can see them all uploading in this box here
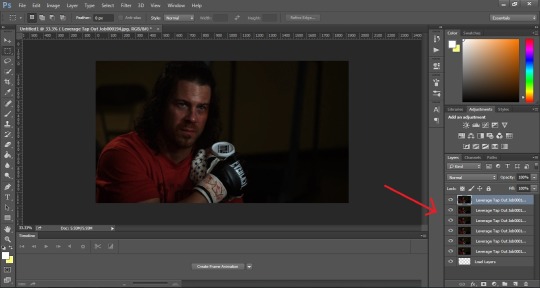
Turning Files into Frames
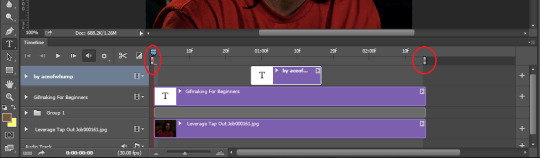
1. Next up we need to make this stack of images into something that will move. So click the button that says Create Frame Animation.

If your version of photoshop started in video timeline you'll need to switch it to frames first and then switch it back to video timeline. Let me show you how to do that just in case. Click the button of the timeline area on the left (circled in red) which will switch it to frame animation.
You could also use the drop down arrow next to the Create Video Timeline button and switch it to Create Frame Animation
Continue to the next step.
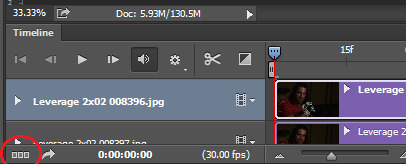
2. To get all our frames showing hit the menu button on the upper right corner of the timeline area which is the bottom portion of your screen (it's got a bunch of horizontal lines and is next to your layers box) and then click on Make Frames From Layers.
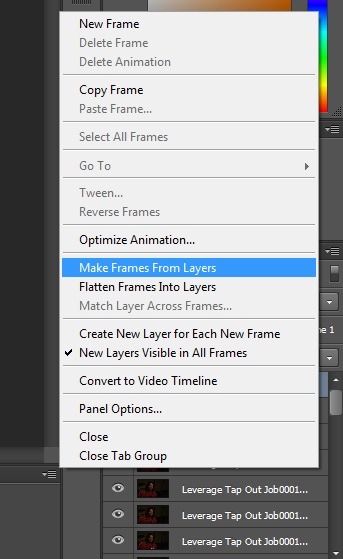
Now we can see all of our frames!
3. But uh oh! it's backwards! So click the menu button again and then click Reverse Frames to put everything back the right way

Much better
Setting Speed
1. Next up we are gonna set our speed. I always do this early because it's super important and doing it now is much easier than attempting to do it after we've edited the whole gif. Select the first frame then click the menu button and click Select All Frames
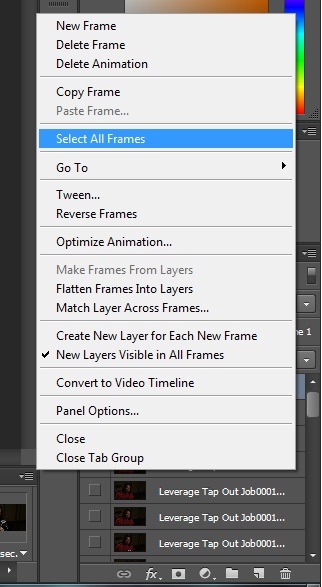
2. Next click on the drop down arrow on one of the frames. The one next to the "0 sec".
3. Select the Other option. Here you have a little leeway to do what you like best when it comes to the speed of the gif. I usually go with .1sec if I screencapped every other frame. The norm for a lot of gifmakers, especially if you've capped every frame, is either .05 or .07 secs. You can try all 3 and see how the speed works for you. To change the speed set the delay to either ".05", ".07", or ".1" and hit okay.
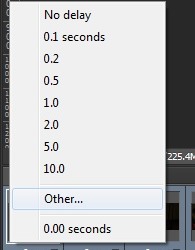

To see how the speed works click the play button. If you like your speed great. If not go ahead and repeat the previous step to try another. Try any number between 0.0 and 0.1 to find a speed you like. .05 is the closest to actual normal speed which is why so many of us use it but sometimes it just inst right. So trial and error it until you've found one you like.
Save your File
This is a great place to save your working file. This is important in case Photoshop crashes or something happens and you need to recover your file. Go to File --> Save As
Pick a location, give your file a name, make sure the file type is PSD and click save. Now your file is saved just in case.
Be sure to periodically go in and click File --> Save to keep your progress safe from Photoshop/Computer crashes! It will not auto save. You have to be sure to save it every once and a while.
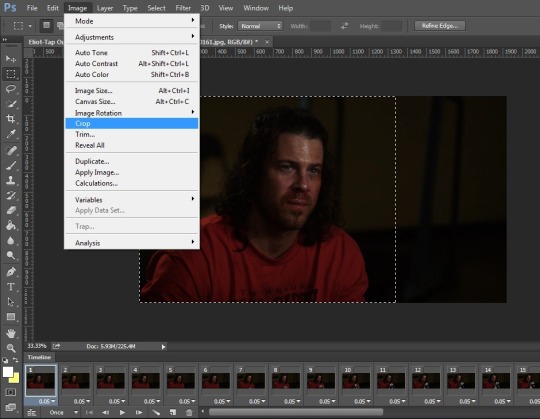
Cropping and Resizing
Now it's time to resize our gif. Let's start with how to crop. Sometimes you'll have a gif that you want to cut down to reduce the amount of empty space or because there's black bars around it, or because you have a certain style in mind and need just part of the image. That's when we crop.
First thing to do is make sure you're using the select tool. That's the tool on the side that looks like a dotted line square box. Click and drag around the portion of your image you want to keep to mark where you want to crop your gif. Everything inside the dotted lines will be what gets kept. Everything outside is getting cut.
Be sure to check the whole gif to make sure you're not going to crop something important out. Don't hit the play button for this because then you'll lose the crop marks. Just select various individual frames to look.
When you are satisfied go to Image --> Crop and your gif will be cut down to your outline.
Now our gif is still huge and tumblr won't like that. In fact, tumblr has very specific dimensions when it comes to photosets that will maintain the quality of the image. These are the current dimensions to follow.
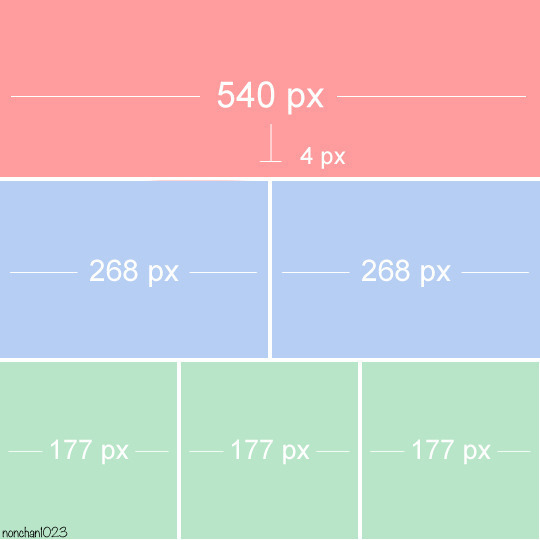
These numbers are the width of the individual images. The height does not matter. You can have any heigt you'd like. So for one image the width is 540px. For two images next to one another each gif would be 268px wide. Three images are each 177px wide. Of course you can have every single image 540px wide if you'd like. That's what I do. Then each gif is big and can be enlarged if you click on it. Just try not to go over 540px wide.
It is important to note that if you're going to put two or three images next to each other, make sure they are the same dimensions as each other. Otherwise tumblr will crop the larger image in the preview to match the smaller one and we don't want that. So keep the gifs the same size
Okay so to resize your gif to fit tumblr's dimensions click Image --> Image Size and this box will open.
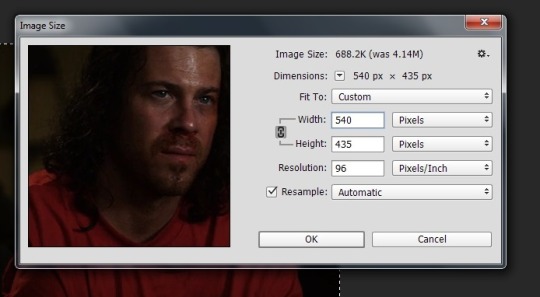
Make sure that little chain link to the left of "width" and "height" is selected. That keeps the proportions of your image. If you only change one size it'll automatically change the other to match the current proportions if that is selected. We want that.
Make sure the box next to the "width" and "length" numbers is on "Pixels" and nothing else. That's important.
Change your width to 540 pixels and click okay.
Turn Frames into Animation
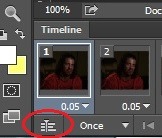
All right our gif has now been resized. This next step will prepare it for editing. We need to turn our frames into a video timeline. Timeline mode allows us to easily sharpen and add adjustment layers to our gif. It also makes it easier to add text and gives a lot more freedom to decide when things like text and certain coloring editing layers show up. Timeline mode gives us a lot of versatility and saves time which I love.
Click the button on the bottom left of the timeline. Just under the first frame. This will turn it into a video timeline for us.
Next up we need to turn all of our layers into a smart object so that our edits will affect every layer. To do this click Select-->All Layers then click Filter-->Convert for Smart Filters. Click okay if another window pops up.
Don't skip this step! It's very important to ensure all the future editing works properly!
-----------------------------------------------------
5. Editing the Gif
This is where we can really get creative and which I find to be both the most fun and frustrating part of gifmaking. Editing!
Sharpening
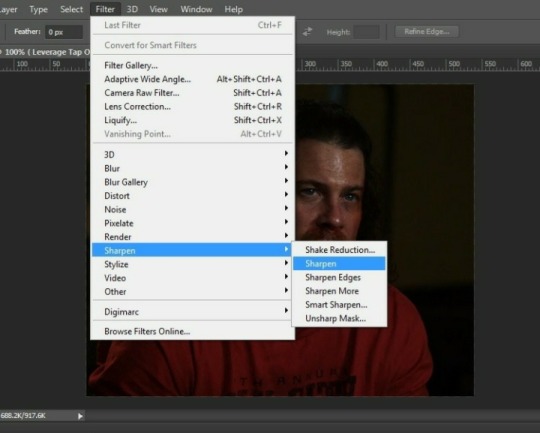
First step is to make our gif a bit more sharp. I know a lot of people use Smart Sharpen here but I have not quite gotten the hang of that myself so I stick with the preset Sharpen. It's not failed me yet and does a good job at sharpening my image for me with no work on my end. So go to Filter-->Sharpen-->Sharpen
Next I like to add a little bit of Surface Blur. To me, this just smooths out the gif a little bit and I like the look. You can skip this one if you like.

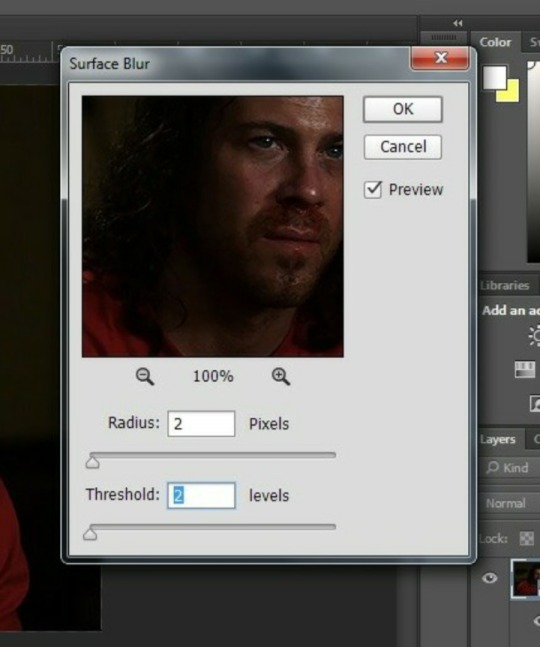
Coloring
This is the hardest part of gifmaking in my opinion. But it's also the most creative part. Coloring. For this we are going to utilize the adjustment layers. There's tons of different options here to adjust brightness, colors, and more. The adjustment layers can be found under Layer---> New Adjustment Layer. Or in the quick box on the right hand side of the screen under the Adjustments tab. Hover over each symbol to see which one is which.
The very first thing I do is to brighten up my gif because every scene is always so darn dark and dingy. So let's brighten it up.
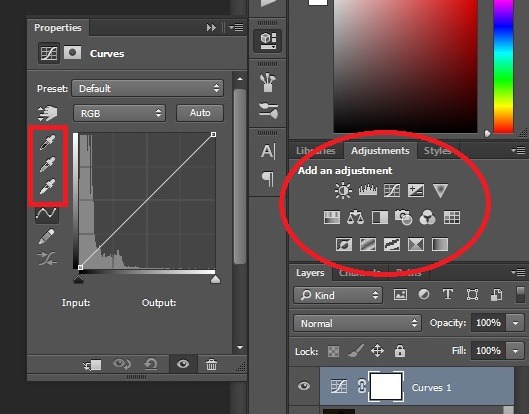
Next I use the Curves layer. The curves layer will allow you to isolate the white point and black point (what you want to be the darkest and lightest values).
Start with the Exposure layer. Go under Layer ---> New Adjustment Layer ---> Exposure (repeat for all other adjustment layers). Or you can use the shortcuts in the block to the right under the Adjustments tab. Use the sliders and just a tiny bit up the exposure so it makes everything a bit brighter.
Click on the eyedropper on the left. The bottom one is your white point, the top one is for the dark point. I usually start with the white point. Once you've clicked the white point eyedropper click on the brightest part of you image. In this case I chose the white spot on the ice pack. Next click the black eyedropper and then click on the darkest part of your image. I chose the part of Eliot's hair right next to the left side of his face.
The next adjustment layer I do is the Levels layer. This is also to brighten my gif. This one just takes some experimenting so slide the little arrows until you like how it all looks. It's gonna be different with each gif you make.
After this I add a layer of Brightness/Contrast. I don't always need more brightness but I tend to at least add a little bit of brightness. Then I add always add some contrast to darken the darks a little more and even out the coloring some.
Next up is the adjustments in the colors. I always like to add a Vibrance layer to make my colors really pop. But the downside is it also brings out colors I do not want to pop. That's when I add a Selective Colors layer.
Selective Colors allows you to adjust specific colors in your image. The idea behind selective color is that each color has its counterpart: cyan-red, magenta-green, yellow-blue. Adjusting them will help isolate certain colors in your image. In this case I want to reduce the red in Eliots face so I'm gonna go to the Red section and adjust those settings. Add as many layers for as many colors as you'd like to get the result you want. Also, doing them in separate layers helps if you need to go find the layer and make changes.
Finally I added a layer of Color Balance. This lets me adjust the colors in the highlights, midtones, and shadows. With a little experimenting you can smooth out or completely change the colors in your gif. It's really useful.
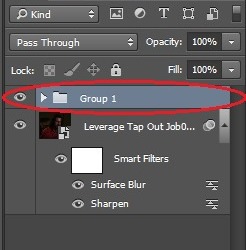
Once your done coloring select all your adjustment layers and add them into a folder. This is also a step you can skip but it makes it easier to copy all your coloring if you want to replicate it in another gif. To do this hold down Ctrl and click on each layer. Then click the little folder button at the bottom of the screen. I have it circled in this image. After you click the folder all your adjustment layers you've selected will be grouped together and look like this:
Text/Subtitles
So your gif is looking beautiful but what do you do of you want to add some dialogue or other text to you gif? I can help!
Click on the text box (the one on the left side that looks like an T) and drag the dotted lines in the area you want your text to be.
Typey type everything you want
Font, size, color can all be chosen in the circled areas below. Just highlight the text and change your font type, size and color to fit your liking. My go to font when I'm making subtitles for a 540px gif is Calibri Italic and I go with a size between 18 to 21.

Once your satisfied with the text, the size, the color, the placement and all that double click on the text layer in your layer box on the right hand side of the screen (circled in red in the image above). Make sure you are double clicking in the blank space and not in the text area of the box. You want this box to open:
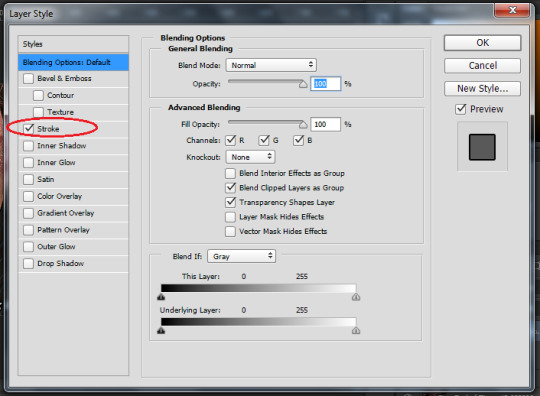
Check the box next Stroke and match my settings. This will put an outline around your lettering and make it pop a bit which in turn makes it easier to read. Click okay.
Make sure your text layer lines up with your gif layer in the timeline. So you're going to see this:
Your gif layer is the very bottom layer. The editing layers, all grouped together, is above that. The text layer(s) are at the top. Double check that all the layers are the same length and that your text layers aren't going past your gif layer. If you only want the text to show up for part of the gif you can control the length of the layer on the timeline. Just grab one of the ends and move it to your start and end points. For example, if I only wanted one of my text boxes to show up in the middle of the gif I would move both sides until it looked like this:
Another good thing to know about timeline mode: There are two brackets, one on either side of the layers, that tell you this is the beginning and the end of the gif. Anything outside of that will not show up when you save the gif. You can move those to cut your gif rather than trying to cut frames. You can also move those to cut off hanging portions of your text.
One final note for adding text, in your layers section on the far right side of your screen, put the Text Layer at top of all your other layers so it's unaffected by your coloring edits. Just click and drag it up to the top.
-----------------------------------------------
6. Saving the Gif
Exporting Gif
Now you're ready to save all your hard work!! Congrats!
Go to File-->Save for Web

A new window will pop up. The first thing you should do is check the size of your gif. Tumblr images cannot be over 10mbs. So check to make sure that size is less than that. That can be found on the left hand side just below the image of your gif. I've circled it in read in the next image.
If your gif is too big (bigger than 10mb) there are a few things you can do. You can get ride of a few frames by move the beginning/ending brackets in the timeline. That usually does it. If you absolutely have to, you can resize the gif down but I don't recommend this because once you get out of the 540px things in the photoset get funky. But it is an option if you need it. You could also crop your image some.
The next important thing to make sure you do is to ensure that your gif loops forever. In the bottom right, circled in red, you'll see looping options. It's going to be set to once. We don't want that. Click it and change it to Forever so your gif never ends.
Also make sure you are set to "gif" rather than a jpg, png, or wbmp. We want gif. See the final red circle at the top for where that is.
Feel free to copy my settings here. I tend to keep it at Adaptive and Diffusion and no dither.

You can click the play button beneath the looping options to check the final version of your gif. Make sure everything runs smoothly, the text (if you added any) is visible when you want it to be visible, and that the end isn't blank or anything weird. If you have any problems just hit cancel and go back and fix things.
Once that's all done click save, choose your save destination, and give your new gif a name!
Congratulations! You've just made a gif!!! WOO!!
-----------------------------------------------
7. Uploading a Gifset on Tumblr
Okay now that we've got our gif (or gifs) we are ready to upload them to tumblr!
Select the photo icon, click the upload from computer, find and select your gif(s).
Wait until they're all loaded then click, hold, and drag your gifs so they're in the right order for your photoset whether that's all stack on top of one another or side by side. This can be tricky because tumblr sucks and changed things so now the post box jumps around as you try and move images. Just be patient and move slow and pay attention to where you are in the post. Or you could upload each gif one at a time.
Don't forget to add a caption! The caption is the perfect place to put what it is we're seeing. You can add a quote or a description but be sure to add the name of the TV Show and the episode or the Movie title so everyone can easily see what this is from.
TAGS
Tags are so so important because without them no one will ever see your beautiful work. Tumblr pays attention to the first 20 tags so these are the most important when it comes to visibility. The best things to add for tags are the general fandom and character tags, edit tags (like marveledit or whumpedit), source blog tags, user tags, and trigger tags.
Next add your trigger tags/trope tags. This is important for the whump community because we gif a lot of things that can be very triggering for people so it's vital we tag for it so people can block it if need be. When in doubt if you should tag it for a specific trope, tag it.
For example if I was posting a whump gifset since I am a whump focused blog I'd first add the two main tags for whump gifsets. Those are #whump (our gen tag) and #whumpedit (our community tag for art/gifsets/edits/videos). The whumpedit tag is so important because this tag is specifically for whump visual art and other edits. The #whump tag is important because who do not like whump will block that tag so be sure it's in there so people can easily avoid triggers.
After those tags add your fandom and character tags. So for this gif I'd add #Leverage and #Eliot Spencer. You can also add the edit tags for your fandom so I could then add #leverageedit and #eliotspenceredit. Please don't forget the fandom tags! Not only does it help people know what the gif content is actually from so they can find it for themselves if they'd like to watch it but it will then add it to the fandom tags so people looking for content from this show/movie will see it. Increases your audience because people are more likely to search for a name than an edit tag or user tag.
Other things you can add in the tags are user tags and blog tags. A lot of big gifmaking/source blogs track a specific tag. They then go into that tag and see everything people made and can then reblog it. So feel free to tag your favorite blogs that you think will like your post. For example, I track the tag #aceofwhump. If you want to add that tag there's a chance I'll give it a reblog and reblogs are great for visibility.
So in posting this gif I would tag it as the following:
#whump, #whumpedit, #leverage, #eliotspencer, #leverageedit, #eliotspenceredit, #my gifs, #mod post, #beaten, #ice pack, #bruises, #blood
-----------------------------------------------
That's about it! Now you're equipped to make all the gifs could ever want! Go forth and have fun and if you run into any trouble or have any questions, my inbox is always open 😊
#gifmaking#gifmaking tutorial#gifmaking guide#how to guide#how to make a gif#how to make gifs#aceofwhump's gifmaking guide#mod post#my tutorials#gifmaking tutorials#tutorial
161 notes
·
View notes
Text
Project RBH DevLog 0100
Not so much of a “what did I do” as a “what will I do” this week. As you may or may not know, Adobe has some… dubious practices, and especially recently has demonstrated a willingness to steal the work of its userbase to train the environmentally destructive plagiarism machine that all the major tech companies are desperate to believe are financially viable.
As such I am now using alternatives—Inkscape and Kritia, currently. The issue with that is that I have to actually learn the new software. It’s not immediately critical, since I use placeholder assets like any sane person would instead of devoting time and resources to something that may not make the final cut, but I am currently taking a step back from active development to focus on the design doc, so it’s probably the best time to do so.
-DeusVerve
DevLogs like these are brought to you by Patron(s) like Haelerin!
Support me on Patreon to get Early Access to builds!
11 notes
·
View notes
Note
Don't let them get you down. I hate AI "art" with a passion, but yours was just a way to make a bland post more colorful. Like a sticker on a note. You didn't try to "trick" anyone and please never stop doing what you love. Please continue your great blog, i love it so much. Try not to let them get to you.
You are kind. You also must suspect that I love it when people complain. Tumblr is awesome for manufactured drama like that. And it's always fun to poke the new Puritans. ;)
And, yeah, AI is already, and is only going to be a bigger, scourge on artists and writers. But box-checking outrage in safe and consequence-less ways does precisely nothing. If you're really against AI, cancel Netflix (I have), cancel Spotify (I have), cancel your subscriptions to any apps you use for content that push AI tools (Adobe, Blender, etc.) or steal/use pirated versions if you must, donate to the Authors Guild (https://authorsguild.org/) or, more usefully, EU activists like these folk because the EU is much more likely to ever pass legislation that will have an effect (the US is pretty much a lost cause).
[The EU's online privacy laws are more powerful than US ones and currently have de facto international binding status because companies want to do business in the EU -- so when it comes to copyright protections or AI prevention, the best approach is probably modeled on that. The most likely way we'll get any kind of actual copyright protection is through the EU's laws like the GDPR that in effect governs US companies' behavior. But I digress...]
Social media is meaningless when it comes to anything long term. Use your money to "vote" because it's the only way to really change anything. (Will it work? Probably not. But at least you're not playing morality police to make yourself feel self-righteous and thinking practically about how you can make a difference.)
#Anonymous#NOW I'M PREACHING!!#See I can write meaningless social media posts that won't make a dick of difference too instead of doing something real
37 notes
·
View notes
Note
nora speaking of gifs, do you have any special settings when you save in ps? idk if its real anymore but i saw a long time ago that changing if it saves in pattern or the other options affects how it looks in tumblr??
some people have very strong opinions on this and are practically married to one specific setting, but it honestly very much depends on the gif! i'm definitely partial to pattern and often use it even if diffusion would probably look nicer just cause i cba to go through the options and check lol, but if you want every gif to look the best it possibly can then ideally every time you export a gif you would change between pattern/diffusion dither and selective/adaptive/perceptual colour reduction and decide which one you prefer. but if you're like me you just have it defaulting to adaptive pattern and then if it looks extra shitty or you're just feeling particularly fancy that day you might actually go through and see which one looks the nicest lmao
basically diffusion will give you little dots and pattern will give you a grid-like, well, pattern. which one looks the best depends on your personal tastes. i find that if there isn't too much dither then diffusion is less noticeable and sleeker, however i like the way pattern blends colours better so if there's a lot of it then pattern looks more cohesive to me. i hate the way diffusion makes bigger gradients look, which often comes into play in dnp videos because their fuckass coloured background lights make it so every background is full of gradients that make the 256 colour limit on gifs cry, and so sometimes diffusion will give you these long ass lines of dots on their wall or something and i don't like it 😔 whereas pattern is technically fucking the entire gif up more than diffusion is, but it still all blends together better imo
if you want to know in technical terms what all of these settings actually do then i'll put what adobe's website says under the cut
colour reduction methods:
Perceptual Creates a custom color table by giving priority to colors for which the human eye has greater sensitivity.
Selective Creates a color table similar to the Perceptual color table, but favoring broad areas of color and the preservation of web colors. This color table usually produces images with the greatest color integrity. Selective is the default option.
Adaptive Creates a custom color table by sampling colors from the predominant spectrum in the image. For example, an image with only the colors green and blue produces a color table made primarily of greens and blues. Most images concentrate colors in particular areas of the spectrum.
dithering methods:
Diffusion Applies a random pattern that is usually less noticeable than Pattern dither. The dither effects are diffused across adjacent pixels.
Pattern Applies a halftone-like square pattern to simulate any colors not in the color table.
Noise Applies a random pattern similar to the Diffusion dither method, but without diffusing the pattern across adjacent pixels. No seams appear with the Noise dither method.
#idk if this helps at all cause the answer is basically just It Depends#i do personally need to start being more mindful of my export settings though cause i'm always too lazy to go through them all#which is stupid when i've spent ages making something look nice and then fuck it up in the export cause i couldnt be bothered#with an additional five minutes of quality check#answered
8 notes
·
View notes
Note
hii could you please write about how the jjk men's social media would look like, like what would they post, how often, what socials they would have? sorry if this is 2 specific!!
HOW THEIR INSTAGRAM PAGES WOULD LOOK LIKE [FT. JUJUTSU KAISEN]
❁—CHARACTERS: nanami kento, yuta okkotsu, gojo satoru (toji isn’t here bc the only online platform he’s on is onlyfans)
a/n: hey hey~ no worries! i love making stuff like these anyway, thanks for this btw, had a lot of fun making these. i only made ig as their socials as of rn because i don’t have twitter so i don’t rlly know how that works ໒꒰ྀིっ˕ -。꒱ྀི১

༊*·˚ NANAMI KENTO


↬ nanami’s instagram would have really warm, vibrant tones to accentuate each and every mundane detail of his life into something that looks so euphoric and almost utopian-like which isn’t at all surprising seeing as this man has seen so much pain and suffering for a good majority of his life.
↬ i think he’d pick up photography as a hobby, maybe he’ll dabble into playing around with the settings on adobe lightroom or maybe secretly attend saturday workshops, on his way home from his bakery run, where he gets to learn all the fundamentals on photography composition. he eventually learns about instagram and he downloads the app on a whim when he gets bored at work. he appreciates the user friendly interface and gets the hang of it pretty quickly. he usually posts thrice a month, more if his schedule allows.
↬ now the thing with kento is he doesn’t usually put captions on his photos other than single emojis like: “🐱” or “🥐”. an exception to this is when he posts your birthday photos. he lovingly spares a few words for you that are minimal, at best, only containing a short birthday greeting. but hey, it’s written in pretty font, sooo~~
kento watches you from the couch situated near your home’s screen door leading to the pocket garden the two of you set up when you first moved in together. a small smile plays at his lips when you momentarily jump in surprise as your cat rubs herself against your legs finally ending your little game of hide and seek. “there you are,” you crouch down to scratch her ears. the loving scene of domesticity unfolds before him like a record tape from the nineties, complete with subdued hues of yellow and rose. “sweetheart, could you look here for a bit?” he calls as he fumbles with his phone. you look up confused and that’s when he decides to snap the picture. “hey! i wasn’t ready,” you protest. but he’s already posting the picture on his instagram with the caption: “💕”.
༊*·˚ YUTA OKKOTSU
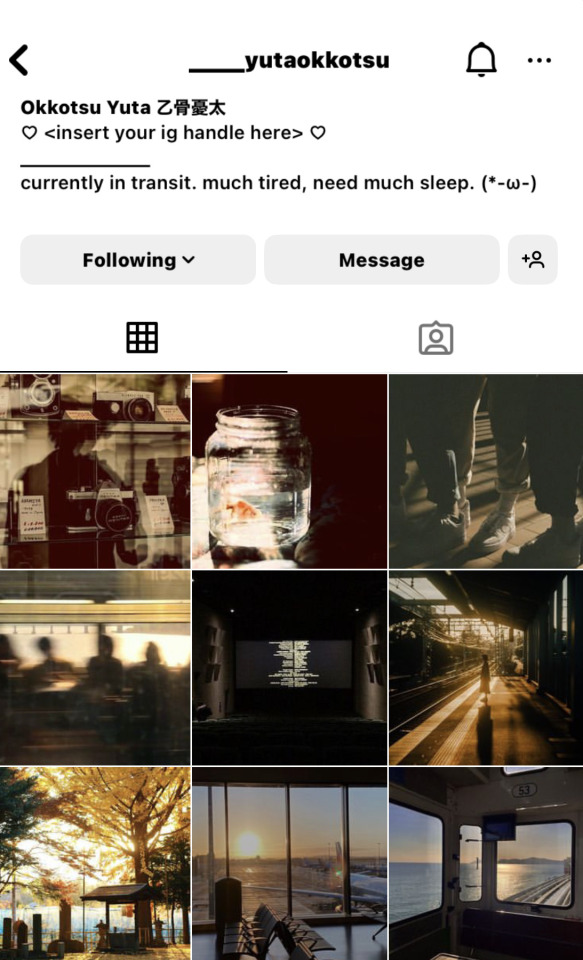
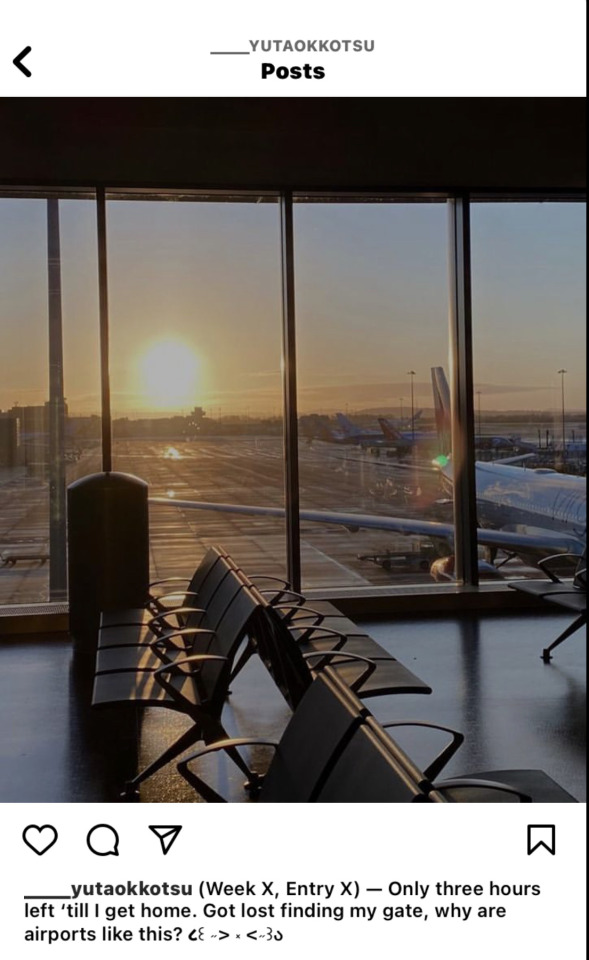

↬ yuta has a fascination with sunsets. there’s just something so alluring and somewhat sorrowful about the last flicker of sunlight waging a war against her opponent, the night sky and her stars, to keep its dominion over the sky. yuta has always struggled with the notion of impermanence — he finds change to be downright terrifying which is why he took it upon himself to confront this fear by taking pictures of the setting sun, a form of change that is ironically as unchanging as his love for a certain someone, hehe.
↬ he normally uses his instagram as a digital journal of sorts. he’s always away owing to the many missions he’s now been assigned as a sorcerer second only to gojo satoru. he writes down entries, as much as possible, on a weekly basis to properly process the many emotions he’s felt that day.
↬ naturally, you’re always the first to view the pictures ergo press the heart button which always makes him turn a bright shade of pink despite the many years you’ve been together. AND, even though you’ve already technically seen the pictures, yuta will ALWAYS show it to you again when he gets home from work and regale you with all the amazing details about his recent trip.
yuta practically melted into your arms when he came in through the front door. “missed you,” he murmurs. you crane your head back to get a good look at him and you heave a sigh of blissful relief when you neither find a single scratch nor bruise on him. “are you alright, my love?” he asks, head tilted to the right, his eyes wide with curiosity at your silence. “yeah, fine,” you shake your head, playfully pinching his unscathed cheek earning a whistle-like chortle from the young sorcerer. “you know,” he says thoughtfully when his laughter dies down. “i never realized how beautiful the hida mountains are,” he recounts the wondrous things he’d seen and taken photos of from the sleepy lake town they took refuge in, to the mighty mountain river he and gojo had crossed on their way to the summit, to the towering willow trees with branches so ancient they could practically block out the sun, and finally to the mysterious abandoned forest shrine that only showed itself to an honored few, emerging from the haze like a ghostly apparition. he continues to ramble on for a substantial amount of time, scrolling through his phone gallery, not knowing that you’d dozed off. “2:48 AM,” the clock read. yuta sighs at your sleeping form, hearts practically swarming in his eyes. he lifts the blankets to cover your forms. “guess we’ll just have to go together someday,” he says, pecking your cheek before shifting ever so carefully to turn off the nightlight.
༊*·˚ GOJO SATORU

↬ posts low contrast pictures with low brightness because he’s cool that way. if not for the fact that he mostly shares memes, his feed actually looks pretty good, it’s subtle but appealing in many ways and it looks glorious on dark mode, it kinda reminds you of those pinterest or twitter moodboards. he knows his way around setting a moody vibe on his feed, and to think almost all of his pictures were shot on his old iphone. satoru gojo, the strongest sorcerer of his generation, much to the surprise of many, is actually quite talented. who would’ve thought?
↬ but please PLEASE someone get instagram away from this man, the world is not ready for his genius. now unlike the others, satoru uses instagram purely for fun. and yes, he posts dumb shit like they’re scripture. he got in trouble with the community once when he posted a picture of dixie (depicted above) from the teletubbies with the caption: “bake those cookies dixie”. you had to help him submit an incident report to the community moderators and a promissory note stating that he’ll never post such lewd things again. and he didn’t (thank god). for a full week, that is. he relapsed almost immediately.
↬ on the bright side, though, his followers always find it cute whenever he posts pictures of the two of you on your dates, even the ever-stoic nanami couldn’t resist the urge to smile whenever he comes across a picture of his senior having the time of his life with you. god knows how much gojo satoru deserves to love and be loved in return, even if he once thought it to be the most repulsive of curses.
gojo watches you from the other end of the table, a tipsy simper on his features when he notices your eyelids drooping, your head bobbing in your drunken stupor, your lips slightly open as your breathing evens out. “you drunk, baby?” he slurs as he polishes off the last of the yakiniku set you ordered, the oily, sweet and salty grilled meat seemingly simmering down the effect of the alcohol. you were the only ones left in the izakaya, at this point, the owner has half a mind to throw the both of you out so they could close for the night. “nooooo,” you sniffle before a tiny hiccup rips through your throat. cute, satoru stares at you with lovestruck eyes. “stop that,” you look at him through your blurred vision. “stop what?” satoru asks, his head resting on the hardwood table as his hand searches his jeans for his phone. he had to capture this moment before he blacks out. “looking at me like i’m the most beautiful girl in the room,” you scowl disapprovingly. he manages to find his iphone just before he nods off to sleep, snapping a picture of the both of you. empty plates and half-finished shot glasses are strewn about your table and the night’s festivities are perfectly captured in the frame. the two of you looked absolutely hammered — your normally tidy hair was disheveled, and his face looked like a cross between a sore thumb and a ripe tomato — but still, you looked happy. and to satoru, that’s all that really matters. “but you are, baby,” he pats you on the head before finally passing out. “you are.”
#⚘—eiwrites#jujutsu kaisen#jjk x reader#gojo satoru x reader#jujutsu kaisen x you#nanami kento x you#yuta okkotsu x you#yuta okkotsu headcanons#gojo satoru headcanons#nanami kento headcanons#jujutsu kaisen headcanons#jjk headcanons#jjk x you#gojo x you#nanami x you#yuta x you#gojo x y/n#nanami x y/n#yuta x y/n#jjk imagines#jjk fluff#gojo fluff#nanami fluff#yuta fluff#kento nanami#yuta okkotsu#gojo satoru#jjk#gojou satoru x you#gojou satoru x y/n
286 notes
·
View notes
Text
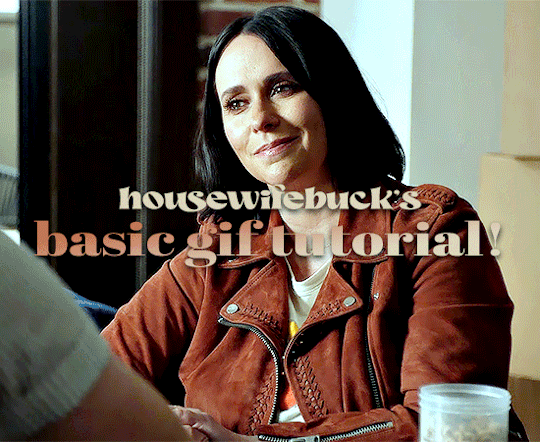
hi everyone! I've gotten several requests to make a tutorial on how to make gifs for someone just starting out and I finally got around to slapping a tutorial together.
This tutorial will cover:
software recommendations
choosing what to gif
creating a gif step by step with probably a lot of unnecessary detail
some tips and tricks:)
(This particular tutorial will not cover how to find tv and movies to download and gif, or any specific instructions on coloring. only the basic gif making process.)
so for the purposes of this tutorial, we will be using Adobe Photoshop, which is the most common program for making gifs, and the one I recommend. the version you have doesn't make a major difference in terms of capabilities but the interface may be slightly different looking if you have an older version or a different type of device. you cannot make or edit gifs in any mobile version of the photoshop application. Optionally, we will also be using Adobe Premiere Rush/Pro or another video editing software of your choice. wherever you are downloading Photoshop, whether from Adobe or a third party, you should easily be able to acquire Premiere as well. I am aiming to be as detailed as possible in this tutorial, so it may sound more time consuming than it really is. once you get the hang of things, it goes fast. the most time consuming part by far is the editing and coloring. in my opinion, one thing that majorly saves time while giffing is knowing your keyboard shortcuts and using your mouse/trackpad as little as possible. I will be going over these in this tutorial as well.
before we begin, some general tips:
gifs of single shots that do not cut between angles or subjects generally will look the best, barring exceptions
for a single gif set, choosing scenes and shots with similar lighting will be easiest to get to look uniform when compiled together, since editing wildly different looking scenes to have similar coloring and lighting is hard and takes some practice!
avoid shots that will require you to majorly crop or zoom to properly frame the subject, as this will greatly diminish quality
speaking of quality, gifs will look best using 1080p video, but you can get away with 720p as well. I would not recommend giffing with anything lower resolution than that
Tumblr's upload capacity for image and gif files is 10mb. be sure when exporting your finished gif that it is under that size. if it is a bit over, you can try trimming a few frames off your gif in the video timeline.
if you get frustrated, don't give up! giffing is hard and complicated especially if you are new to photoshop. I tried to make this tutorial as detailed as possible so it's easy to understand (although im sure I still forgot some stuff)
ok onto the tutorial!!!
STEP ONE: choose what range of frames you want to gif, and how.
once you have decided what you want to gif, there are two main way to convert your episode into a range of frames to make into a gif. the first is by screencapping. this involves downloading a program like mplayer or vlc which can be used to convert video files into "stacks" of screencaps, which can then be separated into whatever range of frames you want and imported into photoshop. this is seemingly by far the most common method I have seen amongst gifmakers*, but personally I don't care for it and I think it's more confusing and time consuming overall, so I will be explaining the second method: importing video frames to layers.
now, normally what this would mean is opening the full episode in photoshop and using the pathetic little playheads on either end of the scrub bar to trim the file into a clip. this is where your video editing software comes into play.
open whatever episode or movie you want to gif in your program. if it is a large file like a long movie in 1080p, this may take a few seconds. like I said, I am using Premiere Rush. I will be using a random episode of 9-1-1 for my example gif.
in your media browser, hover over whichever episode you want (you can also just add the whole episode to your project and scrub through, but that can take longer unless you know what time stamp you're after). click the fullscreen button by the bottom righthand corner.
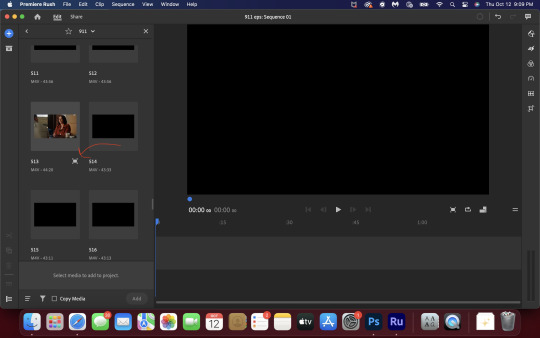
now you can scrub through and trim the episode before you even import it to premiere. this makes trimming your clip even easier.
use the trim bar (yellow outlines) to trim as close as you can around the scene you want to gif.
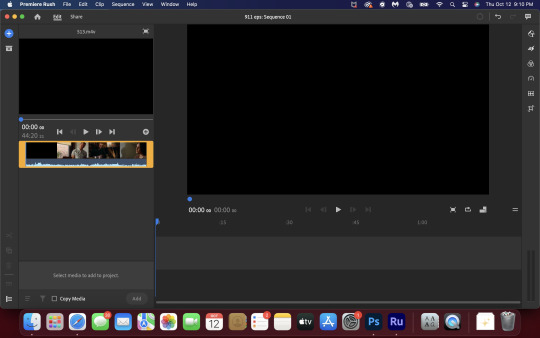
then click this plus, and then "add" below. this will add the clip to your project.
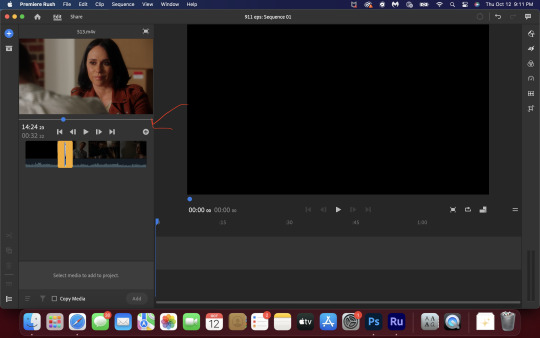
now, move the blue playhead up to the frame you want your gif to start on. then, use the scissors button off to the left to slice the clip. select the portion before the playhead, and delete it.
now move the playhead to where you want the gif to stop. a good length for most gifs is around 1.5-2 seconds in my opinion. some may be shorter depending on how long the shot is, or longer if you plan on making them smaller (remember, the uploading capacity on Tumblr is 10mb per file.) trim again, now delete the portion after the playhead. you can also use the left and right arrows beside the play button to move frame by frame, and you can adjust the side of the horizontal scroll bar below your clip to “zoom” in on it and make scrubbing easier.
once you have your clip, go up to where it says "share". your clip will be rendered, and then you can click export to save it.
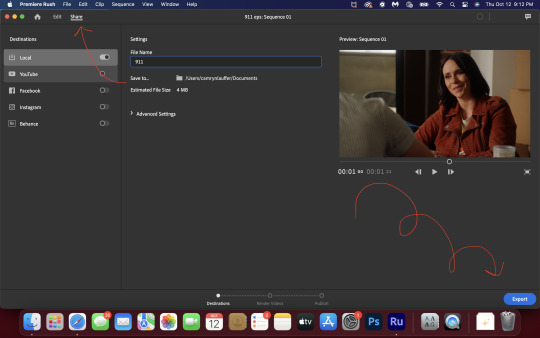
repeat step one as many times as you want for each gif. I know this may sound complicated, but like I said above once you get in the rhythm this step takes only a few seconds.
STEP TWO: create your gif!
close premiere. open photoshop. head to the control bar at the top. select file > import > import video frames to layers.
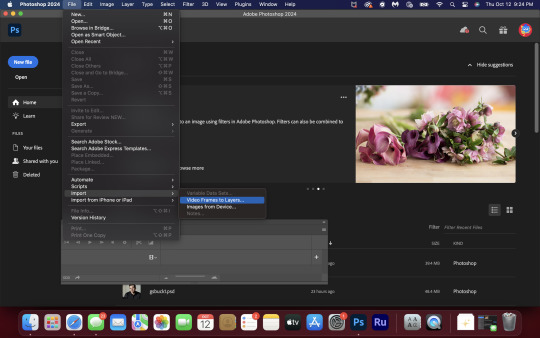
navigate to whatever folder you exported your clip to. select it, and hit enter. a second popup will appear asking you to select your range of frames. since you have already trimmed your clip to your liking, simply hit enter a second time.
now your screen looks like this, and we are going to crop and resize our gif! (troubleshooting: if you do not see the timeline bar at the bottom, select window from the control bar, scroll down, and make sure timeline is selected as part of your workspace. Adjustments and layers should be there automatically but if not add them too).

Tumblr posts are 540px wide, so in order to make my gifs as small as possible while maintaining quality, I typically crop my gifs to be around 550-600px wide, with varying heights depending on what shape I want the gif to be. experiment with this a little and decide what works for you. just don't make the width lower than 540px. once you have the portion of the frame you want inside the cropping grid, hit enter again. sometimes you have to hit it twice.
here are the measurements I am using for this gif
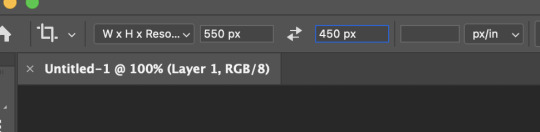
now in your timeline, select frame 1. hold down the shift key and scroll to the end to select the very last frame, thereby highlighting them all. from here we will edit our frame delay rate. photoshop will automatically set it to .03s, which will make your finished gif awkwardly fast. I typically use .05s, or .06s if I want a gif to be subtly slower (this comes in handy if the shot you are trying to gif is very short). anything longer than .06s will look weird though. choose "other" from this menu and type in your delay rate. make sure not to miss the zero after the decimal.
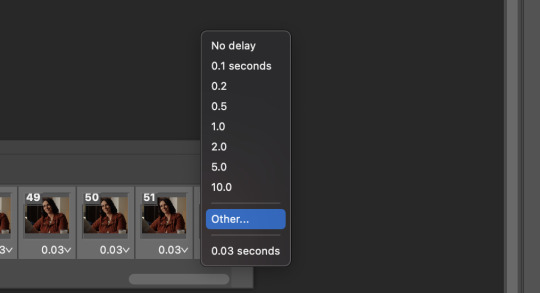
once you've set your frame rate, go to the other end of your timeline and click here to convert your frames into a video timeline.

then press option + command + A (on Mac) or windows + alt + A (on PC) to select all layers. then right click (control + click with a trackpad) on any one of the highlighted layers in your layers tab off to the right. scroll down in the popup menu and select Convert to Smart Object.
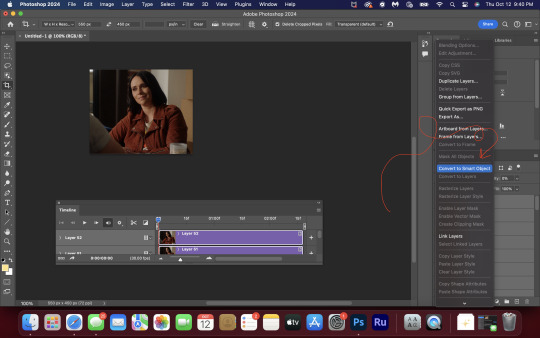
THAT'S IT!! CONGRATULATIONS!!!!! WE HAVE GIF!!!
from here comes the fun part!! you will begin adding action filters like sharpening as well as adjustment layers to color and edit your gif. experiment with different adjustments and styles until you find something you like. too many adjustment layers will up the size of the finished gif though, so I tend to keep mine to 3-4 layers max unless its a really hard to color scene. if anyone is interested in a separate coloring tutorial, please let me know!
once you are finished editing your gif, click file > export > save for web (legacy) OR hit shift + option + command + S. play your gif in the export window to make sure it looks okay, and then hit save!
I hope you guys find this helpful and informative! please hit up my in box if you have any questions or if anything doesn't make sense. happy giffing!!!
*one reason people seem to prefer screencapping to this method, is saving all the individual clips as video files does take up a lot of space on your scratch drive, which in turn can cause your computer to work slowly or crash programs. this can be rectified by making sure to delete the clips from your computer once you are done making the gifs. another space hoarder to look out for is the proxy files of your episodes that will be automatically saved to your hard drive whenever you add an episode to your project in Premiere. Periodically, go through your storage and delete all the .proxy video files. this will not delete the original episode files, only the proxy files created by Premiere.
tagging some mutuals to sb hehe: @shitouttabuck @lover-of-mine @honestlydarkprincess @eddiediaaz @compactdiscmp3 @eddiebabygirldiaz @bigfootsmom @callaplums @athenagranted @firemedicdiaz @sibylsleaves @loserdiaz @buck2eddie @diazass @eddiediaztho @giddyupbuck @monsterrae1 @icecreampotluck @sunflowerdiaiz @swiftfootedachilles @singlethread @aziraaphales @911onabc
145 notes
·
View notes