#DaVinci Resolve Tutorial
Explore tagged Tumblr posts
Visit Tumblr Blog
Explore Tumblr blogs with no restrictions, modern design and the best experience.
Last Seen Tumblr Blogs


Fun Fact
Tumblr has 4 main sources of revenue.
Text
Blackmagic Pocket Cinema Camera 4K BRAW Color Grade Before & After | BMPCC 4K 2383 LUT byBoz™
Color grading and editing done inside DaVinci Resolve using the 2383 LUT byBoz™. Get a special 10% discount at dehancer.com using the code: BOZ10 Blackmagic BRAW LUTs Available to Buy & Download Here: https://blackmagic-luts.com/ Works with: Blackmagic Ursa Cine 12K, BMPCC 6K Pro, Blackmagic Pyxis, BMCC 6K Full Frame, BMPCC 4K, BMPCC HD, BMMCC and ALL other Blackmagic Cinema Cameras utilising…

View On WordPress
#best bmpcc4k luts#blackmagic 2383 lut#blackmagic cinema camera 6k#blackmagic design#blackmagic full frame lut#blackmagic pocket 4k#blackmagic pyxis#blackmagic ursa cine 12k#BMCC 6K Full Frame#bmpcc#bmpcc 4k#bmpcc 4k footage#bmpcc 6k#bmpcc LUT#Cinematic LUTs#color grade#Color Grading#Color Grading DaVinci Resolve#color grading premiere pro#DaVinci Resolve Tutorial#pocket cinema camera#pocket cinema camera 4k
0 notes
Text
yk what fuck it, here's a compilation of a bunch of sonic edits i made when i was 12-13 that i found while going through my external hard drive because sharing this with the world is what little me would have wanted
#me? simping for shadow back in the day?? nahhhhh#tbh i'm surprised these look as smooth as they do since they were all made in 24fps#....since my poor laptop can't handle anything higher than that#i'm sure i could find more of these... if i do and feel cute at that moment i might post those too#also shout out to peej ent on youtube their tutorials were carrying the davinci resolve editors community back then#sonic#sonic the hedgehog#shadow the hedgehog#shadow#miles tails prower#tails the fox#tails#knuckles the echidna#knuckles#rouge the bat#rouge#maria robotnik#maria#sonic fandom#edit#fandom edit#sonic edit#shadow edit
21 notes
·
View notes
Note
Your work looks absolutely amazing! I was wondering if you'd ever make an animatic tutorial? The way you piece the frames together in DaVinci Resolve looks so mesmerizing and I haven't seen any other artists go in-depth on the editor side of animatics.
thank you <3
ive thought about making art help videos since people ask a lot but i feel like others can explain it a lot better than i can :") not that i dont want do,, its just im very bad at explaining and still trying to figure stuff out as i go lol
#asks#trust me i dont know that much about davinci resolve either#i watch general davinci resolve tutorials everytime i make an animatic#and i always learn something new lol
54 notes
·
View notes
Text
trying to find free beginner-level programs feels like that one xkcd comic about experts overestimaing the knowledge of those outside their field
#rambumbles#like ok. I'm sure blender and davinci resolve are good programs. people are always saying this.#but also as a beginner I don't know what the FUCK is going on in there#shoutouts to blockbench though I love u blockbench#I just need something simpleeeeeee auuughghhhh#[sighs and opens 24 minute tutorial of davinci resolve basics]
4 notes
·
View notes
Note
Just wanna say the coloring of ur gifs are absolutely beautiful, what all do you do if you dont mind sharing :0?
ah thank you! that's very kind of you <3 step-by-step under the cut:
get my clip
i open it in microsoft clipchamp (has a paid and free version, i use the free one. nothing fancy, it came with my laptop) and cut as needed (i cut when there's a new gif, or when i'm putting a new subtitle on one gif—so some gifs will be multiple clips, some will be just one)
under filters: i choose 35mm and keep it at the automatic intensity
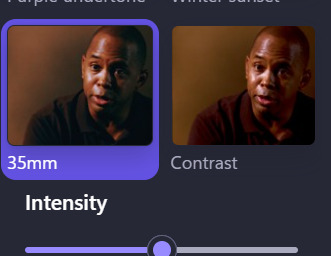
i take the contrast down to about here. i keep it similar between gifs by trying to line the slider up with the "n" in saturation

it's going to look really weird. that will be fixed in a moment. i export one clip as a 1080p video. not as a gif. exporting as gif will kill the quality
i create a video in canva, which if youre unfamiliar is a browser program with a paid and free version, iirc i have the paid version but i dont use any paid features in creating these i dont think? i should probably cancel my subscription tbh i dont use the paid features that often. and it has ai now which sucks :///
i upload my clip to canva. i usually drag and drop it into the timeline rather than onto the page, because it takes the right placement to get it to fill the whole page if you do it that way, while it will be the right size automatically if you put it in the timeline
go to "edit video" in the top left, then go to "adjust" and set these values: Brightness: 10 Contrast: 20 Highlights: 100 Shadows: -100
to add subtitles, go to text — body text. i usually just use the default, but a lot of fonts work well
set the font size to 40 (or whatever works best for the font youre using) and make it bold and italicized. use whatever colour you want as long as it shows up. lighter colours are almost always going to look better.
then go to effects — outline. set it to 80 and the colour to black. in the past ive made the outline a darker colour of whatever colour the subtitles are, but ive switched over to always using black because i think it looks better. ymmv
share — download — gif. you can download multiple clips as one gif, which is what i do when a gif has multiple subtitles or a lead-up to subtitles. so, for example: clip one: gif one clip two: gif two clip three: gif two download clip one as one gif, then select both clip two and clip three for the second.
a lot of the time it's larger than 10mb. when that happens, i upload to giphy and redownload from there and that usually fixes it. it probably reduces the quality and it's convoluted, i know. no idea how people keep their gifs under 10mb. witchcraft, maybe.
hopefully this is semi-coherent? can you tell i dont know how to write a tutorial lmao. disclaimer that if it wasn't glaringly obvious by the free programs and weird, clunky process, i'm not...super passionate about gifs? i like it when i can make them look nice, but mostly they serve as visual aids for my yapping. there are other, more talented people out there who have put out better tutorials using better programs like PS. sorry if this was a disappointing tutorial!
a note: both clipchamp and canva have AI features. i wish they didn't, and i don't use them. i went hunting for a similar free program that didn't have them, but everything just seems to be saturated with ai now ://
#SORRY this is such a bad tutorial#and a bad process#i dont have PS im making do with free programs </3#i used to know how to use davinci resolve but the knowledge is gone from my head now#asks
4 notes
·
View notes
Text

(x)
#you're important!#you're wanted!#xx#🦊.gif#2023#on their socials#(i used davinci resolve for the first time to edit the video... now i need to learn how to do colour grading ;)#i've found one tutorial on tumblr on using davinci resolve for giffing. gotta go and actually read it!)
17 notes
·
View notes
Text
How to edit captions with your video track
Why: I like making edits of my favorite series, but I hate redo captioning. But I also know quality captions are vital to some viewers (I also use them). To me adding captions is the bare minimum for release, but also hearing all the words and timing them or even re-timing existing captions is very hard with my disabilities and this has been a barrier to me releasing edits. But no more!
DaVinci Resolve lets you add a SubRip (SRT) subtitle track to any video and then edit it at the same time as the video. It also counts as an edit for the Go To Previous/Next Edit button. Con: You can't use the button to jump to big cuts in the video. Pro: You can now easily jump to the an existing timing for someone starting to talk.
DaVinci Resolve:
DaVinci Resolve is a professional video editor with widespread industry use that also has a no-strings-attached perpetual free version. It's got a ton of features in the free version that will more than cover basic editing. It's relatively easy to use (basic tutorials help). If you need more advanced tools you can upgrade to a full license. They don't pester you about it in the free version unless you try to use the advanced tools. I would already recommend using this program to anyone looking to get into video editing.
SRT Subtitles
The SRT subtitle standard is a type of text file that includes subtitles with timings and no formatting. They can be stored separately from a video file or embedded into certain files like MP4s. This is what you'll get if you download captions from YouTube (some YouTube downloaders embed them in the video, some don't). DVD rippers usually have several options. You want an SRT file. And there are websites that host fan-made or fan ripped subtitles for less officially obtained material. You can also make your own SRT file with timings within DaVinci Resolve or with an SRT editor. You can also use this to improve on official captions while making your edit.
A pro feature of DaVinci is it can do machine captioning and then you clean it up. You can also do this for free using YouTube by privately uploading the video, letting it auto-caption, and then editing the captions. You MUST edit machine captions. They are not accurate enough on their own to be accessible. But they can be a step in helping you get it done.
Extracting Embedded SRTs
DaVinci needs an SRT file to import captions. It doesn't seem to extract embedded SRT files from MP4s. Fortunately, it's very easy to extract them.
Subtitle Edit is an open source subtitle editor. It's a great tool if you're making your subtitles from scratch or editing existing ones.
For our purposes, simply open the video with the embedded subtitle track. Click save. Save the SRT file with a useful name somewhere convenient. I recommend using the same name as video it goes with in the same folder.
Adding a Subtitle Track to DaVinci
Rev Tutorial with text and video
Open your project in DaVinci Resolve. Add your SRT file to the bin.
Under "File" select "Import" then "Subtitle."
Or click the Import Media button and add it as normal.
From the bin, select your video and subtitles. Right-click them and select "Create New Timeline Using Selected Clips".
You should now have a timeline where the video and captions are reunited and can be edited together.
Editing the Subtitles
You can now move around the subtitles like any text overlay, including making them longer or shorter. If you click a subtitle you can edit the text and exact timing using numbers. Or edit the timing visually using the timeline. The Go To Previous/Next Edit button can now help you skip to a timing someone else made for you which is usually good enough for a fan cut, making your job easier. From the Edit view you can see the audio track visualizer along with the captions for a perfect cut.
Putting Your Tracks Together
If you're making a compilations, where's where things start to suck. The subtitles are not brought along when you next your clips. They will play over the video, but they won't export to an SRT video or be embedded. You're going to have to manually copy them. But at least now they're the correct length and you have them synced up. I would highly recommend you start your subtitles right at the beginning of the clip or put a fake one in to delete later.
Add your Timelines to a new timeline as usual.
Go to the timeline of the first clip.
With the clip at the beginning, right click the seeker bar and click the select to right button on the circular menu.
Use CTRL + left click to deselect the video/audio tracks. Copy the subtitle track.
Go to the combined timeline. Go to the start of your clip.
Paste the subtitles. You may have to add a subtitle track.
Copy the subtitles from the next clip.
Go to the combined timeline and move to the start of the that clip. Paste the new set in.
Rename your subtitle tracks with the language they're in or type.
Export
Go to the deliver tab. Choose the file name and location. If you're posting to YouTube, render as a single clip, and export to MP4. Under the Subtitle Settings, select "Export Subtitle", Format "As a separate file", and Export As "SRT Without Formatting". Select the subtitle tracks you want to export with the video.
Add to Render Queue. Then render the clips over on the right.
Uploading to YouTube
Upload the video as normal. At the Video Elements step, add subtitles. Select upload file, then with timings. Your subtitles should show up on the timeline and you can check they're correct and fix anything last minute. Do this for each language you add. Continue uploading as normal.
Conclusion
That's my process for adding existing subtitles to my videos. I've wanted something like this for ages so I was super pleased to learn Davinci Resolve has it. I hope this encourages other clip makers with some access to pre-made captions to use them for their videos. It's easy, free, and can even help speed up the editing process. It makes your videos much more accessible and creates a transcript that's searchable and timestamped for easy navigation and quote copying. I really recommend working this into your process so more fans who need captions can share in your work.
4 notes
·
View notes
Text
I just found* premiere pro! and it's gonna help me so much with my animatic!! Mainly because whenever you look up how to do anything regarding video editing, the tutorials are always for premiere pro lol
*by found i mean bought. I totally gave my money to adobe, yes i did, in a completely legal manner, because i love capitalism and i love subscription based software... yup!
#my previous animatic i did with a free version (so incomplete) of davinci resolve#which was good. and i was planning to use that for this one as well#but it's hard to find tutorials that only use the free version dkjfhdfg#and i need the tutorials!#lol#angel's animatic journey#angel talks#personal
6 notes
·
View notes
Text
i need to learn how to edit THIS SECOND i need to make an amv so bad i need to learn how to edit i need to learn how to EDITTTTTT
#I FEEL THIS IN MY BONES#MY BONES HAVE ATTAINED CONSCIOUS THOUGHT AND THEYRE THINKIN 'i need to make an amv'#rambles#genuinely anyone have any tutorials they recommend? for davinci resolve. or the art of editing in the first place.
6 notes
·
View notes
Text
DaVince Resolve Not Showing Multiple Audio Tracks [Fix]
For those who are having a problem with DaVinci Resolve not showing multiple tracks in your Edit tab, this could be the fix for you. I spent 3 hours scouring the internet for the solution and some will advice you to download post processing tools. But then I found out that might not be necessary.
In this guide, I will also explain OBS multiple audio recording because that was the source of my audio tracks for editing, as well as how to check if your recording or video has multiple audio tracks. I advice you to check your video first for multiple tracks before importing them to DaVinci just to save yourself the hassle of going back and forth.
This works for .mkv and .mp4 files. I cannot guarantee other file formats.
You can skip this part if you're not recording your audio tracks in OBS.
How to record multiple audio tracks in OBS
Go to Settings > Audio
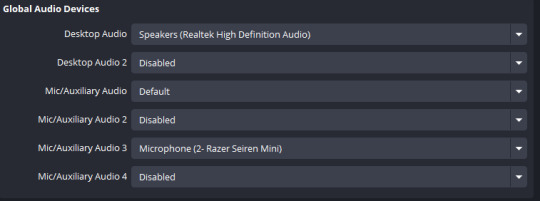
Assign the correct external and internal audio sources in this section. For me, I only needed Desktop Audio and my mic. I assigned my mic to Mic Audio 3. If you want to add a separate audio track for your game capture, music, etc., please check this video by Activater.
2. Go to Settings > Output. Change Output Mode to Advanced. Click on Recording tab.
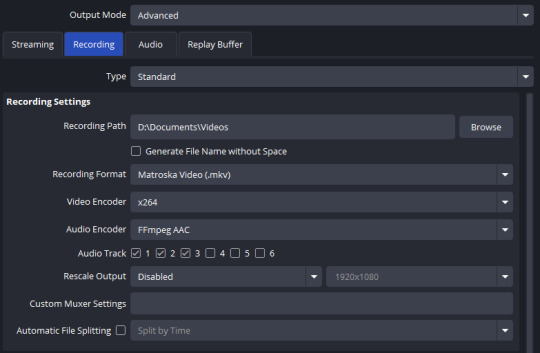
Choose your Recording Path. Choose .mkv for Recording Format. For the Video Encoder, I selected x264, but if you have NVIDIA or any better video encoder then choose that. Audio Encoder is set to FFmpeg AAC.
Now in Audio Track, select how many tracks you want to be recorded separately. The numbers are not relative to what number your Desktop Audio or Mic Audio is. The numbers mean the Audio Tracks that will be embedded to your recording.
My Audio Track 1 is going to include both the Desktop Audio and the Mic Audio 3.
Audio Track 2 is only the Desktop Audio.
Audio Track 3 is only the Mic Audio 3.
You can set up which external/internal audio sources will be tracked in each Audio Track in the next step.
If you require more than three audio tracks, tick more boxes, but note what numbers you ticked. Just tick them in order, and not randomly.
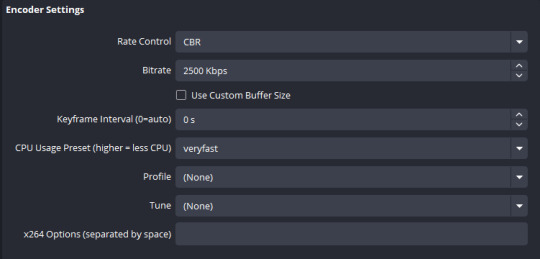
I don't have any knowledge on this section, but if you're wondering, I changed nothing when I set the Video Encoder to x264, and this is how it looks.
3. Click Apply, then Ok. Exit Settings. Select the Gear icon in Audio Mixer.
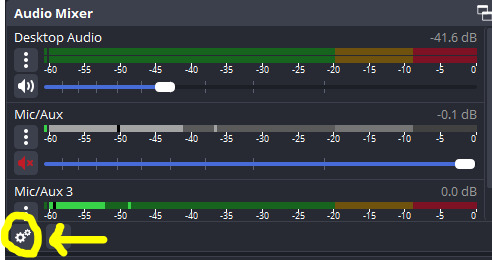
For my particular setup, this is what it looks like:

Under Tracks, this is where you can set which audio sources will be recorded for each Audio Track. Notice that I didn't tick any of the boxes for Mic/Aux. That's because I don't need it.
Since I need my Audio Track 1 to have both Desktop Audio and Mic Audio 3, I tick the Track Box 1 for both. That means it will record both audio sources in Track 1. When you're done recording and open your video, you should be able to hear the audio sources you've ticked for Track 1. If I ticked only Desktop Audio and unticked Mic Audio 3 for Track 1, then I will only hear the Desktop Audio in the video file. Video players usually only play the Audio Track 1 by default. But you can switch listening to other audio tracks using VLC or MPC-HC media player.
For my Audio Track 2, I only needed Desktop Audio so I only ticked that. Then for my Audio Track 3, I only needed Mic Audio 3 so I only ticked that.
You can do the rest for your other tracks.
4. Record your video!
How to check if Video has Multiple Tracks
Open your video file using VLC or MPC-HC.
Right-click. Click Audio, select tracks (for MPC-HC).
For VLC: Right-click. Audio > Audio Tracks > (select track)
If you were following the steps for the OBS recording, you will hear multiple audio sources on Track 1, whichever ones you've ticked.
How to Show Multiple Audio Tracks on DaVinci Resolve
Before importing your video, please check first if your video does have multiple audio tracks. The guide for this is just above this one, if you skipped it.
Add your video to the Edit tab.
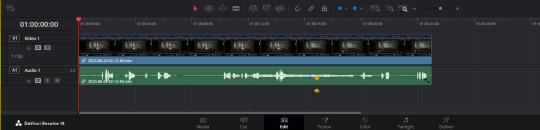
Some videos will automatically show all of the audio tracks. But for me, it didn't. And since you're reading this, then we had the same problem. This shows my Audio Track 1.
2. Manually Add Audio Tracks
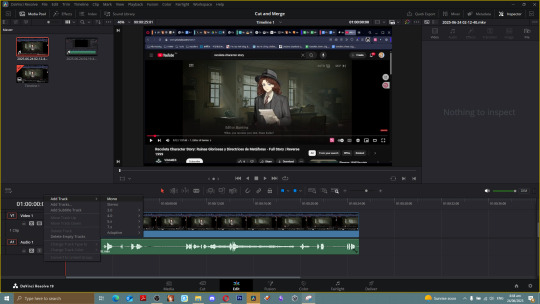
You can select Stereo or Mono, or whichever is needed for your editing project. Stereo utilizes separate right and left channels, while Mono plays back only through a single channel. Game and music audio is best kept on Stereo so that music and sound effects are panned between left and right ear. For voiceover audio tracks, they can just be Mono but it depends on how it was recorded!
3. Duplicate your Audio 1 to your new audio tracks.
Select all audio clips, right click, click Clip Attributes.
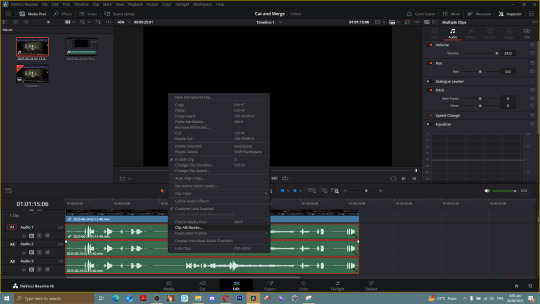
Go to Audio tab.
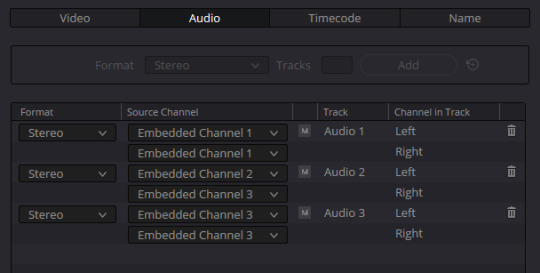
Embedded Channels contain all the Audio Tracks of your video. You simply just need to select the ones you need for each track.
My audio sources were recorded in Stereo, including voiceovers, so that's why everything is in Stereo format. If you recorded with Mono, you can go with that format. Make sure that if it's in Stereo, both left and right have the same embedded channel like you see here. Otherwise, it will pick up other audio sources for that track.
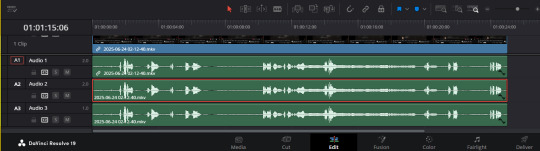
And then you have your separate multiple audio tracks! You're welcome.
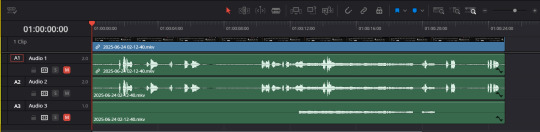
It's a bit difficult to differentiate between my Audio Track 1 and 2 here but if you look really closely at the soundwaves, you'll spot the difference.
I tested this for both .mkv and .mp4 files that contain multiple audio tracks. So it should work. Otherwise, something probably went wrong during the recording in the audio output settings, or you muted a track during recording. Maybe you also need to change the audio encoder that suits your format. I don't answers to those anymore. Gonna have to ask someone else.
0 notes
Text
Blackmagic 2383 LUT byBoz™️ | Color Grading BMPCC 6K Pro Footage in DaVinci Resolve
Blackmagic 2383 LUT byBoz™️. Color Grading BMPCC 6K Pro Footage in DaVinci Resolve. Also works with Adobe Premiere Pro, Final Cut Pro X and other .cube LUT software. Get a special 10% discount at dehancer.com using the code: BOZ10 Available to Buy & Download Here: https://blackmagic-luts.yolasite.com/ For ALL Blackmagic Design Color Science Settings (Gen 1/ Gen 3/ Gen 4/ Gen 5). Continue…

View On WordPress
#blackmagic braw to rec709 luts#blackmagic cinema camera 6k full frame#Blackmagic Color Grade LUT#blackmagic full frame#Blackmagic Pyxis Full Frame (Gen 5) 2383 LUT#blackmagic pyxis lut#BMCC 6K Full Frame#bmcc 6k full frame lut#BMPCC 4K Color Grade LUT#BMPCC 6K 2383 LUT#BMPCC Cinematic LUTs#BMPCC Color Grading LUTs#Cinematic LUTs#color grade luts#Color Grading DaVinci Resolve#Color Grading LUTs#Color Grading Tutorial#DaVinci Resolve Tutorial
0 notes
Text
Automated Video Silence Removal tool for Free DaVinci Resolve
Pro Snap Silence: Intelligent Silence Remover & EDL Generator: Download link: https://learnsharewithdp.gumroad.com/l/jbcpk Pro Snap Silence is a lightweight, no-installation Windows app that helps video editors automatically detect and remove silent parts from their footage using a smart EDL (Edit Decision List) export. Whether you’re a YouTuber, podcaster, or filmmaker, Snap Silence saves hours…

View On WordPress
#Auto remove silence#da vinci resolve#davinci resolve tutorial video editing software remove silence from video video editing script daVinci resolve script automate video editing#ffmpeg#gumroad#Snap Silence#video editng
1 note
·
View note

Text
This bitch just taught herself planar tracking at this fine hour :)
#i still need to teach myself nodes bc scary#i literally just play with the inputs until it works 💀#anyways if anyone has any good node tutorials for fusion/davinci resolve shout em out please ♡#but yippee !!!!#an original post wow
0 notes
Text
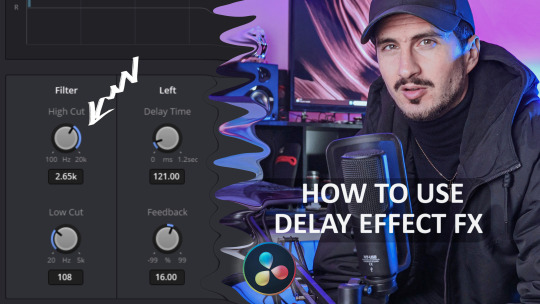
How to Use the DELAY Effect (Fairlight FX) in DaVinci Resolve
👉 https://bysumex.com/how-to-use-the-delay-effect-fairlight-fx-in-davinci-resolve/
Adding a delay effect to your audio can bring a professional and creative touch to your editing projects. Whether you're working on a film, a podcast, or a music track, the DELAY effect in DaVinci Resolve’s Fairlight FX is a powerful tool to enhance your audio. This guide will walk you through the process step-by-step, ensuring you achieve a polished and dynamic sound.
Step 1: Open Your Project in DaVinci Resolve
Start by launching DaVinci Resolve and opening the project where you want to use the DELAY effect. Make sure your audio track is properly loaded into the timeline.
💡 Tip: If you're working on multiple audio tracks, name them in the timeline for easy identification (e.g., “Vocals,” “Background Music,” “Sound Effects”).
Step 2: Access the Fairlight Page
Switch to the Fairlight page by clicking on the "Fairlight" tab at the bottom of the interface. This page is specifically designed for audio editing and mixing, providing all the tools you need to work on your sound design.
Step 3: Locate the DELAY Effect
Open the Effects Library by clicking on the Effects button in the upper left corner.
Navigate to the Fairlight FX section.
Scroll down the list to find the DELAY effect.
💡 Pro Tip: You can use the search bar at the top of the Effects panel to quickly locate the DELAY effect by typing "DELAY."
Step 4: Apply the DELAY Effect
Drag and drop the DELAY effect directly onto the audio track in the timeline. Alternatively:
Select the audio clip in the timeline.
Double-click the DELAY effect in the Effects Library to apply it.
Step 5: Open the DELAY Panel for Adjustment
After applying the effect, open the DELAY settings panel by:
Clicking the small "FX" icon that appears on the audio clip.
Alternatively, navigate to the Inspector (on the right side of the interface), select the audio clip, and find the DELAY effect under the Effects section.
Step 6: Adjust High Cut and Low Cut
In the DELAY panel, you'll find options to adjust High Cut and Low Cut:
High Cut: Filters out higher frequencies, making the delay sound warmer and less sharp.
Low Cut: Filters out lower frequencies, reducing bass and giving clarity to the delay effect.
Experiment with these sliders to find the perfect balance for your project. For example:
If you're working with vocals, a higher Low Cut might help avoid muddy sounds.
For instruments like guitars, adjusting both High Cut and Low Cut can create a dreamy or vintage feel.
(more in the link)
#davinciresolve #delayeffect #videoediting #bysumex
youtube
0 notes
Text
The Friday Roundup - Sound Design & Free A.I. Music
New Post has been published on https://thedigitalinsider.com/the-friday-roundup-sound-design-free-a-i-music/
The Friday Roundup - Sound Design & Free A.I. Music

This website uses cookies so that we can provide you with the best user experience possible. Cookie information is stored in your browser and performs functions such as recognising you when you return to our website and helping our team to understand which sections of the website you find most interesting and useful.
#audio#browser#cookies#course#crash#DaVinci Resolve#Design#DIY Video Editor Blog#Music#sound#sound design#tutorial#user experience#Video
0 notes