#How to connect Cricut to computer Bluetooth
Explore tagged Tumblr posts
Visit Tumblr Blog
Explore Tumblr blogs with no restrictions, modern design and the best experience.
Last Seen Tumblr Blogs


Fun Fact
BuzzFeed published a report claiming that Tumblr was utilized as a distribution channel for Russian agents to influence American voting habits during the 2016 presidential election in Feb 2018.
Text
How to Connect Cricut to Computer Bluetooth: Ultimate Guide
Isn’t it fun to create something with a brand-new Cricut machine? Of course, it is. I like my Cricut machine, and I am really happy writing this blog for you all. If you’re a crazy crafter like me, you should know how to connect a Cricut machine to your computer to get started with the machine. I always use a Bluetooth connection to set up my Cricut machine. Let me teach you how to connect Cricut to computer Bluetooth.
Cricut machines are incredible when it comes to quality. It is enriched with many advanced features that all crafters need. Therefore, it can be a little complicated to set it up at first. In my crafting journey, I have helped many users create DIY projects, and I feel that I should also create related content for their connections. So, let’s continue with the blog.
How to Connect Cricut to Computer Bluetooth (Windows)?
If you want to connect your Cricut product to a computer’s Bluetooth on Windows, the steps are given below. Let’s check them.
In the first step, go to the Start menu on your Windows PC and click on the Settings option.
Then, hit the Bluetooth option and turn it on.
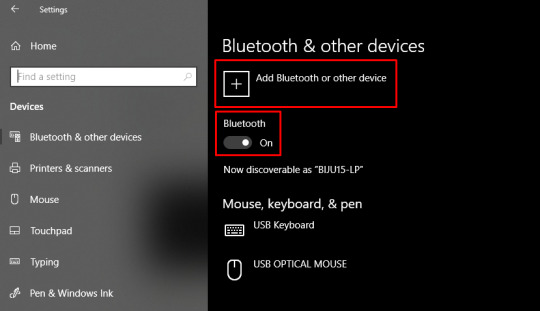
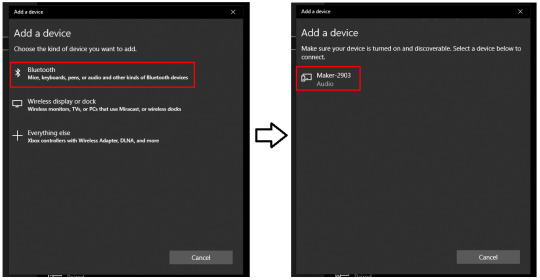
After that, select the Add Bluetooth or other device option.
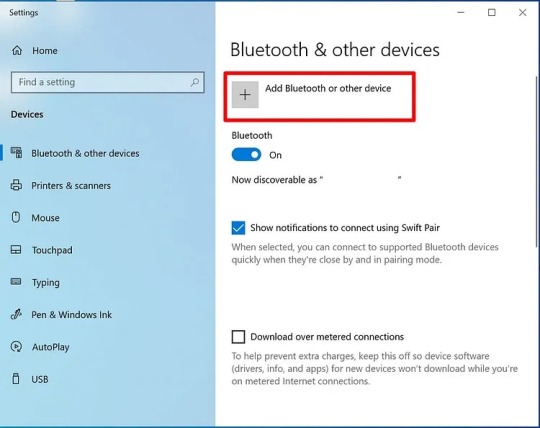
Now, select the Bluetooth option and allow your PC to find your machine.
Once you see your Cricut machine’s name on the screen, click on it.
In the last step, both devices are connected via Bluetooth connection.
Finally, you learned how to connect Cricut to computer Bluetooth wirelessly. Well, you can connect both of your devices via a USB connection. And I assume you know how to connect Cricut to computer with USB. Hence, using a USB connection would also be a good alternative.
How to Connect Cricut to Computer Bluetooth (Mac)?
As you already know, setting up a Cricut product via Bluetooth involves connecting it to a compatible device. Here, let’s discuss Cricut’s Bluetooth connection setup on a Mac.
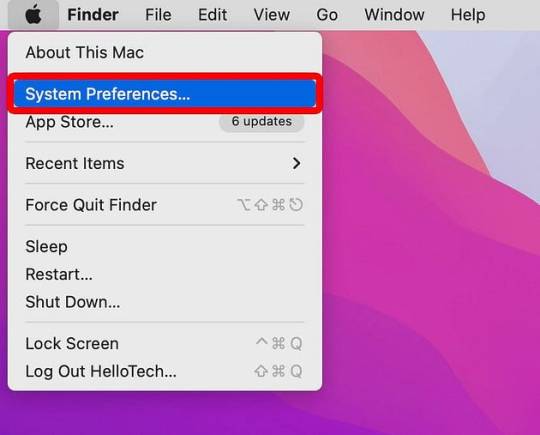
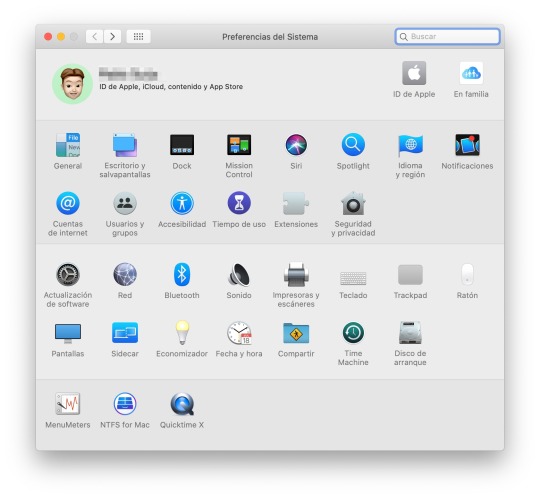
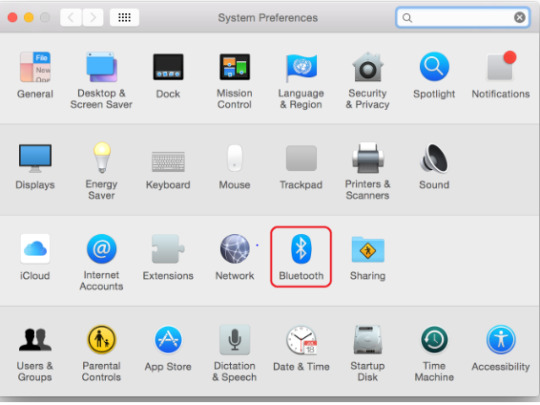
Initially, open the Apple menu and move to the System Preferences.
After that, select the Bluetooth option.
Also, ensure that the Bluetooth connection is ON and select your Cricut model from the list.
If you need to enter the password, put “0000” into the given box.
Finally, the Bluetooth connection process between Cricut and Mac computer is complete.
That’s all for Cricut Bluetooth connection on a Mac. Now, you can start using your Cricut machine with Cricut Design Space. Do you know how to get the Cricut software? If not, I’ll tell you all the steps to get it on your system.
How to Download Cricut Design Space on Desktop?
Once you have learned how to connect Cricut to computer Bluetooth, it’s time to cover the procedure to install Cricut’s software on your computer. Check out the steps below.
For Windows
As a Windows user, you can easily get the Cricut app on your computer. Let’s break down the steps for installing it on Windows.
First, navigate to Cricut’s website on your computer.
Then, search for the Cricut Design Space and hit the Download button to get this software.
After that, the download will start, and your browser will show it.

Now, jump to the Downloads location.
In the following screen, open the file by double-clicking on it.
And then allow the installation to finish.
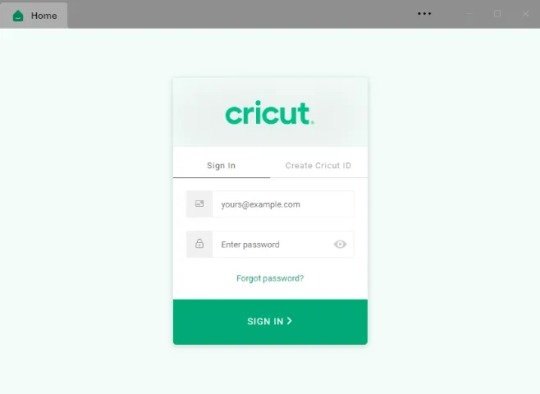
Next, hit the Cricut ID and password option.
Lastly, select the New Machine setup option to finish the connection process.
These are the final steps to get the Cricut software on a Windows PC. Now, you can use your software to create anything you want.
For Mac
When you’re a Mac user, the steps are slightly different than those for a Windows PC. Check the steps below to learn how to install the Cricut Design app.
To start, navigate to an internet browser and visit Cricut’s official website.
Then, locate the Cricut Design Space and hit the Download option next to it.

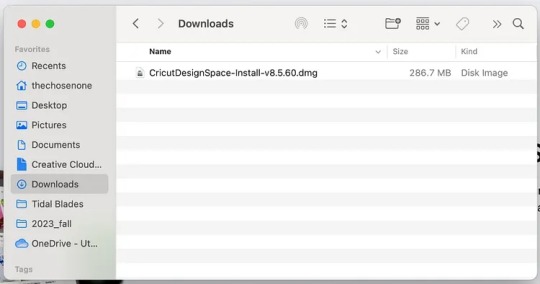
After that, allow the system to download your file.
Once the file is downloaded, open it under the Downloads location.
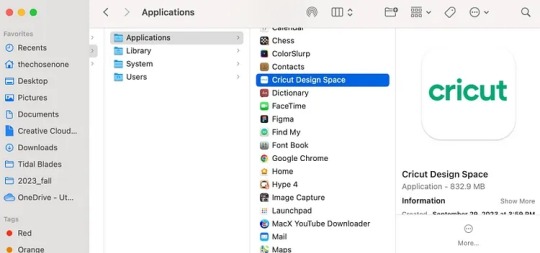
Next, slowly drag the Cricut icon to the Applications folder to start the installation of the Cricut software.
Also, open your Cricut Design app from the Applications folder.
When your app opens, sign in to your Cricut Design Space account.
Finally, you can connect with your Cricut and start making beautiful designs and projects.
That’s it for downloading and installing the Cricut app on a Mac computer. Now, you’re good to go to use your software and machine to start crafting.
Conclusion
Finally, I showed you how to connect Cricut to computer Bluetooth and how to get Cricut Design Space on your system. Hopefully, you understand it, and you’ll also make an effort to connect your Cricut machine to your computer. A Bluetooth connection is excellent for wireless connections, and it helps you work at your convenience. Therefore, if you’re planning to set up your Cricut machine, this blog will be helpful.
#How to connect cricut to computer with usb#How to connect cricut to computer bluetooth wirelessly#How to connect Cricut to computer Bluetooth
0 notes
Text
How to Connect Cricut Bluetooth to Mac and Windows?

Have trouble connecting a crafting machine? Here, I answer how to connect Cricut Bluetooth on Mac and Windows computers. During my six-year crafting journey, I faced many challenges. Be it creating a project or setting up the machine, the journey was full of ups and downs.
Nothing can be worse for crafters than setting up this machine. It takes time, and many non-tech-savvy people do not like to do it—no worries; I know your pain😉! In addition, these years of experience have taught me a lot about this exceptional machine.
Hence, believe it or not, these overall steps can be fun. To learn more, delve into this tutorial and check out the blog. I will explain the system specs first, then show you how to connect Cricut to computer via Bluetooth.
System Specifications for Using Cricut Design Space
Alright, we are heading to learn how to connect Cricut Bluetooth. But before you connect, you need to check the system specs. As I said earlier, checking the system steps can prevent your PC from crashing and many other errors. Let’s take a look at a few important points provided below:
Mac
Supported Operating System: macOS 11 or later
RAM: 4 GB
CPU: 1.83 GHz
Display Resolution: 1024px x 768px
Internet: Minimum 2 – 3 Mbps Download & 1 – 2 Mbps Upload
Hard Disk Space: 2 GB required at least
Connection Type: Bluetooth wireless or wired USB
Offline Feature: Yes, it is available for Mac
Windows
Supported Operating System: Windows 10 or later
RAM: 4 GB
CPU: Intel Dual-Core or equivalent AMD processor
Display Resolution: 1024px x 768px
Internet: Minimum 2 – 3 Mbps Download & 1 – 2 Mbps Upload
Hard Disk Space: 2 GB required at least
Connection Type: Bluetooth wireless or wired USB
Offline Feature: Yes, it is available for Windows
How to Connect Cricut Bluetooth to Your Computer?
Here, I am going to connect your machine to Bluetooth devices such as Windows and Mac. By connecting this machine to your compatible device, you will be able to start your crafting journey in one go! Let’s delve into the steps given below:
Mac
Power on your machine and MacBook.
Cutting machine should be within 10-15 feet of your Mac.
After that, you will need to go to the Apple menu given in the upper left corner.
Next, choose System Preferences or System Settings.
Now, search for the Bluetooth option.
Turn on the Bluetooth.
Wait and see if your Mac detects your nearby machine.
When detected, select it and click on the Pair button.
Once done, return to your Design Space app and Cricut New Product Setup.
Then, your machine will show that your device is connected.
Windows
Turn on the PC and place it 10 to 15 feet away from the machine.
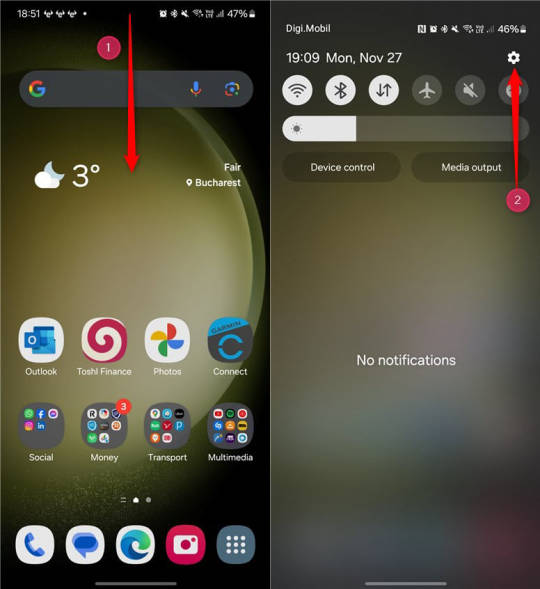
After that, press the Start button (Windows logo-like key) on the keyboard and select a gear icon, which is your Settings.
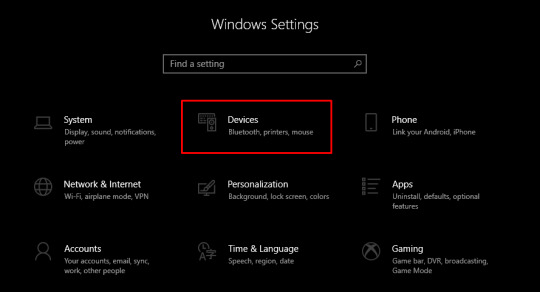
Once the Settings opens, you need to select the Devices option.
Now, you will need to find the Bluetooth option and check if it is on.
If your Bluetooth is off, turn it on.
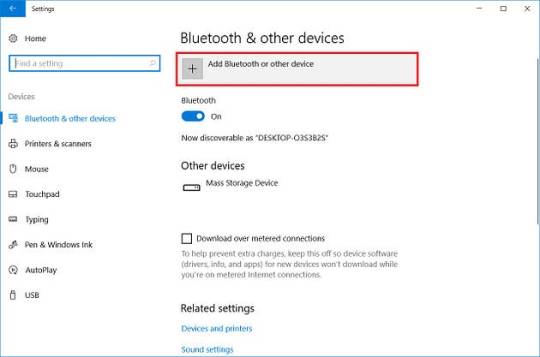
Then, you have to add your machine by clicking on Add Bluetooth or other device.
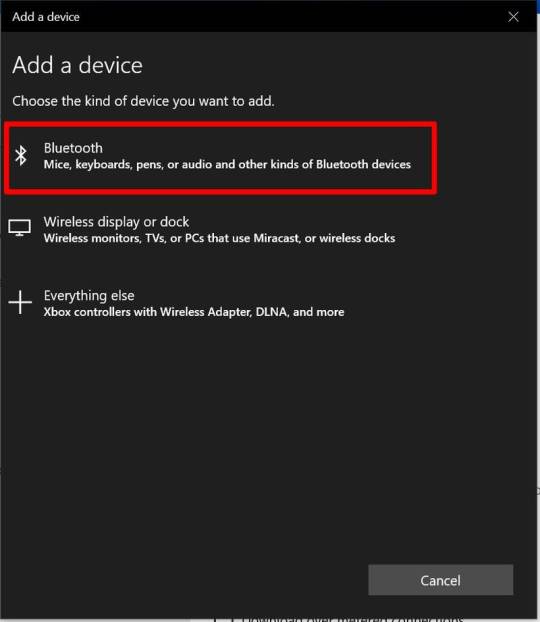
On the next pop-up screen, you are required to select the Bluetooth option.
Also, your PC will start looking for the machine nearby.
Once it finds your machine model, click on it to pair.
Finally, you learned how to connect Cricut to computer. Afterward, you can open your Design Space and start setting up the machine. For setup, you will need to follow the on-screen prompts displayed on the Design Space app. Once done, you are all set to craft!
Final Words
So, yeah, that’s all in this blog tutorial. By now, you might have learned how to connect Cricut Bluetooth. Afterward, you are ready to proceed and complete the machine setup. To conclude, I explained the system specs so that you can understand your system’s compatibility before setting it up. After the system specs, I explained the steps for connecting the machine to the PC and Mac separately. Good luck with your crafting journey.
FAQs
How can I connect my Cricut to Bluetooth?
To create your machine to your Bluetooth device, check out the following points:
Go to your mobile device (Android or iOS).
Ensure Bluetooth is turned on.
Also, turn on the heat press.
Then, head to Google Play Store (on Android) or App Store (on iOS).
Search for the Cricut Heat app and download it.
Open the app and select the Cricut Setup button on the screen.
After that, your device will detect your nearby device.
Tap on the Connect button.
Finally, your heat press is paired now.
Which Cricut machine is Bluetooth enabled?
Several Cricut machines are Bluetooth enabled, such as the Maker, Maker 3, Explore Air 2, Explore 3, Joy, and Joy Xtra. These latest and smart cutting machines have built-in Bluetooth and are compatible with iOS, Android, Windows, and macOS. However, they can be connected via USB cable except for the Joy model.
How to install a Bluetooth adapter in Cricut?
In order to install a Bluetooth adapter in your Explore or Explore One machine, delve into the following quick steps:
Turn on the Explore machine.
Grab the Bluetooth adapter and remove its cap.
Insert the adapter into your Explore machine.
Ensure the text on the adapter is facing up
When you notice a blue light flashing, it means you have installed the adapter.
Source: How to Connect Cricut Bluetooth
#how to connect cricut bluetooth#how to connect cricut to computer#cricut design space download#cricut design space app#cricut design space software#cricut explore air 2 setup#Cricut setup on computer#how to setup cricut explore#cricut explore air 2 software#Cricut New Machine Setup#Cricut maker setup
1 note
·
View note
Text
How to Connect Cricut Maker Bluetooth: A Stepwise Guide
Hey, do you want to connect Cricut Maker Bluetooth? I don’t know why people are still obsessed with Bluetooth connections. Maybe because it frees them from the clumsy wire, but I still use a USB cable to connect. It is my choice because I don’t mind those useless wires😁. Everyone has different preferences, and I respect that.
Coming to the main points, this is a blog in which I will talk about the Bluetooth connection. The connection between your Cricut Maker and computer or mobile device. By connecting to it, you will be able to setup your machine in no time.
If you are ready to learn and want to get started with Cricut, read the blog thoroughly and understand how to connect Cricut Maker to Bluetooth. So, ready to start? If so, let’s get started!
How to Connect Cricut Maker Bluetooth to Desktop?
When I got my first Cricut Explore machine, I connected it to my Windows PC. Later, a few years back, I shifted to a Mac. You might wonder why I switched to a Mac. Well, you already know having an Apple device is everyone’s dream. So, that’s the reason. Anyway, without any further ado, let’s learn how to connect Cricut Maker to computer.
Windows
First, you need to go to the Cricut product and turn it on.
Keep your Cricut machine at a distance of 10 to 15 feet from Windows PC.
Then, type the Windows logo + I keys on the keyboard to navigate to Settings.
After that, you will need to select the Devices option from the next screen.

Now, check if the Bluetooth is turned on. If not, then turn it on.
Then, click on Add Bluetooth or other device.

Afterward, you will get a pop-up to add a device.
There, you have to select Bluetooth.
In the following step, hold on and see if it detects your nearby Cricut machines.

Lastly, select the machine and pair it with your Windows PC.
MacOS
Start by placing your Cricut on a flat surface. Keep it within 10 to 15 feet of your Mac.
Then, go to your Apple menu and choose System Preferences.
After that, you need to look for the Bluetooth option.

Now, you need to make sure the Bluetooth is on.
If it is turned on, then you need to select the Cricut model from the list.
Finally, your Cricut cutting machine is connected to your macOS desktop.
How to Connect Cricut Maker Bluetooth to Phone?
When I was using my Cricut on my desktop, at the same time, I was also using it via my phone. It was like sometimes I wanted to use Cricut on my phone or sometimes on my PC. It is because the phone is handy and easy to control our Cricut. So, let’s connect Cricut to Android & iOS smartphones.
Android
When you are on an Android phone, you will need to go to your Settings.
Once you have your phone settings, navigate to the Bluetooth option.
Then, turn on your Bluetooth.
https://www.digitalcitizen.life/wp-content/uploads/2018/05/android_Bluetooth-10.png
After that, you have to wait and visit until your device finds your nearby Cricut machine.
Once you see the Cricut machine, click on it to pair it.
Finally, you have learned to connect Cricut Maker Bluetooth.
IOS
On your iPhone, you have to find your Settings app.

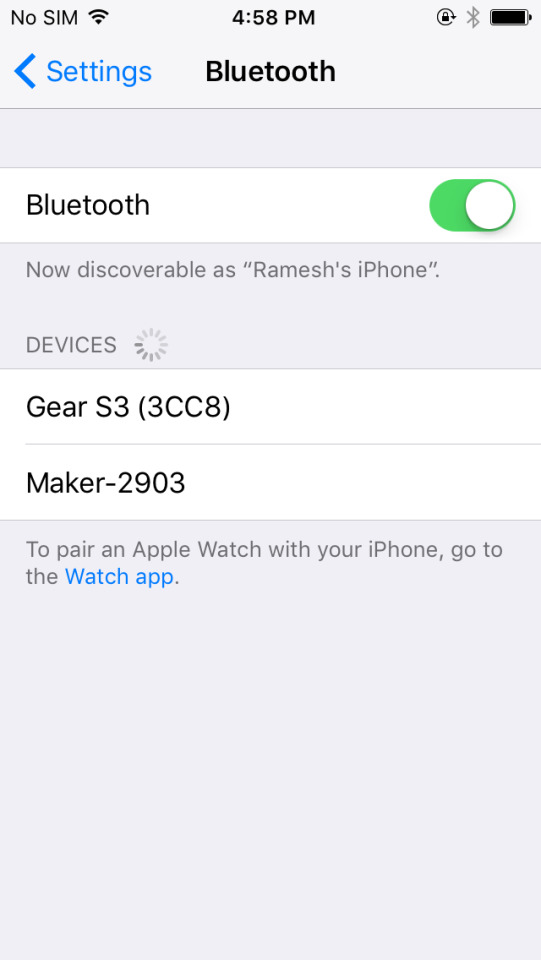
Launch the app and go to find the Bluetooth option.
Now, you have to turn on the Bluetooth by clicking on the toggle button.
https://cdsassets.apple.com/live/7WUAS350/images/iOS/iOS-17-iphone-14-pro-settings-Bluetooth-pair-third-party-device.png
Hold on and let your iPhone find your Cricut machine.
Once it is found, click on it to pair.

Finally, you have linked your Cricut to your iOS device.
As you might have understood, you can connect Cricut Maker Bluetooth to various devices, including Windows, macOS, Android, and iOS. Now, start crafting hassle-free.
FAQs
Question 1: Are system requirements necessary for connecting Cricut?
Answer: Not necessarily, but it’s better to look into the system requirements for your computer or mobile device. Establishing a connection between your Cricut and computer or smartphone is the first step in setting up your Cricut machine. During setup, you need to have the Cricut Design Space software, which can run only on compatible devices.
Question 2: Do I need a Bluetooth adapter to connect to Cricut Maker?
Answer: No, Cricut Maker is the latest version of the machine, so it doesn’t require a Bluetooth adapter. The Cricut Maker and its successor come with built-in Bluetooth, so you don’t need any Bluetooth adapter. However, you need this adapter for only older versions of Cricut machines, such as Cricut Explore and Explore One machines.
Question 3: Does Cricut Maker have a USB cable?
Answer: Yes, Cricut Maker comes with a USB cord to connect it to a cable. You can find a USB port on the backside of your Cricut cutting machine. Just insert the USB cable in, and you will be ready to go with your crafting machine. After connecting to Cricut, you will want to setup and then you will be able to setup the machine.
#how to connect Cricut Maker to Bluetooth#how to connect Cricut Maker to computer#Connect Cricut Maker Bluetooth
0 notes
Text
Cricut Explore Air 2 Connect to Computer: A Stepwise Guide
Hey crafters, are you here to learn the Cricut Explore Air 2 connect to Computer? Here, you will get what you are looking for. Chill and relax; I am going to teach you everything that you need to know to establish the connection between your Cricut and computer.
But hold on! Do you want to connect your Cricut machine to Windows or Mac? Don’t worry, I will teach you both. All you need to do is make sure that your computer meets all the system requirements. For this, you can navigate to Cricut’s official website, where they have mentioned every requirement for Mac and Windows computers.
I am a professional crafter with years of experience. My years of hard work have taught me so much, and now I am excited to share all this with you. Let’s get started!
Cricut Explore Air 2 Connect to Computer (Windows)
Connect your Cricut cutting machine to your computer if you are a Windows user. You can connect it to them easily. Take your Windows computer out. No matter which brand of computer you are using, it should have a compatible or latest operating system. To know the system requirements, you can visit Cricut’s official site. Now, let’s learn how to connect Cricut Explore Air 2 Bluetooth.
Place your PC near your Cricut Explore machine. Make sure your PC has Windows 10 or later version.
After that, you need to look for a flat surface.
Once you find a suitable place, such as a table and floor, you can place the Cricut Explore without exceeding its maximum range, which is 10–15 feet.
Once everything is set up, you need to move to the Settings section.
For Settings, you have to navigate to your taskbar and connect to the Start menu.
From the Start menu, you will need to hit the gear icon, Settings.


Then, turn on the Bluetooth by simply clicking on the toggle button.
Now, select Add Bluetooth or other device.
Here, your Cricut will be detected by your Windows computer.
Once detected, click your Cricut model to pair.
Cricut Explore Air 2 Connect to Computer (macOS)
If you are a Mac user, then you have to follow the steps below. The following steps are for only Mac users; make sure you follow them one by one. After that, you will need to start setting up your Mac. Let’s first learn how to connect Cricut Explore Air 2 Bluetooth.
Choose the right place, such as a flat table.
After that, you need to place your Cricut on it.
Have a minimum gap of about 10 feet between your Cricut and Mac computer.
Then, you should find the Apple menu on your Mac and click on it.
After that, you will need to click the System Preferences.

Once you find it, you will need to turn on the Bluetooth.
Finally, you have to click on your Cricut model from the available list.
When you have followed all the above steps, you will find your Cricut connected to your computer.
Cricut Explore Air 2 Connect to Computer via USB
Don’t want to connect to Bluetooth? Don’t worry; I’ve got another option, i.e., you need to connect it to your simply via a USB cable.
First, you will need to turn on the Cricut product by pressing its power button.
Then, switch on your Mac or Windows.
Once you have turned on both devices, take your USB cable and insert it into them.
First, take one small side and insert it into the back of your machine.
After that, you need to take the bigger side and plug it into your CPU or laptop’s USB port.
Use the one’s end of your USB cable and plug it inside your desktop’s USB port.
Finally, you have connected your Cricut to your computer via a USB cord.
FAQs
Question 1: Can I connect my Dell Vostro 3568 model to Cricut?
Answer: Yes, absolutely; you can connect this Dell Vostro 3568 model hassle-free. Cricut machines are compatible with most popular brands like HP, Asus, Dell, and others. However, you should know that Cricut doesn’t support Google Chromebook or Unix/Linux. Besides Mac, Cricut only supports the Windows operating system. Hence, any laptop with a Windows operating system will be perfect for using Cricut.
Question 2: Should I use the Cricut app to connect my Cricut?
Answer: Yes, you have to use the Cricut software to connect your Cricut machine. There are two possible connections that you can establish on your Cricut: the first is via USB cable, and the second is Bluetooth. If you choose to connect your Cricut via Bluetooth, you don’t need to worry about anything, as it is reliable and frees you from clumsy wire. However, most people also prefer a USB connection, as it is easier than a Bluetooth connection.
Question 3: Is a Bluetooth must for Cricut Explore Air 2?
Answer: No, it’s not! Besides Bluetooth, you can also connect your Cricut using your USB connection. You will find a USB connection easier than the Bluetooth. However, Cricut recommends that if you are using Maker 3 or Explore 3 with a Windows computer + AMD Ryzen, then you have to use a Bluetooth connection. But, this is not the case with the Cricut Explore Air 2 model.
Source: Cricut Explore Air 2 Connect to Computer
Visit here For More Information: cricut.com/setup
Pinterest
#Cricut Explore Air 2 Connect to Computer#how to connect Cricut Explore Air 2 Bluetooth#cricut.com/setup#Cricut Explore Air 2
0 notes
Text
How to Calibrate Cricut Explore Air 2? (Full Guide!)
Cricut Explore Air 2 is a worthwhile machine for crafters who want to make pro-level crafting projects. The machine offers precise cuts for more than 100 different types of materials, including Cricut Smart Material, leather, wood, glass, metal, etc. With its easy-to-use interface, the machine allows users to work on DIY projects even if they are novices. Moreover, sometimes crafters may need to perform Cricut Explore Air 2 calibration before a cut.
Calibration is a process that helps set the machine’s blade to cut the design accurately without any flaws. Many users don’t know the procedure and struggle to get the perfect cut. If you have the same problem, then the follow-up blog will provide you with all the information about calibrating your machine.
Cricut Explore Air 2 Calibration on Windows/Mac
If you are using your Cricut Explore Air 2 machine on a computer, then the following is the extensive guide that will help you perform the calibration process.
Step 1: Selecting the Printer
Open the ‘Cricut Design Space app‘, sign in to your account, and then click on the Settings option.
Then, follow the path Machines > Machine Calibration, and select Cricut Explore Air 2.
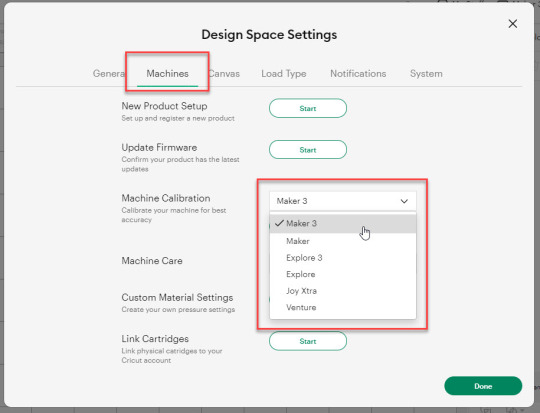
After selecting your crafting machine, click on the Start option.
Depending on the machine you choose, you will be asked to complete the calibration; select the Print Then Cut option.
In the next step, choose what you like to use with your printer machine for the process.
After that, click on the Continue option.
Step 2: Starting the Calibration Cut
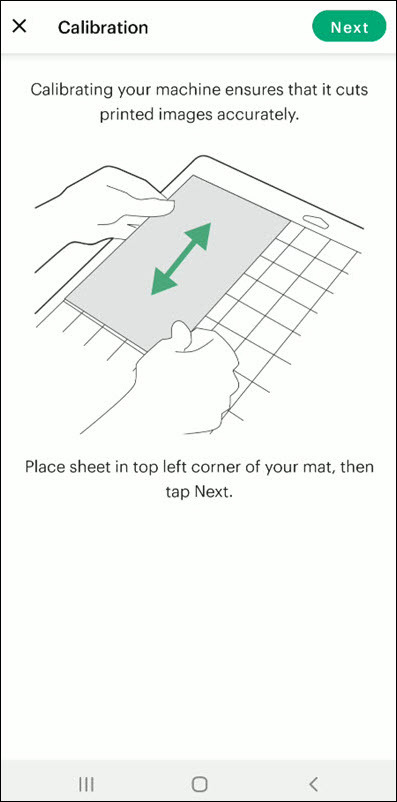
Now, you should place the printed calibration sheet on the mat, position it perfectly, and select the Continue option.
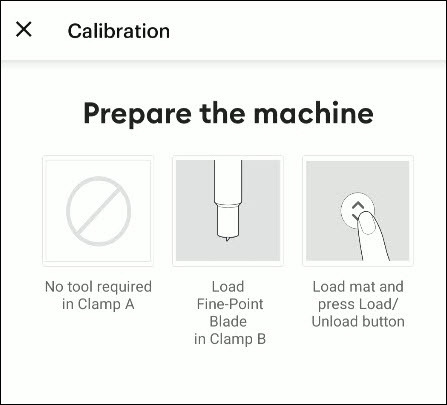
For the next step, ensure that your machine is ON and connected to your computer using USB or Bluetooth. Select the machine from the drop-down menu, insert the cutting mat into your crafting machine, and click Go.
Furthermore, the device will start scanning the markings for the calibration.
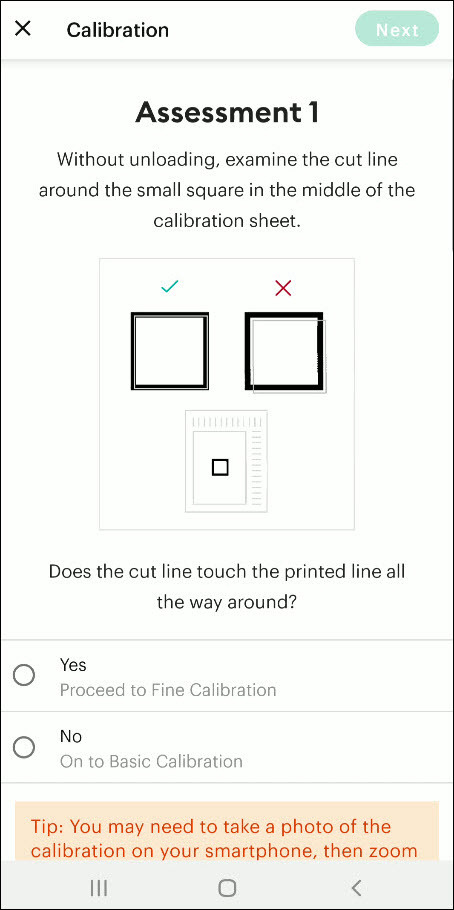
After the cutting is complete, check if the cut-makings are touched without unloading the mat from the machine. (If the markings are touched, then choose the Yes option in the app and select Continue to move to the next step.)
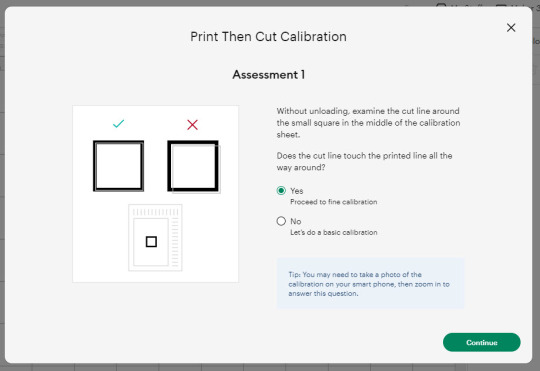
Note: If you choose the No option, then the machine will perform a cut for the next time for the accurate cut.
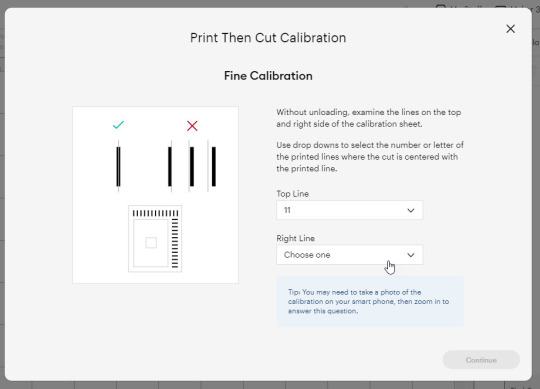
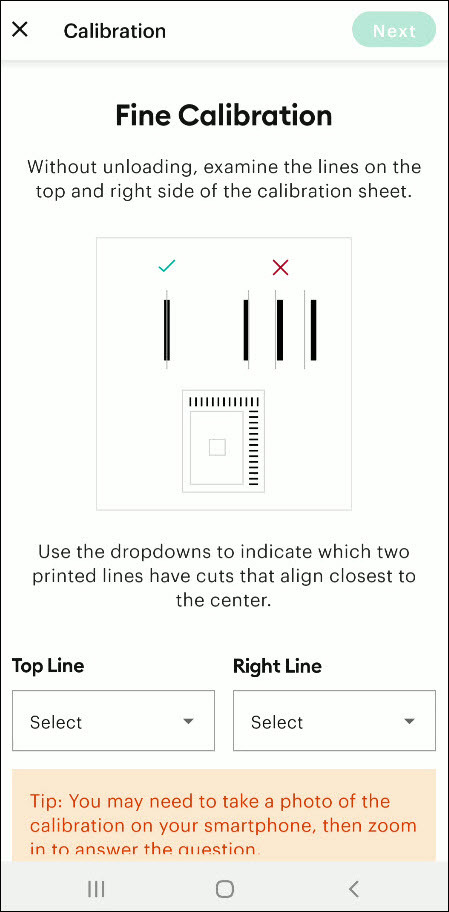
Also, the machine will start the calibration cut at the top and side of the page.
Now, check if the markings are correct without unloading the mat from the device. (The cut should be on or before line 1 and on or before line 21.)
If your cut meets all the conditions, choose the line closest to the center of the printed lines, the same as the following image; when you are done, select the Continue option.
In the next step, the Cricut Explore Air 2 machine will perform a confirmation cut around the large sheet. When this step is complete, unload the mat from the machine and remove the calibration sheet; now, you need to answer the final question on the app.
You need to choose Yes, cut is close enough to the center if you are happy with the cut. (Select no and follow the further process if you are not happy with the cut.)
Cricut Explore Air 2 Calibration On iOS/Android
The follow-up method will allow you to Calibrate your Explore Air 2 machine without any hassle. So, let’s begin the process.
Step 1: Connecting the Printer to Your Machine
Start by signing into your Cricut account on the app and selecting the menu option from the upper right corner.
After that, tap on Settings and then select Print Then Cut Settings.
Also, tap on the Calibration.
Next, you have to choose the Send to Printer, or I have a calibration sheet option.
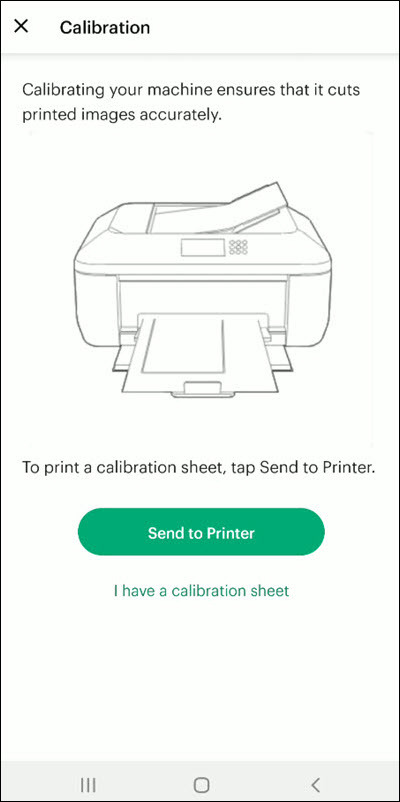
Now, the preview of the calibration sheet will appear on the screen (it can be a little different depending on the device you are using.)
Afterward, tap “Select a printer” and select the printer device you are using. Then, choose Next.
Step 2: Perform Sheet Calibration Process
After that, take the printed calibration sheet, place it onto the machine mat perfectly, and select Next.
Specify the appropriate material setting for your machine.
Then, after loading the mat into the machine, press the Go button on it.
Also, the machine will look for the marking for the calibration and then start the cutting process near the small square.
Afterward, without unloading the mat from the machine, check for the cut to ensure the cut touches the marked lines all the way around. (If the lines touch the cut, then tap Yes in the app, then select Next to proceed with the next step.)
However, if you select the No option, then the machine will try to cut close to the top and sides of the page. (Once done, look closely without unloading the mat; there should be a cut before line 1 and on or after line 21.)
If the cut meets these lines, you need to specify which cut is closest to the center of the printed lines and the right side of the calibration sheet.
Once you are done, select Next to move forward.
After that, keep following the instructions on the screen to complete the procedure.
Once the process is complete, you can start cutting materials on your machine.
Final Words
Cricut Explore Air 2 calibration is the best way to get the pin-point cuts. These methods will help you to perform the calibration process on computer and smartphone devices. With these methods, you cannot only calibrate your Explore Air 2 but also any other cutting machine of the brand. Furthermore, if you have any doubts regarding the procedure or have any issues, then it would be good to ask for more assistance and guidance.
Frequently Asked Questions
Why Is My Cricut Explore 2 Not Cutting Properly?
Cricut Explore machines are known for their flawless and fast-cutting results. Sometimes, it is due to the material you are trying to cut on your device. Also, in some cases, the machine faces technical issues. To get your machine out of this problem and start cutting properly, you can use the calibration procedure. The process to calibrate your machine is simple.
Why Should I Calibrate My Cricut Machine?
However, the cuts can sometimes be misaligned due to various reasons. Crafters can calibrate their devices to get the blades and cuts aligned to their initial position. After the calibration, the machine starts to provide flawless cuts once again. However, the calibration process is a little complex and differs from device to device. So, you must know the whole process before performing it.
What Is the Thickest Setting on Cricut Explore Air 2?
We all know that Cricut cutting machines are known for their fast and flawless cuts, even for intricate designs. Thus, the Cricut Explore machine can cut a wide range of materials of a certain thickness. If you want to cut the wood, metal, leather, etc., then your machine can cut up to 2mm. However, different materials need to use specific blades to get the desired results.
Source: How to Calibrate Cricut Explore Air 2
#how to calibrate cricut explore air 2#cricut design space app#cricut design space download#cricut design space software#cricut machine setup#cricut explore air 2 setup
2 notes
·
View notes
Text
How to Connect Cricut Joy to Computer? (Full Guide)
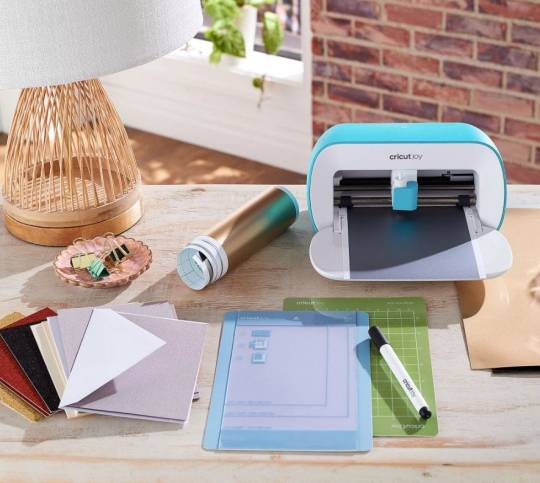
Wants to Learn ‘how to connect Cricut machine and you want to connect it to a computer‘? You can do it effortlessly with the help of this article. This machine is more compact than other Cricut cutting machines. With a sleek appearance and amazing results, Cricut Joy is the choice for many crafters. As a Cricut user and a professional crafter, I’m here to guide you with it. Let’s learn how to connect Cricut Joy to computer.
When it comes to connecting Cricut Joy to a computer, this machine doesn’t support a USB connection. Therefore, you have only one option for connection – Bluetooth. So, I’ll tell you about the Bluetooth connection on your Windows and Mac computers. Let’s get ready with the process.
Minimum System Requirements for Cricut Joy
Before you connect a machine to your computer, check whether your computer and machine are compatible. Why does this matter? You might know that Cricut runs a software called Design Space. This software has some minimum system requirements for a device that is added to it. So, let’s check out those requirements.
For Windows
For a Windows system, Design Space needs Windows 10 or 11 or the latest versions with an AMD processor or an equivalent one. It should also have a minimum of 2GB RAM, good free storage, and compatibility with Firefox, Microsoft Edge, and Google Chrome.
For Mac
For a Mac computer, Cricut Design Space needs a 14.x or newer operating system. Also, an Intel or equivalent processor. It should also have 2GB RAM and 300 MB storage. When you know the most important requirements, let’s dive into the steps involved in connecting your machine to a computer.
How to Connect Cricut Joy to Computer (Windows and Mac)
To connect your machine to your computer, you need to follow the steps given below. Here, you’ll see the steps for Windows and Mac computers.
For Windows
To connect your machine to a Windows computer, check out the given steps. As you already know, Cricut Joy doesn’t support USB, so we’ll stick to the Bluetooth connection.
To start, unpack your machine and collect all the accessories from the machine’s box.
Then, install your machine at least 10-15 feet away from the computer.
Now, connect the machine to a power source and turn it on.
After that, go to the Start menu and hit the Settings option.
Next, you should click on the Devices option.
In the next step, ensure that Bluetooth is ON.
Moving forward, hit the “Add Bluetooth or other device” option.

Also, tap on the Bluetooth and let the computer search for your machine model.
When the machine appears on the screen, select it and let it connect.
Lastly, your devices are paired with Bluetooth connection.
That’s how to connect Cricut Joy to computer. When you know everything, it’s time to try the connection for your devices.
For Mac
If you’re a Mactonish, below are the steps for connecting your crafting machine to your Mac.
To get started, connect your Mac to a power cord.
Then, install your machine on a flat surface and keep it at least 10-15 feet away from your Mac.
Now, go to your Apple menu and select System Preferences.
After that, locate the Bluetooth option on the Mac.
Also, check whether Bluetooth is ON.
In the next step, choose your machine from the list of available devices.
Finally, your machine is paired with your Mac.
That’s how to connect your machine to a Mac computer. Finally, you can start creating projects with your brand-new machine. Now, let’s take a look at the steps for a Mac computer.
Conclusion
Finally, you know how to connect Cricut Joy to computer. Start creating your DIY projects quickly. This machine is excellent for beginners and for DIY pros. The only thing you need to care about is the minimum system requirements for the Design Space software. Besides that, this tiny tool is travel-friendly and works well for you. The crafting machine can become your companion when you need it.
FAQs
How to Download Cricut Design Space on Computer?
To get the Design Space software on a computer, follow these steps:
To start, launch a browser and navigate to https://cricut.com/setup.
Then, accept the Terms of Use and its Privacy Policy.
Now, hit the Download button on the screen.
After that, let the file download under the Downloads folder.
Next, visit the Downloads folder and find the app file.
Double-click on the folder to open it.
In the next step, run the installation and continue with the on-screen directions.
Finally, sign in to your account.
Can I Connect My Cricut Joy to Computer via USB?
No, you can’t use a USB to connect your machine to your computer. It doesn’t support USB. However, you can use a Bluetooth connection to set up a connection between your machine and your computer.
How to Connect Cricut Joy to Windows 11?
You can connect a machine to Windows 11 via a Bluetooth connection. Go to your laptop and search for Bluetooth and other devices. Then, turn on the Bluetooth option. Now, let your laptop locate your machine. Then, choose your machine’s name from the list of devices and let the pairing happen.
Source: How to Connect Cricut Joy to Computer
#how to connect Cricut Joy to computer#cricut design space download#cricut design space app#cricut design space software#cricut joy setup
2 notes
·
View notes
Text
How Do I Set Up My Cricut Maker? [Ultimate Guide]
Buying a new Cricut Maker can be overwhelming for all of us. Initially, setup can be daunting, but once you do it, you will love the overall process. However, you can easily set up any Cricut machine without needing much assistance.
The post is all about how do I set up my Cricut Maker. Through this write-up, we will see the items while unboxing the new Cricut Maker. Further, you will explore the Cricut Maker and its types. Afterward, we will explain the complete process of setting up your Cricut Maker machine.
What Do You Get in the Cricut Maker Box?
Unboxing a new product is always an exciting task. While unboxing the Cricut Maker machine, we got several items that we will be discussing here. However, you always have the option to select the bundles when you buy the machine from Cricut's official website.
Following are the items that you get in the box of the new Cricut Maker:
Apart from these, you will get the following:
The best thing is that we get the blades and tools along with the new Cricut machine. These blades allow us to try various products before buying more blades.
How Do I Set Up My Cricut Maker on a Computer?
When we talk about setting up Cricut Maker machine, it means we want to connect it to our devices like computers or mobile phones. However, there are certain ways to connect these machines to our devices. For example, we can connect our Cricut Maker to our computer or phone via Bluetooth or USB cable. So, it is the users’ choice to choose which way is the most suitable for them.
Below, we explain how to set up Cricut Maker. This method is only applicable for Windows or Mac users only:
How Do I Set Up My Cricut Maker on a Mobile?
Here's how to set up your Cricut Maker on Mobile devices with iOS or Android operating systems:
Cricut Maker is the most advanced and versatile in Cricut's lineup. However, the box contains various items that you can use to make several projects uninterruptedly. In this write-up, we explained the Maker and its features in detail. It helps the users to get an overview of machines so that they can use them without any hassle. After exploring the Maker cutting machine, the blog found out how do I set up my Cricut Maker.
FAQs
Question 1: Can I set up the Cricut Maker easily?
Answer: People think the setup is daunting, but this is not the case. Cricut machines are just like printers. The only difference is that Cricut has blades to cut. However, when you go through the notice period, you will find the setup is too easy and complete in less time. While setting up, you will need to download and install the Design Space app. This app will guide you through the further setup process, making it easy for beginners to set up the machine in one go.
Question 2: How do I connect my mobile phone to my Cricut?
Answer: Here, we are going to show you the method to connect your mobile device to the Cricut machine. Here, we are using iPhone or iOS devices. So, ensure you have an iOS device.
Question 3: Can I use the Cricut without its software?
Answer: No, you must use the Cricut Design Space app to send your design to your Cricut device. The machine is the companion for your Cricut cutting machine. Without this machine, you can't cut anything. However, the Design Space is essential for creating intricate designs and then sending them to the machine. Also, the app is the only way to maintain communication between your computer and Cricut.
Visit: cricut.com/setup
cricut.com/setup
Source: https://cricutmakersetup.wordpress.com/2023/10/21/how-do-i-set-up-my-cricut-maker-ultimate-guide/
#cricut explore air 2#design space setup#cricut maker#cricut.com/setup#cricut.com design space#cricut.com/create#cricut.com sign in#design cricut.com download#digital design
2 notes
·
View notes
Text
Cricut Joy Setup: A Stepwise Guide for Beginners
Excited to start crafting with your new Cricut Joy? You’re in the right place! In this updated and beginner-friendly guide, we’ll walk you through the complete Cricut Joy setup process.
This machine is easy to use to create stickers, greeting cards, personalized apparel, labels, and more. Yes, it's small, and it sets up instantly. You can operate the crafting machine using any compatible phone, tablet, or laptop. Let Cricut Joy measure and cut while you tend to other matters.
Here's a quick preview: Connect it with Bluetooth, and you’re ready to start crafting! Once the cut or drawing is finished, remove it from the machine and personalize it. Cricut Joy can cut any image—pick from thousands of images or design your own. Simply load your chosen material into the machine, and let it handle the cutting or drawing for you!
Tools and Compatibility Requirements for Cricut Joy Setup
The Cricut Joy machine can cut smart materials without a machine mat, but other materials may require a mat.
Important Note: Cricut Joy and Joy Xtra can be connected through Bluetooth only.
Cricut Joy Setup Instructions for Windows
To set up your cutting machine with a Windows computer, download and install the Cicut Design Space software, connect your machine via bluetooth, and then follow these steps to complete the setup.
Step 1: Plug Your Machine Into the Power Outlet
Step 2: Connect Cricut Machine via Bluetooth
Ensure your crafting machine is within 10-15 feet of your computer.
Your Cricut cutting machine is now paired for Bluetooth connection.
Step 3: Download and Install Design Space
You can download Design Space to your mobile device or tablet by visiting the Apple App Store (for iOS) and Play Store (for Android), which you'll usually find within your apps.
Finally, you have installed the Design Space application on your device.
Note: It's not compulsory for you to have a Cricut machine to download Design Space. You can simply create your profile, save endless designs, and get to know your way around the app before you open your machine if you want to.
Step 4: Sign In to Your Account
Now, you have successfully installed the Design Space on your device.
Step 5: Set Up and Register Your New Cricut Product
Now, it's time for your Cricut Joy setup.
You will know when the setup is complete when you are prompted to make a test cut.
Frequently Asked Questions
How to Setup Cricut Joy on Mac?
Follow these steps to set up the machine on your Mac:
Do You Need Software for Cricut Joy?
Yes, you need the free Design Space software to use Cricut Joy machines, which are available for computers (Windows/Mac) and phones (iOS/Android). It is free to use, so you won't need to pay extra for the software. You can use Design Space to create your own designs or browse the library of ready-made projects. Once you've designed your project, you can send it to your crafting machine and start making it.
Can a Cricut Joy Engrave?
Yes, with the right tools, you can engrave with a Cricut Joy using an engraving tip specifically designed for the machine and compatible materials. This engraving tip works beautifully on Cricut Joy & Joy Xtra machines. You can engrave on materials like soft metals, brass, leather, acrylic, and plastic. Use Design Space to upload your design and prepare it for engraving.
Visit: cricut.com/setup
Source: https://cricutdesigncom.wordpress.com/2025/06/23/cricut-joy-setup-a-stepwise-guide-for-beginners/
#CricutJoySetup#cricutcomsetup#installcricutdesignspaceapp#wwwcricutcomsetuplogin#cricutcreateconnecttocomputer#cricutcomsetupmac#cricutnewproductsetup#settingupmycricutmaker#connectingcricutmakertocomputer#cricutsetupcreateaccount#cricutcuttingmachinesetup#cricutsetuponcomputer#settingupnewcricutmaker#cricutsetuplogin#cricutaccountsetup#cricutcomsetupdownload#cricutinstallsetup#cricutprintersetup
0 notes
Text
How to Pair Cricut Machine via Bluetooth or USB? (Easy Tips)
Cricut machines are a must-have for DIY crafters, designers, and small business owners. Whether you’re working on vinyl decals, paper crafts, or fabric designs, pairing your Cricut machine correctly is the first step to getting started.
I still remember the day my Cricut machine arrived as if it were yesterday. But within minutes, my excitement faded as I struggled to connect the machine to my laptop. I couldn’t figure out how to connect it to my laptop. But you don’t have to worry about that. Pairing your Cricut isn’t as complicated as it seems once you know what to do.
In this blog, I’ll explain exactly how to pair Cricut machine with your Windows or Mac, whether you use Bluetooth or a USB cable. It’s a beginner-friendly guide designed to help you avoid the roadblocks I encountered.
Let’s get your machine up and running so you can start creating!
Step 1: Turn On Your Cricut Machine
Before you start pairing, make sure your machine is powered on. Follow these steps:
Plug in your machine: Make sure the power cable is connected to the machine and plugged into a power source.
Turn on the machine: Press the power button (usually located on the side or top) to turn it on. A blinking light indicates readiness.
Step 2: Connect via Bluetooth (Wireless Connection)
You can connect your machine wirelessly via Bluetooth. Here’s how to do it:
For Windows Users
Follow the steps given below to learn how to pair Cricut machine via Bluetooth on Windows:
Open Bluetooth settings: Click onthe Start menu, then select Settings, then Devices. After that, go to Bluetooth & other devices.
Turn on Bluetooth: Ensure Bluetooth is turned on in your computer’s settings.
Put your machine in pairing mode: Press and hold the Bluetooth button on the machine. The machine’s Bluetooth light will begin blinking, indicating that it’s ready to pair.
Select your machine in Bluetooth settings: On your computer, under the “Bluetooth & other devices” settings, click on Add Bluetooth or another device. Choose Bluetooth, then select your machine from the list of available devices.
Confirm the connection: Once paired, the Bluetooth light on your machine will stop blinking and become solid, indicating that it is connected to your computer.
TIP: Cricut Explore and Maker models include Bluetooth functionality by default. Older models may require a separate Bluetooth adapter.
For Mac Users
Follow the stepwise guide listed below to learn how to pair Cricut machine via Bluetooth on a Mac:
Open Bluetooth settings: Tap on the Apple menu > System Preferences > Bluetooth.
Enable Bluetooth: Make sure Bluetooth is turned on in your Mac’s settings.
Put your machine in pairing mode: Press and hold the Bluetooth button on your machine until the Bluetooth light blinks.
Select your machine name: On your Mac, you should see your machine model in the list of available Bluetooth devices. Click on Pair to connect.
Confirm the pairing: After pairing, the Bluetooth light on your machine will remain solid, confirming the connection.
Step 3: Connect Using a USB Cable (Wired Connection)
If you prefer a wired connection or your device doesn’t support Bluetooth, you can connect your crafting machine using a USB cable.
Locate the USB port on your machine: The USB port is on the left side of the machine, where you can connect the USB cable.
Plug in the USB cable: Now, connect one end of the USB cable to the machine and the other end to a USB port on your computer.
Open Design Space: Launch the software on your computer, and the machine should be automatically recognized.
If prompted, follow the on-screen prompt to complete the setup.
Step 4: Setup Cricut Design Space on Your Device
Now that your Cricut machine is paired with your device, you need to set up Design Space to start creating designs.
Download Design Space: If you haven’t already, download and install Design Space on your computer or mobile device.
Create or sign in to your account: Open the software and either sign in with your existing account or create a new account.
Select your machine name: Once logged in, the software will automatically detect your machine. If not, go to Settings and select your machine from the list.
Start designing: Once everything is set up, you can start creating your projects in Design Space and send them to the cutting machine for cutting.
Troubleshooting Cricut Pairing Issues
Sometimes, your machine may not pair correctly due to device settings or software glitches. Here are quick fixes.
Turn off both the machine and your computer or phone. Turn them back on and retry the pairing steps.
Remove any old Bluetooth devices that could be conflicting.
Ensure both your device’s operating system and the Design Space software are updated to their latest versions.
Clear the cache in the Cricut Design Space software.
Reopen the software and attempt to pair again.
Final Words
Pairing your machine doesn’t have to be difficult. Whether you use Bluetooth or a USB cable, the steps above will help you connect quickly and efficiently. Just keep your software up to date, follow the correct steps, and stay patient!
Once your Cricut machine is paired, the world of crafting will be at your fingertips!
Frequently Asked Questions (FAQs)
What to do if Design Space doesn’t recognize my Cricut machine?
If Design Space isn’t recognizing your machine, make sure of the following key points:
Ensure that the Bluetooth or USB connection is enabled and that the machine is discoverable.
Restart both your computer and machine.
Ensure your machine is within the recommended range of 15 feet from your device.
Make sure Cricut Design Space and your machine’s firmware are up to date.
If updates don’t resolve the issue, consider uninstalling and reinstalling Cricut Design Space.
Do all Cricut Machines have Bluetooth?
No, not all Cricut machines have Bluetooth connectivity out of the box. While newer models like the Cricut Joy, Joy Xtra, Maker, Maker 3, Explore Air 2, Explore 3, and Venture utilize Bluetooth, older models like the Explore One require a separate Bluetooth adapter to connect to devices.
Note: Cricut Explore and Explore One require a Bluetooth adapter.
Can I pair the same Cricut Machine with multiple devices?
Yes, you can connect extra devices to one Cricut machine, but only one device can actively control the machine at a time. This prevents conflicts and ensures that the machine receives clear instructions. You can install Cricut Design Space on multiple devices and access the same account and projects. You can connect to the machine via USB or Bluetooth, and the software will guide you through selecting the desired machine for your project.
SOURCE: How to Pair Cricut Machine via Bluetooth or USB
#how to pair Cricut machine#Cricut Setup#Cricut software app#cricut machine setup#cricut design space app#cricut design space software
0 notes
Text
How to Download Cricut App on Computer? (Complete Tutorial)
In this step-by-step guide, we will show you ‘how to download Cricut app on computer‘, whether you’re using Windows or Mac. Cricut Design Space is the essential software needed to design and connect to your Cricut machine. It allows users to create and personalize various projects, from greeting cards to home decor.
Although Cricut Design Space is also available for mobile users, many users still prefer the convenience and ease of working on a computer. It is also free to use, with additional features available through a paid subscription called Cricut Access.
Basic System Requirements for Using Cricut Design Space
Before downloading Cricut Design Space, ensure that your computer meets the system requirements.
Windows
Mac
How to Download Cricut App on Computer?
In this section, you will learn how to download the Cricut app on Windows and Mac, with step-by-step instructions for downloading the appropriate version for your operating system.
So let’s get started!
For Windows
For Mac
Set Up a Cricut Machine
After installing Design Space, it’s time to set up your machine and start designing!
Troubleshooting Tips While Downloading Cricut App
If you encounter any issues while downloading or using the Cricut Design Space software, here are some troubleshooting tips you can try:
Problem 1: Design Space Won’t Open
Problem 2: Design Space Won’t Connect to Machine
Problem 3: Design Space Freezes or Crashes
Conclusion
Now that you’ve successfully learned ‘how to download Cricut app on computer‘, you can explore the world of possibilities for creating and designing with your crafting machine. Whether you’re using Windows or Mac, you can follow this guide to get you started today. It has a larger workspace, enhanced features, and faster performance so that you can create even more intricate designs for all your crafting projects.
Frequently Asked Questions (FAQs)
How to Connect Cricut to Computer with Bluetooth?
Place your machine and device within 10-15 feet of your computer and follow these steps:
How to Update Cricut Design Space on Windows?
It’s important to update Cricut Design Space regularly to ensure you always use the latest features and fixes.
Can I use Design Space offline after downloading it on my computer?
Yes, you can use Design Space offline, but you need to plan ahead. After downloading the app and logging in at least once with an internet connection, you can save projects and fonts for offline use. Here’s how:
Remember, certain features, such as uploading images, browsing the Cricut library, or accessing the latest updates, still require an internet connection.
Visit: cricut.com/setup
Source: https://explorenewmachine.com/how-to-download-cricut-app-on-computer-complete-tutorial/
#DownloadCricutApponComputer#cricutcomsetup#installcricutdesignspaceapp#wwwcricutcomsetuplogin#cricutcreateconnecttocomputer#cricutcomsetupmac#cricutnewproductsetup#settingupmycricutmaker#connectingcricutmakertocomputer#cricutsetupcreateaccount#cricutcuttingmachinesetup#cricutsetuponcomputer#settingupnewcricutmaker#cricutsetuplogin#cricutaccountsetup#cricutcomsetupdownload#cricutinstallsetup#cricutprintersetup
0 notes
Text
How to Connect Cricut Explore Air 2 Bluetooth: Full Guide
How do you connect Cricut Explore Air 2 Bluetooth? Is this what you want to learn? Don’t worry! I am with you! I understand how difficult it is for a beginner to connect your Cricut. You all might not understand properly what to do and what not to do. But there is nothing to worry about when you have a crafting expert like me😅. Yes, you heard that right!
I have been crafting for years using my Cricut. Luckily, I have all models of Cricut machines, including the latest Cricut Joy Xtra. So, I have been used to setting up the machine and establishing connections with various computers and phones.
So, if you want to learn how to connect Cricut Explore Air 2 to computer, look no further than this guide. In this post, I will explain everything that a beginner needs to understand. So, let’s start without any delay.
Connect Cricut Explore Air 2 Bluetooth on Windows
Almost everyone uses Windows computers. The connection method is the same as connecting any other device to your computer. Here are the easy steps to connect your Cricut to a computer on Windows:
Start with switching on your Cricut machine.
Then, place it somewhere at a distance of 10 - 15 feet from the PC.
Next, you have to proceed to the Start menu.
Also, select a gear icon called Settings.
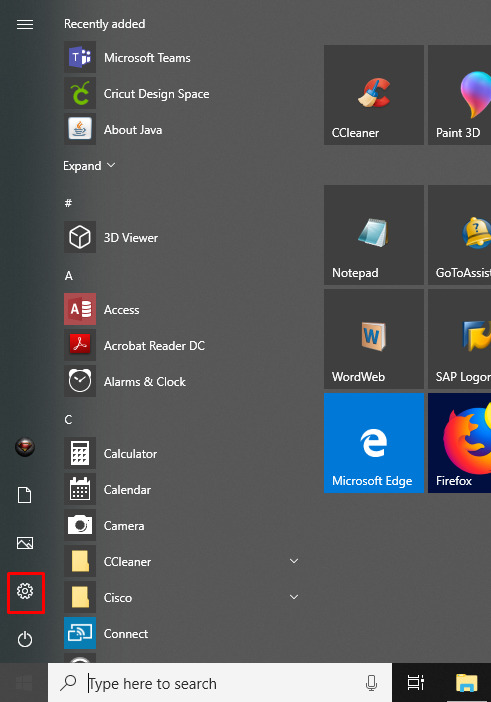
After that, you need to select Devices.
Now, ensure you have switched on the Bluetooth.
Afterward, hit the Add Bluetooth or other device option.

Therefore, you would want to tap Bluetooth and proceed to the next steps so that your machine is visible on the list.
Once you can find it in your list, click on the Cricut machine that you want to connect to and proceed.
Eventually, your Cricut machine pairing is done here.
Connect Cricut Explore Air 2 Bluetooth on Mac
To connect your Cricut Explore Air 2 to your Mac, you should use Bluetooth. However, you also need to place the Cricut and computer within a range of 10-15 feet.
Here are the easy steps to connect your Cricut to a computer on Mac:
Under the Apple menu, you will see an option: System Preferences. Click on it.
Then, you have to look for the Bluetooth on your Mac.

And then turn on the Bluetooth if it is off.
After that, let your Mac search for your Cricut machine model.
Once detected, click on it to pair.
Finally, your Cricut machine is connected to your Mac.
Connect Cricut Explore Air 2 Bluetooth on Android
If you are an Android user, I’ve got your back! Whether you are a Samsung or Real me user or others, you can quickly connect Cricut to a range of devices.
Here are the easy steps to connect your Cricut to a computer on Android:
First thing, you have to power on your Cricut product.
Then, make sure you have positioned your Cricut near your device. The distance should be at most 15 feet.
Afterward, you have to open your Settings to your phone.
Next, you will need to head to the Bluetooth option.
Here, you should turn on the Bluetooth if it is off.
When done, choose the Bluetooth module that is visible on the available list.

If you move to a screen where it asks for four digits of PIN, enter 0000.
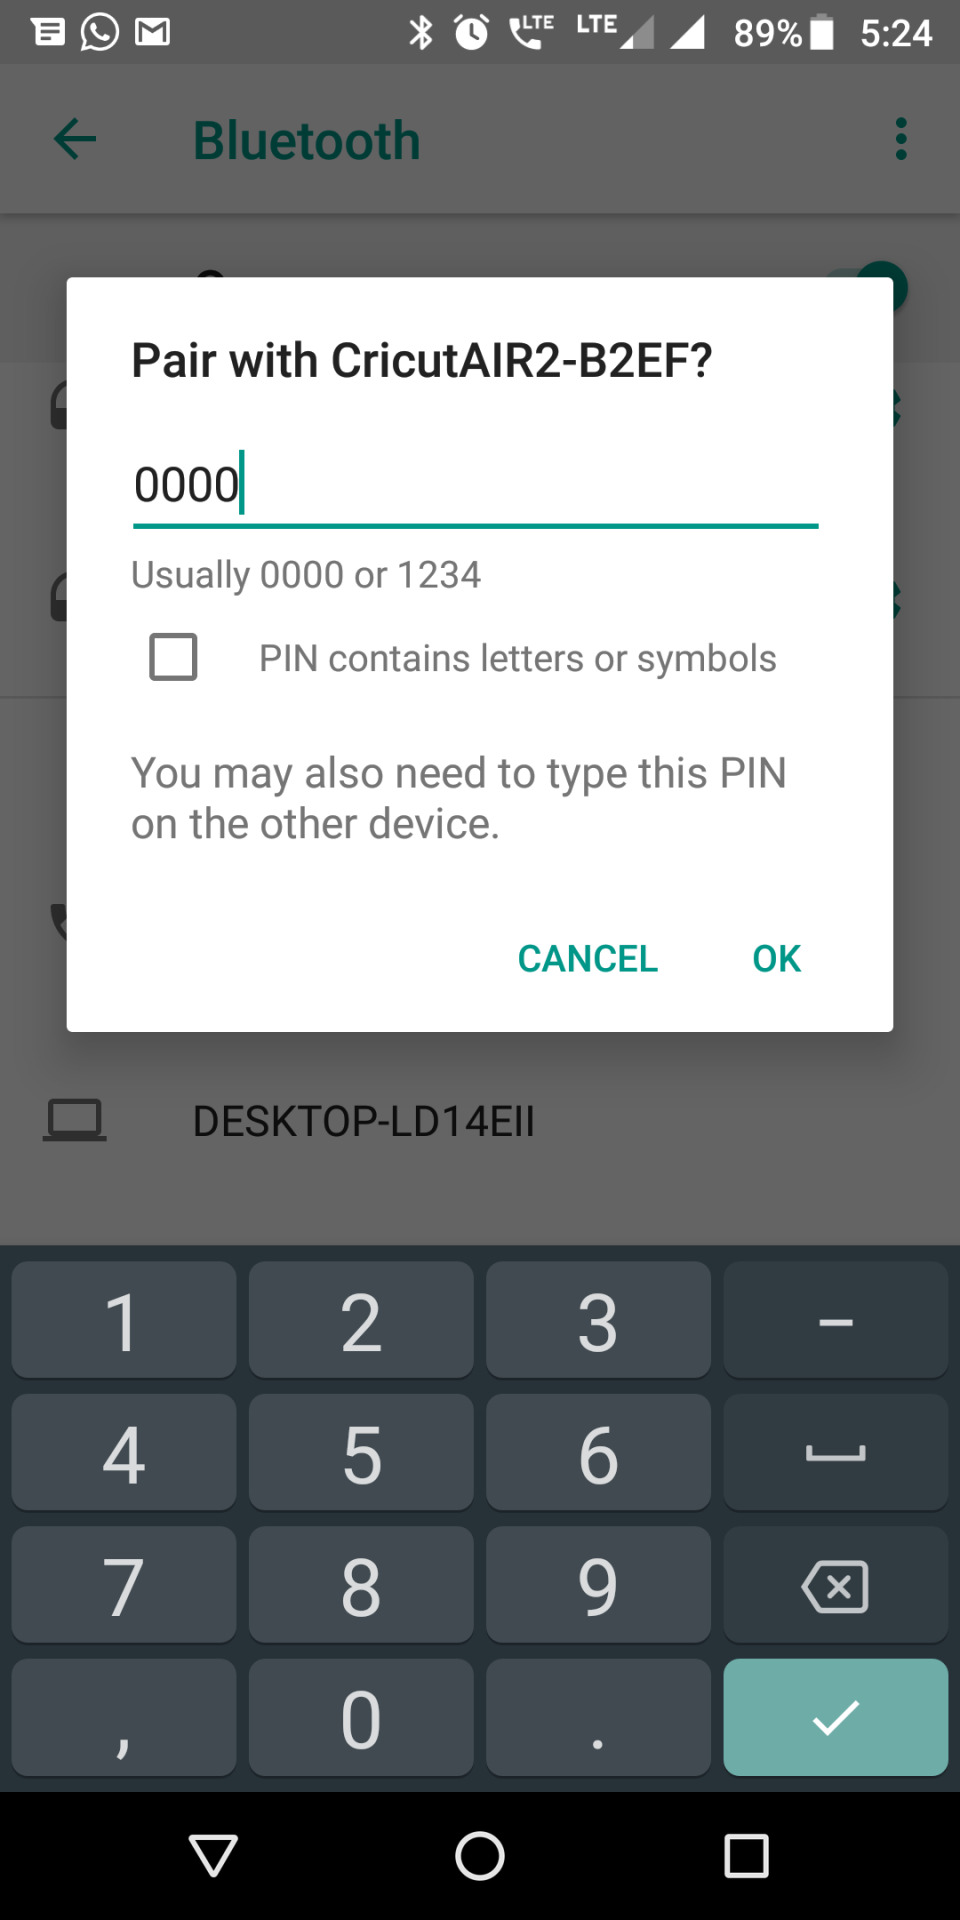
Lastly, your pairing procedure will be done.
Connect Cricut Explore Air 2 Bluetooth on iOS
IPhone or iPad users with the latest operating system can easily connect their Cricut machine to their device. The steps are easy and beginner-friendly. Let’s delve into it!
Here are the easy steps to connect your Cricut to a computer on iOS:
Once your phone and Cricut are near each other, move to the next step.
You need to navigate to your iOS Settings.
Now, enable your Bluetooth.
Then, wait and see if your iPhone/iPad detects your Cricut machine.
After that, when you have found your machine on the list, you will want to select it to pair.
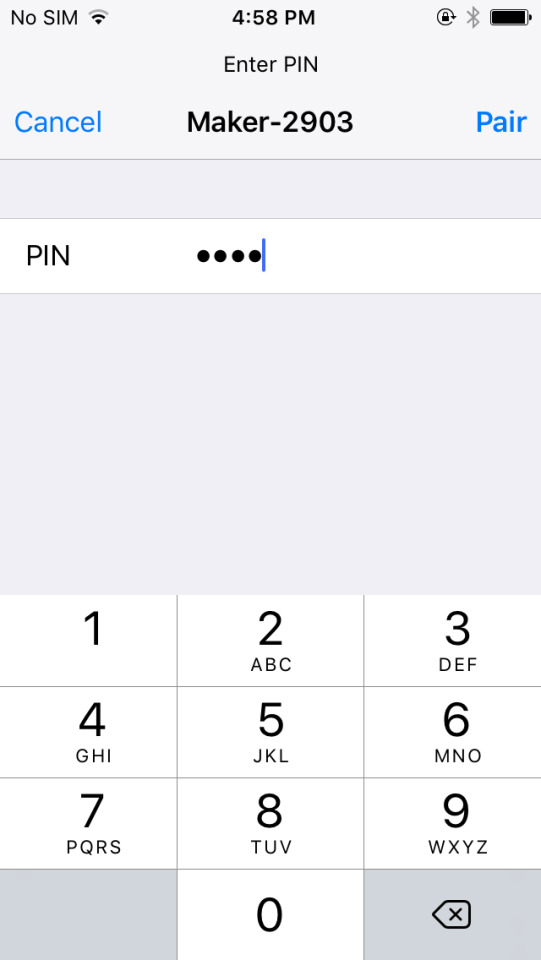
If asked to enter the four-digit PIN, enter 0000.
Finally, you click on the Pair button to complete the Cricut connection.
FAQs
Question 1: What do I need to connect my Cricut Explore Air 2?
Answer: You will need to meet the basic requirements before connecting your Cricut to your device. So, in order to connect your Cricut Explore Air 2 to your compatible device, you will need the following items:
Cricut machine
Cricut ID
Materials for a test cut
Computer, laptop, tablet, or smartphone
Cricut Design Space
Power cord
USB cord
Internet connection
Question 2: What are the system requirements for connecting Cricut on a PC?
Answer: In the system requirements for connecting your Cricut to your PC, you will need to ensure the following requirements:
OS: Windows 8 or later
RAM: 4GB
50MB free disk space
Display: Minimum 1024px x 768px screen resolution
Browsers: Mozilla Firefox, Microsoft Edge, or Google Chrome
CPU: Intel Core series or equivalent AMD processor
Connectivity options: USB port or Bluetooth connection
Question 3: How to connect Cricut Explore Air 2 to Chromebook?
Answer: Yes, you can. Most Chromebooks can download Android apps via the Google Play Store. However, some apps may work differently on Chromebooks than they do on Android devices. For example, if your Chromebook doesn’t have a touchscreen, the app may work if you use mouse clicks instead.
0 notes
Text
How to Connect Cricut via Bluetooth: Easy Setup Guide

Hello readers! Thanks for stopping by. Today, I have something very interesting for you all. As you’re all inspired by Cricut machines, what will be more meaningful than a brief note on its connection setup? With this blog, I will be sharing with you how to connect Cricut via Bluetooth. If you guys are looking for that, you will get it all here. Keep reading this blog to explore methods to connect your Cricut to a computer and phone via Bluetooth.
However, don’t forget to download and install the latest version of Cricut Design Space Software on your computer and mobile device. Only then will you be able to use your Cricut machine to make something. Now, let’s get started with my most awaited blog.
How to Connect Cricut via Bluetooth to Desktop?
Maximum users have a desktop to control their Cricut machines, so do I have. A desktop makes your work easier with a wider screen and fast speed. So, let’s go through the steps for connecting your Cricut via Bluetooth to a desktop.
Windows
From those maximum users who use desktops, the majority of users have a Windows PC for its utmost convenience. Let’s check out the steps to set up your Cricut.
Initially, make sure that your Cricut product is ON and within a range of 10-15 feet from your Windows PC.
Then, go to the Settings option from the Start menu and move to the Devices option.
After that, make sure that the Bluetooth option is ON.
In the following screen, press the Add Bluetooth or other device option.
Choose the Bluetooth option and let your PC recognize your Cricut machine.
Next, choose your machine from the list of devices.
Finally, your Cricut machine will pair with the Windows PC via Bluetooth.
That’s how to connect Cricut via Bluetooth to a Windows PC. Don’t have a Windows PC? Don’t worry; I will cover all devices here.
Mac
For the Mac users, here are the simplified steps for connecting their Cricut machine via Bluetooth to it. Look at the steps below to learn it.
In the beginning, make sure that your Cricut product is ON and at a distance of 10-15 feet from your Mac.
Then, head to the System Preferences from your Apple menu and check the Bluetooth option.
After that, make sure that the Bluetooth option is ON and choose your Cricut model from the given list of devices.
Now, your Cricut cutting machine is all set for the Bluetooth connection.
That’s it for connecting a Cricut via Bluetooth to a Mac device. You can now start using your Cricut after installing Cricut Design app on your device.
How to Connect Cricut via Bluetooth to Phone?
If you want to connect your Cricut via Bluetooth to a mobile device, it’s possible. Let’s check the steps here.
iOS
Use the following steps to connect your Cricut to iOS via Bluetooth. Then, you can use your Cricut the way you want.
First, make sure that your machine is utmost and at a distance of 10-15 feet from your mobile device.
Then, open the Bluetooth option under the Settings.
After that, make sure that the Bluetooth option is ON and choose your Cricut model from the available list of devices.
Now, your Cricut machine will pair with a Bluetooth connection.
Next, go to the Cricut Design Space and select the Cricut New Product setup.
That’s how to connect Cricut via Bluetooth to an iOS device to setup your machine. Now, It’s time to check the steps for an Android device.
Android
Android users should follow the steps below to connect their Cricut via Bluetooth. Let’s check the steps here.
In the first step, make sure that your Cricut is ON and within 10-15 feet away from your phone.
Then, open the Bluetooth option from the Settings option.
After that, make sure that the Bluetooth option is ON and choose your Cricut from the list.
Now, your devices are paired with each other.
At last, go back to the Cricut Design Space and click on the Cricut New Product Setup.
That’s it for connecting Cricut via Bluetooth to an Android device. Once you set up your devices, you’re ready to use your machine.
Conclusion
Finally you’ve learned how to connect Cricut via Bluetooth to different devices. It’s so simple that even beginners can perform it. Moreover, you need to understand that you must download Cricut Design Space to allow your device to connect with the Cricut machine. Only then, you’ll be able to use your machine for creating compelling projects. Once you connect your Cricut to a computer or mobile device, you’re good to go with all the crafting work.
FAQs
How to Connect a Cricut Machine to Laptop Wirelessly?
To connect a Cricut product to a laptop wirelessly, follow these steps:
To start, make sure that the Bluetooth is ON on your laptop and Cricut.
Now, tap on the Add Bluetooth or other device option.
Choose the Bluetooth option and allow your laptop to recognize your machine.
After that, pick your Cricut model from the list.
Finally, your machine is paired with a Bluetooth connection.
What to Do if My Cricut Is Not Connecting to Bluetooth?
If you see that your Cricut machine is unable to connect via Bluetooth, you must ensure that your machine is ON and within a distance of 10-15 feet from the computer. If not, you need to change their place to the required location. Moreover, if your Cricut machine doesn’t have a Bluetooth connection, you can buy a Bluetooth adapter.
How Do I Connect Cricut via Bluetooth to Windows 10?
To connect your Cricut machine to Windows 10, follow these steps:
To start, make sure that your Cricut is at least 10-15 feet away from your computer.
Open the Settings tab from the Menu and then launch the Devices option.
Thereafter, check if the Bluetooth option is ON.
Then, hit on the Add Bluetooth or other device option.
Tap the Bluetooth option to let your Windows 10 PC detect your machine, and pick your machine from the list.
Finally, your machine is paired with Bluetooth.
For more information visit: www.cricut.com/setup login design.cricut.com Cricut New Machine Setup
Source: How to Connect Cricut via Bluetooth
#how to connect cricut via bluetooth#cricut design space download#cricut design space app#cricut design space login#cricut machine setup#Cricut New Product setup#Cricut setup on computer
2 notes
·
View notes
Text
How to Setup Cricut Machine? [Computer & Smartphone]
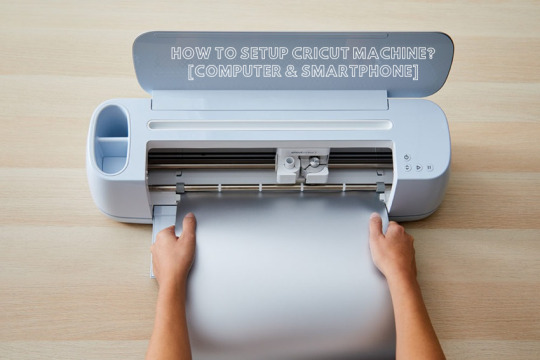
Do you want to learn how to set up a Cricut machine? Worry not—this blog covers all the necessary information you need to know.
Cricut machines are paving a new path for crafters around the world to make brand-like DIY projects at home. In addition, the Cricut machines are easy to use and come with advanced connectivity options to streamline the setup process. By following the instructions, crafters can complete the machine setup and start their crafting journey easily.
However, some users may find it difficult to complete the setup from scratch or face issues. As a result, it is necessary to have a proper understanding of the setup. So, let’s learn about the Cricut machine setup on PC and smartphone devices.
How to Set Up a Cricut Machine on a Computer?
Follow-up guides will help you complete your machine setup on a computer device using the Bluetooth connection and downloading the Design Space app. Follow the steps properly to establish a successful connection.
Step 1: Connect via Bluetooth
First, you need to unbox your machine, turn it on, and then place it within the 10-15 feet range of your computer.
On your PC, open the Settings window by going to the Start menu and then choose the Devices option.
On the next page, ensure that the Bluetooth toggle is on and then click on the “Add Bluetooth or other device” option.
Click on Bluetooth on the open page; it will start looking for your crafting machine.
You need to look for your machine name in the results and select it. (You can look for your machine’s Bluetooth device code, which is printed or engraved on your machine and is near the serial number.)
If asked to enter the password, then enter 0000 and then click on the Pair option.
Now, the Bluetooth pairing of your crafting machine will be complete with your PC.
After that, you can move to the next step of your Cricut machine set up.
Step 2: Download Cricut Design Space
At the start, browse the official Cricut support website Cricut.com/setup on your PC and type the name of your machine in the search section.
After that, you need to click on the checkbox next to the “I agree to Cricut Terms of Use and Privacy Policy” option, then select the Download button.
Now, the download process will start, and the screen will show a progress bar indicating the download status.
Wait for the download to complete; double-click on the Cricut Design Space setup file in your browser to begin the installation.
Open the downloaded file from the Downloads section on your device.
Once you launch the Cricut file, a prompt will ask if you trust this app. Select the right option to continue with the installation process.
Now, the installation process will appear in a pop-up box.
After the installation, you should complete the sign-in process using the Cricut account credentials. (If you are a new user, then click on “Cricut Cricut ID” to make a new account.)
Then, choose the option to set up your machine and then select it.
When the setup process is complete, you can continue with your first project.
How to Set Up a Cricut Machine on a Smartphone?
Carefully read the procedures below and use them if you want to set up your cutting machine on your smartphone.
Step 1: Establish the Bluetooth Connection
First, you need to turn on your machine and bring your smartphone near your machine.
From the homescreen, tap on Settings and then go to Bluetooth.
Now, you need to ensure that the Bluetooth toggle is on; if the toggle is off, then tap on it to turn it on.
Your device will search for all the available Bluetooth devices and show them on the screen.
From the list of devices, you need to tap on your machine. (If you see a prompt to type the PIN, then enter 0000 and then tap on Pair.)
Next, your device will be connected via Bluetooth.
Step 2: Download the Cricut App
Go to your smartphone device’s home screen and tap on the Google Play Store or Apple App Store icon.
Once the app opens, go to the search bar and enter ‘Cricut Design Space‘ to search for it.
From the list of results, tap on the Cricut green C icon and then choose the Install option to start the download.
Once the download is complete, open the app. (The app icon will also be added to your device’s home screen.)
Complete the sign process and tap on the Machine Setup option.
Click on your machine model number from the options, and then the setup will be complete.
Here you go! You can now create awesome crafts using the Cricut supplies and machines.
Final Words
With the help of the above-mentioned guides, you can complete your Cricut cutting machine setup on a PC or smartphone running various operating systems, such as Mac, iOS, Android, and Windows. Carefully use the specific method according to the device you are using, and start your crafting journey right away. However, if you are facing any problems or need more help with the setup, then it would be good to seek further help.
Frequently Asked Questions
How to set up my Cricut machine?
Below are the major steps you can follow to set up your machine with a device.
First, you should turn on the machine and keep it close to your PC or mobile phone.
After that, connect both devices using the USB cable or Bluetooth connectivity.
Next, you are required to download and install the Design Space app on your device.
Once the download is complete, complete the sign-in process. (Create a new account if needed.)
Then, choose the Machine Setup option to search for the machine.
Select the machine, and the setup will be successful; you can start using it.
Why can’t I connect my Cricut machine?
The process of setting up the machine is simple, but you can face many problems. Here are some major reasons you are unable to complete the setup.
The machine may not be compatible with your device if it does not meet the system requirements or lacks Bluetooth connectivity.
You are following the wrong method when setting up the machine.
You have downloaded a corrupt or outdated app.
The devices are not within the same network connection range.
Connection settings on computers or smartphones are not correct, and other issues.
Can I use Cricut machine without completing setup?
Cricut mainly offers heat press devices and cutting machines. If you want to use the heat press device, then there is no need to complete the setup. However, if you want to work with the cutting machine, then it is necessary to connect it to a desktop or smartphone device to use its functions. In addition, without completing the setup, you will not be able to use the machine. For the hassle-free setup of your machine, you need to have proper knowledge of the whole procedure.
Source: How to Setup Cricut Machine
#how to setup cricut machine#setup cricut machine#Cricut Setup#cricut machine setup#Cricut design space Software
1 note
·
View note
Text
How to Use a Cricut Maker to Create a DIY Project? (Easy Guide)
Are you thinking of buying a Cricut Maker? Or you have just got one and are not sure where to start? This guide will walk you through all the different ways to learn how to use a Cricut Maker without any previous experience.
This cutting machine is advanced and unique from other models, like Explore Air 2 and Joy machine. It delivers a wide range of features, tools, and accessories for crafting projects. With this machine, you can cut fabric, vinyl, cardstock, chipboard, and more precisely.
So, if you are a beginner and don’t know how to use this machine—don’t worry; we are here to help! Read this blog, and you will learn how to use it easily.
How to Use a Cricut Maker: Unboxing and Initial Setup
Once you have got your machine in your hands, it is time to check if you have all the necessary supplies and tools that come with the machine or not. So, in order to do that, you must follow these steps:
Step 1: Unbox Your Machine
Carefully remove the machine from the box, ensuring that all packaging materials are removed. Inside the box, you will find the machine, a power cable, a USB cable, a cutting mat, a fine-point blade, and a welcome guide.
Step 2: Positioning Your Machine
Place the machine on a flat surface, ensuring at least 10 inches of space in front and behind the machine. This space allows the cutting machine to move freely during operation.
Step 3: Connecting to Power
Now that you have unboxed your machine, it’s time to take the most important step: giving it life support. To do that, you must insert the power cable into the back of the machine and plug it into an electrical outlet. Once you finish the connection part, let us look into how to activate your machine.
How to Activate a Cricut Maker: Quick and Easy Steps
The first thing to do is activate the machine. To do so, from your Windows/Mac, you must head over to cricut.com/setup from any browser of your choice. Activating the machine is even easier if you have already used the Design Space app. To set up the machine from the app, go to the Menu icon and then select ‘Cricut New Product Setup.’ After that, follow the prompts that let you choose your machine.
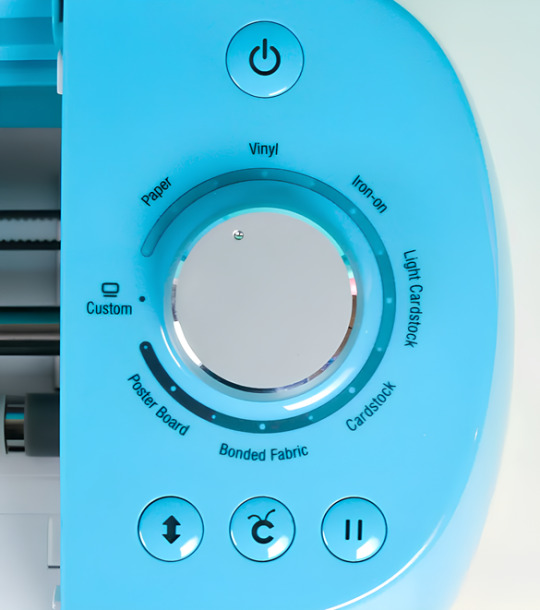
To open the machine, you must lift its lid. This will open the cover of the machine automatically.
Power button: With this button, you can turn the machine on and off.

Feeding switch: This button lets you feed your mat into the machine.

Cricut switch: This is the button with the initial C. Press it when you want to start cutting (it is also called the confirm button).

Pause button: This button gives you the flexibility to pause your machine in between. It’s extremely handy if you’re in the middle of a cut and want to change something or for any other reason.

That’s all in terms of design. In the next section, we’ll look at the steps to create a project.
How to Use a Cricut Maker: 5 Easy-To-Follow Steps
To use a machine, follow these detailed steps from setup to your first project. As the Cricut Maker Setup is a versatile cutting machine, it can handle various materials, making it ideal for crafting projects.
Step 1: Connecting to Your Device
In order to get a hold of the machine, you must connect it to your desktop or computer. This is crucial because, without the connection, the machine cannot communicate with your device. Even though the Design Space app can work offline, you still need a connection at least once to save it on the app.
You can connect your machine to your device via a USB cable or Bluetooth. Connect the square end to the machine and the USB end to your PC via USB. To pair your device with the machine using Bluetooth, turn on the machine and then go to the Bluetooth settings.
Visit the official website or surf design.cricut.com and download the Design Space application. It is essential for project creation and supports various platforms, like Mac, iPad, and iPhone.
Step 2: Setting Up Design Space
This is the most important step after connecting the machine and your device (Mac/Windows). Once you have downloaded the app, you must do these things for a smooth experience:
Open the software and fill out the required fields to create an account. The account allows one to save their projects and access various design features.
In the software, select “New Machine Setup” from your profile. Finish the on-screen steps to choose your machine model and perform the setup process. The app will guide you in connecting your device to the machine.
Step 3: Designing Your DIY Project
Now that you have done all this, let’s start creating your first project. To do so, let’s look at these steps:
Start a New Project: Once your machine is connected, you can start a new project using the software. Select the type of project you want to create, such as a card, decal, or label.
Choose Your Materials: Design Space allows you to select the material. If you use cardstock, set the material type accordingly.
Prepare Your Cutting Mat: Place your chosen material onto the mat. Ensure it is aligned correctly and adheres well to avoid shifting during cutting.
Step 4: Start the Cutting Process
Now that you are familiar with downloading the app and activating the machine, let us look at its main purpose: the cutting process. It happens as described below; follow the steps carefully for a seamless cutting.
Load the Mat: Insert the mat into your crafting machine until it clicks into place. This will automatically feed the mat in for cutting.
Start Cutting: Press the “C” button on the machine to begin cutting. Your device will display a percentage of the cut completion and allow you to monitor the progress.
Completion: Once the cutting is finished, the machine will signal it is done. Carefully remove the mat and peel off your cut material.
Step 5: Post-Cutting Steps
It is equally important to know what to do after you are done with your cutting process.
Removing Your Cut Material: Gently lift the material from the machine mat. If you use delicate materials, such as intricate designs, use a spatula tool to help lift them without curling.
Assemble Your Project: Depending on your project, you may also need to assemble various pieces. Follow any additional steps to add embellishments or complete your design.
Conclusion
Don’t be discouraged if your first project isn’t perfect. The more you use your cutting machine, the more comfortable you will become with the process. Take time to explore the features of Design Space, like templates, images, and fonts. This exploration can inspire new project ideas. Using a crafting machine opens up a world of creative possibilities. Following these steps, you can confidently set up your machine, design your projects, and bring your creative ideas to life. Happy crafting!
FAQs
How do you use a Cricut for beginners?
To use a crafting machine as a beginner, unbox your machine and follow the setup steps. Download the Design Space software on your computer or mobile device for project creation. Familiarize yourself with basic operations like uploading images, selecting materials, and changing settings. Start with modest projects, such as stickers or paper cards, to build confidence. Use online resources and community forums to get more support and inspiration.
What do you use a Cricut Maker for?
A Cricut Maker is a versatile creative gadget that can cut materials like vinyl, paper, and fabric. It’s excellent for making unique designs for home decor, apparel, and more. The machine is capable of cutting a variety of materials, making it appropriate for both simple and intricate crafts. Beginners begin with projects such as greeting cards or decals, gradually discovering their full potential as they gain skills.
Do I need a computer to use a Cricut?
While a computer is not required to use a Cricut, it is suggested for maximum performance. The Design Space software can be accessible from a computer, tablet, or smartphone, making design management easier. Using a computer allows for a wider screen and more accurate control when making complex designs. However, several users have operated their machines using mobile apps, allowing them to create while on the road.
Source: How to Use a Cricut Maker
#how to use a cricut maker#cricut design space download#cricut design space app#cricut design space software#Cricut Maker Setup#cricut new product setup#how to setup cricut maker#cricut new machine setup
1 note
·
View note
Text
Why Is My Cricut Not Connecting? (Quick Fixes)
Cricut machines are one of the most useful tools for crafters, which makes it easy for them to create complex designs and projects. However, users may become extremely frustrated as a result of connectivity problems. It is important to comprehend the causes of these issues. This will enable you to troubleshoot them more successfully. This blog will look into the query, “Why is my Cricut not connecting?” alongside the typical causes of connectivity problems for your machine.
Method 1: Check the Connection of Devices
Cricut machines can connect either via a USB cable or with the help of Bluetooth. Knowing how each connection type works is essential for troubleshooting connectivity issues.
USB Connection

The USB that you are using must be in good condition; otherwise, you will have trouble connecting it to your machine. Plus, you must ensure the wire is correctly plugged into your computer and the machine. A malfunctioning cable or port could be the cause of the connection loss. An alternative USB cable or port might help fix the problem.
Bluetooth Connection
With the Bluetooth option, you can have a wireless connection to your machine. Just ensure that you turn on Bluetooth on your device. If your machine’s name does not appear in the list of available devices, then you should try the following steps:
Restart your devices: Sometimes, a simple restart of your device can resolve the issue. So, start with that.
Forget the device: If that does not work, you can try forgetting the device. To do this on your computer or mobile device, go to Bluetooth settings, find your machine model, and select “Forget.” After that, try to reconnect again.
These steps often answer the question, Why is my Cricut not connecting?
Method 2: Update Design Space or Operating System
Another main factor in connectivity issues is software compatibility. You need to make sure that both the app and the device’s operating system are up to date. Older software often leads to connectivity problems.
Updating Design Space
To check whether the app is updated or not, follow the below steps:
On Windows
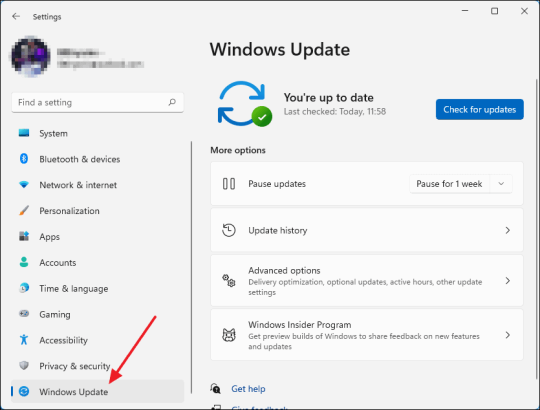
You need to open the app and then need to click on the three horizontal lines in the top left corner. Once there, go on to select “Check for updates” and click OK. Your app will be updated if you have some older versions.
On Mac
If you have a Mac, open the app and click on “Design Space” from the menu bar. Afterward, select the “Check for updates” option. If updates are available, go ahead and install them. Once installed, you must restart the application. This way, you can resolve the issue related to why is my Cricut not connecting.
Method 3: Diagnosing the Network Settings
Network settings can mainly impact wireless connectivity. You must ensure that your antivirus software does not block the firewall settings for the Cricut Design Space app. If found positive, you might need to adjust your firewall settings so that the app can communicate through the network.
Method 4: Check the Firewall Settings
Sometimes, you need to configure the firewall settings properly so that the machine can connect properly. In order to do that, follow the below steps for Windows and Mac.
Windows
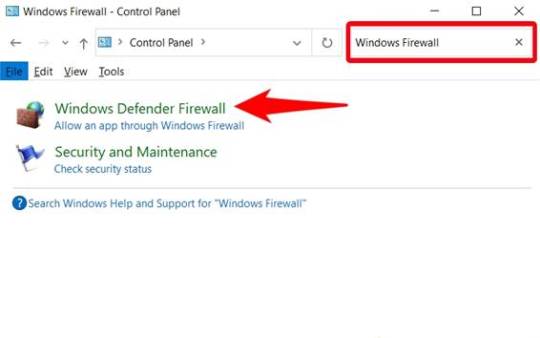
First, you need to go to the Control Panel, then to System and Security, and from there you must open Windows Defender Firewall. Once you reach there, check for the option “Allow an app through Windows Defender Firewall.” Click on it and ensure the app is allowed.
Mac
On Mac, go to System Preferences, then Security & Privacy, and then Firewall. Once there, select the Firewall option and ensure that the Design Space software is allowed. Adjusting these settings can help answer why is my Cricut not connecting.
Method 5: Ensure Your Device Is Compatible
You will have to make sure that your computer or mobile device meets these minimum system requirements for using Design Space. If your operating system has insufficient RAM or processing power, you might have difficulty connecting or might not connect altogether.
Method 6: Checking System Requirements
The minimum system specs for the application include:
Windows: Windows 10 or later, and at least 4 GB RAM or more.
Mac: macOS 10.12 or later, and at least 4 GB RAM or more.
Mobile: iOS 12 or later or Android 5.0 or later.
If your device does not fulfill these requirements, you should consider upgrading your hardware or changing the device that connects your machine.
Troubleshooting Steps
If you still face trouble with the connectivity, then follow these quick and simple steps:
Restart your machine: Turn off your machine and wait a few seconds. Then, turn it on again. This will surely solve the issue.
Reset Bluetooth settings: If you are using Bluetooth, reset your device’s Bluetooth settings and try to reconnect. It should fix the problem.
Reinstall Design Space: Uninstall the app and reinstall it. Reinstalling will ensure a fresh start, and hopefully, you will be able to reconnect again.
Conclusion
In short, connectivity issues with your Cricut machine can arise from various factors, including connection type, software compatibility, network settings, and device compatibility. Following the tips and suggestions mentioned above, one can address the question, “Why is my Cricut not connecting?”
Just remember to check your connections, and ensure that the software is updated, also make sure your device meets the necessary requirements. With these methods, one can enjoy a seamless crafting experience with their machine.
FAQs
1. What should I do if my Cricut machine doesn’t turn on?
Ensure that your power cord is securely connected to both the machine and the electric outlet. If using a power strip, try plugging directly into a wall outlet. You should also check the power cord for any visible damage.
2. How can I improve Bluetooth connectivity with my Cricut?
Make sure that your machine is within range of your device and that Bluetooth is enabled. Restart both devices and try forgetting the machine in the Bluetooth settings before reconnecting.
3. What are the minimum system requirements for Cricut Design Space?
For Windows, you need Windows 10 or later with at least 4 GB RAM. For Mac, macOS 10.12 or later with 4 GB RAM is required. Mobile devices should run iOS 12 or Android 5.0 or later.
4. How do I check for updates in Cricut Design Space?
On Windows, open the app and click the three horizontal lines in the top left corner to select “Check for Updates.” On Mac, click “Design Space” in the menu bar and select “Check for Updates.“
5. What should I do if my Cricut App is crashing?
Try reinstalling the app to ensure a fresh start. Also, check for software updates and clear your device’s cache to improve performance.
Source: Why Is My Cricut Not Connecting
#why is my cricut not connecting#cricut design space#cricut design space app#cricut design space software#cricut design space download#cricut machine setup
4 notes
·
View notes
Text
How to Connect Cricut to Laptop With USB and Bluetooth?
Do you want to connect your Cricut to your laptop? If so, this blog is perfect for you. As a craft expert, I’ll tell you how to connect Cricut to laptop and use it for your creative work. I know it’s a little technical, but trust me, it’s very simple. You’ll learn it quickly.
Everybody starts from scratch, and maybe this is your first time setting up your machine on a laptop. Basically, I’ll share the two best methods here: via USB and Bluetooth. So, without wasting a minute, let’s dig into it.
What Do You Need to Get Started?
Well, when you’re connecting your machine to a laptop, you should take care of a few things. Check out the list below:
Considering all of these factors, you can start connecting your crafting machine to your laptop.
How to Connect Cricut to Laptop: 2 Different Methods
You’re finally ready with your devices to set up your machine. I’m sharing two of the best methods to connect your machine to your laptop. So, follow all the steps carefully to set up your machine and start your DIY journey.
Method 1: With the Help of a USB Cable
This is the most preferred method. Since it’s a wired method, you don’t need to setup any complex settings to connect your devices with it. Check out the steps below to connect it.
This is how to connect Cricut to laptop via USB. It’s a beginner-friendly method, and anyone can use it to setup their machine with a laptop.
However, you must ensure that your laptop has the necessary USB drivers installed. If not, install them immediately to avoid any obstacles during the setup.
Method 2: Using a Bluetooth Connection
This is another way to connect your machine to a laptop. Check all the steps to connect your devices together via a Bluetooth connection. Learn the procedure below.
You know how to connect your crafting machine to your laptop or computer using a Bluetooth connection. As a wireless connection, it’s highly recommended for a hectic working environment. You can use this connection for your devices.
Conclusion
Finally, you know how to connect Cricut to laptop. Both USB and Bluetooth are good for connecting your machine to a laptop. You can choose anyone. Two things that I want you to know are that you should make sure your laptop supports Bluetooth if you’re choosing a wireless network. And, if you’re choosing a wired connection, ensure that your laptop has USB drivers installed. Besides, everything is simple.
FAQs
How to Connect Cricut to Laptop Without USB?
If you want a wireless connection to connect your machine to your laptop, Bluetooth is the only option. As Cricut machines don’t support a Wi-Fi connection, Bluetooth is a reliable method for connecting your devices and starting work on your projects.
How to Install USB Drivers on Laptop?
If your laptop doesn’t have USB drivers installed, it may create problems with your USB connection. Check how to get them.
How Do I Get My Cricut Software on My Laptop?
Downloading and installing the software on your laptop is pretty simple. All you need to do is to follow the steps below:
Visit: cricut.com/setup cricut design space
Source: https://cdesignspace.wordpress.com/2025/01/15/how-to-connect-cricut-to-laptop-with-usb-and-bluetooth/
#cricut design space#cricut design space setup#cricut setup#cricut com setup#www.cricut.com/setup login#www.cricut.com setup login#cricut explore air 2 setup#cricut explore air 2#cricut project ideas#cricut#cutfiles#cricutprojects#svgtrending#cutfilesforcricut
0 notes