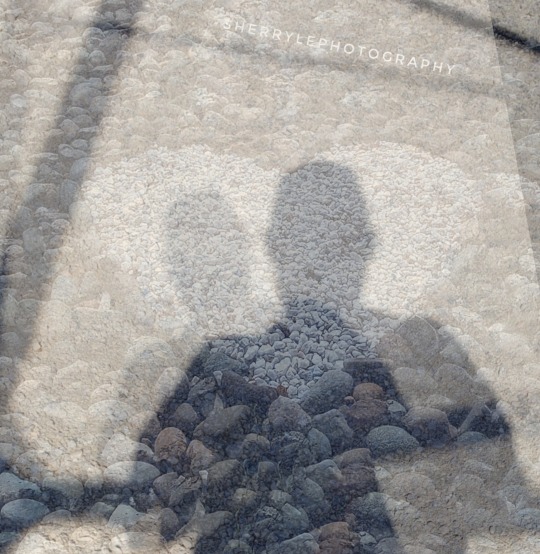
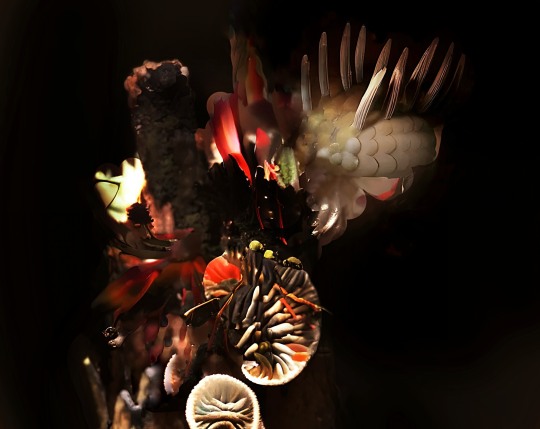
#created using snapseed
Explore tagged Tumblr posts
Visit Tumblr Blog
Explore Tumblr blogs with no restrictions, modern design and the best experience.
Last Seen Tumblr Blogs


Fun Fact
Tumblr has been providing a Korean-language service since 2013.
Text
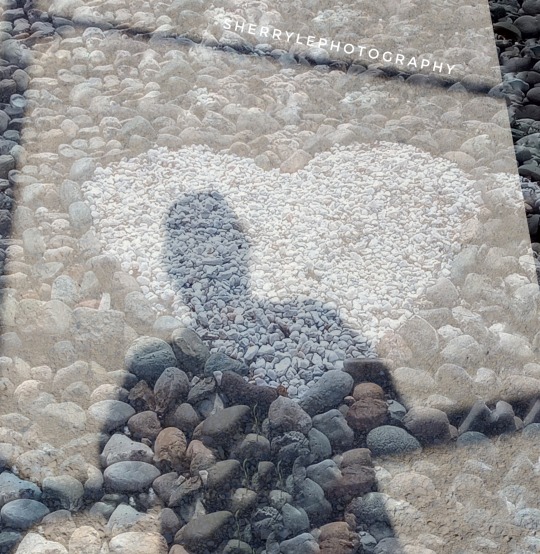
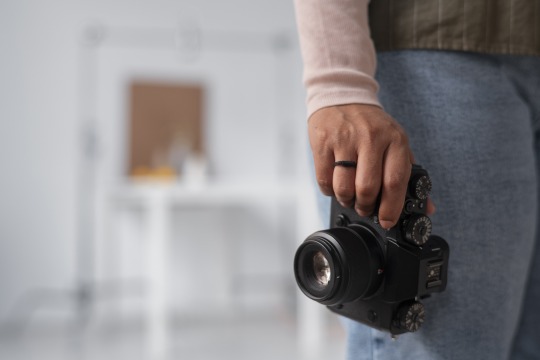
My photography @sherrylephotography
Just finished watching See you in my 19th life, a TV show I watched on Netflix
Ban Ji-eun can remember all her past lives. When her previous life is cut short by a tragic accident, she sets out to reunite with a man named Moon Seo-ha whom she met in her 18th life.
IMBd gives it 7.7
Created using snapseed double exposure.
Submitting to @abstract-challenge
Wasn't found in my kitchen but was fun to create. I miss you abstract challenge.
#abstract challenge#original photography on tumblr#abstract expressionism#created using snapseed#my digital photography abstract art
122 notes
·
View notes
Note
Hello,
Thank you for your posts. They look beautiful. How are you generating these images? What AI do you use?
Thank you! I'm using Stable Diffusion as the core AI for generating them. However, it's about more than just straightforward AI generation. I also use Inpainting and ControlNet to refine the details or change something. Occasionally, I use Photoshop and Snapseed to further enhancements or modify objects. I also use various LoRA models from Civitai, some of which I've compiled myself.
Previously I already wrote about Inpainting:
100 notes
·
View notes
Text
Yevette Heiser - Shares Expert Photography Tips to Elevate Your Smartphone Images
Smartphone photography has come a long way, allowing everyday users to capture professional-quality photos with just a device in their pocket. But how can you take your smartphone images to the next level? According to renowned photographer Yevette Heiser, it's all about mastering key photography techniques. Here, Yevette reveals how small adjustments can make a huge difference in your smartphone photography game.
1. Understand Lighting for Stunning Photos
One of the most important factors in photography is lighting, and this is no different when shooting with your smartphone. Yevette emphasizes the significance of natural light. "Natural light helps to capture the true colors and textures of your subjects," she says. For optimal results, shoot during the golden hours — early morning or late afternoon — when the light is softer and more flattering. Additionally, she advises avoiding harsh midday sunlight, which can create unwanted shadows and overexposed highlights.
For indoor shoots, positioning your subject near windows or soft light sources like lamps will also produce beautiful results. If you're shooting at night or in low-light conditions, consider using your phone’s built-in night mode or experimenting with external lighting sources such as ring lights.
2. Focus on Composition
Composition is key to any successful photo, and Yevette Heiser encourages smartphone photographers to pay close attention to how they frame their shots. The rule of thirds is one of the simplest and most effective composition techniques she suggests. To apply this rule, imagine dividing your frame into three equal horizontal and vertical sections. Place the subject of your photo along these lines or at their intersections for a balanced and engaging image.
Another useful tip from Yevette is to experiment with different perspectives. Instead of always shooting at eye level, try different angles like from above or below the subject. This can give your photos a unique and dynamic feel.
3. Use Your Smartphone's Manual Settings
While most smartphone cameras offer automatic settings, Yevette Heiser advocates for taking control of the manual settings to create more personalized, high-quality shots. Many modern smartphones allow users to adjust aspects like exposure, ISO, white balance, and focus manually. This can result in more creative control and help you capture the perfect shot in any situation.
For instance, by manually adjusting the exposure, you can avoid overly dark or bright areas in your photo. Adjusting the ISO can also help reduce noise in low-light conditions. Yevette recommends experimenting with these settings to understand how each element affects your final image.
4. Editing is Key to the Final Touch
Once you’ve captured your photos, Yevette suggests spending some time editing them to bring out their best features. While it's tempting to rely on filters, she emphasizes the importance of fine-tuning adjustments like contrast, brightness, and saturation to enhance your image while keeping it natural.
Editing apps like Lightroom or Snapseed are popular among smartphone photographers because of their advanced features. Yevette advises using these apps to sharpen details, correct colors, and remove any distractions from your image. A little editing can turn a good photo into a great one.
5. Experiment and Practice Regularly
Finally, Yevette Heiser stresses the importance of practicing and experimenting with different techniques. “The more you practice, the more you'll discover what works for you,” she explains. Whether it’s playing with different lighting setups, trying out new angles, or experimenting with editing tools, constant experimentation helps you develop your own unique style as a photographer.
Conclusion
In summary, Yevette Heiser - Reveals How Photography Techniques Can Elevate Your Smartphone Images by focusing on understanding light, mastering composition, using manual settings, and refining your images with editing. By following these expert techniques, you’ll be well on your way to creating stunning, professional-looking photos with nothing more than your smartphone. Remember, practice is key, so keep experimenting and have fun capturing the world around you in beautiful new ways.
10 notes
·
View notes
Note
I’m sorry if it was already asked by someone, but what materials do you use for your traditional art?
Heya!!
Okay this will be a bit of a longer reply since over the years I do art I've accumulated a lot of tools, but I'll try to write it in a "digestible" way under the cut.
1. Sketchbooks
I am an easy woman, I like sketchbooks that have a lot of pages, can handle multiple tools and doesn't cost me a fortune. So far the winner in this is Canson XL for mixed media.
2. Sketching
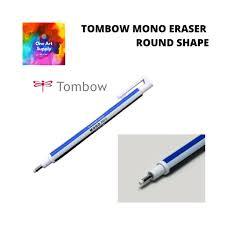
For my sketching and pencil doodles I use mechanical pencils in size 0.5 and 0.3 with HB lead, it's the easiest one to erase and it doesn't smudge, not any preference in a brand, just don't really use the light plastic ones since they tend to creak.
For erasing I use a combination of kneadable eraser and tombow mono eraser for more precise things.
3. Lining
tombow fudenosuke!!!!! Best marker ever, doesn't smudge under water nor alcohol markers and has flexible nib.
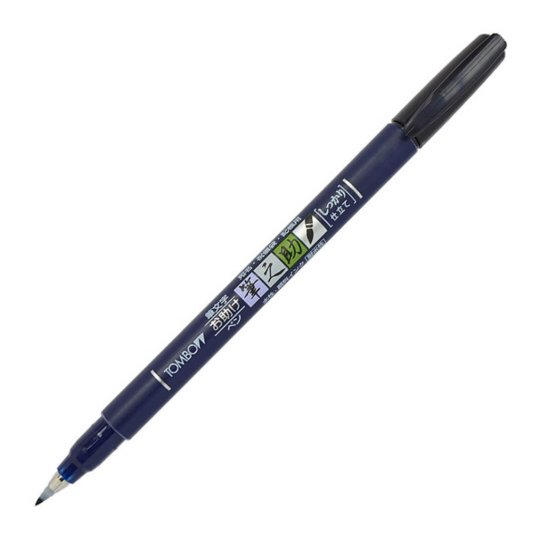
If you're not a fan of the flexible nib, my other go to are either liners from Uni-pin or microns
4. Coloring
For my marker pieces like this one :
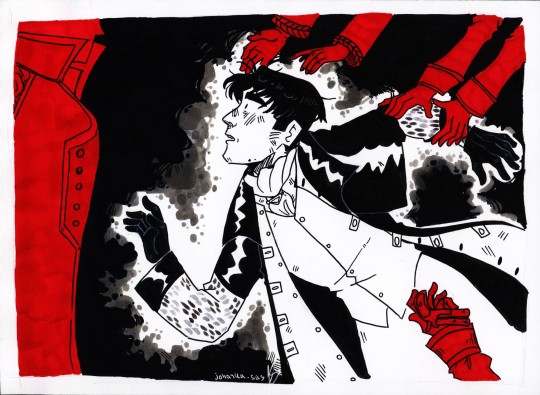
I use the cheapest off-brand alcohol markers I bought in a big set on AliExpress. They're great for personal work but not that much if you're planning to display it anywhere, the color gets immediately eaten by sun
For my watercolor pieces like this
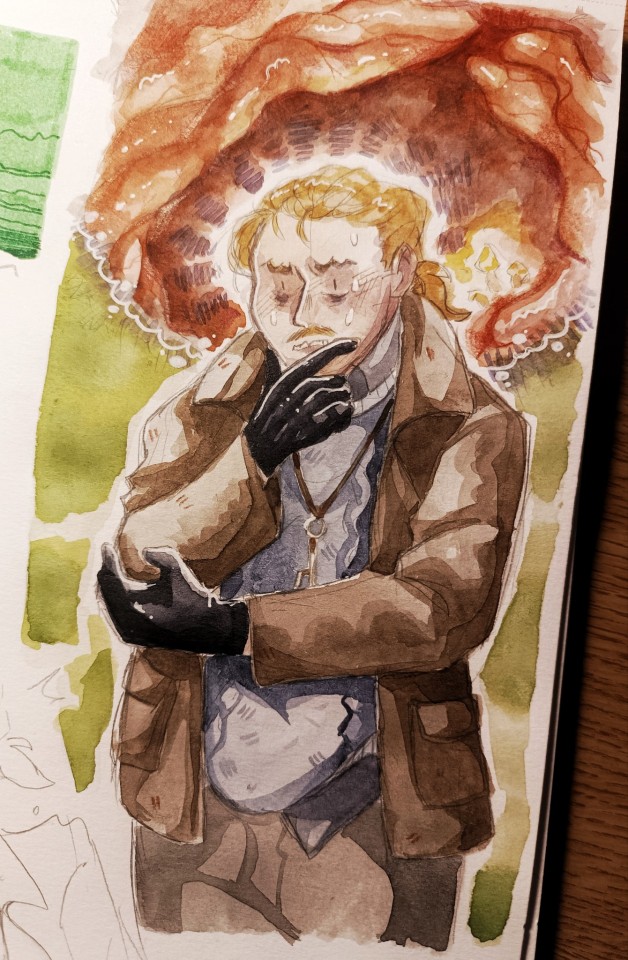
I now use white nights watercolors :]
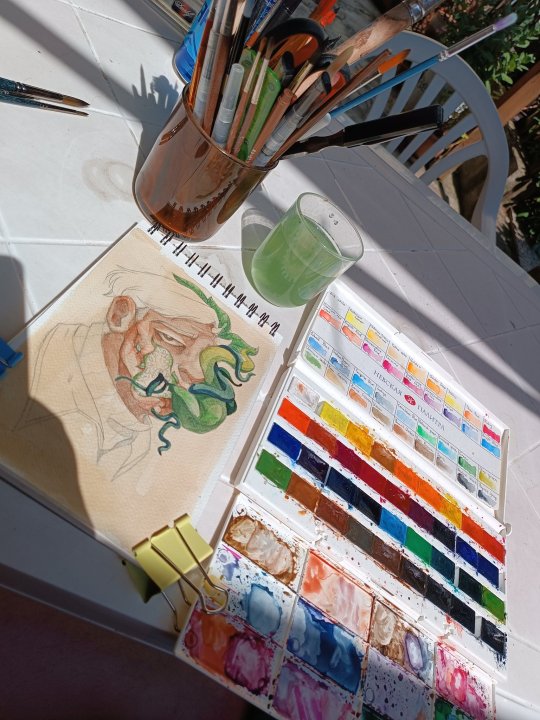
The set of 36 to be exact and some random brushes I also accumulated over the years.
Before investing in white nights I used watercolors from Koh-i-noor, that looked like this :
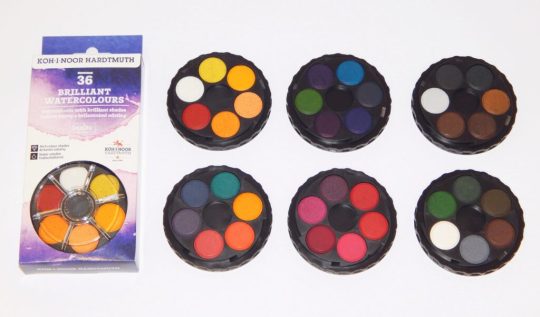
And are much cheaper (in Czechia, dunno the prices out of the country)
For white highlights I use Sakura gelly roll pens. I tested out different brands too and these do their job the best.
5. Scrapbooking/ collage backgrounds
For backgrounds like this:
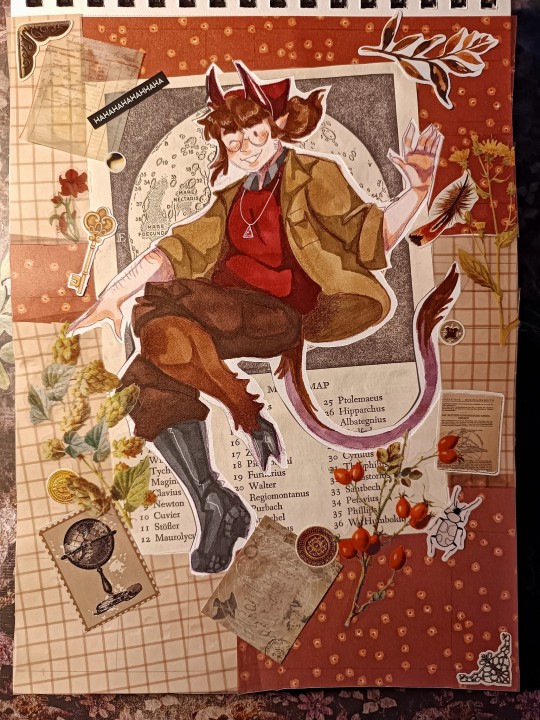
I accumulated over some time a lot of scrapbooking papers and stickers either from action or AliExpress, but also sometimes I use cut outs from magazines I get for free.
For precise cutting I use a precision craft knife, but before that I just used a box cutter knife, just don't press too hard.
Also a very good thing to get is a light pad, again AliExpress is your friend in this, and tbh before moving to the light pad, I used to shine my phone camera under the paper.
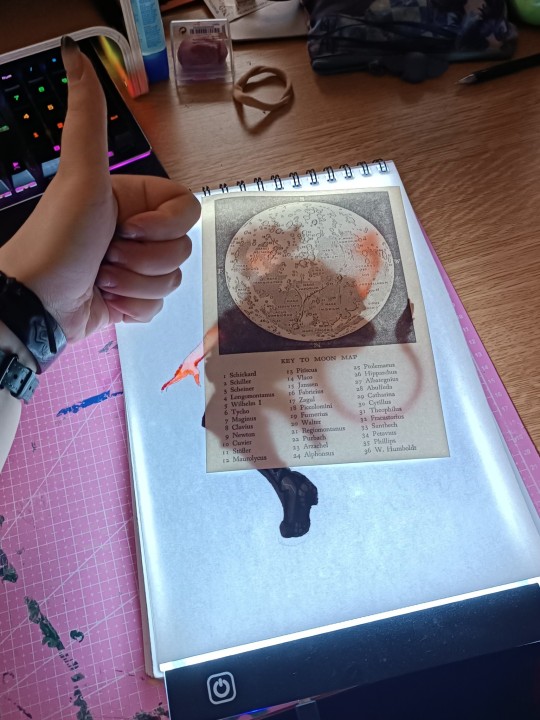
Makes the cutting muuuuuch easier.
And last but not the least
6. Taking photos of your art/ scanning
Phone camera + Snapseed is god tier combo for me, there are so many tutorials on YouTube how to edit the photos into full crispy quality.
But between my friend group it's well known that I am not very good at taking photos, so I scan most of my things.
Just a disclaimer that a good scanner is a very expensive thing ... But if you're willing to go through some loops, you can get a very neat CCD scanner from second hand for very cheap, sadly most of the time the cheap ones are very old and it took a lot of prayers and IT friend to set that thing up :DDD
So that's all I can think of right now, don't forget I got all these things over the years, and still I tend to draw or doodle with pretty cheap low quality things, since I believe that art can be made with everything... The more professional tools just tend to make things easier, but still it's better to test it out a bit before fully jumping into buying big expensive sets.
I wish a lot of luck with creating and don't be scared to experiment :3
#me žblptin#long post#art tips#jojka's creations#traditional art#i hope that my rambling is understadable-
12 notes
·
View notes
Text
Yvette Heiser - Perfect Self-Portraits: Creative Photography Ideas You Can Learn Quickly
In today’s world of social media and digital expression, mastering the art of self-portraits is more relevant than ever. A perfect self-portrait isn’t just about taking a picture of yourself—it’s about telling a story, capturing emotions, and creating an image that resonates with you and your audience. Inspired by Yvette Heiser – Creative Ideas For Perfect Self-Portraits, these photography tips are designed to help both beginners and enthusiasts elevate their self-portrait game effortlessly.

1. Experiment with Lighting
Lighting can make or break a photograph. For self-portraits, explore natural light by positioning yourself near a window during the golden hour. Soft, diffused light creates a flattering glow, while direct sunlight can add dramatic shadows for a more artistic touch. Don’t hesitate to experiment with artificial lighting, like LED panels, ring lights, or even string lights, for unique effects.
Quick Tip: Use household items like lamps or candles to create moody and atmospheric portraits.
2. Use Props to Add Personality
Props can transform a plain self-portrait into a captivating story. Incorporate items that resonate with your personality or the theme of your photo. It could be a book, a musical instrument, or even a cup of coffee. Props not only enhance the visual appeal but also help convey your individuality.
Quick Tip: Make sure your props enhance the overall composition without dominating or distracting from the main subject.
3. Play with Angles and Perspectives
Angles can significantly alter the mood of your self-portrait. Instead of sticking to traditional front-facing shots, experiment with high angles, low angles, or even side profiles. Using a wide-angle lens can create a unique perspective, while close-ups emphasize facial expressions and details.
Quick Tip: Use a tripod or a sturdy surface to keep your camera steady and experiment hands-free.
4. Incorporate Reflections
Reflections add depth and intrigue to your self-portraits. Use mirrors, water surfaces, or reflective objects like glass windows to create stunning visuals. The layered effect of reflections adds a dynamic quality to your photograph.
Quick Tip: Position the camera to include both your reflection and some surrounding elements for added context.
5. Leverage Negative Space
Negative space—the area around your subject—can make your self-portrait feel more expansive and balanced. Use simple backgrounds or minimalistic settings to highlight yourself as the focal point. This technique works well for both dramatic and serene compositions.
Quick Tip: Experiment with blank walls, open skies, or uncluttered environments.
6. Experiment with Motion
Motion in self-portraits adds a sense of dynamism and life. Try tossing your hair, spinning, or walking while the camera captures the action. A slow shutter speed can produce a soft, blurred effect that beautifully highlights motion and adds a dreamy quality to your image.
Quick Tip: Use the timer or remote shutter feature to capture motion without assistance.
7. Focus on Your Eyes
Often called the windows to the soul, the eyes play a crucial role in self-portraits, offering a way to express deep and compelling emotions. Ensure your eyes are sharp and well-lit, as they naturally draw attention.
Quick Tip: Use your camera's focus settings to lock onto your eyes before taking the shot.
8. Explore Post-Processing
Editing is where your self-portrait truly comes to life. Experiment with filters, color grading, and retouching to enhance your image. Software like Adobe Lightroom or mobile apps like Snapseed can make a huge difference in the final look.
Quick Tip: Stay authentic—edit to enhance, not to overdo.
9. Add a Creative Concept
A concept can elevate a self-portrait from good to unforgettable. Think about themes, moods, or stories you want to convey. For example, dress in vintage attire for a nostalgic feel or incorporate bold colors for a vibrant vibe.
Quick Tip: Plan your concept in advance, including wardrobe, props, and background.
Final Thoughts
Perfect self-portraits are a blend of creativity, technique, and personal expression. By experimenting with lighting, props, angles, and editing, you can quickly develop the skills needed to create stunning, standout images. Drawing inspiration from 10 Secrets About Yvette Heiser Photography You Can Learn From TV, you’ll discover new ways to refine your approach and make each shot uniquely yours. Remember, practice is key, and there’s no right or wrong—just your unique perspective.
Now, grab your camera or smartphone, unleash your creativity, and start capturing self-portraits that truly reflect who you are!
#moments#wedding#camera#photographer#pictures#childphotography#photography#yvette heiser#photographytips#events
11 notes
·
View notes
Text
A very nice person (sorry, I must have fat-fingered my response and it went POOF) asked what processes I use to create my art. It's been a mixed bag tbh, since in a lot of ways I'm still finding my style. Primarily, I use a sort of photo-collage I keep building on (my own photos and some stock photos), and when it feels done, I'll run it through something like StarryAI at 100%, so basically all it's doing is refining/blending the piece, not creating it. Aside from the StarryAI, all the other apps I use are free: Snapseed, PicsArt, Galaxy Enhance.
2 notes
·
View notes
Note
*eyes glued to cute and aesthetic journals!*
Hi!
How do you make your photos of your entries so beautiful and aesthetically pleasing???😁😍
They look like they should be in a photo album or something! 😁
This made my day! I never know if my own photography is any good until someone mentions it to me, so thank you so much for that!
I don’t know a lot about photography, but I can tell you what I’ve picked up over the years:
TL;DR: Play and experiment with texture, depth, lighting, shadows, and angles. Snapseed is an app that allows you to easily edit your photos, but lately I’m feeling limited by it.
1. I start with a wooden background because I like nature and it makes me think of trees. To add a bit of color and more texture, I then lay down some sort of fabric/cloth towards the top of my wooden background. In my photos, I’m often using scarves to add texture.
2. I place down my notebook on top of the wooden piece/fabric, then I lay some dried flowers around it because, again, I like nature. I find dried baby’s breath to be elegant, dainty, with a nostalgic feel in the right light. Don’t flatten them to dry them—hang them up by string so they keep their shape and add depth to the photos. I hung mine up by the cords of my blinds. They’ve lasted me years so far.
3. Most importantly, play with lighting and shadows. I’ve found that natural sunlight makes for a far better photo than artificial lighting, which may mean you need to have patience to find the right location and time of day to take your photos. I have these three windows (I think they’re called bay windows?) that face to the west, I believe. In the late afternoon, the sunlight shines through my sheer curtains with a warm glow. The sheer curtains also create interesting shadows, which helps create an aesthetic I like.
4. I mostly do flat lay photos taken from above, but I’m trying to experiment with angles more. This is definitely something I need to work more on, but my suggestion is to take multiple photos from a variety of angles. Look away from the camera/phone for a little while before comparing your photos to each other and choosing which one(s) to use.
5. I edit most of my photos in Snapseed. It’s easy and intuitive to use. I play with brightness, contrast, filters, and sometimes white balance until I get the look I want. I enjoy adding a vignette to my photos because I can make the photo a bit darker while keeping the focus of the photo (my notebook) in brighter light so it’s nice and clear to the viewer. Snapseed is pretty intuitive, but lately I’ve been feeling limited by it, so perhaps it’s time for me to branch out a bit. We’ll see. For now, I need things to be quick and easy, though, because I lack time and energy.
Phew. 😮💨 That was a long explanation of my process, but I hope it helps. And if anyone has any other tips to add, I’d love to hear them! I want to expand my amateur photography skills.
11 notes
·
View notes
Text
Beginner's Guide to Mobile Photo Editing: Tips & Tricks to Get Started
The Complete Guide to Mobile Photo Editing: Enhance Your Visuals Like a Pro
The rise of mobile photography has transformed how we capture and share moments. Whether you're an aspiring influencer, novice photographer, or entrepreneur, learning to edit photos on your phone is essential to stand out. With powerful apps and expert help from services like UK Clipping Path, you can elevate your mobile visuals to professional standards.

Mobile Photo Editing: The Basics and Its Importance
Modern smartphones double as cameras and editing studios. With social platforms like Instagram and TikTok demanding visual excellence, photo editing has become more than just optional—it’s a necessity. If you want to learn more about mobile photo editing tips for beginners, feel free to visit our blog. Here's why mobile photo editing matters:
Make Photos Captivating: Transform average shots into artistic visuals with ease.
Save Time: Edit on the go—no computer needed, perfect for busy schedules.
Affordable: Many apps are free or low-cost, making photo enhancement accessible to everyone.
Personalized Editing: Tailor your photos anytime, anywhere to match your style or brand.
For professional-level results, especially in product photography, a jewelry photo editing service can elevate your images with precision and polish that mobile apps often can't match.
Step-by-Step Guide to Editing Photos on Mobile
Step 1: Choose the Right App
Pick an app that suits your needs:
Snapseed (great for post-processing)
Adobe Lightroom Mobile (excellent for color correction and Professional photo retouching
VSCO (best for filters)
PicsArt (for creative edits)
Canva (ideal for adding text/graphics)
Step 2: Master Basic Tools
Understand core editing features:
Crop & Rotate: Frame your photo perfectly for better composition. Brightness & Contrast: Adjust the light balance to enhance visibility and depth. Saturation & Vibrance: Make colors pop without overdoing it. Sharpness: Define details to make the subject stand out. Temperature & Tint: Fine-tune warmth and color tones for a natural look.
For consistent and professional results, especially in product photography, using an ecommerce photo editing service can streamline these adjustments and ensure your images are optimized for online platforms.
Step 3: Improve Composition
Rule of Thirds: Use grids to balance the photo.
Leading Lines: Direct the viewer’s focus.
Framing: Use objects to center your subject.
Negative Space: Let the subject breathe visually.
Step 4: Enhance Color
Use HSL tools in Lightroom to fine-tune hues.
Moderate saturation to avoid artificial looks.
Experiment with color grading for a unique aesthetic.
Step 5: Retouch to Refine
Utilize tools for:
Spot Healing: Remove blemishes or distractions.
Texture Cloning: Blend out unwanted elements.
Skin Smoothing: Perfect for portraits.
Step 6: Use Filters and Presets
Create a consistent visual style.
Save time with pre-designed adjustments.
Manually tweak presets for personal flair.
Take Your Edits to the Next Level with UK Clipping Path
Mobile editing is powerful—but it's just the beginning. To truly achieve polished, professional-grade visuals, consider combining your efforts with UK Clipping Path’s expert services.
Here’s how UK Clipping Path can help:
eCommerce photo editing service: Make your products pop with enhanced colors, lighting adjustments, and clean visuals that drive sales.
Background removal service: Eliminate distractions for sleek, focused imagery.
Clipping path service: Precisely separate your subject for clean edits—ideal for catalogs and ads.
Jewelry Retouching service: Perfect for capturing fine details and brilliance in jewelry shots.
Photo retouching services: From blemish removal to detail enhancement, perfect every pixel.
Image masking services: Handle hair, fur, or transparent objects effortlessly.
Professional photo retouching: Advanced edits tailored for businesses and high-end creatives.
Shadow creation: Add natural depth and realism to product images.
Photo restoration: Revive old or damaged photos with care.
Ghost mannequin services: Present apparel professionally by removing mannequins while preserving garment shape.
Bulk editing services: Scale easily with fast turnaround and consistent quality.
Why Work with the UK Clipping Path?
Consistency: Uniform edits across all your photos.
Efficiency: Save time by outsourcing complex edits.
Scalability: Handle large projects effortlessly.
Quality: Access studio-level enhancements beyond what mobile apps offer.
Ready to Take the Leap?
Mobile photo editing can help you shine, but if you want to reach the professional level, trust the UK Clipping Path. Whether you’re enhancing product shots or polishing lifestyle images, we ensure top-tier results.
Get started today with a free trial and experience the difference of expert photo editing.
1 note
·
View note
Text
FAQ’s
Frequently asked questions to eeeaaasseee your mind :)
1. Can I recolour your CC?
Yes! Recolours and retextures are a-okay in my book, you don’t even have to ask first! Just please credit me and link to the original CC. My full TOU can be found here.
2. Is your CC free?
Yes! My stuff will ALWAY be free unless it is a commission. I sincerely doubt I will ever start a Patreon, although maybe one day I will have a Kofi donation page.
3. How do you start making a sim? What’s your process?
If it is a celebrity sim, or a sim of a fictional character like Arthur Morgan, I will always go CC shopping first! I usually start with the hair, then if the sim has particularly iconic outfits (e.g. Fran Fine) I will find as close as possible. Sometimes this is really easy, as with @plazasims RDR2 Outfits, but sometimes I have to be a little creative! Then, I always try to create the sim from Pinterest references first. I usually take a few hours away from it so I can see it again with fresh eyes, and it is usually at this point where I will introduce a photo overlay. Essentially, I will overlay an image onto The Sims 4 window and have my sim and the photo side by side. Laying the photo directly on top and ‘tracing’ is a BAD idea! You can’t see the real sim underneath! Usually looks WEIRD afterwards. If I’m feeling stuck, finding a reference on Pinterest at a 3/4 angle and editing my sim in that view helps a lot! It gives you a fresh perspective and often sorts out problems you didn’t even know you had.
4. What’s your main save?
My main save is (totally cliche, I know) actually my Simself in PlumbobKingdom’s save file! It’s INCREDIBLE, and makes the game so much more fun and interesting with the variety of locations, and everything just looks SO much nicer!
5. Who’s the favourite sim you’ve made so far?
I secretly LOVE my Maxwell Sheffield sim, I think he looks awesome. I love my Arthur Morgan Redux, too, and I’m really looking forward to making Bree Van De Kamp! Might develop it into a DH series if the response is positive enough :)
6. How do you edit your screenshots and/or do you render your sims in Blender?
I don’t render my sims in Blender, as I can’t use TS4 Sim Ripper! I am a Mac user. My photo editing process; taking screenshots in CAS using Trait poses, and photos in game using poses and @ravasheencc Full Control Camera. I then use Picsart on iOS to knock up the composition, Snapseed to clean up the photo (sharpen, colour balancing, glow, vignette etc) and Clipdrop Relight (online) for the lighting.
2 notes
·
View notes
Text
After creating the hooded belero I took two images that I then edited in Snapseed.
Ideally I wanted to go to Deborah and use the DSLR camera, create effects and drama, but unfortunately time ran out.
So here are the two images I took trying to capture sadness. In the form of my reluctant daughter. Curled up in a posture to suggest sadness. Showing the empty space all to the left of the sofa. And how incredibly lonely sadness can be.


Like I said I had hoped to use the DSLR camera. The intention had been to take a series of images, with and without effects, make a video/slideshow and add music. The song I would have used was Billie Eilish- What was I made for.
youtube
2 notes
·
View notes
Text
Yevette Heiser - Shares Her Secrets: Phone Photography Tips for Texas Beginners
"In the ever-growing world of photography, phone photography has emerged as an accessible and creative way to capture stunning images. Whether you’re strolling through the vibrant landscapes of Texas or taking candid shots at home, Yevette Heiser Texas: A Complete Guide to Mastering Phone Photography offers practical tips for beginners to elevate their phone photography game."
Why Phone Photography Is Perfect for Beginners
Photography can seem daunting to those just starting out, but the convenience of smartphones makes it easy to learn and experiment. As Yevette Heiser highlights, “The best camera is the one you always have with you.” For Texans exploring everything from sprawling deserts to city skylines, your phone becomes your ultimate creative tool.
Here’s a step-by-step guide, inspired by Yevette Heiser’s advice, to help beginners master phone photography.
1. Understand Your Phone’s Camera Features
Before diving into photography, familiarize yourself with your phone’s camera settings. Most smartphones today offer features like HDR, portrait mode, night mode, and manual controls.
Tip from Yevette Heiser: Explore each setting to understand how it affects lighting, focus, and color. HDR, for example, balances light and dark areas in landscape shots—perfect for Texas sunsets!
2. Focus on Lighting
Lighting is the key to any great photograph. Yevette Heiser advises beginners to shoot during the “Golden Hour” — the first hour after sunrise and the last hour before sunset. Texas, known for its beautiful skies, provides the perfect backdrop during these hours.
Pro Tip: Avoid using flash, as natural light creates a more authentic look. Use window light indoors or experiment with shadows for creative effects.
3. Master Composition Techniques
Framing your subject correctly can turn an ordinary shot into a masterpiece. Use basic composition techniques like:
Rule of Thirds: Place your subject off-center for a visually appealing image.
Leading Lines: Roads, fences, and trails in Texas landscapes naturally draw the viewer’s eye into the photo.
Yevette Heiser emphasizes practicing these techniques to develop your unique style over time.
4. Keep It Steady
A shaky hand can ruin an otherwise great photo. Stabilize your phone by using both hands or resting it on a solid surface. You can also use inexpensive tripods or timers for sharp and professional-looking images.
5. Edit Like a Pro
Editing is where your phone photos come to life. Use editing apps like Snapseed or Lightroom Mobile to adjust brightness, contrast, and colors. According to Yevette Heiser, editing should enhance the photo, not overwhelm it. Subtle changes often make the biggest difference.
Why Texas Is a Perfect Playground for Phone Photography
From the wide-open spaces of Big Bend National Park to the iconic urban architecture of Dallas and Austin, Texas offers endless opportunities for beginners to practice. Capture the vibrant culture, landscapes, and Texan charm using Yevette Heiser’s tips.
Final Words of Advice from Yevette Heiser
Phone photography is all about experimenting and having fun. Yevette encourages beginners to shoot daily, observe details, and never stop learning. Every shot you take brings you closer to mastering the art.
"Whether you’re a Texan capturing memories of your state’s beauty or a beginner exploring photography, follow these tips to make your phone photos stand out. Tips from Yevette Heiser for beginners to get started in photography show us that the journey to becoming a skilled photographer starts with curiosity and the phone in your pocket."
7 notes
·
View notes
Text
Mastering the Art of Image Editing: Unveiling the Secrets to Stunning Visuals
In the dynamic and visually-driven digital landscape, image editing has become an indispensable tool for individuals and businesses alike. From social media influencers curating eye-catching feeds to businesses enhancing product images for e-commerce, the demand for high-quality, visually appealing content is at an all-time high. In this comprehensive guide, we delve into the world of image editing, exploring its significance, popular techniques, and the tools that empower creators to transform ordinary visuals into extraordinary masterpieces.
The Significance of Image Editing:
Images are powerful communicators, capable of conveying emotions, telling stories, and leaving a lasting impression. Image editing serves as the catalyst that elevates visuals to new heights, making them more engaging and effective. Whether you're a professional photographer, a social media enthusiast, or a business owner, the ability to enhance and optimize your images is a game-changer in today's competitive digital landscape.
Key Techniques in Image Editing:
Color Correction and Grading:
One of the fundamental aspects of image editing is adjusting and enhancing colors. Color correction ensures accurate reproduction of hues, while color grading allows for creative manipulation, setting the tone and mood of the image. Professionals use tools like Adobe Lightroom or Photoshop to fine-tune colors and achieve a visually cohesive look.
Retouching and Enhancement:
Perfecting portraits or product images involves retouching and enhancing details. Removing blemishes, smoothing skin tones, and refining textures are common techniques employed to achieve a polished and professional look. Advanced tools such as frequency separation help achieve nuanced results without sacrificing realism.
Cropping and Composition:
The right composition can transform an ordinary image into a captivating one. Image editing tools provide the flexibility to crop, resize, and reframe images to improve their overall composition. Attention to composition is crucial for creating visually pleasing and balanced visuals.
HDR Imaging:
High Dynamic Range (HDR) imaging is a technique that combines multiple exposures of a scene to capture a broader range of light and detail. This is particularly useful in landscape photography, architectural shots, and any scenario with varying light conditions. HDR enhances the overall tonal range and details in an image.
Adding Filters and Effects:
Filters and effects are powerful tools for infusing creativity into images. From vintage looks to modern aesthetics, a plethora of filters and effects are available to cater to diverse preferences. These can be applied to evoke specific emotions or align with a brand's visual identity.
Tools of the Trade:
Adobe Creative Cloud:
Adobe's suite of creative tools, including Photoshop and Lightroom, remains the industry standard for professional image editing. With a wide range of features and capabilities, these tools offer unparalleled flexibility and control.
GIMP (GNU Image Manipulation Program):
GIMP is a free, open-source alternative to proprietary image editing software. Despite being free, GIMP provides a comprehensive set of tools for tasks ranging from photo retouching to graphic design.
Canva:
Canva is a user-friendly online platform that caters to both beginners and professionals. It offers a range of templates and tools for easy image editing, making it accessible to those without extensive design experience.
Snapseed:
For mobile users, Snapseed is a powerful and intuitive photo editing app. Developed by Google, Snapseed provides a wide array of editing tools and filters, making it a favorite among smartphone photographers.
Conclusion:
In the digital age, where visuals reign supreme, mastering the art of image editing is a valuable skill. Whether you're a seasoned photographer or a social media enthusiast, understanding the significance of image editing and familiarizing yourself with the essential techniques and tools will undoubtedly elevate the quality of your visuals. So, embark on this creative journey, experiment with different editing styles, and witness the transformative power of image editing in making your visuals truly stand out in the digital realm.
3 notes
·
View notes
Text
Yvette Heiser Texas: A Complete Guide to Mastering Phone Photography
In the world of photography, the evolution of smartphone technology has made it easier than ever for both amateurs and professionals to capture stunning images. One person who has embraced the power of mobile photography, particularly in the culinary realm, is Yvette Heiser Texas – All You Need to Know about Phone Photography, a Texas-based photographer known for her incredible phone-based food photography. Whether you’re an aspiring photographer or simply someone who loves taking food photos for social media, Yvette’s tips and techniques can help elevate your skills. In this complete guide, we’ll explore how to master phone photography through the lens of Yvette Heiser’s expertise, focusing specifically on the art of food photography in Texas.

The Rise of Phone Photography in Texas
Texas, with its vibrant food scene ranging from classic BBQ to innovative Tex-Mex and diverse fusion cuisine, provides the perfect backdrop for phone-based food photography. The state’s culinary offerings are diverse, and so too are the opportunities to experiment with phone photography. Yvette Heiser, a professional photographer from Texas, has been at the forefront of this shift, demonstrating that high-quality food photos don’t need expensive cameras or advanced technical skills—just a well-composed image captured with the right smartphone. Smartphone technology has improved dramatically over the past few years. With advanced lenses, computational photography features, and powerful editing apps, today's phones are equipped to produce professional-grade images. Key Techniques for Mastering Phone-Based Food Photography
If you're interested in mastering Yvette Heiser — Exploring Phone-Based Food Photography in Texas, food photography like Yvette Heiser, here are some key tips and tricks that will help you get started:
1. Lighting Is Everything
One of the most important elements of any good photograph is lighting. In food photography, natural light is often the best choice. Yvette Heiser is known for utilizing soft, diffused light to make her food photos appear vibrant and appetizing. Natural light highlights the textures and colors of the food, making it look fresher and more appealing. If you're shooting indoors, try positioning your food near a large window to take advantage of the available light. Avoid harsh direct sunlight, which can create unflattering shadows and overly bright spots. If you’re shooting outdoors, the golden hour—just before sunset or after sunrise—is the perfect time for soft, warm light.
2. Focus on Composition
Composition is key to creating a well-balanced image. Yvette Heiser emphasizes the importance of framing the shot to create visual interest. One popular technique she often uses is the "rule of thirds," which involves dividing the image into three equal parts both horizontally and vertically. The subject of your photo, whether it's a plate of food or a single dish, should be placed along these lines or at their intersections to create a more dynamic and visually appealing photo.In addition to the rule of thirds, consider experimenting with different angles. Top-down shots work well for dishes like bowls, flatbreads, and any spread-out foods, while close-up shots from a lower angle can highlight textures and layers in more three-dimensional dishes, like burgers or stacked tacos.
3. Editing Your Photos
After capturing your shot, the next step is editing. While Yvette Heiser’s raw photos are incredible on their own, editing is often necessary to make the final image stand out. Fortunately, there are a number of editing apps available for smartphones that can help enhance your photos, even without professional editing software.Apps like Snapseed, VSCO, and Lightroom allow you to fine-tune elements such as brightness, contrast, saturation, and sharpness. When editing food photos, it’s important to keep the colors vibrant and true to life while avoiding over-saturation or overly dramatic filters that can make the food look unnatural.
4. Pay Attention to Details
In food photography, the details matter. Whether it's a garnish, the drips of sauce, or the steam rising from a hot dish, small touches can make your photo feel more realistic and immersive. Yvette Heiser is a master at capturing these tiny details, which help to tell the story of the food.If you're photographing a dish, consider adding texture through props like cutlery, napkins, or even a wooden board. These props can add context and tell a story, making the photo more engaging. The angle and placement of these elements can also help highlight the food in an interesting and dynamic way.
5. Storytelling with Food
One of the key aspects of Yvette Heiser’s approach to phone-based food photography is storytelling. She doesn’t just take photos of food—she captures moments. Whether it’s a shot of a chef preparing a dish or a close-up of someone taking a bite of a delicious taco, Yvette’s images evoke a sense of connection between the viewer and the food.To incorporate storytelling into your own food photography, think about the emotion you want to convey. Are you showcasing a festive meal with friends or a quiet, intimate moment with a cup of coffee? Your composition, lighting, and props should all work together to communicate this narrative.
Conclusion
Mastering phone-based food photography, especially in a place like Texas, offers a chance to capture the essence of the state's culinary diversity and share it with the world. By following the tips shared by Yvette Heiser, you can create vibrant, mouth-watering photos that reflect your love for food and photography. Remember, phone photography is about creativity and experimentation. The more you practice, the better you’ll get at capturing those delicious moments. Whether you’re snapping photos for social media or simply documenting a meal, these techniques will help you elevate your food photography to new heights.
#camera#wedding#moments#pictures#childphotography#photographer#photographytips#yvette heiser#photography#events
7 notes
·
View notes
Text
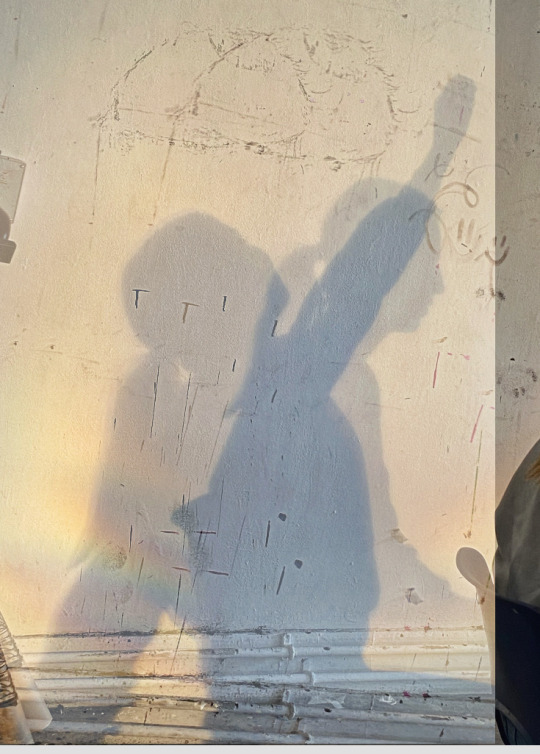
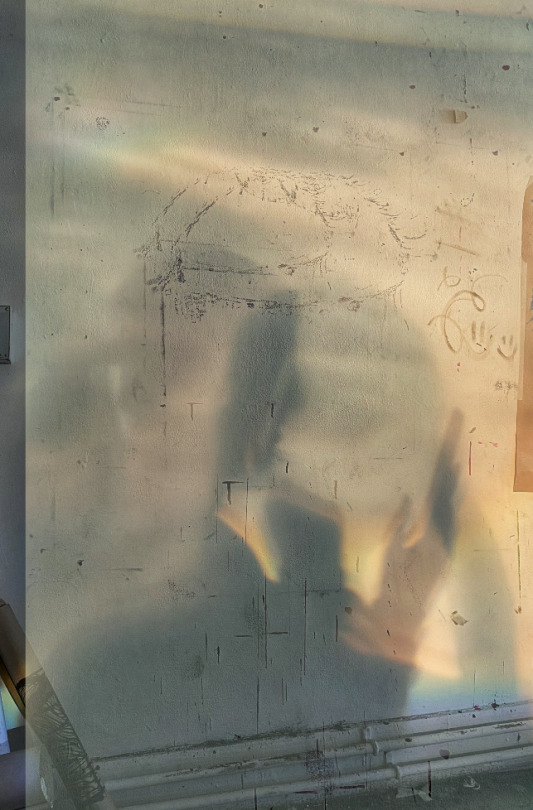
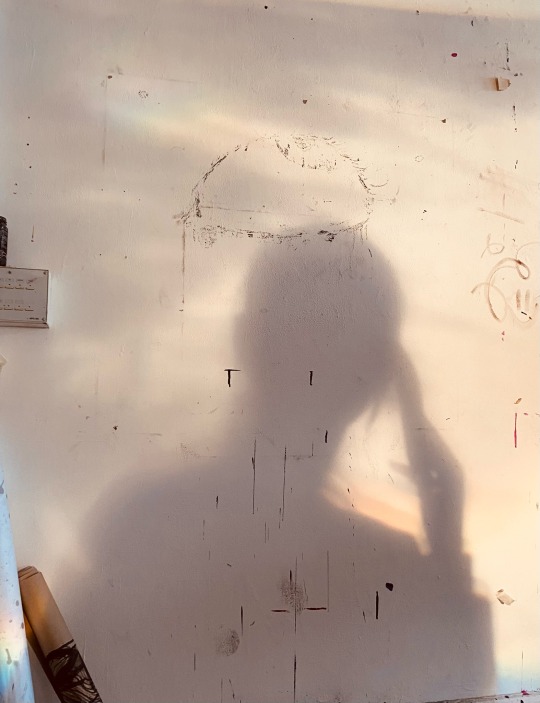
Disrupt Studio Day-9/11/23
I was researching more artists for inspiration and i came across an artist called Kumi Yamashita she is a Japanese artist based in New York , she is best known for her light and shadow sculptures constructed from everyday objects. Whilst i was researching i came across pieces she creates with light shadow figures which i will link

I thought her work was so creative and unique and i wanted to portray some shadow and light figures of my own . My idea was to replicate a memory and how it’s not completely clear as time has passed so the face becomes unclear and it might be as simple as an action or a feeling you are left with in your mind.
To do this i got a projector and used Chloe and Ella to model for me as my figures and i started taking pictures of them with the projector shining against the wall and Chloe and Ella sitting in front of the wall having a conversation .

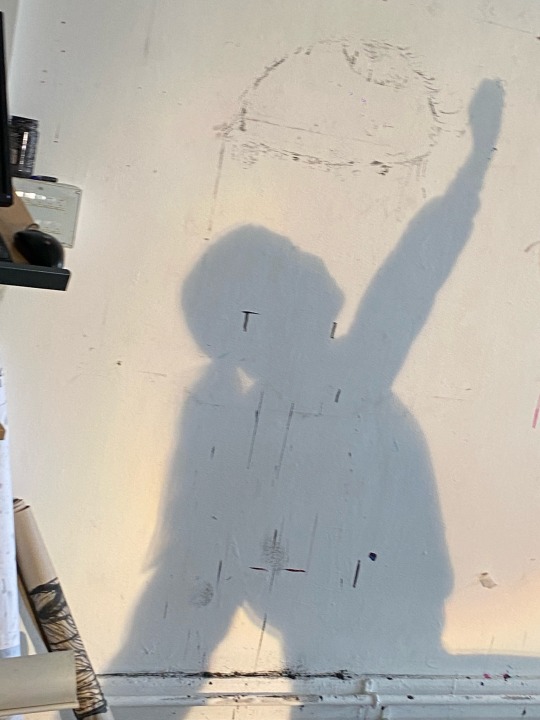
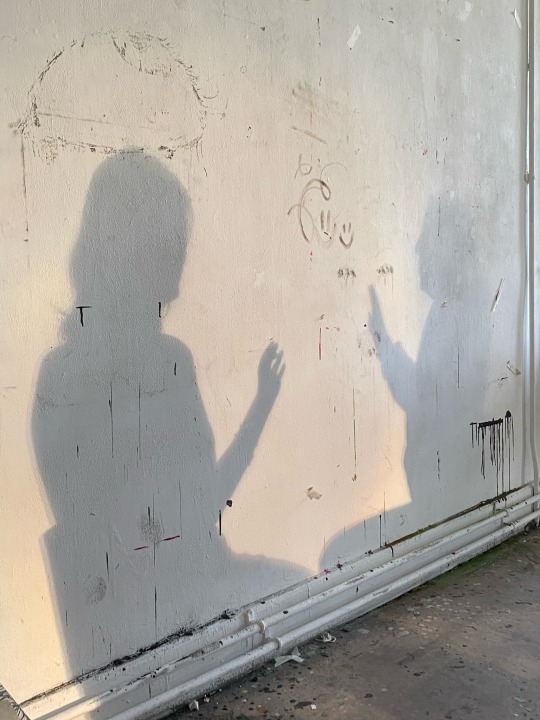
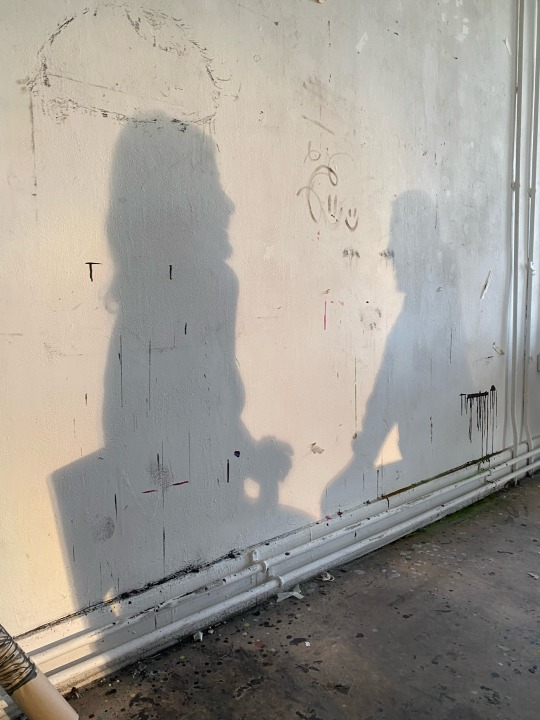
After that, i painted onto a piece of acetate just some simple brush strokes and used Chloe to model for me again and tried to create or resemble the memory with brain fog almost or just the memory becoming more unclear .
Lastly i edited some of the pictures on Snapseed and overlapped them on top of eachother and added some filters and made them almost hazy looking like a memory or a dream and i really liked how they turned out.

3 notes
·
View notes
Text
“Art of Diffusion” is a creative exploration of how form, color, and motion blend into one another—an artistic metaphor for ideas spreading, evolving, and transforming across space and time. The design uses diffusion-inspired gradients and geometric forms to create an abstract, energetic, and layered visual language.
This piece serves as the core identity or main visual pillar of a broader design series that will span across wallpapers, screens, digital posters, and creative UI aesthetics tailored for iPhone, iPad, and MacBook.
Tools Used:
Entirely made on iPhone using simple apps – proving that powerful visuals need only powerful ideas.
CREATE App – Shape construction & layering
PicsArt – Color diffusion, gradients
Snapseed – Final refinements and contrast tweaks
——————-
Design. Disrupt. Dissolve. is the next bold step under the Art of Diffusion umbrella.
It is a visual manifesto and philosophy-driven aesthetic series that reflects how modern creativity functions:
• Design. – The intention, structure, and system.
• Disrupt. – The courage to break norms, challenge structure.
• Dissolve. – The freedom to let go, blur boundaries, and evolve.


#ArtOfDiffusion#artists on tumblr#gradientdesign#minimalart#iPhoneMade#InkyMoon#digital art#wallpapers#Screens#visual concepts
0 notes
Text
How to Make a Professional PDF with Property Photos

Whether you're a real estate agent preparing a listing presentation, a homeowner selling privately, or a photographer creating a portfolio of properties, a sleek, organized PDF can make all the difference.
A well-made property photo PDF helps you communicate clearly, build trust, and leave a lasting impression. So, how do you make it?
6 Steps to Create Professional Real-Estate PDFs
Here's a simple step-by-step guide to help you create a polished PDF featuring your property photos:
Step 1: Gather Your Best Photos
Start by collecting high-resolution images of the property. Include shots of:
Exterior (front and back)
Living room, kitchen, bedrooms, bathrooms
Special features like pools, views, or renovations
Make sure your photos are sharp, well-lit, and in landscape orientation, if possible. Use editing tools (like Lightroom or Snapseed) to correct lighting or crop out distractions. However, if you are using a premium image-to-PDF tool like iSpeedPix2PDF, you don't have to do anything.
Step 2: Organize the Photo Order
Your PDF should look like a walkthrough. You want it to feel like a natural flow through the house. A good sequence might look like this:
Cover photo (often the best exterior shot)
Entryway and living spaces
Kitchen and dining
Bedrooms
Bathrooms
Backyard or balcony
Any special amenities (home gym, garage, etc.)
Name your files in order (e.g., 01_front.jpg, 02_livingroom.jpg, etc.) so they stay in sequence during upload.
Step 3: Add Descriptions
You can add brief captions below or next to photos to highlight features:
"Open-concept kitchen with quartz countertops and stainless steel appliances."
"Primary bedroom with ensuite and walk-in closet."
Descriptions help potential buyers or renters understand better. Keep it short—one or two lines per photo.
Step 4: Use iSpeedPix2PDF to Convert and Compile
Now, it's time to turn those images into a crisp, professional-looking PDF. For this, you can use iSpeedPix2PDF. It is a fast and user-friendly tool built specifically for real estate professionals. It lets you generate a polished PDF in seconds with high quality. It's FREE, so anybody can use it. Also, for a more advanced and ad-free experience, you just have to pay a one-time fee for lifetime use. YES, no annoying subscriptions!
Step 5: Add a Title Page
To give your PDF an even more professional look, consider adding a title page with:
Property address
Agent or owner name
Logo or contact info
A standout photo
Step 6: Save and Share
Once your PDF is ready, review it on your computer and mobile to make sure everything looks right. Then you're ready to share:
Email it to potential buyers or renters
Upload it to your website or MLS
Print it for open houses or listing packets
Final Thoughts
A clean, organized property photo PDF is a small step that can make a big impact. It shows you care about presentation—and in real estate, that often translates directly to interest and offers.
If you want to save time and get consistently beautiful results, iSpeedPix2PDF is worth a try. It's free to start and designed for professionals. Get the free premium trial now!
Download: iOS | Android
#Create professional PDF#property photos to PDF#Professional PDF scan#Free PDF converter App#iSpeedPix2PDF
0 notes