#doughnut tutorial
Explore tagged Tumblr posts
Visit Tumblr Blog
Explore Tumblr blogs with no restrictions, modern design and the best experience.
Last Seen Tumblr Blogs


Fun Fact
Tumblr is available in 18 languages.
Text
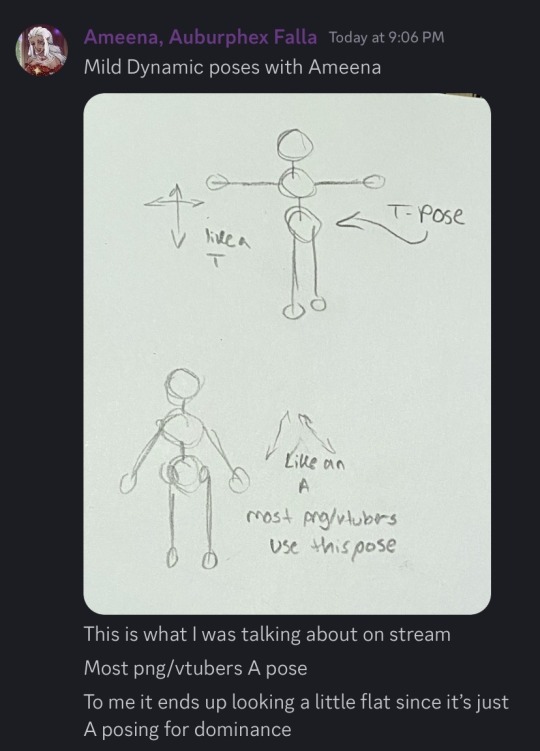
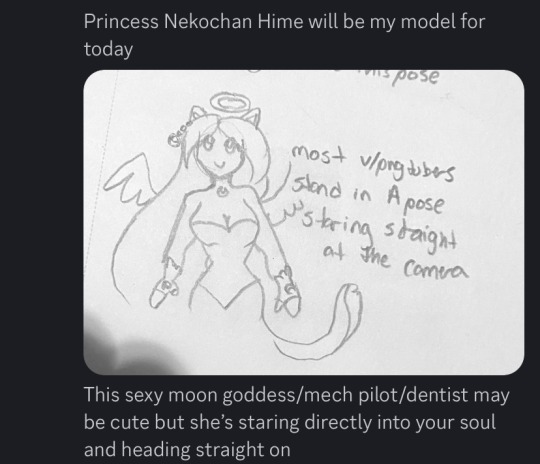
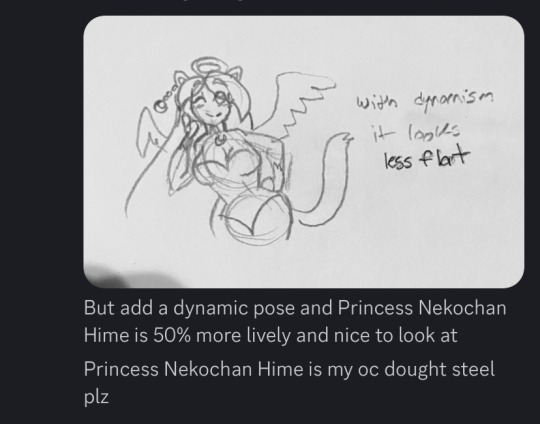
Mild Dynamic Poses with Ameena, featuring Princess Nekochan Hime
#fountainstrangerart#fountainstranger#oc#traditional art#art tutorial#Princess Nekochan Hime#doughnut steel
2 notes
·
View notes
Text
lads i’ve caved
#pulled up the blender doughnut tutorial#went at it for like an hour but man learning new skills is tiring good night
0 notes
Text


Monica Entertainment Center
Details:
100% My Mesh
8 New Meshes
Search [TBZ For Easy Find
Collection:
TV (tabletop & wall): 1 Swatch
TV Stand: 16 Swatches
Doughnut Vase (small & large): 10 Swatches
Incense/ Incense Vase (separated to change colors for each): 10 Swatches
Cable Box: 1 Swatch
Tv Remote (deco & override): 1 Swatch
Picture Frame (2 versions, digital package requires Moschino Stuff Pack): 9 Swatches
Tutorial For Photo Frame
Credits:
Instagram
Pinterest
Substance
Blender 4.2
Sims 4 Studio

Download

Do Not Share My Content (Always Free After 2-3 Weeks)
Recolors Allowed Do Not Include My Mesh
Do Not Use/Altar My Mesh To Make Your Own Content
DO NOT CONVERT TO ANY OTHER GAMES
Do NOT Share IN Discords, Facebook Groups or Give Away In CC Folders.
STOP PUTTING MY CONTENT IN FOLDERS AND PUTTING THEM BEHIND A PAYPALL
IF THERE ARE ANY ISSUES PLEASE BE SURE TO LET ME KNOW VIA MY IG DMS!!!!
IF YOU USE ANY OF MY CC PLEASE TAG ME ON IG I WOULD LOVE TO SEE IT
181 notes
·
View notes
Text
masterlist (2024)⋆.ೃ࿔*:・🪷

law of assumption and manifesting
how i write my scripts
a look into my own manifestation
some manifesting exercises
random success story
beginners guide to manifesting
robotic affirming
law of assumption ins and outs
reprogramming subconscious mind
rampaging with manifesting
valentines day prep challenge (day one)
valentines day prep challenge (day two)
valentines day prep challenge (day three)
valentines day prep challenge (day four)
valentines day prep challenge (day five)
valentines day prep challenge (day six)
valentines day prep challenge (day seven)
honeys tea on self concept (improved)
how i make affirmations tapes + affirmation tape
you know how to manifest
ways to apply the law
for when u think u "failed" at manifesting
reprogramming ur mind activity
building a new life and identity (remake)
what to do when the 3d hasn't aligned
how to deal with self doubt when manifesting
i pledge allegiance
how to manifest faster
dealing with the unfavorable
self care and beauty
for healthier hair
shampoo and conditioner recommendations
long list of self care practices
at home spa day
doll hand-book
maintaining a clean and fresh appearance
"your glowing"
general hygiene secrets and tips
hot girl summer prep
glazed doughnut skin secrets
things that are on my list to buy (beauty binder)
mental well being and healing
the feel better formula
the tea on self love
disconnect and heal
ways to feel better about ur appearance
sustained satisfaction
how to keep going
embracing being alone
for rest and relaxation
the happy pill
self care assessment
how to unwind
shadow work prompts
how to stop being toxic
how to feel enough
honeys girlblogging and that girl-ism
starting a video diary
how to deal with mean girls
ur guide to effortless glamor
little habits to adopt
embodying the wellness girlie aesthetic
the wizard liz mindset analysis
hyper girliness
dear diary
starting ur fitness girlie era
dopamine detox challenge
starting a collection
honeys guide to throwing a slumber party
HONEYS IT GIRL MAGAZINE - FEBRUARY EDITION
giving urself princess treatment
video dairy entry ideas
cultivating creativity and a deeper sense of self
starting and managing ur blog
how to be rich and luxurious
HONEYS BUSINESS INQUIRIES
a glamorous well being
incorporating luxury
HONEYS IT GIRL MAGAZINE - MARCH EDITION
productivity and self development
focusing on urself
getting seriously organized
honey's resource bundle
getting it together
a fresh start
trusting and betting on urself
becoming ur own project and self upgrading
reset routine
goal ideas
practicing self discipline
things to do while on a dopamine detox
making an effective planner
the art of conversation (from a professional yapper)
restocking and replenishing
school and studying
school notion tutorial
becoming an academic weapon challenge
studying methods + tips
how to get good grades without excessive studying
academic resources
ways im romanticizing school
pretty and well educated
notes from honey🎀🍰
places to go vision board
notes from honey - note one
notes from honey - note two
things that make my mornings a million times better
686 notes
·
View notes
Text
I've seen alot of people "wishing" they could make cc for the game but just wont because they dont know where to start or how to gainthe skill or that they are not knowledgeable enough
Listen.... Do you think i know everything there is to know about cc making??
NO
I started out by watching exactly 1/4th of the blender doughnut video and closed it out when i got bored after i learned blender Controls and everything before he gets to the sculpting part
Then from then on i just followed whatever tutorial duck duck go spat out for me that day
I STILL follow those tutorials till this day 3 years later for everything all the shadow bump specular maps all the hair frankmeshing all the clothes frank meshing recolors whight Transfer its all bookmarked tutorials pages that i have open once i sit down to make cc and close each gradually once im done with that step
Are my meshes perfect? NO FAR FROM IT they have issues sometimes i get lazy and skip steps (usually comes back to bite me in the ASS) but people still like them download them and use them so that should tell you something
It should tell you that you shouldn't stop yourself from learning blender Controls and fucking up those sims 4 meshes
You can do it
Trust me i know you can because i did it too
#this is inspired by me having to look at my earliest cc yesterday while i was moving stuff to patreon#i remember how clueless i was#i remember how hard everything was the first time#i remember even making an eyeliner was a massive task#now im thinking about going back and watching rhe rest of that blender video to learn more than frankmeshing#lol
58 notes
·
View notes
Note
Any tips for someone who wants to learn Blender?
thanks for the ask and yeah!
I think my #1 tip is when you get stuck look up youtube blender tutorials relevant to your project every time I have run into a road block on blender a youtube tutorial has saved me, I saved most of the tutorials that have helped me on this youtube playlist just for future reference for myself because I often forget the stuff I learn the first time implementing it into my own work but I realize that the playlist is probably a good tool for others too so feel free to check it out.
There's also a lot of good written info about blender on reddit and the user manual if you have better reading comprehension than me lol this comment on reddit is a really good example of how reddit can be really helpful
Have fun! Lots of people recommend starting on an easy blender tutorial like the classic doughnut and following it mostly to the letter and I get that if it's your first time opening blender but using the tools shown in a blender tutorial to make something you like, like your oc is really where you start to love the program and learn how to use it. At least that's how it worked for me, personally haha if I'm gonna spend months following tutorial/tutorials I need to be REALLY excited for the final product so make something you like with the tools given to you and that you find. Make what you draw, ocs, buildings, inventions, furries, plants, hahaha whatever makes you hyped about learning blender make that as many times as you need to tell you're happy.
53 notes
·
View notes
Text
wip wednesday
thanks @paperstorm @carlossreaders @annoyingcloudearthquake
I worked on a lot of things, nothing Christmas-y. hohoho
this art timelapse

I started womp, it's a 3D app.
This is a mouse being made while watching a tutorial.
no pressure tag!
@lightningboltreader @lemonlyman-dotcom @eclectic-sassycoweyes
@theghostofashton @fallout-mars
@herefortarlos @honeybee-taskforce @ladytessa74
@liminalmemories21 @freneticfloetry @chicgeekgirl89
@carlos-tk @cold-blooded-jelly-doughnut
@never-blooms @reyesstrand
@rmd-writes @goodways @bonheur-cafe
@alrightbuckaroo @orchidscript @welcometololaland
@strandnreyes @tinyluminaryzombie
@thisbuildinghasfeelings @paperstorm @nancys-braids
@heartstringsduet @carlos-in-glasses @tellmegoodbye
@ironheartwriter @decafdino @literateowl
@emsprovisions @sapphic--kiwi
@corsage @goodways @henrygrass @carlossreaders
@carlos-tk @alrightbuckaroo @carlos-in-glasses
@orchidscript @glittersocks7778 @the-126-family
@everlastingday @annoyingcloudearthquake
37 notes
·
View notes
Text
back-to-school thoughts
When I was a kid, the end of the summer holidays always brought around a wave of excitement. As much as I loved the six weeks we got off, going back to school was a whole new level of excitement. Going back to school meant a new start (I think my brain still functions on a September-to-September calendar), seeing friends I hadn't seen in all summer, and the opportunity to reinvent myself.
I would spend hours upon hours watching 'DIY stationery tutorials' and 'What's in my Bag' videos to try and recreate my image in the days leading up to the beginning of the year. I'd collect all my newest pens and pencils (which I would inevitably lose before the Christmas holidays) and pack my bag and anxiously wait for 8am the next morning so I could run off to school.
I couldn't wait to see which teachers I'd have, who was in my classes, and how I'd stack up against the milestones of getting older.
Now - as an adult in university who pretty much hated her last few years of school - the last few weeks of summer are rife with stress. The simplicity of childhood excitement has been replaced with a complicated cocktail of deadlines, money stress, and the pressure to constantly perform.
Yeah, university can be fun. I love my friends, I love my freedom, and I love the satisfaction of achieving my dreams. But the joy of learning that I felt when I was younger often feels crushed beneath an avalanche of essays, group projects, and the constant mental math of wondering where this takes me.
I sometimes think about the younger version of me - who read academic journals for fun - and wonder if I'll ever recapture the carefree excitement of a new academic year.
Maybe it’s not about recreating that feeling but reimagining it. It’s not about colourful pencil cases or new backpacks anymore (although, I love me a nice, new notebook or some cute pens). It’s about finding small joys in the chaos - coffee with friends, a doughnut during exam season - and reminding myself that growth, no matter how daunting, is worth it.
So here’s to all of us still navigating education, whether you are at school or university. I hope that this year is the best it could possibly be, no matter what your best looks like.
#it girl#just girly things#academia#girlblogging#just girly thoughts#school#this is what makes us girls#tumblr girls#university#morning routine#back to school#college#first day of school#student#school system#high school#self love#self care#self help#self improvement#that girl#pink pilates princess#clean girl#glow up#it girl energy#becoming that girl#psychology#self esteem#mental health#divine feminine
27 notes
·
View notes
Note
Hello! I first need to say that I greatly admire your art, I love how you come up with different pieces every time, each more beautiful than the last, you're genuinely a huge inspiration <3 😭
I wanted to ask, do you have more input on how you do your blender papercut-like animations? I know you did a quick tutorial on an artfight piece last year but, how would you explain it to someone who's completely unfamiliar with the software?
I'm maybe asking a lot tho, so instead, do you have any video tutorials you recommend?
Thank you for all the kind words!! I appreciate it so <3 ;u;
I did learn solely off youtube, but it was a very very long time ago. I recommend learning the basics of creating meshes and navigating the menus - a lot of tutorials exist out there (but I don't have any specific one in mind cause it's been forever). I DO remember doing the notorious blender doughnut for my first model though!
---
Additional documentation/tutorial to look up for this is
transparent materials
shape keys
basic keyframing and rigging
I'm sorry I can't provide specifics.. but I tried to put together a very bad overview video myself for the Caged Wish piece to try to walk through it.
youtube
85 notes
·
View notes
Text

starting to try out Blender, so of course I followed the doughnut tutorial. My computer is not equipped to handle this
82 notes
·
View notes
Text

MY FIRST EVER 3D RENDER!!!!!!!!!!!!! I've wanted to learn 3D art since 2019 but The Mental Illness TM Symbol has been stopping me... until yesterday!!!!!
I started with the classic doughnut tutorial because. Well. It's basically a rite of passage, isn't it? :P
50 notes
·
View notes
Text

I did the doughnut thing in blender!
First time really using blender, of course following blender guru's tutorial, and I think it turned out pretty good, although too realistic for my taste.
This was just a test thing, to learn to use the program, so I'm of course gonna go back to low-poly, because I prefer both the style and the process more than this more realistic style.
9 notes
·
View notes
Note
if/when you do decide to give blender a go, i recommend having an in-depth tutorial by your side, as i went in blind and it was quite painful :)
i know i’ll be making heavy use of tutorials for my second go…
o7 last time i tried i used the doughnut tutorial,, might do that one again sounds reasonable
i did also go work on some sewing instead of blender. and watch cinderellas castle ^_^
3 notes
·
View notes
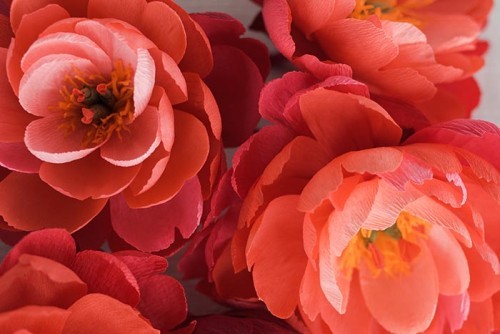
Text
DIY Paper Coral Charm Peony
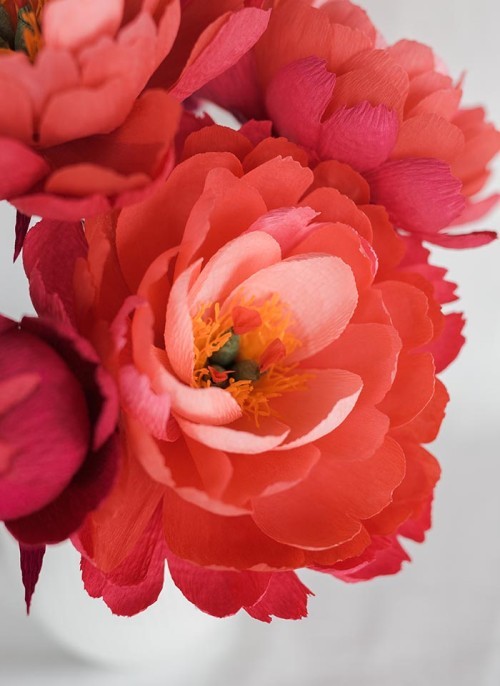
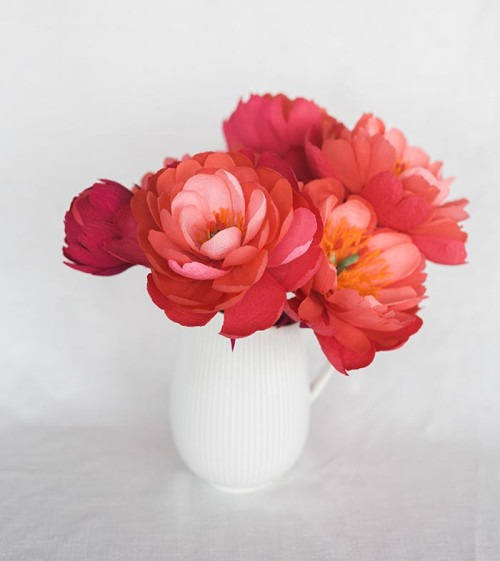
When West Elm Seattle asked me to design a paper flower workshop for February 13th — the day before Valentine’s Day — I immediately thought of Leslie Knope’s Galentine’s Day celebrations on Parks and Recreation. I loved the idea of creating a fun event to celebrate female friendship, and no flower seemed like a more fitting mascot for Galentine’s Day than the coral charm peony. It’s big, bold, bright, and stylish. It’s everything that sad grocery store roses are not.
I brought candy, gals brought pals, and we had a blast.
Project by Kate Alarcón:
In the interest of keeping the Galentine’s Day spirit alive year-round, I offer this tutorial. Order up some crepe paper from the wonderful Castle In the Air, invite some gals (and guys!) over, and whip up some peonies. (If you’d like to send one to a friend, but are more a paper flower admirer than a paper flower maker, I also have some finished flowers available in my shop.)
Finally, on the subject of wonderful gals: I’d like to give a shout-out to the very talented Natalie Lynne, who was the first flower maker I ever saw create a peony seed pod in this way. Check out her beautiful work on Instagram (@a_bloom_time)! —Kate Alarcón
A Note about the paper:
This peony is made up of layers of different weights and colors of crepe paper. The heavy crepe gives it most of its structure, while the fine and doublette crepe help it to look more delicate. If you’d like to try different weights and colors of crepe, don’t worry about layering them in exactly the same order. But some combination of heavier and lighter crepe will help to recreate the structure and texture of these. With the exception of the moss green from Papermart, I’ve used the color names from Castle in the Air to make ordering easier.
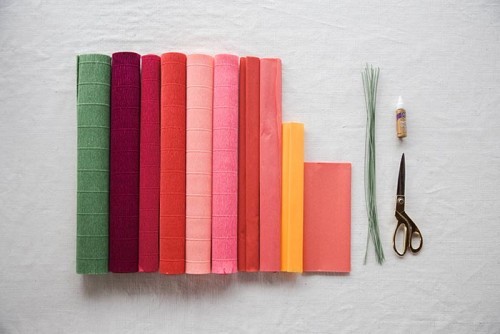
You will need:
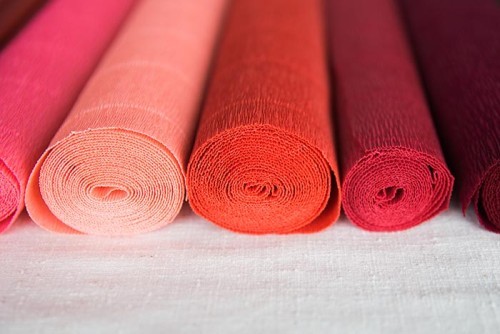
-Fine crepe (30-60 gram) in corals and reds for the petals, and orange or yellow for the stamens. I’ve used “Raspberry,” “Red,” and “Orange” from Castle in the Air.
-Heavy crepe (160 or 180 gram) in corals, reds, and pinks. I’ve used: “Peachy Pink,” “Candy Apple,” “Pink Pansy,” and “Burgundy” from Castle in the Air, and “Moss Green” from Papermart.
-Doublette crepe in “Light/Dark Salmon”
-Aleene’s original tacky glue
-Stem wire (18 gauge, cloth covered)
-Template (download here)
A note about grain:
The grain of the crepe paper runs parallel to the roll or fold. Crepe paper stretches horizontally, but not vertically, so you will almost always cut petals with the grain, placing the template so that the tiny wrinkles in the paper run up and down the template, not across.
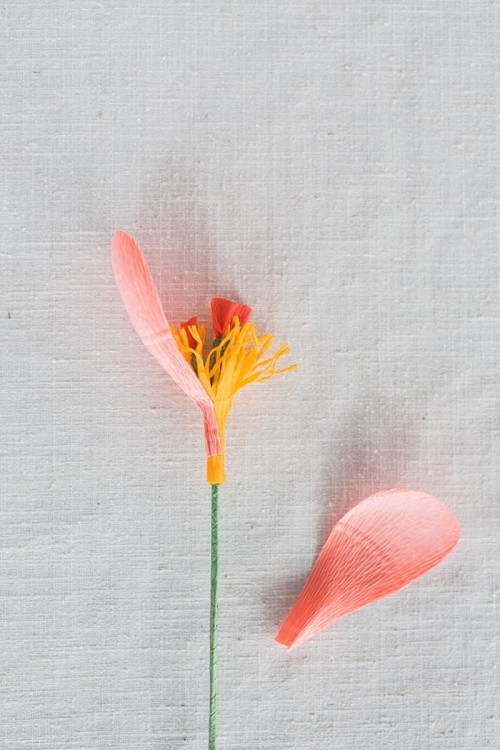
Creating the center:
Use template 1 to cut a small rectangle from the red fine crepe. Use your scissors to round the upper corners so they aren’t too sharp. Gently stretch the top edge of the rectangle. Dot a very small amount of glue on the lower two thirds of the rectangle, wrap it loosely around the stem wire so that the top third extends beyond the tip of the wire, and then scrunch the lower two thirds closely to the wire.
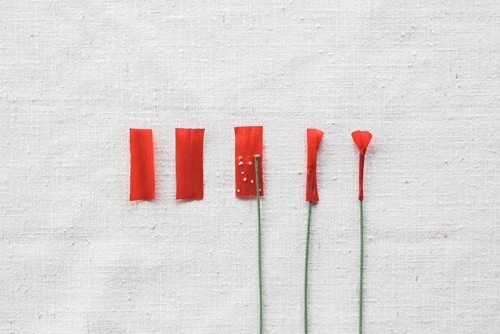
Cut a ¼” strip 10” long across the grain of your green crepe. I’ve used “Moss Green” from Paper Mart, but any medium green would be fine. Dab small dots of glue down the strip and attach it to the top of the wire, on top of the coral rectangle. You’ll wrap this piece around the wire to create an elongated ovoid shape. To achieve this, you’ll need to wrap the strip up and down the top inch of the wire, making sure that more of the layers end up in the middle.
Start wrapping from the top, holding the strip at a 45-degree angle to the wire. When you’ve covered about an inch and a half of the tip of the wire, start wrapping back toward the tip of the wire, again holding the strip at a 45-degree angle to the wire. When you reach the midpoint of the section of the wire you wrapped on the way down, hold the strip at a 90-degree angle and wrap the middle several times, creating a kind of doughnut around the mid point. Once you’ve got a nice, thick middle, continue wrapping toward the tip of the wire. Make one more pass up and down the pod to create a fairly smooth covering for your pod. This time, you don’t need to stop to thicken the middle. Snip any extra strip. Spread out the pod frill so that it’s not too compressed.
Repeat to create 2 more seedpods.
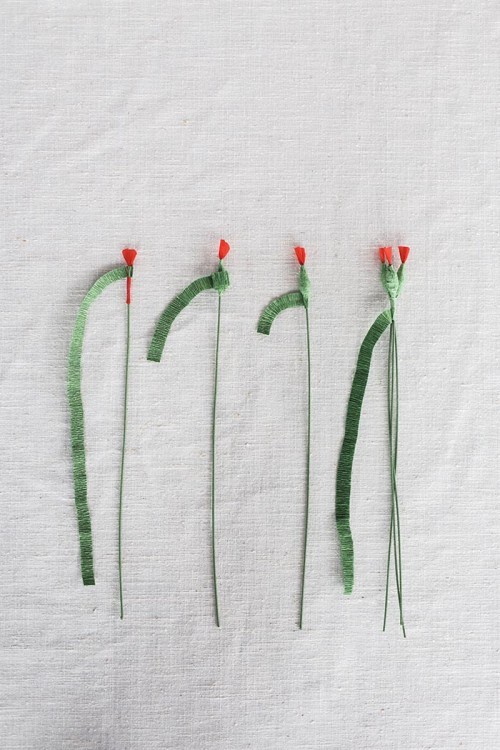
Cut a ¼” x 10” strip across the grain of the green crepe and dot with glue. Hold the three stems together using the strip to wrap them tightly from just below the pods to about three inches down the wire.
Stamens:
Using template 2, cut a rectangle from orange or yellow fine crepe. The short sides of the rectangle should run parallel to the grain of the paper, while the long side of the rectangle will go across the grain. Fold your orange rectangle in half horizontally, so that the two long ends line up. Unfold. This crease in your unfolded rectangle marks how far down to cut the fringe.
Now you’ll fold the rectangle in the opposite direction twice to create four layers, so that it takes fewer cuts to make the fringe. Fold it vertically so that the two shorter ends line up. Fold in half again, so that the two short ends line up with second fold. Your grain lines should be parallel to the folds.
Make a series of parallel cuts (about 1/8th inch apart) across the top edge of the rectangle to create a fringe. The cuts should stop at the crease you made when you first folded and unfolded your rectangle (this line is also marked on the template). Working in sections, gently twist the fringe in one direction, untwist and gently straighten with your fingers. Its fine if a few of the stamens fall off in the process.
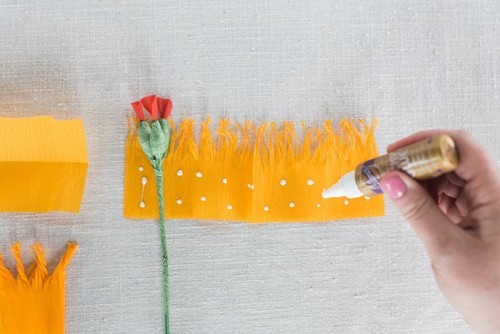
Unfold the rectangle, and dot glue along the bottom edge beneath your fringe cuts. Wrap the fringe loosely around the stem twice so that the bottom of your cuts is just below the seedpods. Snip off any excess. Scrunch to adhere the paper tightly around the stem.
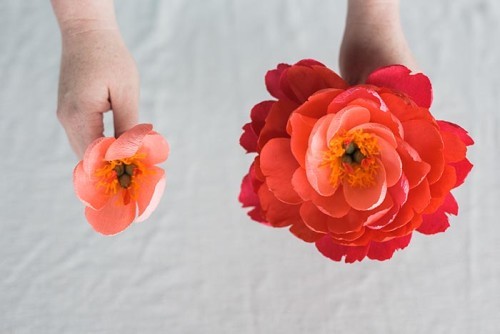
Cutting the petals:
The peony is made up of five rows or rounds of petals that radiate out from the center. The petals in each row are a different color and shape. The first and last rows are heavy crepe, which will stretch out much more than the lighter weights, so these templates are narrower.
For each row, I’ve listed which template to use, which paper to use, and how many you’ll need to cut to complete the row. Then, once you’ve made it all the way around, you’ll move to the instructions for the next row.
If you choose different paper for a variation of this peony, just be sure to match the heavy crepe templates with the heavy crepe.
Optional: I’ve found that substituting a bright bluish pink petal in heavy crepe (such as “Pink Pansy”) adds a nice highlight amongst all the coral. I use template 5 and make two of these pink petals. I like to insert one in rows 2 and 3, fairly close to each other. You’ll still want the same total number of petals for that row, so you’ll be substituting a petal, rather than adding an extra.
Row 1: template 3, 6 petals of light coral heavy crepe (“Peachy Pink”) Row 2: template 4, 6 petals of coral fine crepe (“Raspberry”) Row 3: template 4, 6 petals of doublette crepe (“Light/Dark Salmon”) Row 4: template 4, 7 petals of red fine crepe (“Red”) Row 5: template 6, 8 petals of dark pink heavy crepe (“Candy Apple”)
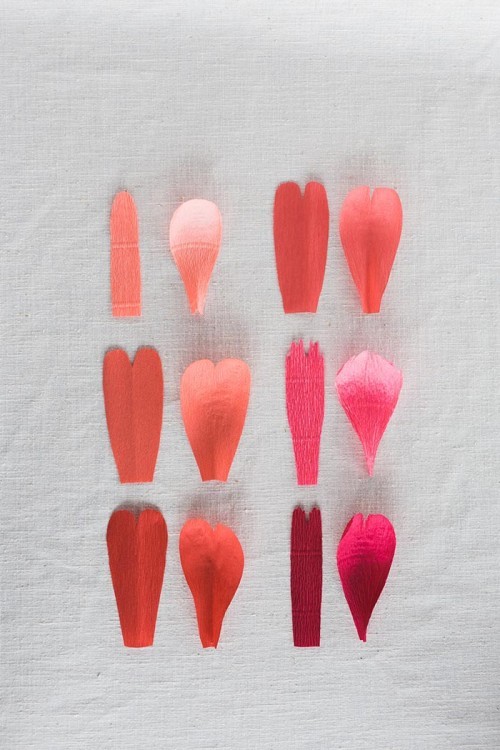
A petal from each layer before and after shaping.
Shaping the petals:
To create the cupped shape of the peony petals, hold the center of the upper third of the petal with two hands, between your thumbs and sides of your index fingers. The goal is to stretch the inner part of the petal, while leaving the rounded outer edge unstretched to create a little bowl. For the petals that are lobed, or heart-shaped, cup each lobe and then the area under the lobes. The fine crepe will only cup slightly, while the heavy crepe will give you the nice, dramatic cups that give the flower its structure.

Attaching the petals:
Dot glue along the bottom of the petal and apply just below the seedpod.
You’ll be able to feel the ridge where the pods end and the wire begins. Always push up into that ridge when you’re applying petals; this will counteract the tendency for the petals to gradually drift down the wire, creating a cone shape. Apply the petals evenly in rounds around the center. The precise degree of overlap is less important than having them evenly distributed around the flower.
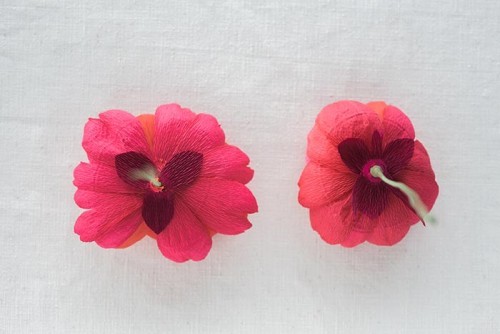
The calyx:
Use template 7 to cut three shorter calyx pieces and template 8 to cut three longer calyx pieces from the “Burgundy” heavy crepe. Apply the shorter pieces evenly around the base of your peony, just as you did the petals. Apply the longer pieces so that they fall between the shorter pieces.
Wrapping the stem:
Cut a “Burgundy” ¼” x 12” strip across the grain and dot glue up and down the strip. Wrap the stems, covering the bottoms of the calyx, just underneath where the seedpods meet the wire, and then all the way to the bottom of the stems. This may require a few strips.
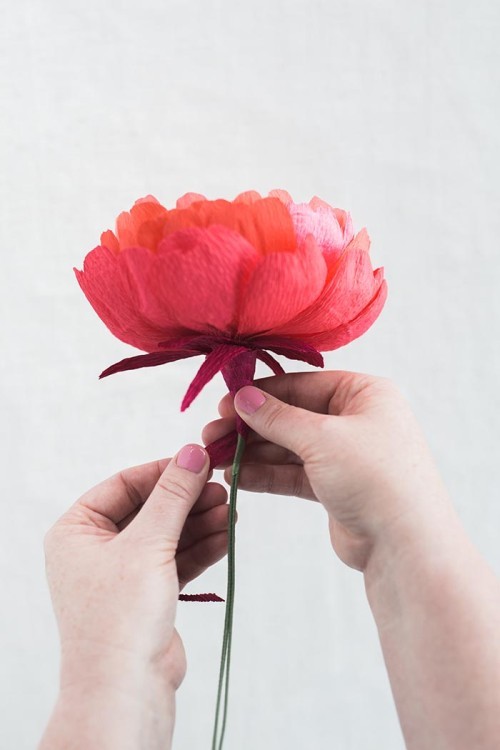
Finishing touches:
Curl back the long pieces of the calyx by scraping them between your thumb and the blade of your scissors, as though you were curling ribbon. Gently spread out any seed pod frills that have been compressed, and arrange the fringe so that it’s all standing up and evenly spaced. Straighten any petals that have been mussed, and use your thumbs to reshape any petals whose cups have been collapsed.
If you’d like a looser peony, stick your fingers between the first two layers down to where the petals meets the seedpods and gently spread, working your way all the way around the flower. Repeat for each layer.


20 notes
·
View notes
Note
Sorry if this is a bother, but I always see you uploading you (lovely)(gorgeous) head model edits for mass effect and stuff and was planning on doing a bg3 for myself. Since I saw that you were working on one (Lauren Bacall right?) I was wondering if you have any tips for people trying to do the same?
omg no bother at all!! thank you so much!
there is the down by the river server, full of very talented people and helpful resources and tutorials to help you along!
idk how experienced you are with blender but heres the doughnut tutorial which is a handy intro to the programme itself
for bg3 modding specific tutorials i really recommend padme4000's channel, she has video tutorials on importing/exporting meshes into blender, as well as extracting all the files you need from the game itself and links to the programmes you need in the descriptions of her videos
a nexus link to more of padme4000's resources and tutorials
here is another video on bg3 mesh editing
i hope these are a good starting point! honestly all my blender endeavours have been trial and error since i started messing around with it last year to create custom heads for mass effect :) im definitely not an expert but if u get stuck with anything im happy to try and help! good luck!
12 notes
·
View notes
Text
I'm learning Blender so I did the classic Doughnut tutorial. The goal of me learning blender and making the doughnut is to eventually be able to make balloon balloons with it, just a couple because I think it would be funny
7 notes
·
View notes