#export WordPress posts
Explore tagged Tumblr posts
Visit Tumblr Blog
Explore Tumblr blogs with no restrictions, modern design and the best experience.
Last Seen Tumblr Blogs


Fun Fact
Total funding amounts to $125.3M.
Text
How to Export and Import WordPress Posts and Pages: A Beginner's Guide
Managing a WordPress website comes with its challenges, but exporting and importing posts and pages shouldn’t be one of them. Whether you’re migrating to a new host, creating backups, or sharing content between websites, WordPress makes this process surprisingly simple. In this beginner-friendly guide, we’ll walk you through how to export and import your WordPress posts and pages, step by…
#backup WordPress content#export WordPress posts#how to export WordPress posts#how to import WordPress pages#import posts to WordPress#import WordPress pages#manage WordPress content#migrate WordPress content#transfer WordPress content#WordPress#WordPress admin tools#WordPress beginners guide#WordPress export and import tutorial#WordPress migration#WordPress tools#XML file WordPress
0 notes
Text
I’m so tempted to turn one of my url-hoarding sideblogs into a studyblr (specifically for tracking my language learning and holding myself accountable) but wow this might be the worst time to start a new tumblr blog lol
#i mean this site is like some kind of cockroach that just keeps going and going and going as better-run and funded sites collapse#so i figure even if the ‘25ish staff left’ rumour is true; we probably have at least a year left#or maybe they’ll migrate everything to wordpress. that’d be nice#also i’d be surprised if we didn’t at least get a warning so people can export stuff#i’m gonna be so real with you i really don’t care to back up this blog#yeah i’ve had it for like 8 years or something but it’s not like i’ve been posting important content here or anything#it really is just shitposting and my diary#everything of any value is stuff i’ve reblogged. like reference posts and such. which i forget to refer to anyway#(i mean i go through my recipes tag and ‘to read’ every so often but that’s about it honestly)#i could back up 8 years of blogging and never refer to it again#would i miss this blog and this site? absolutely. do i miss it enough to make a backup? i genuinely don’t know#i care about my taylor swift sideblog even less. like much less#the studyblr would be about the same.. like i’d just be using it to hold myself accountable and record what language lessons and activities#i did in a day. i wouldn’t feel a need to refer to it again#i am truly the type of person who dumps shit out of my brain and never goes back to it#i respect the hell out of people who post actual important shit onto their blogs and i 100% think they should back that up#that’s not me though#personal
0 notes
Text
Step-by-Step Tutorial: Migrating Translated Posts and Custom Posts in Multilingual Site with Polylang Using CSV Importer

Introduction
Multilingual websites are becoming increasingly common as businesses and individuals aim to reach a global audience. Polylang is a popular WordPress plugin that facilitates the creation of multilingual websites. In this guide, we’ll explore the process of Polylang import translations for various content types, including posts, pages, custom posts, and custom fields.
What is Polylang?
Before diving into the import process, it’s essential to have a basic understanding of how Polylang works. Polylang allows you to create and manage multilingual content by associating different language versions of a post, page, or custom post type. It also supports translations for custom fields.
For efficient content translations install and activate the Polylang plugin in your WordPress website.
How do you set up languages on a WordPress site using Polylang?
Once you install the Polylang plugin, it is time to set up the language to translate your WordPress site content into your preferred languages.
To set up languages in Polylang,
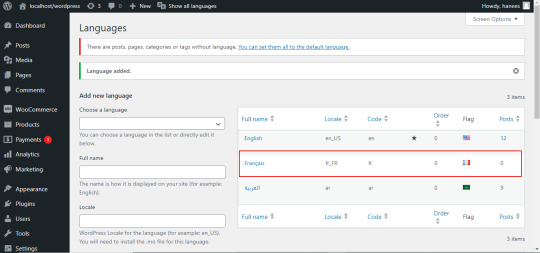
Login to your WordPress website and navigate to the Language tab from the left-side menu

Choose the language from the drop-down menu. Once you select the language, all the other fields like the Full name, locale, and language code have been updated automatically.
Then click on Add Language.

Now your language has been updated in the right side table.
How to Import Polylang translated content in your Multilingual Websites?
Before Importing the Translated content of Polylang, let us understand the basic reasons and benefits of importing translated content in WordPress.
Key reasons to import translated content in WordPress
Importing translated content into WordPress can be essential for several reasons, particularly when managing a multilingual website. Here are some key reasons why importing translated content is crucial:
Global Reach and Audience Engagement: Importing translated content allows you to reach a wider global audience. By offering your website in multiple languages, you increase accessibility and engage users who prefer to consume content in their native language.
Enhanced User Experience: Providing content in the user’s preferred language enhances the overall user experience. Visitors are more likely to stay on your site and explore its offerings when they can easily understand and navigate the content.
SEO Benefits: Translating content helps improve your website’s search engine optimization (SEO). Search engines recognize and index content in different languages, making it more likely for your site to appear in search results for users searching in those languages.
Catering to Diverse Markets: If your business operates in or targets diverse markets, importing translated content is crucial for effectively communicating with customers from different linguistic backgrounds. It demonstrates cultural sensitivity and a commitment to serving a global clientele.
Compliance with Local Regulations: In some regions, there may be legal requirements or industry standards that mandate providing information in specific languages. Importing translated content ensures compliance with such regulations and helps you avoid legal issues.
Multilingual Content Management: WordPress plugins like Polylang make it easier to manage multilingual content. Importing translations allows you to efficiently handle posts, pages, custom posts, and custom fields in multiple languages within a unified content management system.
Consistency Across Languages: Importing translations helps maintain consistency in messaging and branding across different language versions of your website. It ensures that the translated content aligns with the original message and intent.
Efficient Content Localization: Instead of manually translating and inputting content for each language, importing translations streamlines the localization process. It saves time and resources, allowing you to focus on creating high-quality content rather than duplicating efforts for each language.
Adaptation to Regional Preferences: Different regions may have specific language nuances or preferences. Importing translated content enables you to tailor your messaging to resonate better with audiences in various geographic locations.
Facilitates Regular Updates: As your website evolves, regularly importing translated content ensures that the latest updates and changes are reflected across all language versions. This is crucial for keeping the information current and relevant for all users.
CSV Importer for Polylang- WP Ultimate CSV Importer Plugin
The WP Ultimate CSV importer is an all-in-one import tool that helps to import, update, and export your WordPress content in their desired file format.
With WP CSV importer, it is easy to import the Polylang translations with few clicks. The translated content will be imported into your WordPress Website in the languages that we have set up in the Languages section.
In this blog, we will have step-by-step instructions on how to import posts, pages, custom posts, and custom fields in Multiple languages.
How to prepare a CSV to import the content of Polylang translations?
Every content import includes the CSV files with the translated content. Whether it is posts, pages, custom post types, etc it is important to prepare a csv file with the original content and the translated content
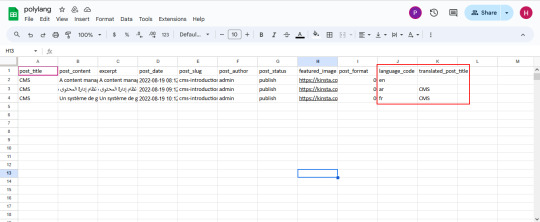
To import the content into the Multilingual website, add two additional columns in the csv file called language_code, and translated_post_title.
Provide the language code with respect to its related content.
Leave the translated_post_title field of the original content as empty.
Enter the post title of the original content in the translated_post_title fields of the translated content
Save and download the CSV file
How to Import Posts, and Pages in Polylang Translation?
The WP CSV importer plugin will make the job easy to import the posts, and pages in the polylang translations.
To import translated posts, and pages in Multilingual Website,
Navigate to the WP CSV importer Plugin from the left side menu.
Click on Import/Update from the top sidebar

Browse the prepared CSV (posts, or pages) from your downloads.

Select the content type that you want to import in the “Import each record as” field
Then click on continue for mapping.

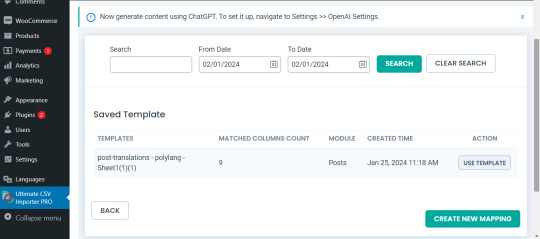
Now click on Create New Mapping. Or If you want to use the existing mapping template, you can click on the saved templates.
In the mapping section, you can map the CSV header field with its related WP fields by means of the drag-and-drop method or advanced method( Mapping the fields by means of selecting the desired field from the drop-down)

Verify the mapping of the polylang settings field. That is language_code and translated_post_title.
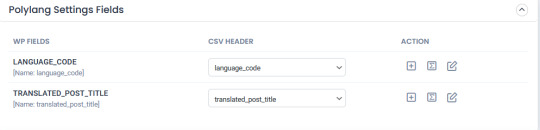
You can also add mapping for the custom fields. Once done with the mapping save the mapping template with the unique name.

Click on Continue for featured media handling.
Here you can enable the desired field for handling media files.
Here you can have all the options to import your featured image based on your business needs.
You can enable the download of external images to media while importing the posts
Also, you can select your desired image handling and image size.
You can map the media SEO and Advanced Options
Click on Continue

Then configure the Import configuration settings and Click on Import.
Now your post/page has been successfully imported in the desired languages that have been set on polylang.

You can click on the view log to view the successful post/page import on Multiple languages

This is how your translated post content mentioned on your csv has been imported into Multilingual Websites.

How to import Custom Post types and custom fields in Multilingual Websites?
Before diving into the topic of how to import custom post types and custom fields in polylang translation, let us have a basic understanding of What custom post types (CPT) and Custom fields are.
What are Custom Post Types and Custom fields?
WordPress comes with two primary content types: posts and pages. However, in many cases, websites require additional content types that may have distinct characteristics and purposes. This is where custom post types come into play. Whereas custom fields provide a way to store and display specific information related to the content.
For example, if you are building a real estate website, you might create a custom post type for “Properties” with specific custom fields such as price, location, and number of bedrooms. This ensures that the content is structured in a way that suits the website’s needs.
Things to remember before importing custom posts and custom fields
Ensure that you have created your custom post types and have assigned the custom fields to the desired post types.
Ensure you have prepared a csv for the custom post types and all the fields included in that custom post type have been properly assigned to the respective post type.
Ensure you have included the language_code and translated_post_title in the prepared CSV.
Steps to import Custom post types in Polylang translations
Importing translated custom post types is now efficient and effective with WP CSV Importer Pro. You can easily import the translated custom post types of any third-party plugins such as ACF, Jet engine, Metabox, etc.
However, the WP CSV importer Pro will provide support to all the ACF custom fields except that of the layouts sections.
The supported ACF fields for Translated custom field Import are listed below:
Basic: Text, Text area, Number, Range, Email, URL, Password
Content: Image, File, WYSIWYG Editor, oEmbed, Gallery.
Choice: Select, CheckBoxes, Radio Button, Button Group, True/False.
Relational: Link, Post object, Page Link, Relationships, Taxonomy, User.
Advanced: Google Maps, Date Picker, Date Time Picker, Time Picker, Color Picker
The Import steps are the same for all the content types in the WP CSV importer Pro plugin.
Prepare the CSV File:

Importing Translations:
Now that you have a CSV file containing your Polylang translations, it’s time to import them back into your WordPress site. Follow these steps:
Navigate to “WP Ultimate CSV Importer Pro” in the WordPress dashboard and select “Import/Update”
Upload the CSV file you prepared earlier and follow the on-screen instructions.
Choose the content type you want to import translations for. On the ”Import Each record as” field all the custom post types of ACF, Jet engine, Metabox or any plugin and the ACF custom fields are displayed on the drop-down.
All your custom post types and the ACF custom fields have been listed in the drop-down

Select the desired Custom Post types or custom field that you would like to import
Click on Continue. Map the WP fields with respect to their corresponding CSV headers.
Importing translations for custom fields might require additional steps. If your CSV file includes custom field translations, you may need to ensure that the custom field names match those in your WordPress setup.
Map the Custom field Suite and all the desired fields.

You can also add Mapping for the custom fields by simply clicking on the Add Custom Fields.
Ensure that the Polylang settings field is mapped correctly.
Save the mapping template with the unique name and click on continue
Enable the desired field in the Feature Image Media Handling section, and click on Continue.
Configure the Import Section and click on Import.
Now your CPT/ custom fields have been successfully imported into the Multilingual Website.

You can also view the log by clicking on View log-> admin view to verify the imported posts.

How to import taxonomies in Polylang translations?
Importing polylang translations with WP Ultimate CSV importer includes the same steps for all the content types. You can refer to the Importing steps explained above to import your taxonomies into Multilingual Websites.
WP CSV importer has smartly designed to import your translated post/page along with its taxonomies. That is if you import a post, then its related taxonomies like post_categories and post_tag (need to be included in the csv) have been imported with the post itself.
However, you can also provided with an option to import taxonomies alone without a post.
Steps to Import translated Post categories and Post tags
Prepare a csv with the translated content of (post_categories/ post_tags)
Add language_code and translated_post_title.
Navigate to CSV importer -> Import/update-> Browse the CSV
Select the content type as categories or tags
Map all the desired fields like post_categories/ post_tags.

Ensure the polylang settings field is mapped correctly
Save the Mapping template
Configure the Import process and click on Import.
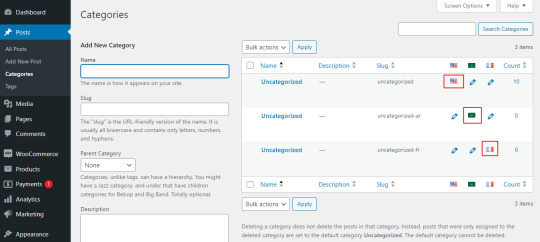
Now the categories has been imported into the Multiple languages
Post Importing Steps
Once you successfully imported your polylang translations, there are few things to consider. That are listed below:
Verification and Troubleshooting
After the import process is complete, it’s crucial to verify that the translations have been applied correctly.
Regular Maintenance
Keep in mind that website content evolves over time. Periodically export and import translations as you update your content. This ensures that your multilingual website remains up-to-date and provides a seamless experience for users across different language preferences.
How to export translated content in WP Ultimate CSV Importer?
Like importing, the export process of Polylang translation is quiet easy with WP ultimate CSV importer plugin. Moreover, this plugin is an all-in-one tool that smartly import and export your translated content from/to the multilingual websites.
The export process is same for all the content types. Let see an example of how to export pages in Multiple languages.
For that, navigate to WP ultimate CSV importer
Select Export from the top side menu and choose the content type that you want to export
Here I select pages. It displays the number of pages including the polylang translation has been displayed. Now click on continue

Provide the File name and File type. Here I select CSV.
You can also Export your translated content with advanced filters.
Now click on Export.

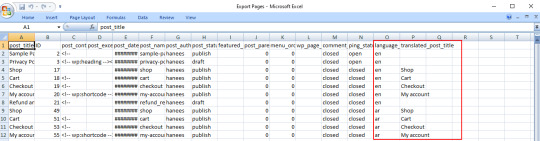
Your WordPress pages with polylang translations has been exported. Now click on download to download the exported file in your local computer.
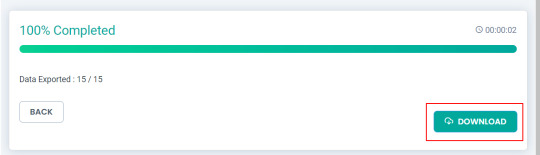
The exported pages with polylang translation will now be downloaded as desired file type.
Conclusion
Importing and Exporting Polylang translations for posts, pages, custom posts, and custom fields is a crucial step in maintaining a dynamic and effective multilingual website. By following the steps outlined in this guide, you can streamline the translation import & export process and provide a seamless experience for your global audience.
Refer to our user guide for step-by-step instruction to migrate Polylang Translations for WooCommerce Products, Variations and Orders
#wordpress#cms#wordpress tutorial#plugins#polylang#csv importer#custom post type#posts#import export data
0 notes
Text
Tumblr Backup Options: None of them do everything
Cheeky but true. I'll go through what's good and bad about each option though so you can decide which balances out for you.
Covered: native export, WordPress (kinda), TumblThree, tumblr-utils (kinda)
Native Export
If you go to "https://www.tumblr.com/settings/blog/yourblogname", at the bottom of the page is an export option

Once you hit the button to start the request, it will start processing. Feel free to log off, this is going to to take a few hours. You don't need to keep it open. ~22k posts took roughly a day for me. If you have a small number of posts and get stuck, you're probably broken.
When it's done processing, you can hit that download backup button and then wait some more as you wait for the zip file to download. Mine failed the first time after like twenty minutes, and then I had to start over. I think it took 1-2 hour(s) and I'm almost certain that was on Tumblr and not my internet. And that was the zip file! So make sure your computer can be on for a while before getting this started.
So what do you get?
A media folder, conversations folder, and posts folder
Media folder: Every single photo, gif, and video that has ever been on your blog or in your DMs. There is no context data attached (except for dm images which do say which conversation they're from at least), but they seem to be in chronological order because they seem to be titled by the post's ID (the string of numbers in the address bar after "/post/"). They look like "100868498227", "100868498228_0", "100868498228_1"
When you see something end with "_0" and up that means the photos are in the same post, so _0 represents the first image in the post, _1 represents the second, etc (at least, I think).
Conversations folder: HTML export files of every DM history you have on your blog. These are actually pretty well formatted, see example here.
Posts folder: html subfolder and posts_index.html file
posts_index.html: File listing every single post on your blog by post ID on its own line with no other context. Example of a line: "Post: 780053389730037760". The ID number will link to the post in the html folder
html subfolder: contains a submissions subfolder and stripped html file versions of every post on your blog. See below first what the post looks like on Tumblr, and second what the post looks like in the html folder


The way you seem to be intended to use this is to open the file index, select a post ID, and be jumped to where that post is saved as an html file, but I don't know why you would bother when the index doesn't provide any information about the posts inside it. The posts all have extremely minimal formatting. See a reblog chain below.

Notice I said ALL posts on your blog. Photo posts without a caption will just have a broken image icon and then the date and tags. Theoretically, it might be that if you unzip the entire export folder that allows it to automatically link to the image saved in your media folder. I have no fucking idea, unzipping the folder was estimated to take two hours so I didn't do it. Let me know if you do though so I can update this post!
The submissions folder is such a rabbithole I made a post just on it but long story short it's asks you haven't replied to
What do I see as the main reasons to opt for this option? 1) you don't want to download any programs or files from the internet just to backup your blog, 2) your blog is relatively small, so digging through the ID files isn't a big deal, 3) you mostly just want to download either the images (which will be browsable via thumbnail previews in the media folder if you unzip it) or conversation history, which are fairly well formatted, 4) you don't need to update your export often/ever, because you'd have to request it from the start and download the entire thing all over again, 5) you want to be able to read your text posts clearly and don't care about preserving the full formatting, and/or 6) you don't plan to reupload this information elsewhere (say on... a WordPress blog)
WordPress Automatic Ex/Import
Move your post's from Matt's right hand to his left! WordPress (another product of Automattic) has a native Tumblr importer found under your WP Admin dashboard for your site under Tools > Import > Tumblr.
How does this work? No idea! I hit import 2 days ago and it has done nothing. Maybe I'm stuck, maybe it's permanently broken. It says to contact support if it's been over 24 hours but they don't make that easy. I disconnected from Tumblr (you can only port over a blog you have the login of) and reconnected and it still said it was importing. I don't think it's ever going to do anything.
Presumably it's supposed to 1:1 import every post on your blog onto the WordPress site, which will result in a whole lot of stolen art because there's no way to select just your original posts. Also, you'd need enough storage on your webhost to house all the posts (this honestly might be my problem, but I was planning to delete all the non-original posts once it imported.... anything and backfill what it didn't get to). The one thing I'll say about this option is that it's the only one I've seen so far that exports drafts and queues as well.
I mean, if it exported anything. If this ever does anything I'll update this post, but either my blog is too large or this tool isn't totally functional anymore.
TumblThree
(previously TumblTwo, etc)
TumblThree is an all-in-one program requiring no extra downloads beyond the main Zip, and was last updated fairly recently at the time of this post. In order to run it, unzip it into one folder and run the main .exe. It has a full UI interface with lots of very descriptive helper text to help you select the right options for you without looking at the wiki. I think it's user-friendly for non-tech people.
There are a lot of options in TumblThree to change what output it gives you, but I'm going to start with the largely universal parts first:
Everything from one blog will be exported to one folder, no subfolders or sorting. As a result, the output is very messy and difficult to wade through, but post metadata and the photos are named in the same way so you can scroll, see an image preview, and then click on the metadata txt for that post and read the caption.
Depending on your settings, you can export all photos, videos, text posts, etc as their own files or exclude them from the export entirely. For the different types of media posts, you can independently select if you what to download just the media, just the metadata for it (everything that surrounds the post when you see it on Tumblr, such as the caption, OP, tags, etc), or both.
Master txt file: For every type of media metadata you export, a correspondingly named txt file will be created (images.txt, answers.txt, etc) that contains the text/metadata of every post of that type in one txt file. This is also the default behavior for exporting text posts.
Note: for text posts (which includes asks/answers), it only creates a master txt file if you do not select "Save texts as individual files", in which case it will only save each text as an individual txt file and not make a master file.
The formatting on these files is so brutal I won't even give examples, but they're unreadable. Being a .txt file, there is no native formatting, so it exports in html formatting.
Example: instead of a post that says "I want to go swimming", it exports: "I want to go < b >swimming< / b >" (minus the spaces around the b) as the post body, which is a big part of what makes it unreadable, because there are a lot of hyperlinks in all the header information listed below.
Each post in the master txt exports with: Post ID, date, post URL, slug, reblog key (no idea what that is), reblog URL, reblog name, title, [the text/caption itself], and tags.
Theoretically this means you could ctrl+f "cybertrucks" in the master txt file and then browse all your posts making fun of Tesla owners by tabbing through the returns. This is not possible with any of the previous options, and only is possible because it's all in one file, as ridiculous as it is, which is why getting that master file is so important.
For the trick to get both the individual text posts and master text.txt & answers.txt file, as well as my recommended settings and details on how updating backups works, see the read more at the end of this post.
The images.txt includes all the information listed above, but with the following additions: photo url (NOTE: this is the url on Tumblr, not a link to where it is in your folder), photo set URLs, photo caption, and "downloaded files" (NOTE: this is the name of the file it has downloaded)
The video.txt is similar to the above
The use case for this would be similar to what I described for text posts above: search keywords from captions, tags, etc and when you find what you think is what you want, copy the name from "downloaded files" and search your folder to find the actual image
I really hated TumblThree's output the first time I looked at it and then I realized the single file is the only way to make browsing tags workable, because otherwise you would have to have a folder for every tag, and posts with multiple tags would have to be duplicated between them. I'm not pressed on finding a txt to HTML converter right now but it could be an option in the future if you wanted to make things more readable.
Okay, let's get into the non-universal stuff you can customize in settings, because it's like, everything:
File names: We've already established you can search with the downloaded file name for images, but what will that be? Whatever you fucking want. Post date, reblogger name, post ID, post title, original file name, you can make it any and all of these in any order you want! You can have actually useful file names! Personally I like %e_%p_%q_%i_%x which exports as DateTime_PostTitle_BlogOriginName_PostID_IteratingNumber (note: you need some kind of unique iterator to be valid so two files don't have the same name, such as multiple photos from one post). Look how much searchable information that gives me, in chronological order! It decreases your need for the master txt file.
Tip I wish I thought of before doing my massive export: make one of the unique headers from the master txt file part of the exported file name so it's easy to search for it after identifying it in the master file.
Files scanned: this is the only method I've found that lets you back everything up, remember what it backed up, and then lets you add any new posts since that date without having to download the whole thing again. That's a game changer, but see the read more below for limitations.
You also have the option to rescan the entire thing if you want.
Post type: T3 (I'm abbreviating it now) also lets you export just your original posts, just reblogs, etc - again, giving you the most control of any options. It also lets you export replies. I, uh, would not do this because if you have any popular post on your blog it might have hundreds, or thousands of replies but hey, you can do it!
You also have the option to only download posts with a certain tag.
Blog options: You can export literally any blog you have the URL of. In fact, if you copy a blog URL while it's open, it will automatically add that blog to its UI and create an empty folder for it. It makes it easy, no private key required. I do have mixed feelings about the concept of exporting someone else's blog... but I'm also planning to do it to some of Crew-ra's blogs so... my digital horde must grow.
You can also queue blogs up and leave it to run through a lot of them. It is a lot faster than Tumblr's native export, I started this import well after I started typing this post and it took a few hours, probably not all that much longer than just downloading Tumblr's export took (and that's while running it alongside other data copy operations because I'm backing up a lot of stuff right now).
I do recommend doing a test export with a sideblog, I was able to use wild-bitchofthenorthwoods as a test import since it only has one post and it has media, so it was super quick.
(I do want to note, I think the number of downloadable items starts out matching the number of posts on your blog without scanning them until you start the export - but if you choose to export everything as its own file, you're going to end up with way more than that because a post with three images would be multiple files)
Things T3 cannot export:
Since in its simplest form it's just accessing the public upload of your blog, it cannot export your drafts, queue, or conversations
It cannot export posts as HTML files, and thus cannot export them with readable formatting natively
What do I see as the main reasons to opt for this option? 1) you don't care about exporting your DMs/conversations, 2) you want the ability to export only certain kinds of posts (original, photos, using a tag, etc), 3) you want to control the titles of the exported files 4) you don't mind wading through massive folders, 5) you want the ability to search tags (using the txt files), 6) you want the ability to update your export without starting over from the beginning, 7) you either don't want to reupload this information somewhere else, or you want to upload it somewhere that supports automatic HTML conversion (for instance, you can switch a Tumblr post from a rich text format to HTML, same with AO3, so you can put it in as HTML and then hit post to see it turn into a rich format. This techically makes T3 the most versatile/useful export option if you're planning to do anything with it other than browse your own files).
tumblr-utils
Full disclosure: haven't tried this one. But others have! tumblr-utils is a no-UI, python-based backup software. This means in order to use it you have to type commands into the terminal. If you don't know what I just said, don't use this one.
If you do, you'll need to separately download python and youtube-dl just to get this one running. You'll also need to give it your personal Tumblr API key and feed it commands deciphered from the wiki page I linked. Here are two different guides people have written on how to use it. Output:
Obviously I'm guessing based on the documentation, but one thing that is nice is this tool allows you to save each post in its own folder. Presumably each post is multiple files like we saw with T3, so this would make it easy to group them, but it also means you'd have to look in every single folder to find anything.
It seems to break posts up into timestamp folders by month, again, helping with management to narrow down where you have to search
It allows you to save only certain kinds of posts at a time like T3
It allows you to backup posts only from a certain time period (so if you keep a little .txt note of the last time you backed up, you can easily add only the new posts into your backup without having to start over from the beginning)
It allows you to only save posts under a certain tag like T3
It allows you to save only original posts
It's the only one I've found that lets you back up your liked posts
What do I see as the main reasons to opt for this option? 1) you don't care about exporting your DMs/conversations, 2) you want the ability to export only certain kinds of posts (original, photos, using a tag, etc), (okay now we get to the points that aren't also covered by T3), 3) you want posts to export already broken into folders, whether by post or by month, 4) you want to back up your likes, 5) you don't care what file names look like, 6) you're comfortable with the command line/coding and don't need a UI.
Summary:
None of these options are ideal for reuploading your files anywhere (except WordPress), but I do think TumblThree is the best of the options because of the written HTML formatting in the txt files being useful for websites that support automatic conversion (or require HTML input).
For starting another blog, WordPress wins. If it works. I'm trying to be generous here.
For searchability, T3 wins again.
For versatility... yeah you know it's T3, but tumblr-utils has a lot of the same features, too!
For sentimentality (aka conversations), it has to be the native export. There literally is not any other option.
For queues and drafts, the only theoretical option is WordPress. If it works.
For likes, the only option is tumblr-utils.
Every option does something the others don't, so theoretically to cover everything, you have to do all four options. Actually I would say do the native export if you don't have a lot of posts and aren't a freak like me, check it out, and if it doesn't work (I know it's finnicky) or you don't like the export, go with TumblThree. This also means you'll at least have your conversations even if you don't end up using the native export any other way.
And I wish it could go without saying, but don't repost people's shit, y'all. I'm backing up everything for my records only and it will never be shared with anyone else, or even browsed as long as using Tumblr instead is an option.
TumblThree adding to old backup quirks, recommended settings, & master file backup solution:
Adding to backup quirks:
From my tests, when you scan a blog you've already backed up to just add new posts to it, it does not update the master file, so if you want to update it, you'll have to do the steps I list at the end of this post. It might be possible it does update if you force rescan, but I highly doubt it.
If you scan a blog you previously backed up under more restrictive settings - say you only backed up original text posts as one file before and now you've selected to back up absolutely everything - it will only download up until the time you last backed up that blog. It will not blow past where you last downloaded to download all the photos and videos it didn't get before just because they're selected now. This is great for doing after using the master file solution I'm showing below, but if you do need to download everything after doing a more restrictive scan, you can once again follow the first few steps below to do so.
Recommended settings:
This will obviously vary by what you're trying to do, but one or two things weren't immediately obvious to me and I did say I think this was the best solution for less technical users, so I want give my personal recommendations. Settings can obviously be found under the settings button at the bottom of the screen (you may need to use the scrollbar on the UI for, which is separate from the scrollbar on the blogs panel), but when you click on a blog, when you click "Details" in the right sidebar, you can also see your most important settings at a glance and adjust them to whatever you want them to be "per blog". I believe TumblThree remembers what you last used for the blog and applies the things in settings only to new/other blogs.
The thing that is going to vary the most is how many different types of posts you want to back up (text, video, reblogs included, etc), so I'll leave that up to you. If you're going to export a media type, though, I generally recommend exporting the metadata too.
I already gave my preferred file names above and again that's going to be something that varies a lot by people. Hover over the "Filename template" box and it will give you all the options in the legend you can combine via underscores.
Leave "Skip .gif files" off unless you're hurting for hard drive space. This removes all the gifs from your download, and the reason this is provided as a separate setting is because gifs have relatively massive files (at least compared to a text file)
I'll be honest I haven't seen a difference between turning on and off "Group photo sets". Because of the way file names work, most conventions will naturally lead to photos from the same post all being in a row.
"Save texts as individual files": if you only want texts to be saved as their master text.txt and answers.txt files, uncheck this. If you want the individual files I highly recommend you also download the master file for searching purposes, in which case my recommendation is this:
1) Select to export texts only, leaving off all media options, and uncheck the "Save texts as individual files" option. 2) Export the blog. This will only result in two files, answers.txt and texts.txt. 3) Move these files elsewhere on the computer to save them. 4) With T3 closed, delete the folder for the blog and the blog's Indexes (see instructions at the end of this post for finding these). 5) Reopen T3, which shouldn't remember it ever saw the blog and create a new folder for it. Turn on the "Save texts as individual files", as well as any other media posts you want to download. 6) Export the entire blog again. 7) Move the texts.txt and answers.txt file back into the blog's folder.
I leave all other options on the Details tab off, except for:
"Force rescan" scans past the point it last backed up and searches the whole blog again. If you have a big blog, this is going to burn time. This is needed for the number of downloaded items in the panel to be accurate but I don't know why you would care or turn this on unless it lets you skip steps 3-4 above, but my blog is too big to burn through testing that, so if you try it, let me know and I'll update this post!
Master file backup solution:
See my 7 steps from above to skip having to do this, but if you accidentally do things out of order and then realize you still need the master files for texts post after backing everything else up, here's how you get it with minimal pain:
T3 will make an "Index" folder in both the main folder for the program where the exe is located and the destination folder where you have your blogs backing up (note: these were two very different places for me, if you just have it back up to the automatic Blogs folder within T3's folder, it might not create a second Index folder).
To make T3 "forget" what it has backed up previously so it goes through to the beginning and makes a master file that includes everything, all you have to do is remove the Index file(s) for the blog while it's closed so it doesn't remember it anymore. I backed my index up in another folder.
Check off for it to only download text posts, and then uncheck the "Save texts in individual files" option. This will cause it to only create the master answers.txt and texts.txt file on the rescan.
The combination of only going for one post type and only downloading one file for it means this rescan is relatively fast. When you look at your Blogs folder, you'll find a new folder has been created for your blog name (in my case, there was "n7punk" and "n7punk_2) and your output is in the new folder. I just moved it over to the original folder.
At this point you can restore the indexes, though I've only gotten it to half recognize them. I can get it to recognize my original n7punk folder so everything can stay there, but the total downloaded items is stuck at what it was when I did just the text posts. I don't really care, it was mainly the folder thing I wanted to fix. If you have lag between your last full backup and your master-only backup, this might cause some issues? I don't know because I made sure there wasn't lag, so I recommend doing another backup to add any missing items before doing this method.
You can also use this technique if you want to download only your original posts and then download everything else to a second folder. Adjust the setting to only download original posts, download the whole blog, close T3 and delete the indexes, rename the folder to whatever you want ("n7punk_original", etc), and then reopen T3 and set it to download everything and run it again from the start.
#tumblr#automattic#words and things#tumblr hacks#resource#tumblr-utils#tumblthree#100#posts that haunt me#in a good way back up your shit yall lol
475 notes
·
View notes
Note
Hello! I think you’ve been on tumblr as long as I have, possibly longer. If tumblr goes down at some point, will you be backing up your blog? If so, how? Thanks!
Yeah, I want that stuff just to look at. Before I left Twitter, I downloaded my archives and was very grateful for the photos I had completely forgotten about. I have about 27k posts. I went to my blog settings last night, and requested an export. It's still chugging along - no download for me to click yet. I'm not sure what my plan for the export is. A lot of folks are importing into WordPress, but that's also in the same blogging ecosystem as tumblr. Since I'm a former webdev, I might spin up my own server just to have this content somewhere. If the export doesn't work, I'm going to try a web scraping program that saves to local HTML files on the computer. You have to be very careful about the settings, though, to avoid getting seen as a bot / eating up your hard drive space.
44 notes
·
View notes
Text
If tumblr goes down or something
I have a wordpress blog where I'm working on mirroring all my download posts: letomills.wordpress.com
It's very much under construction, turns out I've uploaded a ton of stuff and it's taking a long time to copy-paste everything and make the necessary adjustments. Yes I'm doing it fully manually because I tried to export my tumblr using the export feature but it's been stuck like this for 2 days:

So I'm not counting on it.
I don't intend to ever use wordpress as my main platform, it just seems like a fairly stable place to have everything backed up. If tumblr dies, pretty sure I'll move to pillowfort and/or simblr.cc.
23 notes
·
View notes
Text
apparently you can export your whole blog to wordpress directly so that might be easier than using python. there was a post about it but it was made unrebloggable
14 notes
·
View notes
Text
Thank you @caput-larvae for slowly archiving some of my posts 🙏, I will definitely try to export my blog to WordPress! So I at least have a backup option.
7 notes
·
View notes
Text
How to back up your Tumblr blog
Not sure if all of you heard the news, but Wordpress laid off 16% of its staff, which happened to include senior tumblr staff like cyle. According to 3liza, the amount of staff running tumblr is about 25.
Welp. Will Tumblr finally die? I don't know. It's pretty likely, since this site costs millions to run and to host all this content, but I'll stay till the end. But I backed up my blog, with the help of a post that can't be reblogged rn.
you can reblog this one though.
Quoth butchlinkle: "In your blog settings you have the ability to initiate a blog export, and this will generate a backup for your blog.
Fair warning though, if you’ve been on the platform for a long time this archive is likely to be quite hefty in file size. This blog I have had for 5 years with 22k posts, and the export from tumblr came to be 48GB. My previous blog I made in 2011 and has 95k posts, so needless to say I did not use tumblr’s built in export to back that one up.
If you want more control over exactly what you back up from your blog, I recommend that you use tumblr-utils instead. It allows you to backup specific tags, post types, and to ignore posts that you did not create (reblogs where you’ve added a comment count unfortunately do not count unless you use the older version of the script made with python 2.7).
To use it:
download and install python
create an application on tumblr to get an api key
create a folder where you would like to save your backups and right click to open it in the terminal/command prompt, or type cmd.exe in the address bar from inside that folder


Backing up just my original posts from this blog with this command came to 632MB rather than 48GB, and also gave me the option to save my posts in JSON format which will be useful for converting my posts to a new format for self hosting.
On that note I’m currently looking into figuring out a simple (and ideally free) way of self hosting a static site blog that utilises activitypub, and also converting my old posts to re-host on said blog.
This post series by maho.dev on implementing activitypub with any static site is my primary source of guidance atm if you also want to try figure that out yourself, as well as having an explanation for why you’d even want to do this if you don’t already know
but if tumblr goes down before I get things sorted and write up a post about it then i’ll be reporting back on it via my bsky, mastodon, and toyhouse accounts
if you dont have an account on any of these I’ll also be sharing an update via my personal site’s RSS feed, link of which includes an explanation of what RSS is and some feed readers you can use, I highly recommend checking it out as getting a feed reader is going to be the best way you can stay connected with people if they scatter across the internet!
tldr: download tumblr-utils to backup your blog more efficiently, introduce yourself to RSS and get a feed reader to stay connected with people, consider saving mine so you can find out how to self host your blog later if tumblr goes down."
here's a guide from the notes: https://docs.google.com/document/u/0/d/1yBWlk-yEgpSoEh3c9oLhz_kbLtUGqbqzOpCtJsvQgjI/mobilebasic?pli=1#h.u9vj7pezwpcy
Back up those blogs. This was way faster than trying to use Webarchive, and webarchive seems to be only good for saving text, audio, and video, because it saved none of the images. And remember: I did not write this guide, and I do not know a thing about coding or fixing bugs.
8 notes
·
View notes
Note
do you know any good places to put webcomics? is it best to just make your own website for them? I'm not really into sites like webtoon or whatever...
If you don't want much setup, you can make a Tumblr and use the Simple Webcomic Theme (or any other theme, as long as you set it so the blog shows 1 post per page for long form serialised work, or in a full-size grid for funny comics).
There are still other alternative platforms like Comics Fury, Comics Gator and Drunk Duck, those have been around before Webtoons.
If you are comfortable with HTML, CSS or generally learning/playing around with independent website setup, then you can go to Neocities or Wordpress. I use Wordpress (the dot org) for my personal website, The World in Deeper Inspection webcomic and the Comics Devices library, but that's a system that's worked with me and my brain for 11 years now.
Neocities allows you total freedom, but you really have to be comfortable with learning since this is old-school website building. There's a webcomic template though.
Squarespace or Wix is fine if you use their blog system.
I don't recommend Carrd for webcomics! I just don't think the infrastructure (one-page site) is flexible enough for yourself or your readership.
My general opinion is that I'll always recommend having your webcomic in a place that you can control, or at the least, easily export to another platform. I've been through so many eras of platforms rising and falling. And exporting all the posts/art you upload on that one dying platform only is an ordeal that you would want to avoid (ask me, who's working on manually transferring stuff from Twitter and Deviantart to my personal website OTL)
137 notes
·
View notes
Text
I am working on a crazy project.
I plan to combine the archives of ShortFormBlog on WordPress and ShortFormBlog on Tumblr into a single site, using the static site generator Eleventy. I’ve already done a good chunk of the exporting. Between the two sites, there are 36,000 posts. We had numerous contributors over the years, with about half a dozen regulars—but even given that, I’m responsible for most of the posts. I’ll keep the Tumblr archives online so you can follow the notes if you wanna, but I’ve long wanted to merge these archives into one piece, as complicated as it sounds.
The ten-year anniversary of the “official” shutdown of ShortFormBlog hits in October. I will have it ready before then. I hope.
#es#holy shit ernie#how did you post that much#how did you not break tumblr#what an insane archive#goddamn dude
12 notes
·
View notes
Text
Finally biting the bullet and attempting to back things up. Good grief.
Wordpress import seems to be the best idea at the moment. They'll grab your drafts and private posts too, which is very helpful. I don't think I can do this blog with it as it's too big for the free version, but we'll see.
Tumblr export is pretty useless.
#of course the gifsets don't look right#but apparently no one does them like tumblr#at least I get the stuff
3 notes
·
View notes
Text
How to Import and Export WordPress Users to CSV with Ultimate CSV Importer
When migrating your website content, it’s important to know that users data is just as significant as Posts, Pages, and Custom Posts data. Migrating all data is simply done using an Import/Export plugin such as WP Ultimate CSV Importer. This plugin can import and export your users/WooCommerce customers data along with their billing and shipping information. It can also let you update existing users’ data.
Using WP Ultimate CSV Importer, you can easily manage the users information without manual entries. It offers a wide range of filters to export only the data you require. Adding to that, you can export and import users with metadata. To create meta fields in the users, you can use third-party add-ons like WP-Members, Members, Ultimate Member and ACF, Toolset, JetEngine, and more.

Is it significant to take a backup of your WordPress site?
Any reasons like hardware or software failure, human error, or server crashes may result in the loss of necessary site data. Taking a backup can protect you from such data loss and help you restore the site data quickly. So you wouldn’t lose your data. Using Ultimate CSV Importer you can take a safe backup of all your content including Posts, Pages, Comments, Categories, WooCommerce data, and more. Here in this blog, we’ll see the complete features of User export using the Ultimate CSV Importer plugin.
How to Export WordPress Users?
Exporting users data is indispensable if you’re about to migrate your site or need to take a backup of all your necessary data. You can export user information, their passwords, WooCommerce plugin-generated fields like billing/shipping information, and other data. Here we will see how to export users with the metadata using Ultimate CSV Importer.
Navigate to the Ultimate CSV Importer (Pro) plugin in your WordPress instance and click the Exporter tab.

Select users and click continue.
The next step is “To export data based on the filters”.
1. Export File Name - Give a name to the export file.
2. Export Type - Here are the four different types of file formats you can export: CSV, XML, XLS, and JSON. Choose anyone.
3. Split the Record - Allows splitting and exporting records. If you have many records to export you can use this option. For example, you give the value 100 after enabling the checkbox and have chosen the CSV file type to export. It will download the files as a zip. Inside the zip file, you can see CSV files. The first exported CSV will contain the first 100 records and the second CSV contains the next hundred records and so on.
4. Using advanced filters, you can export any specific data from WordPress you need. Export data with auto delimiters, specific periods, and specific Inclusions(specific fields selection to export).
5. To schedule your export, just enable the "Do you want to schedule this export" and fill out the details: schedule date, time, frequency, and time zone then click Schedule Export.

If you haven’t used the scheduling option. Click the Export button to export your data and then Download. Now the files will be downloaded locally that contain all the User details and meta fields in your CSV.

Exported CSV

How to Export Users with Metadata?
To begin with, let’s see why users should have custom fields. Custom fields are helpful to collect more information about website users. You can use third-party add-ons to create these additional fields.
If you have created metadata(custom fields) using plugins like ACF, JetEngine, Toolset, Metabox, etc., You can export users data along with its metadata using the Ultimate CSV Importer plugin.
We have the aforementioned export steps. To export specific users fields with metadata follow the below steps
1. If you only want to export metadata and some specific user fields, navigate to the Ultimate CSV Importer Pro plugin. Click Export and select the module “Users” and then click Continue.
2. On the next page click “Export Based on Specific Inclusion”. Here you can select the meta fields and default user fields you want to export.
3. At last, click export and download.
The below picture shows the custom fields assigned for users that were created using ACF, Toolset Types, and MetaBox plugins.

How to Export WooCommerce Customers along with Membership plugin information
In WordPress, the customer who visits and makes a purchase on your WooCommerce store will automatically become a User. This will include some additional fields in the users like Billing and Shipping Information. Ultimate CSV Importer will export all the User details along with Billing and Shipping information.
It also supports membership plugins like WP Member, Ultimate Member, and Members. For example, I have created meta fields using Ultimate Member, and WP Member plugins and assigned them to users. You can see that in the below screenshot.

To export WooCommerce customers with metadata follow the above steps explained to export the User with all the details. And if you want to export only some fields with WooCommerce User information, navigate to the Ultimate CSV Importer plugin >> click Exporter Tab. Select Users >> then click Continue.
Choose “Export Based on Specific Inclusion”. There you can see Billing and Shipping Information and Custom Fields of Membership plugins widgets. Click and select the fields you want to export.

Import WordPress Users using WP Ultimate CSV Importer
Creating large numbers of users or updating existing users or adding new roles, etc manually sucks your time. Ultimate CSV Importer makes the process simple and easy with just a few clicks. You can import Customer Billing Shipping information and metadata using the plugin. Let’s see how to do it.
Click on the Ultimate CSV Importer(Pro) plugin in your WordPress dashboard. It will open up the Import tab. Upload your CSV/XML file. If you don’t have any, download a sample CSV/XML file for reference. Then prepare your own and upload it.

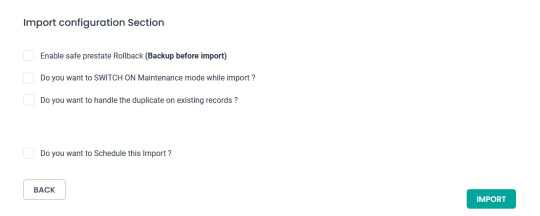
After uploading, select users from Import each record dropdown. Continue with New Item to import the new users or choose Existing Items to update the old users data. All the file header fields must be mapped to WordPress field headers. User Login, User Email, and Language are mandatory fields. Skip the media handling section. In the Import configuration section, there are 4 different options available to configure your import. Enable safe prestate Rollback (Backup before import) - Import can be reverted to the previous state if any issues arise. Do you want to SWITCH ON Maintenance mode while import? - To notify the visitors that the site is under maintenance mode. Do you want to handle the duplicate on existing records? - Enable this to truncate the duplicate records.
Do you want to Schedule this Import? - Fill out all the details necessary to run the data import at a particular time.
Click Import to finish the process.
You can verify the status in Admin View/Web View by clicking the “View Log” button.
How to Import Users with Metadata?
Follow the above steps to import the User. If you have to add additional columns in your CSV that are the meta fields. At the time of configuring import, in the mapping section, a new widget will appear for mapping custom fields so you have to map the CSV headers with WordPress fields.
As mentioned above, the Ultimate CSV Importer plugin supports meta fields created with plugins like JetEngine, ACF, toolset, Meta Box, etc., Know the compatible plugins listed here.
For instance, I created an ACF and Types fields and assigned them to the User. In the mapping section, new widgets with naming ACF Pro Fields and Types Custom Fields will appear. You can see that in the below screenshot.

How to Import WooCommerce Users and Membership plugin information
Not only exporting, but Ultimate CSV Importer also supports importing data into Membership plugins like WP Member, Ultimate Member, and Members plugins. Furthermore, you can import the WooCommerce Billing and Shipping Information of the User.
1. After you upload your file inside the plugin, choose "Users" from the drop-down menu.
2. Then in the Mapping section, along with the default user field, the WooCommerce Billing Shipping Information widget and Membership custom field widget will appear.
3. Map all the fields and next continue to Import.
How does it work with Passwords?
In the plugin page, go to Settings >> General Settings >> Send password to user. Enable the “Send password to user” toggle to send passwords via email.

To provide customized passwords to the users, prepare your CSV with the password assigned to users and import it. Otherwise, the plugin will automatically generate the password and share it with the users via email.
Note: To send passwords via email, make sure you have enabled and configured Easy WP SMTP in your WordPress.
How to update WordPress Users?
When you decide to update existing User data, begin to export the users data from your WordPress and make all necessary changes to the exported CSV file, and save it. Then import the file with our plugin.
Let’s explore how we can accomplish this using the Ultimate CSV Importer plugin.
Updating is just as same as importing, only a few steps will differ.
Likewise, import, and upload the CSV file. Next to that, you have to select Existing Items and map all the fields required to update data.
Select a field from the ‘Update records based on’ dropdown in the Import section, to update existing records based on the selected User Email/ID/Login field. That’s all you need to do.

Tips for successful User Import and Export
File Format: When you are ready to import, make sure your CSV/XML is in a valid format. Use a file validator to check the files before uploading.
Duplicate Checking: Check if there are any duplicate records in your CSV or else enable “Do you want to handle the duplicate on existing records?” in the Import configuration section to restrict the duplicates entering your website.
Trial Import: Try a test import with the User CSV to ensure it is error-free and successfully import. Download CSV & XML file samples here to know how to give or include values to the files.
Backup your WordPress site: Before importing any data it is necessary to keep a safe backup to revert the website data in case of any error occurs in the import process. Use the “Enable safe prestate Rollback (Backup before import)” in the Ultimate CSV Importer plugin to keep a backup before import.
Frequently Asked Questions for WordPress Users Import & Export
1. How do I export my WordPress users to another site?
To get started, install and activate the Ultimate CSV Importer plugin on your WordPress site. Go to the plugin’s Export tab and click on users. Provide a filename and choose a file type. Then click the Export button. After the file is exported, make changes to that file as needed and prepare it for re-import into your new website.
2. Can I export/import WordPress users with their passwords?
Yes, you can. Ultimate CSV Importer plugin exports users data along with their password. You can import users and their passwords, if the password fields are empty the plugin will send auto-generated passwords to the appropriate user email id.
3. I have a specific scenario where I have two user profiles with the same name. How can I change/update the record in this situation?
Yes. Even though the users have the same name they differ in their Email IDs. So you can easily update the users record based on Email ID.
4. Can I import Zip Code with user data?
Yes, it is possible to import Billing and Shipping Information(including Zip Codes) to the users module. Prepare the CSV, with all the details and import the data.
5. Is there a plugin for automated User Import and Export?
There are many plugins available to Import & Export users. Here are a few suggestions:
WP Ultimate CSV Importer
WP All Import
User Meta Pro
Export User Data
When choosing a plugin do detailed research and select the best plugin that fits your needs.
We hope that this article is helpful to you. Please don’t hesitate to reach out to us at [email protected] if you have any inquiries.
#wordpress#wordpress plugins#wordpress tutorial#cms#website development#plugins#blog post#import#wordpresswebsite#csvimporter#users#import export data#wordpress users
0 notes
Text
Thoughts?
Due to the recent layoffs at tumblr HQ, I made personal accounts at pillowfort and dreamwidth. I'm not super familiar with either of those sites, so does anyone have advice for choosing a back up site for this archive?
Update: it looks like tumblr can be exported to wordpress, so I did that for now. Downside: my url sucks (unless I pay $ which I refuse) and I'll need to hand edit every post to add tags, etc.
3 notes
·
View notes
Text
Just to let all of my followers know.
Im leaving Tumblr soon on this account! It will become a permanent sideblog and I will move on to only managing my sideblog (which will then become the main blog.)
✅️I have a bunch complied in the queue, so I'm going to let it run until it loses all of its juice (actually I just posted it all at once like a dumbass ✌️)
✅️Im going to unfollow everyone unless they are a p-shifter (Or if they are following me TY!!)
im going to export my whole account and catch all of that stuff I've written that's important (once this is done I won't post anymore. Ill delete everything except important stuff)
✅️Im also going to empty out my drafts there are too many lol (The only one left is my introduction which is going to be pinned at the top of my blog after this one)
and I'm going to recede into my tiny hole which I call home on WordPress. I'll post some hints to get anyone who is still interested (and is in the p-shifter community) to find it if they so desire to. This is to keep trolls off of my site and also who doesn't like a challenge?
Im sorry I couldn't stay for long. Its just too public here. I wish I could, but I'm tired of doomscrolling and want to go back to shifting without distractions.
Obviously I will continue to be on my Amino too.
Regardless, I'll see you around until my queue runs out of posts ♡♡
#mountain lion.txt#human override.txt#tired of the internet#trying to live my life without addiction#I'm so tired
17 notes
·
View notes
Text
How to Quickly Duplicate a Page in WordPress for Easy Reuse

Duplicating a page in WordPress is a fast and efficient way to replicate content or layouts without having to start from scratch. WordPress itself doesn’t offer an option for this, but with the right approach, it’s easy to learn how to duplicate an entire page in WordPress. For a step-by-step guide, check out our article on How to Duplicate a Page in WordPress.
Why Duplicating a Page is Useful
There are several reasons you might want to duplicate a page:
You need a similar layout for different pages on your site.
You want to quickly create landing pages for marketing campaigns.
You’re making updates to a page but want to keep the original version as a backup.
How to Duplicate an Entire Page in WordPress
The two main ways to duplicate a page in WordPress are through plugins or manually copying content.
Duplicating with a Plugin
Using a plugin is the easiest and quickest method to make a duplicate page. Here’s how:
Install and activate a plugin like "Duplicate Post" or "Duplicate Page."
Go to your WordPress dashboard and navigate to "Pages."
Hover over the page you wish to duplicate and click on "Clone" or "Duplicate."
A new draft will be created with the same content, layout, and settings as the original.
This method ensures you don’t miss any important page settings or SEO configurations.
Manually Copying a Page
Another option is to manually duplicate a page by copying the content from the original page into a new draft. However, you’ll need to reapply any settings like SEO, featured images, or custom templates.
How Do I Duplicate a WordPress Site?
If you need to go beyond just a page and duplicate your entire WordPress site, tools like "Duplicator" or "All-in-One WP Migration" are designed for this purpose. To duplicate a WordPress site, you’ll need to:
Install one of these migration plugins.
Export your current site’s data.
Import the site backup into a new WordPress installation.
Make adjustments to URLs and settings as needed for the new site environment.
This method will give you a complete copy of your site, including all content, settings, and plugins.
Best Practices for Duplicating Pages
Duplicating pages can be a powerful tool in your website management. Whether for A/B testing, marketing campaigns, or simply saving time, knowing how to duplicate an entire page or even a full site can help streamline your workflow. Keep in mind that using plugins for this task is much faster than manually duplicating content, especially if you’re handling multiple pages.
Conclusion
Duplicating a page in WordPress is a simple process, especially with the right tools. Whether using a plugin or doing it manually, the ability to easily replicate content can save you time and effort. For more details on how to duplicate an entire page in WordPress, check out our full guide on How to Duplicate a Page in WordPress.
3 notes
·
View notes