#how to uninstall application on windows 10 using cmd
Explore tagged Tumblr posts
Visit Tumblr Blog
Explore Tumblr blogs with no restrictions, modern design and the best experience.
Last Seen Tumblr Blogs


Fun Fact
Total funding amounts to $125.3M.
Link
Check Out New Video On How To Uninstall Apps MUCH Easier Through Software
CLICK THE LINK UP ABOVE TO SEE A VIDEO IF YOU CAN LIKE,SHARE&SUBSCRIBE
#how to uninstall apps on windows 10 that wont uninstall#how to uninstall apps on windows 10#how to uninstall application windows 10#How To Uninstall Program'#how to uninstall application on windows 10 using cmd#how to uninstall application#how to uninstall application in windows 8#how to uninstall application in windows 7#iobit uninstaller#iobit uninstaller 9.3#iobit uninstaller 9.2#uninstall#how to uninstall a program#app uninstaller for pc#uninstall apps
1 note
·
View note
Text
Java se development kit 10 install fails

Java se development kit 10 install fails how to#
Java se development kit 10 install fails install#
Java se development kit 10 install fails update#
Java se development kit 10 install fails 32 bit#
Java se development kit 10 install fails full#
OS: Win11 Pro, Win10 Pro N, Win10 Home, Windows 8.1 Pro, Ubuntu System Manufacturer/Model Number: ۞ΞЖ†ԘΜΞ۞ Java - What is the difference between JDK and JRE? - Stack Overflow Why would you need JDK then? Because application server will convert JSP into Servlets and use JDK to compile the servlets. For example, if you are deploying a WebApp with JSP, you are technically just running Java Programs inside the application server. Sometimes, even though you are not planning to do any Java Development on a computer, you still need the JDK installed. On the other hand, if you are planning to do some Java programming, you will also need JDK.
Java se development kit 10 install fails install#
Usually, when you only care about running Java programs on your browser or computer you will only install JRE.
Java se development kit 10 install fails full#
JDK: It's the full featured Software Development Kit for Java, including JRE, and the compilers and tools (like JavaDoc, and Java Debugger) to create and compile programs. It also includes browser plugins for Applet execution. It is basically the Java Virtual Machine where your Java programs run on.
Java se development kit 10 install fails how to#
How to open or run a JAR file on Windows.JRE: Java Runtime Environment.
Java Virtual Machine Launcher, Could not create the Java Virtual Machine.
Most modern computers will be able to run Java JRE perfectly without any hassle. So, as you can see that specs are not an option.
Browsers: Internet Explorer versions 9 and higher, Mozilla Firefox.
Processor: Intel Pentium II 266 MHz CPU or above.
Java se development kit 10 install fails update#
Space: 124 MB or more for JRE (Java Runtime Environment) + 2 MB for Java Update.
Operating system: Windows 7 or above, Server 2008, Server 2012 (including R2).
Your computer just needs to meet the following requirements and you will be good to go. Java is a programming language and to install it you don’t need tons of bells and whistles, and we are going to prove it. What are the system requirements for Java? If you are using a 64-bit variant, then it gives you information about the Java installed on your system. Then this means that you are using a 32-bit variant. If it says something like the following error message.Įrror: This Java instance does not support a 64-bit JVM. It is an easy step, just open CMD with administrative privileges. You can use the Command Prompt to check if you are using Java 32-bit or 64-bit.
Java se development kit 10 install fails 32 bit#
How do you check my Java is 32 bit or 64 bit? Read: Java security – Tips for using Java securely on Windows. Then restart your computer and you will be good to go. Windows 11: Click on the three vertical dots and select Uninstall. Windows 10: Select Java and click Uninstall.If you don’t want to install anything then you need to use Windows Settings to remove Java from your system. After uninstalling the language it is advisable to restart your computer. You can easily install Java Uninstall Tool from and then use it to remove Java from your computer. Let us start with a utility provided by Java, i.e Uninstall Tool. But you need to make sure that you are removing them completely and in this section, we are going to see how to do the same. There are two ways by which you can remove Java completely from Windows PC. Sometimes, it is required to remove all the older versions of Java. Then follow the on-screen instructions to install it on your computer. If you are a developer and want to install Java SE Development Kit then go to and download the one for your Operating System. Now, follow the on-screen instructions to install Java JRE on your computer.Click Agree and Start freeload and your download will begin.Visit and then click on the Download tab.To download Java 64-bit and 32-bit on your computer, you need to follow the given steps. Download Java 64-bit and 32-bit for Windows 11/10 Do note that Java is not to be confused with JavaScript. It is not only important for developers but also for someone who wants to run apps and websites built with the help of this language. It is one of the world’s leading software development tools used by many programmers to create software, games, and other projects. Java is an Objected Oriented Programming Language, allows users to build and run their game in its environment. That’s why we are here to answer from where to download Java 64-bit and 32-bit for Windows 11/10? Not only that, there are a lot of games, websites, and apps that won’t run on your system if you don’t have Java installed on it. So, if you want to ride the bandwagon and use the language, you must download it on your system. Java is one of those OOPs based languages, along with Python and C++, that’s in demand right now.
0 notes
Text
How to download fliqlo

#HOW TO DOWNLOAD FLIQLO HOW TO#
#HOW TO DOWNLOAD FLIQLO FOR MAC#
remove the related registries in this place, or you can apply a professional registry cleaning tool. Fliqlo is a flip clock app that is the iOS version of a Mac screen saver, and inherits the simple design and functions that have been popular over the years. Send help! This part of the article is going take you through steps to do this yourself. Download Fliqlo and enjoy it on your iPhone, iPad and iPod touch. Using the operating systems built in uninstall the software may seem obvious, but this is not the only way to do it. These are the best ones selected among thousands of others on the Internet. If Fliqlo 1.5.1 is frozen, you can press Cmd +Opt + Esc, select Fliqlo 1.5.1 in the pop-up windows and click Force Quit to quit this program (this shortcut for force quit works for the application that appears but not for its hidden processes). freeload Desktop Clock Download Clock Screensaver.
#HOW TO DOWNLOAD FLIQLO HOW TO#
By learning properly how to uninstall you can be sure that you will keep your computer free from corruption and degrading speeds. Lastly, right-click on desktop, select Personalize, select Screen. Double-click on the executable file to install it. Extract the zip file onto the desktop by using WinRAR or Winzip. (A dialogue box may appear that warns you about opening applications from unidentified developers. 1 Fliqlo Flip Clock Screensaver for Windows & Mac1.1 User reviews (73)1.2 Write a review2 () Mac Windows: 10 2.1 Apple. If a window doesn’t open automatically, search for the name fliqlo170 in Finder.
#HOW TO DOWNLOAD FLIQLO FOR MAC#
Extract the zip file onto the desktop by using WinRAR or Winzip. Scroll to the bottom of the page, and choose Download for Mac or Download for Windows. First, visit the developers page to download Fliqlo Clock Screensaver for Windows. First, visit the developers page to download Fliqlo Clock Screensaver for Windows. When uninstalling Fliqlo, most people may think they know how to do it. How to install Fliqlo on Windows Here are the steps: 1.
1 note
·
View note
Text
Install qt platform plugin windows 10

Qt for Windows | Qt 5.15.
Qt plugin free download - SourceForge.
Qt 6.2 and Windows 11.
6 Ways to Install Qt SDK on Microsoft Windows - wikiHow.
How to reinstall Qt platform plugin for Windows 10 - GitHub.
ROS2 Eloquent Turtlesim Missing Qt platform plugin - Robot Operating System.
How to fix "could not find or load the Qt platform plugin.
How To Install Qt Creator on Windows 10 - YouTube.
Install qt platform plugin windows 10 - antiberlinda.
Qt Platform Plugin Missing Windows 10 - recordsrom.
Qt platform plugin not found since updating MiKTeX.
Download Qt 5.14.1 for free - Free Download Manager.
How to fix 'Could not find the Qt platform plugin "Windows" in ""' when.
Solved: whenever i try to launch games i get a error about qt.
Qt for Windows | Qt 5.15.
This application failed to start because it could not find or load Qt platform plugin "windows" in "". Reinstalling the application may fix this problem. Get this message when I start up AutoCAD 2017 and 2018. Have used repair and reinstall. Have uninstalled using the uninstall tool from Autodesk and then done a fresh install. Nothing helps. I this video we will begin Installing QT Creator. I will show How to install Qt Creator and SDK. This Qt 5. QT- Installation We will do in Windows. I will s. Repair or update the "Single Sign On Component" (AdSSO) following the solution in "This application failed to start because it could not find or load the Qt platform plugin "windows"." dialogue appears when launching or updating any Autodesk software (It may be required to delete C:\Program Files\Autodesk\Autodesk AdSSO folder completely after.
Qt plugin free download - SourceForge.
Qt Platform Plugin Windows Missing Download. @jrmmuller said in 'could not find or load the Qt platform plugin 'windows' in ',: If you could help me with the steps. Open cmd and type echo%QTPLUGINPATH% if it's not empty then delete it (just google: delete environmental variable windows #, where # is your windows version) Open cmd and type echo. Dec 17, 2021 · Follow the steps below. Click on the Folder icon located on the bottom task bar next to the Internet Explorer icon. Type/Copy/Paste: ;C:\QtSDK\mingw\bin;C:\QtSDK\Desktop\Qt\4.8.1\mingw\bin; this will set and notify the Windows operating system to compile Qt SDK applications from the command line.
Qt 6.2 and Windows 11.
Feb 28, 2016 · I tried to make an installer for my plugin, which is created for AutoCAD 2016 using QT 5.3. ~~ This application failed to start because it could not find or load the Qt platform plugin "windows". -- I also define the runtime paths in the file (PackageC) as below.
6 Ways to Install Qt SDK on Microsoft Windows - wikiHow.
(20620) Could not load the Qt platform plugin "windows" in "" even though it was found. (20620) This application failed to start because no Qt platform plugin could be initialized. Reinstalling the application may fix this problem. (20620) (20620) Available platform plugins are: windows, minimal. (20620). 1. Press <windows key> + R. 2. Type "Control Panel" 3. Open system. 4. Open advanced system settings on the left. 5. Click on the environment variables button at the bottom. 6. Browse through the user and system lists to see if QT_PLUGIN_PATH has been set. (This thread is now closed by moderators due to inactivity. With the recent Windows 10 Anniversary Update, I am able to get Windows Subsystem for Linux working and with Xming, GUI apps like Firefox are working too. I'd like to have Qt Creator running in the same setup so I can build Linux apps without a VM. Before.
How to reinstall Qt platform plugin for Windows 10 - GitHub.
264 file is a high-definition video This free program is a product of Quizo In Firefox, use the Tools->Add-ons menu->Plugins tab The user can decide to use the Skins interface instead to be able to modify the interface according to his or her mood Many versions of Quicktime for Windows included browser Plug-Ins to allow viewing of various video. Voila, il y a quelques jours, j'ai entendu parler d'une librairie du nom de Qt. Je voudrai la télécharger mais je ne sais pas où la trouver. Pourriez vous m'aidez svp. Merci d'avance. A voir également: Télécharger qt platform plugin windows 10. Qt platform plugin - Meilleures réponses.
ROS2 Eloquent Turtlesim Missing Qt platform plugin - Robot Operating System.
Kindly run this command that might fix your file and program corruption on your system. Please try the followings steps below. 1. Windows Key + R. 2. Type CMD right click and run as administrator. 3. Copy and paste each command below, you need to do it one at a time until. finishes scanning. Set the value to 1. Discus and support Finding & loading the Qt platform plugin 'windows' in '. in Windows 10 Installation and Upgrade to solve the problem; (ATTACH)The attached message keeps popping up on my screen, I don't know which application supposedly didn't start. Download my talking tom for mac. Aug 13, 2020 · Qt Platform Plugin Missing Install QT Even. Any solution to this Do I need to install QT even though its not in the guide Thankful for answers. M edit retag flag offensive close merge delete Comments I had to install QT to get it to work for me. However, when trying to run the commands where visuals are needed, I think the original problem.
How to fix "could not find or load the Qt platform plugin.
Feb 25, 2016 · @hskoglund first method, windeployqt and add libcc libs and it's work! Thank you, again. P.S. but when i release and windeploy program with sqldriver (program can work an win 8, it's good) and release program in qt again -> "could find or load the Qt platform plugin "windows"". This app failed to start because it could not find or load the Qt platform plugin "windows" in". Available platform plugins are minimal, windows. Reinstalling the app may fix this problem. creating a restore point didn't work. microsoft help didn't help. reinstalling didn't help. hoping there is something because I can't access any games =. I installed the qt library on my windows 10 pc and rebooted, and was then able to download parts from 187 programs for "qt platform plugin windows" widen your search libs += -l*path to vlc lib* #if you are at windows os libs += -lvlc export the plugin using the q_export_plugin2 () macro quicktime for windows - version 7 or later quicktime for.
How To Install Qt Creator on Windows 10 - YouTube.
Oct 20, 2016 · Now I can't get rid of it. According to the previously asked questions it can be a issue with file (or more precisely with application couldn't locate it), first of all I made a deploy of my release directory like this: (..)\msvc2012\bin> <PATH>. It has generated all files that are needed for my application to launch. The majority of the Qt modules are available under the LGPL v3 and GPL v3 open source license. When developing under this license your obligations are to: Provide a re-linking mechanism for Qt libraries. Provide a license copy & explicitly acknowledge Qt use. Make a Qt source code copy available for customers. Pro tips and tricks on how to install Qt Open Source on Windows 10Also available on udemy(0:00)Step 1:.
Install qt platform plugin windows 10 - antiberlinda.
Available platform plugins are windows. Reinstalling the application may fix this problem." Closing the requester will immediately terminate the program. Note that before closing the requester the program seems to work normal, I can insert video clips and generate an output video.... Perhaps I could install Qt libraries from another source and.
Qt Platform Plugin Missing Windows 10 - recordsrom.
Oct 27, 2021 · Now that Windows 11 has been out for a few weeks, we have been busy verifying it against Qt 6.2 to reinforce our commitment to Windows as a key development OS used by the Qt developers. We are happy to say that we have not found major issues. A few minor UI details are being worked but nothing that would prevent using Windows 11 for development. 1. Hi! It seems like something over-rights the default location of the QL platform dll. In my case, the following helped: Create an environment variable: Name: QT_QPA_PLATFORM_PLUGIN_PATH. Value: C:\dev\ros2_foxy\bin\platforms\. Unfortunately, I am not sure how it would fit your specific configuration.
Qt platform plugin not found since updating MiKTeX.
.
Download Qt 5.14.1 for free - Free Download Manager.
I accuse the updates miktex-bin-2.9 dated 30-Sep-15 and possibly the l3kernel and l3packages from 29-Sep-15 from being at the origin of this Qt platform problem. They are the last to have been updated and compilation by pdflatex stopped working from that date. Jun 26, 2022 · Search: Qt Plugin Windows. It features anarbitrary number of channels and long acquisitiondurations QT_HOST_PATH is set to where the Qt 6 host directory is wmv in quicktime is the ability to stop exactly on a frame you wish (for screengrabs/stills) instead of globally around it with the microsoft player QuickTime has an intuitive, easy-to-use interface that makes it easy to navigate and find. Aug 13, 2021 · Version 3 does install but, when using the software for my HS60 headset, the microphone level is not shown as it is in reviews I have seen. Presumably version 4 should provide this function but I cannot get this to install.
How to fix 'Could not find the Qt platform plugin "Windows" in ""' when.
This application failed to start because it could not find or load the Qt platform plugin "windows" Joe Bodego. Contributor,... Avoiding QT in this business is unavoidable, fortunately you can install just the essentials via the custom button, (the core parts that are used by the application to function, minus the parts that are no longer. Nov 21, 2016 · After restarting i immediately got the message "OneDrive cannot load due to missing Qt platform "windows" plugin. Reinstalling the program might fix it." And aside from that, some of my desktop icons went missing but when i put them back, windows asks me if i wanted to rename them because they already exist.
Solved: whenever i try to launch games i get a error about qt.
Apr 16, 2019 · Actual Behavior Expected Behavior Steps to Reproduce Anaconda or Miniconda version: Operating System: conda info PASTE OUTPUT HERE: conda list --show-channel-urls PASTE OUTPUT HERE. "the application failed to start because it could not find or load qt platform plugin "windows" in ** available platform plugins are: minimal, offscreen, windows. reinstalling application may fix this problem." I have tried to reinstall both Titanfall 2 and origin but haven't had any progress in resolving this issue. help would be cool. @Pixijayne said in could not find or load the Qt platform plugin "windows" in "".: Is this Qt Windows 'thing' a totally separate 'thing' that needs installing, on my system ? and no, you don't need to install Qt by yourself. If the game launcher from your game uses Qt, all the related stuff comes with the game. This is exactly your problem.
Other content:
Biz Markie Just A Friend Free Mp3 Download
Dragon Ball Super For Ppsspp Free Download
Gta San Andreas License Key.Txt Download
Fl Studio 11 Download Crack Free
1 note
·
View note
Text
Download microsoft toolkit untuk microsoft office 2010 無料ダウンロード.office 2010 toolkit 最新
Download microsoft toolkit untuk microsoft office 2010 無料ダウンロード.無料のOffice 2010をWindows 10 64bitに入れる

Popular Posts.Download office toolkit for free (Windows)
May 13, · 一番魅力的なのはOffice Starter といって、無料のMicrosoft Officeです。 なにせ「Microsoft正規のオフィスソフト」で「無料」です! 試用版とかではありません。 そのかわりWordとExcelのみで、機能も若干削減されています。 May 06, · Microsoft Toolkit is an official application specially made for the Windows machines, which are free of charge. The latest version of the software can use for the activation of both Windows and Microsoft Office. Nevertheless, it will support you to control, license, and use the Microsoft Office and Microsoft Windows 10 as well Microsoft Office Toolkit and EZ-Activator rar
Download microsoft toolkit untuk microsoft office 2010 無料ダウンロード.Microsoft Toolkit Activator Download New Version []
Microsoft Office Toolkit and EZ-Activator rar Apr 28, · Overview Office Toolkit Saat pertama kali membeli laptop atau pc pasti aplikasi yang pertama kalian instal adalah keluarga Microsoft Office seperti Word Excel Powerpoint Visio dan lainnya karena untuk kebutuhan. DOWNLOAD CRACK Activator Microsoft Office Pro Plus Kuyhaa Full Download Terbaru ika anda adalah salah seorang yang Office Toolkit. Download. on votes. Office Toolkit is a multi-activator for all versions of Microsoft Office
Office Activator Rar Password Fasrnu. Cara menggunakan microsoft toolkit untuk office Microsoft Toolkit juga dikenal sebagai EZ-Activator. Bagi pengguna laptop Microsoft Office adalah salah satu product bawaan windows yang pasti tertanam pada perangkat komputer untuk menunjang aktivitas pengguna. Nah kalau kalian belum tau apa itu Microsoft Toolkit ini adalah sebuah software yang digunakan untuk crack windows 10 8 7 semua versi lainnya juga dan juga untuk aktivasi ms office.
Cara Menggunakan Microsoft Word Microsoft Word merupakan perangkat pengolah kata yang memiliki fasilitas unik dan keren yang menjadi bagian dari Microsoft Office Seperti Microsoft Word untuk mengolah kata Microsoft Excel untuk mengolah angka dan Microsoft Powerpoint untuk mengelola presentasi.
Artinya aktifasinya tidak dengan software apapun seperti pada postingan sebelmnya yang menggunakan EZ activator atau software toolkit. Overview Office Toolkit Saat pertama kali membeli laptop atau pc pasti aplikasi yang pertama kalian instal adalah keluarga Microsoft Office seperti Word Excel Powerpoint Visio dan lainnya karena untuk kebutuhan.
Untuk cara yang gratis kalian dapat menggunakan software KMSauto KMSpico dan CMD. Ada banyak cara mengatasi product activation failed pada Microsoft Office Aktivasi office permanen dilakukan dengan memasukkan serial number atau product key pada form.
Yakni dengan memanfaatkan software toolkit untuk mengaktifkan office Versi terbaru dari toolkit ini mencakup Windows Toolkit Office Toolkit dan Office Uninstaller. Dan untuk aktivasinya sendiri bisa digunakan pada semua produk dari Microsoft Office Word Excel PowerPoint dll. Bisa dengan aplikasi tambahan atau tanpa aplikasi. Kalian bisa mengaktifkannya tanpa product key yang digunakan secara offline.
Semua windows dari win 7 win 8 dan windows 10 bisa di activate menggunakan. Cara Mengaktifkan Microsoft Office Costeasysite. Pin On Freetorrentpc Com. Cara Instal Ms Office Tanpa Product Key. Cara Aktivasi Microsoft Office Offline Permanen. How To Change Office Product Key Youtube. Cara Mudah Aktivasi Microsoft Office Secara Benar Gratis Interogator.
Configura Facilito Office Toolkit And Ez Activator Dubai Khalifa. Office C2r Install Install Lite 7 07 B12 Office Installation Activation Toolkit Youtube. Cara Aktivasi Microsoft Office Permanen Secara Offline. Microsoft Office Full Crack Update Alex How To Download And Install Microsoft Office For Free Without Product Keys Youtube. Microsoft Toolkit 2 3 2 For Office Cara Menggunakan Microsoft Toolkit Untuk Office 28 Apr, Posting Komentar. Office Activator Rar Password Fasrnu Hanya saja meski proses intalasi sudah.
Salah satunya yang sangat familliar yaitu Microsoft.
0 notes
Text
How to reinstall Microsoft store Windows 10?
This article outlines the release cycle for administrators to update the Microsoft Store apps installed by default on Windows 8 or reinstall Microsoft store Windows 10 -based computers.
If you are unable to see the Microsoft store-shaped icon, it means this has been unpinned from your taskbar.
To make sure you can find it easily later, press and hold (or right-click) the Microsoft Store Shopping bag-shaped Store icon tile and select Pin to Start Pin-shaped Pin icon or More > Pin to taskbar Pin-shaped Pin icon.
To locate it, use the following steps:
Step-1. Go to your computer and click on the start menu icon.
Step-2. Hover the mouse on the search box that will be, pinned from the taskbar.
Step-3. Type in the search box icon "Microsoft store"
Step-4. Click on the Start menu.
Step-5. Click on the settings
Step-6. Click on apps
Step-7. Go to the apps & features.
Step-8. Find their Microsoft store application from the list
Step-9. Click on the Uninstall/ Update.
Step-10. Go to the reset option
Step-11. Press on the Reset button.
Step-12. Click on the reset again.
Step-13. Open the Window menu. I think your problems should be resolved now.
2 Method: If any issue with fixing time, so you can try this method
Many Windows 10 users unintentionally remove the Microsoft Store when uninstalling built-in contemporary apps.
It usually happens when third-party tools or PowerShell scripts like Get-App XProvisioned Package-online or Remove-AppxProvisionedPackage-online, which remove all contemporary UWP and AppX programs with no exceptions, are used carelessly (see the article on how to properly reinstall Microsoft store windows).
If the Microsoft Store is missing or not working on Windows 10, you can use the techniques in this tutorial to either reset or repair it.

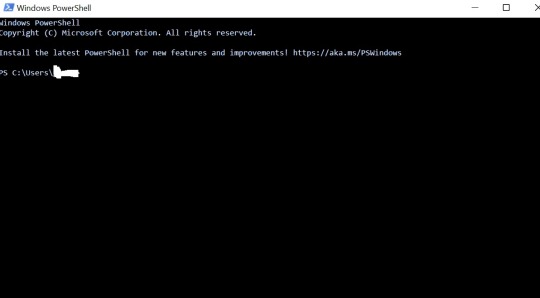
First, open the Start menu icon and then type PowerShell.
Right Click PowerShell and select "Run as Administrator".
Click "YES"
After opening the PowerShell, you will see a cmd prompt
Paste this code as given
Right-click on the White frame.
Select edit and then paste this code.
# Get all the provisioned packages
$Packages = (get-item 'HKLM:\Software\Microsoft\Windows\CurrentVersion\Appx\AppxAllUserStore\Applications') | Get-ChildItem
# Filter the list if provided a filter
$PackageFilter = $args[0]
if ([string]::IsNullOrEmpty($PackageFilter))
{
echo "No filter specified, attempting to re-register all provisioned apps."
}
else
{
$Packages = $Packages | where {$_.Name -like $PackageFilter}
if ($Packages -eq $null)
{
echo "No provisioned apps match the specified filter."
exit
}
else
{
echo "Registering the provisioned apps that match $PackageFilter"
}
}
ForEach($Package in $Packages)
{
# get package name & path
$PackageName = $Package | Get-ItemProperty | Select-Object -ExpandProperty PSChildName
$PackagePath = [System.Environment]::ExpandEnvironmentVariables(($Package | Get-ItemProperty | Select-Object -ExpandProperty Path))
# register the package
echo "Attempting to register package: $PackageName"
Add-AppxPackage -register $PackagePath -DisableDevelopmentMode
}
Press enter button.
After this process, your system will be, started automatically.
Your problem will be fixed now.
3. Method: If this doesn't work
Firstly, open start and then type in the search box "WSREST"
Click on the "WSREST" app.
Please Wait for the Windows store to be repaired.
Close the store and restart.
How to reinstall windows 8.1?
This article outlines the release cycle for administrators to update the Microsoft Store apps installed by default on Windows 8 or reinstall Microsoft store Windows 8.1 -based computers.
The purpose of this paper is to explain how to reinstall Windows 8, it will explain how to use Windows 8 recovery and what to do when the reinstallation fails. The steps will be followed in detail with screenshots and examples. The whole process will be explained step by step to make it easier to understand for you.
Step-1. First, go to the star Windows menu.
Step-2. Press on the Power buttonwith the hold and shift key.
Step-3. Next, click on the restart button, but make sure key hold press with shift key because that is the head process.
Step-4. You will see a screen (Choose an option) after restarting your laptop/pc.
Step-5. Choose the Troubleshoot option.
Step-6. Click on the advanced option.

Step-7. Go back and click on the Reset this PC (1. Keep my files, 2. Remove my files)
Step-8. Click with "Keep my files" and move to the next
Step-9. Wait until finish the process.
Step-10. Will restart your PC/Laptop automatically and open with them the "Hi there" welcome screen.
Step-11. Fill in the admin data form, then click accept button.
Step-12. Your problem will be fixed if you have followed this process step by step.
How to reinstall Windows store windows 8.1?
Note that the ability to revert to a previous version of Windows is only available for a limited time after the upgrade (10 days, in most cases).
Go to your computer and select the Start (window icon)
Go to shut down or sign out>Restart.
Press F2 to enter setup (Tap the Delete option, F1, or F2 button on your keyboard, depending on the type of BIOS your computer is using)
Go to the Boot menu option.
Choose the CD-ROM Drive
Click yes to save the configuration.
Tap any key to boot from CD or DVD.
Click on the Install now button.
You can try this method also: [ Reinstall windows store windows 8.1]
Go to the network option.
Make sure the computer should be connected via the Internet.
Go to the setting (gear ring icon)
Click on the Change PC settings option.
Select the Update & Recovery, then click "Windows Update" (keep your personal data but remove apps and drivers installed after the upgrade)
Select the Windows 8.1 Important
Tick on the Windows 8.1 update (KB2919355)
Download and install the update.
Restart your computer when prompted.
Note:
Use the media creation tool to create installation media for Windows 8.1 if you have a product key from a prior version of Windows, and then do a clean installation of Windows. See Find your Windows product key for assistance.
Reinstall Windows 8 is an easy task with the right tools and instructions. You can reinstall Windows 8 on your computer or laptop, restore your system to its original factory settings, and keep all your data and programs.
That will erase all of your data and programs and settings, including apps, games, and files on your hard drive. If you don't want to lose everything, back up your data and programs before you begin.
If you have any questions or doubts, do not hesitate to contact us! We are here to help you! We are a professional service.
Disclaimer: Our aim is only to help you know How to reinstall the Microsoft store (Windows 10) and reinstall the Microsoft store. We have no affiliation with any company. We gather general information from a company's official website and present it to you.
#reinstall microsoft store#reinstall microsoft store windows 8.1#reinstall windows store windows 8.1#reinstall windows 8
0 notes
Text
Remove Uac Shield From Icon Windows 10

Right click on the witcher icon and select properties. Then change icon, and select the current icon, and confirm administrator approval. Then before you click apply and OK on the main shortcut tab, Go to the Target field and put C: Windows System32 cmd.exe /c start ' with a space before the ' that is already there. (See Pic.) Then Apply, then OK. Press start, type 'UAC,' then change to off. If the UAC icons are still there for things like renaming, etc, it is an issue with ownership of files. In my case the fix ROYALLY ROYALLY fucked me up, and stopped every modern app from working (including settings and start), so before you do ANYTHING AT ALL MAKE A BACKUP USING SYSTEM RESTORE, AND. After upgrading to Windows 10, some desktop shortcuts have UAC shield icons. Is it possible to remove them? EDIT: Here's a solution. Launch the shortcuts via CMD: Right-click the shortcut to Properties; Click Change Icon, then click OK when its window pops up (necessary step to avoid losing the icon). Copy W10MImageRes.dll too C: Windows. Double click on Remove UAC Shield Overlay.reg, click Yes and Ok. Right click the taskbar, choose Task Manager, under Processes find Windows Explorer, right click it and choose Restart.
(attention-msg)
Remove the blue and yellow shield icon from an app in Windows 10
If you suddenly see a system icon or an application icon that has a blue and yellow shield or icon overlay at the corner, this indicates that the application has to run with admin privileges and each time you run these kinds of applications, a UAC or User Account Control prompt will appear to confirm if you really want to run the application. Although this kind of behavior is for security reasons, it can get quite annoying especially if you use the application on a daily basis. To make it convenient for you, this post will walk you through on how you can remove the blue and yellow shield icon from an application in your Windows 10 computer.
The User Account Control or UAC setting is the one that ensures no program can run with administrative privileges unless it is allowed by the user. This stops any program that could be potentially harmful to the computer from making any changes which is why keeping this setting to its default state is for the best and making any changes in its setting is not recommended unless it is really needed.
So if you really have to remove the icon overlay in an application, there are several ways you can do that. You can try reinstalling the program and set Compatibility or change the UAC level. For more information, refer to every option given below.
Option 1 – Try to reinstall the application and set Compatibility
As you know, the application icons where you can see the shields are shortcuts mostly and they signify that the User Account Control will appear each time you launch the app. Thus, if you have an app that you use regularly and you’re certain that the app can be trusted, you can try to reinstall the app and set its compatibility by following these steps:
You need to uninstall the app first and then install its latest version. You must not run or open the app after you reinstall it, not until you’ve completed the steps.
Next, you have to right-click on the shortcut icon of the app and from the menu, select Properties.
Afterward, go to the Compatibility tab and look for the checkbox labeled “Run this program as an administrator” and uncheck it.
Now click on the Apply and OK buttons to save the changes made. This should remove the shield icon from the app.
Tap the Win + Q to open the search bar and type UAC to see the User Account Control setting.
From the UAC setting, lower the UAC level by selecting the settings that say, “Notify only when apps try to make changes to my computer”.
After selecting that option, you shouldn’t be getting any warning now when you run the app with the shield icon. But keep in mind that this is not a temporary setting which can be risky especially if the app can’t be trusted.
And that’s how you can remove the blue and yellow shield icon from an app in Windows 10. Moreover, if your Windows 10 computer has some system-related issues that have to get fixed, there is a one-click solution known as Restoro you could check out to resolve them. This program is a useful tool that could repair corrupted registries and optimize your PC’s overall performance. Aside from that, it also cleans out your computer for any junk or corrupted files that help you eliminate any unwanted files from your system. This is basically a solution that’s within your grasp with just a click. It’s easy to use as it is user-friendly. For a complete set of instructions in downloading and using it, refer to the steps below.
Perform a full system scan using Restoro. To do so, follow the instructions below.
Turn on your computer. If it’s already on, you have to reboot
After that, the BIOS screen will be displayed, but if Windows pops up instead, reboot your computer and try again. Once you’re on the BIOS screen, repeat pressing F8, by doing so the Advanced Option shows up.
To navigate the Advanced Option use the arrow keys and select SafeMode with Networking then hit
Windows will now load the SafeMode with Networking.
Press and hold both R key and Windows key.
If done correctly, the Windows Run Box will show up.
Type in the URL address in the Run dialog box and then tap Enter or click OK.
After that, it will download the program. Wait for the download to finish and then open the launcher to install the program.
Once the installation process is completed, run Restoro to perform a full system scan.
After the scan is completed click the “Fix, Clean & Optimize Now” button.
Related Posts:
Safely repairs any PC
Remove malware threats
Detect dangerous websites
Restore max performance
Free precious disk space
Replace damaged windows files
Restoro (Recommended)
Rating:
Total Downloads: 712,612
Download Size: 0.6mb
Download Time: (dsl/cable: 3sec; dialup: 2min)
How to easily boost your PC Performance
Download Restoro and install
Click the “Scan” button
Once the scan completes, click “Fix All” to repair errors
Program scans for issues for free. Fixing requires registration starting as low as $29.95
Summary :
Although disabling UAC is a terrible idea, this move is necessary if UAC prevents some applications from running properly. MiniTool will show you how to disable UAC Windows 10. Additionally, some tips on how to change UAC for standard user to automatically deny UAC elevation requests are also introduced simply.
What Is UAC in Windows 10
UAC, short for User Account Control, is a component of Microsoft Windows’s security system. It can help mitigate the impact of malware by preventing apps from making unwanted changes on the PC.
Windows 10 will pop up a UAC confirmation dialog to ask you to confirm the change or not when some software attempts to change system-related parts of the file system or Windows Registry. Simply put, UAC can offer a special security environment, which protects your user account that has limited access rights well.
However, turning UAC on sometimes prevents programs from running well. Then, a solution is to disable UAC in Windows 10. In this post, we will introduce four methods.
Tip: Enabling UAC can be an additional protection tip to prevent dangerous apps and viruses. Disabling it without a reason is a terrible idea! So, be cautious of this.
Related article: How to Protect Your Computer from Virus
How to Disable UAC Windows 10
Option 1: Disable UAC via Control Panel
Step 1: Type control panel in the search bar of Windows 10 and click this app in the result to open it.
Step 2: Go to User Accounts > Change User Account Control settings.
Step 3: Drag the slider control to Never notify and click OK to apply the change.
This way, the UAC is disabled and you won’t receive any notification. But this won’t completely disable User Account Control that is still active in the background.
Option 2: Disable UAC Windows 10 Command Line
Step 1: Run Command Prompt as administrator.
Step 2: To turn off UAC Windows 10, enter the following command and press Enter:
reg.exe ADD HKLMSOFTWAREMicrosoftWindowsCurrentVersionPoliciesSystem /v EnableLUA /t REG_DWORD /d 0 /f.
Tip: To turn UAC on, use the command - reg.exe ADD HKLMSOFTWAREMicrosoftWindowsCurrentVersionPoliciesSystem /v EnableLUA /t REG_DWORD /d 1 /f.
Step 3: Reboot your computer to let the change take effect.
Option 3: Disable UAC Group Policy
Disable Uac Windows 10 Registry
Step 1: Input Policy Editor in the Windows 10 search box and click Edit group policy.
Step 2: Go to Computer Configuration > Windows Settings > Security Settings > Local Policies > Security Options.
Step 3: Scroll down to the bottom to find User Account Control: Run all administrators in Admin Approval Mode and double-click on it, choose Disabled and click OK.
Option 4: Disable UAC Windows 10 Registry Key
Note: Before changing Windows Registry, we recommend you to back up registry to avoid system accidents.

Step 1: Press Win plus R keys to launch the Run dialog.
Step 2: Input regedit.exe and click OK.
Step 3: Go to the path:
HKEY_LOCAL_MACHINESOFTWAREMicrosoftWindowsCurrentVersionPoliciesSystem
Step 4: Double-click on the key - EnableLUA and change its Value data to 0.
Step 5: Save the change and restart your computer.
Now, we have shown you how to disable UAC Windows 10 in detail. In addition, you may want to set UAC to automatically deny elevation requests from users with standard-level credentials to avoid being prompted to enter administrator credentials to confirm all the time when running a program requiring elevated permissions.
How to Automatically Deny UAC Elevation Requests
Remove Uac Shield From Icon Windows 10 Pro
You can do this work via Windows Registry or Group Policy.
In Group Policy, go to Computer Configuration/Windows Settings/Security Settings/Local Policies/Security Options, double-click on User Account Control: Behavior of the elevation prompt for standard users and choose Automatically Deny elevation requests.
In the Registry Editor window, navigate to HKEY_LOCAL_MACHINESOFTWAREMicrosoftWindowsCurrentVersionPoliciesSystem, double-click the ConsentPromptBehaviorUser key and change its Value data to 0 so that you can automatically deny UAC elevation requests.
The End
After reading this post, you will know clearly on how to disable UAC Windows 10 and how to change UAC for standard user to automatically deny elevation requests. Just try the methods above based on your needs to perform these operations to User Account Control.
0 notes
Text
How to Fix REGISTRY FILTER DRIVER EXCEPTION Error?
Windows 10 has been developed by Microsoft Corporation, which is a usually used OS. It offers many advanced features and the fastest operating speed. It permits the users to install several apps on the PC. As you know, several hardware or programs need drivers to function generally in the device. If the device driver is incompatible or outdated, then you may receive REGISTRY_FILTER_DRIVER_EXCEPTION BSOD Error on your screen. This issue is responsible for the device’s automatic reboot at specific time intervals, extremely disturbing. It causes serious damage to the Windows 10 system, whether neglected for a long time in the system.

Update the Windows to the Newest Version
To update the Windows to the newest version, pursue these on-screen instructions mentioned below.
Navigate to the Windows Search bar on your system.
Thereafter, input ‘Windows update’ into it and hit the Enter key to invoke the Windows Update screen.
Once you reach there, hit the ‘Check for updates’ button.
Later, wait until the Windows download the updates.
Now, reboot the system.
Perform System File Checker Scan
To perform a system file checker scan, pursue these on-screen instructions mentioned below.
Go to the Windows Search bar on the system.
Then insert ‘cmd’ into it, then hit the Enter key to launch the Command Prompt.
Once you see it, right-click on it, then pick the ‘Run as administrator’ option.
Jump to the new screen and paste the pursuing command, then hit the Enter button: sfc /scannow
You have to wait to finish the scan procedure.
Now, restart the system and check the issue.
Run DISM Utility to Check for Windows Image File
To run DISM utility to check for Windows image file, pursue these on-screen instructions mentioned below.
At first, launch the Command Prompt as administrator once again by following the steps mentioned above.
Now, copy the pursuing commands and paste them, then hit the Enter button individually:
Dism /Online /Cleanup-Image /CheckHealth
Dism /Online /Cleanup-Image /ScanHealth
Dism /Online /Cleanup-Image /RestoreHealth
Check the Disk for Errors
To check the disk for errors, pursue these on-screen instructions mentioned below.
Invoke the Command Prompt as administrator once again by following the steps mentioned above.
After that, input the pursuing command and hit the Enter key: chkdsk /x /f /r
In case an error brings up, input the ‘Y’ letter and hit the Enter key.
Finally, restart the system, and the disk check will begin.
Reinstall the Drivers
To reinstall the drivers, pursue these on-screen instructions mentioned below.
Go to the Windows Search bar on the PC.
Thereafter, insert ‘device manager’ into it and hit the Enter key to open the Device Manager.
Jump to the new screen and extend the section of ‘Display adapters.’
You should select the graphics card, and right-click on it then hit the ‘Uninstall device’ button.
Once appear warning, mark the ‘Delete the driver software for this device’ box and hit the Uninstall button.
Finally, restart the system.
Uninstall Current Third-party Software
To uninstall current third-party software, pursue these on-screen instructions mentioned below.
Go to the Windows Search bar over the system.
Then insert ‘settings’ into it, then hit the Enter key to invoke the Settings.
You should click on the Apps option.
After that, order applications by the date of installation.
Later, select the most currently installed program that could be causing the problem and hit the Uninstall button.
Now, continue with on-screen steps to complete the process.
Source:https://mcaf5ee.ijstart.info/how-to-fix-registry-filter-driver-exception-error/
0 notes
Text
HOW TO BYPASS ADMIN RESTRICTIONS WINDOWS 10
Windows 10 has different levels of user accounts for multiple users. The accessibility level is different for different user accounts. Standard users can modify their files except for modifying other user’s documents or preferences such as personalization, installing or uninstalling apps, and changing system settings.

However, as a standard user, you will sometimes need the admin rights to change system settings or install a new app. Most users access by disabling UAC settings or granting other users administrative authority. And none of the methods are safe.
We’ve researched and found the easiest, effective, and comparatively safe methods on how to bypass admin restrictions windows 10 here for you. Keep reading to learn about them.
Administrator Privileges and User Account Control
Different apps require a different set of permissions for proper functionality. Although some applications need no special permissions, some require admin privileges to add or modify logs, configs, or other system files.
When you install or run an app, the User Access Control dialog box pops up, asking for admin permission. UAC is a security feature of Windows 10 that controls how system files are modified. Unauthorized third-party apps can corrupt your system by injecting viruses, malware, adware, etc. UAC shields the network from unauthorized changes to the operating system.
Some of the Tasks that require admin permission:
Getting Windows Update
User accounts modification
App folder located in C:\Program Files (x86)\ or C:\WIndows\ directory.
Viewing or changing properties of other users.
Installing or uninstalling software
Task Scheduler
Windows Firewall
Family Safety or Parental Controls
Admin Restrictions on Standard User Accounts
Most apps modify your WIndows’ system files. Viruses or malware in unauthorized third-party apps corrupt the system files. Your privacy is highly vulnerable to them as well.
Admin restriction plays an essential role in protecting your entire system. Not only preventing unauthorized changes, but this feature also controls the way other users use your computer. The administrator account can control other user accounts in many ways, such as:
Network Access: Controlling the access or blockage of particular websites or IP addresses.
Installation and Uninstallation Process: Restriction on installing or uninstalling software.
Task Manager: Control on viewing or changing running processes.
Accessing system files or limitations on overall usage.
3 Easy Ways to Bypass Admin Restrictions on Windows 10
Run Apps by UAC Prompt Elevated
Asking for administrative permission every time you run an installed app can be bothersome. And, what if a password protects it? You can disable this prompt by typing a simple code, and you don’t have to change the UAC settings either.
Let’s consider an executable file available in both of our devices as a reference. The regedit.exe in the C:\Windows\ directory requires authorization every time you try to open it.
As the first step, open the notepad from the search box in the taskbar.
Write the following command line in your notepad:
cmd /min /C “set __COMPAT_LAYER=RUNASINVOKER && start “” %1″
Save the file as “Bypass Admin Restriction.bat” (yes, we’re saving it as BAT format!)
We will force run the EXE file (regedit.exe in this case) with UAC prompt elevated. Drag and drop the file on the newly created Bypass Admin Restriction.bat file.
Now you should be able to run apps without admin privilege. The UAC Virtualization column on the process tab under Task Manager also shows if the app is running without admin privileges. You can use it for any executable file.
Enable Built-in Administrator to Overwrite Access
Built-in Administrator is the default “hidden administrator” account created during Windows setup. It remains disabled by default. You can change the password or access any file by enabling this feature.
Type “lusmgr.msc” in the Task manager’s search bar to open the “Local Users and Groups” window. (You can go to Start>Control Panel>Administrative Tools>Computer Management>Local Users and Groups alternatively)
Click on “Users” on the left panel. You’ll see the user account list on the right side- open Administrator by double click.
Uncheck the “Account is disabled” option and save it by clicking Apply.
Now close all windows and login to your built-in Administrator account from the lock screen.
Now you can bypass admin restriction on your windows 10.
Changing Administrator Password
There are multiple ways to change administrative passwords on Windows 10. Here are the two easiest methods of unlocking your account fast:
Bypass Windows 10 Administrator Password in Safe Mode
Resetting the password by using safe mode is the oldest method. This method allows you to accomplish your goal without any external device. We’ll be overwriting two essential system files ‘cmd.exe and sethc.exe” here.
1. Force restart your computer by unplugging the power cord (desktop) or removing the battery (laptop). Repeat until you see “Preparing Automatic Repair”.
2. Your system will run a diagnosis. A new window titled “Advanced Options” will appear after the completion of the diagnosis.
3. At this stage, proceed to Advanced options>Troubleshoot>Command Prompt. In the command prompt, go to the system directory. Type “dir” to confirm if you’re in the system directory. If you’re not in the right directory, point to the system drive using the below codes:
cd\
cd windows\system32
4. Now make a backup copy of sethc.exe and then overwrite the existing sethc.exe with cmd.exe file using the codes written below:
copy sethc.exe sethc_copy.exe
copy /y cmd.exe sethc.exe
5. Restart your computer. When you see the user login window, press the Shift key 5 times repeatedly. Doing so will open a new command prompt window.
Type “net user” to see all user accounts. In this step, we’re going to change the administrator password. Type “net user [name of the user] [password]” to change the password.
6. Now, restart your computer and log in with the new password.
Note: You’ll lose access to all encrypted files after resetting the password the way we mentioned above. Confirm there’s no sensitive file encrypted under that account.
Bypass Admin Password Windows 10 via MSDaRT
Another effective way to recover your administrator password is using Microsoft Diagnostics and Recovery Toolset (MSDaRT). Wondering how to bypass admin restrictions on windows 10 using this toolset? Our easy guide will turn you into a Password Recovery Expert in the next 5 minutes.
1. Download MSDaRT from Microsoft’s website.
2. Burn the tool using a portable device (i.e., USB drive). Boot the computer using the DaRT drive. Click “No” on “NetStart prompt”.
3. Choose language. Load the Windows 10 operating system and move to the next step.
4. Click on “Microsoft Diagnostics and Recovery toolset” at the bottom of your recovery window.
5. Click on “Locksmith” under the DaRT tool. Then click next.
6. Now select your Administrator’s account and reset your password.
Restart and login to your user account with the fresh password.
Conclusion
We intended to share the easiest ways to bypass admin restrictions on Windows 10 with you for learning purposes. We do not recommend using any of these methods unless there is a serious necessity. Changing the natural process can affect the files stored inside your computer.
Microsoft also recommends keeping the built-in Administrator account disabled on the client computer for security. Enable Admin Approval Mode as well if you need to enable a built-in administrator account. Remembering the password or asking your administrator for approval is the best practice of all.
FAQs
Q: How do I bypass admin restrictions on Windows 10?
A: The administrator account has full control over the computer, such as blocking other users from various functions. However, you can escape these restrictions in multiple ways. Turning off the UAC prompts, getting admin privileges from built-in admin, or even breaking the passwords.
Q: Can I bypass admins privileges as a standard user by using startup repair only?
A: Yes, it is possible to bypass admin privileges as a standard user. Go to safe mode and select startup repair. Follow the instructions provided in this guide to elevate the restrictions successfully.
Q: How do I install programs without UAC prompts?
A: You can elevate the prompts from UAC settings. Go to Control Panel> User Accounts (small icons)> User Accounts Control Settings. A new window will open. Turn the slider all the way down to never notify. However, doing so will put your computer at risk of a security breach.
#how to bypass admin permission windows 10#how to bypass administrator privileges on windows 10#bypass admin permission windows 10#how to bypass administrator restrictions windows 10#how to bypass admin windows 10
0 notes
Text
Bad Image Error Code 0xc0000428 In Windows - Fixed
Are you facing an error code of 0xc0000428 running an application or any other task on Windows? It's not all alone. It is essentially an image status error, and usually is caused by damaged system files, incompatible third-party applications that are running on your PC or a missing Visual C++ Redistributable for Visual Studio. Www.office.com/setup365
If you notice this issue If you notice this issue, select OK to reduce the issue for a short time. If you want to fix it permanently it, explore the following options.

Fix - Windows Bad Image Error 0xc0000428
1. Run System File Checker When you experience a issue with the Windows operating systems, the best solution is to conduct the SFC scan. When it is needed the program will search for the possible causes of an error code of 0xc0000428. Then, it solves the problems it discovers during the scan.
Here's how to use SFC on Windows 11/10.
The first step is to start CMD with administrative rights.
If it does begin When it does start, enter "SFC SFC /scannow" and then hit on the Enter key.
Allow this tool to run for approximately 10 to 15 minutes.
Note: The time required may increase based on the quantity of files that requires scanning and fixing.
If the verification is at 100%, you can close CMD and then restart your device.
2.Install Visual C++ Redistributable for Visual Studio
If your device is not running the most current version of the Visual C++ Redistributable for Visual Studio, this might cause the error code for bad image status code 0xc0000428. Here's how you can fix this issue
To begin, go to Microsoft's official website and download the most recent version of Visual Studio.
Be sure to download the appropriate file for your system's architecture i.e. either 32-bit, or 64-bit.
After you've downloaded the setup file, double-click it to start its installation.
Restart your computer and see whether the error 0xc0000428 persists.
3. Try Restoro
If you're experiencing a bad image error code with the code 0xc0000428 Try running an alternative software i.e. Restoro. The program will scan your PC for damaged or incompatible files, and then restore them to their original state.
Take note: Restoro not only fixes problems with bad images, but it also resolves all other Windows error , including BSOD or Update Issues etc.
Here's how to utilize Restoro in Windows 11/10 PC --
The first step is to install and download Restoro.
Once the installation has been completed after which you can start the application.
Let the program look over the system for possible incompatibilities and issues.
Once it has completed its search for the root cause, press Start Repair.
At the end, reboot your PC and verify that the error 0xc0000428 is resolved in the near future.
4. Uninstall the latest cumulative updates.
A number of times an error in the installation of an update can also result in incorrect image status errors for Windows OS 11/10. If you have recently installed an update, ensure that you delete it out of your computer. Here's the method to uninstall any recent update on your system:
Launch Control Panel.
Select Programs > Programs and Features.
Click "View the latest updates installed" on the left side.
A list of the most recent patch installations will be displayed on the right side of the screen.
Select the patch following that your system gets in trouble, then press the Uninstall button.
A pop-up will pop up after which you will be asked to give your consent Click Yes.
After you have removed the update, your computer will automatically restart.
Once you've uninstalled the insecure updates then browse through the patch listed below, and then click Check for updates. Windows 10 Setting (Win + I) > Update and Security > Windows Update
Windows 11 Setup (Win + I) > Windows Update
Note: Make sure to remain connected to a high-speed network connection throughout the download/installation.
5. Perform a Clean Boot
If the image is not working properly and error is still showing it could be due to of third-party software operating on the device. To resolve the issue you must boot your device to its Clean boot state and follow the steps above again.
Bad Image errors usually occur due to a corrupted or faulty third-party application running on your system. By booting your device in Safe Mode, you have Safe Mode, you have removed all of these applications. Then, you can allow them one at a and observe if your device experiences another issue. This way, you could identify the program that caused the issue.
If found, visit the official website for the software and check if an update is available or not.
6. Utilize System Restore to restore your system.
If none of these solutions work to fix this issue on your computer and you own a backup point attempt to restore your device to the state it was in when everything was working flawlessly.
If you've not taken any backups of your system previously, then installing the latest Windows OS is the last option.
0 notes
Text
Omnisphere Crack For Mac

Omnisphere 2.6 Crack VST (Studio Edition) Torrent Free Download
Omnisphere 2.6 Crack Torrent Reddit
Omnisphere Free Download Mac
Omnisphere 2 Crack For Mac
Omnisphere 2 Crack with Keygen Download Omnisphere 2.6 Crack for mac and windows is the leading synthesizer which id on the top of the prize. So you can start to make some noise with spectra Sonics. Omnisphere VST Crack Win Download 2020 Omnisphere Crack is the flagship synthesizer for Spectrasonics, an instrument of extraordinary power and versatility. The best artists from around the world trust Omnisphere as an essential source of sound inspiration. Omnisphere Crack 2.6 with Keygen Free Download Windows & MacOS Latest 2020 Omnisphere Crack + Latest Version free. download full 2020: This is mainly used by numerous songwriters as well as composers who else would like to produce remarkable songs.
Omnisphere Crack is also a comprehensive program suite for different wave forms and functions. It is rooted with a lot of extra functions and features that enable users recover sound performance. Browsing graphics and content allows users to easily guide latest sounds and effects. It is important to note that this program works amazing on all versions of Windows, starting from at least Windows XP. It is also compatible with MacOS with the same functions and features. This plugin has also won a number of awards for clocking different sound combinations together as one.
The world's most popular DAW lets you record, edit and mix your songs like a musician, while providing you a professional, studio-grade audio quality at all stages of the creative process.Compose and record songs whenever inspiration strikes - Cubase bristles with an eclectic ensemble of creative tools that are both easy to use and highly musical. Cubase pro 8 for mac.
Omnisphere Keygen is also a star synthesizer Spectroscopic. It is an extraordinary, compelling, and versatile instrument. All top artists from all around the world rely on this software as an essential source of music and Sonic inspiration. It can also bring many different types of synthesizers together into a single amazing-sounding instrument that can spark a lifetime of exploration. It is the only surface synth in the world that offers hardware synth integration features. It’s well known and remarkable innovation can transform over 6500 synthesizers into extensive hardware controllers that can unlock the newly expanded syntheses capabilities.
Omnisphere Crack (MAC/WIN) 2020 Free Download
Omnisphere 2.6 Crack can double the number of your profiles and can add support for such iconic synths such as super Jupiter, Roland Juno 106, Roland D50, and Alesi’s Andromeda. It has more than 600 new patches. Also, it offers you a new stunning hardware library that gives you a corresponding set of sounds. Each of the hardware profile has many games of sounds which are specially invented using the hardware synth as omnisphere controller. It offers you a high-resolution interface. It offers you a newly redesigned interface for hiDPI displays. This new in modernized GUI is very easy to use and is resize able so that it can comfortably fit into your work space. Also, it allows you to import any audio file as a sound source by simply dragging it into the interface.
Omnisphere Registration Code offers you a new metal credit cards time USB drives that are designed to make Spectrasonics products a greatly simplified process. Also, it has a transfer speed that is many times faster than any optical disk that helps the expert user in saving multiple hours during the installation process. Omnisphere Fl Studio is the top synthesizer that identification on the best of the reward. You can begin to create several noises with spectra Sonics. Its brand new form of dunes, importance audios, synthesizes fresh sounds, as well as use results, are mainly enjoyed by many music artists.
Omnisphere Crack Features:
It offers you hardware synth integration
It has a stand-alone application
It’s able to smart update system
it now provides you velocity curve presets
Furthermore, it has many arpeggiator features
It gives you a pattern lock while browsing
Offers you sound source reversing
It has many new modulation capabilities
It is the gift synthesizer for Spectrasonics
The top artist uses it all around the world
It is incredibly flexible with many types of synthesis
It can bring a different kind of synthesis
Offers you more than 14,000 inspiring sounds
it also features hardware science integration
It provides you wave table synthesis
Also, it has all the wave forms in a morphing wave table
It gives you live mode with keys split
What’s New:
Omnisphere Key now offers you more creative tools making it much more flexible.
It currently provides you with a new robust, granular synthesis algorithm.
It has expended modulation with new sources and more targets.
Also, it now includes many modern inspiring patterns, modes, pitch slides, step dividers
It allows you to create entire categories of cutting edge new sounds
System Requirements:
Microsoft Windows: Vista, XP, 7, 8, 8.1 and 10 (both 32-bit & 64-bit)
Memory RAM: 512 MB of RAM (Recommended 1 Gb)
Disk Space: 60 MB of free Hard Disk space
Processor: 800 MHz or higher
CPU: Pentium – compatible CPU
Operating System: All-MAC OS Supported
How to CRACK?
Firstly, uninstall the old version from your system
Download the Omnisphere Crack from the download button
Disable your internet connection for a second
Also, extract the zip file and run to install the setup into your system
After install, you can run the Crack file in the same folder
Wait for a minute to complete
Furthermore, after activate restart your system for best performance
That’s it, Enjoy & Thank you
Omnisphere 2.6 Crack + Activation Code & Torrent Full Download
Omnisphere Crack is the best synthesize of the Spectrasonics instrument of most power and versatility. Top artists using Omnisphere all over the world as a compulsory source of sonic inspiration. It has a lot of syntheses together into one wonderful sounding instrument that will shine or spark forever of exploration. In this latest version, Omnisphere becomes the first tool synth in the world that offers a Hardware synth integration option. it helps you to transforms over 25 Plus well-known hardware synthesizers into extensive hands-on controllers that helps you to unlock Omnisphere synthesis features and capabilities.
This setup groundbreaking feature enables Omnisphere Keygen to feel just like a hardware synth quickly. This unbelievable innovation bridges the physical experience gap both between hardware and software that gives its users control of Omnisperer by simply using the layout of a hardware synth. Also, Omnisphere Crack has a very friendly user interface for its users.
Omnisphere Crack + Keygen (Torrent) Free Download
Also, it included over 1000 Hardware Library new patches that are created by Eric Persing and checked by Spectrasonics sound development team. All hardware profile has a corresponding set of sounds int the hardware library that is specially designed using the hardware synth. Also, the new sounds are available for all users. Furthermore, you can use your own Mp3 files as a sound source in this software Omnisphere Crack. Simply you can drag it onto the interface.
In addition, use all creative tools inside Omnispere Serial number. Also, it has a high-resolution interface with support for HIDPi displays. Furthermore, it includes over 13000 sounds library that you can use. Also, this library growing by Spectrasonics sounds development team. So, don’t be late and let’s start its full version. You can all these above and below functions and features in this latest version for free. Simply click on the download button and get Omnisphere Crack for free.
Beatport LINK streamingAdded support for the Beatport LINK streaming service. Serato DJ Lite 1.4 is out now, bringing Beatsource LINK streaming, Beatport LINK streaming and laptop speakers as master output. Serato dj pro mac torrent. Beatsource LINK streamingAdded support for the Beatsource LINK streaming service. Get access to the expansive open-format catalog directly from Serato DJ Lite.
However, it still does not address all of the keyboard shortcuts that were available in Excel 2011 for Mac. Thank you for bringing this feature back. Specifically, Paste Values, which was CMD+SHIFT+V.It would be super-helpful to get this back, please.Also, I really don't understand why this is so hard - why was this removed? I'm sure all the fancy new bells & whistles and collaboration features are great, but all I need athome are the basics. Mac shortcut keys for excel. And why can'tall possible functions have a keyboard shortcut?Honestly, if it wasn't for the notification that the 32-bit 2011 version would no longer be supported in future versions of Mac OS, I'd still be using it.
Omnisphere 2.6 Crack Torrent Reddit
Screen Short:

Omnisphere Virtual Key Features:
Omnisphere Crack has more than 13000 inspiring sounds for different types of music creation.
Moreover, it has vastly expanded synthesis engine.
Also, groundbreaking hardware Synth integration option.
Also, it has a drag and drop option where you can drag your own audio file to use as a sound source.
Additionally, Synth Oscillator with waveforms.
Moreover, it has sound match features.
also, included hardware library with modern sounds.
Also, Powerful granular Synthesis.
More than 50 FX units.
Omnisphere Crack has sound lock features that can create endless useful variation by simply locking sounds.
Also, it has an ORB circular motion interface that permits you infinitely shifting variations easily.
Dual Filter architecture also included.
Also, Deeper FM modulation
In addition, it is very simple and easy to use for its users.
great feature performance-oriented live mode permits to its users for the seamless patch.
Also, the stack mode interface includes that makes easy complex patch layering as well as splits.
Install process is very simple.
High-resolution resizable interface.
Moreover, easy sound sharing.
Omnisphere Free Download Mac
How to Crack?
Omnisphere 2 Crack For Mac
First of all, Simply download Omnisphere Torrent or crack file from the given link mirror link
After, you need an extractor by using the WinRAR tool.
Now, Extract your setup on the desktop
Then, run the setup file
Moreover, follow instructions and allow it to finish
Next, close the program and run the crack file
Finally, follow the instructions and let it be completed
That’s all!
Enjoy the Omnisphere Full version for the lifetime.
0 notes
Text
How to root Android phones and tablets and unroot them
Android rooting is the perfect way to gain more control over your smartphone, and open up a world of unknown, yet important, possibilities.

Root Android phones and tablets and unroot them
Rooting isn't without its risks - and if something goes wrong, it could void the warranty, leave you a broken smartphone or tablet, or worse.
Before continuing, it is important to understand that rooting is not always a straightforward process, and you may experience hiccups along the way. If you decide that you should root your Android device then continue below, but know that this is not for the faint of heart or tech geek.
Manufacturers and vectors will discourage you from taking root, and they're not just a freak out of fear. If you don't follow the instructions properly, the worst-case scenario could damage your device irreparably, but many people find the potential benefits worth it. With a rooted phone, you can remove bloatware, speed up your processor, and customize every element of your phone's software appearance.
This guide will guide you on how to root Android phones through the steps to root your device. While we can reach some phones within minutes, others will require more research. But one thing is clear: Rooting your phone is one of the best ways to harness the true potential of your Android device.
What is rooting?
Rooting an Android phone or tablet is like jailbreaking an iPhone - it essentially lets you dive deeper into the phone's subsystem. Once the rooting process is complete, you have access to the entire operating system to customize almost everything on your Android device, and you can bypass any restrictions that your manufacturer or carrier might have imposed.
Rooting is best done with caution. You must back up your phone's software before installing - or "flashing" in terms of root - a custom ROM (modified version of Android).
Why should you root?
One of the biggest incentives in rooting your Android phone is to allow you to remove bloatware that cannot be uninstalled otherwise (although you can sometimes turn it off - see our guide on disabling bloatware). On some devices, rooting will enable settings that were previously disabled, such as wireless tethering. Additional features include the ability to install specialized tools and dedicated flash ROMs, each of which can add additional features and improve the performance of your phone or tablet.
There aren't many root apps to have, but there are enough of them to make them worth it. Certaines applications vous permettront de sauvegarder automatiquement toutes vos applications et données dans le cloud, de bloquer les publicités Web et intégrées aux applications, de créer des tunnels sécurisés verses Internet, d'overclocker votre processeur ou de faire de votre appareil un point d'accès cellular. Take a look at the best root accessed apps for devices to get a better idea of what is possible.
Why shouldn’t you root?
I am a fixture on non-influencing abilities based on the Android voting system.
Voiding Your Warranty: Some manufacturers or carriers will void your warranty if you root your device, so it should be borne in mind that you can always unroot. If you need to return the device for repair, all you need to do is flash the software backup you made and it will be like new.
Brick your phone: choose If something goes wrong during the rooting process, you risk breaking - i.e. corrupting - your device. The easiest way to appear to happen is to follow the media carefully. Make sure that the guide you are following is up to date and that the custom ROM you are flashing is specifically for your phone. If you do your research, you won't have to worry about bricking your smartphone.
Security Risks: Rooting presents some security risks. Depending on the services or apps you use on your device, this could create a security hole. And I have seen malicious elements that play a big role in data protection, the combination of malicious and invented launchers and made available from devices inaccessible through the annoying web.
Disabled apps: a few apps and services: Security-conscious doesn't work on rooted devices - financial platforms like Google Pay and Barclays Mobile Banking don't support them. Popular apps for human rights-protected TV works and movies, like Sky Go and Virgin TV Anywhere, won't start on rooted devices either - and neither will Netflix.
How to prepare your Android device for rooting
One of the easiest ways to root an Android device is through an app, and several rooting apps have received attention over the years - Framaroot, Firmware.mobi, Kingo Root, BaiduRoot, One Click Root, SuperSU, and Root Master are among the most reliable.
Typically, these services root your device during the time you spend brushing your teeth. But some of them only support devices running older versions of Android, so you might need to do some research to find a device that works with your device. If you are looking to root an older device, you may need to check out Firmware. Mobi.
Previously, root Android versions of Android 7.0 Nougat was more difficult. The certified startup service will check the integrity of the device's encryption to detect if your device's system files have been compromised, preventing legitimate root applications. Thankfully, I faced the curve root apps and it became much easier to root newer versions of Android than before.
If your phone is not compatible with the one-click rooting app, then you need to spend some time looking for alternatives in Android forums. A great place to start is the XDA Developers Forum. Look for a thread on your phone or tablet and you'll likely find a way.
Preparing for rooting
Back up anything you can't live without before you start. You should always back up your current ROM to your phone before flashing a new one. You'll also need to make sure your device is fully charged before you begin.
You will need to turn on USB Debugging and OEM Unlocking. Do this by opening Settings on your device. If you do not see Developer Options toward the bottom of the Settings screen, follow these steps to activate it.
Tap on About Phone and find the Build Number. The exact path depends on your phone, but it’ll usually be found with other software information.
Tap on the Build Number seven times, and the Developer Options will appear on the Settings main page. You may need to confirm your security passcode to enable this.
Tap on the Back key to see your new developer options.
Tap Developer Options.
Check to enable USB Debugging.
Check to enable OEM Unlocking.
Installing the Android SDK Platform Tools
Previously rooting included downloading the entire Android SDK from Google. Thankfully, this is no longer the case, and all you need is the Android SDK platform tools.
Download and install the Android SDK Platform Tools from Google's developer site. There are options for Windows, Mac, and Linux systems. These are instructions for Windows devices. Extract zip files. When asked to select the directory where you want to install the program, we recommend that you set it to C: android-SDK. If you've chosen a different site, be sure to remember this.
Installing device drivers
To ensure that your computer can properly communicate with your smartphone or tablet, you will need to install the correct USB driver.
Devices from some manufacturers come with drivers included in the phone software, so all you need to do to install the correct USB driver is to connect your phone to your computer with a USB cable. OnePlus is an example, but it's worth connecting your phone first to see if the USB drivers will be installed automatically.
Other than that, here is a list of the most popular manufacturers' drivers:
Asus
Acer
Alcatel
Coolpad
Google / Nexus / Pixel
HTC
Huawei / Honor
Lenovo / Motorola
LG
Samsung
Sony
Xiaomi
Follow the installer’s instructions. Once the drivers are installed, proceed to the next step.
Unlock your bootloader
Before you begin, you need to unlock your device's bootloader. Bootloader, in simple terms, is the program that loads a device's operating system. Identifies the apps that run during the booting process of your phone or tablet.
Some manufacturers require you to have a key to unlock the bootloader. Motorola, HTC, LG, and Sony provide step-by-step instructions on how to do this, but a word of caution: it requires you to sign up for a developer account.
Unfortunately for Huawei and Honor device users, it is no longer possible to unlock the boot chargers on these phones. Huawei revoked the ability to request unlock codes in July 2018. If you still want to root a Huawei or Honor device, you need to use a third-party service like DC-Unlocker.
Once you follow these steps, you can start the unlocking process. You will need to put your device in fast boot mode. It's different for each phone, but on most devices, restarting the device and holding the Power and Volume Down buttons for 10 seconds does the trick (HTC phones require you to press the Volume Down button and press the Power button to select it).
Once Fastboot starts up, head to the folder where you previously unzipped the Android SDK files. Next, open the command prompt on your computer by pressing Shift + right-click and choosing Open Command Prompt here. If your device requires a passcode, you'll get a long string of characters. Paste it in the box on the manufacturer's website for your device, then submit the form and wait for an email with a key, file, and additional instructions.
Unlock the bootloader of your device by connecting it to your computer and returning it to Fastboot Mode. Open a command prompt by typing cmd into the start menu.
For Google Nexus and Pixel devices, the commands are easy:
Nexus phones: Type “fast-boot OEM unlock” (without quotes) and hit Enter.
Pixel phones: Type “fast-boot flashing unlock” (without quotes) and hit Enter.
It’s the same for Samsung devices:
Samsung phones: Type “fast-boot flashing unlock” (without quotes) and hit Enter.
Motorola’s command is a little different:
Type “OEM unlock UNIQUE_KEY” (without quotes), replacing “UNIQUE KEY” with the code you received
So is HTC’s:
Type “unlock token Unlock_code.bin” (without quotes), replacing “Unlock_code.bin” with the file you received.
Confirm the unlock, and you’re one step closer to rooting your Android device.
Some manufacturers and carriers don’t sanction bootloader unlocking, but that doesn’t mean it can’t be done. Try searching the XDA Developers forum for workarounds and unofficial solutions.
How to root Android phones and tablets and unroot them How to root Android phones, HOWTO, one click root, root Android phone, root android phones, root my android, root my device, root my phone, rooting definition, unroot android phone, What is rooting via exercisesfatburnig.blogspot.com https://ift.tt/3mJ1MWf
0 notes
Text
Amazing Slow Downer For Mac

Download this app from Microsoft Store for Windows 10. See screenshots, read the latest customer reviews, and compare ratings for Amazing Slow Downer. Amazing Slow Downer for Mac, free and safe download. Amazing Slow Downer latest version: Slow down or speed up music without changing the pitch. Also slows down MP3, AIFF, AAC/MP4 and wave files on your computer in real-time. Great sound quality! Amazing Slow Downer requires a Mac computer running Mac OS X 10.10 or higher. Supports Mac OS X 10.15 (Catalina). Note: DRM protected M4P files from the iTunes store is NOT supported. Spotify and Apple Music is also not supported. Amazing Slow Downer 3.5.4 is a third party application that provides additional functionality to OS X system and enjoys a popularity among Mac users. However, instead of installing it by dragging its icon to the Application folder, uninstalling Amazing Slow Downer 3.5.4 may need you to do more than a simple drag-and-drop to the Trash.
Unlike the software developed for Windows system, most of the applications installed in Mac OS X generally can be removed with relative ease. Amazing Slow Downer 3.5.4 is a third party application that provides additional functionality to OS X system and enjoys a popularity among Mac users. However, instead of installing it by dragging its icon to the Application folder, uninstalling Amazing Slow Downer 3.5.4 may need you to do more than a simple drag-and-drop to the Trash.
Download Mac App Remover
When installed, Amazing Slow Downer 3.5.4 creates files in several locations. Generally, its additional files, such as preference files and application support files, still remains on the hard drive after you delete Amazing Slow Downer 3.5.4 from the Application folder, in case that the next time you decide to reinstall it, the settings of this program still be kept. But if you are trying to uninstall Amazing Slow Downer 3.5.4 in full and free up your disk space, removing all its components is highly necessary. Continue reading this article to learn about the proper methods for uninstalling Amazing Slow Downer 3.5.4.
Manually uninstall Amazing Slow Downer 3.5.4 step by step:
Most applications in Mac OS X are bundles that contain all, or at least most, of the files needed to run the application, that is to say, they are self-contained. Thus, different from the program uninstall method of using the control panel in Windows, Mac users can easily drag any unwanted application to the Trash and then the removal process is started. Despite that, you should also be aware that removing an unbundled application by moving it into the Trash leave behind some of its components on your Mac. To fully get rid of Amazing Slow Downer 3.5.4 from your Mac, you can manually follow these steps:
1. Terminate Amazing Slow Downer 3.5.4 process(es) via Activity Monitor
Before uninstalling Amazing Slow Downer 3.5.4, you’d better quit this application and end all its processes. If Amazing Slow Downer 3.5.4 is frozen, you can press Cmd +Opt + Esc, select Amazing Slow Downer 3.5.4 in the pop-up windows and click Force Quit to quit this program (this shortcut for force quit works for the application that appears but not for its hidden processes).
Amazing Slow Downer For Mac Torrent
Open Activity Monitor in the Utilities folder in Launchpad, and select All Processes on the drop-down menu at the top of the window. Select the process(es) associated with Amazing Slow Downer 3.5.4 in the list, click Quit Process icon in the left corner of the window, and click Quit in the pop-up dialog box (if that doesn’t work, then try Force Quit).
2. Delete Amazing Slow Downer 3.5.4 application using the Trash

First of all, make sure to log into your Mac with an administrator account, or you will be asked for a password when you try to delete something.
Open the Applications folder in the Finder (if it doesn’t appear in the sidebar, go to the Menu Bar, open the “Go” menu, and select Applications in the list), search for Amazing Slow Downer 3.5.4 application by typing its name in the search field, and then drag it to the Trash (in the dock) to begin the uninstall process. Alternatively you can also click on the Amazing Slow Downer 3.5.4 icon/folder and move it to the Trash by pressing Cmd + Del or choosing the File and Move to Trash commands.
For the applications that are installed from the App Store, you can simply go to the Launchpad, search for the application, click and hold its icon with your mouse button (or hold down the Option key), then the icon will wiggle and show the “X” in its left upper corner. Click the “X” and click Delete in the confirmation dialog.
Download Mac App Remover
3. Remove all components related to Amazing Slow Downer 3.5.4 in Finder
Though Amazing Slow Downer 3.5.4 has been deleted to the Trash, its lingering files, logs, caches and other miscellaneous contents may stay on the hard disk. For complete removal of Amazing Slow Downer 3.5.4, you can manually detect and clean out all components associated with this application. You can search for the relevant names using Spotlight. Those preference files of Amazing Slow Downer 3.5.4 can be found in the Preferences folder within your user’s library folder (~/Library/Preferences) or the system-wide Library located at the root of the system volume (/Library/Preferences/), while the support files are located in '~/Library/Application Support/' or '/Library/Application Support/'.
Open the Finder, go to the Menu Bar, open the “Go” menu, select the entry:|Go to Folder... and then enter the path of the Application Support folder:~/Library
Search for any files or folders with the program’s name or developer’s name in the ~/Library/Preferences/, ~/Library/Application Support/ and ~/Library/Caches/ folders. Right click on those items and click Move to Trash to delete them.
Meanwhile, search for the following locations to delete associated items:
/Library/Preferences/
/Library/Application Support/
/Library/Caches/
Besides, there may be some kernel extensions or hidden files that are not obvious to find. In that case, you can do a Google search about the components for Amazing Slow Downer 3.5.4. Usually kernel extensions are located in in /System/Library/Extensions and end with the extension .kext, while hidden files are mostly located in your home folder. You can use Terminal (inside Applications/Utilities) to list the contents of the directory in question and delete the offending item.
4. Empty the Trash to fully remove Amazing Slow Downer 3.5.4
If you are determined to delete Amazing Slow Downer 3.5.4 permanently, the last thing you need to do is emptying the Trash. To completely empty your trash can, you can right click on the Trash in the dock and choose Empty Trash, or simply choose Empty Trash under the Finder menu (Notice: you can not undo this act, so make sure that you haven’t mistakenly deleted anything before doing this act. If you change your mind, before emptying the Trash, you can right click on the items in the Trash and choose Put Back in the list). In case you cannot empty the Trash, reboot your Mac.
Download Mac App Remover
Tips for the app with default uninstall utility:
You may not notice that, there are a few of Mac applications that come with dedicated uninstallation programs. Though the method mentioned above can solve the most app uninstall problems, you can still go for its installation disk or the application folder or package to check if the app has its own uninstaller first. If so, just run such an app and follow the prompts to uninstall properly. After that, search for related files to make sure if the app and its additional files are fully deleted from your Mac.
Automatically uninstall Amazing Slow Downer 3.5.4 with MacRemover (recommended):
No doubt that uninstalling programs in Mac system has been much simpler than in Windows system. But it still may seem a little tedious and time-consuming for those OS X beginners to manually remove Amazing Slow Downer 3.5.4 and totally clean out all its remnants. Why not try an easier and faster way to thoroughly remove it?
If you intend to save your time and energy in uninstalling Amazing Slow Downer 3.5.4, or you encounter some specific problems in deleting it to the Trash, or even you are not sure which files or folders belong to Amazing Slow Downer 3.5.4, you can turn to a professional third-party uninstaller to resolve troubles. Here MacRemover is recommended for you to accomplish Amazing Slow Downer 3.5.4 uninstall within three simple steps. MacRemover is a lite but powerful uninstaller utility that helps you thoroughly remove unwanted, corrupted or incompatible apps from your Mac. Now let’s see how it works to complete Amazing Slow Downer 3.5.4 removal task.
1. Download MacRemover and install it by dragging its icon to the application folder.
2. Launch MacRemover in the dock or Launchpad, select Amazing Slow Downer 3.5.4 appearing on the interface, and click Run Analysis button to proceed.
3. Review Amazing Slow Downer 3.5.4 files or folders, click Complete Uninstall button and then click Yes in the pup-up dialog box to confirm Amazing Slow Downer 3.5.4 removal.
The whole uninstall process may takes even less than one minute to finish, and then all items associated with Amazing Slow Downer 3.5.4 has been successfully removed from your Mac!
Benefits of using MacRemover:
MacRemover has a friendly and simply interface and even the first-time users can easily operate any unwanted program uninstallation. With its unique Smart Analytic System, MacRemover is capable of quickly locating every associated components of Amazing Slow Downer 3.5.4 and safely deleting them within a few clicks. Thoroughly uninstalling Amazing Slow Downer 3.5.4 from your mac with MacRemover becomes incredibly straightforward and speedy, right? You don’t need to check the Library or manually remove its additional files. Actually, all you need to do is a select-and-delete move. As MacRemover comes in handy to all those who want to get rid of any unwanted programs without any hassle, you’re welcome to download it and enjoy the excellent user experience right now!
This article provides you two methods (both manually and automatically) to properly and quickly uninstall Amazing Slow Downer 3.5.4, and either of them works for most of the apps on your Mac. If you confront any difficulty in uninstalling any unwanted application/software, don’t hesitate to apply this automatic tool and resolve your troubles.
The Amazing Slow Downer For Mac
Download Mac App Remover
0 notes
Text
Best Solutions MSVCR120.dll is missing in Windows
When stacking games or dispatching programs in Windows, you may get the mistake beneath. Try not to freeze. This is a typical Windows issue and you can fix msvcr120.dll is missing effectively and rapidly.
The program can't begin on the grounds that MSVCR120.dll is absent from your PC. Have a go at reinstalling the program to fix this issue.
Attempt these fixes
To realize how to fix MSVCR120.dll is missing, follow the given arrangements underneath. You don't have to attempt them all; simply work your way down until your concern is tackled.
Introduce the MSVCR120.dll document
Reinstall the Visual C++ Redistributable Packages
Do a perfect establishment of the program
Duplicate the record from confided in PC
Run an infection check for your framework
Reward Tip
Note: the screen captures underneath come from Windows 10, and fixes apply to Windows 8 and Windows 7.
What is MSVCR120.dll?
What is the MSVCR120.dll record? MSVCR120.dll is a basic document for the Window Operating System. The record is utilized to separate the important application assets needed at runtime by the outsider establishment program. MSVCR120.dll is the relating C++ library. In the event that MSVCR120.dll is missing, you won't have the option to dispatch games or different projects in the C++ programming dialects.
Fix 1: Install the MSVCR120.dll record
On the off chance that MSVCR120.dll is absent or not found in your PC, you can fix your concern by reestablishing the missing document in your PC. To do as such, utilize the DLL-files.com Client.
The DLL-files.com Client will fix your DLL blunder in a single tick. You don't need to understand what framework is running on your PC, and you don't have to stress over downloading some unacceptable record. The DLL-files.com handles it for you.
Download and introduce the DLL-files.com Client.
Run the application.
Type MSVCR120.dll in the hunt box and snap Search for DLL document.
Snap msvcr120.dll in the query output.
Snap Install (you're needed to enroll the program before you can introduce the documents – you'll be incited when you click Install).
Once introduce, check if your MSVCR120.dll missing issue has been fixed.
Fix 2: Reinstall the Visual C++ Redistributable Packages
The MSVCR120.dll record has a place with the Visual C++ Redistributable Packages for Visual Studio 2013. On the off chance that it's absent on your PC, something turned out badly introducing this bundle. The most straightforward approach to fix msvcr120.dll is missing is to re-download the bundles from Microsoft.
Significant: Download the document from the authority sites to evade expected dangers. Also, DO NOT download the .dll documents from the informal sites, in endeavor to supplant your missing records. Those are unapproved hotspots for DLL documents, and might be contaminated with infections. So it's prescribed not to do that to guarantee your PC security.
1) Go to Microsoft download site.
2) Click Download.
3) Select the record as indicated by your framework type ( x64 for 64-bit and x86 for 32-digit). At that point click Next.
Tips: You can check in the event that you are running 32-digit or 64-cycle by means of cmd in Windows: Open cmd.exe, and type systeminfo, and press Enter, and afterward you can see your framework type is x86-based or x64-based.
4) After downloading, double tap the downloaded .exe record, and adhere to the guidelines to introduce.
5) Restart your PC. At that point open a similar program to check whether it works.
This should resolve your concern. If not, attempt the accompanying advances.
Fix 3: Do a perfect establishment of the program
As recommended in the mistake message, you can attempt to reinstall the program to fix it. The program document might be undermined when introducing, so a spotless reinstallation to have a total and right record may tackle the issue.
1) On your console, press the Windows logo key + R simultaneously.
2) Type appwiz.cpl in the Run box, and press Enter.
3) Right snap the program that gives the mistake, at that point click Uninstall. For my situation, the program that gives the mistake is Python, so I right snap Python and snap Uninstall.
4) Follow the popup directions to affirm the erase.
5) Restart your PC, reinstall the program, and open it to check whether it works.
Fix 4: Copy the record from another PC
You can likewise fix this blunder by duplicating a similar document from another PC and glue it to your own. To do as such:
Discover another PC that runs a similar working framework as yours.
The renditions (Windows 10/8/7) and designs (32-bit/64-bit) of both working frameworks should be the equivalent.
On that PC, open File Explorer (by squeezing the Windows logo key
also, E on your console), at that point go to C:\Windows\System32 and duplicate the msvcr120.dll there.
Glue the replicated document to a similar area (C:\Windows\System32) on your own PC. (You may require an outside stockpiling gadget, similar to a glimmer drive.)
Have a go at dispatching the program again and it should be working.
Fix 5: Run an infection check for your framework
An infection or malware disease in your framework could likewise stop the .dll document from running. A few mistakes like dll not found or dll is missing, are identified with malware, for example, Trojan, that claims to be the dll records.
To check this chance, run a full framework check with your enemy of infection program. Windows Defender alone probably won't have the option to help, so you can attempt other enemy of infection programs, for example, Norton and AVG AntiVirus Free.
Run a total infection examine for your whole Windows framework, and this could require a couple of moments. A snappy framework sweep may exclude numerous pieces of your Windows PC, so please guarantee to check all aspects of your PC.
Subsequent to filtering, restart your PC. Assuming sadly, your Windows has been tainted by malware, adhere to the guidelines appeared by the counter infection program to fix it. At that point restart your PC and check whether the issue is addressed.
Reward Tip: Update your drivers
An absent or obsolete gadget driver can carry different issues to your PC, so refreshing gadget drivers should be a consistently go-to choice to keep your PC from additional issues.
You can refresh your drivers physically or consequently. The manual cycle is tedious, specialized and unsafe, so we won't cover it here. Nor do we suggest it except if you have great PC information.
In the event that you don't have time or tolerance to physically refresh drivers, you can consequently refresh drivers with Driver Easy.
Driver Easy will naturally perceive your framework and locate the right driver for your PC.
1) Download and introduce Driver Easy.
2) Run Driver Easy and click Scan Now. Driver Easy will at that point filter your PC and identify any difficult drivers.
3) Click the Update button close to a hailed driver to consequently download and introduce the right sound driver (You can do this with the FREE form).
Or on the other hand click Update All to naturally download and introduce all the most recent right drivers that is absent or obsolete (This requires the Pro form. You will be incited to redesign when you click Update All).
4) Restart your PC to produce results.
These are the best answers for fix msvcr120.dll is absent in your PC. Expectation this can help. You can impart to us which arrangement makes a difference. On the off chance that your difficult actually perseveres, don't hesitate to tell us and we will perceive what more we can do to help.
0 notes
Text
Inaccessible Boot Device Windows 10

Here we can see "Inaccessible Boot Device Windows 10" One of the foremost common errors experienced by Windows 10 users is that the Inaccessible Boot Device error. It's a typical "blue screen of death" (BSOD) error with the code 0x0000007b, which regularly shows up during Windows startup and happens after a Windows 10 upgrade, Windows 10 anniversary update or Windows 10 reset. This error message often stops computers from booting correctly. It tells users that their PC has developed a drag, and restarting is important to deal with the purported error. It also says Windows is collecting some error info and can restart at a given percentage.
Meaning of Inaccessible Boot Device Error (error code 0x0000007b)
Windows typically updates itself automatically, which is particularly exciting when a replacement update is unrolled. However, this auto-update is susceptible to introduce an enormous problem. Imagine eagerly expecting Windows 10 to reboot itself after an update, only to ascertain the error code 0x0000007b on your screen. Then, after a couple of moments, your PC restarts everywhere again. Just picture that scene and picture how it feels. This error message implies that Windows couldn't access the system partition while attempting to startup. The problem (obviously) forced Windows to restart everywhere again. Several Windows 10 users have reported the prevalence of this error message in computers running an SSD. But what are the causes of the inaccessible boot device error? Read on to seek out out.
Causes of Inaccessible Boot Device Error In Windows 10:
The Inaccessible Boot Device error refers to a BSOD error message that happens when the Windows 10 OS fails to access the system partition while trying to start up. Windows 10 might not access the system partition thanks to the subsequent issues: - Corrupted, outdated, or inaccurately configured drivers - Hardware conflicts resulting from system updates or changes - A damaged hard disk - Malware - Other causes Besides causing the Inaccessible Boot Device Error, the issues highlighted above may end in other system malfunctions, including the MSVCP110.dll missing error, I VIDEO_DXGKRNL_FATAL_ERROR, INTERNAL_POWER_ERROR, and far more. Therefore, it's important to repair the inaccessible boot device issue to stop the likelihood of a more severe system malfunction in the future.
How to Fix Inaccessible Boot Device Error in Windows 10
There are several solutions on the way to troubleshoot the inaccessible boot device error in Windows 10. However, it's not necessary to use all of them. You got to provide a few solutions to cope with the one that works for you. Thereupon said, here's a recommended guide the way to Fix the Inaccessible Boot Device Error In Windows 10: Solution 1: Uninstall the Recently Installed Packages Recently installed packages may result in the inaccessible boot device error in Windows 10. If you've set Windows Update to put in packages automatically, it'll install new packages without notifying you. If you think the recently installed packages cause this problem, you'll remove them one after another. Hopefully, uninstalling the updates one by one will ultimately delete the package causing difficulty. However, since it's impossible else Windows 10 normally when this error occurs, you're recommended to uninstall the packages by getting to Repair and using the DSM command. Note: This process restarts your computer. Confirm all work has been saved before you continue. Steps to follow: - Ensure your machine is off 2. Press your PC's power button to show it on, then hold down the facility button for five seconds until it automatically shuts down. Repeat this process quite twice until the "Preparing Automatic Repair" screen appears. Note: This step aims at mentioning the Preparing Automatic Repair screen. If Windows cannot boot correctly, this screen pops up, and Windows tries to repair the difficulty by itself. You'll skip this step if this screen appears the primary time you power up your computer. 3. Wait for the Windows diagnosis to finish. 4. Click Advanced Options to mention the Windows Recovery Environment screen 5. Click Troubleshoot on the Windows Recovery Environment screen 6. Choose Advanced Options on the Troubleshoot screen 7. Select the prompt - Your PC should restart and boot itself into the prompt. When the prompt has appeared on your screen, follow the instructions below: - Type dir c : (that's if you've got Windows installed within the drive C) and tap Enter - Run Dism / Image: C:/ Get-Packages - A list of packages installed on the system appears. You'll use the date field to work out the foremost recent package. confirm to notice the package identity - To uninstall a package, enter dism.exe /image:c: /remove-package /. "Package identity" here is that the package name that you jotted down within the preceding step. 9. Reboot your computer after uninstalling the packages. Then, check to verify whether the error has been successfully resolved. If the error persists after uninstalling recent updates, you're recommended to get rid of another recently updated package using an equivalent process. Alternatively, you'll use a completely new solution to repair this blue screen hitch. Solution 2: Update Your Drivers Drivers are handy tools that allow Windows to use your hardware correctly. However, outdated drivers aren't compatible with Windows 10 and thus create all kinds of hitches, including the inaccessible boot device error. You're highly advised to update your drivers to repair these sorts of errors. To update a faulty driver, visit your hardware manufacturer's official website and find and download the newest drivers. Often, controller drivers like IDE ATA/SATA can cause this boot device problem. So, downloading and installing the newest version of your drivers can fix the error once and for all. You can update your drivers automatically with Auslogics Driver Updater. It recognizes your system automatically and finds the proper drivers for it. With this driver update software, you'll easily have your computer scanned and every one driver problem detected and glued without employing a slow manual approach. It is worth noting that downloading and installing wrong driver versions can damage your system. employing a professional driver troubleshooter, like Auslogics Driver Updater, maintains your system's safety and prevents it from permanent damage. In addition, it repairs all problematic drivers in one click. Solution 3: Toggle AHCI Mode Value in BIOS to Enabled Many users have reported the likelihood of fixing this boot device problem by switching the AHCI mode to "Enabled" within the BIOS. The BIOS menu varies significantly between manufacturers, and you would possibly want to see your motherboard manual for instructions. For that reason, this troubleshooting process lacks a one-size-fits-all approach to explaining it. In general terms, however, the method involves entering the BIOS during boot by pressing either the Delete key, Escape key, or Function keys. You'll then select Advanced Options and locate the Set AHCI Mode. Finally, switch the AHCI Mode value to Enabled. Solution 4: Get Rid of “Update Pending” Packages The Windows 10 OS can sometimes get entangled in limbo, thanks to pending updates. Packages that are pending forever and not installing can cause this technical blue screen problem. It's important to get rid of them to permit Windows to run properly. Follow the procedure below to get rid of "update pending" packages in Windows 10: - Go to Update and Security within the menu - Click on Recovery - Proceed to Advanced Startup - Choose Restart Now - Select Troubleshoot - Tap Advanced Options - Select command prompt Run the subsequent commands as soon because the prompt application has started running. These three commands will remove the Sessions Pending registry key. Confirm to press the "Enter" button after each line. - reg load HKLMtemp c:windowssystem32configsoftware - reg delete HKLMtempMicrosoftCurrent VersionComponent Based Server - reg unload HKLMtemp After this process, any pending updates should be moved and stored in their respective temporary file. Getting an inventory of updates isn't a tough task. All you ought to do is type dism/image: /get-packages and note any package with the "install Pending" tag. 8. Create a short-lived file by typing MKDIR C:temppackages. Press the "Enter" button when complete 9. Keep in mind that each pending package needs to be moved or placed in its respective temporary file. Key in dism / image : C: remove package / package identity:/scratchdir:c:temp|packages. Then, press Enter. Don't forget to exchange "package identity" with the acceptable package name. Solution 5: Check and Have all Corrupted Hard Drive Files Fixed If corrupted files are available on your computer's disk drive, they're likely to introduce the inaccessible boot device error. Gladly, fixing corrupted files during a disk drive may be a straightforward process that's easily understandable. If you think that corrupted files are causing this problem, you'll fix that by using the prompt. Note that you must be an administrator to perform this task. First, press the "Windows" button and key in cmd. Then, when the result has been displayed, right-click thereon and choose Run as administrator. Still, on an equivalent prompt application, key in chkdsk / f / r, then choose Enter. Give the appliance a couple of moments to process your input and display the output. Then, type the letter Y and press the "Enter" button. If Windows isn't bootable, you'll use the recovery console to run this command by typing chkdsk/r C: Solution 6: Malware Scan Viruses also can cause BSoDs, hence the importance of scanning your computer regularly to get rid of all malware. A competent anti-malware solution like Auslogics Anti-Malware will detect and neutralize all malicious items and provides you with the peace of mind you would like.
Conclusion:
The Inaccessible Boot Device error is troublesome, but many Windows 10 users report that solving this issue isn't an uphill task. The above five methods are proven useful when it involves fixing the blue screen error in Windows 10. there's little question one among these solutions will work for you. Just give them an attempt to tell us your opinion within the comments section below. Good luck!
User Questions:
- Inaccessible Boot Device Error In Windows 10 I manage multiple computers running Windows 10 Pro 64-bit with the newest Current Branch and recently had multiple computers randomly startup with this BSOD: Inaccessible Boot Device. - Inaccessible Boot Device I recently restarted my computer to urge the BSoD error "Inaccessible boot device", which put my computer during a restart loop. I did a couple of things and was unsuccessful in fixing the error, so I did a system restore and managed to urge back in. Anything I can do to properly fix this? Thanks :) (also, my registry doesn't have a backup, just in case you were wondering) - INACCESSIBLE BOOT DEVICE Error my PC with windows 10 shows a blue screen at power on, with this stop code: INACCESSIBLE BOOT DEVICE. I looked for an answer on the internet and, after tried everything, I found an answer that gives, through the prompt, the exchange of backup data contained within the directory: D:windowssystem32configregback with the first ones. Unfortunately, I discovered to be one among the unfortunate ones that contain 0 bytes therein directory (redback) - this due to the modifications made by Microsoft since October 2018. How ready to"> am I able to fix then the blue screen error and be able to log again into my pc? I hope for a positive response as soon as possible, from a proper expert. - windows 10 pro - inaccessible boot device After the foremost recent update (January 13 on my PC), I experienced strange things. First, after a short time, the USB memory sticks aren't recognized when inserted. Then, on the restart, I buy the blue screen "inaccessible boot device". After the system restores, things work OK for a short time, but things reappear eventually. Searching the web, I discovered that I'm far away from the sole user having this issue, i.e. inaccessible boot device after the recent windows update. I attempted the manual patch detailed at https://www.windowscentral.com/how-fix-update-causing-inaccessible-boot-device-error-windows-10 However, I couldn't get the syntax to be accepted as written there. I am running Windows 10 pro with the autumn creators update. This feature upgrade was installed a couple of months ago and has run without issue until a few days ago. Any advice is going to be greatly appreciated. - Inaccessible Boot Device I fired up my PC yesterday morning and was welcomed by the dreaded BSOD. It told me that it had run into a drag caused by an inaccessible boot device. There are numerous help sites online that specify the way to affect this issue. I attempted all of them bar one, and none of them got me up and running again. the sole one I have never tried is that the hard reset option. Although I even have backups of most of my files, I didn't want to lose what's on my disk drive unless it's necessary. Reinstalling all the applications goes to be an enormous enough PITA. I'd have the interest to find out whether anyone else hit an equivalent brick wall and aroused wiping their disk drive because nothing else worked. Having spent most of yesterday trying to resolve this problem and getting nowhere, I'm wrestling with the thought of ditching Windows altogether and switching to a Mac. Does anyone want to offer me an argument? BTW I typed "Inaccessible Boot Device" into the search box on the BSOD forum and got zero results. Read the full article
#howtofixinaccessiblebootdevice#inaccessiblebootdevice#inaccessiblebootdeviceerror#InaccessibleBootDeviceWindows10#inaccessiblebootdevicewindows10afterupdate#inaccessiblebootdevicewindows10fix#inaccessible_boot_device#win10inaccessiblebootdevice#windows10bootdevice#windows10inaccessiblebootdevice#windowsinaccessiblebootdevice
0 notes