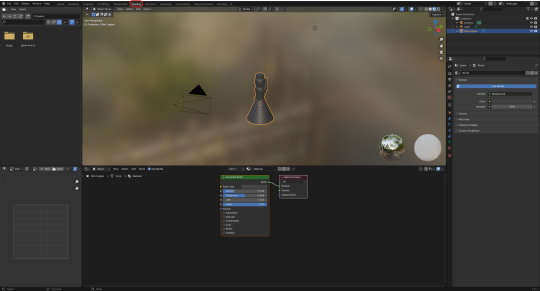
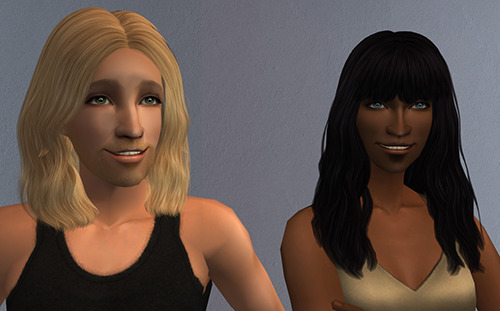
#my next posts will probably have a different shader
Explore tagged Tumblr posts
Visit Tumblr Blog
Explore Tumblr blogs with no restrictions, modern design and the best experience.
Last Seen Tumblr Blogs


Fun Fact
12.7% of mobile users access Tumblr.
Text


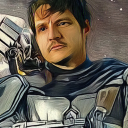
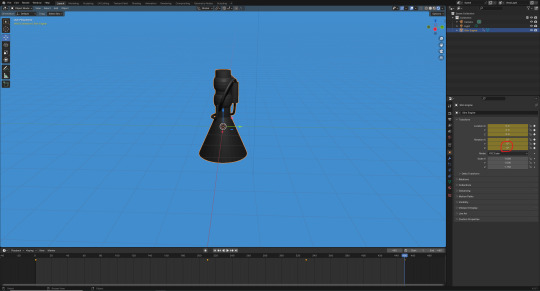
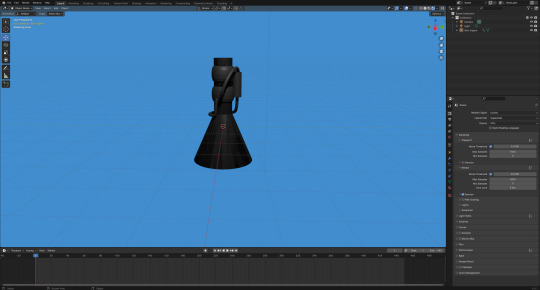
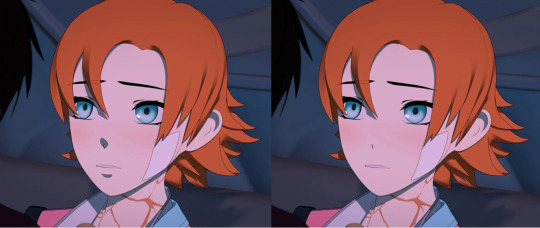
visiting home 🏠
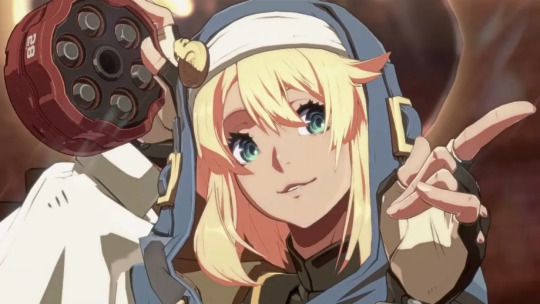
#my next posts will probably have a different shader#youve been warned#simblr#sims#sims 4#sims 4 gameplay#sims 4 screenshots#gshade#gshade preset#jol: gen 2#joy of life legacy#my sims#sim: clementine
5 notes
·
View notes
Text
The Mountain Province 1 - Intro [New Project]
Introducing... my new project. It doesn't have a name yet...

This project will be a whole new world, built block by block, in a fantasy Japanese style. The current plan is to have the project separated by provinces which will be geographically distinct and feature different industries and styles, but all these provinces will be part of a collective Kingdom? Empire? Confederation? IDK yet. The world will have a roughly late medieval technology level but will include Minecraft's more magical components like enchanting, alchemy, and monsters. There will also be hot air balloons/air ships and a focus on wind and water powered technology. Think Grand Cathay from Warhammer, but not Grimdark.
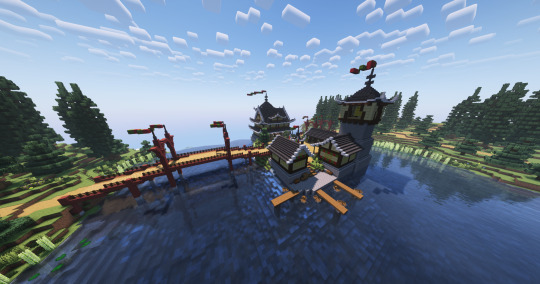
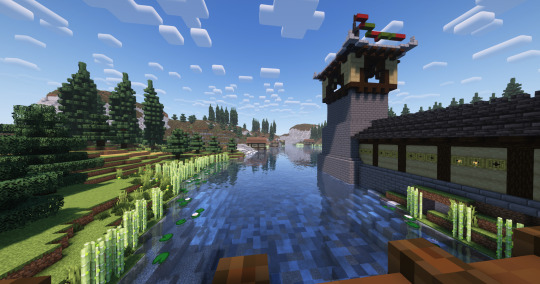
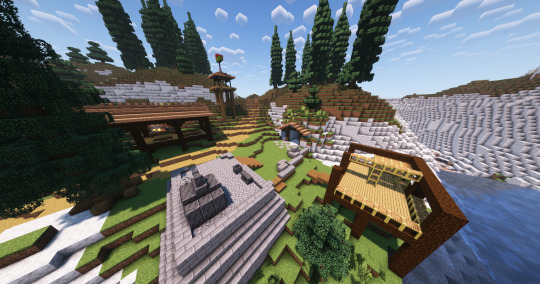
Each province is governed by a local Lord? Daimyo? Governor? Time will tell, I'm a working man, I can't spend all my time planning out a fictional world, there are arts and crafts to do too. But I do know that each Province has a town hall/government building, which is shown in this post on a commanding spot between two big waterfalls. It does not really have an interior, not many of the buildings ever will, but I plan to have the town halls be my bases to keep track of each regions lore (not pictured is the sign room where all this nerd stuff is documented).
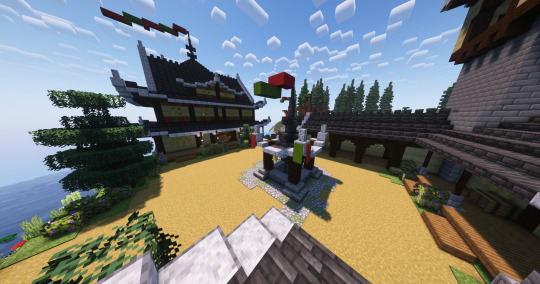


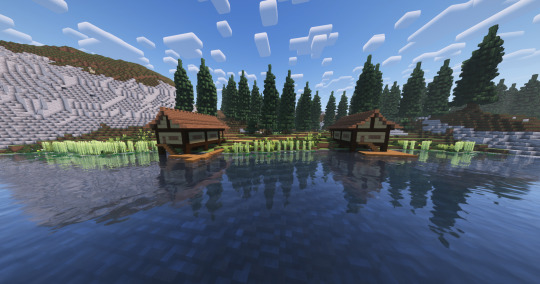
Starting with a breakdown of the Mountain Province. This region is mountainous and covered with dense forests of towering spruce trees that are broken up by deep lakes, rivers, and ponds. The main industries are mining and lumber, and the population relies on fishing, foraging, and small farming communities for it's food. While not a densely populated region, the mountains are home to hardy folk who provide the necessary raw materials for other regions to fuel their industries.
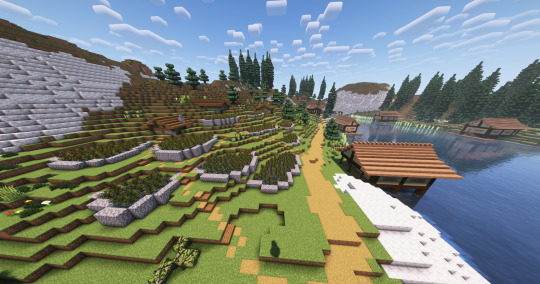

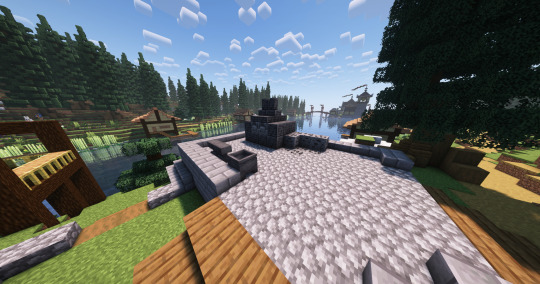

This world is being built entirely by me. That means all the terrain. Every tree, every bush, every river is being done with world edit, commands, and right clicks. My plan is to do small segments at a time. This post is built around the lake and waterfalls. The next one will probably be expanding the river that flows into the lake and the mountains and valleys around it. I want the world to feel real and make sense, because I am a mega nerd who needs something to do in my free time, so stay tuned, and hopefully my soul sucking job will not cause a premature end to this project.
---Technical Information---
This project is being built in a modded version of Minecraft 1.21.1.
I am using Sodium/Fabric/Iris for optimization and graphical boosts. Mods installed (so far) are world edit and Farmers Delight, both were sourced from CurseForge.
Texture pack is just vanilla Minecraft because Mizuno's is not being updated :( and I almost got a virus trying to find something else.
Shader pack is Complementary Reimagined.
#minecraft#minecraft creative#minecraft build#minecraft aesthetic#mineblr#minecraft castle#minecraft screenshots#minecraft inspiration#minecraft java#minecraft cottagecore#minecraft worldbuilding#minecraft nature#japanese aesthetic
23 notes
·
View notes
Text
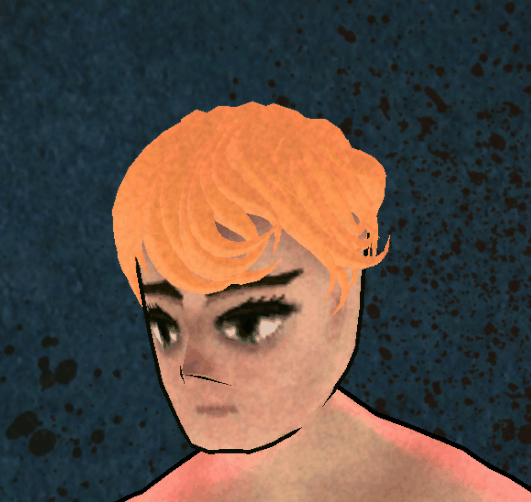
hey, it's me! i'm still alive, somehow, though just barely. this semester has been pretty tough so far and will probably remain that way until spring. despite this, i managed to add some fun new features. : ) ALSO i promise 100000% that if you sent me an ask i WILL answer it. i will. anyway, look at all those cool things! -> a system for cuts, bruises, tattoos, wounds and other decorations your whumpee's skin is an empty canvas. whether you fill it with scars and wounds or cutesy band aids is up to you!
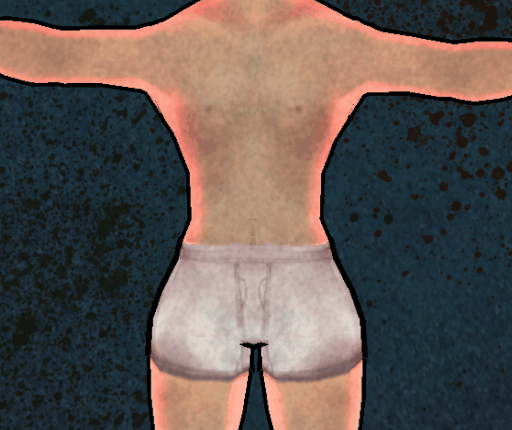
the way this is set up is kind of like a bunch of stickers. so for example, if you decide to hurt the lil' guy with something sharp, he'll get a "stab wound" sticker in the spot you decided to target. over time, that sticker will change over to a "stab scar" one. it's a very flexible way to do things, but it still needs some work and a couple big changes, since it's very unfriendly to low-end computers. in terms of visuals though, it should look exactly the same as the decal-based "decorations" for your whumpee that you see above!
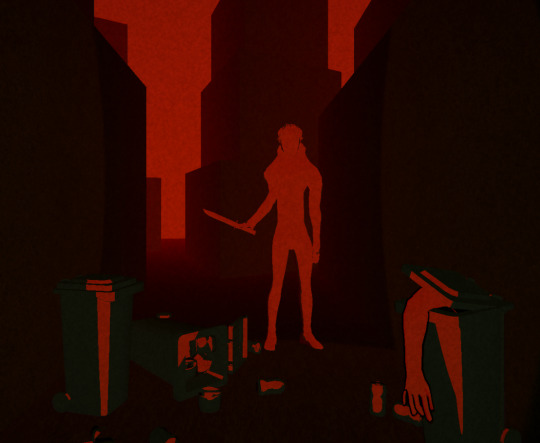
- a better way of getting that dude on camera the camera system is now a lot more immersive and will fit the story. the awkward developer cam that could clip into walls is no more.
you can drag around the view and zoom in and out by scrolling. as you progress, you'll get access to even more ways to invade your whumpee's privacy. : )
-> new ways to get horny in the last devlog post (around 1000 years ago) i said that you won't see any "horny accessories" in the upcoming updates. that was a complete lie, sorry! here's a preview of some cool new horns you can give to your whumpee.
the neat part is that the horns are customizable - other than just choosing the shape, you can modify their size and color gradient. -> other stuff + story i've made plenty of changes and additions to the back end. most of it is not flashy or super significant - most of the time and energy i could dedicate to the project went right into fueling the violent, bloody conflict between me and custom shader code. i've also made some updates to how time is simulated and fixed a bunch of bugs. there is now a sound system too! i'll look for some copyright-free sfx and music before the next update. oh, and there's some lore too!
i've been experimenting with different ways of delivering the main storyline. heavily stylized cutscene-like sequences were very fun to do! not sure if i'll stick with this style though. either way, i have the general outline of something that resembles a plot. >: ) that's it for now! again, sorry for the irregular update schedule. i've been following the "no progress for a long time, then one night you have all the energy and inspiration in the world and you zone the fuck out for an unhealthy amount of time just working on your thing then until realize that you're going to be asleep within the next 40 seconds" development strategy - hopefully, my brain will kindly allow me to switch to a more comfortable workflow. :' ) taglist below: (let me know if you want to be added OR LET ME KNOW IF I FORGOT TO ADD YOU IM SO SORRY) @whumpinthepot @andithewhumper @pigeonwhumps @monarchthefirst @scp-1296 @whumpedydump @screenys-whump-corner @whumpshaped @bloodsweatandpotato @burning-and-remembering @thealmightyconeoftruth @whimpity-whumpity @catnykit @vietbluecoeur @rainythealias @cardboardarsonist @snakebites-and-ink @lthrboy @woo-lu-woo @wingsofadragonsstuff @wecoffphm @bayvel @pics-and-fanfics @dokidokisadness @generic-whumperz @lambetjenasus @aarika-merrill @hayaneakabane @moons-cozy-corner @brittaunfiltered09 @rule-masochism @reverie1234 @oddsconvert @wh-wh-whumpified @currentlyinthesprial @cupcakes-and-pain @heavenlyden @whumpsday @likeadeadbattery @stay-on-topic1 @cyborg0109 @kawhump @astrowhump
#whumpdev#whump community#whump art#whump game#whumblr#whump#this took forever SORRY#there's still so much more to do but i'm really excited to start implementing new stuff#i gotta get myself a trello board with features or something#or anything that resembles a plan tbh#planning is hard but you know what is even harder? sticking to a plan#and that difficulty SKYROCKETS if its a plan you made yourself#man idk i gotta check if i don't have adhd or something i feel like this might not be the way an adult brain should operate#ill do some research later if i don't forget??? i'm always so skeptical of thinking to myself “i might have this disorder”#cuz i feel like i'm super hardcore prone to some weird bias and i wouldn't trust my own brain to diagnose itself#i don't trust that fucker in general
304 notes
·
View notes
Text
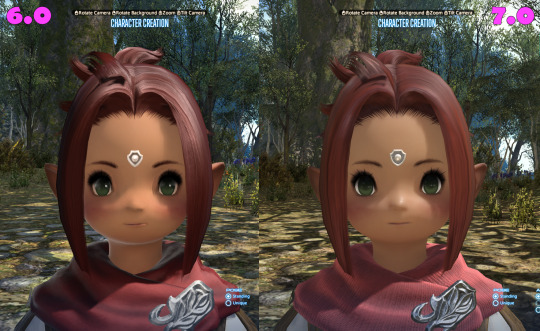
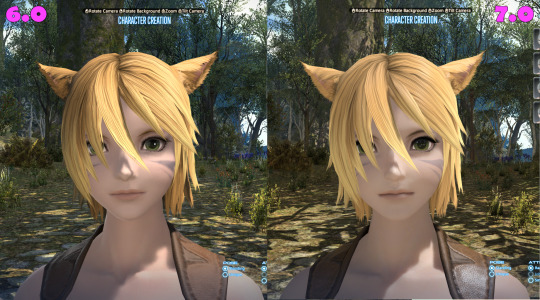
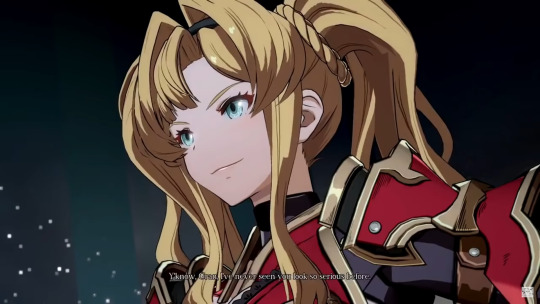
Dawntrail Benchmark Vs My WoLs
First of all, for those of you that missed it, the benchmark is available for download:
The rest of this post is gonna be under a cut as I'll be posting 6.0 vs 7.0 pics of my characters, and my thoughts comparing them.

First up is Luki, and her eyes pop like crazy! They feel like the most details thing about her and that's... well, they're nice to look at, but they don't feel like they fit the rest of her. I think it's less the eyes themselves as much as the skin texture... it's weird and... flat? I can't decide if she looks caked in foundation or like she's made of rubber.
I've notied that the quality of most viera ears' textures don't match the hairs at all. It's really jarring.
The freckles are even harder to see too. And I much prefer the shape of her eyes in 6.0.

Next up is Lokin, who's ears suffer the same problem as Luki's, but overall I'm really happy with his look. He's even more handsome than before!
His eyes also look like they belong to him (unlike Luki's).
Now let's move on to my old main, Kikilu. Somehow, she's looks even more adorable! I really can't complain about anything specifically regarding her.
Alright, on to Kitani, who also looks great! I prefer the shade of 6.0 hair, but hopefully that's something I can tweak. It seems a lot of the hair colours have changed a little.
The only other things are that their fangs are nowhere near as prominent as they were before, and the clan markings seems to have faded too.
I've also just noticed that her eyebrow colour doesn't match her hair. Hmm. Let's hope they fix that, or give us options to pick eyebrow colour seperately.

On to Chisaki, who really does look different. Um, I'm loving her eyes and eyebrows, but there's something really off about her lip shape. I don't hate her look at all though.
⠂⠄⠄⠂⠁⠁⠂⠄⠄⠂⠁⠁⠂⠄⠄⠂ ⠂⠄⠄⠂☆
Overall, everyone's faces have varying degrees of an artifical look to them now, and all the colours seem duller to me (note that all the above screenshots were taken as SquareEnix intends you to see them - without external shaders).
I'm probably one of the few that, while I hugely welcome graphical updates, thinks they should have kept the character features looking as much the same as possible. And that seems to have happened with some, but not with others. Midlanders, both male and female, seem to have really gone through some unsolicited cosmetic surgery, while the majority of the others escaped with a few unavoidable tweaks.
I really hope everyone offers their feedback, positive or negative, to the devs (in a decent manner). And I hope that, by the graphical update's implementation, we all feel happy with our characters. They're so important to us and our enjoyment of the game.
(Yes, I've tried with different levels (including 0) of gamma correction.)
#kiki squeaks#dawntrail benchmark#final fantasy xiv#ffxiv#viqo'te#lalafell#miqo'te#hyur#viera#final fantasy 14#ff14#kiki plays#finalfantasyxiv#finalfantasy14#dawntrail
38 notes
·
View notes
Text
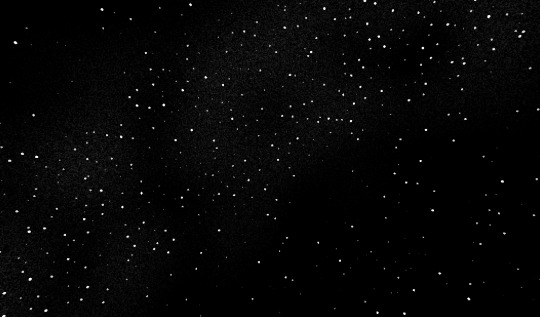
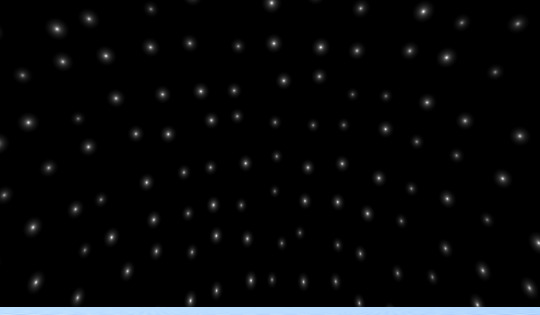
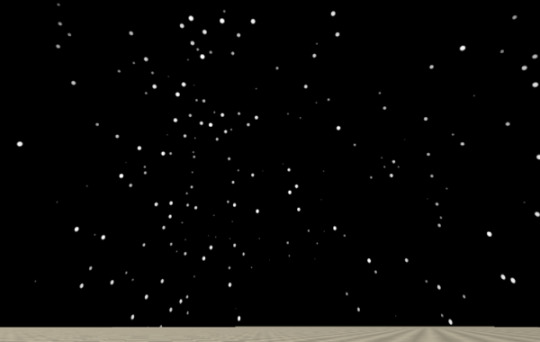
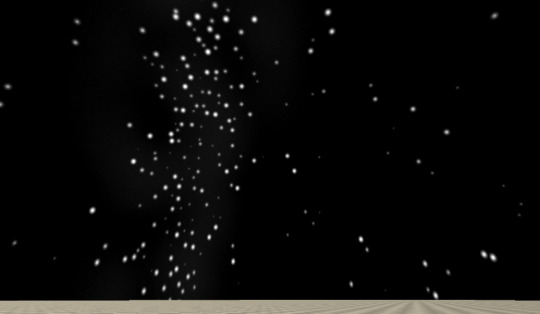
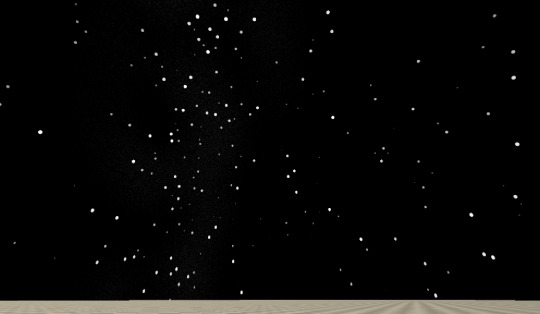
Procedural Skyboxes 2 - Stars


This time I need to credit a second excellent tutorial, this time by Tim Coster. My end result looks very different from this, but the underlying principles were essential.
Process and discussion below the cut.
Mk0 - Voronoi
My first attempt at stars was based off the same tutorial I referenced in the previous post, using Voronoi noise to space the stars. Two inputs control star density and star size.
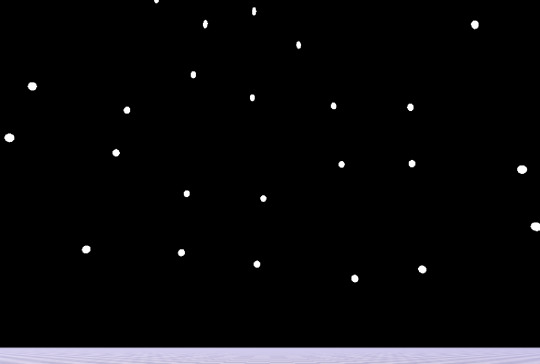
This might work fine for the use case in the tutorial, but in trying to adapt it for mine I immediately encountered some major issues.
the very even spacing feels kinda unnatural, especially with fewer, larger stars
there’s a seam in the sky (probably wouldn’t be visible with smaller stars)
heavy distortion around the sky zenith

Kinda looks like you're going to hyperspace every time you look up.
The seam and distortion issues are a result of the UVs (the coordinates that determine how the shader wraps around the sky). I solved this by moving to a kinda parachute-shaped UV as outlined in this incredibly helpful post on the Unity forums.
The unnaturally even distribution is a consequence of using Voronoi noise as a base. An entirely new approach was called for, which is where the Coster tutorial comes in.
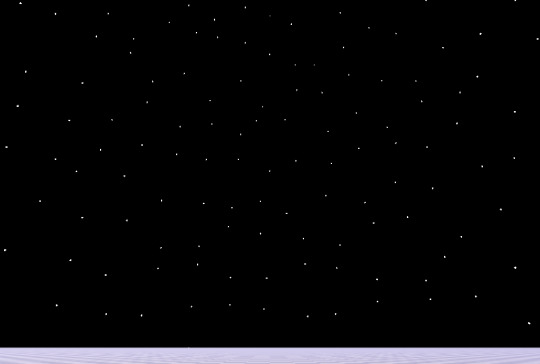
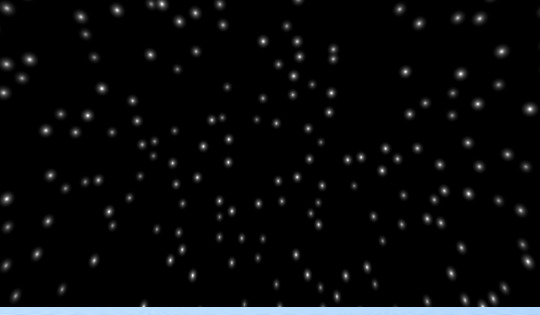
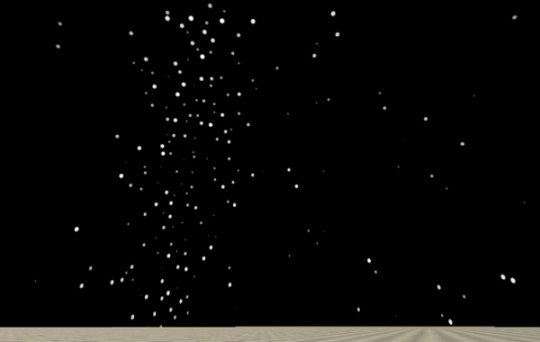
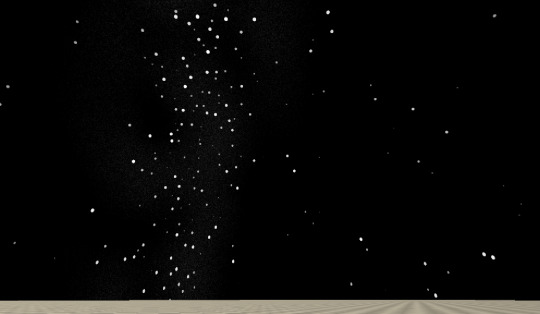
Mk1 - Tiling with displacement
I skipped the addition of the spiky light flares (not the aesthetic I’m going for) and worked through the tutorial as far as the section on size variation.
The Mk1 shader is a much better fit for the feel I’m looking for, and also looks good when you stare directly up into the sky, not just at the horizons. It also has a lot more controls. Star size remains, and gains an extra control for how much variation in size.


Density now has two controls: one which controls the density of the “tiling” (it’s not a repeating texture, because each tile is randomised, but there is tiling) and one which randomly omits a certain proportion of stars, making the distribution more gappy.


There’s also a control for how randomly the stars are spaced. I probably won’t want to move this much from a value of about 0.8 (1 produces a little more tight bunching than I like), but it’s there.
Last but not least, there is a setting for the hardness of the stars. This is going to be important later for modelling the effects of different amounts of atmosphere on the visible starfield.

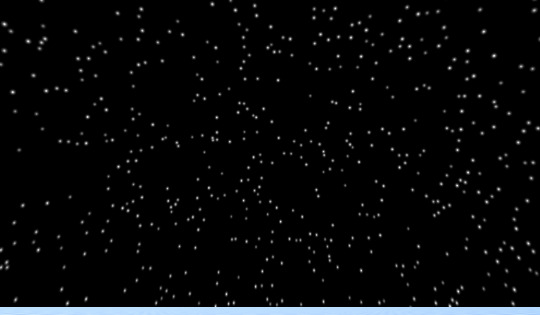
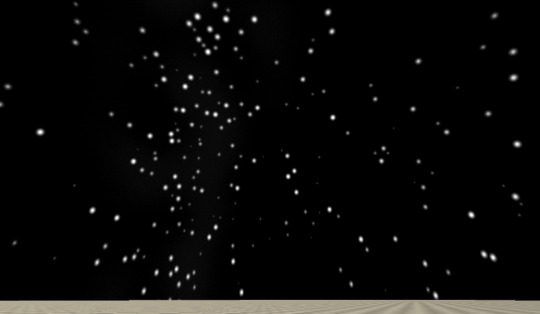
Mk2 - Galaxy Band
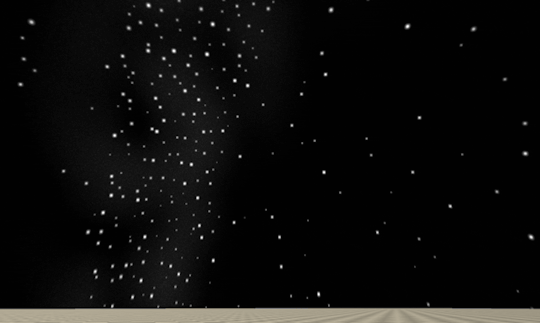
In the Mk1 shader, star distribution is even in all directions. The next thing I wanted to add was a band of denser stars across the sky to represent the bulk of the galaxy - as we see the Milky Way as a band across the sky from Earth.
Up to this point I had been using the purely-Shadergraph approach from the tutorial – which involves a very clunky grid of nine nearly-identical subnodes to perform an operation that is much more neatly executed by a for loop in code.
When I started trying to vary star density across the sky, this clunky 9-way graph was no longer adequate. Maybe I could have made it work with the right transformation of inputs, but it reached the point where it made more sense to bite the bullet and learn how to include the HLSL code from the tutorial and edit it to suit.
Once I managed that, feeding in variable density across the sky got a lot easier.
A new control variable, BandIntensity, controls how dramatically stars are grouped into the galactic band.
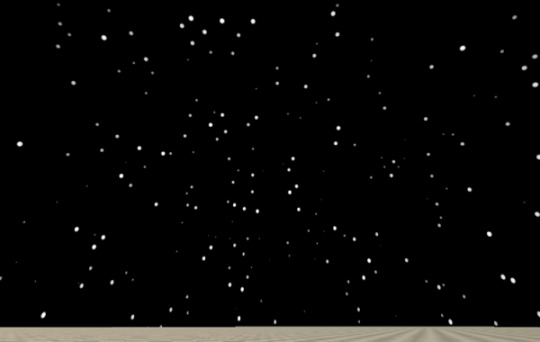
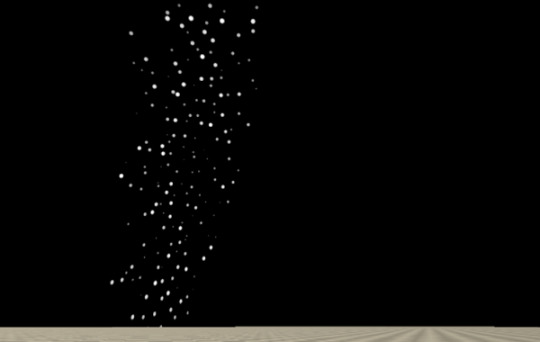
It was also at this point that I added twinkle, with controls for rate and magnitude. Eventually twinkle and hardness will be tied together, because they’re both functions of amount of atmosphere, but for now they’re separate controls.
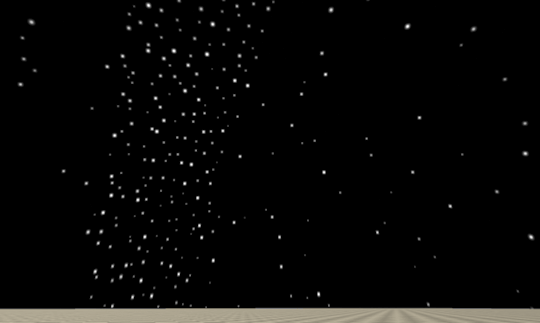
Next I added a band of faint texture behind the stars.
At low hardness, it’s just a soft stripe of Unity’s Gradient Noise. At high hardness, to make it seem “sharper” and more like a dense field of points instead of a smudge, the gradient noise is multiplied by some Simple Noise.

The end result – a pretty good looking, flexible starfield.
Next up, combining it with the atmosphere shader from pt1.
2 notes
·
View notes
Text
⋗ MAKING THE PLAYER FALL
OK, I am back from my trip to Iceland, and I am ready to get back to developing!
This is going to be on the shorter side, but I've been encouraged to share everything that I do, so here's how I made the player fall:
First off, I create an invisible sphere that I use to see if the player is on the ground, I then use this to reset the player's Y velocity (how fast it's falling) if we are on the ground. To actually make a difference and have this "Y velocity" variable move the player, I just use CharacterController.Move(), with Y velocity * gravity * time^2. The time^2 will mean the player will continue to accelerate, so I can just clamp the value.
Here's A video of it working (and yes, I did add some post-processing, I couldn't help myself):
Next up, I'm probably going to end up adding the test model I was using before, and I'm also probably going to start working on the shader again, I really shouldn't yet, but I love graphics programming...
2 notes
·
View notes
Text
Last week I made a little jam game for Minijam 150, the theme was magic and the limitation was 'light is the way.' A pretty abstract limitation for sure ahahaha. We got 1st place! My goal was to play with my toolkit and make something small and complete, from start to finish. Across the projects I've worked on I have pretty good libraries for handling stuff like NPCs, conversations, interactable elements etc. that I wanted to play with.
Scoping out an RPG in 3 days is fun! We started with an outline for the story, magical girl beats up aliens. Combat system came next, that's the gameplay part of the game. You get 3 moves, that cover different areas and solve different problems, which makes the fights into super basic flow charts the player can solve. With 3 moves, we knew we wanted 3 combats and a boss, let's you make a super easy level up system where you upgrade a move after each fight, then fight the boss with your skills. Exploration is rewarded with little health upgrades that give combats a larger margin of error, a neat little package! The game also gave me a great space to work with my new lighting tools and experiment with some practical uses of the color lookup table. On the html build of a love2d project, canvases get compressed and lose color accuracy. But with a color lookup table, I can use a shader to cheat in the proper colors, pretty cool! My favorite part was modding in a secret boss after the jam though, spending a couple laid back days post-jam playing with the legos I made! A harder more complex boss than you should probably put in a jam game, but I had fun ahahaha
3 notes
·
View notes
Text
Dev Log May 9 - Mod Kit Considerations
I wouldn't say that Crescent Roll is exactly my "dream game" that I've always wanted, but the genre is something I can say that I enjoy considerably, and would be something I'd play if I wasn't the one making it. So, one of my big-ticket items that we've been planning from the start is mod support - new levels and cosmetics without needing to code anything. That way, I can be selfish and play somebody else's stuff instead of doomscrolling before bed. I mentioned this in a previous post, but Crescent Roll uses a special data-driven engine we developed called Plinth that can read in plain-text JSON files. It's capable of mixing and matching from multiple sources from the get-go, so as it exists right now, we effectively have the equivalent of the Minecraft Behavior Packs under the hood (with the only difference being that the actual things you can do with it are not publicly documented. I'm getting to that.) So, the root game is technically just a mod itself, which makes adding levels and cosmetics a breeze (y'know, code-wise. Not design-wise, as apparent by our current rate of stage additions.) But getting zip files full of text and images can't really be done on consoles, and is probably a little too advanced for the average user, so we're leaning towards adding editors directly in the game itself. The data in the game is technically split into two pieces - the levels and cosmetics are "compounding data", which are the parts that you can add infinite numbers of mods to expand without affecting anything else, and then there's the "replaceable data" such as animations and menu layouts where you can technically only really have one active at a time. The in-game editors will likely only target the levels and cosmetics, while there will be some tools to help with the replaceable data, but either as a separate application, or more hidden from the average user. The first is likely going to need to be the Level Editor. Fortunately, we really just need a Paint application with the option to move some pieces around.

Quick Level Editor Mock-Up. Terrain Mode and Object Mode will probably show different menu sets instead of everything at once, and will use actual stage graphics for objects. The main stage graphic will probably remain RGBK, as re-rendering for the shaders is a bit expensive. Once that's done, cosmetics are an easy step up - it's the same paint structure, just with a pre-set number of layers. Most users will probably want at least slightly more precise tools for that, or the ability to work with external editors since we won't be able to deliver something half as nice as Krita, so we'll consider that significantly less important for at least the PC release. Obviously, both of these tools are secondary to actually having the kit available to use in the first place. And to note, it's going to be a bit limited in what can be modified - no actual code injection allowed, so it won't be possible to make an instant win button. But it's flexible enough that the every object graphic and animation can be replaced and the entire menu schema can be changed. Once we hit v2.0 here in a couple of months, the internal API will be frozen, and then documentation published so that everyone can roll their own without it. Steam Workshop integration and having menus in-game to manage mods will be next, and then finally, the actual editors. It's a also couple months out at this point, but you know - better to start planning now so that avenue at least remains open.
1 note
·
View note
Text
Making a rocket engine Pt3:
Next, I deleted the default cube mesh and imported the 'fbx' model.

The problem here was that it didn't work. Worse still, is that it has imported the camera and light too. I then closed this file down and didn't save it. As a result I reopened the previous file.
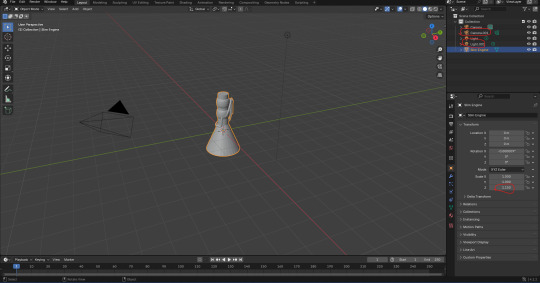
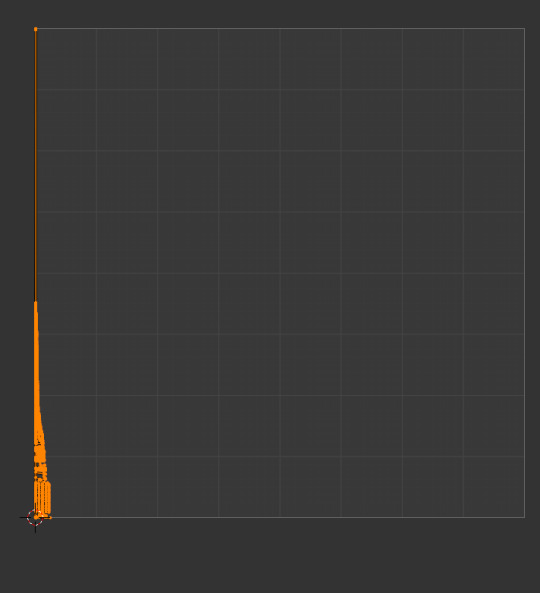
After that, I decided that I would have to squish the model for now. If I wanted to render it in Unreal Engine 5 at a later date, I could increase its height.
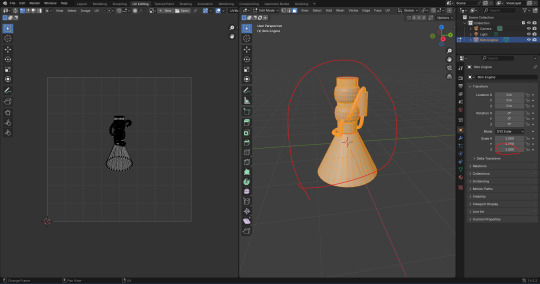
Here, I tried to unwrap the model again.
It then looked like this. I couldn't help but feel like it's not going to work.
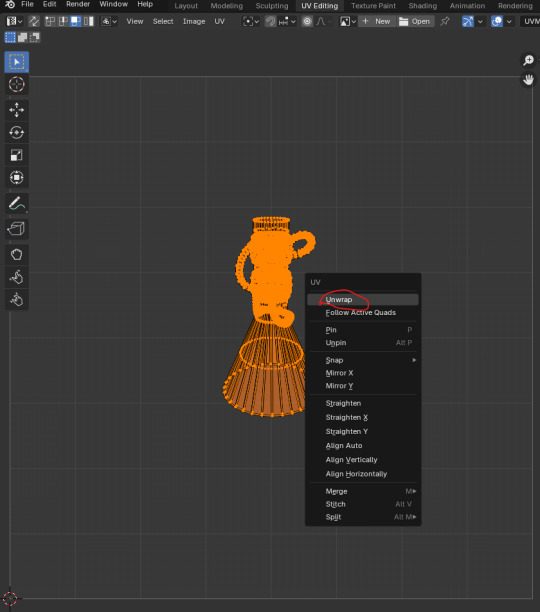
Here, I wanted to paint the model with a picture to see how good or bad the UV map is.
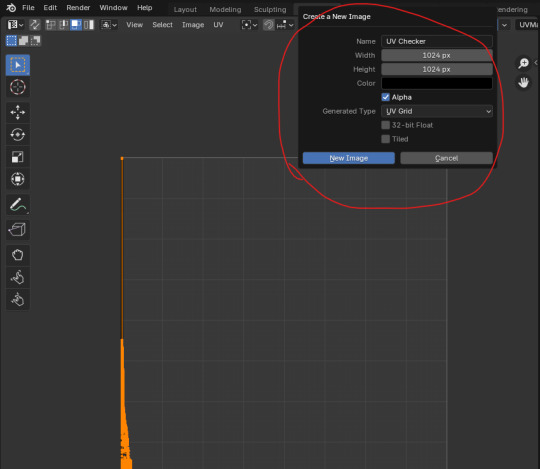
Next, I made a new material for the model and selected 'Image Texture' and then 'UV Checker'. I felt that the UV map looked terrible.

Meanwhile, I realized that I forgot to thicken up the walls of the engine nozzle. It was too late to fix it now. I would have to do that if I was to make a better version later into the project.

As I've opened the file up in blender on the college computers, I've found a warning notification. This is because I was using blender 4.2 at home whereas the college computer uses version 4.0.

On YouTube, I found another video that should help me.
youtube
I realized that in most of these videos, they create a UV map for individual objects and meshes instead of one big one.
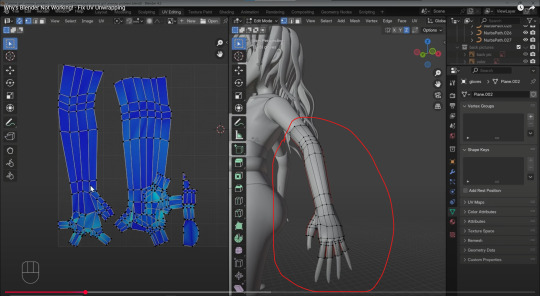
I decided search on 'Microsoft Edge' if you have to UV map a model in separate meshes or as one mesh. I have circled a video that I could use for a future model.
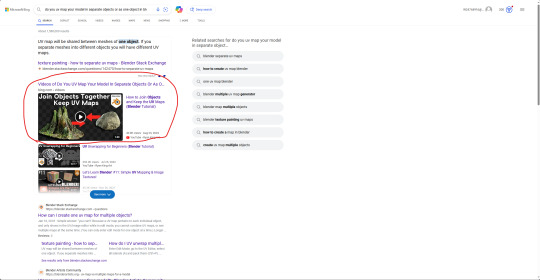
One of the problems I gathered from the video is that I am probably missing seams in the model. I am now of the opinion that the current model has too many mistakes to be fixed. The complexity and the time it would take is getting out of hand. I feel it would be better to move onto a newer model and use a different method. As a result, I decided to close the file down and open up the older file which made the model as tall as I wanted it to be. From there, I added a material for the model and coloured it a dark colour that you would expect from a rocket engine. I had dragged the white dot down to make the mesh darker and increased the 'Metallic' box from 0 to 0.25.

Here, I made a new folder and called it 'Blender Renders'. I then saved the file as a new one and called it 'Engine 1 -Render-'.

Next, I looked at an older blog post I made on tumblr. The post I looked at was one I was working on while developing the fuel tank model. I looked at the post to find a video that I linked that would prove helpful for changing the world colour without effecting the colour of my model.
youtube
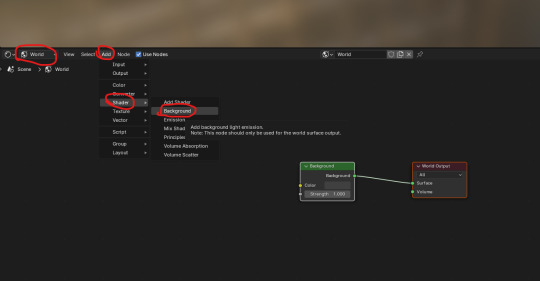
First things first, I clicked onto the 'Shading' workspace tab.
Next, I selected 'World' and then added a new background shader. I clicked on 'Add', 'Shader' and then onto 'Background' to do it.
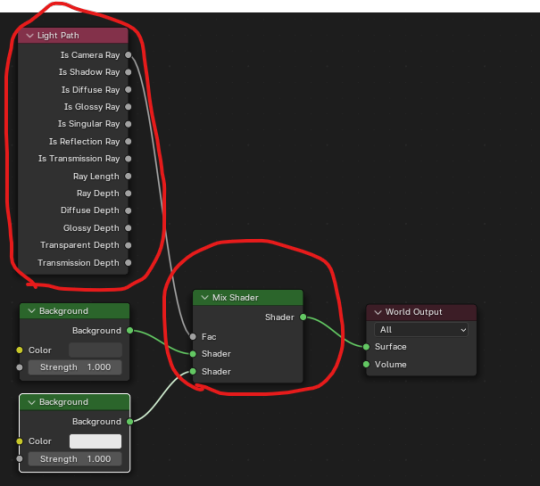
Here, I added a 'Light Path' and 'Mix Shader' box. After that, I attached them together.
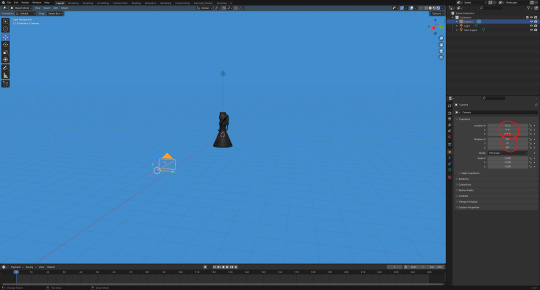
Next, I had set the background colour to a light blue colour.

Here, I moved and rotated the camera until the engine fitted perfectly into view.
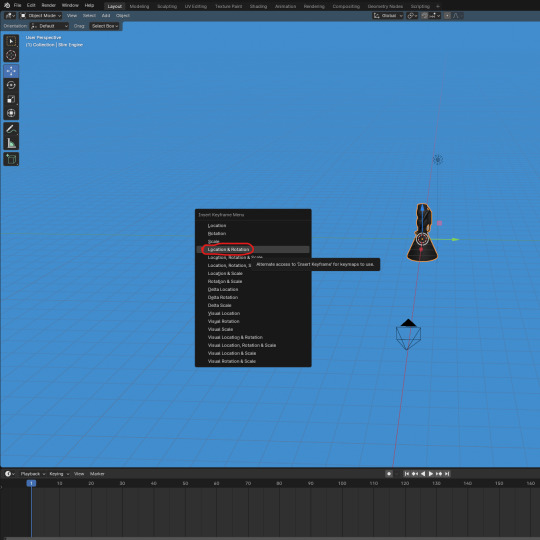
After that, I started to animate the model. Firstly, I needed to add the first key frame. The animation needs a first key frame to let blender know where to star the animation. I did this by pressing 'I' while hovering my mouse over the viewpoint. I then clicked onto 'Location and Rotation'. I wasn't going to change the scale of the model so I didn't click on the option that included scale.
Next, I increased the animation length from 250 to 450 frames. I also made it so that the model rotates 360' degrees on the 'Z' axis by the 210th frame. I then added a key frame.
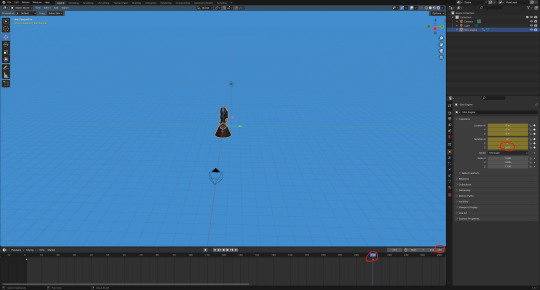
Here, I set the model to rotate by 360' degrees on the 'Y' axis by the 330th frame.
Lastly, I set a key frame on the 450th frame that should rotate the model back to 0' degrees on both the 'Y' and 'Z' axis.
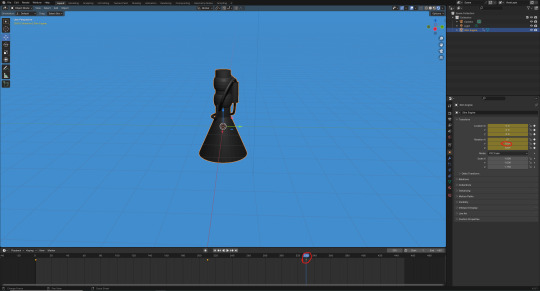
Once I had animated the model's movement, I wanted to experiment with how the model looks with blender's 'Cycles' render engine. I personally thought it looked no different. As a result, I set it back to the render engine, 'EEVEE'.
I was now ready to set up the render settings and render out the animation.
0 notes
Text
The 25th Year | Week 4ish | Change and Monsters
Believe it or not, I DIDN’T forget to write a new blog post on Saturday. I probably should’ve, but I was considering making a rather large change to my art style.
Up until Saturday, The 25th Year was going to have a low poly art style. However, I was really struggling to make certain things look right, especially character models.
I briefly considered a sort of PS1-esque style, but with more detailed models and textures (kinda like Valheim). This idea died when I remembered how much I hate uv mapping. Specifically, having to make sure the pixels that make up the textures are properly scaled was such a fucking headache.
I’ve now settled on a new art style. It’s cel-shaded. It’s smooth. And it probably won’t be annoying to work with!
Monsters
To showcase this incredible new art style, here’s a screenshot of one of the first monsters you’ll encounter on your quest!
BEHOLD!

A slime! Specifically, a Bouncy Slime. There will be a few different types of slimes, but I suspect this is the one that players will find the most useful and fun… I’ll leave you to speculate why that is.
That’s not all though! I have a second monster to show you.

It’s called a Rocker (the name’s not final). This is actually the first monster I modeled for this game. It’s still not finished yet, some details need to be adjusted for this new art style, but overall I’m quite happy with it. I disabled one part of the model for this screenshot because I’m still figuring out how it’ll actually look.
I technically have a third monster pretty much finished, but it’s a late-game world boss that I’d rather players discover on their own.
End of Blog
There were a few other things I wanted to talk about in this blog, but it's pretty late and there are other things I want to do, so I’ll save them for the next one (WHICH WILL ABSOLUTELY RELEASE ON SATURDAY I FUCKING SWEAR).
I’ll leave you with one last screenshot.

While I was working on the slime shader’s transparency, I somehow made it so not-transparent, it turned black and started to… glow…? Regardless of how strange it is, it looks kinda neato. Maybe I’ll use it for something?
0 notes
Text

Basidia Post #4
Vintage CGI:
Modus Interactive and I have been spending the last week or so learning how to use Alias Power Animator 9 which is essentially an old version of maya. It was used on sgi workstations back in the day on games like ff7 and mario64 for all the pre-rendered stuff. For a long time Modus and I have been pretty invested in learning how to replicate the look of old pre-rendered stuff, and, as it turns out, the best way was just to do it how they did it. For so long I tried to wrap my head around how old cgi stuff was modeled because the sorts of shapes that were often created seemed like they'd be unnecessarily hard to create with polygons. The thing that specifically stumped me for a while was how they handled wrinkles in clothing and organic shapes. As it turns out, the answer was hidden right under my nose the whole time. They weren't using polygons at all! Instead they were modeling with NURBS! It seems very obvious in hindsight, but I feel like I deleted the memory of NURBS once I exited highschool, and nobody ever seems to talk about or use them these days. If you don't know what they are, it's basically a style of modeling that involves making a bunch of bezier curves and using them to define surfaces. It's a totally different style of modeling from polygons with a lot of pros and cons, but it achieves that smooth look we're after extremely well.
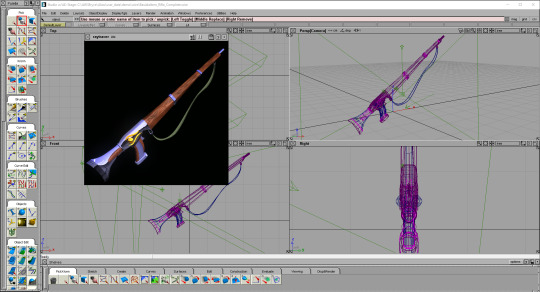
Scout Rifle Render:
As shown in the pics above, I decided to make a model of the scout rifle in Basidia so that we could use it for an item icon. The process was definitely a learning experience, and one of the things I learned is that modeling like this is super fun. It's like creating each shape is a puzzle where you need to theorize what is the best approach to take, and following through is always a multi-step process of defining a surface and slicing it up. I find it super satisfying to pull off, and making slapping materials on it is always fun as well. Moving forward we are probably gonna use this program and/or older versions of maya to create any pre-rendered item icons or backgrounds that we'll be needing. Modus actually made new versions of the vials in it as well which I will put right here \/

Wow there it is would u look at that. Power Animator just has an amazing way of outputting some unique, rich colors that are hard to get in modern software. I mean, just look at that cork. How do you make a cork have such interesting colors? Amazing. Fuck it, I'm gonna show off a little guy I made in power animator that has nothing to do with Basidia. I've been hyperfixating on this program since I downloaded it so I owe this to myself.
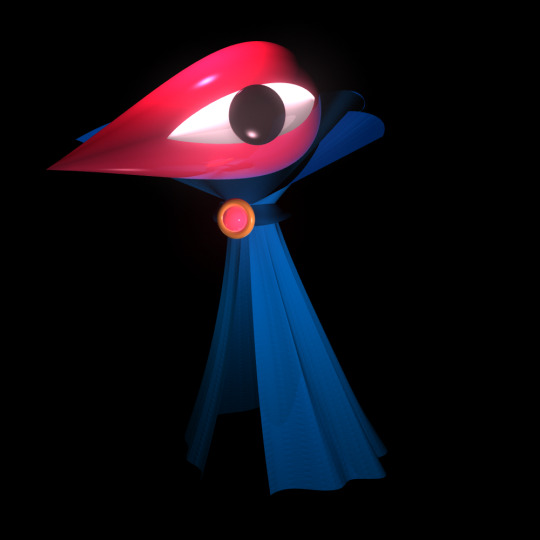
Here he is! Power animator has this amazing glow effect you can put on any shader that adds this bloom as a post processing layer. I used it on the head in this one, and I think it achieves a particular dreamlike effect really well. The sorts of shapes I can get for cloth out of NURBS is also super fun and rewarding, as shown with the cape here. Character modeling is something I'm always really excited about, and I'll definitely be modeling some Basidia characters in this thing.
Conclusion:
I am loving this program and I cannot stop thinking about it. Anyway, I have some commissions to take care of before switching back to midwest lost development, so I may or may not be posting about that game next week. I'm trying to buy an old sgi workstation with the commission money, and, if I can pull that off, then I will have access to all the old software they used back then (including the IRIX version of poweranimator). If you want to check out power animator yourself then here is a link to the program, and here is a helpful tutorial. Oke bye take care!
#lowpoly#power animator#maya#vintage cgi#old cgi#raytracing#indie game#indie games#game development#gamedev#indiedev#indiegames#indiegamedev#indiegame#the winds of basidia#basidia#winds of basidia#snow of basidia#the snow of basidia#3d art#screenshotsaturday#nintendo 64#n64#haunted ps1#rpg#pre rendered#prerendered
416 notes
·
View notes
Text
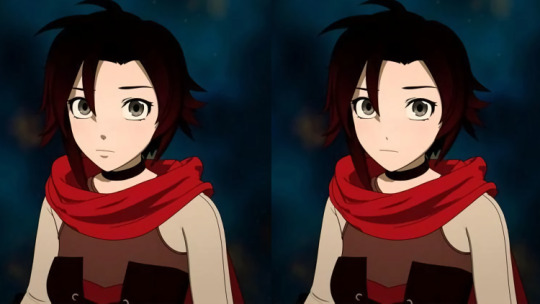
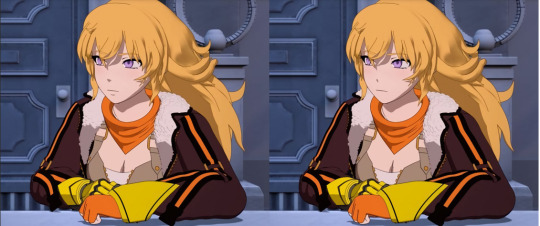
Nitpick N(Oct)ovember #1: 👄
Time to start off my first day of Nitpick November. Basically it's an event started by @odsalt for us to talk about our RWBY gripes that we don't want to spend time intellectualising, hence the name. So if you're a RWBY fan, you can already skip this.
Anyway, this is something that has bothered me for the better part of... 6 years now? It pains me knowing I've grappled with this in RWBY for a longer time than I spent not.
I have an irrational and near-constant dislike of RWBY's post-V4 lips. I hate them so much.
I just find them so... ugh. I've rarely liked anime where the bottom lip has a prominent shadow like this unless it's done well, and to know this was going to be in RWBY forever now when the models looked perfect before made me shrivel up inside. Not to mention the shadow covering the entire underside of the nose is also really unappealing to look at.
Chalk it up to my own art preference combined with it just being another hurdle that made the jump between the Poser and Maya models even more painful. I'm a very visuals-oriented person and how the characters look in a show is already enough to get me to watch or drop it, making a special exception for RWBY post-V4.
It's probably because of their engine or shader, but there's some shots (only one with Ruby that comes to mind) where the lip shadow isn't visible and the nose shadow is only on one side and I swear the model looks so much cuter:


(Put next to Volume 2 Ruby for comparison)
I decided to go ahead and remove the lip + nose shadow on different shots of the girls from Volumes 7-8 to prove my case, and personally I find them way nicer to look at. (not to mention that the skin shading in RWBY always tend to have this weird muddy tone to it which further contributes to making the overall face look worse)
The nose/lip shadow is such a small thing to gripe about but it's like a fly in the room - it's always there and always bothering me. Hence why I call it a nitpick.


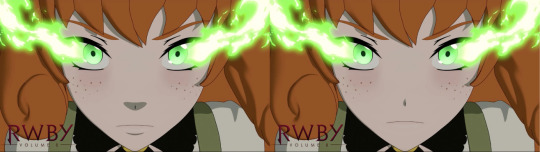
In Penny's case, I actually had to raise the entire mouth and nose up a little because the facial features look too weirdly long without the shadows - the long faces are sort of a problem with all of RWBY's faces, which are only further exacerbated by the shadows.
I'll be honest, if the models in RWBY consistently looked like this at the very least, I'd be way more forgiving of it. But this has been a constant itch in my brain that's constantly kept me from fully getting into the show. It feels like it's trying to imitate Avatar's style of shading, only... it doesn't look good.

In Avatar, the rest of its more Western-anime hybrid artstyle matches its shading style, namely the more defined noses and mouths. For RWBY, it's like it's trying to shoehorn Avatar's shading style onto a conventional anime style, and the result is just this off-putting half-measure that's neither here nor there.
(but I guess I shouldn't be surprised given how much RWBY tries to copy Avatar's surface-level traits without considering how to actually do it well)
"So that's why you're hating on this? You just want the characters to have boring cute anime faces?"
Yes. I like cute anime faces on my hyperstylized anime-inspired show about cute anime girls.
"You just want the characters to have these samey cutesy faces on all of them?"
As if they don't all have the same generic face model for every character anyway - especially the female characters.
For god's sake, if you're gonna copy another media's style of 3D anime shading, why not copy ArcSystem Works? You know, the company you've collaborated with before?


Anyway, that's it. Click Read More if you want to see more RWBY screenshot edits without the lip/nose shadows - they were pretty fun to do.


36 notes
·
View notes
Text
Capstone Concept art Process 2022-2023
Introduction:
This is the first post of my series based on my Capstone for my 2022-2023 final year in college. In this post, I will be focusing on the concept art for my Capstone and the challenges I had/have while making it. I will also be documenting the process of how I designed it.
The breakdown:
Previously, I had a whole plan of 3D modeling an armory store with an elf character as my Capstone for my third year in college. But that in itself had two problems; the two ideas are both very generic, and it would be time consuming to do both.
So, I changed my concept. I narrowed it down to just the character. I started with creating a base model from silhouettes and then a theme for the clothing. The theme being Fairy Kei.

I created the clothing with that in mind and created a very cute little dagger to go with her.
Now, the colour scheme: I kept trying to make the colours pastel to fit the fairy Kei style, however, it was not creating the right feel for what I envisioned. I wanted a warm character with a bit of edge to her. I began experimenting with colours other than just pastel.

I started studying colour schemes from my favourite game characters and tried to pinpoint each feel that they gave. I started implementing some of the colour schemes into my concept as well as tweaking them to fit my style.

There were five different ones that I found to stand out:
The first one has the same sort of colour scheme as my initial plan but is missing something unique.

The second one has that edge to it and feels like she could be an iconic design, but she does not have that warm feeling to her.

The third one I actually based off of the colour scheme that the character Saria has in The Legend of Zelda: Ocarina of Time.

However, I found that my character resembled her far too much with the short hair and elf ears, so she would have been another lookalike and unoriginal.

That leaves two designs left:
The fourth one I really liked personally. I used the same principles of what I learned from studying game character designs with my own colour choices. This is around the same time I also started matching the dagger colours with the designs. If it were not for the next one, I think I would have chosen this one.

The fifth one:
This colour scheme is also based on one of my favourite video game characters of all time. Medli from The Legend of Zelda: Windwaker

I cannot help but to love this colour scheme. All the colours complement each other and the yellow boots really add that iconic look that I wanted to give (of course, I changed the colours a bit to match my character). Her colours are mainly warm and light, giving her that friendly feeling. The pop of saturation in the red and her red eyes also give that edgy feeling I loved. Also, I love that the bunny eyes on the dagger matches the characters.

I was probably also very biased when choosing which one out of all the colour schemes since this one reminds me of my memories of playing the game as a child and my first reaction to when Link meets her. But nonetheless, this is the one I chose.
Of course, I think that there could be improvements on the actual clothing of the character, but now I have a pretty great understanding of what I want to model.

Here are just some extra concept sheets for my character.

My next steps will be to possibly polish up the concept art (creating more detailed clothing - possibly some accessories like gloves, etc. Maybe even a small bunny companion for the final render), creating a cell shader in Unreal Engine 5, and modeling a blockout for the character and weapon
2 notes
·
View notes
Text
Tales from the SMP Presents: The Pit
Another Tales, another Kingdom Hearts comparison post! “The Other Side” is a mix between the soundtrack The Other Promise and the cinematic “Another Side, Another Story” (both of which come from Kingdom Hearts, of course), which evokes a very specific KH character that... yeah. So let’s get into it.
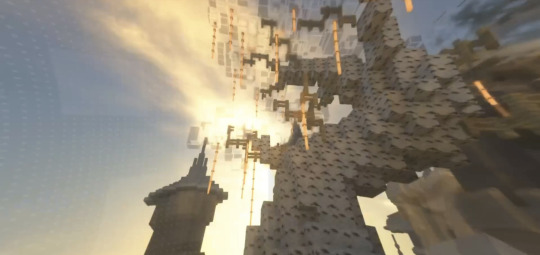
Karl gets stabbed by the king’s new general and finds himself back in the Inbetween. A cool new logo pops up as we enter the Inbetween, which actually is a... very typical example of a Kingdom Hearts world logo / intro card / name card? I honestly don’t know what it’s called, it doesn’t have a name, it’s just a thing that happens every time the character enters a new world.
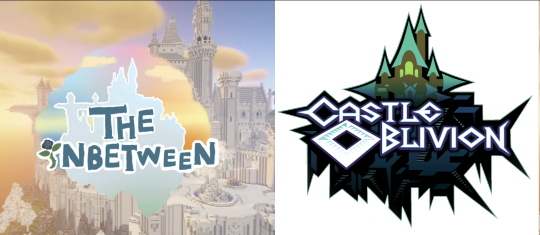
Castle Oblivion is just one (1) example, but if you just look up “Kingdom Hearts worlds” and scroll a bit, you’ll see what I’m talking about, haha. This doesn’t really change anything, it’s just another little wink and nod to the Kingdom Hearts series.
... Except, of course, the fact that there’s a title placard for this world implies the existence of other worlds. Which we eventually find out is, in fact, true. Fun! There’s a number of associations I could make based off the aesthetic of the logo (the castle reminds me of Radiant Garden, etc) but honestly they’re not worth much without more information.

So, the Inbetween is vividly aware of Karl’s straying from “the path”. It makes a huge attempt to still be pleasant and “nice” and whatever, but we can tell quite obviously that there’s an undercurrent of threat under all those pretty quartz blocks and smiles :]
Speaking of the :] smile, the reveal of Quackity’s previous lore stream actually doesn’t push me to think that it’s directly related to him in any way. It’s not impossible that c!Quackity achieved such heights as... becoming? The Inbetween? Because he’s got reason to be invested in Karl’s powers and keeping him in line. But it’s a reach or long-term thing at best, honestly, so I’m shelving the Quackity-smile association until further evidence appears.
(I could go bonkers and say that this is the culmination of c!Quackity’s ascension after ripping Information out of Dream or even XD, but that’s well into AU territory, so it’s all just shrug emojis for now.)
Which, of course, leads to the question of who that smile actually is associated with, and I think as clear an answer as we’re going to get is... The Inbetween itself. Clearly.
There’s a lot of meaning I could take from that; is it associated with Dream or XD then? Or maybe is it tapping into Karl’s memories of c!Dream doing the :) thing and it’s appropriating that for itself? Why? To intimidate Karl into obeying it?
Mayhaps. Mayhaps!
Anyway, Karl goes up to the tree, and as he approaches, the video feed distorts as the game abruptly switches to a higher-level shader like BSL or something.
Now, I haven’t confirmed it, but the way the audio shifts makes me think it suddenly started playing backwards, too. It’s just the way it sounds; it’s got that... sucking effect that’s pretty typical of musical tracks played backwards.
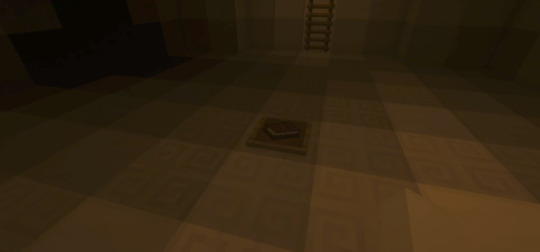
Karl swims down to the hidden room, which is very dark now. There is a book that tells him to go up the ladder for a surprise.
Also, by the way, I’m back on my wither rose pot association brainrot, because I can’t help but notice that there isn’t one here. There was one in the previous Inbetween segment, but it’s gone now. Now there’s a new book with the :] smiley, which of course should set the audience on edge, since we just saw the first book use it in a... mildly threatening manner.
We know that in Dream SMP it’s a pretty common thing to use redstone as blood. Other characters have used it in bits, some more seriously than others, and I think that’s what this room is trying to emulate.
If I had to guess, I’d... hm.
A part of me wants to say that the blood is probably from the different versions of Karl wandering around. Nobody’s going to notice if a few abruptly take a swerve to bleed themselves out in a room or something, right? But that carries a lot of implications, namely that of control so perfect it borders on possession. So either the Inbetween can control Karls, or it has some other agent capable of dragging something into this chamber to bleed it all over the room.
Neither of those options are particularly nice, I’ll admit!
There’s no Kingdom Hearts associations here, by the way. Due to being so closely tied with Disney, KH is deathly allergic to portraying blood in any way lmao. Not so many messages carved into the walls.
Or painted onto the walls with blood, if that’s what that is. Color correction gets a bit odd with shaders, so I’m not saying anything for certain; the closed books don’t look enchantment-purple, for example.
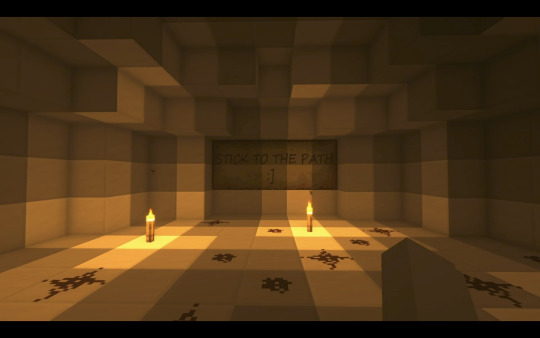
What does catch my eye are the torches, which will later be the flickering lights that guide Karl to the portal. The fact that they are here makes me think that this was definitely the scene of either a battle or some other conflict between the two sides to this story (haha, get it, Another Side, Another Story, because that’s a Thing in KH—), or at least proves that an influence from The Other Side was here at some point in time.
Karl quickly gets the fuck out of there, and when he swims back to the surface the shaders/music switch back to normal.

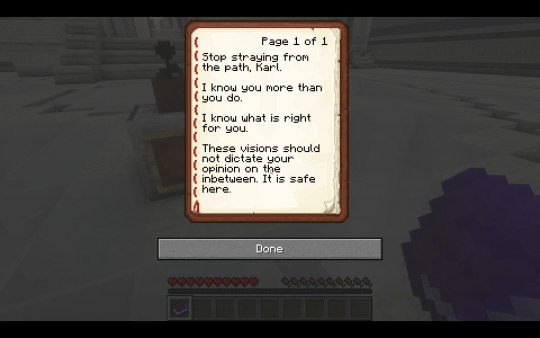
Oh, and for all you people who like to point fingers at anything vaguely false and scream “that’s gAsLiGhTiNg!!!1!!111″ about it, here’s an actual attempt at gaslighting. Note the language used here: “Your mind seems to be playing tricks on you :]”. It’s explicitly trying to convince him not to trust his own senses and mind. It’s saying, let me think for you. And that is a very dangerous thing.
Wither rose pot exists again, yay. Definitely a Inbetween voice, this book.
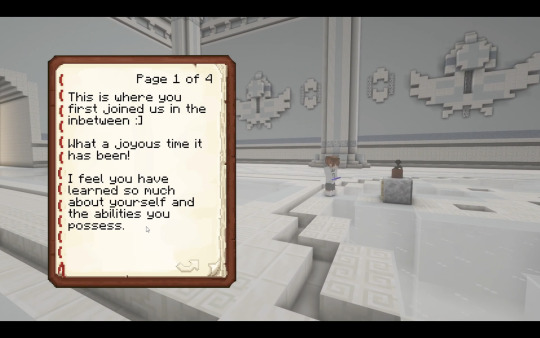
More wither rose book, this time in the, uh, grand entrance hall? The lobby? Yeah.
This book basically goes on a spiel about how the Inbetween is so great for Karl (a declaration, by the way, rather than a hope) and says that he is doubting himself or being less like himself, which is odd, because what he’s really doing is doubting the Inbetween and the path it has laid out for him. In a way, by questioning the Inbetween, Karl is being truer to himself than anything else.
The malicious way this place frames its words becomes more and more obvious with each passing page; it again reminds him that it’s a place to be “feel at ease”, which is super sketch that it has to tell him outright rather than actually being that place. It continues attempting to gaslight him, telling him that his imagination is getting away from him and that he can’t trust himself or anything else but this “path”.
I’ll get back to the “path” thing in a minute, but I really want to drive home that this is the truest instance of gaslighting we’ve ever had on the Dream SMP. Nothing has ever so clearly declared that it must be trusted over the victim’s own senses, practically infantilizing the victim’s concerns and trying to make them think that their worries are just flights of fancy. Please, please keep this in mind any time you want to accuse a character of gaslighting in the future; not all psychological abuse is a form of gaslighting. Sometimes it’s just... abuse. It’s not any more or less worse than gaslighting, it’s just different.
Anyway, about the “path” that the Inbetween is so obsessed with. No idea what the fuck that’s talking about.
In Kingdom Hearts, the only paths that are really of import are is a specific character’s “road to dawn” (redemption without fully yielding his edginess, essentially) or the “paths” that characters take to traverse between different worlds. I really don’t think the Inbetween has anything to do with either of them, but I’ll leave the options there if you want to peruse the possibilities.
What’s more likely, I think, is that this is a vaguely more subtle version of control/possession. The “path” is just “whatever the Inbetween wants you to do”.

Our next book is from the other side, and is plastered nonchalantly but boldly against the wall with no flower pot or anything.
Karl picks it up, puts it in his inventory (which probably indicates that he’s keeping this particular route close to his heart, rather than whatever the Inbetween is trying to make him do), and then the video stutters and he teleports back to the main entrance.
There’s a new book. It’s spooky as fuck, and hilariously hypocritical.
The tone shift is immediate, of course, aided by the abrupt change in background music since he got teleported back here. (I can’t quite nail it down; I assume it’s a slowed KH track like the others, but it doesn’t quite ring any bells for me.) The way the Inbetween speaks through these books has changed too, though; it addresses him by name without any attempt to cover up its intentions with flowery softness.
It does a cool fun thing where it says that it knows more than Karl, and knows what’s right, and then goes on to say that those visions shouldn’t dictate his opinion on the inbetween. (I’m keeping an eye on that lowercase, by the way. Not sure if it’s a typo or intentional, since it’s still one word, but.) As though he should trust the Inbetween’s opinions of itself rather than his own brain? A’ight. Sure, Jan.
Again it tries to tell him that it’s safe here. The lying is getting more transparent now.
He puts this book back, the previous book back, and runs after a double of himself until the shaders and music glitch again.

Fun thing about shaders is that they make dark areas... much, much darker. Especially since we saw that Karl’s got night vision (the effect, for cinematic purposes) on.
The music has a few notes that again sound as though they’re being played backwards.
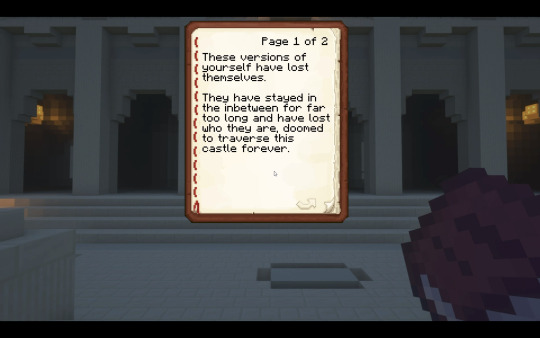
The book on the tree in this courtyard does not come with its own little wither rose pot, and neither does it seem to come from the Inbetween, since it’s telling him some awful things about these other versions of himself.
It confirms a few things about the mystery other selves, namely that they’re definitely condemned to walk the castle forever, but it doesn’t really tell us why this happens or why the Inbetween (probably) wants this to happen. What’s the end goal?
We’re probably a bit early in the story to figure that out, but they’re questions worth keeping in mind as this storyline progresses.
Karl gets teleported back to the main lobby, which looks very dark and spooky, though in the transition we do see a glimpse of that portal. There are torches around the wither pot book pedestal, and the audio really kicks into high gear with the creepy notes and the visuals get stretched and glitch quite a bit as he opens the book.

Funnily enough, the audio kind of reminded me of some pokemon encounter music, but I think that’s just because I’ve got those notes wired into my brain from years of playing those games. Anyway! The book tells him this is not a warning, and that they’re gonna fucking come for him to make sure he sticks with their path.
“We”.
Who is “we”? Is the Inbetween a collective? Is the Inbetween just part of a different whole? Maybe it counts all the different Karls as a part of it.
Either way, it’s creepy and threatening. Karl starts running; the screen glitches and tells him to follow the torches, which at first I was kind of leery about trusting, but the next series of words helped clear up exactly what side those words are on.

Also, you’ll notice that some other text kinda skitters across the screen before the English, like it’s getting translated. I think it’s Galactic, which is something different from the thing that Ranboo uses for Ender? I think Ranboo uses the Alien language thing or something? I’m not 100% sure on that, feel free to correct me and I’ll fix this portion.
It certainly implies that the speaker isn’t communicating in the server equivalent of “common”, however. Not sure if they’re translating into English or if Karl inherently understands it and it’s translated into English for the audience’s convenience, but either way, the other speaker might be linked to something completely different.
Karl runs on with encouragement and creepy music until he finally arrives at the portal, which is not barred off like it was last time. Thanks, whoever’s responsible for that!
The music dies for this final book.

The Inbetween’s last-ditch attempt to make him stay. It calls him silly a couple of times, and smiles at the end with a :]
Problem is, we and Karl already know that staying with the Inbetween will keep him from his friends. And the voice tells him to leave for his friends.
Karl looks around at this place that calls itself his sanctuary, and makes his decision.
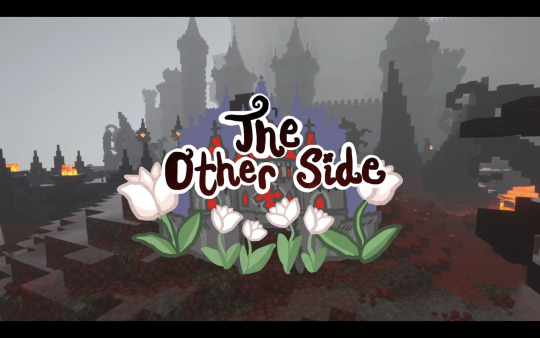
He arrives at The Other Side.
The music appears to be drawn from parts of either The Other Promise or Roxas’ Theme, both of which are heavily tied to the character known as Roxas. The version that Karl uses is slower and lower, the same as with the Dearly Beloved track he uses for his Inbetween segments.
Honestly, I’m not as certain on this as I could be, because I couldn’t find the exact variation on Youtube and there are parts that could just be Emotional rather than Roxas-related, I’m not sure. I’ll probably come back and fix this if it’s untrue.
EDIT: Yeah, uh, it’s Ven’s theme, not Roxas’, but the world itself is still heavily associated with Roxas in naming themes.
For now, I’m going off the assumption that the decision to make both the name and the theme of this world relevant to Roxas is purposeful, which means I’m... going to attempt to explain who Roxas is and what his story is.
Oh boy.
To grossly oversimplify the situation, Roxas is a “part” of Sora who develops his own sense of identity, is betrayed, gets coerced into murdering his best friend, gets kidnapped, gets memory wiped, and then—when he gets his memory back and realizes he super hates his captors—is convinced by those same captors to give up his existence because he “isn’t a real person” and if he lives then Sora will never wake up. So he “dies” and becomes a part of Sora again until later.
(Sora, by the way, is asleep due to the events in Castle Oblivion, which you might recognize as That Place I Keep Associating The Inbetween With.)
He’s also a fan favorite lmao. Take from that as you will, and, I don’t know, flip through his wiki page or something. Can’t guarantee it’s all understandable though.
My point to bringing Roxas up is that his arc... kind of parallels Karl’s. He did his job working for superiors he didn’t really understand in a white castle, with the higher-ups trying to control him, until he realized he was losing his friend/s to them. At that point, he defects. I think this is the point that Karl has reached, in his own storyline. He’s pulled away from the thing that’s made itself known to him, and now he’s wandering down something that hopefully isn’t as awful as the beast he’s just left behind.
Roxas also doesn’t get his happy ending for a long, long time.
Let’s hope Karl is different.

Off the top of my head, I can tell you that the mood this world creates is very reminiscent of some areas that the Kingdom Hearts games explore in 0.2 (yes, zero point two, that is the number of that game. This fucking series, man), specifically Castle Town, in which the player character has to smack a bunch of clock gears to make time go backwards in order to proceed, which is fun. But no exact inspirations come to mind the same way that Castle Oblivion did for the Inbetween.
Until we get a better look at the interiors, I’m going to gently claim that this build is more original and doesn’t take inspiration quite as directly from a Kingdom Hearts source, so there might not be an exact parallel. There isn’t a black castle in Kingdom Hearts that I can think of, honestly.
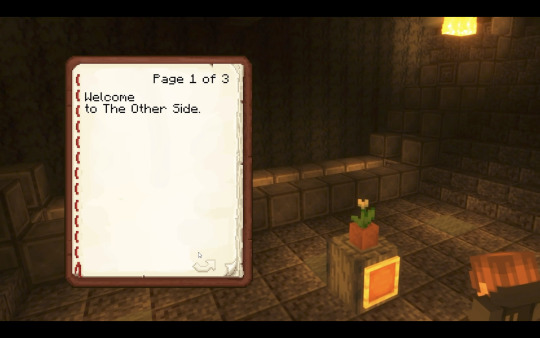
Also, I will say that I’m going to take this episode as confirmation that the wither roses are associated with the Inbetween and appear next to books that come from / are related to the Inbetween, especially since The Other Side associates itself with a completely different flower: the white tulip.
Anyway, The Other Side tells him he’s home, and that they’ll explore more soon.
This... eerily parallels the Inbetween, which told him that he’s safe, and has lots to explore.
I can’t say that I immediately trust The Other Side, but neither can I say that I inherently distrusted it the same way I did with the Inbetween. We’re going to have to wait and see how this place behaves in future episodes to get a good grasp of it. Who built these places? Are they alive, and writing the books, or is there a mastermind behind them? We still don’t have a lot of the answers, but that’s okay.
For now, I’m content to know that Karl is away from the more obvious perils of the Inbetween.
It could still be a trap, but for now, it’s a refuge.
64 notes
·
View notes
Photo

late ass replies but this time i have so much stuff to reply to that i actually need to split things up into categories :))))
also i apologize if any of this is no longer relevant / i am of absolutely no help :)))
otherwise, if you’ve asked a reshade related question...uh... sometime between christmas and now LMAO then it’s probably here!
nonny :
Hello Mikayla, I hope you're having a lovely year so far. I just wanted to ask this about the dove preshade (1st question here) kindlespice/tumblr/com/post/632163463099269120/ft-reshade-questions-a-theme-question-nonny i'm having the same problem, i have a new computer and after installing the game and it's last 3 updates and then the reshade it's not looking the same and it sucks bc i know how it's supposed to look (1)
the shadows are not as noticeable, the transparency between the walls is not there and the blur is gone (i have miiko´s ghibli's cloud override but i had that on my old computer and the reshade still looked normal) idk if it's the game or the reshade but it sucks bc i love how the original looks like anyways it would be really helpfull if you could answer. Take care and stay safe :))!!! (2/2)
hi hi! thanks for the kind message and i hope your year is going well! if I had to take a guess, I would say that maybe some of your settings in-game have changed? I would double check and make sure you’ve got edge smoothing off, and you could try turning off post-processing as well (im not ACTUALLY sure if turning off post processing does anything but it’s worth a shot!) otherwise i would try removing the preset and redownloading it? maybe the settings of the preset got jacked up and you can fix it by re-installing. let me know if this helps! if not, then you can always dm me so i can see pics of your situation!
nonny:
Hi! Sorry if this is worded odd but I just downloaded your Leif reshade and have completed all the steps, however there is still this blur over the screen which isn't the best for game play. If you could help explain how to toggle it for gameplay/cas that would be great :)
hi hi! the blur is the DoF (depth-of-field). it’s used for taking screenshots and is supposed to make the background all blurry. to disable it, you can use the hotkey shift-2 or open the reshade menu and manually untick the DoF option!
nonny:
Hi, i just installed the latest version of the dove preset and my game is dark. It is the MXAO that is doing it but i don't have the preprocessor definitions box. How do i fix it?
hello! im assuming you have a 4.0 version of reshade if you can’t find the box. in this version, it’s a blue tab called “Edit Global Preprocessor Definitions” beneath all the toggleable effects. if you have an earlier version, it should be under the “settings” tab at the top though.
nonny:
Hello!! Thank you so much for your work! I have a really quick question - so I am trying to work with the reshade and got it all set but when I play around with it, my objects don’t look “rounded”. If that makes sense. Other people who use it, their objects look rounded and smooth and just different (I have an image for reference) but mine just looks like the normal objects just different colors. Is there something I’m missing or doing something wrong? I have all the settings correct. :)
hi hi! hmm, im not really sure what that could be... probably something to do with mxao bc it’s always something to do with mxao lol. I would double check to make sure you have this line in your preprocessor definitions: RESHADE_DEPTH_INPUT_IS_REVERSED = 0 this line should equal 0 for the mxao to work properly. that might give you the “rounded” look. if this doesn’t fix it for you then you should go ahead and dm me so i can see what the game looks like!
nonny:
Hey, I tried your Dove preset but my game just can't handle it, it's pretty old and I just have to uninstall the reshade (even though I really loved the effect) but I'm scared to do anything in the Game folder or delete anything. Could you please help me with what to remove? I'm scared to break my game if I delete something that souldn't be deleted :( I tried searching for this in your WCIF and reshade questions and couldn't find an answear. Please help
hello! sorry to hear that your game can’t handle the preset :( here’s to hoping you can get an upgrade in the future! anyhow, to uninstall; i believe you only need to remove
ReShade - config settings (it’ll have a little paper w/ gear next to it)
d3d9.dll - application extension (it’ll have a little paper w/ gears ON it)
d3d9 - text document (little paper w/ lines icon)
reshade-shaders - folder
your reshade presets - config settings (if you remove the files above first though, you won’t be able to use/see these in-game)
that should uninstall reshade from your game! and don’t worry, if you accidentally remove something you didn’t want to, you can “verify your game files” through origin and that should restore any missing files. unless you.. *ahem*... acquired your game through other means... in which case be careful XD
@maddybarbz
Omg I don't know if you are active or not but I'm having some problems. So I downloaded the 3.0.8 and it was going smoothly but I loaded the game it said that magic bloom had issues.
i don’t know if im active either. probably not tbh XD but im here now so here ya go! i would recommend deleting the shaders you’re having problems with and then putting back the 3.0.8 shaders you downloaded. it’s really easy for things to break / be incompatible during the install so your best bet is always to delete the ones giving you trouble and put the new ones in.
@kaiamikulka
hi! I’ve been jealously stalking your page for a while, because I’m in love with the dove preset, but I’m very confused about how to download it. My computer keeps marking it as a virus, so i was kinda scared to download it. and when i finally did, it didn’t show up in my game. could you walk me through how to download it?(i have a pc laptop)
Thank you so much,
Kaia☺️☺️❤️❤️❤️
hi hi! lol im flattered for the jealousy stalk! anyway im not sure why it wouldn’t be showing up in game? unless you were so excited that you forgot to install reshade with it? i have a video here explaining how to install a recent version of reshade and set up dove with it so you can check that out here !
@bojanastarcevic
Hello, I've been trying to fix the dove reshade for a long time, but the new version just doesn't support it, and the old version spoils the game and sometimes it won't even start ... Would you consider trying to make the same preset version for the latest reshade version? I'll be very grateful because your preset is the most beautiful I have ever seen?! 😘😂Don't know if you still play of work on your game but like I said if you have time to try make new one couse everyone was looking for it!!! 😉😘😘😘
hi hi! i totally understand not using the earlier versions--these later ones are soo much more user friendly!--but i’ve been able to get the preset to work with later versions (4.7.0 is the latest i’ve tried though) and it looks, if not the same, then very close to the original. I have a video here explaining how i did it if you’re really eager to have it
in the future i guess i could try to re-release the preset? i can’t give you an eta bc im lazy and i fall off the face of the earth regularly, but i do think it would help to have updated instructions right on the face of the download.
#i think i might make another reshade video#one that's not an hour long and is more put together LMAO#like#i should actually go IN GAME to show people how busted reshade really is#XDD#rereleasing dove is probably the play too...#god i really wish i had put a read more on that post#:((((#asks#reshade
13 notes
·
View notes
Text
My mind is blown.
I’m totally serious. And this is a seriously long post, for which I apologize, but you might think it worth it in the end.
I did some fiddling with my Simming computer while solving the mystery of the super-lag/abysmal FPS rate in my TS3 game. While I was reading up on things to do that might improve that situation, I ran across this MTS forum post. It's about NVIDIA graphics settings (meaning, settings outside of the game, controlled by the video card itself) that improve the appearance of TS3 in-game. Now, maybe among the more gamer-types out there, doing this kind of stuff is common knowledge. But I didn't know, and my gamer husband never saw fit to inform me of these things, for which he’s gonna get a whuppin’ :), and my mind is blown, so I thought I'd share info for other non-gamer-types like me who don't know about this stuff. :)
After I fixed my TS3 game and tried out the NVIDIA settings and they made my TS3 game look awesome, I wondered what would happen if I applied the same settings to TS2. I had to test the game anyway because part of my problem-solving in TS3 was to update my GPU's driver to the version that was released about two weeks ago instead of a 5-year-old one. *laugh* I feared this would screw up TS2, but Mustang Valley and my creating set-up, at least, are fine with it. (Might be a totally different story when I play a regular, active, populated neighborhood, of course!) But I figured, what the hell, let's make a profile for TS2 with these settings, too. The worst that could happen is the game freaks out and I have to revert back to the default settings.
Well, the game didn't freak out and, in some ways, it looks a lot better. I'll go into more detail about that, via many pics, behind the cut. In front of the cut I'll say this:
You need an NVIDIA graphics card. I mean, I'm sure there's ways to do the same things with AMD cards. I just don't know how. You can't do this stuff with Intel integrated graphics.
Moreover, you need a decent NVIDIA video card. In the linked MTS post, the OP has a 700-series card and the guy who posted the settings was dubious about whether or not the OP should mess with this stuff because it might cause lower FPS rates and lag in TS3. But I'm gonna venture a guess that you could do this with a lesser card for TS2, since it's a much less demanding game even when it's all tricked out. And either way, there’s no harm in trying. (For the record, my card is a GTX 1050Ti. It's decent, the best card I can put in my Simming machine without needing a stronger power supply, and it’s more than adequate for both TS2 and TS3, but it’s certainly not high end.)
You need the Nvidia Profile Inspector, if you don't already have it. It's freeware, and you can download it here. Note that it's a program for Windows; I have no idea how you’d go about doing this stuff on a Mac.
Once you've downloaded/installed the Profile inspector, open it up. It looks like this when you open it:
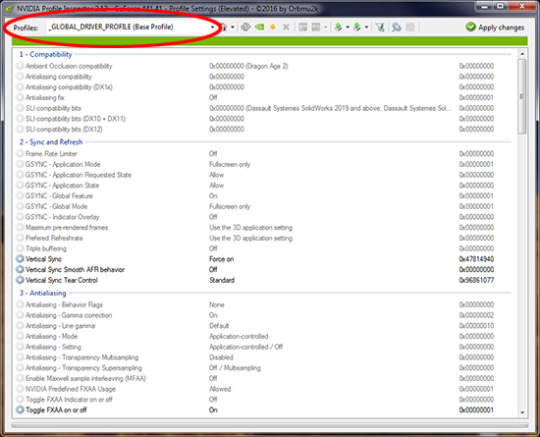
Under the drop-down at the very top (circled in red in the pic), there's a huge long alphabetical list of games and programs, old and new, that you can create an individual graphics profile for using this program. This means that the settings you choose will affect only that program and no others. So, if you play other games, Sims or otherwise, or use other programs (my CAD program's on the list, yay!), you might want to fiddle with those, too. But anyway, for TS2, find Sims 2 (with no "The". And it lists all the EPs, too, but just pick the base game) on the list and choose it. Then, plug in the settings in the post I linked to above. They’re all in the drop-downs for each setting, so all you have to do is click and choose the right setting. When you're done, click "Apply Changes" in the upper right corner of the program window. Done. Easy-peasy. It'll take you two minutes to do, if that.
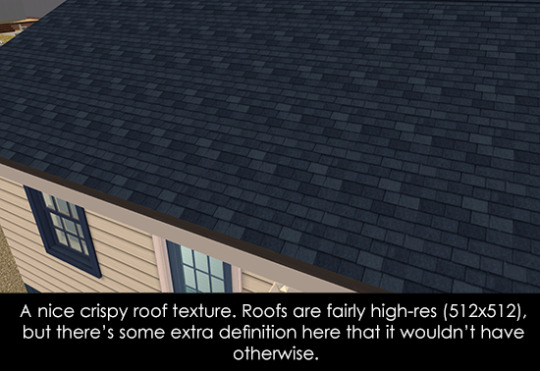
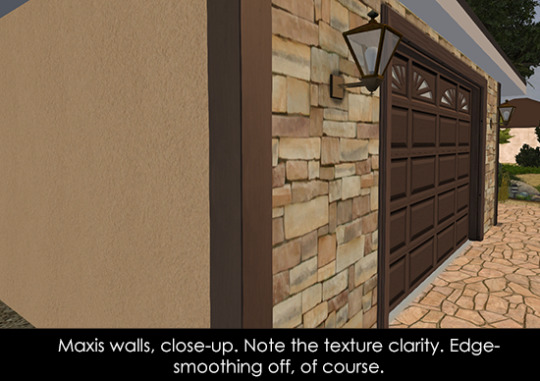
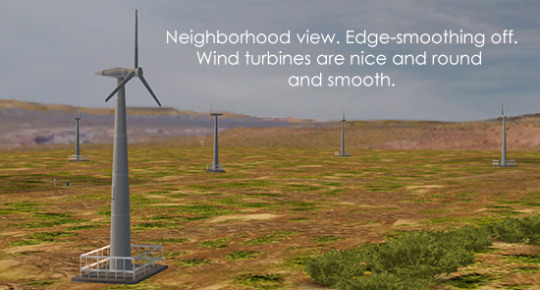
Then load up your game, and in your graphics settings you can (and probably should) turn off the game's native edge smoothing. It's being overwritten with much stronger anti-aliasing, so there’s no point in having it turned on. In the pics below the cut, all of my graphics settings are at max except that edge-smoothing is turned off, I have no lighting or shader mods installed, and the game is in windowed mode. (It tends to look better that way.)
Now as to what it looks like... There’re a bunch of pics behind the cut. I'll say up front that the changes are subtle. Don't expect miracles in a 15-year-old game! :) But for me -- since I'm pretty damn picky about how my game environment looks, what with wanting high-res and stuff - they make enough difference that I'm definitely keeping these settings in place.
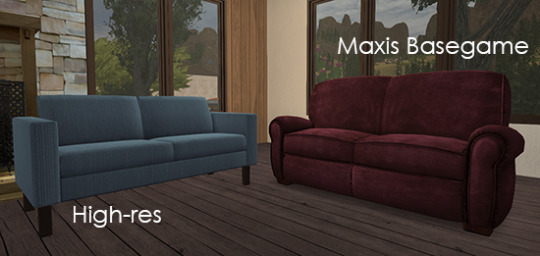
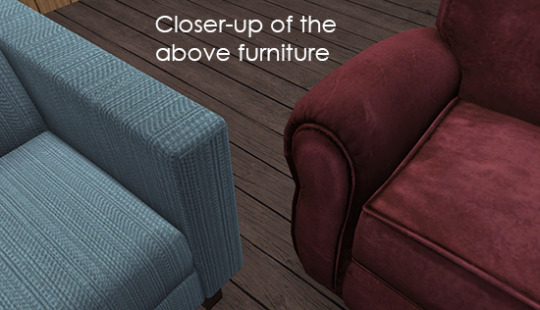
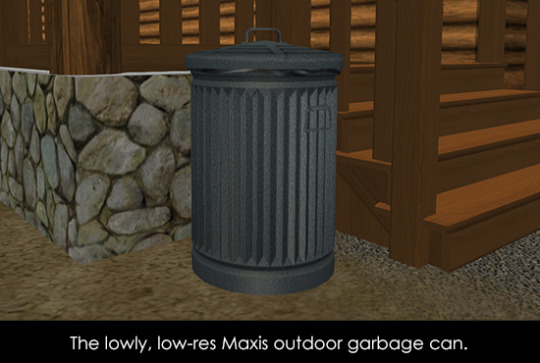
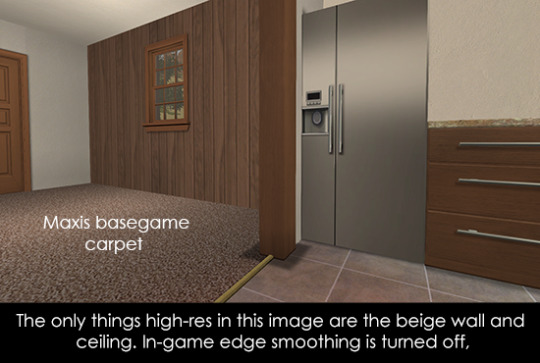
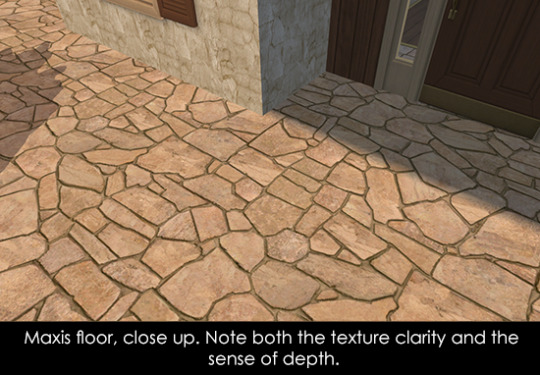
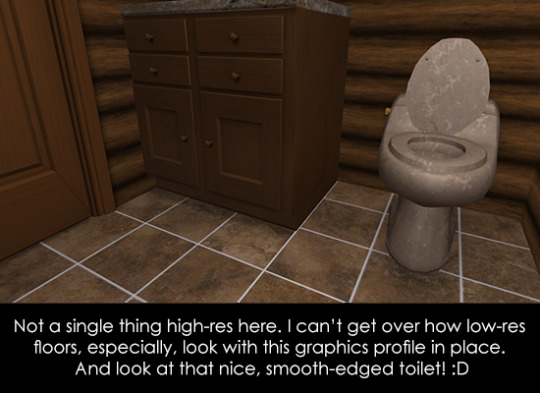
I don't see much difference in neighborhood view -- including skyboxes/horizons -- aside from meshed stuff having smoother edges and a bit (not a lot, just a bit) better texture quality/clarity. Rather, the main difference that I see is in the on-lot textures. There is better clarity and more depth, even in things like basegame carpets. It affects objects, walls/floors/terrain paints, hair textures, everything. (Well, OK, I didn't notice much difference with clothing and other non-hair CAS stuff, but all I had available to look at was my defaults and Maxis clothing, and...yeah.)
Overall, you get a higher level of detail and more depth, even close-up, without having higher-res textures. (But if you do have high-res stuff, it looks even better than it did before, with no further increased resolution.) Which means that you get better-looking textures WITHOUT contributing to pink flashing at all.
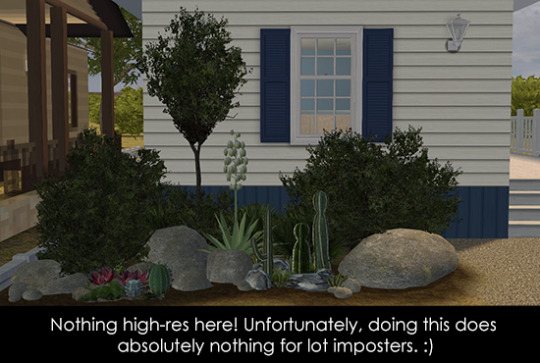
So! On to the pictures, none of which are edited in any way except for cropping/resizing and adding text. No sharpening, no fiddling with brightness/contrast. Nothing. I wish I could give you “before and after” pics, but...nope. You’ll just have to take my word that there is a difference. Which you can verify by fiddling with your own settings. (Don’t worry about breaking your game or anything. Since these are settings that exist entirely outside the game, there’s no way you can hurt the game with them. :) ) So, pictures...


And now for some hair...
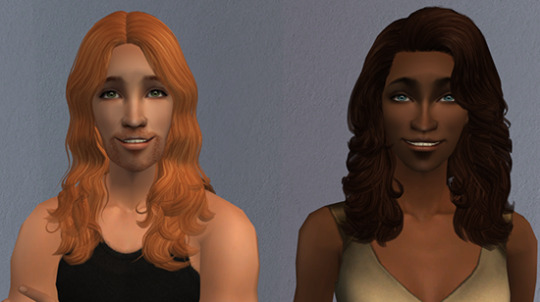
Unfortunately, all I have to show you are my own hair textures, which are neither Maxis-match nor Pooklet-y. However, this graphics profile does tend to bring out extra depth in all textures, including hairs, and with hairs specifically it does nice things to hair ends so that they aren’t so stringy-looking. I’m assuming other textures would also gain extra definition/depth.
One (and only, so far) bad thing about using this profile: It gives you better transparency. Unfortunately, this means that if you use hairs with transparency issues, the issues will be more noticeable, not less. I’m slowly weeding out such hairs in my collection, but I noticed that on the female hair in the first hair pic, there’s a transparency that wasn’t noticeable before, right next to her neck, about half-way down it, on the viewer’s right side. It’s hard to see on the sized-down pic, but it’s the bit that appears to be a blue-ish dot. So, if you do use a lot of hairs with transparency issues, you might want to use a not so high transparency sampling setting. That might help.
As for other stuff that goes on a Sim’s body, I didn’t notice any huge difference in the stuff I looked at, but what I had to look at was limited since I didn’t fire up my full game with all the CAS CC. :) I think my default skintones and the body meshes themselves might be a bit smoother/less pixellated...but that also might be my imagination. :) I do think accessories like glasses and jewelry would probably see some improvement.
So, um, yeah! If you made it through this post, I hope you found the info relevant to your interests. :) I wish that I had learned that you can do this a looooooong time ago!
853 notes
·
View notes