#patch panel rack
Explore tagged Tumblr posts
Visit Tumblr Blog
Explore Tumblr blogs with no restrictions, modern design and the best experience.
Last Seen Tumblr Blogs


Fun Fact
Tumblr’s reach among the 26-to-35-year-olds in the US is 11%.
Text

24 Port Wall Mount Patch Panel Unisol communications
#24port#wall mount patch panel#patch panel#fusion splicing#unisol#industrial#fiber optics#1u rack mount fiber patch panel#fiber optic rack-mount enclosure#wall rack mount#1u rackmount patch panel#server rack patch panel#patch panel rack#rack patch panel
1 note
·
View note
Text
#Cabling and Cable Management#Network Cabling#Fiber Optic Installation#CAT 6A Wiring#Data Center Cabling#Onsite Cabling Services#Aerial and Underground Cabling#IT Cabling Solutions#Patch Panel Installation#Server Cabinet Installation#Data Cable Certification#UPS Installation#Communication Closet Installation#Data Center Services#Data Rack Installation
0 notes
Text
on friday I decided I wanted to make better luggage bags for my wheelchair in time for my trip today (monday), so I spent the weekend in a frenzy and created these


lots more pics and info under the cut!
until now I've been using an off-the-rack under seat bag at the front (smaller than necessary, awkward to use) and random shopping bags bungeed to the axle at the back (impossible to add/remove items without taking them off and unpacking them entirely, not much volume for all that effort).
here's my old setup for comparison (although I can still add the backpack with the new setup too):

the old front bag attached by wrapping all the way over the seat, which made it difficult to remove. it was also unnecessarily small - there was a lot of wasted spare space behind and either side of it.
I measured up for a replacement to properly fill the available space. It's a simple but irregular cuboid - the top edge slopes slightly (because the seat slopes), and the top is narrower than the bottom (becase the frame is in the way at the top).

I designed mine to attach directly to the frame, rather than around the seat. at the back there are short straps with side-release buckles to wrap around a conveniently-placed bar on the frame. at the front are more side-release buckles, attached to make use of the buckles that were installed on the chair by the manufacturer (intended to attach a much smaller under seat bag).

the old bag just had one big compartment inside, so there was no easy way to keep small items accessible without them getting lost among everything else. so I added pockets to mine!
at the top, I made a panel the whole size of the top face, and attached it at a slight diagonal to make a shallow sloping pocket. I also added big flat patch pockets to both sides. and I added a piece of really thick cardboard as a base shaper so it wouldn't sag when full of stuff.

the rear bag was a lot more complicated. I didn't have an existing bag for this use at all, I'd been getting by with just bungeeing soft bags onto whatever bars I could reach on the frame.
I took a bunch of measurements and planned out my design. to make the best use of the space, it needed to wrap *around* the axle both above and below. so the end result is a slightly irregular cuboid but with a cutout at one side.


just above the axle cutout, there are short straps which clip around side bars on the frame to keep it in place. at the other end there are longer straps which buckle around the horizontal bar on the seat backrest, to hold it up.


I didn't add any pockets to this bag, because it's basically for luggage so I won't need to get at small things while it's still attached. more board in the bottom to keep the base in shape.
I would have used a double-ended zip for this one too but I couldn't get one in time (might replace it later). I'm also wondering about adding a shelf or something, to make it easier to squeeze things into the little above-axle space without falling back out.

on both bags I added a strip of old woven belt along the inside top of the opening, to help it keep its shape when the zip is undone.

I don't know enough sewing vocabulary to describe the kind of seam I used on them, but- I folded the edges in, right-sides together, and then topstitched over them. just one line of stitching per seam, but that line goes through each piece of fabric twice. raw edges still exposed on the inside.
I successfully took the new bags on a 4.5-hour train journey today, packed with a week's worth of luggage. and when I arrived, all I had to do was clip them off the chair and lay them on their backs, and then they can easily unzip like suitcases!

58 notes
·
View notes
Text
A Long Road Home - Page 81
Page 81
Imogen’s outfit here came from some concept art I drew for a 1950s-themed Bells Hells cosplay.


(Which you can see in person on this post!)
The plant Imogen is using to stuff the mattress is lady’s bedstraw, which, as its name suggests, was traditionally used as mattress stuffing because of its vanilla-like scent and natural insect-repelling properties. (She is not actually stuffing fresh damp flowers into the mattress; there’s a desiccated pile of them next to her that she has dried out presumably with prestidigitation.)
The middle panel here was originally different and showed them settling into their new home:
Panel 3: Evening. There's a fire in the wood stove, now cleaned of rust. The loft is furnished with the straw mattress and the blankets and furs from their bedrolls. A sideways wooden box nailed to the wall forms a kitchen shelf on which are stacked a few dishes and cups. (NB every time we see the cups they have switched between being rightside-up and upside-down.) The washtub and some pots and pans hang on the walls. A table made of crates and boards holds a vase of colored leaves. There's a rag rug on the floor. Sitting by the fire, Laudna is sewing a quilt patch from odd fabric scraps she has collected, with Pâté and Calamari beside her. Imogen is stretched out nearby on the rug, reading. It's very cozy.
I even got as far as sketching it but I felt like I needed to address how the two most noodle-armed farm girls in Exandria managed to get the dead tree off the roof with their combined strength of 13. (As unfortunately it’s too early for Imogen to levitate it off using Telekinesis or Laudna to simply ask it to roll away with Animate Objects.)
My friend Snow and I brainstormed for a little bit and came up with using pulleys and levers, having a friendly monster carry it away, or just leaving it there and using it as a coat rack, but in the end I decided that Imogen’s lightning magic could probably break it into pieces with the least amount of visual explanation.
Laudna working on a quilt was meant to be a recurring visual motif throughout this chapter though so I will have to find a way to put that in later.
The underlying sketch of the last panel is REALLY old, it was from that unfinished comic I have mentioned before that I was channeling all of my frantic energy into between episodes 33 and 34. So long before they had any kind of established romantic interest in each other. They were just Like That.
It was late and by the time I was painting the interior objects I was too tired to create a new color palette so the rug is just the Southern Gothic server colors. ;)

21 notes
·
View notes
Text
Being sent to check something in the hot, cramped server closet that’s gone unchecked for like 8+ years and feeling a rack of devices breathing their hot air on me while I just stared at yards and yards of cabling, some just sliced through and hanging like some sort of arterial severance. Nearly every port is occupied in every switch and server and patch panel it’s a fucked up virtual overstimulation like a data bukake. I got so hard typing that I went cross eyed sorry
#Inkneed to care for themmmm I need to but my boss has me on other projects . Growls#Objectum#gbs readable media#Be kind to me I don’t write a lot about these thingd#objectophilia
81 notes
·
View notes
Note

HI! I hope all is well! I don't know if you can help me, if so, ignore my question :). Since I switched to using DirectX 11 I have noticed notable graphical improvements (the elimination of lines on the sims' faces or in cc objects), however I noticed this annoying graphical problem and I no longer know how to remove it :( It appears both on game objects than on the CC ones. I wanted to know if by any chance you know how I can solve the problem. Do I have to change some settings in the Nvidia control panel? Thanks in advance. Best regards :)

Hi! I’m not completely certain what you’re pointing me too. Do you mean the faint grey marks under the dish rack and behind the headboard? If so, that is, remarkably, the game’s own ssao implementation and has been there since launch. Most people turn it off manually by editing the graphicsrules.sgr file.
If that is what you meant, you can edit the file (found inside the game’s Bin folder) in any text editor (I recommend notepad++).
Open the file and search for ssao. Then, next to all the lines that have that, change ‘true’ to ‘false’ and save.
You’ll have to do this again every time there’s a patch, or alternatively you can place a copy of your edited file inside the configoverride folder (in the The Sims 4 folder) and it’ll take precedence over the vanilla file and persist across patches.
33 notes
·
View notes
Text
Chapter 12 - Soft sheets and Sweet Dreams pt1
Authors Note: Little something something about non binary queer new teacher coming in, leading to Melissa finding the one.
As the door shut, Melissa glanced around the room, seeing a golden vertical handle along the side of the tiled wall over near the plants.
Heading over and pulling she poked her head in and realised the toilet was hidden away almost camouflaged in the tiled wall.
Deciding she did want a shower after the trip to the hospital, what was it about hospital smells that stuck to you, she headed over to the sinks to take a peek in the cupboard behind the mirror you’d got the glass out of, taking a drink of the fresh cool liquid before placing the glass next to sink. The shelves were split, the bottom shelf clearly products you used on a daily basis, face, hair, tooth paste. A glass with a gothic style A on it. The shelf above was two baskets marked with a label ‘help yourself’ clearly guest supplies for when you had people visit. One basked with a variety of facial products, face masks, eye patches, mini shower products and a couple of little boxes with bamboo toothbrushes in. Then second had a handful of small facial flannels neatly folded. Next to it was another glass same as the one Melissa was using.
Melissa took one of the small towels and a facial wash and used them to carefully clean off her makeup and remove any dried blood that had made its way into hair or lingered on her face. She then used one of the toothbrushes and a swig of your mouthwash with the other glasses.
She turned on the shower as you’d instructed and carefully stripped off her clothes, folding them into a pile on the chair before stepping into the walk in shower. The angled spray a perfect template and power, almost a full body massage. She sighed, the tension of the day, hell maybe of her life slowly fading from her body as the water cleansed her skin of the hospital scent that lingered. Along a build in shelf were a ranged of bottles, she studied, deciding to take your advice and help herself, selecting out a exfoliating scrub to start, she worked it into her shoulders, arms, and legs. The scent a deep alpine scent, fresh but with a hint of warming herbaceousness, studying the bottle as she rinsed she could see it was labelled pine needle and sage, aswell as recommending following up with a body wash. Scanning the products she saw a metal tube of body wash concentrate.
Applying it to her hands and soaping it up, a thick generous lather gathered to apply over her newly softened skin. It glided easily over her curves and despite attempting to cleanse herself, her thoughts led to your hands tracing the curves of her body, your tattoos standing bright against the pale slopes of her hips and thighs, skimming up to her chest. The slightly masculine scent of your body wash adding to the thoughts and she could almost smell the scent as if a memory of it clinging to your skin as she had sat beside you in meetings.
She pressed her forehand against the coolness of the tiles and took a breath refocusing. The spray rinsing away the soap with little intervention needed she hit the panel to cut the water, reaching for the large fluffy towel she’d hung on the way in.
Stepping through the bathroom, she stepped back into the bedroom, the main door was shut Charlie having closed it to give her privacy. The lights were set to a low light and the blinds had been closed, the room looked inviting. The deep green sheets of the thick looking duvet looked inviting as she dried herself with the towel, and she noticed a folded tshirt at the bottom of the bed. Quickly slipping back into the bathroom hing the towel on the rack and she picked up her lacy knickers, a flattering french style in black, which she slipped on then grabbed her water glass, before heading back to the bedroom, unfolding the oversized black shirt that showcased a purple rain prince print on the front. Slipping it over her head it hugged her chest and hips before falling to thigh length, like a tshirt dress, the sleeves down almost past her elbows.
Lifting the collar to her nose it smelt clean, slightly masculine with your laundry detergent and a slightly more intense almost fragranced scent in places. Melissa wondered if you’d pulled it on to wear before changing your mind and rehanging it, your cologne left on the fabric.
She caught a glance at herself in the long mirror, dimly lit by the lamp beside the bed, she liked how she looked in your clothes and wondered if you’d like that too. She slipped under the covers, the mattress only giving slightly, cool and supportive. The sheets sliding against her bare legs felt soft. Reaching over and turning the light off completely, she sunk into your pillows, feeling small in the vast bed, but the scent of you on the pillows comforting in a way it had been a long time since she’d felt. In fact she didn’t know if she had ever felt as looked after, safe and comforted as she had by you recently, in her previous relationships. Maybe she was just hoping too much or imagining things, but she hoped not. Her last thoughts before sleep took her were that you also were feeling the longing that was growing in her stomach, in her mind and maybe in her heart too.
#abbott elementary#abbott elementary fanfiction#melissa x other#melissa x reader#lisa ann walter#melissa schemmenti fanfic#melissa schemmenti
8 notes
·
View notes
Text
Mario Kart Tour: Oxford Foray
Told you this page would be random.
I think an underappreciated aspect of Tour's city track design is their atmosphere. They don't just tour recognisable landmarks in a believable layout, they really capture the city's character! From New York's dazzling nightlife to LA's casual appeal, Singapore's extreme extravagance to Sydney's energetic simplicity, Vancouver's splashes of colour and natural beauty, Amsterdam's effortless harmony with canals and nature alike, Rome's ancient architecture with comfortable life on top, Madrid's modern bustle with impressive history underneath, Athens' proud (and hilly) past and Bangkok's humble yet hopeful future, and Berlin's seamless integration of all eras: they're all accurate as far as I can surmise. There's only a few that I think don't quite hit the mark. Paris’ modernity is smothered in quaint romanticism, though what else could one expect, Tokyo has little of its maximalist flair, but perhaps the graphics limited that, and then… London.
I'm certainly biased, it being my home country and the only city on the list I've seen for more than a day, but it seems to only hit the beats of its most recognisable icons: laudably no doubt, but the city isn't just its imposing imperial riches! What strikes me about London is its fast-paced mishmash of cultures that fill in all the gaps between the great British statements like water running over cobbled streets: history and novelty around every corner! The course gives me the impression of the former but not the latter.
I'm not sure I'm qualified to rectify this, but I can make up for it with another English icon! My hometown has its history, but not enough to base a tour around. My current homestead, however, is undeniably culturally significant, and it's not just that. I hope I did well to convey the place as storied and not just interesting, but inviting, a genuinely fun place to stay for a day or a year. That's how I feel about it at least.
HERE WE GO

1: Our foray begins on the left side of the picturesque High Street, between Queen’s College and the Examination Schools. It’s a noticeably wide street (and a noticeably wide gothic limestone starting gate with a waving chequered flag to boot), with a cobbled dividing strip, and plenty of buses to crowd the way! As the road narrows and items are collected, there’s a right turn into the Covered Market, which has three narrow lanes to choose from, and a few opportunities to weave between.
Out of the market is a sharp right turn down a walled alley, with the lovely Exeter and Lincoln colleges adjoining. This is before a huge 180 turn with another item set around the Radcliffe Camera, an impressive dome in the middle of a big communal square. Having lost its fence, at that, so if you’ve got a mushroom and are prepared to miss out on items, the shortcut is worth it! Racers continue north past All Souls College and the Bodleian Library to reach the roundabout connecting Broad Street and Holywell Street. Remember the Bridge of Sighs to your right.
The route continues up Parks Road, a leafy avenue with plenty of boost panels, before splitting around Keble College! If you continue straight forwards, you get an easy wide road, and a view of both the Natural History Museum and University Parks. However, if you take that subtle sharp left, you can find a potentially faster cut-through that’s a bit tougher to navigate. I didn’t even have to design this one!
Both options reconvene at the apex of St Giles, where a patch of off-road leads to an optional ramp, and the road broadens to quite a degree, leaving room for a ridiculous row of coins. The abbreviated straight ends at the Martyr’s Memorial, which now has just a humble patch of grass behind it instead of an entire church, just to improve the flow.
A quick left turn introduces Broad Street, which, you guessed it, also widens out, somewhat narrowed by some of the city’s numerous bike racks. However, this one has its right half covered in short wooden ramps, for the first half! These can be useful for some trick boosts, but more coins lay the other way. Items are given at the halfway point. Before reaching the roundabout at the end, there is a conspicuous diversion past the Sheldonian Theatre (which has no fence, to make way for the race) and through the library complex towards the Bridge of Sighs. Racers may either run straight through the gate (tricking as they go) or take the grated glider ramps to make it over the bridge!
The return to the start line via New College Lane and Queen’s Lane is a winding, narrow path, walled in by the historic namesake colleges. You’ll have to forgive them for not having karts running through their grounds. Nonetheless, navigate those chicanes and a final left turn (with a sneaky cut over the pavement) brings you back to the line. It’s a long one alright!
2: As in track 1, we begin on the High Street, though this time we forge ahead past the Covered Market, the traffic turning off before the Carfax Tower, until the course swerves into the Westgate Centre. In a strikingly similar manner to Coconut Mall, the route has two walkways either side of an optional drop with escalators, before a right turn into a more open area where the drop and escalators are forced. I swear it’s coincidental! The decor is distinct at least.
After grabbing items wherever you may encounter them, exit the mall via another sharp right turn onto open road. Make use of its breadth before you have to navigate the Castle & Prison, which is exactly what it sounds like! A couple of narrow turns later, there is a brief anti-grav uphill to wind up the Castle Mound to a big glider ramp, from which one must avoid the dreaming spires of Nuffield College and St Peter’s College some random church, or grab some of the revolving coins if you’re daring…
Though you could just drop onto the street, the Ashmolean’s grand ionic forum is a perfect landing place, where one can drift around to jump down the stairs and find themselves heading onto Broad Street once again! This time, the route heads past the theatre and turns at the roundabout, so the other lot of ramps, this time occupying the left half, can be made useful. The lap ends the way you’d expect after turning at the roundabout.
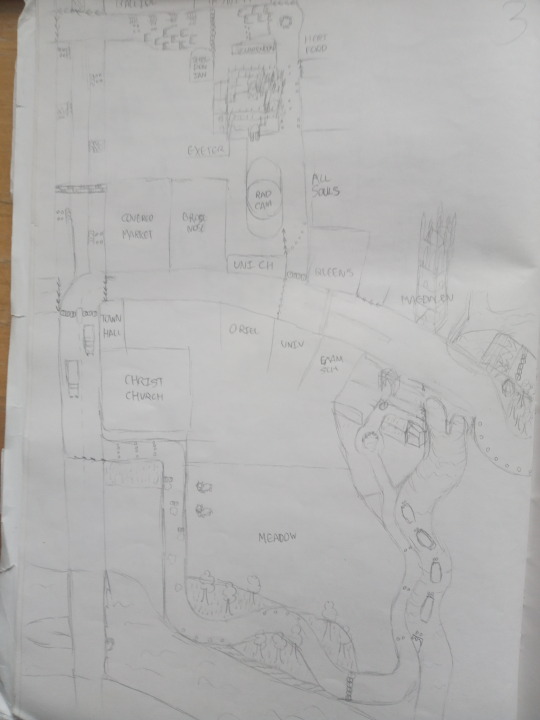
3: Unlike both 2 and 1, we start our race on Cornmarket Street (under a long hanging sign of oil paints on wood, the closest I can get to putting a pub in a kids’ game), a place I would be remiss not to include, along with its clutter of bicycle parking. If there’s one thing you notice about transit in Oxford, it’s how many bicycles are in the way. However, if you can dodge around the racks, you may find some coins or even dash panels…
Anyway, Cornmarket is a simple, if not uninterrupted, straight, which racers take south, spying once again the Carfax Tower and then the Town Hall and impressive Christ Church. You know, the big one. The road continues down St Aldates with all its traffic, but soon turns left through the open gates of Christ Church Meadow! The next half of the lap takes place in greener pastures, first down a puddle-ridden southward straightaway with sparse items and Moo Moos spectating, then when the course meets the Thames and Folly Bridge, a more wide open snaking route with grass shortcuts abound! The riverside path remains intact, but still off-road.
After doing this eastward a while, the course drastically narrows as it winds its way northward strictly following the meanders of the Cherwell. Of course, there’s nothing stopping you from driving through the river itself, but the bumpy terrain and drag force balances any advantage of breadth. A wiser path is found by jumping onto a series of punts, which can be quite hard to aim for, but offer a trick each time. They’re not hard to come by in Oxford. This continues all the way to the Botanic Gardens, which can themselves be snuck through via a gap in the fence. Those wishing for a complete row of item boxes and, of course, the exquisite surroundings, can find themselves jumping over the pond in the south section before reaching the north, where a quick right around the fountain directs you between the greenhouses to reenter the river. The river, of course, does continue past the gardens, but who would want to miss out? Especially when that part of the bed gets so muddy…
When you’ve finally made it to Magdalen Bridge, you need only drive under it to find a wide slope up to the roundabout, which is drifted around before crossing the bridge to witness the lovely Magdalen Tower! We then cross the line - the line from the other versions, that is - before sneaking past the University Church to reach the road past the Radcliffe Camera. The Bodleian Library can now be dashed through for a guaranteed double box, if you can find the narrow entry! The rest is obvious: take Broad Street one last time, westward now, to reach the top of Cornmarket Street.

So how might these all fit together if they were given the Mario Kart 8 Deluxe treatment? Honestly, probably better than the individual courses! Lap 1 takes version 1, of course, but stops short of Broad Street, instead cutting through via Cornmarket to start lap 2, with version 2 taking over by way of a right turn at Carfax Tower. Lap 3 simply commences from the High Street and doesn’t bother with the whole Broad Street diversion: we’ve already seen it!
Oh right, I also made the music for it! You'll have to forgive Musescore's playback engine, they try, bless 'em.
It too had to be truly emblematic of Oxford, and besides the obvious historical, academic, fancy vibes, no sound reminds me more of this place than the echoing of church bells! And there are choirs in every college. So I ended up with a rather baroque piece, arpeggiated bass, change ringing, suspensions and all, which certainly suits the locale, but does NOT typically suit Mario Kart's encouraging energy. Heck, they almost always rely on synths, too, let alone their melody-first composition style that is entirely unfamiliar. How did I fit the mould? By focusing on intensity of Biblical proportions! If there's one thing choirs and organs can do, it's a ramp-up of DRAMA. With enough build and release, it's got the natural energy. Slap on a drum-beat and it ends up shockingly fitting. With all the zero inspiration I had to go on, I seriously surprised myself with this one. Judge for yourself!
Oxford is quite a convenient place to work with: most cities are so massive that you have to smush all the landmarks together and the layout doesn’t quite come naturally. But this place is already so compact, and packed with unmistakable buildings! Also, I know they’re trying to be flattering, but can you believe London saw not a drop of rain?! I think Oxford should be partially cloudy by contrast, providing a gentle rainfall, but with enough streams of sunlight to pierce the depressing grey… it could make the meadow look positively angelic!
Perhaps one day I’ll try my hand at Hong Kong Hustle to address Tokyo’s plight… or Shanghai Streets, I can’t decide! And then there’s one that is so easy to make that it’d be kind of funny just to do for the sake of it. We’ll see.
If anyone wants to take the names Rio de Janeiro Jaunt, New Delhi Journey, Moscow Scoot, Stockholm Swing, Cairo Cruise, Geneva Chase, or best of all, Brussels Bout, be my guest. And if any modders feel like 3d-modelling most of Oxford for me, I would love to give it a look :D
3 notes
·
View notes
Text
Mildly annoyed at my body.
Probably venting. Mostly complaining. Some medical talk.
I kinda want to get a second shift job, but I just got a raise and starting this month, I will be making really good money. Like, double minimum wage money. I don't think I'll be finding that wage anywhere else with no college degree and only 5 years of office experience...
I want to put more of my books on the shelves, the ones still boxed in the living room and the basement. Go through the comics I probably have no real attachment to, maybe offer them up somewhere. Put the books I keep thinking about that somehow didn't get their boxes marked "FAVE" and thus weren't put upstairs when I moved. They're in the basement. I KNOW I have more books by my favorite author. I've been wanting to reread the ones I haven't unpacked.
But I just ate. I can't go up and down the stairs, let alone carrying 2+ boxes and unpacking them. Not to mention, some of them are practically buried in others' boxes... I can't exert myself by moving them around, either. I might be able to reach the ones by the shoe rack, but I don't remember. I can't stand up and bend over to look.
For my stomach AND my back reasons. Ever since I had the neurology appointment, during which they twisted me in ways that made my mostly-fine back start hurting at a Level of 5/10 Again, and when I said it started hurting they kept twisting and asked if it still hurt. Yes! Fuck yes, it hurt WORSE!
And it still hasn't entirely calmed down. The pain now is worse than it was before the appointment. Even two weeks later (or is it three?). Even with lidocaine patches and muscle relaxers. They want me to start steroid shots. (And do physical therapy again, but I already spent most of my PTO built up this year on Sisu's vet appointment and my teeth. I need to build up more hours for things in April, a concert road trip and taking the day of the solar eclipse off because I absolutely REFUSE to miss the eclipse, when I live conveniently RIGHT in the path of totality! I can't take 4 hours off work every week because the PT only has appointments during my work schedule.)
I need to do at-home physical therapy exercises more often anyways, but I can't lay down (let alone lay on my side for 10 minutes) after eating, and by the time my stomach's done making me uncomfortably aware of the food I've eaten, I need to go to sleep.
And tomorrow, I want to watch some panels at an online convention and go grocery shopping and clean the pet cages and shower. Maybe sweep my room and do dishes. I'm still debating if I want to wake up at 10am for a panel on something I've often wondered about (thanks in large part to the name of a roller coaster at Cedar Point), but that will sacrifice about 4 hours of sleep.
Precious sleep. Which is ALWAYS a struggle working first shift. When I worked 3pm to 11pm, I slept for 9 hours every night, no problem. (I was constantly exhausted for Other reasons, but sleep wasn't the problem.) But working first shift? I have to fight my body tooth, nail, and pharmaceuticals to get it asleep before 11pm. Half the time it doesn't happen. The meds make me sleepy, but won't KEEP me asleep.
I take melatonin, L-theanine, herbal supplements (valerian and lemon balm and passionflower and lavender), magnesium citrate, and an anti-depressant and muscle relaxer, all in the desperate hopes that I MIGHT be able to sleep for 8 hours a night. (I struggle with delayed circadian disorder. It's not insomnia, because I can easily fall asleep and stay asleep if it's within my body's natural circadian rhythm. Sleeping about 1-3am, waking about 10:am to noon.)
It isn't the ADHD meds that keep me awake because, once again, due to my stomach being a Little Bitch^tm, I can only take them when I'm having Really Good Days with my stomach. Which is, at most, about 1 in 5 days. It's rare that I CAN take them 2x a week. Let alone every day.
At the core of it, if I didn't work 40 hours a week and didn't have to ride a bus for an hour each way to and from work and didn't have to wake up at 7am every day, I'd have more time and more sleep to endure and work around my stomach's issue with Being Active After Eating, and work around Needing to Sleep or I feel Dead On My Feet.
....though with the raise, maybe I'll be able to get my temps again, and once I get my license, have the budget to start paying for gas and parking downtown...? I figure that's another $200/month, at least, but even if I break even with what my cashflow is NOW, I'd get about 80 minutes of my life back every day. That actually sounds really nice...
But currently, as it stands, my schedule is perpetually packed and my body is perpetually fighting me on doing Anything Ever. =_= Not to mention, the ADHD making it really hard to overcome that executive dysfunction...
It's just frustrating, wanting to do So Much but needing 2 weeks to recover my social battery after being at a wedding for 5 hours. I can't catch up on sleep when my duplex neighbors are massive inconsiderate assholes who blast music every Saturday morning. I want to wake up a little early to hear a really interesting topic discussion tomorrow, but it comes at the cost of spending the entire next week exhausted from sleep deprivation.
Where's the Quality of Life when the amount of life you can live is so small, you can't fit a lot of Doing Things in it anyways?
Worst of all, I've been too exhausted to write, whether that's roleplaying or fic. I'm lucky if I can come up with 5 words for my Pokemon character to tag on a blog post. I can't come up with New Things Happening very often. I really desperately want to continue some Old RPs with Dove, but my brain is fried mush. It's burnt on the outside and just a gooey mess on the inside. I can't jog it enough to Imagine New Things.
I'm not exactly depressive. I'm having fun at the convention this weekend! I'm glad for the 5 words I can scrouge up on the Pokemon RP blog! I'm eating good food and stealing every minute of personal time I can get! I'm watching Teen Titans and ATLA with my roommates once a week! I only have minor complaints with my actual job duties! It's not All bad.
I'm just frustrated that working 40 hours a week is so fucking much to work around that it's a chore all its own to try fitting my life around it without sacrificing sleep health.
Fuck capitalism.
2 notes
·
View notes
Text
A Simple Guide to Understanding Network Cabinet
A network cabinet plays an essential role in the data center. It is used for organizing routers, patch panels, switches, networking equipment, and accessories. Network cabinet helps improve cable management, physical security, ease of installation, etc. This article provides a simple guide to understanding network cabinets.

What is Network Cabinet?
A network cabinet is a piece of equipment used to combine installation panels, plug-ins, sub-boxes, electronic components, devices, and mechanical parts and components to form an integral installation box. It provides the perfect environment for housing and protecting network infrastructure components. It is particularly suited to the back office and commercial building infrastructure applications.

Types of Network Cabinet
Wall- Mounted Network Cabinet
A wall-mounted network cabinet is used for all rack-mounted equipment conforming to ANSI/EIA standards. It has a solid and reliable modular steel alloy frame structure for a maximum static load capacity of up to 60 KG, movable aluminum magnesium alloy equipment mounting pillars that can fit different depth equipment, multi-place with cabling passageways for various cabling requirements, and high adaptability(optional wall-mounted or ground-mounted fixing to ease meeting the installation).

Widened Steel Alloy Network Cabinet
Widened steel alloy network cabinet is used for all rack-mounted equipment conforming to ANSI/ EIA standards. It has a solid modular alloy steel frame, a maximum static load capacity of up to 800 KG, widened cabinet structure design, is equipped with vertical cable ducts to orderly lay a large volume of cables, and movable aluminum magnesium alloy equipment mounting pillars for different depth equipment.

Outdoor Network Cabinet
An outdoor network cabinet is used for connections between cabling elements. It has heat insulation, water-proof and dust-proof performance, good corrosion resistance, and 19-inch equipment mounted.

Applications
A network cabinet is used in the copper network, FTTH access networks, telecommunication networks, CATV networks, local area networks, data centers, etc.

Things to Look Out for When Choosing a Network Cabinet
Access: Different equipment has different access points. Therefore, your network cabinet should provide several access points for the various devices. Make sure you understand the equipment you need to store in your rank and their usage in and out. You can only determine that you require a cabinet rank that can open on the side, back, or front.
Weight: The network cabinet should not be too bulky that you cannot lift it when setting it up or in case you need to move it. However, it should be the perfect weight to hold all your equipment without collapsing due to the weight of the equipment.
Dimensions: It is wise to choose a rack with physical characteristics that are appropriate for you. Consider the room's square footage and the size of the equipment that will be housed inside the cabinet.
Available space: When setting it up or relocating it, the network cabinet shouldn't be so heavy that you can't lift it. It should, however, be the ideal weight to support all of your equipment without collapsing under its weight of it.
Conclusion
When you are designing a data center, deciding which network cabinet to deploy should be put in the first place. The right one that meets your installation demand can help you improve power protection, cooling, cable management, and physical security.
Sun Telecom specializes in providing one-stop total fiber optic solutions for all fiber optic application industries worldwide. We are devoted to not only meeting the need of customers but; also providing our customers with basic and in-depth knowledge about fiber optic products and solutions through articles. Contact us if you have any needs.
#fttx#cabling#telecomengineering#fiberoptic#suntelecom#telecommunications#osp#fiberopticcable#catv#telecomconsult
2 notes
·
View notes
Text

Rack mounted fiber optic patch panel Modular design with splicing and distribution function Splice tray inside changeable Standard size, can be used in 19'', 23'' standard distribution frame Suitable for SC, FC, ST, LC adapters Front mark on the plate is easy for identification and operation Max. capacity 12 cores Front door and rear door for front and rear access
0 notes
Text

1U Standard Rack Mount Patch Panel/LIU
SPECIFICATIONS:
Material : CRCA/Aluminum with 7 Tank Process powder coating.
Dimensions : 44*430*320 mm (H*W*D)
Color : RAL 7035/Black
Spool : FR grade PVC.
Cable grommet : FR grade Nylon
Splice Holder : FR grade ABC.
Splice Holder Dimension : 220*110*10 mm (L*W*D).
Cable Glands : Nylon with nitrile butadiene rubber, cable diameter of 5mm to 14mm max available
Fiber components standard : Telecordia GR 326
Insertion Loss : less <.3dB (Multimode), < .2dB (Singlemode)
Plug/Unplug durability : 1000 times
#patch panel#cctv#unisol#fiber optic product#fiber optics#unisol communication#rack patch panel#wall mount patch panel#cable winding & storing#1U Standard Rack Mount Patch Panel/LIU
1 note
·
View note
Text
The Rise of Japanese Aesthetics in Global Fashion

When you flip through today's fashion feeds, a surprising wave keeps popping up: Japanese style. It's not a loud catwalk moment; it's a slow-motion revolution that is quietly remapping the way we think about cool. Kimonos hug the runway one minute, then untamed Tokyo street-sneaks claw at the pavement the next. That blend of old and brand-new is what keeps everyone hitting refresh.
Luxury houses, basement-sized street labels, even eco-friendly tags now borrow something from that Far East playbook. The question shoots back into every chat: How did the island codes invade the global wardrobe so hard, so fast? The answer almost everybody hears first is attention, that's the polite word for obsession.
A Rich History of Style and Simplicity
Japanese gear has roots that dig deep into a respect for tiny stitches, careful dye pots, and lines that are anything but accidental. A century before influencers, the kimono was already flexing on timelessness and careful shape, grading fashion with quiet authority. Every panel, every sash, every snap of color has its memoir page; you just have to look closely.
Then there's wabi-sabi, that homespun philosophy shouting, Hey, dents and nicks can be pretty dope too. It's the opposite of the fast-and-furious look of disposable trends that vanish after one selfie. Instead, designers on the islands whisper, Make it slow, make it last, and watch how different pretty can feel.
Back in the late 1800s, Japanese crafts and style slipped quietly into European art studios and drawing rooms. Paris painters were soon gushing over the fluid lines and soft colors of kimono fabric. That first spark lingered, quietly nudging the globe toward the cross-cultural fashion waves we feel today.
The 1980s: When Japan Shocked the Fashion World

Everything changed in the 1980s when the Japanese fashion influence exploded onto the global stage. Designers like Rei Kawakubo and Yohji Yamamoto disrupted norms with bold, asymmetrical looks. Fast-forward to the 1980s, and something electric zig-zagged through the runway tents. Designers such as Rei Kawakubo (think Comme des Garçons), Yohji Yamamoto, and the ever-visionary Issey Miyake barreled into Paris and upended the schedule. Their looks ignored neat timelines and outright smashed them.
Forget neat silhouettes; the 80s avant-gardists served up oversized boxes splotched in black, gray, and indigo that hung off the body like unfinished sketches. Initial buzz was half confusion, half awe, yet those raw silhouettes quickly carved a niche in the hall of fame. Every piece felt like a thundering statement rather than a polite outfit.
Asymmetry, draping, and honest deconstruction whispered, Look, fabric can be art too. Critics began chewing on phrases like quiet strength and negative space long after the shows closed. Today, those very ideas flavor how most of us talk, think, and shop for clothes.
Japanese street style has quietly shaped fashion for two decades. Designers now admit they see clothes as a declaration, not just a buy-off-the-rack item.
Streetwear and Subcultures That Went Global
Nineties Tokyo birthed a whirlwind that newspapers barely caught at first. Harajuku sidewalks are filled with teenagers who mash thrift-store denim, anime patches, and hand-painted sneakers without asking permission. The results looked random but hummed with personal logic. Youths turned sidewalks into runways seconds before the rain hit.
A Bathing Ape, Undercover, and Neighbourhood noticed the buzz and soon were shipping tees with tucked-away tales. Collectors felt lucky whenever they landed one because the tags read limited, but the hype screamed scarce. The workmanship in those releases, crisp stitching and heavyweight fabric, turned obvious at first touch. Suddenly, a plain black hoodie felt like owning a tiny gallery exhibit instead of just warm clothes.
Western critics tried to write off the movement, yet it kept throwing curveballs. Japanese designers refused to mirror Milan or Paris; they charted a private course and dared onlookers to catch up. Runway scouts from Tokyo would tell brands, Copy us if you like, but the formula changes tomorrow.
Collaborations began popping up late and fast, from Comme des Garçons meeting Nike to Jun Takahashi sharing a pop-up with Converse. Luxury buyers proved unwilling to sleep once those logos started appearing. That unexpected boom taught many that honesty in style-even when bragged about-ends up cooler than mere Boldface Name. Switching gears completely, Visvim and Kapital open even odder doors by yoking U.S. workwear with Japanese patience. A standard carpenter pant thus gets extra top-stitching that no human needs, yet here we are, willing to pay.
Sustainability, Quality, and the Future of Fashion

Japanese designers keep earning a global spotlight, and the reason is pretty straightforward: they don't skimp on quality or respect for the planet. While fast fashion dumps mountains of clothes into landfills each week, many labels in Tokyo, Osaka, and beyond quietly roll out collections built to survive multiple seasons without looking tired.
Inside that approach, you'll find the word mottainai. It doesn't just urge people to recycle; it pleads with them not to waste anything, even the tiniest scrap of fiber. In practical terms, that challenge has sparked a small boom in shops that repair denim, workshops that upcycle surplus fabrics, and brands that openly brag about stitching back a tear for free.
Japanese menswear strikes a similar chord. Think of jackets that hug the shoulders just right, trousers sewn from fabric you swear gets sturdier with each wash, and shirts designed to move as easily at the office as they do on a weekend hike. Leathers, wools, and canvas are chosen first, flash second, so the silhouette feels both modern and respectfully old-school.
Quality-first thinking no longer exists in a niche corner of the market. Average shoppers, not just style reporters, now flip tags to check a brand's origin story and its carbon footprint. Labels that can answer in detail-usually with two or three proud syllables of Japanese-end up selling out.
Conclusion
Japanese style has jumped from local streets and temples into wardrobes around the globe, and its reach isn't fading anytime soon. People aren't just swapping prints; they're rethinking how fashion can tell their story and mirror their values.
Centuries-old kimonos and fast-moving Tokyo streetwear now sit side by side in magazine spreads. That mash-up itself shows how Japan quietly rewrote the fashion map.
The real magnetism here is balance. Heritage textiles share space with wild experiments, so respect for craft never feels smothered by trend-hopping noise.
Looking forward, designers and shoppers alike are hearing the same simple nudge: slow down, look closer, wear what matters. A sculpted jacket or a slouchy haori can both carry that message in very different languages.
The bigger picture is clear. The world will shift, seasons will flip, yet this Japanese thread will straighten back out and keep leading without raising a voice.
#HowWorkflowAutomationSavesBusinessesTimeandMoney#WhatIsExpenseReportAutomationandWhyYouNeedIt#DigitalCaseManagement:AGame-ChangerforMotorcycleLawFirms#TheFutureofLegalTech:AutomatingforAccuracy&Speed#StopLettingYourPhotoFilesSlowYouDown:RefinedStorageExplained#TaskListsAren’tEnoughAnymore—YouNeedaFulfillmentSystem#TheRiseofJapaneseAestheticsinGlobalFashion
0 notes
Text
5 Critical Mistakes That Cause Network Downtime in Data Centers

Network downtime in data centers isn't just an inconvenience—it's a business catastrophe that can cost companies millions of dollars per hour. According to recent industry studies, the average cost of data center downtime has reached $9,000 per minute, making prevention not just a technical priority but a critical business imperative.
After analyzing hundreds of data center failures over the past decade, we've identified five recurring mistakes that consistently lead to network outages. Understanding these common pitfalls can help your organization implement better system downtime prevention strategies and maintain the reliability your business depends on.
Mistake #1: Inadequate Cable Management and Infrastructure Planning
The foundation of any reliable data center network lies in its physical infrastructure, yet cable management remains one of the most overlooked aspects of data center design. Poor cable organization doesn't just look unprofessional—it creates a cascade of problems that inevitably lead to network failures.
When fiber optic patch cords are haphazardly routed through racks without proper planning, technicians face several challenges. First, identifying specific connections becomes nearly impossible during emergency situations when every second counts. Second, the risk of accidental disconnection increases dramatically when cables are tangled or improperly secured.
More critically, inadequate cable management creates airflow restrictions that can lead to overheating. When network infrastructure components operate outside their optimal temperature ranges, failure rates increase exponentially. We've seen cases where simple cable reorganization reduced equipment failure rates by over 40%.
The solution involves implementing structured cabling systems with proper patch panel solutions that provide clear labeling, organized routing, and easy access for maintenance. Professional-grade patch panels not only improve organization but also provide better signal integrity and easier troubleshooting capabilities.
Mistake #2: Using Substandard Network Components
In an effort to reduce initial costs, many organizations make the critical error of choosing cheap, low-quality network components. This penny-wise, pound-foolish approach almost always results in higher long-term costs due to increased failure rates and more frequent replacements.
Substandard fiber optic cables and connectors are particularly problematic because they're often the last components suspected when network issues arise. Poor-quality cables may work initially but degrade over time due to inferior materials, inadequate shielding, or manufacturing defects. When these components fail, they rarely fail completely—instead, they create intermittent issues that are difficult to diagnose and can plague networks for months.
Quality fiber optic patch cords and adapters use premium materials and undergo rigorous testing to ensure consistent performance over their entire lifespan. While the initial investment may be higher, the reduced maintenance costs, lower failure rates, and improved reliability more than justify the expense.
Consider this real-world example: A financial services company saved $50,000 on network components during their initial build-out by choosing cheaper alternatives. Within eighteen months, they had spent over $200,000 on emergency repairs, replacement components, and lost productivity due to network instability. They eventually replaced their entire infrastructure with enterprise-grade components.
Mistake #3: Insufficient Redundancy and Single Points of Failure
One of the most dangerous assumptions in data center design is that individual components will always function as expected. Networks without proper redundancy are essentially gambling with business continuity, and the house always wins eventually.
Single points of failure can exist at multiple levels of network infrastructure. At the physical layer, having only one path for critical data flows means any component failure results in complete service disruption. At the equipment level, relying on single switches, routers, or even power sources creates unnecessary vulnerability.
Effective redundancy planning requires identifying every potential failure point and implementing backup systems. This includes redundant fiber optic cable paths, backup power systems, and duplicate network equipment. However, redundancy isn't just about having backup components—it's about ensuring those backups can seamlessly take over when needed.
Many organizations make the mistake of implementing redundancy systems but never properly testing them. Regular failover testing is essential to ensure backup systems work correctly when they're actually needed. We recommend monthly testing of all redundancy systems and immediate investigation of any failover delays or issues.
Mistake #4: Inadequate Environmental Monitoring and Control
Data center environments are more fragile than many realize. Temperature fluctuations, humidity changes, and power anomalies can all contribute to network equipment failures. Yet many organizations implement insufficient environmental monitoring, leaving their networks vulnerable to preventable outages.
Temperature control is particularly critical for fiber optic infrastructure. Extreme heat can cause cable jackets to degrade, while rapid temperature changes can create expansion and contraction that stresses connections. Humidity problems can lead to corrosion in metal components and affect the performance of sensitive electronic equipment.
Comprehensive environmental monitoring should include temperature sensors throughout the facility, humidity monitoring, power quality assessment, and air quality measurements. Modern monitoring systems can predict potential problems before they cause failures, allowing for proactive maintenance rather than reactive repairs.
Additionally, proper ventilation design ensures that heat generated by network infrastructure components is effectively removed. Strategic placement of equipment and careful attention to airflow patterns can prevent hot spots that accelerate component degradation.
Mistake #5: Poor Change Management and Documentation
Perhaps the most insidious cause of data center network downtime is poor change management. Well-intentioned modifications, updates, and expansions can have unintended consequences when proper procedures aren't followed.
Undocumented changes are particularly problematic because they create confusion during troubleshooting. When network issues arise, technicians need accurate information about current configurations, recent changes, and equipment specifications. Without proper documentation, diagnosis time increases dramatically, extending outage duration.
Effective change management requires formal procedures for any network modifications, comprehensive documentation of all changes, and thorough testing before implementation. Every change should be traceable, reversible, and fully documented before it's approved.
Furthermore, regular audits of network documentation help ensure accuracy and identify discrepancies before they cause problems. We recommend quarterly reviews of network diagrams, equipment inventories, and configuration documentation.
Building a More Reliable Future
Preventing data center network downtime requires a comprehensive approach that addresses physical infrastructure, component quality, redundancy planning, environmental controls, and operational procedures. While implementing these improvements requires initial investment, the cost of prevention is always lower than the cost of recovery.
Organizations that prioritize network reliability through proper planning, quality components, and rigorous procedures consistently experience fewer outages and lower total cost of ownership. In today's digital economy, network reliability isn't just a technical requirement—it's a competitive advantage that directly impacts business success.
By avoiding these five critical mistakes and implementing robust network reliability best practices, your organization can significantly reduce the risk of costly network downtime and maintain the reliable connectivity that modern business demands.
0 notes
Text
Brighten Your Workspaces with Colour Cable Ties from Zip Tie Man
Colour cable ties are more than just handy tools – they’re an efficient, eye-catching solution for managing wires, cables, and components in homes, workshops, offices, and even industrial spaces. At Zip Tie Man, we stock a vibrant range of colour cable ties that combine strength, flexibility, and visibility to help you keep things tidy and easy to identify.

Whether you're bundling wires, tagging equipment, or separating items by project, using different colours allows for faster identification and improves overall organisation.
Why Choose Colour Cable Ties?
Quick Visual Identification - Colour-coded ties make it simple to sort or label cables based on use, length, or department.
Versatile Usage - Ideal for home setups, tech projects, car repairs, garden work, or warehouse tagging.
Strong & Durable Material - Made from tough nylon, our colour cable ties can withstand both indoor and outdoor conditions.
Multiple Colours & Sizes - Available in red, yellow, blue, green, black, white, and more – with sizes to suit any job.
UV Resistant Options - Perfect for outdoor use without the worry of sun damage.
Neat and Professional Look - Adds a polished finish to any wiring job or installation.
Applications Across Industries
At Zip Tie Man, colour cable ties are used by:
Electricians to sort wiring circuits
Mechanics for cable management in vehicles
IT professionals in server racks and patch panels
Gardeners to tie plants and support structures
Event organisers for quick cable layouts and takedowns
Buy with Confidence from Zip Tie Man
Our colour cable ties are high-quality, affordable, and available in bulk or small packs. Whether you’re managing cables in a car, at a workstation, or around the home, we have the right colour tie for you.
Shop online at Zip Tie Man today and find the ideal colour cable tie to suit your needs. With fast delivery and top-notch customer support, it’s never been easier to take control of your cable chaos.
0 notes
Text
How to Choose Server Racks That Maximize Space and Cooling Efficiency

Choosing the right server racks and network racks matters more than you might think. Not only do they house critical IT gear, they also impact how much space you use and how well your systems stay cool. A well‑chosen rack can help avoid clutter, reduce downtime, and even lower energy costs. In this post, we’ll show you how to pick racks that maximize space and cooling efficiency.
Key Takeaways
Learn to balance rack size with future growth.
Discover rack designs that enhance airflow.
Understand key features like cable management and materials.
Follow smart installation and maintenance tips.
Understanding the Basics of Server Racks
What Is a Server Rack?
Server racks are a frame or cabinet designed for mounting electronic gear like servers, switches, and patch panels. Most racks follow the 19‑inch standard, measuring width and height in rack units (U). You’ll find two main types:
Open‑frame racks: great for easy access, but dustier.
Enclosed cabinets: protect gear and support better airflow control.
Both serve your server racks and network racks, but their environments and use cases differ.
Why Server Rack Design Impacts Performance
The design of your rack affects how efficiently you use floor space and manage heat. A well‑ventilated rack helps cool components, which boosts performance and equipment lifespan. On the other hand, a cramped or poorly ventilated rack can lead to overheating and costly failures.
Maximizing Space Efficiency
Evaluate Your Current and Future Needs
Start by listing current equipment and forecasting growth. Racks come in heights from 1U to over 45U tall. Floor space matters too—you may choose wall‑mount racks or deep cabinets depending on room layout.
Choose the Right Rack Type for Your Setup
Wall‑mount racks are compact and handy for edge setups.
Floor‑standing racks give you more vertical space for servers.
Models like Schneider Electric’s 7500 line provide both open and enclosed options with versatile sizes.
Optimize Vertical and Horizontal Space
Use the full height of racks with rackmount shelves. Tool‑less rails and cable arms reduce clutter. And install rackmount PDUs to save precious horizontal space.
Ensuring Proper Cooling and Airflow
Understand the Basics of Rack Cooling
Most rack‑mounted equipment draws cool air from the front and exhausts hot air at the back. That’s why front‑to‑back airflow is key. Choose racks that support this airflow pattern.
Select Racks with Good Ventilation Design
Look for perforated doors and vented panels. Schneider’s 7500‑series racks emphasize good ventilation for both server racks and network racks. Don’t forget blanking panels: they fill empty U‑spaces to prevent hot air circulation.
Consider Supplemental Cooling Solutions
For dense installations, rack‑mounted fans or cooling units help. Raised‑floor setups and hot aisle/cold aisle containment are great if you have a data center space.
Features to Look for in an Efficient Server Rack
Build Quality and Material
Racks are usually steel or aluminum. Steel is sturdy and supports heavy gear. Aluminum is lighter for easier handling.
Cable and Power Management
Great cable management keeps airflow clear and maintenance easier. Look for racks with built-in cable channels and support for vertical PDUs.
Security and Accessibility
If your gear is sensitive, choose racks with locking doors and side panels. Also, ensure panels are removable for easy access during troubleshooting.
Best Practices for Installation and Maintenance
Proper Rack Positioning
Leave space between racks and walls—especially at the back to allow hot air to escape. Align racks so all fronts face cool supply air and backs face hot aisles.
Regular Monitoring and Maintenance
Install temperature and humidity sensors in racks. Clean dust filters and reorganize cables regularly. As equipment changes, re‑balance airflow and power loads.
Conclusion
Choosing the right server racks and network racks goes beyond size—it’s about efficiency, cooling, and future‑proofing. First, assess your needs (current and future). Pick rack types that enhance airflow and cable organization. Focus on key features like material, ventilation, and security. Finally, install racks thoughtfully and maintain them well. A smart rack setup leads to better performance, lower costs, and smoother operations.
Frequently Asked Questions (FAQs)
1. What is the ideal temperature range inside a server rack? Between 18 °C and 27 °C (64 °F–80 °F) is recommended for most server gear to operate reliably.
2. How do I know what rack size I need? Add up the rack‑unit heights of all your devices. Add a buffer (20–30%) for future growth. That’ll guide you to the right U‑height.
3. Can I use home-grade racks for a small business setup? Yes—for light loads, open‑frame or home‑style racks work. But for denser or more critical setups, invest in robust, purpose‑built models like Schneider’s 7500 series.
4. What are blanking panels, and why are they important? Blanks fill empty rack spaces to prevent recirculation of hot air. They keep the cold‑aisle in front and a stable airflow, improving cooling efficiency.
5. How do I improve airflow in an existing rack setup? Start by adding blanking panels and organizing cables. Make sure vents aren’t blocked. Consider fan kits or repositioning racks into a proper hot‑aisle/cold‑aisle layout.
0 notes