#sharepoint online powershell get all users in site collection
Explore tagged Tumblr posts
Visit Tumblr Blog
Explore Tumblr blogs with no restrictions, modern design and the best experience.
Last Seen Tumblr Blogs


Fun Fact
12.7% of mobile users access Tumblr.
Text
Retrieve all users from Site Collection using PowerShell
Retrieve all users from Site Collection using PowerShell

Hello SharePointer, Today, in this article we will see how to retrieve all users from site collection using PowerShell.
This tutorial will guide you to retrieve users from SharePoint on-premise as well as SharePoint Online. we also might need to download a list of users in CSV format.
For SharePoint On-Premise
In below few code Snippets we will see, How to get all users from SharePoint…
View On WordPress
#export sharepoint online users and groups to excel using powershell#get sharepoint online site and subsites permission using powershell#get spouser#getusereffectivepermissions powershell#powershell date#powershell dates#powershell for sharepoint#powershell scripts examples#powershell sharepoint#sharepoint 2013 powershell get all users in site collection#SharePoint online management shell#sharepoint online powershell get all users in site collection#sharepoint powershell get all users in farm#sharepoint powershell get all users in web application
1 note
·
View note
Text
Amd m880g with ati mobility radeon hd 4250 drivers

Amd m880g with ati mobility radeon hd 4250 drivers how to#
Amd m880g with ati mobility radeon hd 4250 drivers install#
Amd m880g with ati mobility radeon hd 4250 drivers password#
Amd m880g with ati mobility radeon hd 4250 drivers windows#
Amd m880g with ati mobility radeon hd 4250 drivers how to#
SharePoint Online: How to Recover Deleted Files from Preservation Hold Library?.
Open a Document in Browser instead of Client Application in SharePoint Online.
Site Assets Library missing in SharePoint Online? Here is the fix!.
How to renew a Client Secret in SharePoint Online using PowerShell?.
How to Create a Rotating Banner in SharePoint Online?.
How to Copy Permissions from One List to Another in SharePoint Online using PowerShell?.
Disable the "Connect to new Microsoft 365 Group" Option in SharePoint Online.
SharePoint Online: Sync Button Missing in a Document Library?.
Get Internal Name of a Column in SharePoint Online using PowerShell.
SharePoint Online: Convert Folders to Metadata.
Add User to All SharePoint Online Sites using PowerShell.
Batch Execute CSOM PowerShell Scripts to Avoid 429 Resource Throttling Issue in SharePoint Online.
SharePoint Online: Grant Folder Permissions from a CSV File using PowerShell.
SharePoint Online: How to See Who has viewed a File?.
SharePoint Online: How to Save a Modern Page as Template?.
Amd m880g with ati mobility radeon hd 4250 drivers install#
How to Install the PnP PowerShell Module for SharePoint Online?.SharePoint Online: Add Bulk Users and Groups using PowerShell.SharePoint Online: How to Change the User's Display Name?.SharePoint Online: Add Site Collection Admin to Multiple Sites from a CSV File using PowerShell.SharePoint Online: Bulk Add Multiple Fields to List from a CSV using PowerShell.Fix "We can't sign you into your company portal because something on the server isn't configured correctly." Error.SharePoint Online: Get Default List Form (New/Edit/Display) URLs using PowerShell.Copy Document Library Between Tenants in SharePoint Online using PowerShell.SharePoint Online: Format List View using PowerShell.Add a List or Document Library to a Page in SharePoint Online using PowerShell.How to Remove a Web Part from Modern Page in SharePoint Online using PowerShell?.SharePoint Online: Add Web Part to a Modern Page PowerShell.SharePoint Online: How to Share a File or Folder for Anonymous Access?.SharePoint Online: How to Hide Folders in Document Library and Show All Files?.SharePoint Online: How to Turn Off "You may also be interested in" Feature?.How to Add Calendar to SharePoint Online Modern Page?.SharePoint Online: How to Open PowerPoint in Presentation Mode?.SharePoint Online: How to Enable Missing Apps (Picture Library, Announcements, Etc.) in Communication Sites?.How to Add Yammer Feed to SharePoint Online Sites?.How to Remove "Add shortcut to OneDrive" in SharePoint Online?.SharePoint Online: How to Prevent Users from Editing Pages?.SharePoint Online: "Edit User permissions", "Remove User Permissions" greyed out!.Replace Site Collection Administrator for All Sites in SharePoint Online.SharePoint Online: Change "Search this site" text in Search Box.
Amd m880g with ati mobility radeon hd 4250 drivers password#
SharePoint Online: How to Share and Password Protect Files?.How to use the "Request Files" Feature in OneDrive for Business?.How to disable "Return to Classic SharePoint" in SharePoint Online?.How to create a Newsletter (News Digest Email) in SharePoint Online?.How to Remove a Redirect Site in SharePoint Online?.SharePoint Online: Perform Bulk Operations (Add/Update/Delete) Faster in Batches with New-PnPBatch cmdlet in PowerShell.How to Change the Page Layout of a Modern SharePoint Online Page?.Enable-Disable Automatic News Digest in SharePoint Online.How to Disable the App Bar in SharePoint Online?.How to Enable or Disable Comments in SharePoint Online List?.SharePoint Online: Bulk Create Dummy Files using PowerShell.How to Find Microsoft Teams Connected SharePoint Online Sites?.Send an interactive authorization request for this user and resource." Fix "Connect-PnPOnline : AADSTS65001: The user or administrator has not consented to use the application with ID '31359c7f-bd7e-475c-86db-fdb8c937548e' named 'PnP Management Shell'.
Amd m880g with ati mobility radeon hd 4250 drivers windows#
SharePoint Folder shows Empty in the Windows Explorer!.
External User Access Expiration in SharePoint Online and OneDrive for Business.
Change "New item" text in Modern SharePoint Online List.
How to Create A-Z Glossary Page in SharePoint Online?.
SharePoint Online: Disable SharePoint Designer Workflow Creation.
Fix "View in File Explorer" missing in SharePoint Online Issue.
SharePoint Online: How to Change the Author in Modern Page?.
How to Copy User Permissions in SharePoint Online using PowerShell?.
How to Copy Permissions from One Folder to Another in SharePoint Online using PowerShell?.
How to Connect to Exchange Online using PowerShell?.
SharePoint Online: Switch Navigation to Horizontal or Vertical.
0 notes
Text
Reset office 365 sharepoint site

#Reset office 365 sharepoint site install#
Interestingly, everything was returned correctly except the GroupId. The output of the script returns the template that should contain the word GROUP, the GroupId, and the Owner of that site (which is the Group). We did it by executing the following PowerShell script. Therefore, we had to ensure that our site is a group. Usually, once a group is being deleted, the associated site is marked to be deleted and then processed by a timer job at Microsoft.Īt first sight, it looked that something is handled improperly by the life cycle management of group expirations. This user is responsible for cleanup SharePoint Online sites after an Office 365 group has been deleted. The AAD to SharePoint Sync user deleted twice the site in a month. We performed the restore but started to dig deeper into the case to see what might be the root cause by verifying the Office 365 audit logs. We haven’t performed additional checks because in many situations owners just missed the expiration notifications for their group.Ī month later, the same group of users came back to us stating that their site disappeared again. We fixed this problem by restoring the SharePoint Online site. We received complaints from a group of users complaining that their SharePoint Online site disappeared without prior notice. This will considerably reduce cases of users forgetting to extend a site while they are actively using it.Īn interesting anomaly with group expirations If you don’t know the deleted site url, you can use the command Get-SPODeletedSite to list all the deleted sites with Url.Microsoft is going to introduce activity-based group expiration policies in Q1 2020.
#Reset office 365 sharepoint site install#
So you can use the SharePoint Online Management Powerhsell cmdlet Remove-SPODeletedSite to remove the deleted sites from Recycle Bin.īefore proceed Install and Connect SharePoint Online PowerShell Module, then run the below command to remove a deleted site. Manually deleting the sites from Recycle Bin will be a tough task. So you have to remove the deleted site first from Recycle Bin to have the same group site url. Now you can create another O365 group with same name and email alias (group email address), but it will not create the associated team site with same url and it will place a numeric number after the site name in the URL (For example: ). If you delete this O365 group, it will also delete its associated site, both the group and site will be moved into Recycle Bin. Note: The permanent delete option is only available from the Classic SharePoint Admin Centre, it is not available in the Modern SP Admin Centre.Ĭonsider that you have a Office 365 group that named as TestO365Group and the O365 group should have a associated team site (). Under this error message you can also see the option Permanently delete the site collection from the recycle bin and continue., you can check this option and proceed to remove the deleted site from Recycle Bin and create a site collection with same site url. If you are creating another site collection from SharePoint Online Admin portal, then you will get the validation error The site collection already exists. In this case, you can create a site with the same name but you can’t reuse the deleted site url until the deleted site exists in Recycle Bin. Scenario 1:Ĭonsider that you have deleted a team site and you want to create another site with same name and site url. You can restore a deleted site before this retention period time end. The deleted sites are automatically emptied from the Site Collection/Tenant Recycle Bin after the retention period. When you delete a SharePoint Site from Office 365, by default the deleted site will be retained in the Site Collection Recycle Bin for 93 days (Retention Period) and if you have deleted a site collection, then the site collection will be retained in Tenant Recycle Bin.
0 notes
Text
Organize your SharePoint sites with megamenu navigation and new “change the look” options
It is time to further organize your modern intranet – building with SharePoint and Microsoft 365 – to enhance employee engagement and change the look of your sites so they work for you. Sites (portals) help bring together people and information that reflect your organization. It’...
"Organize your SharePoint sites with megamenu navigation and new “change the look” options" by Mark Kashman originally published January 30th 2019 in Microsoft SharePoint Blog articles
It is time to further organize your modern intranet – building with SharePoint and Microsoft 365 – to enhance employee engagement and change the look of your sites so they work for you. Sites (portals) help bring together people and information that reflect your organization. It’s about getting things done – finding where you need to go—with effective navigation and common page elements.
“Megamenu and header layouts will make sites more appealing to groups that have diverse needs for pages and site navigation. It will really make my life easier in many ways as a solution architect for my company. While it's a look and feel update, these are the features that the end users really notice and makes a big impact.” – verbatim cloud admin feedback sent to Microsoft in reply to the corresponding message center post.
Site owners can now use:
Megamenus to better organize and showcase their site’s navigation items.
Updated “Change the look” edit pane consolidates all modern site look & feel options.
Site headers allow adjustment of layout options, logo and background choices.
Site footers allow logo, text and links to be added to the bottom of pages.
Site settings > Site designs to view any applied site designs and apply additional ones.
We will first begin rolling out these new “change the look” features in February 2019 to Office 365 customers that have opted into the Targeted Release program. And then in March 2019, we will begin roll out to Office 365 customers on Standard Release, followed by rolling out to our sovereign data centers (like Office 365 for government (known as GCC)).
Let’s dive into the details and screenshots of each new and updated “change the look” options – all important additions for site owners to configure a more-engaging SharePoint site – a more modern intranet.
Organize your site navigation with SharePoint megamenus
The most effective SharePoint sites (and web sites in general) help visitors find what they need quickly so that they can use the information they find to make decisions, learn about what is going on, access the tools they need, or engage with colleagues to help solve a problem. Even when search is available, most visitors start their web experiences by navigating.
Now you can change the navigation style to increase the value of your site navigation. The new Megamenu options allow for multiple levels of hierarchy at once - no cascading fly-outs needed. This will enable you to better organize and showcase the content and sites. And of course, for sites that don’t need the megamenu look and feel, you can still use the Cascading option. You simply go into the Change the look edit pane, click on Navigation and choose between Megamenu and Cascading. You then add and adjust your navigation items inline as you had before – now with a new megatastic look if you choose.
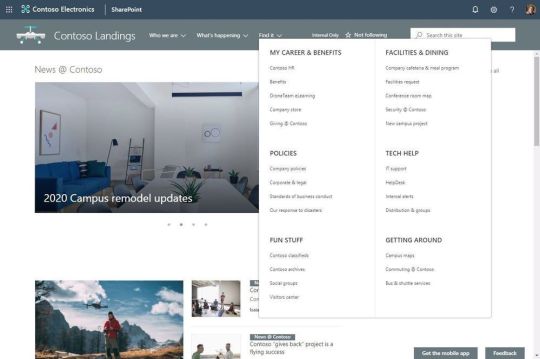
The new SharePoint mega-menu helps organize your site navigation.
Navigation should always be planned from the perspective of the user of information – the visitors to your site. And why not present them with a beautiful, organized megamenu. Note: the megamenu navigation layout is only available for horizontally oriented navigations and allows for a panel display of links up to three levels.
Learn how to customize the navigation on your SharePoint site. And review the Microsoft guidance on planning navigation for the modern SharePoint intranet.
Updated Change the look edit pane gives access to control site structure
We have consolidated several look & feel site settings into an updated Change the look edit pane – including where you go to turn on the megamenu option. The Change the look edit pane provides access to site settings for theming, header, navigation and footer options.

The updated Change the look panel gives you easier access to adjust site theme, navigation, header and footer configuration.
Adjust the header of your sites
Site owners control the header portion of a site with a few simple configuration choices. First, they choose between two layout options: standard and compact. Second, choose a site logo. And third, modern site headers support backgrounds to make it easier to see the distinct header section and adds visual variety at the top of the site; you’ll see four distinct background options.

Site owners control the header portion of a site by choosing its header layout, logo and background.
Adjust the footer of your sites
When site owners change the look of their site, they can now add a site footer to showcase common information at the bottom of your site - like a logo, text and hyperlinks. If site owners choose not to use a logo image file, they can still add text that will appear on the bottom left. Text with links will appear on the bottom right.
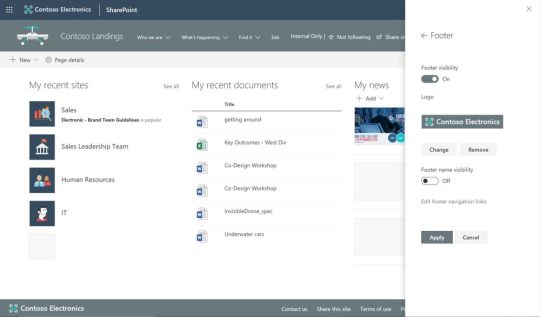
Add a logo, text and hyperlinks to the footer of your site.
Note: configuring the footer is only available in pages and news articles in SharePoint communication sites. It will not appear at the bottom of SharePoint lists or document libraries within these same communication sites, and it will not available in SharePoint team sites. You will also be able to turn off footers from the “Change the look” panel after this feature rolls out to you. When this feature rolls out, all existing communication sites will get a basic site footer. If you want to turn off the footer control before its rolled out to you, please follow these instructions to turn off footer using PowerShell.
Learn more how to adjust the look of your SharePoint site footer. Learn more how you can “change the look” of your SharePoint site in Office 365.
New site designs panel for site owners
We are providing a new site setting to view any applied Site designs and apply additional ones - from within the sites themselves. The new site setting option is for site owners to display a new site design information panel. If any site designs have been published to the tenant, they will be displayed in the picker. Only site owners and site collection administrators have access to invoke this panel – and it respects any additional scopes on the published site designs, so only those available to the viewer will be displayed. If any sites designs have been applied to the site, they will also be displayed and can be selected to view what changes were applied.

The Site designs site settings pane allows site owners to view any applied site designs and apply additional ones.
Learn more about working with SharePoint site design and site scripts.
Try more and more of what SharePoint offers, and let us know what you think
Build your modern intranet on SharePoint in Office 365 and get the benefits of investing in business outcomes – reducing IT and development costs, increasing business speed and agility, and up-leveling the dynamic and welcoming nature of your intranet.
In all, we encourage you to build out and organize your sites, your intranet – the way you want them to be consumed in context of your content. As you progress year over year, keep creating and sharing structured, easy-to-navigate experiences to your audience.
We want to empower you and every person on your team to achieve more. Let us know what you need next. We are always open to feedback via UserVoice and continued dialog in the SharePoint community in the Microsoft Tech Community —and we always have an eye on tweets to @SharePoint. Let us know.
—Mark Kashman, senior product manager for the SharePoint team
FAQs
Q: When is this all being released in Office 365?
A: Our goal is to release all the items to Targeted Release customers in Office 365 by the end of February 2019, with release to all Office 365 productions customers by the end of March 2019.
Q: Is this the same set of features Office 365 cloud admins were notified about via the message center – two message center posts: MC165552 and MC 172503?
A: Yes. Microsoft first sent MC165552 (“Updated feature: we're rolling out new SharePoint Online site branding and navigation features), and then we paused roll out. Recently, we sent the follow up MC172503 (“Updated Feature: New site branding and mega menu navigation features are rolling out”) to indicate that we were moving forward to release this set of features.
Read Full Post
0 notes
Text
Original Post from SC Magazine Author: Doug Olenick
In August 2018, security researchers announced that cybercriminals were successfully bypassing Office 365’s Advanced Threat Protection via a new evolution of phishing – inserting malware links into SharePoint documents. Analysts at the cloud security firm Avanan discovered this vulnerability – reporting that SharePoint invitations containing malicious links were being sent from Microsoft to some users.
The SharePoint file itself mimicked a typical OneDrive file access request. However, the researchers noted that the Access Document button within the file was coded to instead send the user to a spoofed site. A bogus Office 365 login screen appeared when the link was clicked. This fake site looked like the real thing but was simply a portal through which hackers collected the login credentials of the unaware.
Vulnerabilities such as this remind us that Office 365 is far from a universally secure environment. In fact, it is critically important to adjust certain aspects of the system and take other steps if you want to improve security, meet compliance requirements, or simply exert more control over user behavior. Here are steps you can take.
1. Know your Office 365 Secure Score
We often think of technologies or services in isolation, in terms of how secure that entity is. However, it is critical for every organization to optimize how they are implementing and using systems; that is the focus of the Office 365 Secure Score, which rates your security configurations and behaviors. Microsoft notes specifically that the perspective toward this score should be to think about methods to safeguard your users and data better (ideally with no negative influence on user productivity) – a tactic that will, in turn, improve your score. While the scoring system is established by Microsoft, it should give you a sense how well your organization adheres to security best practices.
2. Check the Security & Compliance Center reports and dashboards
Familiarize yourself with the dashboards and reports within the Security & Compliance center:
Reports dashboard – Audit reports for your Exchange Online and SharePoint Online organizations are retrievable within the Reports section. Within Reports, you can also view the Azure Active Directory (AD) audit log, user sign-in reports, and user activity reports.
Threat explorer – This Security & Compliance center tool shows you how many attacks have occurred over time, along with data on attacker servers and analysis of data organized into threat families. If your Office 365 tenant ever is attacked, analysis with this tool can help you mitigate and investigate it.
Threat management dashboard – This dashboard is helpful for sending out reports to business decision makers related to security steps you have taken. It also is a place to review threats that have been resolved in the past.
3. Add Customer Lockbox
The external threat to your data is significant. However, so is the internal one. Access by Microsoft staff to your personal data may seem to be unacceptable to you as a risk. However, you will sometimes want Microsoft engineers to access your data in order to provide support.
Customer Lockbox allows you to control their level of access. This feature is available via subscription for any enterprise plan; it comes automatically with Office 365 Enterprise E5. Customer Lockbox allows you to approve or reject Microsoft’s desire to access for fixing or troubleshooting. If you approve the access request, the engineers will exit the system as soon as they have completed the approved task and will not be able to access it again. Plus, “[i]f you reject or don’t approve the request in 12 hours, access is automatically revoked,” noted MS Expert Talk.
4. Enable Cloud App Security
Cloud App Security is a feature that comes standard with the Office 365 Enterprise E5 plan and can also be ordered as an enterprise subscription. Sometimes a user will sign in from dangerous or unknown Internet protocol (IP) addresses; fail to sign in repeatedly; or download a large volume of data. To monitor these and other high-risk or uncommon user behaviors, you can create alerts within the platform.
5. Turn on mailbox audit logging.
Mailbox audit logging, unlike some other forms of audit logging, is not enabled by default in Office 365. Exchange Online PowerShell can be used to establish that all user mailboxes get audit logging. Once you have set up audit logging for your mailboxes, you can know who is logging intro mailboxes and sending emails or conducting other tasks that are typically performed by the administrator, the mailbox owner, or a designated user. You can adjust the amount of time that the audit log keeps entries to meet your needs. You are able to search the logs within the Compliance center and within Office 365.
6. Implement MFA
Ideally, you want user accounts to remain secure even if someone steals the password. For that reason, beyond having good password policies, it is wise to require users to respond to a notification via a smartphone app, through a phone call, or via SMS – and to disallow access until that second factor is successfully met. This method, called two-factor authentication (2FA) or (more broadly) multi-factor authentication (MFA), is now one of the top security best practices across the industry. (However, it is far from perfect as a security mechanism.)
7. Add mail flow protections
You want to be certain that your messages do not contain malicious links, viruses, or malware. For better protection against these threats in Office 365, you can use the rich feature set within Exchange Online Protection and complete these tasks:
Protect yourself from dangerous links and attachments via advanced threat protection.
Implement an antimalware solution.
Set up policies for Email Anti-Spam Protection.
When you use a custom domain within Office 365, you become particularly vulnerable to spoofing. In order to prevent that activity and to properly validate all the messages that your organization transmits, implement DKIM, SPF, and DMARC.
Study and set up safety tips for your users within Office 365.
Recovering your Office 365 data
As the data landscape grows increasingly complex and threatening, robust safeguards are needed to defend your organization against attack. In fact, no matter how many protections you deploy, hackers may still figure out a workaround to get into your system. If your technology has fallen into the wrong hands, a reputable data recovery company can get to the bottom of it.
The post 7 Critical Security Steps to Protect You From an Office 365 Compromise appeared first on SC Media.
#gallery-0-6 { margin: auto; } #gallery-0-6 .gallery-item { float: left; margin-top: 10px; text-align: center; width: 33%; } #gallery-0-6 img { border: 2px solid #cfcfcf; } #gallery-0-6 .gallery-caption { margin-left: 0; } /* see gallery_shortcode() in wp-includes/media.php */
Go to Source Author: Doug Olenick 7 Critical Security Steps to Protect You From an Office 365 Compromise Original Post from SC Magazine Author: Doug Olenick In August 2018, security researchers announced that cybercriminals were successfully bypassing Office 365’s Advanced Threat…
0 notes
Link
This year I set myself a little project to see if I could use some of the tools and platforms provided in Office 365 to create something mildly useful. I wanted to start with something basic and achievable without having to spend months and months of trial and error experiments and thought that Phone Number management could be that starter project.
I will preface this blog by stating that there are already various number management solutions out there, some paid and some free and this hasn’t been created to compete with them. It is a project that enables me to learn and develop new skills but also has some use cases that may benefit you, hence the reason for sharing.
Often when I speak with customers and ask them about their number management solution, they invariably say Excel. They’d like to move towards a more suitable product but those offering these solutions are sometimes out of reach of the budget available. Using a basic Excel sheet has it’s own problems, but mainly keeping the thing up to date with all adds, moves and changes. So I thought there must be a way to leverage what is available in just an E1 Office 365 licence to create a middle ground. Something in between Excel and the paid apps must surely be possible?
So I looked at Lists in SharePoint Online. This seemed the logical choice in the Office 365 product suite to use a my “database” as it where. Out of the box it had a lot of built in features that meant I could save time by not having to create user interfaces, search filters and different views. It also acts like Excel so that you can easily update multiple records in-line and provide a single pane of glass experience without having to install any software on to a bunch of admin workstations. However, a SharePoint List on it’s own is probably no better than that Excel sheet stored on a file share somewhere. It needed a way in which admins can interact with it and easily use in day to day tasks. More importantly it needed a way to talk to Skype for Business to ensure that the list kept was the single, undisputed source of truth.
What it needed was a PowerShell Module to bridge the gap between SharePoint Online and Skype for Business. I then found that the SharePoint Online Management Shell allowed management of tasks, but offered no way to interact or manipulate the data held within SharePoint. I quickly learned that in order for me to manipulate data I needed to use the Client Side Object Model (CSOM) for SharePoint Online.
Enter first problem. I know nothing about CSOM. Worse still I seem to have a mental block in understanding how to code in .Net or C#, but I can do some basic PowerShell. I am glad to say that this was quickly resolved with the thanks to Arleta Wanat (a SharePoint MVP) who had already create her own PowerShell module for manipulating data within SharePoint Online. A great set of commandlets that everyone should have in their back pocket. You can download the module here: http://ift.tt/2n3os3A
I thought all my birthdays had come at once with this module, until I found some limitations to some of the functions I was using. Mainly these where down to the size of the data being extracted from SharePoint Online in order to return my custom list fields, and the dreaded 5,000 item view limit of SharePoint Online!
So I had to customise it slightly to allow me to continue as it worked really well for 5,000 phone numbers but failed miserably with 5,001! Having overcome this, the theoretical maximum this can handle if somewhere in the region of 50,000,000 (Yes, 50 million) phone numbers.
Key Features
I am pretty sure right now, you don’t want a life story of development, but rather want to know what does this thing do, right?
Skype for Business On-Prem and Cloud PBX Support
Firstly, this works for Skype for Business On-Prem and Skype for Business Online (Cloud PBX) so you’re covered in all three states (On-Prem, Hybrid and Cloud Only).
Synchronizes Phone Numbers
Whether you run Skype for Business Server or Cloud PBX or Both you can synchronize numbers from these systems into the Phone Inventory List. All Cloud PBX numbers will be synchronized whether they are subscriber or service numbers. If they are assigned to a service or user, then this information is passed back to the list so that it immediately understands the allocation landscape. The same for On-Prem, synchronization happens and retrieves all used numbers within the ecosystem for users, conference, RGS, Trusted Applications etc etc. Again passing back their assignments.
Integration with Numverify
For On-Prem numbers it can be hard sometimes to gather a list of cities, countries and even carriers each phone number relates to. If you don’t have this information to hand, then the task of finding this out can be arduous. Therefore, there is integration with the numverify api (https://numverify.com/) which will search for this information and retrieve it automatically when you synchronize or import your numbers. The API is free to use (up to a max of 250 calls per month) and requires you to sign up for an account for your own personal API key.
PowerShell Module
The PowerShell module is the beating heart of all this. There are several commandlets that give admins the power to allocate numbers to users individually or in bulk as well as allow you to reserve a number or a block of numbers so that they cannot be used unless specifically chosen. This is useful for planning projects that require a bank of numbers to be allocated but not yet assigned in Skype for Business. There are also commandlets that allow you to import numbers from a CSV, or just by stating the start number and how many numbers in sequence you want to add.
PowerBI
If you want to produce graphs on consumed numbers per area, per usage, per site etc. This can all be done in PowerBI with a live data connection to the SharePoint list. PowerBI free is sufficient, but you will need the PowerBI desktop app to create the data connection.
Mobile support using PowerApps
Want to be able to quickly reserve or assign a number to a user? Maybe add one that you forgot whilst on the train home? No problem, easily create a mobile app using PowerApps and you can manage your DDIs wherever you are.
Requirements
An active Office 365 E1 licence subscription assigned to each admin account
Each admin must have at least contribute permission on the SharePoint list
Each admin must have Skype for Business Online Admin permission if you are using Cloud PBX
Each admin must have at least Voice Administrator permission on Skype for Business On-Prem
The SharePoint Online Client Side Components must be installed on the machine the PowerShell module is going to be run on
Skype for Business Management components required on the machine the module is going to be run on
Skype for Business Online Management Shell installed on the machine the module is going to be run on
SharePoint Site Collection and Site (not required to be dedicated)
PowerShell Commands
Connect-MyPhoneInventory
You must use this command at the beginning of each session to establish a connected session to SharePoint Online, Cloud PBX and Skype for Business Server. The command accepts four mandatory parameters. When connection has been established, a full copy of the SharePoint List will be downloaded into memory to enable faster access to the subsequent commands used in the session. Please be aware that as the list grows, the longer it will take to download the list. Estimate performance to be around one minute per 5,000 numbers.
Parameters
-Username [string]
-Password [string]
-Url [string]
-ConnectOnline [bool]
Usage
Connect-MyPhoneInventory –Username [email protected] –Password <mypassword> –Url http://ift.tt/2mIZVVn –ConnectOnline $true | $false
Sync-Cache
This command you can use to update your local cache based on the data held on SharePoint. This is useful in case the local cache becomes inconsistent, or something happens where the cache is lost. This command accepts no parameters.
Usage
Sync-Cache
Get-Cache
This command you can use to bring the cache out of the private data area into a custom variable you can use for other commandlets not included in this module. This commandlet accepts no parameters
Usage
$Data = Get-Cache
Get-MyNextNumber
This command gets the next available number(s) from the pool in which you specify. When executed, this command will put a “soft” reserve on the numbers returned. This allows you to assign numbers to bulk users in your scripts without having to synchronize with SharePoint after each one. Please be aware that after you have finished using this command you should perform a Sync-Cache to return an accurate copy of the list if no changes have been made in Skype for Business / Cloud PBX. If there have been, a full Skype for SharePoint synchronization is required.
Parameters
-Area [string][optional] – The Area / City to get the next number from
-Carrier [string][optional] – The carrier from which to get the next number from
-NumberType – [string][optional] [valid types] – Subscriber, Conference, RGS, Service, Private
-Block – [num][optional] – The number of free numbers to return in the result
Usage
Get the next 10 numbers available in the town called Crewe where the Carrier is BT and the Number is a Subscriber.
Get-MyNextNumber -Area Crewe -Carrier BT -NumberType Subscriber -Block 10
Get-MyNextNumber on it’s own returns the next available number in the list based on ID
Get-MyAvailableNumber
This command returns all the available numbers in the pool in which you specify.
Parameters
-Area [string][optional] – The Area / City to get the next number from
-Carrier [string][optional] – The carrier from which to get the next number from
-NumberType – [string][optional] [valid types] – Subscriber, Conference, RGS, Service, Private
Usage
Get-MyAvailableNumber -Area Crewe -Carrier BT -NumberType Conference | Format-Table
Count-MyAvailableNumber
This command returns a count of all the available numbers in the pool in which you specify.
Parameters
-Area [string][optional] – The Area / City to get the next number from
-Carrier [string][optional] – The carrier from which to get the next number from
-NumberType – [string][optional] [valid types] – Subscriber, Conference, RGS, Service, Private
Usage
Count-MyAvailableNumber -Area Crewe -Carrier BT -NumberType Conference
Reserve-MyNumberRange
This command allows you to reserve numbers in ranges from 1 to unlimited, or by number type and how many based on area.
Parameters
-StartNumber [number] must be in E164
-EndNumber [number] must be in E164
-Area [string][optional] – The Area / City to get the next number from
-NumberType – [string][optional] [valid types] – Subscriber, Conference, RGS, Service, Private
Usage
Reserve-MyNumberRange -StartNumber +441270212000 -EndNumber +4412702121000
Or
Reserve-MyNumberRange -Area Crewe -NumberType Subscriber -BlockTotal 500
Count-MyReservedNumber
This command allows you to count how many numbers are reserved but not assigned yet in the pool in which you specify. This is useful for identifying number that require scavenging / recycling back into the available pool.
Parameters
-Area [string][optional] – The Area / City to get the next number from
-Carrier [string][optional] – The carrier from which to get the next number from
-NumberType – [string][optional] [valid types] – Subscriber, Conference, RGS, Service, Private
Usage
Count-MyReservedNumber -Carrier BT
Get-MyReservedNumber
This command outputs all the reserved numbers in your chosen selection
Parameters
-Area [string][optional] – The Area / City to get the next number from
-Carrier [string][optional] – The carrier from which to get the next number from
-NumberType – [string][optional] [valid types] – Subscriber, Conference, RGS, Service, Private
Usage
Get-MyReservedNumber -Area Crewe | Format-Table
Get-MyNextReservedNumber
This command returns the next unallocated reserved number in your selection
Parameters
-Area [string][optional] – The Area / City to get the next number from
-Carrier [string][optional] – The carrier from which to get the next number from
-NumberType – [string][optional] [valid types] – Subscriber, Conference, RGS, Service, Private
-Block [int] – the number of numbers to return
Usage
Get-MyNextReservedNumber -Area Crewe -Carrier BT -NumberType Service -Block 10
Release-MyReservedNumber
This command is used to release reserved numbers that will not be allocated to a user or service back into the available pool.
Parameters
-StartNumber [number] – Must be in E164 format
-EndNumber [number] – Must be in E164 format
-Area [string][optional] – The Area / City to get the next number from
-Carrier [string][optional] – The carrier from which to get the next number from
-NumberType – [string][optional] [valid types] – Subscriber, Conference, RGS, Service, Private
-BlockTotal [int] How many numbers to release
-Site [string] – The site the numbers belong to
Usage
Release-MyReservedNumber -StartNumber +441270212000 -EndNumber +441270212500
Or
Release-MyReservedNumber -Area Crewe -NumberType Subscriber -BlockTotal 500
Or
Release-MyReservedNumber -Site ManchesterOffice -NumberType Service -BlockTotal 100
Count-MyUsedNumber
This command returns a count of all used numbers within the pool chosen
Parameters
-Area [string][optional] – The Area / City to get the next number from
-Carrier [string][optional] – The carrier from which to get the next number from
-NumberType – [string][optional] [valid types] – Subscriber, Conference, RGS, Service, Private
Usage
Count-MyUsedNumber -Area Crewe -Carrier BT -NumberType Service
Get-MyUsedNumber
This command returns a list of all used numbers within the pool chosen
Parameters
-Area [string][optional] – The Area / City to get the next number from
-Carrier [string][optional] – The carrier from which to get the next number from
-NumberType – [string][optional] [valid types] – Subscriber, Conference, RGS, Service, Private
Usage
Get-MyUsedNumber -Area Crewe -Carrier BT -NumberType Service | Format-Table
Sync-MyNumbersFromSkype
This command gathers all the allocated numbers within Skype for Business Server and uploads them to the SharePoint List. This command also updates the assignments to users and other services that may use numbers. It is recommended that you create a schedule task to run this command at least once per day during quiet times to ensure that the list remains current and up to date.
Parameters
-UserNumbers [bool] [optional] $true | $false
-ConferenceNumbers [bool] [optional] $true | $false
-PrivateNumbers [bool] [optional] $true | $false
-RgsNumbers [bool] [optional] $true | $false
-ServiceNumbers [bool] [optional] $true | $false
Usage
Sync-MyNumbersFromSkype
Use parameters only if you want to synchronize a sub portion of numbers based on type.
Import-MyNumberBlock
This command allows you to add new numbers to the SharePoint List from a CSV File
Parameters
-Path [string] – Path to CSV file
Usage
Import-MyNumberBlock -Path C:NumbersMyNumbers.csv
Please note that columns in the CSV should be named as follows:
Number – The full phone number in E164 format
Exten – The extension number
Carrier – The name of the Carrier
Type – The Number Type i.e. Subscriber, Service, Conference, Rgs, Private
Country – The country of origin
Area – The city / town or area
Reserved – Yes or No
Site – Site where the number terminates
User – The SIP address of the user assigned to the number – must match sip:[email protected]
Residency – The system type, e.g. On-Prem or Online
Export-MyNumberBlock
This command allows you to export the data from the SharePoint list to a CSV. The default behaviour is to export from the current data held in memory.
Parameters
-ExportPath [string] [mandatory] – The path where the file will be saved
-FromSharePoint [bool][default $false] [optional] $true
Usage
Export-MyNumberBlock -ExportPath C:NumbersMyNumbers.csv
Or
Export-MyNumberBlock -ExportPath C:NumbersMyNumbers.csv -FromSharePoint $true
Add-MyNewNumberBlock
This command allows you to add sequential number blocks to SharePoint without a CSV. If you don’t know the area, country or carrier of the numbers, then you can use numverify to retrieve these.
Parameters
-StartNumber [number] [mandatory] – Must be in E164 format
-BlockTotal [int] [mandatory] – number of sequential numbers to add
-NumberType [optional][valid options] Subscriber,Conference, RGS, Service, Private
-Area [string][optional] – The city town or area of the number’s residence
-Country [string][optional] – The country the number belongs to
-Carrier [string][optional] – The name of the carrier
-ExtensionLength [int][optional][default = 4] – The extension length (taken from last X of DDI. Default is 4 if none specified)
-Site [string][optional] – The name of your site where the number terminates
-Reserved [bool][optional] – Should the number be immediately reserved. Values $true | $false
-Residency [string][mandatory][valid options] – On-Prem,Online
Usage
Add-MyNewNumberBlock -StartNumber +441270212000 -BlockTotal 2000 -NumberType Subscriber -Area Crewe -Country "United Kingdom" -Carrier BT -ExtensionLength 5 -Site CreweOffice -Reserved $False -Residency On-Prem
Or with numverify enabled
Add-MyNewNumberBlock -StartNumber +441270212000 -BlockTotal 2000 -NumberType Subscriber -ExtensionLength 5 -Site CreweOffice -Reserved $False -Residency On-Prem
If no results found, or numverify not enabled, then “unknown” will be entered in missed fields.
Remove-MyNumberBlock
This command removes numbers that are not allocated to users or services from the list
Parameters
-StartNumber [number] [mandatory] – Must be in E164 format
-BlockTotal [int] [mandatory] – number of sequential numbers to remove
Usage
Remove-MyNumberBlock - StartNumber +441270212000 -BlockTotal 1000
Show-MyNumberSummary
This command produces a summary of the current number allocation
Parameters
-Area [string][optional] – The Area / City to get the next number from
-Carrier [string][optional] – The carrier from which to get the next number from
-NumberType – [string][optional] [valid types] – Subscriber, Conference, RGS, Service, Private
Usage
Show-MyNumberSummary -Area Crewe
Or
Show-MyNumberSummary -Carrier BT
Or
Show-MyNumberSummary -NumberType Subscriber -Area Crewe -Carrier BT
Or
Show-MyNumberSummary
Sync-MyOnlineNumber
This command synchronizes Cloud PBX numbers to the list and updates assignments. It is recommended to create a scheduled task to run this command at least once per day to ensure the list is kept up to date. This command accepts no parameters
Usage
Sync-MyOnlineNumber
Get-MyOnlineNumberArea
This command is used to retrieve the Cloud PBX area allocation code which can be used to find available and reserve numbers. This command accepts no parameters
Usage
Get-MyOnlineNumberArea
Get-MyOnlineNextNumber
This command return the next available number(s) from Cloud PBX that have been acquired by your tenant. Please note that this command places a “soft” reserve on returned numbers so it an be used in a script. Please ensure that you run Sync-MyOnlineNumber command once finished to update the cache.
Parameters
-NumberType [string][mandatory][valid options] Subscriber, Service
-Area [string] – output of Get-MyOnlineNumberArea
-Block [int][optional] – Number of numbers to return
Usage
Get-MyOnlineNextNumber -NumberType Subscriber -Area EMEA-UK-ALL-ENG_CR -Block 10
Reserve-MyOnlineNumber
This command reserves Cloud PBX numbers in the list so they cannot be allocated.
Parameters
-NumberType [string][mandatory][valid options] Subscriber, Service
-Area [string] – output of Get-MyOnlineNumberArea
-Block [int][optional] – Number of numbers to return
Usage
Reserve-MyOnlineNumber -Area EMEA-UK-ALL-ENG_CR -NumberType Subscriber -Block 5
Release-MyOnlineReservedNumber
This command releases any reserved but not allocated numbers in the list that are Cloud PBX numbers.
Parameters
-NumberType [string][mandatory][valid options] Subscriber, Service
-Area [string] – output of Get-MyOnlineNumberArea
-Block [int][optional] – Number of numbers to return
Usage
Release-MyOnlineReservedNumber -Area EMEA-UK-ALL-ENG_CR -NumberType Subscriber -Block 10
Get-MyOnlineReservedNumber
This command return a list of all reserved numbers in the selection chosen
Parameters
-NumberType [string][mandatory][valid options] Subscriber, Service
-Area [string] – output of Get-MyOnlineNumberArea
-Block [int][optional] – Number of numbers to return
-All [bool][optional] – Set to $true if you want to return all reserved numbers regardless of type or area
Usage
Get-MyOnlineReservedNumber -All $true
Or
Get-MyOnlineReservedNumber -Area EMEA-UK-ENG_CR -NumberType Subscriber
Count-MyOnlineReservedNumber
This command returns a count of all numbers reserved in Cloud PBX
Parameters
-Area [string] – output of Get-MyOnlineNumberArea
-Block [int][optional] – Number of numbers to return
-All [bool][optional] – Set to $true if you want to return all reserved numbers regardless of type or area
Usage
Count-MyOnlineReservedNumber -All $true
Or
Count-MyOnlineReservedNumber -Area EMEA-UK-ENG_CR -NumberType Subscriber
Count-MyOnlineAvailableNumber
This command returns a count of all numbers available in Cloud PBX
Parameters
-Area [string] – output of Get-MyOnlineNumberArea
-Block [int][optional] – Number of numbers to return
-All [bool][optional] – Set to $true if you want to return all reserved numbers regardless of type or area
Usage
Count-MyOnlineAvailableNumber -All $true
Or
Count-MyOnlineAvailableNumber -Area EMEA-UK-ENG_CR -NumberType Subscriber
Count-MyOnlineUsedNumber
This command returns a count of all numbers in use in Cloud PBX
Parameters
-Area [string] – output of Get-MyOnlineNumberArea
-Block [int][optional] – Number of numbers to return
-All [bool][optional] – Set to $true if you want to return all reserved numbers regardless of type or area
Usage
Count-MyOnlineUsedNumber -All $true
Or
Count-MyOnlineUsedNumber -Area EMEA-UK-ENG_CR -NumberType Subscriber
Get-MyOnlineAvailableNumber
This command returns a list of all available numbers in Cloud PBX
Parameters
-Area [string] – output of Get-MyOnlineNumberArea
-Block [int][optional] – Number of numbers to return
-All [bool][optional] – Set to $true if you want to return all reserved numbers regardless of type or area
Usage
Count-MyOnlineAvailableNumber -All $true
Or
Count-MyOnlineAvailableNumber -Area EMEA-UK-ENG_CR -NumberType Subscriber
Installation
Install the sharepoint components in the Components Directory
Create a folder in your My Documents called WindowsPowerShell
Create a sub folder within this directory called Modules
Copy the PhoneInventory Folder and place it inside the Module folder you created above
In SharePoint Online click on Site Contents > Site Settings
Click on List Templates in the Web Designer Galleries
Click on the Files tab and click Upload Document
Browse to the SharePoint Online folder and select the PhoneInventory.stp file and press OK
Now go to your SharePoint Home Page and select Add lists, libraries and other apps
Find the app called PhoneInventory and click on it
You must call it PhoneInventory. No other name will work! Press Create
You should now be able to browse to your list
Enabling numverify Integration
To enable numverify integration, go to C:users<your name>documentswindowspowershellmodulesphoneinventory and open PhoneInventory.psm1. Around Line 13 you will see a variable $numverify that is commented out. Uncomment this variable and replace <your-key> with the API key given to you by numverify. Save the file and reload any open PowerShell windows.
Download
To download PhoneInventory please click here
Public BETA
This is currently in BETA. There may be bugs or features missing. If you come across any, please use the comment section below and I will work with you to get a stable release in the coming weeks / months.
0 notes
Text
Original Post from Insider Threat Security Author: Chris Nieves
The policy of ‘Data protection by design and by default’ in article 25 of the GDPR is driving vendors like Microsoft to align data security with innovation to not only develop better products but also more secure products. Along these lines organizations should adopt the policy of Privacy by Design, that is, organizational processes that are designed with protecting privacy in mind.
Just as external sharing is a critical and unavoidable piece of business success, so too is achieving compliance within a regulatory framework. Last year U.S Fortune 500 and U.K FTSE 350 companies spent nearly 9 billion dollars in efforts to avoid the multi-million dollar fines associated with failing to be GDPR compliant. The purpose of this article is to show you the settings Microsoft provides to control external sharing and how they can benefit your organization.
External Sharing: Organization-Wide Settings (O365 Admin Center)
Starting at the top, these tenant or organizational level settings will determine what options are available to your users throughout your environment in both SharePoint Online and OneDrive for business. In order to control how your data is shared externally, the organization needs to allow it to happen in a place where the organization has control. This is why you should deeply consider allowing external sharing at the tenant level.
To expose the tenant level external sharing settings for your organization in the O365 admin center navigate to:
Settings –> Services & add-ins –> Sites
Whichever option you choose, the more restrictive settings are still available on Site Collections and OneDrives.
The second option is recommended because it doesn’t restrict users from the ability to share with new users while the last option is unlikely to be used in most organizations and comes with some risks and less control after a file or folder is shared.
What Policy Makes Sense for Your Organization?
Choose this option: If you want to: Only existing external users (sign-in required) Allow sharing to external users who already exist in your directory because they were either already shared to or manually imported. New and existing external users (sign-in required) Require external users to sign in with a Microsoft account before accessing content. Allow only site owners or others with full control permission to share sites or documents with external users. Anyone, including anonymous users (Optionally, you can set links to expire in a specific number of days, and how recipients can use the links) Allow use of anonymous links which do not require sign-in or an authenticated user to access.
External Sharing: Top Level Site Collection & OneDrive for Business Settings
After you’ve set the tenant-wide sharing settings for SPO and OneDrive, you can further configure the top-level external sharing settings for SPO and ODfB in their respective admin centers.
These settings affect what options are available to your users when sharing links in OneDrive or in SharePoint respectively.
Choose this option: If you want to: Anyone New and existing external users (Recommended) Require external users to sign in with a Microsoft account before accessing content. Allow only site owners or others with full control permission can share sites or documents with external users. Best for site collections which have external collaborators, especially if you’re in the process of migrating to a newer version of SharePoint. Existing external users Allow sharing to external users who already exist in your directory because they were either already shared to or manually imported. Only people in your organization Not allow any external sharing.
An important difference between allowing anyone and allowing new/existing users is that the latter requires a sign-in. This requirement gives users more control over how their file is accessed and who it is accessed by. But potentially the most important control you gain, is what happens to the file after it’s been shared. Since users have to sign-in to access the link, we can further control how the file is interacted with and choose what kind of rights they have to it and even block them from downloading it.
In the OneDrive admin center, you can further restrict external sharing settings for ODfB, however, you cannot configure settings to be less restrictive than those set in SharePoint. In this section I will touch upon what you get by allowing ‘Anyone’ but focuses on available options if you were to allow external sharing to New and Existing users as this policy is best practice in most cases.
Since I decided to allow new and existing (authenticated) users, the options to the left are available when sharing a link to OneDrive.
An important difference between allowing anyone and allowing new/existing users is that the latter requires a sign-in. This requirement gives users more control on how their file is accessed and who it is accessed by.
But potentially the most important control you gain, is what happens to the file after it’s been shared. Since users have to sign-in to access the link, we can further control how the file is interacted with and choose what kind of rights they have to it and even block them from downloading it.
Consider setting more restrictive settings for OneDrive than SharePoint, I think of OneDrive as a place for personal documents whether that relate to storing company information or personally identifiable information.
SharePoint Admin Center
In the classic SPO admin center there are two categories for sharing settings. The first options are in the ‘site collections’ section and the second are in the ‘sharing’ section. I’ll cover the site collection sharing section first.
Classic SharePoint Admin Center
Sharing options can be configured for each SharePoint site in this section when a site is selected, the options on the top become available and the options to the right are displayed.
The default setting is ‘no external sharing allowed’ so a conscious decision must be made on which sites allow sharing, and what type of sharing is allowed.
This is where you can tighten control on sites which contain sensitive data or alternatively allow more permissive controls for sites that are more collaboration oriented.
Note that you can also choose who is allowed to invite new users to a site, in general I recommend leaving that privilege to site owners.
Modern SharePoint Admin Center
The modern SharePoint admin center is simplified and the settings have been changed to reflect the same options as previously described.
I suspect some of the other options you saw above (like setting the default link type for a site) will be merged to the modern admin center once it’s fully released. For now there’s no mention of those options in Microsoft’s documentation so we’re stuck with the classic experience for those settings for the time being.
Access control settings:
Unmanaged devices
Restrict access from devices that aren’t compliant or joined to a domain. Options range from allowing full access, web only (not desktop or mobile), and blocking access entirely.
Idle session sign-out
Automatically sign out users from inactive browser sessions.
Network Location
Limit access to only from specific IP addresses.
Apps that don’t use modern authentication
More security controls
In addition to all the above settings, there are a range of additional controls available:
All user activities related to SPO and ODfB, including who accessed, viewed, edited, deleted, or shared files are viewable in the audit logs. In the new admin center, a high-level view of activity for a site can be highlighted in the ‘Insights’ section as well if enabled on a site.
SPO and ODfB content are subject to Data Loss Prevention (DLP) policies which depending on the policy may prevent users from sending it externally. This is dependent on the DLP policies ability to identify the content correctly which may cause frustration for end users.
SPO and ODfB content may be subject to records retention policies set by preservation policies. These may impact on the ability to send documents externally.
SPO and ODfB content may be subject to an eDiscovery case.
Administrators can be notified when users perform specific activities in both SPO and ODfB.
Sharing (and access to the documents once shared) may be subject to security controls enforced through Microsoft Information Protection.
Summary
In conclusion, understanding and implementing the settings above will give an organization a strong control of what and how things can be shared both internally and externally. These additional controls are only available if you allow sharing through SharePoint Online and OneDrive for Business. If you choose to allow sharing, the settings described in this article will provide further control on how internal users can share information and what external users can do with it.
For a glimpse at some of your tenant’s settings, today check out some of the PowerShell scripts below, for the full picture of your environment check our STEALTHbits SharePoint Data Collector.
Handy PowerShell Scripts
Use this PowerShell script to return all your tenants external users (requires SharePoint Admin)
The output will look like this:
Use these PowerShell scripts for additional details on your current SharePoint Online and OneDrive tenant settings:
The post External Sharing Best Practices for SharePoint Online & O365 appeared first on Insider Threat Security Blog.
Go to Source Author: Chris Nieves External Sharing Best Practices for SharePoint Online & O365 Original Post from Insider Threat Security Author: Chris Nieves The policy of ‘Data protection by design and by default’ in article 25…
0 notes