#pshelp
Text

COLOR CORRECTION BASE PSD PACK
please reblog if you plan to use!
credit is super appreciated but not required:)
don't repost/claim as your own
optional: tag me in your creations with #usercam!!!
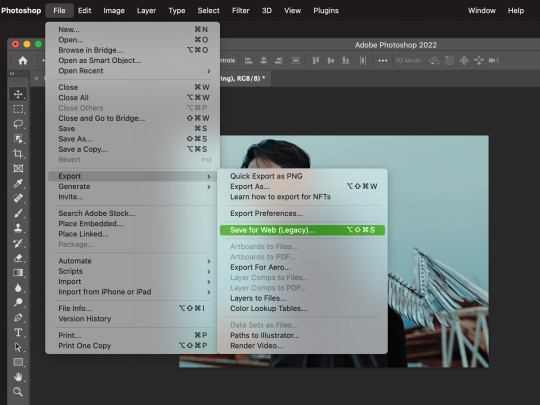
download here (mediafire) | more gif help
more info + instructions under the cut
these are base PSDs which each include two adjustment layers for color correcting scenes with various oversaturated colored lighting. the gifs above have additionally been brightened and sharpened.
you will still need to play around with all the adjustments to make your gifs look perfect! these are just meant to get you started:) please send me an ask if you have any questions. if you use these psds and choose to give credit (thank you!) please add a link to this post!
Instructions for use:
1. Save the PSD files to your computer
2. Open your gif in photoshop. In a separate tab open the PSD file
3. CTRL + click or right click on the adjustment layers folder (titled: group 1) in the “layers” box. Click duplicate folder, and choose your gif as the destination for the duplicate.
4. Finish editing your gif and save!
#this is my 2k celebration post btw. thank u ily guys#psd pack#photoshop#my psds#🪐#gif help#psdresources#psd coloring#usergif#pshelp#completeresources#gifmakerresource#tv psd#ajlook#alielook#athenagranted#tuserdaria#icecreampotluck#gonna reblog with more tags later probably
434 notes
·
View notes
Text

SHARPENING ACTION for Photoshop
It's a small thing we don't always think about when editing a picture, but sharpening really does create a difference in your final edit!
DOWNLOAD THE ACTION HERE
You may like or reblog this post, no need to credit me if you use this resource!
Consider supporting me on Ko-Fi if you can ♡
#sharpening#sharpening actions#photoshop action#pshelp#photoshop resources#resources#actions#free#free misc
235 notes
·
View notes
Text
How to tone down yellow tinted scenes
Hi, so first of all, sorry for the late reply. I'm going to try and explain what I did.
We are basically going to try and cancel out the yellow tint in this scene, I used very few adjustment layers for that and then i just did my usual colouring. Tutorial under the cut!

First thing I did was use Curves, you can try and do it manually but all I did was click Alt + Automatic on my curves panel and then selected Find Dark and Light colours, I then adjusted Shadows and Lights to my liking, you can play with the other settings see which one adjusts the best to the results you want. This will be different for every video/scene so don't try to make it look like mine, adjust as you go.


This is what we have after that, left is original gif and right is just after curves.

As you can see, it's still a little yellow but their skin tones look a little more human. Then I went and added a Photo Filter, Cooling filter 82 to be exact and set the opacity down to 30%
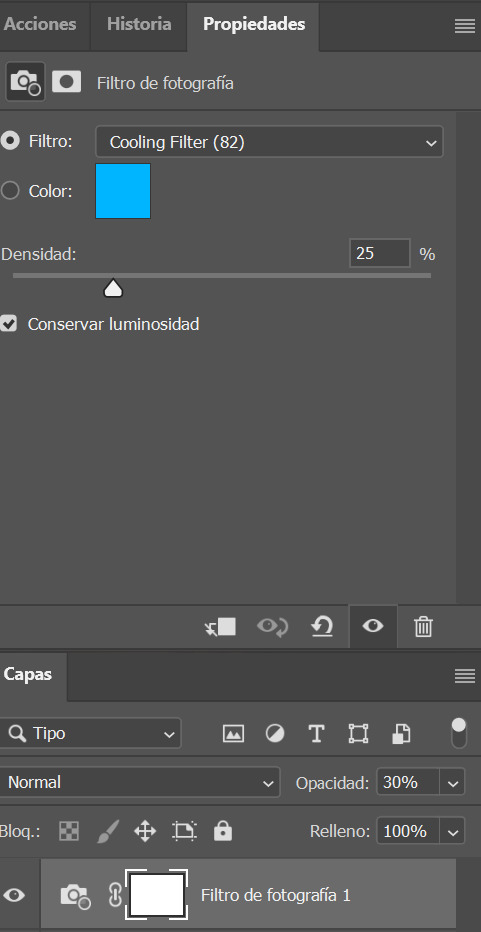

Next i added a gardient map, you can make your own or select one of the presets just remember to stay on the blue/cyan/pruple so you can cancel out the yellow. I then set it to soft light and opacitiy 20%, I wouldn't go over 50%. (left)

Because I thought this was a little too whitewashed, I then went and added a Colour Lookup, selected 3Strip, set it to Darken and lowered the opacity to 20-40%. (on the right)
This is my final gif after my regular colouring. It's masked so you can also see the original. I also did the same steps on another scene with darker lights overall and this was the result.


I hope this helps!
#colouring tutorial#gif tutorial#it's nowhere near perfect but i hope it helps even a little!#resources#kpopccc#by moonbyulys#completeresources#allresources#pshelp#photoshop help
117 notes
·
View notes
Note
hi este, your do revenge gifset is an aboslute MASTERPIECE and was wondering how did you do the coloring? it's so vibrant and i love the noise effect too it's just WOW.
THANK YOU SM !! here's a quick colouring tutorial based on my do revenge set under the cut !

first, what i usually do (and what most people do) is load my screencaps into the file. i do my usual sharpen settings + some noise (shown below !)

when it comes to this, it always varies especially when it comes to the quality of the gif. i only add noise when the gif seems patchy or weird. when adding noise it definitely increases the file size so beware !
now time for the actual colouring! i always start out with a brightness/contrast layer.

next, i hit it with a levels layer.

(hehe 69)
as you can see, their skin looks kinda saturated and red and it usually bothers me so i go ahead and make a colour balance layer.

lastly, to achieve the pink gradient around the gifs i just use a soft brush with hardness set to zero and to my colour of choice ! for this gif, i used pink. i also don't give the layer a specific blending change, but feel free to do so if you want ! i also always add +10% noise to the gradient, just so that it wont have the weird patchy lines around it.


and we're done ! that's basically my usual colouring process. hopefully you found this helpful, and if you did i would appreciate if you reblogged this post !
#photoshop tutorial#coloring tutorial#completeresources#allresources#usergif#pshelp#*gif#tuserlucie#rogerhealey#tuserrex#userfern#userkarolina#tusercat#uservivaldi#userives#userelio#usershreyu
220 notes
·
View notes
Note
Hi! I'm wondering if it's too much to ask by wondering if you could explain how to do gifs like this: /post/665885361316233216. Or if you know of some other tutorial or just things to think about while making it? Thank you!
Not at all, I’m happy to know someone appreciated my template! I'm sure there are other tutorials out there on how to create layouts like this but I haven’t seen any lately to link you to so I'll go ahead and show you my approach to getting this type of layout. This will be very detailed and image heavy to make it easy for those who might have never worked with putting gifs into templates before to follow.
This tutorial assumes you have:
just about any version of photoshop (I use CC23)
basic knowledge of giffing with this program
some experience with layer masks
If you want to actually learn how to make a template like this from scratch, keep reading. Otherwise you can just download the template I created here and skip to step 3, or download this anyway for a visual and follow along.
(STEP 1): HOW DO I GET STARTED?
Create a new blank document with the dimensions of the entire size of the canvas (file > new) and change the highlighted settings to match these (with your own choice of dimensions of course):

Before you do anything else, make sure your timeline is visible (window > timeline) and select “create video timeline” from the drop down.

(STEP 2): MAPPING IT OUT AND CREATING THE TEMPLATE
With your blank canvas is where you have to use a little imagination to create your layout to fill in the space and where you start is up to you.

I started at the top of the canvas in the left corner and decided my first gif was gonna be 268 x 340. Why these dimensions? 268 is tumblr’s standard width for (2) side-by-side gifs and I want the gutter alignment at the top of this canvas to be centered. The height of the block just felt right. As you drag the tool, photoshop will tell you what the dimensions are.
Now I have this:

Our second shape will also have a width of 268px to ensure the transparent space between them is perfectly centered. My second block ended up being 268 x 260.
Make sure there is a gutter of 4px between all of the squares you create. This is important because tumblr’s standard gutter size between gifs is 4px, and this means you need to subtract 4px from your squares on all sides that face each other.

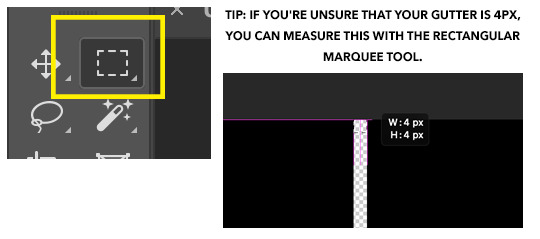
The easiest method to make and align the squares without spending too much time on it is to click off the canvas in the corner and drag the shape inward. Then click on the shape you’ve just created and align it with its designated 90 degree corner of the canvas first. [Edit > free transform] the sides until they align correctly by holding shift + control while dragging. Zoom in to a microscopic level to make sure the gutter is right if you have to 📐🔬🔎👀
If you’re not using weird shapes in your template, do the same thing with all the blocks until you get your desired outcome.
Otherwise, you’ll have to deal with this:
(STEP 2.1): THE ANGLE

In order to create a template like this, you will need to delete the corner of your shape. Create your rectangle like normal as you did with the others, but this one is going to overlay the layer on the top left.
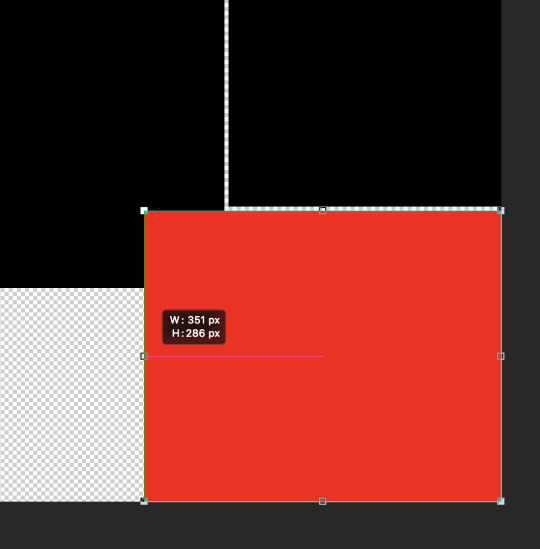
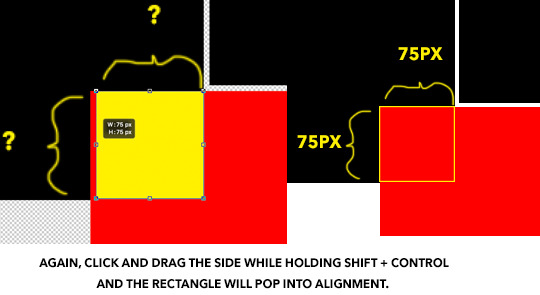
To make sure everything will be even, I used the rectangle tool again to measure and with a new square (in yellow for visibility), I determined that this corner overlay is 75x75, so I fixed the alignment of the red rectangle to make it even.
(STEP 2.2): DELETING THE CORNER OUT OF THE SHAPE
Using the yellow square as your new guide, extend its edges to cover the gutter on the two sides while maintaining its 1x1 proportion.
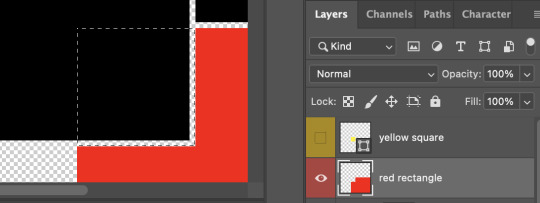
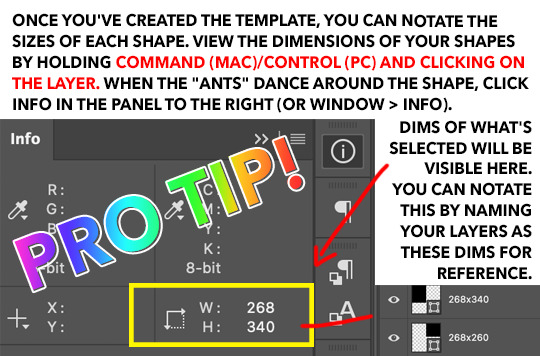
Keyboard command + click on your yellow square layer and once the “ants” dance around the square, hide the layer so it’s invisible on the canvas.
Right click on the red rectangle layer and select “rasterize” from the drop down menu, then you can hit “delete” or “backspace” on your keyboard which will remove the selected portion only to reveal the gutter. command + D will make the 🐜s go away. Then the yellow square layer can be deleted.
Once this is complete, you can finish up your template by adding your small rectangle in the left bottom corner in the space that remains and VOILA! You have a template!
3. REPLACING THE SHAPES WITH GIFS USING LAYER MASKS ETC
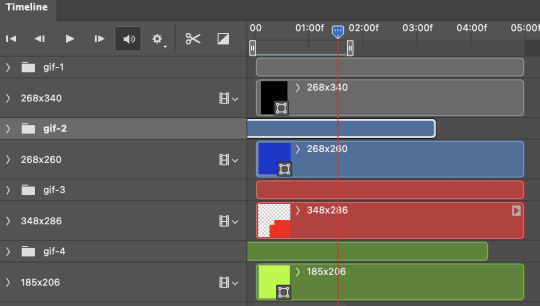
When you make your gifs, remember that they will need to be in timeline form in order to drag them onto the template. You can resize them to match the dimensions of the shapes, or you could just drag your gif—whatever be the size—directly onto the canvas, and “free transform” them to fit inside each space.
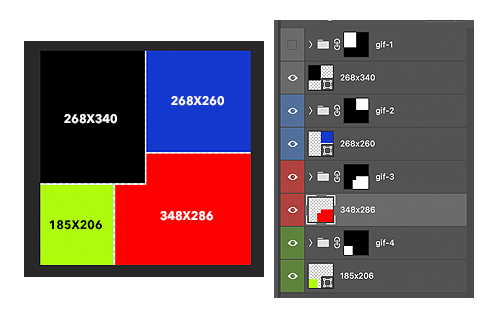
Create a group for each shape and create a layer mask for each group, containing it’s designated shape. I’ve colorized this visual to make it make sense.
Now you can finally drag your gifs onto the template. The coloring can be added before or after, it doesn’t matter as long as you place your gifs and the colorings inside the groups with the layer masks to contain the effects of the color adjustments.
And the best thing about putting gifs in a template in timeline is you can move the groups containing the gifs from left to right to get your desired part of the clip.
Once you’re finished with this, hide the original shape layers, as they were just guides and we no longer need them, but also if you don’t do this, you may be able to see them on the sides rather than transparency once you upload to tumblr. And AT LAST you can convert everything into frames as you normally would and save.
It seems like a lot, but these are very satisfying to make. Feel free to drop me another ask if you have any questions regarding some detail I might have left out.
#gif tutorial#tutorials*#resources*#templates#template tutorial#pshelp#completeresources#quirkyresources#answered#idk who to tag in tutorials tbh
70 notes
·
View notes
Text
psd coloring : 𝐏𝐒𝐃 𝟓𝟑𝟐 : 𝐏𝐑𝐎𝐌𝐈𝐒𝐈𝐍𝐆 𝐘𝐎𝐔𝐍𝐆 𝐖𝐎𝐌𝐀𝐍
a free psd coloring for my tip jar/subscribers i made & spend my time on on my deviantart ! feel free to adjust layers if you want to. just keep the credit to me still ! it might not work on all colors the same. this psd coloring comes with some adjustments !
PRICE : none. only for my tip jar/subscribers ( if you don’t have deviantart or don’t want to subscribe to the tip jar, / hmu and i can send you my ko-fi you can donate on and ill send you the psd after it !
#promising young woman#psd#psds#psd files#psd resources#psd coloring#psd colorings#icon psd#roleplay psd#rp resources#roleplay resources#roleplay help#filters#psd filters#effects#effects for icons#photoshop#photoshop resources#pshelp
6 notes
·
View notes
Text
help!
i’ve been trying to change my theme but i can’t. When I paste the new html code I got, a tumblr sign pops up and says I have to use a “non HTTP-URLs” theme. Why is that? how can I fix it?
Similar thing happened when I wanted to change the ask code for a faq one (add the ask box on that page).
Pleeeaseee, I’ll be so grateful if you guys can help me out.
0 notes
Text
Me: I love talking about gifs. :)
Anyone: So can you tell me how to make gifs?
Me: tf? Do I look like Einstein to you?????
#personal#[shifty-eyes]#https://choidaehoon.tumblr.com/pshelp#You didn't hear this from me#Tho I will note that I don't think 2D animation's sharpening rule has changed; 100% might still be the way to go#But can't recall if 0.1 was also needed >__>
0 notes
Photo

— i think it’s been a year and a half since i posted my last tutorial! with a few more requests (and me learning new things) i decided to make a new and updated tutorial 💎
— this is a VERY image heavy tutorial and it is also very long! i’ve put it under the cut <3 like there are OVER 50 images...this is more of a masterpost really. if there is something that does not make sense, feel free to ask!! i will more than happy to clarify!
— i promise the header gif was once good quality but for some reason, i did something to it and it became weird. please ignore that 😭

the first step is to make the gif! i’ll try to go through everything, step by step! there are different methods to make gifs but i’ll only be explaining the method i use. but i’ll link some incredible tutorials from other content creators later :D
i’ll be using photoshop. make sure you use a version of photoshop that allows you access to the timeline option! there was a weird update where the adobe timelines were not compatible with the m1 macbook chips so look out for that!
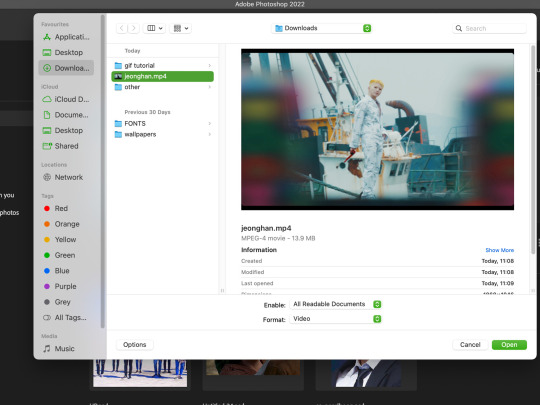
— the first thing you need is an .mp4 video. i use the in-built screen recorder on a macbook (which you get by pressing command + shift + 5). i usually just record the section of the video that i need but some people use programs such as 4k video downloader (which also works very well but i stopped using it because i was worried that i was using too much data downloading longer videos!)
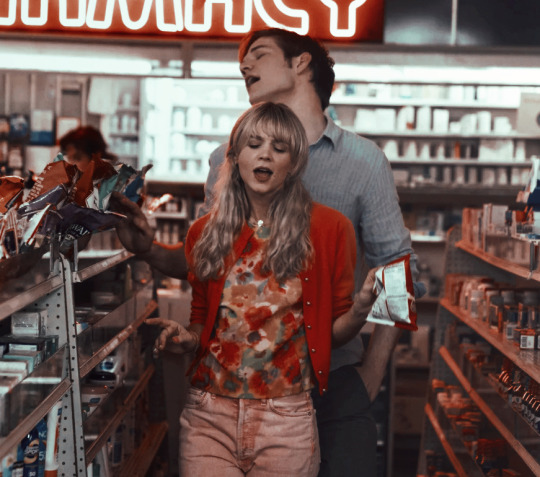
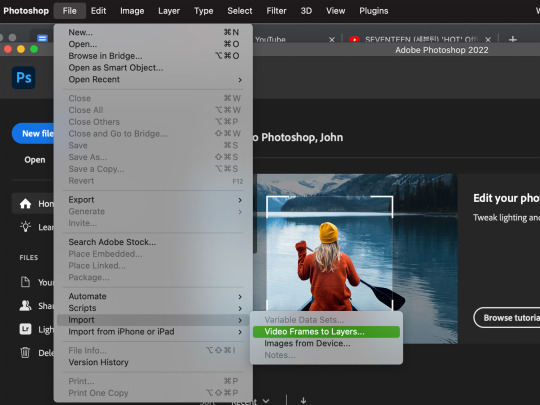
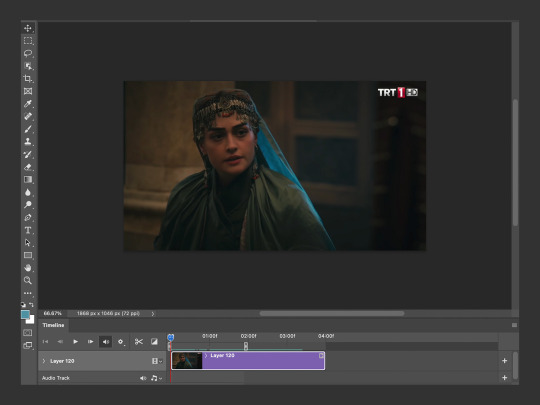
— i’ll be using a clip of jeonghan from the hot music video! when you open photoshop, go to file > import > video frames to layers
— this will open up your files and from there, you should select the video that you want to make a gif out of!
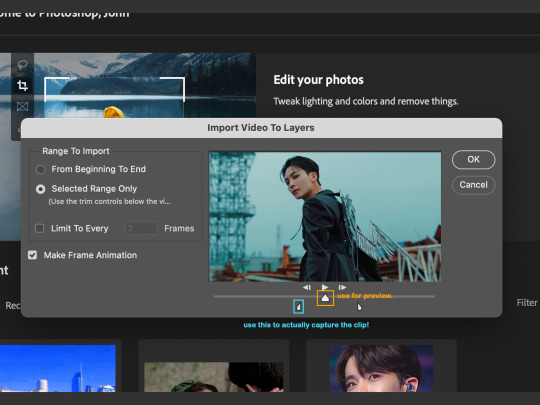
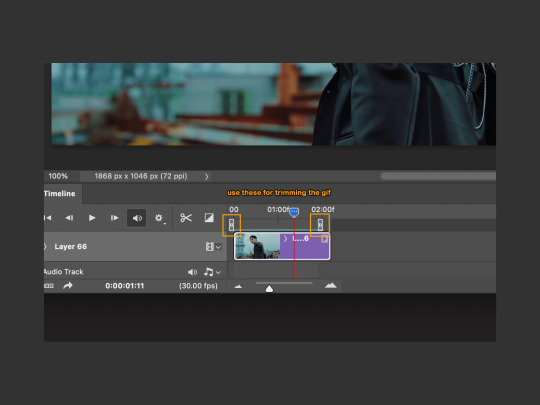
— once you have selected the video, you will get a pop-up and it has a little trimmer (that i’ve highlighted in the blue box!) that you can use to find precisely what you want to gif. the little triangle that i’ve placed in the yellow box is like a slider than you can use to preview the video!
—now your specific video clip will be opened as a bunch of layers and you want to press the small button (i am so sorry 😭 i don’t know what it’s called) and it will do something (which, even after three years of making gifs, i still don’t what its called) but just press it!! i’ve highlighted it in the yellow box!!
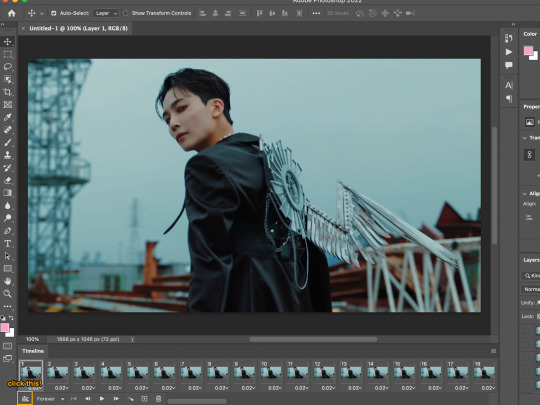
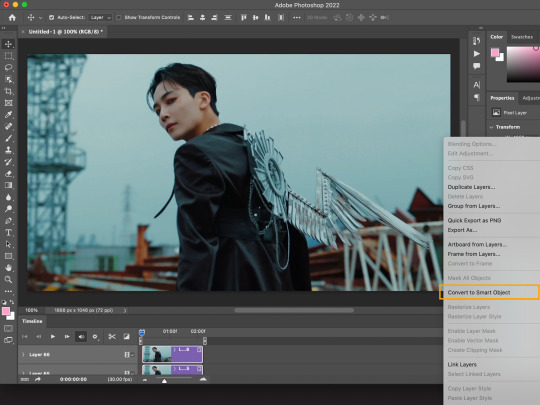
— then select all the layers and right click and then convert to smart object. this will make it a lot easier for you to sharpen and colour your gif at a later stage.
— if you still think your gif has unnecessary frames/scenes, use the small trimmers in the timeline to trim the gif even further!
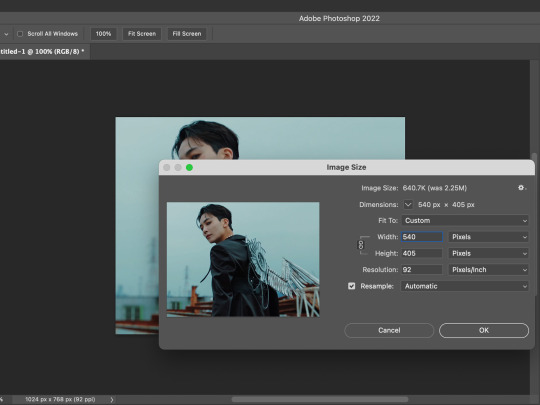
— now at this stage, your gif is technically ready but the chances are that the gif is too large to be posted on tumblr. tumblr has a 10mb gif size limit (praying that they don’t go ahead with the bad updates) so we want to bring that gif size down into a gif that can be posted onto the dashboard.
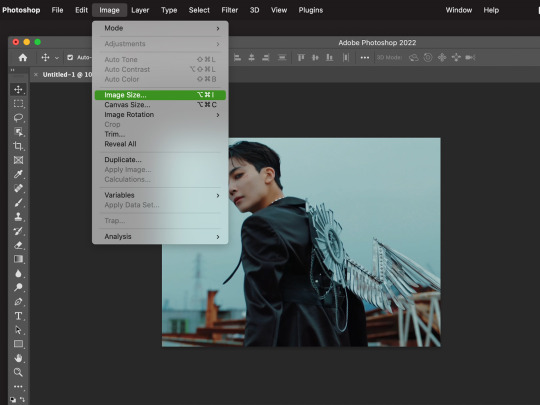
— go to image > image size! something very interesting that you can also do when resizing your gif is changing the resample settings (look at this post by @usergif here!)
— now there are many sizes you can make your gif but if you want a recommended size for a single gif on the dashboard - check this out! the width should always be 540px but the height can vary!
— now that your gif is ready (unsharpened and uncoloured - but this is just the base gif tutorial) we can now save the gif! go to file > export > save for web. don’t make the same mistake as me back in 2018 when i was trying to make lotr gifs but i kept clicking save as...and it would save as a still image.
— saving settings can vary! but these are the ones i use and they usually work for me! make sure that your looping is set to forever otherwise your gif will play out and then stop :(
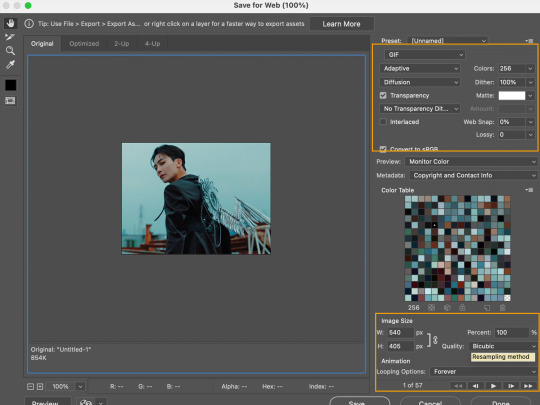
— and this is our final gif! it has no sharpening or colouring but its a functioning gif on its own :D


— i enjoy this part the most!! there are so many different ways that you can colour a gif and it is all up to personal preference! but this is first the basic colouring on a gif. you should go to layer > new adjustment layer > curves.
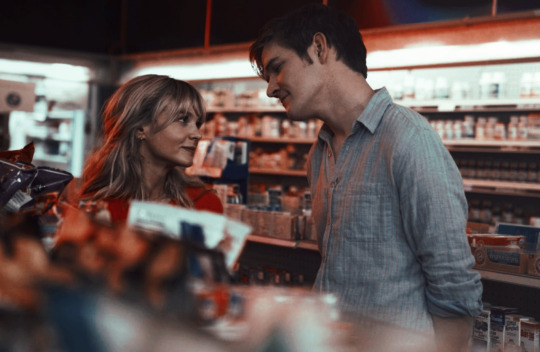
you’ll see three eyedroppers on the side (black, grey and white)! we’re going to be using the black and white ones! when you click the black eyedropper, you’re going to click it onto the darkest pixel in the gif. and then take the white eyedropper and place it onto the whitest/lightest pixel in the gif! it makes a huge difference!
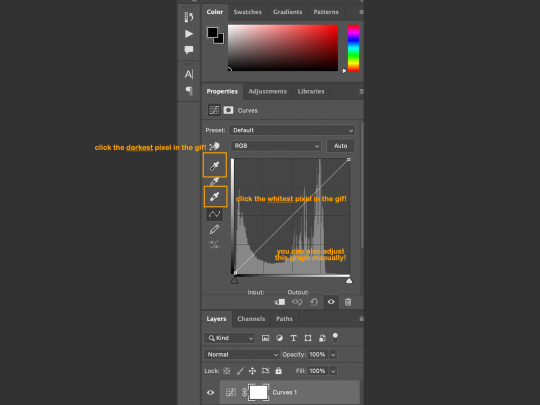
— as you can see, the difference is immense. that cyan sort of washed tone has been lifted from the gif!

— the gif on the left is a comparison of only the curves layer against the original gif. the gif on the right includes some extra adjustments that may help your gif :D
the two little skin-tone rectangles compare jeonghan’s skin tone without selective colour and then WITH selective colour (respectively). the rectangles near the bottom-right corner show just one example of how you can play and adjust hues with selective colour!


— now i’ll show an example of how this might with a more yellow/darker toned scenes. for some reason, so many shows love turning the brightness down on their scenes and its up to gifmakers to actually make the scenes visible 😭 i’ve taken a small clip of halime sultan from dirilis ertugrul!
— i resized the gif but i have not added any adjustments yet to it!
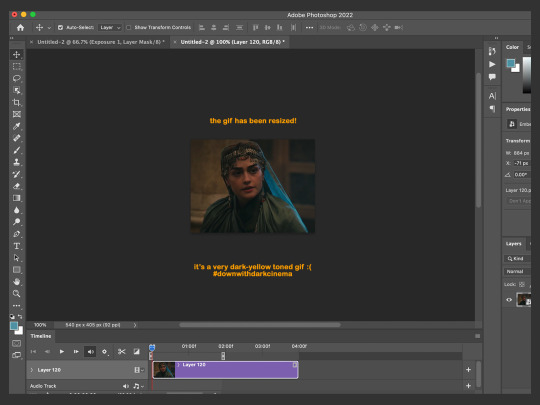
— i created a new curves layer and i took the black eyedropper, placing it on the darkest pixel i could find (a fold in her headdress) and this is how the gif looks now. arguably it looks worse but this is a necessary step for the final gif.

— so now i took the white eyedropper and placed it on the lightest pixel i could find. it was a reflection on the metal decor on the headdress. and it brightened the gif up quite a bit!! but here is where things can get interesting...

— this is an alternative use of the white eyedropper! in this case, i placed the dropper on the highlight reflection on her cheekbone (which was originally tinted a more blue with red on the edges) and this also brightened up the gif but it gave it a more green/yellow hue!!
this is important and something that is so useful for me because basically if your gif is too BLUE-hued, find the lightest blue-ish pixel but if it is too YELLOW-hued, then find the lightest yellow-ish pixel. you can easily manipulate the tones in the gif this way!
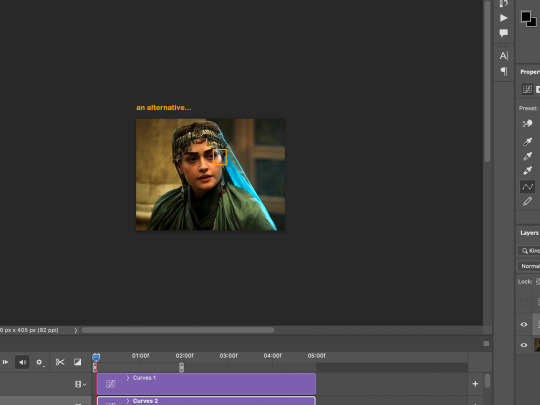
— so on the left i have the final gif!! and on the right i have a comparison on how the lighting has improved so much from the original gif!

— now i could go on forever about all the ways you can colour a gif but we would be here forever, and you would be scrolling forever so instead, i put together some colourings that you can download here!

— cheers: it brings out the reds and orange and it turns greens into teals and blues!
— selemzar: if you’ve watched historical turkish dramas, especially ones with tribe/city sets you know that they love their yellow hues! this one gets rid of the yellow cast on a scene <3
— httyd: a very basic psd that turns blues into greens and brings out skin tones!
— up: i use this one very often (and named it after the mv in which i first made it). its a psd for bright and vibrant gif colourings that focuses on making the blue colours as bright as possible!

— i’m gonna be honest...i am not a huge expert in this area and my knowledge of sharpening is limited to photoshop’s own features. there are so many softwares and programs you can use to clean up a video and to make it smoother and sharper such as avisynth and topaz!
— this is the sharpening i use the most nowadays! it has two layers of differing smart sharpens and then a layer of noise on top. it usually works well for me except noise increases the size of the gif a LOT so my gifs are never too long 😭

— this is one that i used to use all the time. it gives a very glowy look to the edges and i’ll use it if the video is lower quality as this sharpening covers up some of the weird pixel squares!

if you would like some more clean and comprehensive sharpenings, then take a look at these!
this tutorial by most beloved @woozi / this tutorial by @trashcora / this tutorial by @haleths / or this one from @hyunfelix
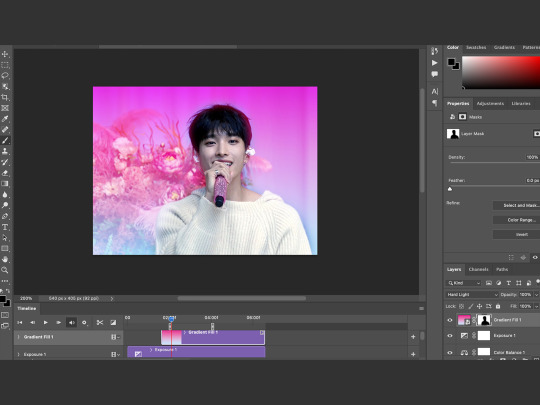
— another thing i like are matte gifs!! i haven’t made many of them but they are such a neat effect to add onto gifs - especially stage/live gifs! so here i’ve made my base gif of heeseung and given it some base colouring (curves and selective colour)

— now i saw this tip from another blog (an nct/wayv blog im so sure but i cannot remember the url for the LIFE of me) but what i remember is that you add a levels layer (and with the three numbers under the graph in order: it’s 20 / 1 / 250 and then with the numbers next to output levels it’s: 20 / 240) and then you add a solid fill colour of #2f2f2f and set it to screen and you get the results below!


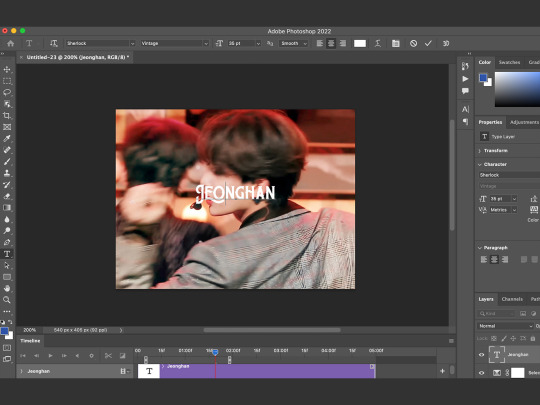
— often if you’re giffing a music video / a film / a show, there are people speaking and you want to add subtitles!! i like to use the font: arial rounded mt bold and then i open the character window and click on the bold and italic T <3
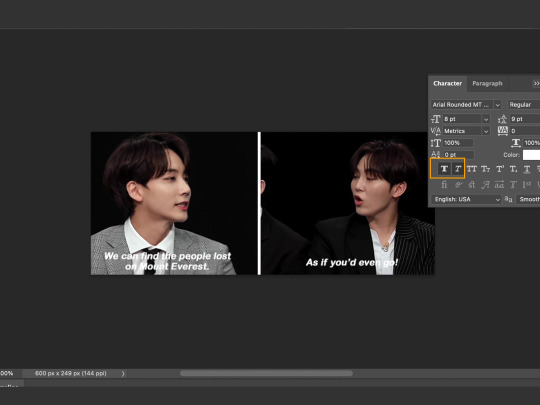
— now we have the basic subtitles, but they are not as easy to read against jeonghan and seungkwan in the background so we’re going to right click on the text and go to blending options and then you add a shadow behind it!
— i personally find that subtitles look nicer with a stroke as well, so you can add a stroke (any size of your choosing) and set the position to outside.
— and here we have subtitled gifs!!! if there is more than one person speaking, you can change the colour of the gifs and my go-to secondary colour is #fda700 :)
— if you want to learn how to blur captions, i recommend this tutorial by @chanstopher

— now that i’ve gone through the basic tutorials for making gifs, let’s take a look at some fun effects!!
a place that i really recommend learning these things from is @usergif as they have super cool tutorials and a directory as well that you can access here <3
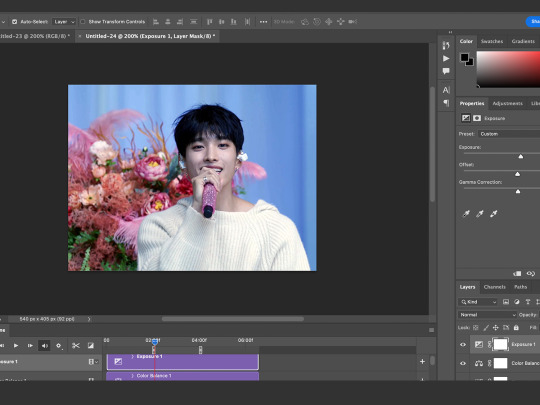
— if there is one thing i love...it’s gradient backgrounds. and also this video of seventeen and thus i will show both in this next tutorial! i’ve started off with this seokmin clip and i’ll add some adjustments to it.
— so now that i’ve added curves, exposure, colour balance etc (all the basic adjustments) we’re ready to add the gradient!
— go to layer > new fill layer > gradient!

— a small pop-up comes up and click on the gradient (in this case that blue-transparent bar) and another pop-up will appear! here you can make your own gradient or choose a pre-set gradient (there are heaps of good options)
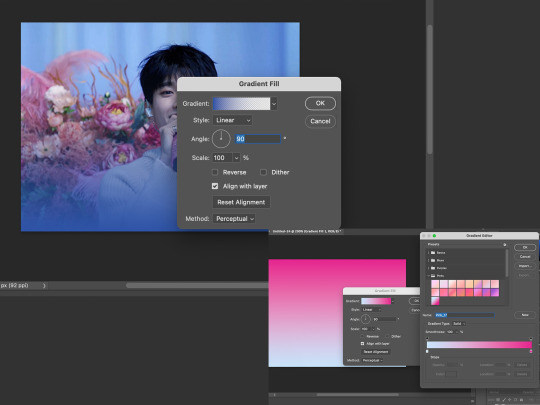
— once you’re satisfied with the gradient, you can click OK and then set the gradient layer to hard light. you can play with different settings but this is the one that i prefer the most!

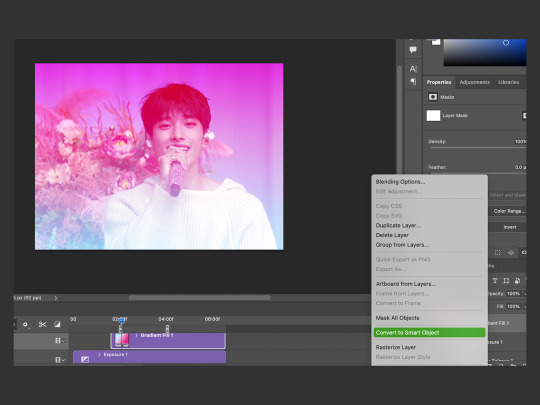
— now convert the gradient to a smart object!
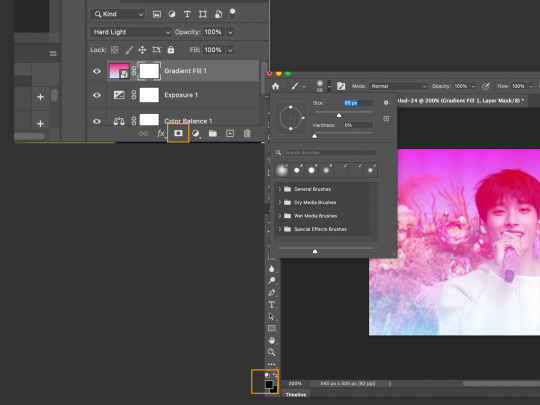
— in the small yellow box, i’ve highlighted the layer mask button and you should add one to your gradient layer! a layer mask will be useful because if you make a mistake later on, you can simply make another layer mask and start again! also bring out a soft brush (hardness set to 0%) and make sure the brush colour is BLACK. a black brush erases the layer mask and a white brush brings it back. use the brush and you can erase over the subject in the gif!
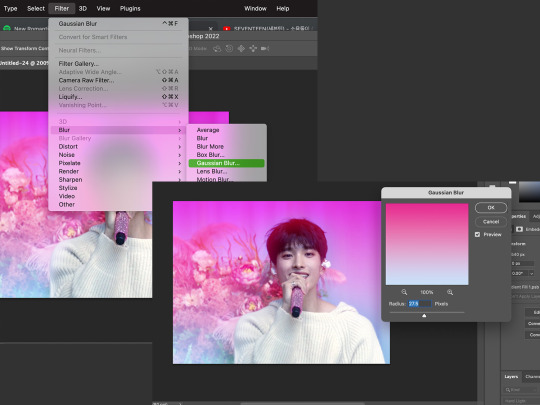
— so now we have a seokmin-shaped hole in our gradient (if he is not a heart🧡 why heart shaped?) but the edges (even with the 0% hardness) are still too sharp and we want to soften the gradient!
— go to filter > blur > gaussian blur and play around with the blur settings till you find a gradient edge that satisfies you! you don’t want it to be so soft that the gradient ends up covering the subject again but not too hard either.
— and this is our final gif!! the gradient background is really so versatile and it adds pops of colour to your gifs (and can be very useful in covering pesky pixel ugly-coloured backgrounds!)

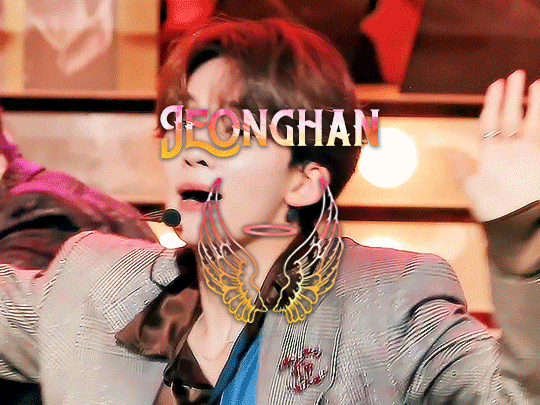
— another effect that i love so much is adding gradient text and pngs to gifs! i feel like they just make the gif so much more fun and interesting <3 so here i’ve got a gif ready (its been coloured and resized) and i want to add text and an image onto it!
— in any font you like, and any size you like, you can type out your text but make sure that the text is WHITE (otherwise you won’t achieve the same gradient effect)
— i love adding transparent pngs and a site i like to use is called nicepng.com as they’re free to use and they have a great selection of transparent images! i looked up an angel image (for beloved jeonghan ofc) and i downloaded one! i prefer images that have a thicker outline as this helps the gradient appear more clearly!

— i downloaded the png and placed it on the gif. but the original png was NOT white so i need to make it white. for that, i made a small white rectangle and placed it in a clipping mask over the angel wings and then merged the layers. then you can reposition the text and png to wherever you want them to sit in the image.

— now we’ve reached the gradient part! set the text to EXCLUSION (this will let your text have that see through property and if you don’t want it to look transparent, then you can keep it on normal). then go to BLENDING OPTIONS and go to gradient overlay. here you can select the gradient that you would like!
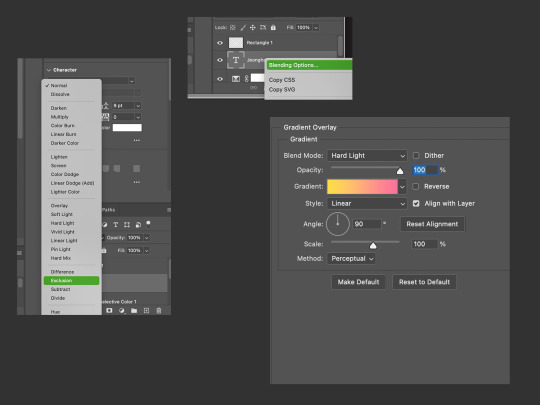
— once you’ve selected a gradient to your liking, click OK and then make sure that the blend mode of your gradient (in the gradient overlay box) is set to HARD LIGHT. in the previous step, if you did not change the white text to Exclusion, then you can keep the gradient blend mode on normal. i also like to add a shadow on my text as it helps it stand out a bit more!

— so i did the exact same process to the angel png (exclusion > blending options > gradient on hard light) and there we have our final gif! its such a versatile and fun effect that can liven up your gifs!!
there are countless more effects and tricks and tutorials that you can use to make your gifs but we would be here for another fifty years so i will add some links below of some incredible tutorials that i often refer back to!
if there was anything that i said above that didn’t make sense (because after a while, my brain turned to mush), you can always come and ask for clarification :D
colour isolation tutorial by @simoneashly
my own tutorial on blending over @kgifsource
an amazing guide on colouring those heavily yellow tinted scenes by @nobodynocrime as well as this amazing glitch effect tutorial!
the tutorials from which i learnt blending gifs together are these two: this one by @jackarthurdavenport and this one by @yenvengerberg
a guide on vapoursynth and colouring by one of my favs @wonublr
and this comprehensive guide on gif making in general by @soonhoonsol <3
#tutorial#gif tutorial#usergif#allresources#photoshop tutorial#completeresources#pshelp#kpop gif tutorial#photoshop#usernik#userbecca#cheytermelon#userjoanna#userkitty#tusermanny#usershreyu#usermarcy#aleksbestie#ANYWAY 48 hrs later...
1K notes
·
View notes
Note
Hi, how did you do the honeycomb layout gifsets?
hey!! so this is likely to not make sense as i am awful at explaining myself, but i will try the best i can.
so, firstly, you need your shape. for the hexagons (used in these sets) i use the polygon tool w/ 6 sides, but you can literally do this with any shape, if you can't get the shape you want on photoshop, or have found a specific shape elsewhere you can use that too (for example this set, i used an hourglass shape from google images, and created the shape in between in photoshop).
my canvas looks like this now...
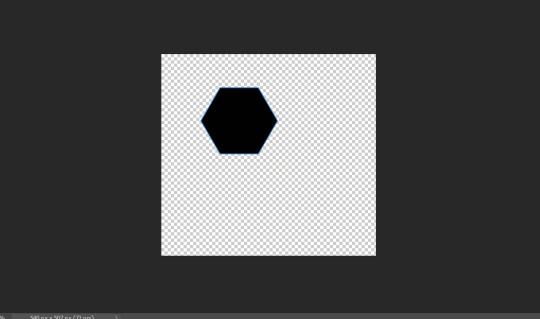
i've made my canvas the size i think i want it, but as long as you set your width to what it needs to be for tumblr, 540px, you can adjust the height of the layout once you've worked out how you want your layout to look. now the next step is just duplicate and move the shapes around until you've filled your canvas. it can take a little trial and error to get things lined up, but i try make sure the gaps between all the shapes stays at 4px, to match the margin between gifs on tumblr.
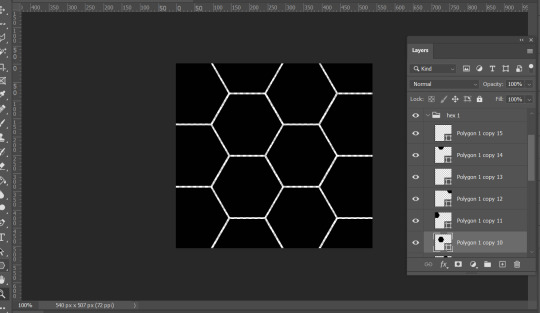
so, now i'm left with all the shapes in separate layers, NOW, before you do anything else make sure you've clicked create video timeline.
once you have all your shapes placed out, you're ready to make your gifs. and once you have a gif (i colour them entirely but DON'T resize or sharpen until they're placed in the layout), make sure it's a smart object and either drag from one canvas to the layout canvas, or use the duplicate option. now you literally just clip the gif to the chosen shape layer and resize as needed (there’s a tutorial here by kate that looks at clipping masks/layer masks if you need help with that in more detail!), then sharpen. (i've done it with three random gifs i had psds saved on my laptop to show you as an example)


so this is how it should look with your layers and i saved it as it is too (but i do recommend flattening it all back into layers at the end of this whole process to set the time of your gif properly!) but yeah, you basically just keep going until you've filled your whole gif! really hope this helped i'm bad at this stuff!!!
#ps ask#usergif#quirkyresources#chaoticresources#allresources#dailyresources#hisources#usernik#userk8#userhella#uservale#uservalentina#userace#tusermeg#userrobin#userannalise#userrainbow#usershreyu#useryoshi#pshelp#pstutorial
323 notes
·
View notes
Note
Hello! Could you please tell me what fonts are you using in that pink Nina Zenik gifset? Thank you!
this gifset
first gif: LEMON MILK and NT Josefine
second gif: ARIAL BLACK
third gif: LEMON MILK, BEAUTY, and ARIAL BLACK
#ask#pshelp#some of these i downloaded from dafont#like lemon milk and beauty#some are already pre-installed! :)
3 notes
·
View notes
Note
if you don’t mind me asking of course! what are your sharpening and save for web settings? thank you!
i use this sharpening and here's my save for web settings:

2 notes
·
View notes
Photo

TEXTURE PACK – by cavalierfou
This pack comprises 15 simple textures.
I made all of these from scratch. You do not have to credit me when using them but please do not steal, redistribute or claim them as your own.
Please consider liking or reblogging this post if you use this resource.
I hope you enjoy them! ♡ DOWNLOAD HERE
#textures#texture pack#vintage texture#free textures#photoshop resources#pshelp#photoshop textures#hey! it's been a while#i've been a little discouraged during the past months#due to issues with people stealing my content#so i moved over to my rp blog and posted a lot over there instead of here#BUT#i'm back ((((:#and working on a new graphics pack#i'm also planning to reopen commissions soon <3
730 notes
·
View notes
Photo
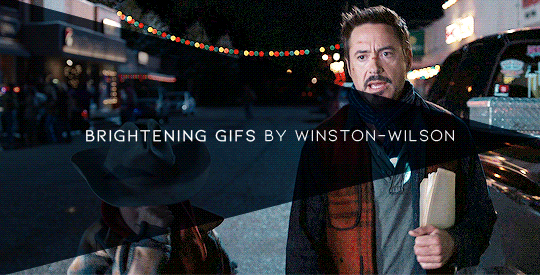
how to brighten gifs by winston-wilson mini tutorial
i’ve gotten a couple of anons asking how i brighten the dark scenes, and as long as there’s no golden rule/way for that, i can sure as well try to explain my way. so how to go from this
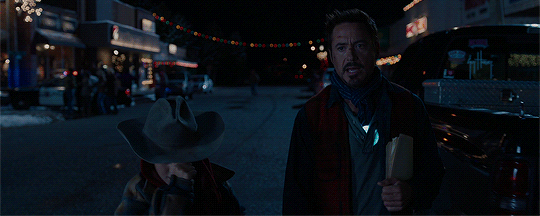
to this
rule no1. use high quality movies and clips.
rule no2. don’t overdo the brightening. just today i was making a set that resulted in this:

and the scene was almost pitch black to begin with. i think this is the furthest you can go, but that’s just me. anyway.
rule no3. user the blending ‘screen’
the first thing i do nowadays is, i create a brighten/contrast layer, don’t edit it, and only change its blending to ‘screen’. like this (i’ll be editing a half of the gif for contrast between the not edited part and the edited one):

and if necessary, i make another one:


you can stop at 2 layers like these because they brighten everything without highlighting anything. it’s already a big difference. (don’t overdo with the brightens, otherwise your gif loses its quality and becomes scrappy)
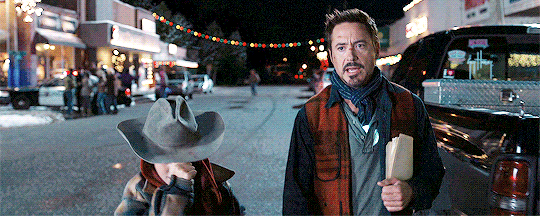
so this gif is mostly blue-ish, so we gotta bring out the reds.
rule no4. curves
my favorite magic wand


this is how it sorta works: if you click at blueish parts, it will bring out the reds. if you click on the reds, it will bring out the blues. click on greens, everything goes nuts. we choose the blues. let’s say i click somewhere here:

and the reds are out but not intensively out. and since we people don’t have red skin, we go change that shade.
rule no5. skin color
don’t... make people orange. that is, if you’re not making aesthetic sets. in normal sets, keep people’s shades of skin the way they are. we gotta yellow that red a bit so i go to hue/saturation, choose reds (enlarging the are of reds to oranges and yellows), and try to find the balance

aaand the result;

to compare before bringing out the blues and changing the reds to after:

rule no6. brighten more but don’t over do. get rid of the colors you don’t need.
so i brighten it a tad more using levels

and darken blues to tone them down. you don’t have to, but blue have the tendency to pixelize.

some more brightening bc i still can

adding some blacks for contrast without using the contrast option


some more levels

and we’re done.
result:


p.s. use those settings when saving a gif:

#photoshop help#gif tutorial#gif help#userhope#userlance#userjessie#userariella#bimarvel#usercherie#my tutorials#completeresources#fyeahps#pshelp
2K notes
·
View notes
Note
If you've already answer this i apologize for being lazy to search for it but how do you make your header? It's 🥺 so 🥺🥺 prettyyyyy 🥺🥺🥺 i haven't been following you for that long so i only witnessed like 3 headers and they're all so bootiful. Makes me sad i didn't find you out earlier i probably missed like a bunch of em
Nonny pleeeaseee this is so sweet :(((( and don’t worry, I haven’t answered this before!! So, I’m an accounting major and I just started learning photoshop about 3 months ago, so a tutorial from me would be confusing at best and an absolute disgrace to photoshop at worst lmao. So instead, I’m gonna link some of the wonderful tutorials made by amazing content creators that helped me learn, as well as some other resources!
This tutorial is what I use to do most of mine. My current one wasn’t really made using this method, but my last two were! In this tutorial, there’s links to a texture pack, a border template pack, and a gif overlay pack- all of which I use frequently!
My lovely and talented friend Hannah aka @taehysung made a wonderful header tutorial not too long ago, and I’ve used things I learned in that tutorial to make some of mine! (For example, the drop shadow effect she describes towards the end is how I added that effect to the border on my current header). In the tutorial, there’s also a link to her header template pack that she made on her other blog, which I also use often!
This is a texture pack that I’ll often use to make the background more interesting. This pack also has lots of helpful resources that I use sometimes.
I would also recommend checking out these blogs for more resources: @/cc-source, @/itsphotoshop, @/completeresources
#i hope this helps you nonny and isn't too overwhelming!!#it just takes practice to get the hang of it!#also i'm glad you've only seen my last 3 because those are definitely my best ones lol#everything before that was more like an experiment gone wrong lol so you didn't miss much! i promise!#thank you again for your sweet words they really made my day :(((#anonymous#inbox 💌#pshelp#just gonna start that tag now even though i'm not anticipating getting many asks like this lol#and of course if this didn't answer some of your questions feel free to send another ask and i will try to help as much as i can!!!!!
6 notes
·
View notes
Note
hi I don't know whether it's offensive to ask this (please don't be offended) but may I please know how did you create this masterpiece? The PSD is so stunning I need to know. the post: sulli-at-the-boucheron-pop-up-store-launch
sorry this took so long to answer, and you are no bother, i love when people ask me about my psds! unfortunately i didn’t save that particular psd, but i tried recreating it here:


original post | download link
adjustments will be needed depending on the source material, but this should be a good base psd. feel free to pm me again if you have further questions!
pls like or reblog if saving ♡
79 notes
·
View notes
Last Seen Blogs

too-many-scorpions
I do music

morgu3-bun1
bunny

egeningercekleri
Ege Üniversitesi Gerçekleri

nayo-niya
海辺に佇むカプリース

wonhoslovr-remade
lean on me