#usb-a design socket
Explore tagged Tumblr posts
Visit Tumblr Blog
Explore Tumblr blogs with no restrictions, modern design and the best experience.
Last Seen Tumblr Blogs


Fun Fact
25% of US internet users with an annual income of $80-100K use Tumblr.
Text
Understanding the technical characteristics of an electrical socket
In a previous article, our detailed guide helped you choose the electrical socket best suited to your functional and aesthetic needs. Whether they are conventional sockets, USB sockets or RJ45 sockets, they are all designed according to strict standards that are essential for them to work properly. To make the right choice, it’s also crucial to understand the technical specifications to ensure…
#20A electrical socket#32A electrical socket#domestic electrical outlet#electrical socket#electrical socket earth#faceplate design socket#faceplate socket design#plug mechanism#rj45 socket design#safety standards electrical socket#technical characteristics socket#usb-a design socket#usb-c design socket
0 notes
Text
ok i had to do one more ultra-specific british train meme. i'm sorry

#personal crap#no one who sees this is going to understand and i apologise for that but these things Suck#if you want to go anywhere northwest of where i live you have to take either these or the class 158s which are even older#but the thing i hate about these fuckers is they don't have ANY plug sockets ever#the 158s are older than me and my older brother and they have fucking plug sockets and even usb ports!#also class 170s are almost as much a bunch of rickety loud fuckers as those are anyway#the virgin class 158s and 170s vs the chad flirts basically#what i find funny is my friend really hates the class 700s bc he thinks they're too uncomfortable and badly designed#he doesn't know my extremely specific pain#don't mind me it's nearly 1am and i am bitching about trains in this hell country
7 notes
·
View notes
Text
Going to be out of action for a little while...
Sul Sul, so I wanted to redecorate my room and it has turned into a MUCH bigger project than I thought it was going to be! If you want some more details, plans etc, it is all under the cut.
But for now, my room went from this (this is from when it was first built so no skirting boards on it just yet)... to its current state;
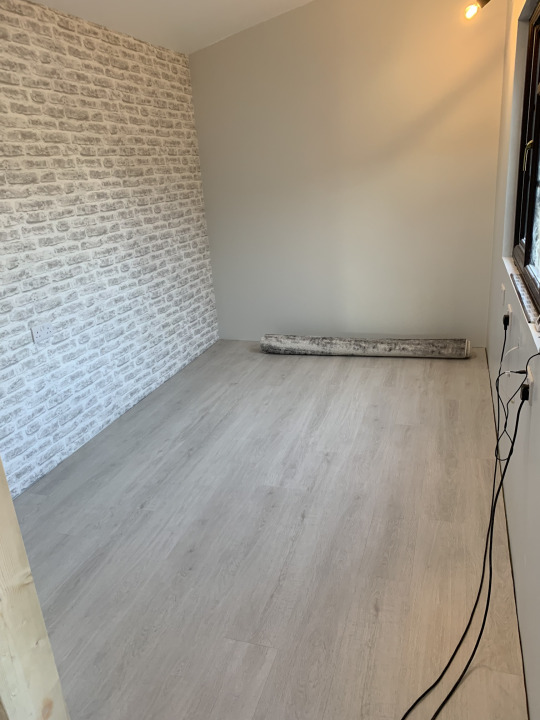

Side note; I know that there was nothing really wrong with how my room was, but after 5 years I wanted a change.
The plan;
So before I had my wardrobe, desk and bed all in a line along the "brick wall" and a desk of drawers on the opposite wall behind the desk. I had space but I felt a bit squeezed in, and my bed could only be accessed via one side. Sims 2 pic for reference - note furniture and room scale is not the same as IRL obviously, but these were the vibes.

Why did I ripped the walls off;
So my new plan is to have built in wardrobes / drawers either side of the bed and shelving on top (see image below). Majority of my sockets (3 double USB but only the older USB) were on the wall with the window (originally I wanted the sockets there for my comp and all its bits, but hated it there) and 1 double socket on the brick wall. The light switch was also on the wall next to the window, so you have to walk past the door to switch it on... a minor inconvenience.
The plan is to have 2 double sockets with both USB C and A above the bed and two on the wall with the door on it, again with USB C and A for my desk area. There will be a light switch for the ceiling lights on both these walls - so I can be lazy and turn it on / off whilst in bed ahaha! It will also be on a dimmer.
ATM there is no ceiling lights, only two wall lights, now that is fine but since I am redoing the whole room I always wondered what it would be like to add ceiling lights, so yes, the wall lights are being removed and 4 spotlights are being added.
The desk will now be on the wall with the door, this leaves way more space behind the chair.
So to answer why I ripped the walls down, it was so that I can rewire my whole room and make it simpler for the electricians. I didn't want patch work and I wanted seamless lines on my walls. I also wanted to know what was behind my walls (I blame the autism) so now I know where my timbers are, where my wires will be, and I always wondered if my room had insulation everywhere; turns out it didn't in some spots / or very thin insulation. So explains why I was very cold this winter and needed a hot water bottle ahaha.
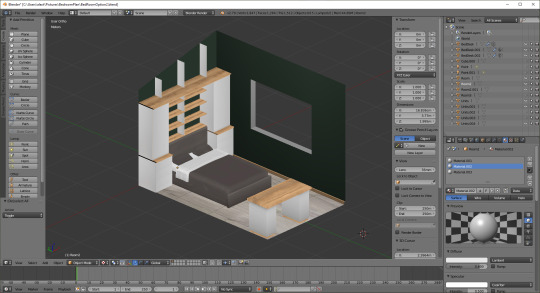
The info on the built in;
I am custom making the built in, I tried using the IKEA and other room builders but I couldn't configure something I liked, or wanted for my space. So I changed measurements in blender to match my room, and viola; I have my plan;

Swatches / design elements;

The white is just a white matt, and the wood details will be Baroque Gold Oak. ATM my desk is not part of the reno so will be using my black standing desk but with the top in this same wood.
This will be my new bed frame;

Walls - I am going dark, mainly because I had such a light bedroom prior so I thought I would mix it up, it took me a little while to decide, but fundamentally I went for a dark green. (ballina)

Floors;
So I will not being the floors at this time, as I would like to have lovely oak flooring throughout my whole downstairs, so when I do that I will redo my rooms floor then so its all matching. I did not want the expense of the flooring as well as the whole room! But nothing a big rug cant hide!
I will update as I can! Peace out!
Extra bonus images - I threw together a foam version of my built in... and taped my walls to figure out sizing (you can see how little space I had for my bed and probably now see why I want access all around.


88 notes
·
View notes
Text
American education has all the downsides of standardization, none of the upsides

Catch me in Miami! I'll be at Books and Books in Coral Gables on Jan 22 at 8PM.

We moved to America in 2015, in time for my kid to start third grade. Now she's a year away from graduating high school (!) and I've had a front-row seat for the US K-12 system in a district rated as one of the best in the country. There were ups and downs, but high school has been a monster.
We're a decade and a half into the "common core" experiment in educational standardization. The majority of the country has now signed up to a standardized and rigid curriculum that treats overworked teachers as untrustworthy slackers who need to be disciplined by measuring their output through standard lessons and evaluations:
https://en.wikipedia.org/wiki/Common_Core
This system is rigid enough, but it gets even worse at the secondary level, especially when combined with the Advanced Placement (AP) courses, which adds another layer of inflexible benchmarks to the highest-stakes, most anxiety-provoking classes in the system:
https://en.wikipedia.org/wiki/Advanced_Placement
It is a system singularly lacking in grace. Ironically, this unforgiving system was sold as a way of correcting the injustice at the heart of the US public education system, which funds schools based on local taxation. That means that rich neighborhoods have better funded schools. Rather than equalizing public educational funding, the standardizers promised to ensure the quality of instruction at the worst-funded schools by measuring the educational outcomes with standard tools.
But the joke's on the middle-class families who backed standardized instruction over standardized funding. Their own kids need slack as much as anyone's, and a system that promises to put the nation's kids through the same benchmarks on the same timetable is bad for everyone:
https://pluralistic.net/2021/11/28/give-me-slack-2/
Undoing this is above my pay-grade. I've already got more causes to crusade on than I have time for. But there is a piece of tantalyzingly low-hanging fruit that is dangling right there, and even though I'm not gonna pick it, I can't get it out of my head, so I figured I'd write about it and hope I can lazyweb it into existence.
The thing is, there's a reason that standardization takes hold in so many domains. Agreeing on a common standard enables collaboration by many entities without any need for explicit agreements or coordination. The existence of the ANSI/SAE J563 standard automobile auxiliary power outlet (AKA "car cigarette lighter") didn't just allow many manufacturers to make replacement lighter plugs. The existence of a standardized receptacle delivering standardized voltage to standardized contacts let all kinds of gadgets be designed to fit in that socket.
Standards crystallize the space of all possible ways of solving a problem into a range of solutions. This inevitably has a downside, because the standardized range might not be optimal for all applications. Think of the EU's requirement for USB-C charger tips on all devices. There's a lot of reasons that manufacturers prefer different charger tips for different gadgets. Some of those reasons are bad (gouging you on replacement chargers), but some are good (unique form-factor, specific smart-charging needs). USB-C is a very flexible standard (indeed, it's so flexible that some people complain that it's not a standard at all!) but there are some applications where the optimal solution is outside its parameters.
And still, I think that the standardization on USB-C is a force for good. I have drawers full of gadgets that need proprietary charger tips, and other drawers full of chargers with proprietary tips, and damned if I can make half of them match up. We've continued our pandemic lockdown tradition of my wife cutting my hair in the back yard, and just tracking the three different charger tips for the three clippers she uses is an ongoing source of frustration. I'd happily trade slightly sub-optimal charging for just being able to plug any of those clippers into the same cable I charge my headphones, phone, tablet and laptop on.
The standardization of American education has produced all the downsides of standardization – a rigid, often suboptimal, one-size-fits-all system – without the benefits. With teachers across America teaching in lockstep, often from the same set texts (especially in the AP courses), there's a massive opportunity for a commons to go with the common core.
For example, the AP English and History classes my kid takes use standard texts that are often centuries old and hard to puzzle out. I watched my kid struggle with texts for learning about "persuasive rhetoric" like 17th century pamphlets that inspired anti-indigenous pogroms with fictional accounts of "Indian atrocities."
It's good for American schoolkids to learn about the use of these blood libels to excuse genocide, but these pamphlets are a slog. Even with glossaries in the textbooks, it's a slow, word-by-word matter to parse these out. I can't imagine anyone learning a single thing about how speech persuades people just by reading that text.
But there's nothing in the standardized curriculum that prevents teachers from adding more texts to the unit. We live in an unfortunate golden age for persuasive texts that inspire terrible deeds – for example, kids could also read core Pizzagate texts and connect the guy who shot up the pizza parlor to the racists who formed a 17th century lynchmob.
But teachers are incredibly time-constrained. For one thing, at least a third of the AP classroom time seems to be taken up with detailed instructions for writing stilted, stylized "essays" for the AP tests (these are terrible writing, but they're easy to grade in a standardized way).
That's where standardization could actually deliver some benefits. If just one teacher could produce some supplemental materials and accompanying curriculum, the existence of standards means that every other teacher could use it. What's more, any adaptations that teachers make to that unit to make them suited to their kids would also work for the other teachers in the USA. And because the instruction is so rigidly standardized, all of these materials could be keyed to metadata that precisely identified the units they belonged to.
The closest thing we have to this are "marketplaces" where teachers can sell each other their supplementary materials. As far as I can tell, the only people making real money from these marketplaces are the grifters who built them and convinced teachers to paywall the instructional materials that could otherwise form a commons.
Like I said, I've got a completely overfull plate, but if I found myself at loose ends, trying to find a project to devote the rest of my life to, I'd be pitching funders on building a national, open access portal to build an educational commons.
It may be a lot to expect teachers to master the intricacies of peer-based co-production tools like Git, but there's already a system like this that K-8 teachers across the country have mastered: Scratch. Scratch is a graphic programming environment for kids, and starting with 2019's Scratch 3.0, the primary way to access it is via an in-browser version that's hosted at scratch.mit.edu.
Scratch's online version is basically a kid- (and teacher-)friendly version of Github. Find a project you like, make a copy in your own workspace, and then mod it to suit your own needs. The system keeps track of the lineage of different projects and makes it easy for Scratch users to find, adapt, and share their own projects. The wild popularity of this system tells us that this model for a managed digital commons for an educational audience is eminently achievable.
So when students are being asked to study the rhythm of text by counting the numbers of words in the sentences of important speeches, they could supplement that very boring exercise by listening to and analyzing contemporary election speeches, or rap lyrics, or viral influencer videos. Different teachers could fork these units to swap in locally appropriate comparitors – and so could students!
Students could be given extra credit for identifying additional materials that slot into existing curricular projects – Tiktok videos, new chart-topping songs, passages from hot YA novels. These, too, could go into the commons.
This would enlist students in developing and thinking critically about their curriculum, whereas today, these activities are often off-limits to students. For example, my kid's math teachers don't hand back their quizzes after they're graded. The teachers only have one set of quizzes per unit, and letting the kids hold onto them would leak an answer-key for the next batch of test-takers.
I can't imagine learning math this way. "You got three questions wrong but I won't let you see them" is no way to help a student focus on the right areas to improve their understanding.
But there's no reason that math teachers in a commons built around the (unfortunately) rigid procession of concepts and testing couldn't generate procedural quizzes, specified with a simple programming language. These tests could even be automatically graded, and produce classroom stats on which concepts the whole class is struggling with. Each quiz would be different, but cover the same ground.
When I help my kid with her homework, we often find disorganized and scattered elements of this system – a teacher might post extensive notes on teaching a specific unit. A publisher might produce a classroom guide that connects a book to specific parts of the common core. But these are scattered across the web, and they aren't keyed to the specific, standard components of common core and AP.
This is a standardized system that is all costs, no benefits. It has no "architecture of participation" that lets teachers, students, parents, practitioners and even commercial publishers collaborate to produce a commons that all may share and improve upon.
In an ideal world, we'd get rid of standardization in education, pay teachers well, give them the additional time they needed to prepare exciting and relevant curriculum, and fund all our schools based on need, not parents' income.
But in the meanwhile, we could be making lemonade of out lemons. If we're going to have standardization, we should at least have the collaboration standards enable.

I'm Kickstarting the audiobook for The Bezzle, the sequel to Red Team Blues, narrated by @wilwheaton! You can pre-order the audiobook and ebook, DRM free, as well as the hardcover, signed or unsigned. There's also bundles with Red Team Blues in ebook, audio or paperback.
If you'd like an essay-formatted version of this post to read or share, here's a link to it on pluralistic.net, my surveillance-free, ad-free, tracker-free blog:
https://pluralistic.net/2024/01/16/flexibility-in-the-margins/#a-commons
504 notes
·
View notes
Note
For Cassie, do any of the stuff she had back in the Pizzaplex still have a use for her in the Playtime caves?
What tools does she add to her arsenal?
Should we assume that the underground part of Playtime is so large that parts of it can plausibly be underneath a mall kilometers away?
Answering your last question first, I'd say yes. Which probably would help make sense how an elevator from the underbelly of the PizzaPlex can crash-land through the cavern into the Prison or the Mining area of Playtime Factory, when the top surface locations of both business being not even remotely close to one another. Even though the whole thing still sounds kind of silly.
As for Cassie's arsenal, she certainly would still have everything she had in the PizzaPlex minus the AR collectibles. The problem is that initially none of those tools are compatible with Playtime Co. tech and machinery, not to mention the complete lack of a V.A.N.N.I network (and thus, Helpi is also offline.)
But with how intuitive Cassie was with those tools back in RUIN, on top of being daughter of a technician, she certainly would be able to eventually circumvent the incompatibility and make modifications/adaptations to make her tools functional again, with the addition of a few cables and stuff to help make those possible.
At the beginning she'd only have her Faz-Wrench with very limited use, as I headcanon it can also work as a taser (it is kinda shaped like one when you think about it too, doesn't it?) which is a decent help for defense. it'd require modifications for any of its hacking properties though- which might be possible already in design (if you inspect the 3d model of the Faz-Wrench you can see input sockets for cables like USBs.) One of its prongs got slightly bent in the elevator drop, but that's an easy fix (easy but still needing delicacy in handling.) With enough adaptations, it could be very useful to help troubleshoot and maintain some machines like Safe Haven's generator.
The VANNI mask is as good as a cheap Halloween mask at first. But if Cassie manages to restore functionality to it without the network, it'd essentially work on its own grid, and be used as a neural-based controller for other devices if Cassie wears it. There's no "AR world" or VANNI network in Playtime Co. though, so it can't quite work the exact same way as it did back in the PizzaPlex... but with it she can see through walls! And now there's no M.X.E.S. limiting her time to use it meaning it's relatively safer to wear (though I imagine seeing through walls for too long in a row could cause a sensory overload perhaps? Hm, that would have to be a togglable property.) The mask would also make Cassie invisible to The Doctor just as it did for the Glamrock Endos and Ruined Glamrocks (but back then that was just trading them for M.X.E.S.) The Doctor sees "everything", but it's always through technology like cameras and monitors, things susceptible to the mask's interference, since he no longer has his organic eyeballs. Along with the see-through-walls property, I imagine Cassie MAYBE also developing other vision modes like infrared, night vision, heat vision, etc. Hell, if she gets one of those gas masks Playtime Employees would wear, she could use it to further upgrade the VANNI mask to also double as a gas mask to keep her safe from the red smoke. And perhaps restore its ability to run simulations too, like the one we see in the Brazil Ending... so long Cassie doesn't get too lost in her own memories and lose touch with reality- but current friends like Doey would be great anchors to help prevent that.
Flashlight? Broke. Busted in the elevator fall. RIP.
The Roxy-talky technically would already be usable, but it'd run in a frequency that doesn't match Playtime Co. communication-- Com'on, of course Fazbear Entertainment would design those things that way to force customers into buying more of their own mascot-talkies, rather than have them work with any other walky-talkies. Greedy corp shitty designs, amirite? Other walky-talkies would have to be manually recalibrated to run on the same frequency the Roxy-talky does in order to communicate with it. Sounds like a hassle, but would allow for a safe isolated communication line if you get what I mean.
Once Cassie is more recovered from her injuries, I think Doey would get her a GrabPack with a few hands- not that he'd expect anything from her, but if you don't have one you're very limited in what you can do there. And boy, that girl would overhaul that shit over time, especially when combining it with her own tools already. Connecting the mask to it as a neural controller would let her control the GrabPack with pretty much just her brain so her actual hands remain free. Controlling the GrabPack that way would also increase the dexterity of the hands meaning they're a lot more posable with a wider-range of movement (picture Cassie shooting a hand out towards Player/Employee only for it to stop inches away from their face with the middle finger up. Admit it WE all wished we could do that with those hands DONT LIE LOL.)
And that's not mentioning the hypothetical scenario of Doey and perhaps the more capable toys of Safe Haven hunting The Doctor's automatons for sport for parts. Who freaking knows what else Cassie could add to her arsenal with such resources.
At this point, she DREADS the possibility of being limited and unable to help those left that she holds close like it happened in the PizzaPlex, so she really would start applying herself, especially technologically, for her toy friends in Safe Haven. She learned in the PizzaPlex, and would vow to do better for Safe Haven.
#ppt#poppy playtime#doey the doughman#doctor harley sawyer#fnaf sb ruin#cassie#anon#anonymous#jellycream answers#oh sHIT this got way longer than i thought. oopsies?#the mental image of cassie using parts of the doctors automatons to make a gIANT CLAW like scrap baby's tho...#girl deserves it. shes earned it even#playdough and glitter au
48 notes
·
View notes
Text

Fruit Jam RP2350B credit-card mini computer with all the fixin's 🍓🍇💾
We were catching up on a recent Hackaday hackchat with Eben Upton (https://hackaday.io/event/202122-raspberry-pi-hack-chat-with-eben-upton) and learned some fun facts: such as the DVI hack for the RP2040 was inspired by a device called the IchigoJam (https://www.hackster.io/news/ichigojam-combines-strawberry-and-raspberry-to-deliver-a-raspberry-pi-pico-powered-educational-micro-66aa5d2f6eec). We remember reading about this back when it was an LPC1114, now it uses an RP2040. Well, we're wrapping up the Metro RP2350 (https://www.adafruit.com/product/6003), and lately, we've been joking around that with DVI output and USB Host support via bit-banged PIO, you could sorta build a little stand-alone computer. Well, one pear-green-tea-fueled-afternoon later we tried our hand at designing a 'credit card sized' computer - that's 3.375" x 2.125", about the same size as a business card (https://hackaday.com/2024/05/07/the-2024-business-card-challenge-starts-now/) and turns out there's even a standard named for it: ISO/IEC 7810 ID-1 (https://www.iso.org/standard/70483.html).
Anyhow, with the extra pins of the QFN-80 RP2350B, we're able to jam a ridonkulous amount of hardware into this shape: RP2350B dual 150MHz Cortex M33 w/ PicoProbe debug port, 16 MB Flash + 8 MB PSRAM, USB type C for bootloading/USB client, Micro SD card with SPI or SDIO, DVI output on the HSTX port, I2S stereo headphone + mono speaker via the TLV320DAC3100 (https://www.digikey.com/en/products/detail/texas-instruments/tlv320dac3100irhbt/2353656), 2-port USB type A hub for both keyboard and mouse or game controllers, chunky on-off switch, Stemma QT I2C + Stemma classic JST 3-pin, EYESPI for TFT displays, 5x NeoPixels, 3x tactile switches, and a 16-pin socket header with 10 A/D GPIO + 5V/3V/GND power pins. The PSRAM will help when we want to do things like run emulations that we need to store in fast RAM access, and it will also let us use the main SRAM as the DVI video buffer.
When we get the PCBs back and assembled, what should we try running on this hardware? We're pretty sure it can run DOOM. Should that be first? :) We also need a name. Right now, we're just calling it Fruit Jam since it's inspired by the IchigoJam project.
#fruitjam#rp2350b#raspberrypi#microcomputer#hackaday#diyelectronics#retrocomputing#creditcardpc#hardwarehacking#usbhost#dvioutput#psram#retrogaming#makercommunity#opensourcehardware#homemadecomputer#minipc#embeddeddevelopment#techinnovation#electronicsproject#tinkering#cortexm33#doomport#custompcb#hacktheplanet#hardwaredesign#diytech#retroconsole#handheldgaming#fruitjampc
34 notes
·
View notes
Text
I bought an 8bitdo Retro mechanical keyboard!

(Picture not mine, source from PC World.)
I wanted a plastic keyboard, I really do not actually use the knob on a Keychron board I have, it still comes in a scooped keycap profile, and it has a companion numpad with a calculator built in. Win/win/win!
This keyboard comes in four designs (not colorways, full designs) themed after the NES, the Famicom, the IBM Model M, and the Commodore 64 keyboard. The NES keycaps have multiple different fonts on them, the Famicom keycaps have Japanese sublegends, the Model M keycaps have a mock stepped Caps Lock key, and the Commodore 64 keycaps are an apparently off-the-shelf SA set from one of many, many, many keycap companies floating around China (I recognize their font and profile shape from Akko ASA keycaps and numerous other scooped profile keycap sets you can have cheaply off of Aliexpress and Amazon. Do check those out, genuinely, you'd struggle to find a bad scooped keycap set these days and I love scooped profiles over Cherry and OEM.)
The build quality of the actual keyboard itself is good, feels like a very similar plastic blend to what 8bitdo uses for its controllers like their Pro 2. Stabilizers are smooth and don't rattle, the legends on the keycaps are reasonably sharp and in NES-appropriate font, the keycaps themselves are MDA profile (I would prefer SA, but beggars can't be choosers) and are somewhat thin but still good quality, dye-sublimated PBT, no warp on the spacebar. Arrow keys are a separate color from the two tones that make up the main keycap set and made to resemble a d-pad. The keyboard itself is somewhat light, but my perception is skewed from using a metal keyboard for a long time, and this is after all a plastic shell, top-mounted keyboard. Even so I think I'll probably end up cracking open the keyboard and putting in some liquid silicone as noise-dampening and additional weight.
Two knobs control both wireless functionality and computer software volume, the wireless knob is heavy with only three options while the volume one is light with many individual steps. The volume knob can be somewhat unresponsive on individual steps. Bluetooth is very responsive and wants to pair with my computer the moment it's flicked over to, and 2.4ghz wireless comes with a receiver that slots into the back of the keyboard magnetically for storage. A power light on the right of the keyboard mimics the NES power light and pulses while charging, is steady while using wireless or when fully charged and connected over USB.
The underlying PCB is south-facing hotswap sockets (who the hell cares their orientation, this only matters for lighting, which this keyboard doesn't have). By default the keyboard comes with Kailh box whites, a very light clicky switch. I yanked them out immediately and put Boba U4T tactiles in because they're the king of all switches. They thunk nicely in this chassis, the Kailh whites weren't slouches either, they did pick a good stock choice for switch without resorting to Gateron or Outemu blue horseshit.
The NES version of the keyboard came with a two-button macro pad that hooks over TRRS cable (you recognize it as a 3.5mm jack or headphone cable) to one of four ports on the top-right of the keyboard. These are essentially just two keyboard switches with giant keycaps on a separate board and the buttons are populated by Gateron greens. The switches are nowhere close to heavy enough to approximate a button, and I gave them Kailh box navies. Still not enough, but better.
These keyboards also come wiiiiiith a companion number pad!

(Picture credit the 8bitdo store.)
While I don't actually have this one in hand just yet I do have it on order. It looks like it'll be about the same build quality as the main keyboard, and it caught my eye for four reasons and ended up making me purchase the full set as a result:
The numpad has a built in calculator.
Same aesthetic choices as the main keyboard (NES, Famicom, IBM Model M, Commodore 64)
Magnetically attaches to the right side of the keyboard to transform it into a more era appropriate full-size.
Far and away the cheapest wireless mechanical numpad with calculator on the market, sitting at $45.
An important note though is that the Famicom and NES keypads don't attach to their respective keyboards, simply because their respective keyboards don't have magnets inside the sides of the chassis to allow for it. I have some cheap button magnets laying around that I'll use for this purpose and probably see if they're strong enough to be placed on the inside of the board and allow for the numpad to connect to it. I also imagine there's going to be a repop or v2 of this keyboard in the future that has this done already, seeing as the Commodore 64 version of the board and I believe the Model M version of the board already have that.
I'll reblog this and give some actual definitive thoughts on the numpad once it's in my hands.
As far as the board itself is concerned, I quite like it. The keycap profile is agreeable, the nostalgia pandering targeted me with laser precision, the board sounds quite good acoustically (especially for being a top-mount keyboard!) and it has a volume knob I'll see if I can reprogram some day. While I normally hate TKL layouts, I'm putting up with it because it will eventually be a fullsize with the numpad. Worth $150 total? Don't know, can't answer that for you, it's worth it to me but I very specifically wanted a keyboard themed after an old Nintendo console with no setup required and no chasing down or commissioning GMK keycap sets. I also wanted a calculator numpad.
#look at my flop reviews boy#mechanical keyboards#keyboards#mechanical keyboard#keyboard#tech#gadgets#computers#nintendo#NES#nintendo entertainment system
47 notes
·
View notes
Video
youtube
Stay Charged Anywhere: The Ultimate 20000mAh Power Bank with Digital Display
Tired of your phone dying during travel, work, or adventures? Meet the Digital Display Power Bank—your new on-the-go lifesaver. With a massive 20,000mAh polymer battery, built-in USB-C, Lightning, and Android cables, this portable charger keeps all your gadgets juiced up without the cable clutter.
Why This Power Bank is a Game-Changer?
See Your Battery Life: The LED digital screen shows exactly how much juice is left—no guessing games!
Charge 5 Devices at Once: Use the USB-A, Micro-USB, Type-C, and built-in cables to power phones, tablets, cameras, and even small lights. Perfect for group trips or multitaskers.
2.1A Fast Charging: Say goodbye to sluggish charging. This powerhouse refills your devices quickly, so you’re back to 100% in no time.
Travel-Ready Design: Compact (5.5” x 2.7” x 1.2”) and lightweight, it slips into any bag. Plus, it works with USA, EU, UK, and Aussie sockets—ideal for globetrotters.
Built to Last (and Protect) Safety first! Certified by CE, FCC, and RoHS, this charger guards against overheating, overcharging, and short circuits. The rugged ABS+PC shell survives drops, spills, and daily wear. Choose classic black, red, blue, or even customize the color to match your style.
Who Needs This? Travelers: No more hunting for outlets in airports. Outdoor Enthusiasts: Keep your GPS, phone, and flashlight charged during hikes or camping. Busy Pros: Power through back-to-back meetings without battery anxiety.
Final conlusaction This isn’t just a power bank—it’s a must-have tech essential for anyone who hates being tethered to a wall. With its huge capacity, smart features, and travel-friendly design, you’ll wonder how you ever lived without it.
#PowerBank #FastCharging #StayConnected #TechEssentials #OnTheGo #ChargeOnTheGo #HighCapacity
Grab yours at https://pse.is/7j7ryd today and never run out of power again!
#youtube#PowerBank FastCharging StayConnected OnTheGo TechGadgets MustHave PortableCharger TechAccessories StayCharged PowerUp BatteryLife USB-C LEDd
2 notes
·
View notes
Photo

MSI H610M-E PRO Intel LGA1700 M-ATX Motherboard MSI PRO series motherboards help users work smarter by delivering an efficient and productive experience. Featuring stable functionality and high-quality assembly, PRO series motherboards provide not only optimized professional workflows but also less troubleshooting and longevity. MSI motherboards feature tons of convenient and smart designs for DIY users, and countless system tuning and troubleshooting tools are at your disposal to push your system to new heights and satisfy even the most demanding tweaker. This makes it so easy to install your own motherboard without any issues. MSI motherboards let you manage speeds and temperatures for all your system and CPU fans. Total Fan Control allows you to check your primary system characteristics in a simplified graphical interface. You can also set up to 4 temperature targets for CPU and motherboard, which will adjust the fan speeds automatically. Detecting CPU & GPU temperatures and automatically adjusting fan duty of system fans to a proper value by adopting MSI AI ENGINE. The most important thing about DIY is expandability. MSI PRO series motherboards feature plenty of possibilities for prosumers’ needs. Stable LAN, faster storage and USB transfer speeds and other expandable connectors are ready to enlarge your flexibility. Stay connected with Intel® LAN, optimized for stable internet throughput and ideal for championship-level online playing. MSI PRO series motherboards are designed to satisfy any professional workflow. Elevate your listening pleasure and enjoy the extreme sound quality. Moreover, with years of experience in creating performance-enhancing tools that are easy to use, only the highest quality applications are at your disposal. The extensive features let you fine-tune your system to deliver reliable maximum performance. MSI lightning Gen 4 PCI-E is the latest and the fastest PCI-E data transfer solution with 64GB/s of transfer bandwidth that has doubled compared to its previous generation. PCIe 4.0 maintains both backward and forward compatibility with older and newer specifications. Optimized by steel armor design, your motherboards can support the weight of heavy graphics cards. MSI conducts thorough memory testing with the most popular memory brands under extreme conditions to ensure your system runs stable no matter what. Our memory partners include brands like Corsair, Crucial, Kingston, G.Skill and many more to optimize memory modules and configurations. Core Boost technology combines MSI’s premium layout and optimized power design which allows for faster and undistorted current delivery to the CPU at pin-point precision. Not only supporting multi-core CPU, also creating the perfect conditions for your CPU overclocking. FEATURES: Supports 12th Gen Intel® Core™, Pentium® Gold and Celeron® processors for LGA 1700 socket Supports DDR4 Memory, up to 3200(MAX) MHz Core Boost : With premium layout and digital power design to support more cores and provide better performance Memory Boost: Advanced technology to deliver pure data signals for the best performance, stability and compatibility Lightning Fast Experience: PCIe 4.0 Audio Boost: Reward your ears with studio grade sound quality Steel Armor: Protecting VGA cards against bending and EMI for better performance, stability and strength. SPECIFICATIONS: Socket: 1700 CPU Support: Supports 12th Gen Intel® Core™ Processors, Pentium® Gold and Celeron® Processors up to i9 Chipset: Intel® H610 Chipset DDR4 Memory: 3200(MAX) / 3000 / 2933 / 2800 / 2666 / 2400 / 2133 MHz Memory Channel: Dual Channel DIMM Slots: 2 Max Memory (GB): 64 PCI-E x16: 1 PCI-E x1: 1 SATAIII: 4 M.2 Slot: 1 TPM (Header): 1 LAN: 1x Realtek® RTL8111H Gigabit LAN controller USB 3.2 ports (Front): 2(Gen 1, Type A) USB 3.2 ports (Rear): 2(Gen 1, Type A) USB 2.0 ports (Front): 4 USB 2.0 ports (Rear): 4 Audio ports (Rear): Realtek® ALC897 Codec VGA: 1 HDMI: 1 DirectX: 12 Form Factor: mATX Operating System: Support for Windows® 11 64-bit and Windows® 10 64-bit WHAT’S IN THE BOX: MSI PRO H610M-E DDR4 Intel 1700 mATX Motherboard – Black x1 SATA Cables x2 EZ M.2 Clip x1 I/O Shield x1 Quick Install Guide x1
2 notes
·
View notes
Text
AFERIY P010 800W Portable Power Station Review
I have been looking at the AFERIY portable power station and waited until they are on discount. AFERIY P010 800W is one of the highest power output battery in the battery, and I do need this to power my camping kettle, coffee machine, fridge and a mini oven.
I ordered the battery together with a 200W solar panel as I know the sunshine in UK is not the most intense even in summer. I would need a higher power solar panel to take advantage of the free energy from not so optimum daylight.
The battery comes with 28% power and I immediately charged it from the wall socket using the power cable included in the package. It took about an hour to go up to 100% and I am very pleased.
There is a MC4 to XT60 cable for solar panel charging. I bought an solar panel extension cable with MC40 plugs at both end that connects to the integrated power cable that comes out from the solar panel. The other end of the extension cable is connected to the battery’s XT60 cable.
Today I place the solar panel in my garden and connect the cables to the battery input. The AC output is connected to a power extension lead socket bar which powers my 77” OLED TV, FireTV Cube, Echo Sub and a pair of Echo Studio speakers.

On an early June midday today in southeast U.K. , the solar panels fed average 135W power to the battery, while the TV and sound system power output was between 70W - 150W when a Netflix movie was streaming. The battery capacity drops very slowly to 95% in two hours. When I played Spotify on my TV, the capacity climbs back to 100% in an hour.

In a hot and bright summer day, I would expect a higher power generated by the solar panels. I am very pleased with the P010 battery so far. It should be noted that the high voltage and current that the electronics have to handle, careful handling of the battery is necessary particularly during powering up and down of the battery. No power plugs should be inserted or unplugged when the battery is inputting/outputting power.
At 6:00pm the solar panels are still producing > 100W. I do not have any problem with the noise of the cooling fan inside my living room. I have no doubt that the P010 battery will serve me well during my summer campings.
AFERIY P010 Battery
PROS:
800W (1600W surge), lightweight (6.5 kg), PD100W, PD20W, for USB-C and USB-A QC3.0 charging, relatively silent cooling fan.
CONS:
Plastic swinging cover for the power sockets feels flimsy and care should be taken not to break it. Don’t know why it’s designed to open from the bottom and swing up, which is prone to easily broken when accidentally hit upon, rather than swinging open from the top, so that the power cables are always on top to protect the cover.
200W Portable Solar Panel
PROS:
lightweight, contains USB-C and DC sockets for directly charging devices.
CONS:
Cables a bit short. MC4 to Anderson cable in the accessories is out of date technology. No variety of DC adaptor sockets like other brands of solar panels. The integrated supporting legs for the solar panels are a bit short and the tie back from the supports to the panel is too long. This restrains the angle of the panel to max. 40 degrees to the horizontal. Not good to better capture the last light from the setting sun.
#aferiy#aferiy portable power station#portable power station#power station#solar panels#solar energy#power station reviews
3 notes
·
View notes
Text
How to Charge Rose Toy Without a Charger?
In modern life, sex toys have become a part of many people's private lives, among which Rose Toy has attracted much attention due to its unique design and powerful functions. However, sometimes we may encounter situations where the charger is lost or damaged, and how to charge Rose Toy becomes a tricky problem. This article will detail several ways to charge Rose Toy without a charger to help you continue to enjoy the fun in an emergency.

Charge with USB power cable and computer
Prepare materials A USB-A to USB-Micro (or corresponding interface) charging cable (usually a mobile phone charging cable is sufficient) A computer or laptop with a USB port
Operation steps Check the interface: First confirm the type of charging interface of Rose Toy and make sure the charging cable you prepare matches the interface. Connect the device: Plug one end of the USB cable into the USB port of the computer and the other end into the charging port of Rose Toy. Turn on the computer: If the computer is not turned on, turn it on first to ensure that the USB port is working properly. Check the charging status: Some Rose Toys will have an indicator light when charging. Observe the indicator to confirm whether charging has started. Wait for charging to complete: Depending on the battery capacity of the Rose Toy and the power supply capacity of the computer's USB port, the charging time may vary. Generally speaking, a full charge may take several hours. Notes Make sure the computer is turned on, otherwise the USB port may not supply power. Avoid using Rose Toy during charging to avoid damaging the battery or device.
Charging with a mobile power bank
Prepare materials A mobile power bank with sufficient capacity A USB charging cable that matches the charging port of Rose Toy
Operation steps Confirm the interface: Same as the above method, first confirm that the charging cable matches the interface of Rose Toy. Connect the device: Plug one end of the USB cable into the output port of the mobile power bank and the other end into the charging port of Rose Toy. Turn on the power bank: Press the power button of the power bank to make sure it is in working condition. Check the charging status: Observe the indicator light of Rose Toy or the screen of the power bank to confirm whether charging has started. Wait for charging to complete: The charging time will vary depending on the output power of the power bank and the battery capacity of Rose Toy. Notes Choose a suitable power bank and ensure that its output power can meet the charging needs of Rose Toy. Avoid charging Rose Toy when the power bank is low on power to avoid affecting the charging effect.
Charge with other USB devices
In addition to computers and power banks, you can also try to charge Rose Toy with other devices with USB interfaces, such as car chargers, USB sockets, etc. The operation methods of these devices are similar to the above-mentioned USB power cord and computer charging methods. Just connect the USB cable to the corresponding interface.
Charging precautions
Safety first: Before trying any charging method, be sure to ensure safe operation. Avoid using unmatched chargers or charging cables to avoid damage to the device or personal injury. Check the instructions: Please read the Rose Toy product manual carefully before charging or consult the manufacturer's customer service to understand the charging requirements and precautions. Avoid overcharging: Although most modern charging devices have overcharge protection, long-term overcharging may still cause damage to the battery. Therefore, it is recommended to unplug the charger in time after the battery is fully charged. Keep dry: During the charging process, please make sure that Rose Toy and the charging device are in a dry state to avoid dangerous situations such as short circuit or electric shock. Store properly: After charging, please store Rose Toy in a cool and dry place to avoid direct sunlight and high temperature environment to extend its service life.
Conclusion
Although charging Rose Toy without a charger may cause some inconvenience, through the above creative solutions and daily charging and maintenance suggestions, we can still ensure the normal use of the device and extend its service life. While enjoying the fun brought by technology, we should also pay attention to the care and maintenance of the equipment so that they can serve us better. I hope this article can provide you with valuable reference and help!
3 notes
·
View notes
Text
COB Rechargeable LED Light 10w
We are thrilled to unveil our latest innovation in lighting technology - COB Rechargeable LED Light 10W. Designed for both efficiency and durability, this Rechargeable LED light is a innovative for professionals across various industries. Perfect for professionals in construction, automotive, emergency services, and outdoor activities, this light guarantees reliability when you need it the most.
Key Features:
10w Super Bright LED Light: With a 10W LED, it offers an impressive 750 lumens of output. The LED is designed to emit a high level of brightness, making it ideal for environments where strong, clear illumination is required. Illuminating your workspace like never before.
USB Charging Outlet: The light comes with a built-in USB charging outlet. This means it can be easily charged using a standard USB cable connected to any compatible USB port. This feature adds convenience and flexibility to recharging the light, making it suitable for use in various settings and situations.
Durable HD Housing: "HD" here likely refers to high-density, indicating that the housing of the light is made from a high-density material. This suggests that the light is robust, able to withstand impacts, and is resistant to wear and tear. The durable housing ensures the longevity of the light even in demanding environments or in case of accidental drops or knocks.
13A Charger and 12v Car Adaptor: This feature implies that the light comes with two charging options. A 13A charger suggests a standard mains electricity charger, suitable for plugging into regular wall sockets. The 12v car adaptor means it can also be charged using a vehicle's 12-volt power outlet (cigarette lighter socket). This dual charging capability enhances the light’s portability and usability, especially for professionals who need to charge the light on the move.
🛒 Explore more at: COB Rechargeable LED Light 10w

#connexionelectrical#coblight#rechargeablelight#10wLEDlight#LEDlight#LightingInnovation#LEDTechnology#ProfessionalLighting#EnergyEfficient
2 notes
·
View notes
Text
How to Setup Cricut Design Space on Computers and Mobiles?

Whether you want to know how to setup Cricut Design Space or Cricut machine, both are similar questions, so don’t get confused between them. Since the Cricut software plays a vital role in setting up Cricut, it is a must-have on your device. Anyway, my main purpose in writing this blog is to show you how to setup a Cricut machine on various devices, such as Mac, Windows, Android, or iOS.
If you are ready with your new Cricut product, let’s start delving into the world of Cricut. You will learn to setup Cricut in no time. Let’s get started!
How to Setup Cricut Design Space on a Computer?
As I have already cleared above, whether you are setting up the Cricut software or the Cricut machine is. Both are the same, as you need both of them to setup the machine. In it, you will learn how to setup a Cricut machine on Mac and Windows. The steps are the same for both computers. Without further delay, let’s get into the first step.
Step 1: Unbox the Cricut Machine
The Cricut setup is all about setting up a new machine. But you might have bought a new machine so you need to unbox it.
Once you unbox the machine, you have to take out all the accessories that come along with it. Inside this box, I got a Cricut Explore Air 2 with some other instructional manuals and accessories.
Step 2: Open Your Cricut Cutting Machine
After unboxing, you should place your Cricut machine on a flat surface, such as a table. Ensure the distance between your Cricut and computer is not more than 15 feet. Now, I will show you how to open the machine. To open your Cricut Explore Air 2, you just need to press the Open button on the left side of your machine. However, if you are using a Maker, then lift the top lid.
Remember, you don’t need to pull the door. You let it open slowly on its own. Once it is open, you have to move to the next steps.
Step 3: Turn On the Cricut Machine
Next, it’s time to power on the machine. Take the power cord that came with your machine and plug it into the power socket. And the other end goes into the machine. After that, you don’t need to turn it on. Wait for some time; we will switch it on a bit later.
Step 4: Download & Install the Cricut App
Here comes the exciting part: we are finally going to set it up. The setup starts after downloading and installing the software. To download the app, you should visit cricut.com/setup. After downloading, install the app and open it on your device.
Step 5: Log in to Your Cricut Account
Then, the app is opened on your desktop. You have to sign in using your Cricut ID and password. If you don’t have any, then create an account. Also, you need to proceed to the next step, where you will learn how to setup Cricut Design Space.
Step 6: Complete the Cricut Setup
You might have logged in to your Cricut account login by now. As soon as you are done with your account setup, the next screen will guide you through three prompts to setup your machine. These prompts are as follows:
a. Prepare Your Workspace
In it, you have to place your machine in an appropriate place. I have already covered this in the first step above.
b. Plug in and Power on Your Cricut Machine
We have already done this, too. To do this, just power on your machine by pressing the power button.
c. Connect via a USB Cable or Bluetooth
Now, you have to connect your Cricut machine via Bluetooth or a USB cable. Choose what suits you the best. Finally, after connecting it to the computer, you will be redirected to perform a test cut. Do it, and your Cricut setup will be done! 😍
How to Setup Cricut Design Space on Mobile Devices?
If you are an Android or iOS user, don’t worry. You can easily setup your Cricut using your smartphone, too. However, the first three steps that I have explained above are the same for mobile devices; once done, you can proceed with the steps below:
Connect your Cricut product using a wireless Bluetooth connection.
After pairing your device, go to the Play Store or App Store on your device.
And then search for the Cricut Design Space.
Hit the Install on an Android device and Get on an iOS device to download the app.
After installation of the software, create your Cricut ID or simply log in if you have an account.
Finally, you have learned how to setup Cricut Design Space on your mobile design.
FAQs
How do I install Cricut Design Space on my PC?
To install Cricut app, you will need to follow the steps below:
Open the internet browser on your computer and go to the design.cricut.com.
Now, you will need to download the Cricut Design Space app.
After that, select the Download button and move ahead to download.
Then, go to the file folder where you have downloaded your file.
To open the file, you have to double-click on it.
Lastly, follow the directions to install the app.
What can I do with my Cricut Design Space?
The Cricut Design app can help you set up your Cricut machine. This software connects your machine to your computer or mobile device. So, ensure you have used the right or compatible device with the Cricut software. Plus, you can use this app to make amazing designs, accessing thousands of free resources, including ready-made projects, images, and fonts.
Can I use my Cricut machine without the Cricut app?
No, you cannot use or run the Cricut machine without using the Cricut software. However, the software helps you connect the machine, create a design, and send it to the machine. Without this software, you can’t make a single cut on your material. Hence, the Cricut app is a must for using the Cricut machine.
Source: How to Setup Cricut Design Space
#setup cricut design space#How to Setup Cricut Design Space#cricut design space download#cricut design space login#cricut design space app#cricut design space software#cricut machine setup#cricut software app
1 note
·
View note
Text
Don't get me started.
Enforcing standards is a pain in the ass, there's a lot of bureaucratic back-and-forth, sneaky corporate lobbying and outright half-assing of things, and the older the tech you want to standardize, the more of it happens.
Remember how Apple repeatedly came up with their own bullshit over the last four decades and it took a serious organization of major industrialized nations to force them to play along? As in, the European Union, their WEEE directive and standardization mandate on universal USB chargers. And that's what, a decade or two of the whole wireless, portable, rechargeable stuff? In the globalization era, no less?
Now, take a look at the entire Wikipedia page on plugs and sockets. You're about to witness some serious bullshit. Like, every-man-for-himself bullshit dating back over a century. What is now the European Union runs on no less than three different models of plugs and sockets, and that's before looking at how they're wired. You have the mostly compatible German and French standards, with a lot of heavy-duty earthed plugs designed to work with both kinds of sockets, and then you have the bullshit. For example, the Italian plug with an earthing post right in the middle. Which wasn't the problem until the common European market was formed, and that led to...

This. (cue confused noises)
It's supposed to work with German and Italian plugs, and is a fairly new invention. But hey, at least it's not going to give you a potentially lethal shock while unplugging, unlike using German or French plugs in a Danish socket.
And that's still nothing compared to some other designs, for example the US plugs - there was a dangerous TikTok trend (why am I not surprised) that baited idiots into dropping a coin between the very much live posts of a plug slightly pulled out of a socket that - unlike European ones - isn't recessed to avoid this kind of situations.

19K notes
·
View notes
Text
Transform Your Space A Complete Guide to Media Wall Installation
Media wall installation has become one of the most popular ways to enhance modern living spaces, blending functionality with sleek, stylish design. Whether you're creating a cozy entertainment hub in your living room or a statement piece in your office, a media wall offers the perfect solution for organizing your technology while elevating the look of your interior. It provides a clean, clutter-free setup for TVs, speakers, lighting, and storage, all customized to your preferences. With smart planning and the right materials, media wall can transform any blank wall into a dynamic focal point tailored to your lifestyle and needs.
What Is a Media Wall and Why Is It Popular?
A media wall installation is a custom-designed feature that integrates your television, audio equipment, lighting, and storage into a single streamlined space. It's become increasingly popular for its ability to elevate the look of modern interiors while optimizing functionality. Unlike traditional TV stands or wall mounts, a media wall hides unsightly cables and equipment, creating a clean, elegant focal point. With flexible design options from minimalist layouts to luxury setups with electric fireplaces or LED lighting it appeals to homeowners looking for both practicality and style. Media walls blend entertainment and aesthetics, making them a must-have in contemporary home design.
Choosing the Right Location for Your Media Wall
Selecting the right wall and room for your media wall is crucial for both visual appeal and user experience. Living rooms and family areas are the most common choices, but bedrooms and basements are also excellent candidates. Consider natural lighting, seating arrangements, and available space before finalizing the spot. Make sure the wall can support the weight of your TV and additional components. Also, think about visibility from different angles and proximity to electrical outlets. Choosing the ideal location ensures not only seamless integration with your room’s layout but also maximizes comfort and viewing enjoyment.
Planning Your Media Wall Design
Effective planning is the foundation of a successful media wall installation. Start by identifying what elements you want to include TV size, speakers, shelves, cabinets, electric fireplace, or lighting. Measure the wall dimensions and sketch a rough layout that suits your needs and style preferences. Decide whether you prefer a flush, built-in look or a bolder design with contrasting materials. Consider future upgrades, cable management, and ventilation for devices. Collaborate with a professional if needed to ensure your ideas translate into a functional and visually striking result. A well-planned design will save time, reduce errors, and deliver lasting satisfaction.
Choosing Materials and Finishes
The materials you choose play a major role in the appearance and durability of your media wall. Popular choices include MDF, wood veneer, stone, tile, or drywall—each offering unique aesthetic appeal. Matte finishes provide a sleek, modern look, while textured or high-gloss surfaces add character and dimension. You can incorporate LED strip lighting for ambiance or floating shelves for extra storage. It’s important to select materials that complement your existing décor while being heat-resistant and easy to clean. Mixing textures and finishes can create a striking visual impact, turning your media wall into a true centerpiece of the room.
Integrating Technology and Smart Features
A modern media wall goes beyond aesthetics by incorporating smart technology. From voice-controlled lighting to built-in sound systems and concealed wiring, you can tailor your setup for maximum convenience and performance. Consider integrating smart speakers, streaming devices, and cable management systems that keep everything organized and hidden. USB ports, power sockets, and charging stations can be discreetly embedded within cabinets. Many homeowners also include LED backlighting, which enhances viewing while reducing eye strain. By embracing smart home trends, your media wall becomes not only a visual focal point but a functional, tech-savvy hub for daily entertainment and convenience.
Professional vs. DIY Media Wall Installation
Deciding between a professional installation or a DIY project depends on your skills, budget, and the complexity of the design. A DIY media wall can be rewarding and cost-effective for those with carpentry and electrical experience, especially for simple setups. However, larger projects involving custom cabinetry, built-in fireplaces, or integrated AV systems often require professional expertise. Hiring a professional ensures safety, code compliance, and a flawless finish particularly when it involves wall-mounted equipment or structural changes. Consider your comfort level and timeline before choosing the right approach. Whether DIY or professional, proper planning is key to achieving outstanding results.
Maintenance and Long-Term Value
Once installed, a media wall requires minimal maintenance but offers long-term value. Regular dusting and occasional wipe-downs with a damp cloth keep surfaces looking clean and polished. If your setup includes tech components, ensure proper ventilation and avoid overloading power outlets. Media walls not only enhance day-to-day living but also increase property appeal, especially in modern homes where integrated design is highly sought after. A well-built media wall adds functionality and elegance, making your space more attractive to future buyers. It’s a stylish upgrade that blends comfort, technology, and design into a lasting investment for your home.
Conclusion
Media wall installation is a smart and stylish way to enhance the functionality and aesthetics of any living space. By combining entertainment technology with sleek design, a media wall creates a focal point that is both practical and visually impressive. Whether you opt for a minimalist layout or a feature-rich setup with lighting and storage, it offers a clutter-free, personalized solution that elevates your home environment. With careful planning, the right materials, and either DIY effort or professional help, a media wall becomes a lasting investment. It’s more than a trend it’s a transformative upgrade for modern living.
0 notes
Text

USB-C "Fixer" for Missing CC Pins 🔌⚡🛠️
We have a few devices missing the 5.1K resistors on the CC pins, which frustratingly don't work with Mac computers or certain smart USB-C power supplies. To solve this, we designed a small adapter that combines our sunken USB socket
and USB plug breakout
This handy USB-C "fixer" adds the necessary CC resistors and includes a power-good LED indicator. It passes standard USB 2.0 signals (5V, GND, D+, D-) and fits onto any USB-C cable end, ensuring compatibility with a wider range of devices.
#usb#usbc#electronics#usbfix#maker#tech#hardware#diy#usbadapter#fixit#hack#engineering#powerfix#usbmod#maccompatible#poweradapter#charging#resistors#circuitdesign#usbprojects#techfix#usbhack#diytech#gadgets#electronicsprojects#techrepair#powergood#programming#linux#python
13 notes
·
View notes