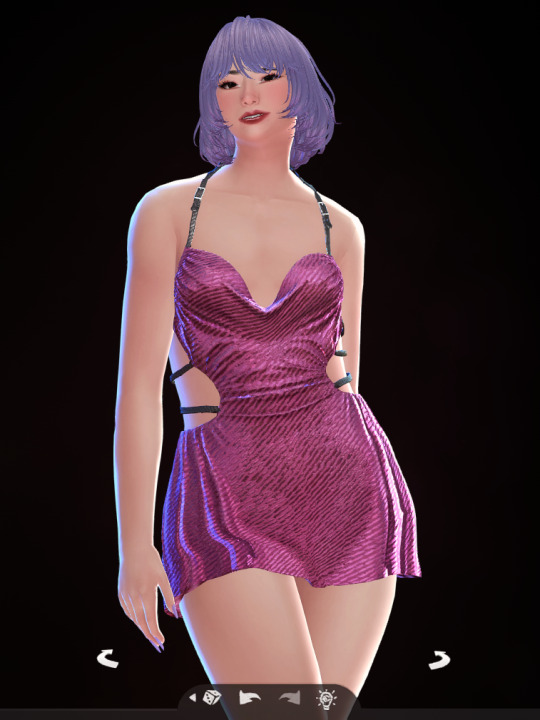
#uv_1 tutorial
Explore tagged Tumblr posts
Visit Tumblr Blog
Explore Tumblr blogs with no restrictions, modern design and the best experience.
Last Seen Tumblr Blogs


Fun Fact
25% of US internet users with an annual income of $80-100K use Tumblr.
Text
STICKY POST: ULTIMATE(ISH) GUIDE(S) TO SIMS 4 CC-MAKING; OR, A COMPREHENSIVE COMPENDIUM OF TUTORIALS, INSTRUCTIONAL MATERIALS, & FELLOW COMPILATIONS OF A LIKEWISE NATURE
In which I list a fuckton of tutorials, guides, and lists of such, each written, curated, and crafted by people far more talented than I.
More will be added as I find them.
---
@teanmoon's CC Guides - Includes tutorials on cloning, uv_1, weights, bump and specular maps, bi-color hair, and a Blender Cheat Sheet. High poly 'creators' have little excuse to churn out high poly, non-optimized garbage when they can lean on bump maps. (I know those can only do so much for more complex meshes, but for objects, texture maps can do SO much heavy-lifting).
@vintagesimstress's CC Guides - Includes tutorials on using Blender to create objects and clothing, especially for people who are just getting started.
@eliavah's uv-1 adjustment tutorial. Haven't tried this myself yet, but after glancing through it, it's something I will surely want to keep bookmarked.
@simlaughlove's CC Tutorials List - Includes many tutorials handily laid out by category on everything from object texturing to CAS morphs.
@thefoxburyinstitute's Nav Page - This blog is nonstop Sims 4 resources for e v e r y t h i n g. READ THIS POST FIRST as a guide on how to actually... nav.
@simsresourcehub's Tags List - What it says on the tin.
Transferring Weights in Blender 3.3.1 - Over at Sims4Studio forums.
@trillyke's List of Tutorials - Good ones!
@sims4tutorials - *GRAND GESTURES*
@katverse's Huge List of Tutorials - Tutorials on eeeverything.
@thatsimslady's Massive List of Tutorials - 31 pages????? Damn.
@kouukie's Sims 4 CAS with Marvelous Designer Tutorial - YouTube video!
@rusticottage's Gifmaking Tutorial - I love Sims gifs tbh.
@cowplant-pizza' Boes' Editing Masterlist - Includes stuff for Reshade, PSDs, PS Actions, and how to use them.
@melonsloth's Deco Sim Tutorial - Using SimRipper
@depthofpixels's Deco Sim Tutorial - Using SimRipper
@azuhrasims' Guide to Posing Sims - Includes how to pose sims, and handy workarounds! Super great for beginners and longtime users.
@radioactivedotcom's Guide to Posing - Includes additional posing resources. NOT for beginners.
@madameriasims4's Add a Flame to Your Basegame Candle - Great for mood lighting and historical gameplay!
@syboubou's Making a Lamp Start to Finish - a video tutorial
MORE BELOW:
Adding Lit DST to Fireplace
New image ref for default overrides
Make an RGB Spec for Objects
Bake a shadow onto your object in Blender
Linking all bedding to a single frame
Cutouts for Doors/Windows/Archways
Making objects see-through/glass
Making lamps light correctly
Give an object transparency (add an alpha)
Make a candle w/ multiple flames
Change LOD viewing distance
942 notes
·
View notes
Text
Converting Fem-Frame Mesh to Masc-Frame
This tutorial assumes you have basic knowledge on blender and sims4studio, so i won’t go over basic things. As always, you’ll need to export the mesh you wish to convert first. Next, open it in blender and switch into edit mode.
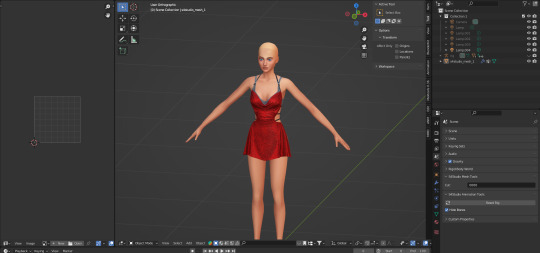
Hit ‘UV sync selection’ to make the work easier.
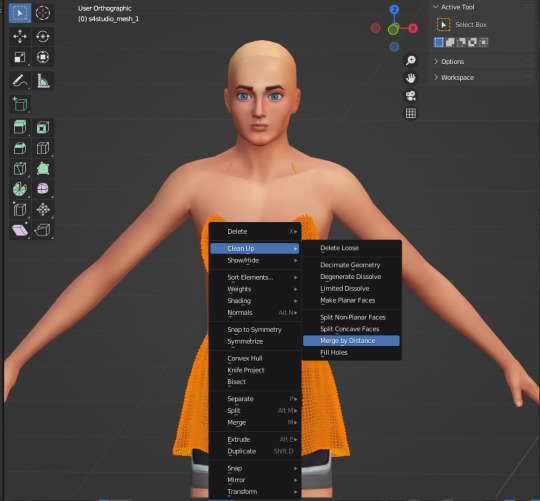
Now, with the ‘L’ key, select only the body parts and separate with the ‘P’ key. Your mesh should look like this:
Then, hide the body (hit ‘H’ key or hit the eye icon in the outliner tab) and import the needed male body mesh. If your object is only a top or only a bottom you may not need the whole male mesh, but just to be safe, I prefer importing both regardless for a better view of how the weights look later.
Before editing the mesh, make sure to merge by distance so nothing breaks or gets crunchy in the sculpting step.

The Main Event:
aka sculpting the mesh to the male body. Go into sculpt mode and select ‘elastic deform tool’, either through the button itself or the keys ‘shift+space 8’. Then make sure to select ‘mirror: x’ in the symmetry tab so that everything you do on one side occurs on the other to keep it all even.
If all's well, when you move around the mesh, your cursor should look like this:
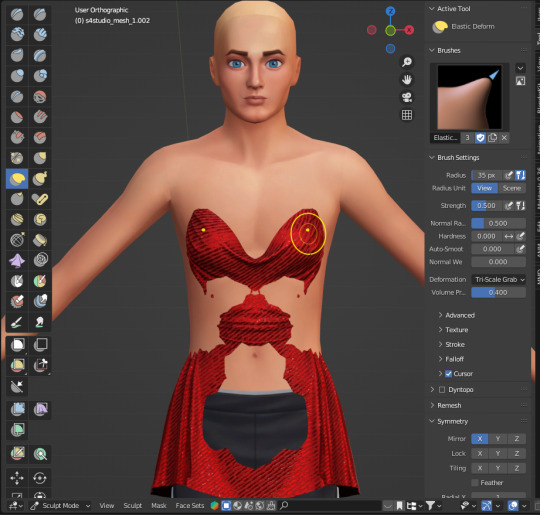
You may need to switch between ‘material view’ and ‘solid’ with x-ray on as shown in my recording to get a good look and keep everything proportional.
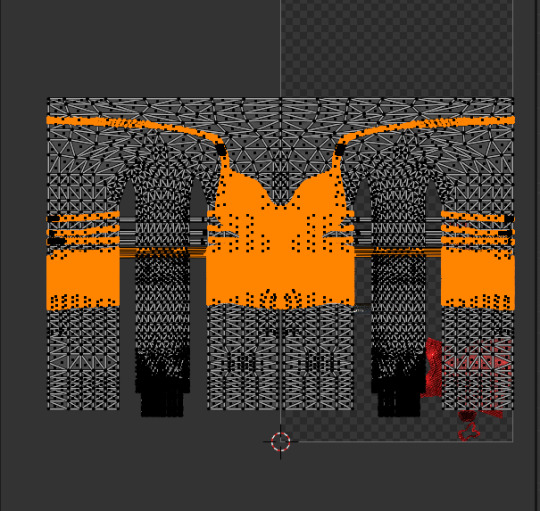
Before moving onto weights, I usually look back at the original female body to see what parts were deleted as an outline for how I will now delete parts from the male body. Visually, the easiest way for me to do this is I select both bodies, with the female pre-highlighted and the male unselected, and then select parts while holding the shift key.
Separate and hide the other meshes, leaving you with something like this:
If you don't see any holes anywhere, we can now move onto weight painting.
Weights
The first thing you want to do is to look for the cas-breast weights and delete them. Theyre not needed and will only fuck up things later LOL.
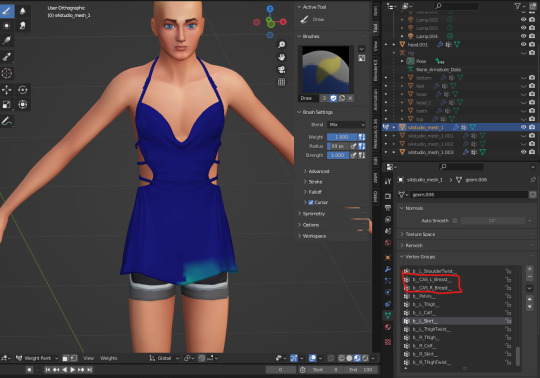
Now, go to the ‘spine_1’ weight, it’ll probably look like that, which we dont want. So hit the button ‘weights’ and select ‘normalize all’ as such :
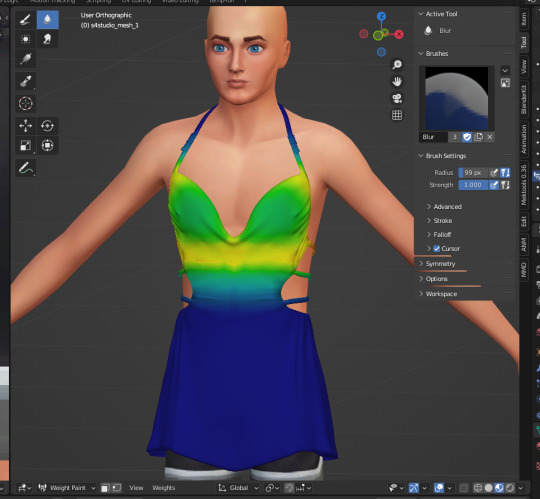
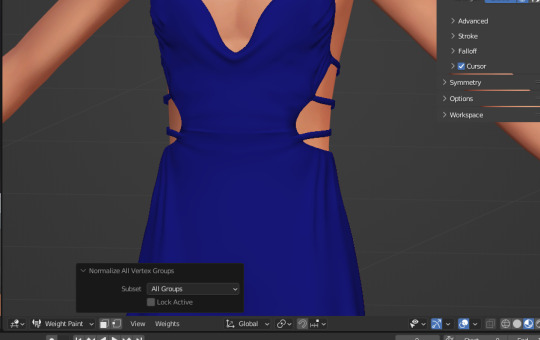
Spine1 should now look like this

After this point, weight painting is very dependent on the mesh itself, so, the most I can say is to un-hide the rig and rotate various bones to ensure the clothes move properly and/or don’t clip anywhere. If it does, those are the weights you'll need to fix.
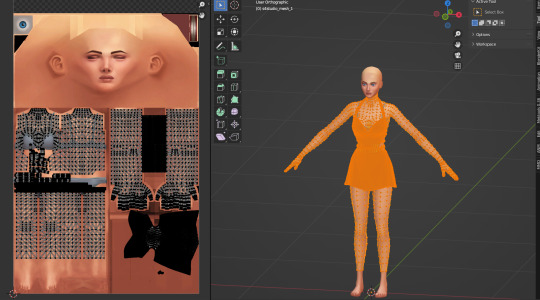
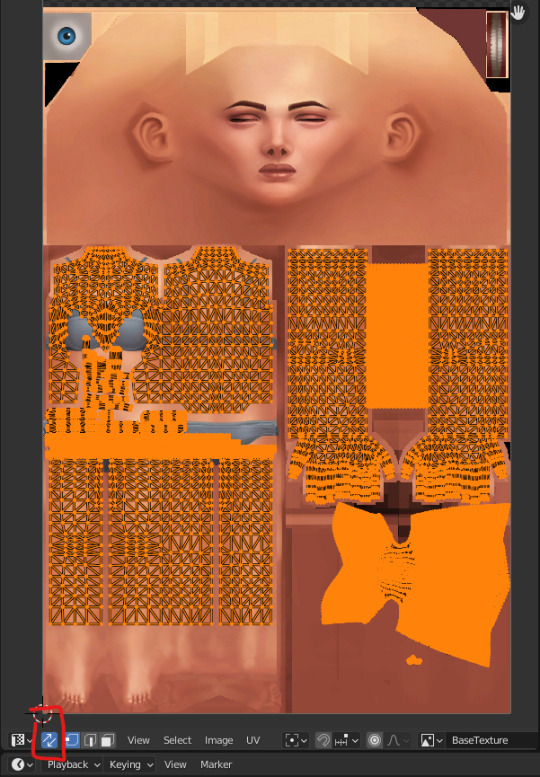
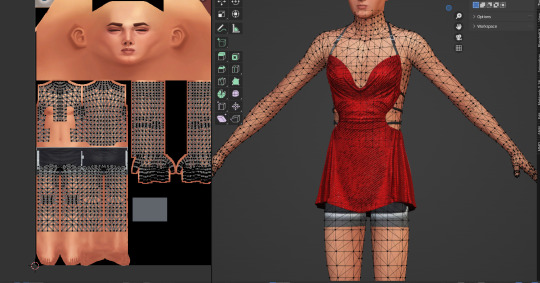
When youre done, merge both meshes together and import it. Once it's imported, youll wanna export it again to fix the uv_1.
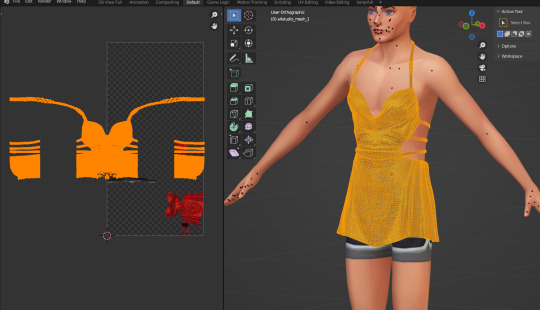
Why? Because we merged vertices earlier and that impacts the way the uv_1 turns out. Seeing lines go across every side of the mesh negatively impacts the way itll morph on the body in-game. Everything has to fit correctly. Example of a not well uv_1:
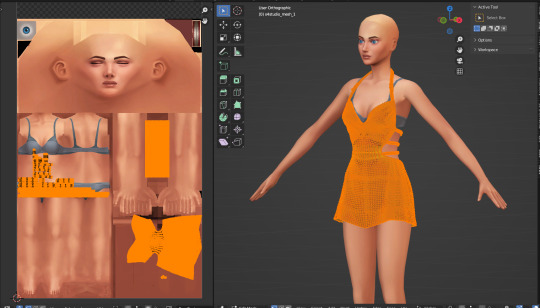
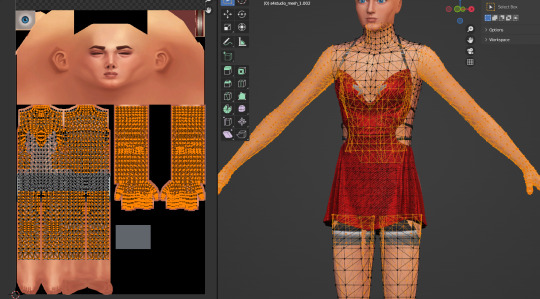
Once the mesh is re-imported, separate the body from the dress/clothes so the uv_1 editing happens /only/ to the clothes. Add a complete male mesh again, select your outfit and go to modifier properties and select ‘data transfer’. Make yours look like this:
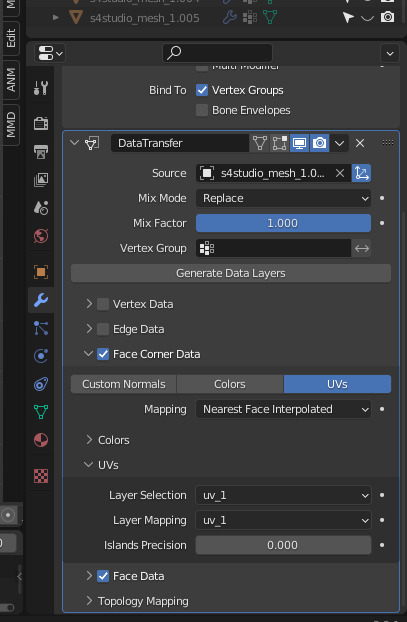
After applying it, it should look something like this:
And now you're free to combine the two meshes and to merge by distance again!!
Finally, import and check how it looks in game. It's usually never perfect the first time…
How did this dress turn out? Well, like I said, its imperfect still but looks like this in-game atm:
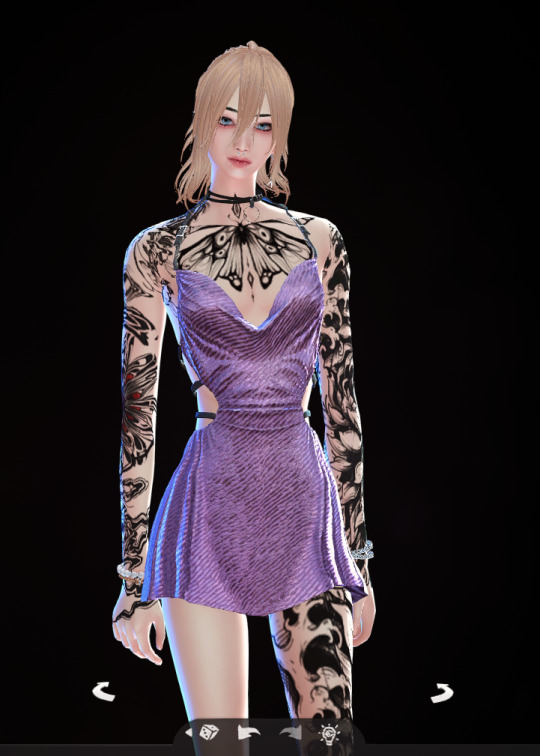
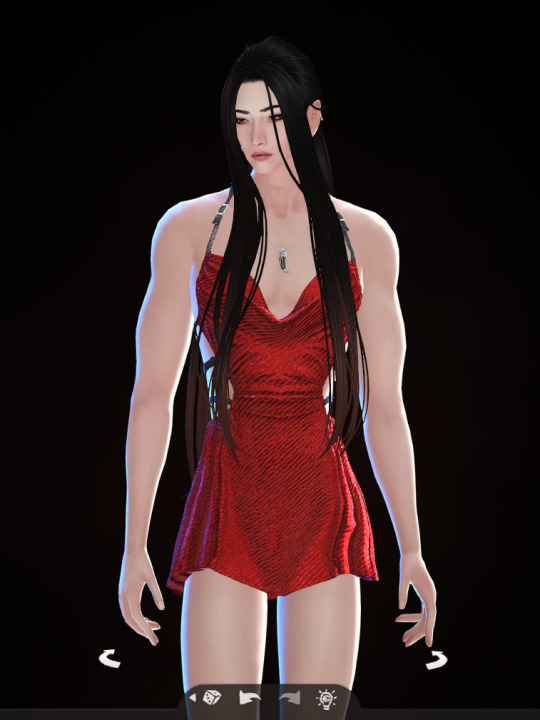
(all mascframe-male)
434 notes
·
View notes
Text
youtube
NEW VIDEO TUTORIAL 🩷
In this video I show you how to bring your own models that you created in Blender into The Sims 4 Create A Sim mode! Some experience with basic Blender controls and Sims 4 Studio options is neccessary to keep this video short and on point (and you all obviously watched my last video where I explained Blender AND Sims 4 Studio lol).
I hope this video helps to get your own things into the game. If you are stuck and need help, don't hesitate to ask me! 🩷
Timestamps below if you are looking for something specific:
0:00 Intro
01:17 Blender | Starting with your own model
02:15 S4S | Exporting a reference mesh
02:49 Blender | Preparing the reference mesh
03:04 Blender | Adding your own model
03:40 Blender | UV_0 and UV_1
04:14 Blender | Data Transfer the UV_1
05:07 Blender | Merging reference and own model
05:56 Blender | Weights & Weight Transfer
07:45 Blender | Vertex Paint
08:55 Blender | Mesh Groups & Cut Number
09:59 S4S | Creating a package file and importing the files
10:27 The Sims 4 | Final asset in the game & Outro
99 notes
·
View notes
Text
How to Add 3D Models to TS4
Required Applications:
S4Studio - https://sims4studio.com/
Blender - https://www.blender.org/download/releases/4-3/
Note: Make sure the blender path is set up in your S4Studio settings
*This tutorial assumes you know your way around blender*
Step 1: Open S4Studio
Step 2: Under Object, select Create 3D Mesh
Step 3: Check 'Show Debug Items', change 'Mesh Groups' to 1 and search for arch. Choose the following object:
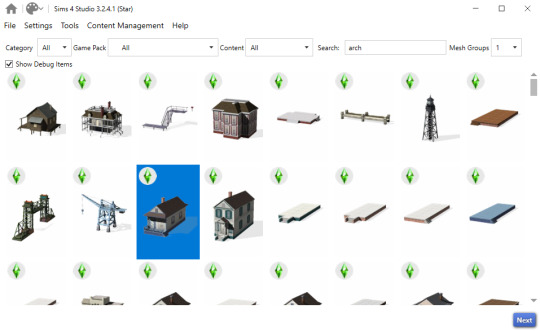
Step 3: Click next, name your package and hit save.
Step 4: Name your object. I suggest adding your creator name or initials in the front so that you can search for it in the catalog faster (ex. creatorname_objectname)
Step 5: Import your textures. The diffuse will be the main texture and the material_lighttex will be what will be illuminated on the mesh. If you don't want an illumination map, just import a plain black image or choose a different object to clone that doesn't have one (eg. the wooden slab/pole??) Ex:

Step 6: Go to the meshes tab and export LOD 0.
Step 7: Open the LODs .blend file.
Step 8: Tab into edit mode and delete the object. Do not delete it in object mode or else you'll lose all the mesh data and S4Studio will throw you an error. Tab out of edit mode.
Step 9: Import your object.
Step 10: Under the object's scene properties, you will see a tab that reads 'S4Studio Mesh Tools'. Add the number 0 to the blank space beside 'Cut'.

Step 11: Go to the data properties and change the UVMap's name to uv_0
Step 12: In the side panel where it displays the name of the objects in your scene, click on the object and then ctrl click on 's4studio_mesh_0'. Make sure your mouse is hovering over the 3D viewport window and hold ctrl+j to join the objects together. The name of your object should now be s4studio_mesh_0.
Step 13: In the modifiers tab add the 'Edge Split' modifier and then apply it. Before I do this, I tend to go into edit mode, select all vertices, click m and merge by distance just to make sure there are no double vertices. Note: If you do not add the modifier, the object will look weird in game, trust me.
Step 14: Save your blend file as 'objectname'_mesh
Step 15: Once you have saved it, go to the data properties again and change the UV from uv_0 to uv_1, this will be the shadow mesh.
Step 16: Save file as 'objectname'_shadowmesh. Choose save as and not save because it will overwrite your main mesh blend file.
Step 17: Back in S4Studio import your main mesh into LOD 0. Once that has loaded in, click on the dropdown and choose the Shadow LOD 0. Import your shadow mesh.
Step 18: Under the tags tab you can change where you'd like your object to show up in the catalog. If you leave it as is, your object will show up in the debug menu, which will have to have the debug/live edit cheat to be able to see. If you'd like it to show up as a decor object instead, uncheck world object, scroll down until you see the 'Decorative' drop down menu and choose where you'd like it to show up. I suggest the Decoration (misc) option.
Step 19: Save your package and test in game
I use this same process for all world/decor objects I make/convert. Let me know if you have any questions.
24 notes
·
View notes
Note
Hello!! I've been rlly loving the hair you've been making lately. I was wondering if there was any tutorials or resources you found helpful? I've been thinking of trying my hand at it and would love to know what worked for u!! Tysm
hello too and tysm! It's been a while since I last made those hairs so I don't really remember which specific tutorial I followed, but you can look up Frankenmeshing tutorials on YT :] not just hair specifically but frankenmeshing in general is informative too!
(frankenmeshing: combining of 2 or more meshes together to create a new one)
There's also this S4S thread I recently found that lists down everything you need to know/do when creating CAS items (while it focuses on hairs, the process is the same for all CAS items except for a few that's only for hairs)
which covers:
different texture maps and how to create them (diffuse, normal, spec, shadow)
UV_0 (for textures)
UV_1 (how a mesh is affected by sliders/morphs)
vertex paint (determines which part of mesh should be affected by sliders/morphs)
weights (how a mesh moves during animation)
hat chops & level of details/LODs
how to import/export resources (esp for swatches)
ofc not only that, you can also look up more specific tutorials based on the list above if you want to get more in-depth explanation of what each does. Here's a masterlist doc that I go to from time to time ^^
hope it helps!
58 notes
·
View notes
Note
hihi!! i wanted to ask how you learned to make cc, specially clothes! your stuff is always so so nice and im just very curious!
Hey 👋🏽
I'm self taught mostly. I learned how to do recolors first and then made my way to mesh edits. I was really slow at learning blender cause there wasn't many tutorials that I could easily follow (most of them were written and several years old, I learn best visually) it took probably 2 years for me to fully grasp what the heck I was doing in blender through trial and error. I had to watch a lot of videos and read through old forum posts for knowledge on uv_1 maps, weight transfers, vertex paint, etc.
After that I learned a little bit of Marvelous Designer but that program never really did it for me, rarely would anything come out right and eventually I would spend hours in blender trying to tidy up the meshes. Nowadays I mesh everything by hand, I like it better and I have more control over what goes where. I still have old MD meshes but idk if or when I'll go back to them.
20 notes
·
View notes
Text
Looking good so far! Reasonable poly count even.

HOWEVER: Does anyone have a good tutorial for uv_1, especially for blender 2.79 or so? I did one following Alerii's video tutorial and it made it look SIGNIFICANTLY worse in CAS, so right now it doesn't have one.
I'd also appreciate any advice on weight painting, since this isn't hair, it's flesh, so it should both move more heavily but also ideally not deform too hard. Predictably it looks fine on average sims but on max fit/fat or min fit/fat sims there are weird jaggedy bits.


These two randos I generated look fine. These two not so much:


Below is what I have for b_Head_ and b_Spine2_ respectively. If there's something glaringly wrong I'm not practiced enough to spot it yet, beyond a general 'the colors should be different probably'.


I think between me being new to weight painting/the lack of a uv_1 it's Struggling to deform correctly, so like I said, any advice or links to resources would be stellar.
get it stellar it's aliens
20 notes
·
View notes
Note
Hello! So, I'm fairly new at CC making and I'm embarking on my first CAS set. I've gotten most of it done but I'm running into an issue with the male frame version of my earrings. For some reason, they're warping and distorting in weird ways in relation to the neck and head. I suspect this might be a weighting issue but my limited knowledge on the subject isn't showing the problem; from what I can tell, the colors are lining up with what they're meant to under the different rigs. I'm wondering if you might be able to point me in the right direction on how to fix them? Here's the file link: https://drive.google.com/file/d/1Bk46xwFxt-3ehF4X35HEu6r1zgMWo_j4/view?usp=sharing
Hello back! It's always a warm and fuzzy feeling to have new creators pop up.
Your warping seems to be a uv_1 issue. I took a peek and yours looks a bit crooked, so the game can't apply sliders properly. uv_1 handles morphs like sliders, body fat, and muscle. In opposition to that uv_0 is the texture of your asset. CAS stuff needs both. You can test for a bad uv_1 by setting body sliders to their maximum settings in-game.
If you are unsure about making an uv_1 from scratch look at how the original Maxis one looks like or data transfer from it. Accessories are generally much more forgiving than clothing here.
Here's a really good tutorial to get you started
Much luck with your set! I wish you the best ✌️
11 notes
·
View notes
Text
to the person asking me for a uv_1 tutorial, I do see you and i'm gonna do it, its just gonna take me some time.
meanwhile, heres footage of how I feel regarding the uv_1:
youtube
7 notes
·
View notes
Note
Everything you do is so awesome and I really really appreciate the wip posts you share! I'm interested in learning to make cc for myself because I see so many things I'd like to give my sims in the game... So far, I've made myself some eye replacements! But I haven't done anything yet that requires actually using blender. So if I may ask, what was the first piece of cc you made and what would you recommend a beginner attempting? (I'm gonna try and do it all... 😂 But I should be realistic for my first go.)
Ty in advance! 😊
the first thing i made was this little succulent! it was very tiny and very high poly. i used this youtube tutorial and recommend it!
for a beginner, i think objects are definitely the way to go! they're much easier than cas stuff in my experience (no weights unless it's animated, larger textures, no uv_1 to worry about.) there are also a lot of tutorials for creating objects. illogicalsims has a great one
for me, the biggest hurdle to learning blender was the interface. after that it was smooth sailing, especially since sims 4 is low poly! most things can be made from a cube :D
118 notes
·
View notes
Note
Do you have any tips on how to make CC for beginners? Your stuff has inspired me a lot but idk where to start!! >~<
Hey nonny! I'm so happy you're inspired to make cc.
One of my greatest resources as someone that learns better with written tutorials than videos, is the full index of sims4studio tutorials. It looks a little overwhelming at first, but just take things one link at a time. Also, whenever I have a problem, I usually google whatever my problem is along with "sims4studio", and a helpful thread usually pops up.
The threads I return to very often are:
Weight transfer tutorial
UV_1 tutorial
It's slightly more advanced, but if something's fucky and you can't figure out what, chances are it's the weights or the UV_1. So I would learn about those pretty early on (after looking at the more basic tutorials of course). Also, always remember to remove those doubles! (You'll know what I mean when you follow the tutorials, ha)
Anywho, here's a few more resources that I and others in my discord server have found useful for just starting out:
@thefoxburyinstitute tutorial blog
cc making for beginners video tutorial by @powluna
cc tutorial by @myshunosun
written hair tutorial (part 1/part 2) by @simandy
For general advice, I'd recommend to take things very slowly, one step at a time, one project at a time, until you feel more comfortable. There's a teeny bit of a learning curve at first, if you've never touched blender or any image editing software before- but once you've got the hang of things, you're pretty much golden. Also, it may take a little bit to discover what you like making most. For example, I like making hair a lot, but clothing irks me. Some people love clothing and hate hair lol. So if you start off on one thing and find yourself hating it, don't be afraid to drop it completely and try something else. Every project you try is never a waste, even if you don't finish it, it's all teaching you something and building your familiarity with the process.
If you have any detailed questions, don't be afraid to come back and ask me! I'll help with whatever I can. Good luck, nonny 💜
44 notes
·
View notes
Text
you wanna know a secret? I still don’t understand weights. yup. I’ll figure it out eventually but nope don’t understand it for cc making. or how to do the uv_1 map properly. watched a tutorial, but was too stupid to comprehend it at that time.
2 notes
·
View notes
Note
(fem to masc frame anon) i see! no worries if not, but would you ever consider doing a mini tutorial on converting masc to fem frame? ik there are tutorials for mesh editing, but i haven't found any that detail specifically frame-switching steps, like how to replace the neck that comes "attached" with mascframe tops that makes femframe sims look like no-neck ed lol

first you need to export whichever mesh you want to convert

Highlight the e/a body parts from the clothes (I have 'linked pick' turned on and highlight easily by hitting 'L') and seperate


Append the fem-frame mesh ( i used the flat fem-frame)


Sculpting is where it all happens; i use grab tool and elastic deform the most. Solid mode + x-ray on helps you sculpt the mesh correctly to fit the new body

And were good!


Now un-hide the original mesh. What i usually do is click both meshes so i can see what parts of the new body i need to preserve based on the original mesh’s body. What i do is, hit the ‘C’ key and highlight/ go over all the spots in orange as shown above. This is the mesh we need to keep.

This is what youll have left after deleting the unneeded parts (i ofc deleted the bottom torso area after..)


You can use bisect tool to further perfect the faces to avoid clipping

Now transfer the weights from the OG mesh to your new one (and ofc make sure alls well)

You probably can leave the uv_1 alone (if it has items like bows and theyre moved up/down the body, you need to correct it)

Open up cas tools and clone the original package

Import your version


Make sure to change the tag from “male” to “female”, (you can do the same with fem-masc fashion but it's up to you) and hit restrict opposite frame so fem-frame appears

Lastly if issues with the uv-1 happens or the arms clip in (or too far at rest) , click the auto-assign slotrays to fix that

aaaand profit :D (that swatch is a recolor i did lol)
48 notes
·
View notes
Text
CC Help!
I need to up my CC meshing game. Frankenmeshing is great, don't get me wrong, but I'd love to be able to make more stuff from scratch. I've started playing around and I'm kind of getting there, but have a long way to go. Now that I finally understand the mysteries of uv_1 and weight painting i'm ready to move on to bigger projects.
Anyone have good resources that aren't frankenmesh tutorials and that DO NOT USE Marvelous Designer? Somehow pretty much everything I'm finding requires me to use MD. Thank you!
idc if they're for an ancient version of Blender either, i can figure it out. The tutes I learned from were for Blender 2.76 and I'm using 3.6.
5 notes
·
View notes
Note
Hi! Thank you for your deco sim tutorial, it was super helpful and I managed to create a couple deco sims! In your tutorial you renamed the UVMap to uv_0 and added another UV map and named it uv_1. Out of curiosity, is it necessary to add another UV map when you’re making a simple deco sim (no accessories or glasses)? What is the purpose of adding that extra UV map?
Thank you for your help!
ah no purpose lol. you can delete the uv_1. that's a CAS thing (it's the uv that makes the sim morph and scale into clothing properly). for deco, it's just uv_0. i'll make that change on the tutorial
2 notes
·
View notes
Text
I forgot how patronising they are if you’ve done something in a way that they don’t like. like i know i have mapped the left and right half of the mesh on the same half of the uv_0 map but one half is mirrored.
i know that we both know that that’s not causing the issue with my mesh in game but i guess i’ll make my mesh match your expectations in the hope that after this performance of subservience you will give me a real answer.
(also i was given a picture tutorial on how to flip a uv island along the x axis??? who do they think can mirror parts of a mesh in edit mode and on the uv_1 map but not on the uv_0 map???)
back on my bullshit (posting on the s4s forum)
#i don't think i will get a workable answer#my issue has been cropping up on there for years and nobody has ever figured out what causes the issue
1 note
·
View note