#vhd file
Explore tagged Tumblr posts
Visit Tumblr Blog
Explore Tumblr blogs with no restrictions, modern design and the best experience.
Last Seen Tumblr Blogs


Fun Fact
The most popular pages on Tumblr are about Minecraft, GIFs, and David J. Peterson.
Text
Configuring Storage for Virtual Machines: A Complete Guide
Virtual Machines (VMs) are at the core of modern IT environments — whether in cloud platforms, data centers, or even personal labs. But no matter how powerful your VM is, it needs one key resource to operate smoothly: storage.
This blog will help you understand what storage means for virtual machines, the types of storage available, and how to configure it properly — all without diving into code.
🔍 Why Is Storage Configuration Important?
When you set up a virtual machine, you're creating a digital computer that runs inside another one. Just like physical computers, VMs need hard drives to store:
Operating systems
Applications
User data
Poor storage choices can lead to:
Slow performance
Data loss
Difficulty in scaling
High maintenance costs
Types of Storage for Virtual Machines
Local Storage
Uses the hard drive of the host computer.
Best for personal use, testing, or small setups.
Not ideal for high availability or scaling.
Shared Storage (SAN/NAS)
Shared between multiple servers.
Useful for large organizations or cloud data centers.
Allows features like moving VMs between servers without downtime.
Cloud-Based Storage
Provided by platforms like AWS, Microsoft Azure, or Google Cloud.
Scalable, secure, and accessible from anywhere.
Great for businesses looking for flexibility.
⚙️ Key Elements in Storage Configuration
When setting up storage for VMs, here’s what to consider:
Disk Type
VMs use virtual hard disks (like VMDK, VHD, or QCOW2 files) to simulate physical drives.
Think of it as a "container" for all the VM's files and data.
Disk Size
Choose based on your VM’s purpose. A basic OS might need 20–40 GB, while databases may require hundreds of GB.
Provisioning Method
Thick Provisioning: Full disk size is allocated from the start.
Thin Provisioning: Uses only what’s needed and grows over time.
Storage Performance
High-speed SSDs improve VM performance, especially for apps that use a lot of read/write operations.
Traditional HDDs are more cost-effective for bulk storage.
🧠 Best Practices
✅ Plan Based on Usage A web server VM needs different storage than a database or a file server. Always size and structure your storage accordingly.
📁 Organize Virtual Disks Keep the operating system, application data, and backups in separate virtual disks for easier management.
🛡️ Back Up Regularly Set automated backups or snapshots to recover data in case of failure or changes.
📊 Monitor Performance Use available tools to track how your VM is using the disk. Upgrade or optimize if it becomes a bottleneck.
🔐 Secure Your Storage Use encryption for sensitive data and restrict access to storage resources.
🌐 When to Use Which Storage?
Use CaseRecommended StoragePersonal VM / TestingLocal storageBusiness apps / High uptimeShared SAN/NAS storageCloud-native appsCloud-based storageBackup and recoveryExternal or cloud backup
📌 Conclusion
Configuring storage for virtual machines may sound technical, but with the right planning and understanding of options, anyone can get it right. Whether you're working in a small team or managing a large infrastructure, your choice of storage will directly impact your virtual environment’s efficiency, reliability, and scalability.
For more info, Kindly follow: Hawkstack Technologies
#VirtualMachines #ITInfrastructure #CloudStorage #DataCenters #SysAdmin #VMware #KVM #Azure #AWS #StorageManagement
0 notes
Text
If your system is running out of space due to a multitude of data, creating a virtual hard disk (VHD or VHDX) is a practical solution for additional storage. However, these files can sometimes become corrupted and inaccessible. In this guide, we'll explore why VHD files get corrupted and discuss methods to repair these issues using both manual and automated approaches. Common Causes of VHD/VHDX File Corruption Let's delve deeper into some common causes of VHD (Virtual Hard Disk) and VHDX (Hyper-V Virtual Hard Disk) file corruption. Understanding these causes can help in both preventing corruption and diagnosing issues when they arise. 1. Improper Installation of the Hard Disk Improper installation refers to issues during the setup of the physical or virtual hard disk. For virtual disks, this might involve incorrect configuration settings, such as allocating insufficient resources (like memory or processor power) or errors during the creation of the disk file, which might not become apparent until the disk is in use. For physical disks, this might involve improper connections or configurations that affect the virtual disk stored on them. 2. Frequent Errors Displayed by Hard Drives Hard drives can display errors due to a variety of reasons such as bad sectors, mechanical failures, or logical errors within the filesystem. When a VHD or VHDX file is stored on a physical drive that frequently encounters these errors, the data comprising the virtual disk file can become corrupted. This includes corruption occurring as a result of repeated, unresolved I/O errors that prevent the correct reading or writing of data to the disk. 3. Antivirus Software Interference Antivirus programs scan files and operations on a computer to detect and block malicious activities. However, these programs can sometimes interfere with legitimate operations, such as when a VHD file is being accessed or modified. If an antivirus program mistakenly identifies activities within a VHD as suspicious, it might lock the file or interfere with its normal operation, leading to corruption. 4. Installation of Corrupt Data on the Hard Drive If corrupted data is written to a VHD, it can lead to file system inconsistencies within the virtual disk. For example, if a software installation on a virtual machine is interrupted or if the installation files are corrupt, this might not only affect the software but also the file system structure of the VHD, leading to broader corruption. 5. Unexpected System Shutdowns Unexpected shutdowns can be particularly harmful if they occur while data is being written to the VHD. This might happen due to power failures, system crashes, or abrupt manual shutdowns. During such events, the virtual hard disk may not have the chance to complete its write processes, leaving the file system in an inconsistent state. This can result in sections of the disk becoming unreadable or the entire virtual disk failing to mount. Preventive Measures Understanding these causes highlights the importance of regular maintenance, such as ensuring proper installation and configuration, regularly checking hardware for faults, maintaining robust data backup protocols, and configuring antivirus software to avoid conflicts with virtualization software. By taking these considerations into account, you can significantly reduce the risk of VHD and VHDX file corruption and ensure the longevity and reliability of your virtual disk files. Strategies to Repair Corrupted Hyper-V VHD/VHDX Files Repairing a corrupted file can be challenging but necessary. Here are some effective techniques: Method 1: Using PowerShell to Repair Corrupted VHD Files Using PowerShell to repair a corrupted VHD or VHDX file is a valuable method, especially for those managing virtual environments like Hyper-V. Here's a detailed explanation of the process, broken down into steps and what each step accomplishes: Step 1: Open PowerShell
Firstly, you need to open PowerShell with administrative privileges. This is necessary because the commands you'll be using to manipulate the VHD files require elevated permissions. You can do this by searching for PowerShell in the Start menu, right-clicking on it, and selecting "Run as administrator." Step 2: Mount the VHD or VHDX File The command used is: Mount-VHD -Path "d:\folder\vdisk.VHDX" -ReadOnly Mount-VHD: This is the cmdlet used to mount the virtual hard disk. -Path: This parameter specifies the path to the VHD or VHDX file that you want to mount. -ReadOnly: This option mounts the disk in read-only mode, which means you can't make changes to the disk during this session. This is a safety measure to prevent further corruption as you inspect or repair the disk. Step 3: Optimize the VHD or VHDX File The command used is: Optimize-VHD -Path "d:\folder\vdisk.VHDX" -Mode Full Optimize-VHD: This cmdlet is used to optimize the VHD file, which can help in improving the performance and reclaiming unused space within the VHD. -Mode Full: This parameter tells PowerShell to perform a full optimization, which includes compaction where applicable. This can be particularly useful for dynamic and differencing disks. Step 4: Dismount the VHD or VHDX File Finally, you dismount the VHD/VHDX using: Dismount-VHD -Path "d:\folder\vdisk.vhdx" Dismount-VHD: This cmdlet unmounts the VHD file, ensuring that all handles to the virtual disk are closed properly. It's crucial to dismount the VHD safely to avoid any potential data loss. Notes and Tips Always ensure that you have a backup of the VHD/VHDX file before performing these operations. While these steps are generally safe, having a backup ensures you can recover your data in case something goes wrong. If the VHD is heavily corrupted, these steps might not be sufficient to repair the file. In such cases, you might need to use more specialized recovery tools or techniques. These steps are typically used for recovery and maintenance purposes and might not resolve all types of corruption. Method 2: Using CHKDSK to Address VHDX File Issues Using the CHKDSK command to troubleshoot and repair issues with VHDX files is a common technique, especially when dealing with file system errors. Here's a detailed breakdown of how this method works and each step involved: Step 1: Open Command Prompt with Administrative Rights First, you need to open the Command Prompt as an administrator to ensure that you have the necessary permissions to run system-level commands: Search for "Command Prompt" in the Windows Start menu. Right-click on the Command Prompt and select "Run as administrator." Step 2: Launch Disk Management Utility Before running CHKDSK, you might need to identify the correct drive associated with the VHDX file. This step involves launching a disk management utility called diskpart: In the Command Prompt, type diskpart and press Enter. This opens the DiskPart command-line tool, which allows you to manage your disk partitions and volumes. Step 3: Run the CHKDSK Command After identifying the drive, you'll use the CHKDSK command to check the integrity of the file system and fix logical file system errors: chkdsk D: /f /r /x D: represents the drive letter where the VHDX file is located. You should replace D: with the appropriate drive letter for your scenario. /f tells CHKDSK to fix any errors it finds, which is crucial for repairing the file system. /r instructs CHKDSK to locate bad sectors on the drive and recover readable information, which can be essential if the physical storage is failing. /x forces the drive to dismount before the process starts, ensuring that CHKDSK can gain exclusive access to the disk for more thorough scanning and repair. What Each CHKDSK Parameter Does: /f (Fix): This parameter enables CHKDSK to correct errors on the disk. It will repair issues related to file system integrity, including file directory entries and file allocation tables.
/r (Recover): This command is used to locate bad sectors and attempt to read from them or recover data from them if possible. This is particularly useful if you suspect physical damage to the drive. /x (Dismount): This option ensures that no other process can access the disk while CHKDSK is running, which is necessary to perform repairs that require exclusive access. Professional Tool for Repairing Corrupted VHD/VHDX Files DiskInternals VMFS Recovery is a specialized tool designed to recover data from VMFS (VMware File System) drives, which are commonly used in VMware environments. While it is primarily tailored for VMFS, it also supports recovery from other file systems, including VHD and VHDX files used by Microsoft's Hyper-V. This makes it an excellent tool for professional-level recovery of virtual disk files that have become inaccessible or corrupted. Here’s how to use DiskInternals VMFS Recovery to recover a corrupted VHD or VHDX file: Step 1: Install DiskInternals VMFS Recovery To repair VHD file, you will need to download and install DiskInternals VMFS Recovery on a Windows machine. Ensure that the machine has enough hardware resources to handle the recovery process effectively, especially if dealing with large VHD or VHDX files. Step 2: Launch the Software Open DiskInternals VMFS Recovery. You’ll be greeted with a wizard that can guide you through the recovery process. You can opt to use the wizard for simplicity or manually configure the recovery settings if you are experienced and need more control. Step 3: Connect to the Server (if applicable) If the VHD or VHDX file is located on a remote server or a VMware ESX/ESXi server, you can connect to it directly using the software. This feature is especially useful for recovering data from VMFS volumes hosted on VMware servers. Select the option to connect to the VMware server, and enter the necessary credentials and network information to establish a connection. Step 4: Scan the Drive Select the drive where your VHD or VHDX file is stored. If it’s on a local machine, navigate to the physical disk or partition. Initiate a scan. DiskInternals VMFS Recovery offers different scanning methods, including a full scan for severely damaged files. Wait for the scan to complete. The duration will depend on the size of the disk and the extent of the damage. Step 5: Find and Recover the VHD/VHDX File After the scanning process, browse through the recoverable files displayed in the software’s interface. Files are usually shown in a folder-tree structure. Locate your VHD or VHDX file in the list. You can use the search tool if you know the file name. Preview the file if possible. DiskInternals VMFS Recovery allows you to preview files before recovery to ensure that they are the correct ones and are recoverable. Step 6: Save the Recovered File To recover the file, you will need to purchase a license for DiskInternals VMFS Recovery, as the free version typically allows only file preview. Once you have the license, select the VHD/VHDX file and save it to a safe location. It is recommended to save the recovered file on a different drive to avoid any potential overwriting of data. Additional Tips Backup: Always maintain regular backups of important data to minimize the need for recovery. Avoid Using the Damaged Disk: Do not write any new data to the disk where the corrupted file resides until after the recovery is complete to avoid overwriting recoverable data. Assess Physical Hardware: If you suspect physical damage to the disk, consider using hardware diagnostics tools or consulting with a professional data recovery service to prevent further damage. Conclusion Understanding the reasons behind VHD file corruption and knowing how to fix them is crucial for data management. While manual methods can be effective, they require technical expertise and carry a risk of data loss. Using a professional recovery tool offers a safer alternative, ensuring data integrity and ease of use.
0 notes
Text
Today something crazy happened while I tried to fix a permission problem on Windows!
Preamble
My biggest gripe with my Linux machine is its rigidity. I guess it makes it harder to hack with its superior permissions system and leads to better security over all or what-ever, but today I did the unthinkable on Windows and it only happened because... I don't know, it's fucked I guess.
Windows' W, or wasting as little of my time by being incredibly faillible
So, to keep it simple, I have a backup of my Windows system on an external drive, all right? I tried to open it, but no matter what I was denied, I spent a few good hours online trying to troubleshoot the problem. People were complaining about permissions, which is the single jankiest thing on Windows, on VHD files, and I primarily found tutorials as well as forum posts on the ever so unhelpful Microsoft help desk forums about that, you follow me? So, I read most of it, figured that I had to mess with permissions on the mounted virtual drive to fix my problem. Unfortunately, when I tried to meddle with it I got another permission error, clicked on cancel and immediately after I got a popup dialog box telling me it is now in an unstable state or something, got very worried and so I tried to fix it by reverting my changes to the best of my knowledge of what it must've been like before, got another permission error, clicked off which has then deleted my user from the security tab and somehow that gave me full access to this entire thing that up until now wouldn't cooperate at all.
In conclusion:
If there's any problem on Windows I can just bang my head against my desk like a neanderthal until it solves itself, however that's not going to ever be an option on Linux. Is this a positive or negative?
Anyhow, checkmate Linux! I'm joking by the way, Linux is still far better than contemporary Windows for numerous reasons, but they are never going to celebrate a year of Linux if it stays this rigid and easy to wreck: for example, I once bricked an old install with apt-get update which has never happened since thankfully, but still if that happened to me and other people (Yes, I watched the Linux Tech Tips video), then it is going to put people off from ever trying it again. I even heard recently that system upgrades could brick the OS and for some reason it won't work on my system which I still haven't gotten around to fix yet, I'm kind of procrastinating/avoiding it right now because it's annoying. 😒
1 note
·
View note
Text
Virtual Hard disk is a separate disk image ‘file format’ that can store the contents of the physical hard drive, partly or fully. The creation can be done at a location that is preferable to the computer host. The VHD has all the structural elements of the physical hard disk, while it can contain almost all the data from the hard disk, by copying the data files or simply creating new data resources. The types of virtual hard disks include the fixed size and the disk that can have dynamically expanding size. Yet another type is the differencing one, which can be attached to any of the two other types, for increasing the performance of the system. The fixed sized disks do not have to specify for the minimum space required on the computer file system of the host, as it can automatically acquire the required space. On the other hand, dynamically expanding VHDs will take up the required space, according to their need. (Rouse) Virtual Hard Disk drives are the best alternative, when conducting cost-effective operations on computer systems. Using VHD, diverse operating systems can be loaded on the same PC, which allows the host to run different software programs on the same computer, while allowing the software developers to test their programs in a cost-effective manner. During February, 2013 Microsoft purchased the Virtual Hard Disk software from Connectix Virtual PC Software, which was originally responsible for creation of this software. Thereafter, Microsoft renamed this product as Microsoft Virtual PC. (VHD) Virtual Hard disk Formats Apart from the fixed and dynamic formats, as mentioned above, there is another format of VHD called ‘Differencing’ type. Each format can perform different tasks, as they vary in performance. Fixed size VHD The space required by this type of VHD is allocated on the physical Hard disk storage, while creating the VHD. While the fixed size can be increased, in an offline operation, the software does not support reducing the size. The fixed size characteristic of this type ensures optimum efficiency in operation of the system. However, due to the commitment of space allocated, Read the full article
0 notes
Text
//you guys, i just realized that since i have a ps5, I can record the special features on for VHD bloodlust. I'm noticing i haven't done cause file transfers and stuff for years. I'm going to relearning so much. Hopefully learning new things as well.
1 note
·
View note
Text
Ventoy - A new Bootable USB Solution
Ventoy is an open-source tool to create a bootable USB drive for ISO/WIM/IMG/VHD(x)/EFI files.With ventoy, you don’t need to format the disk over and over, you just need to copy the ISO/WIM/IMG/VHD(x)/EFI files to the USB drive and boot them directly.You can copy many files at a time and ventoy will give you a boot menu to select them (screenshot).You can also browse ISO/WIM/IMG/VHD(x)/EFI files…

View On WordPress
0 notes
Text
Easy Reliable Approaches to Repair VHD file
There are several reasons responsible for VHD corruption such as defective hard drive, malicious entities, antiviruses, etc. However, It is not a matter of concern, since there are some effective manual techniques to Repair Corrupt VHD File. The manual methods are as follows:-
Repair VHD file using Windows Powershell,
VHD Recovery using the Microsoft VHD repair tool
Repair VHD file using virtual machines
0 notes
Text
Attach a VHD File in Windows XP
Attach a VHD File in Windows XP

If you are also running Windows XP on another computer, you can transfer this VHD file to the XP computer and mount it without having to launch Virtual PC or Microsoft Virtual Server. You can install only the Microsoft Virtual Server component and run the command from the command line.
NOTE. If you applied a password to the VHD file using BitLocker on Windows 7, you CANNOT access the VHD file on…
View On WordPress
0 notes
Text
Tempo hari, diminta kampus untuk mindah salah satu server yang dari workstation biasa ke server kampus. Karena pakai infrastruktur nya virtual-machine, walhasil tinggal pindah virtual-harddisk (VHD) settingan ikut, tinggal disesuaikan dikit.
Hari pertama setelah selesai pindah, masih ada kendala bahwa server tidak dapat diakses di jaringan lokal. Walaupun dari hoating sudah diarahkan ke alamat IP public terkait dan di reverse proxy ke alamat IP sesungguhnya. Masalah teratasi keesokan harinya setelah network engineer saya minta untuk tambahkan IP static atau ganti IP DNS (DHCP) dengan public DNS.
Namun sangat disayangkan, catu daya mati di siang hari sesaat saya konfirmasi bahwa jaringan lokal sudah dapat mengakses server dengan domain terkait. Masalah selanjutnya datang, yakni setelah dinyalakan server tidak otomatis mem-booting VM. Namun hal tersebut dapat teratasi karena sudah diantisipasi dengan melakukan setting pada BIOS supaya mainboard dapat menyala sesaat setelah mendapat catu daya.
Tinggal masalah terakhir bahwa dari VM sendiri tidak dapat menjalankan cronjob maupun booting otomatis melalui VBoxManage. Hingga akhirnya jalan terakhir adalah menjadikan action tersebut sebuat service yang berjalan sesaat setelah booting hypervisor selesai.
Dan benar, Hari ini terjadi pemadaman listrik. Setelah pemadaman, hypervisor dan VM booting kembali secara normal.
Baru saja, saya menambahkan auto-mount ke harddisk bawaan servernya. Mungkin besok saat restart server akan dicoba dan dilihat hasilnya.
Fin.
Surakarta, Jumat, 31 Maret 2023
Rhesa
Referensi :
[1] https://kifarunix.com/autostart-virtualbox-vms-on-system-boot-on-linux/
[2] https://www.linuxbabe.com/desktop-linux/how-to-automount-file-systems-on-linux
3 notes
·
View notes
Text
What Are the Benefits of Using a Virtual Hard Disk System?
Learn everything you need to know about the Virtual Hard Disk (VHD), its relevance, and the benefits it provides to its users in this blog post. Aside from that, readers will learn about the most widely used and highly effective VHD/VHDX recovery solution available on the market today.
The Virtual Hard Disk: An Overview
Virtual Hard Disk, often known as VHD, is the hard disk that is used by virtual machines such as Hyper-V, VMware Workstation, and others. It allows for the simultaneous hosting of multiple operating systems on a single host system. A variety of tasks, such as moving files between the host system and a Virtual Hard Disk, data backup and recovery, disk conversion from physical to virtual, and the converse, are made easier with their assistance.
{ "@context": "https://schema.org", "@type": "Organization", "url": "https://doamour.tumblr.com/", "mainEntityOfPage": "https://rosheenonice.tumblr.com/" }
The following sections provide an overview of the two types of VHD formats:
Variable-size VHD: This kind is assigned with a variable-size Virtual Disk Drive and occupies a variable-sized amount of storage space on the host machine's Hard Disk Drive. It is the fastest technique available, with continual fragmentation during the entire process.
Adaptive VHD: This VHD type has a variable size and can grow gradually with the addition of more data to it, implying that it is the same size as the data that was written to it at the time of the write operation. It allows for the rapid allocation of storage capacity.
It is possible to mount and unmount VHD/VHDX files in Disk Management or Windows Explorer in a variety of different methods.
What are the advantages of booting the system from a Virtual Hard Drive?
A virtual drive can host multiple operating systems, such as Windows, Mac, and others, and it is extremely useful for developers who want to test their products, websites, and applications in a variety of environments on a single hardware system by utilizing a Virtual Machine such as VirtualBox to do so.
Let's have a look at some of the additional benefits of using a Virtual Hard Drive on the system.
Deployment is simple and convenient because VHD files include provisions for standard and pre-built configurations that may be used for testing and working on specific projects in specific operating systems environments.
Backup and restore in a jiffy: If the data in VHD files has been modified for any reason, like inadvertent data deletion, malicious file, and so on, then the data may be recovered without a lot of effort.
Recovering from snapshots: The ability to create snapshots of existing Virtual Machine configurations using Virtual Machine programs allows users to rewind to a point in time during the snapshot process where the installation troubles first appeared, allowing for speedy recovery from snapshots.
Easy replication: It enables the user or developer to save his or her work so that it may be readily replicated or copied to another machine for use by a second or third programmer.
Complete isolation for many users: It enables several users to operate on different operating systems of their choice on the same system without interfering with the work of others.
Economical: Because it avoids the need for various systems (hardware) with distinct OST environments, VHD storage and deployment are both economically advantageous (installation).
VHDX is superior to VHD in what way?
This updated and improved version of the VHD file, which uses the.vhdx extension and has a larger storage capacity than the older VHD format, is the most recent and most advanced version. It is mounted in the same way as a VHD file, but it has a number of advantages over the VHD file format, which are listed below.
VHDX files have a storage capacity of 64TB, but VHD files have a storage capacity of just 2TB.
The VHDX file format keeps track of metadata updates and provides data protection in the event of a power failure, but the VHD file format does not have this functionality.
VHDX files outperform VHD files in terms of performance and have more flexibility to contemporary hardware.
VHDX files have a logical sector size of 4KB, but VHD files only have a logical sector size of 512 bytes.
Custom metadata can be stored in VHDX files, although VHD files do not.
VHDX files can be resized in real time, however VHD files cannot.
When is it necessary to use a VHD/VHDX Recovery tool?
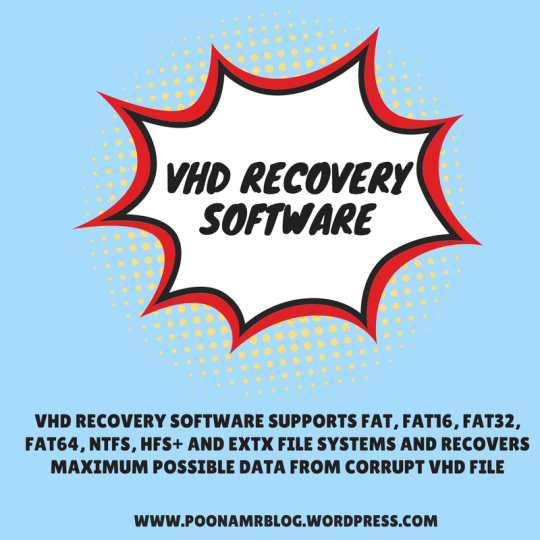
VHD or VHDX files, like any other type of file kept on the system, are susceptible to corruption. It is possible to list the top three reasons why a VHD/VHDX file becomes corrupted and unreadable as follows: broken or corrupted hard disk storage, file transfer through virtual drive in poor network conditions, and interference by third-party applications such as antivirus.
Corrupted data is unquestionably distressing, which is why we are here to provide our finest recommendation to our readers, which is the Kernel for VHD Recovery program. The advanced recovery of corrupted, damaged, and inaccessible data from VHD and VHDX files is supported by the utility, which may be done quickly and instantly.
Now is the time to download
FAQs
Q- Which format should I use — a VHD or a VHDX file?
A- As previously said in the blog, it offers benefits such as increased storage capacity, improved performance, protection against power failures, and more, among other things. VHDX files are preferable, but it all depends on the user's requirements because VHD files can be loaded on a greater number of operating systems than VHDX files.
Q- What is a VMDK file and how do I open one?
A- VMDK, also known as a Virtual Machine Disk File, is a file format that is supported by VMware and is used to store complete information on Virtual Machines. It is an open-source file format that is used for a variety of virtualization services, including testing, cloud computing, and many more.
The distinction between VHD and VMDK files is explained in the following question.
If you want to learn everything there is to know about the differences between VHD and VMDK files, go to the following blog post: Difference Between VHD and VMDK Files (nucleustechnologies.com)
In the free edition of the Kernel for VHD Recovery tool, what restrictions have been placed on its functionality?
A- Using the free edition of the Kernel for VHD Recovery utility, users can recover and preview the whole contents of the VHD file, but they can only save up to 250 MB of data.
Q- What is the purpose of the Save Snapshot feature in the Kernel for VHD Recovery tool? A- The Save Snapshot feature is used to save a snapshot of the current working directory.
In the Save Snapshot feature of the utility, users can save the progress of the recovery process as a.nkfn file, which can then be restored later. This stored file can be loaded at any moment in order to begin the recovery procedure from the point at which the snapshot was taken. It facilitates the recuperation process without requiring additional time investment.
3 notes
·
View notes
Text
How to install Windows 1.0, get the mouse to work and make the display look good (NON-VIDEO TUTORIAL)
This tutorial is for those who don't like watching videos and/or do not have a good enough internet connection to watch a video tutorial.
You will need:
Virtual Machine software. I recommend VirtualBox, as it costs nothing, has all features free to begin with, including online snapshots and is overall pretty good.
Software capable of altering the contents of floppy disks. (PowerISO seems to work best for me).
The ability to mount virtual hard drives (ImDisk may be needed).
Windows 1x installation floppies. (download)
Windows 2x installation floppies. (download)
MS-DOS 3.30 installation floppies. (download)
Instructions:
Part 1: Installing MS-DOS:
Open your Virtual Machine Software and create a new Virtual Machine. Set the OS to Windows 1.0, or if you can't do that, Windows 3.1. You can allocate a generous amount of memory and hard drive space from here. I gave my VM 86 MB RAM and 1 GB storage space.
Note: Make sure your hard drive is a *.vhd hard drive. This will make your life easier and possibly eliminate the need for ImDisk.
Run the VM. You will get a message saying it can't read from the boot medium or something to that effect.
Mount Disk 1 of MS-DOS 3.30 and restart the VM.
You will boot into MS-DOS on the floppy drive. Run the following commands:
fdisk - this allows MS-DOS to recognise your virtual hard drive as a hard drive, with a drive letter and all, allowing you to format it and copy files to it:

"format c:" without quotes). It's simple - just say yes when it asks whether you're sure you want to do so.
"sys c:" (without quotes). This command is not very necessary, but it makes the hard drive bootable. Without running this command, you would have to insert a bootable disk (such as the first MS-DOS disk) every time you booted up this VM in order to continue. So running this command saves time.
Copy all files from the mounted floppy disk to the hard drive. In other words, "copy a:\ c:\"
Insert MS-DOS Disk 2 and repeat the previous step.
Now you can install Windows.
Part 2: Installing Windows:
There are two ways you can install WIndows. The traditional method and the patched method. The traditional method lets you install a vanilla copy of Windows, but it is very lacking in terms of drivers. (i.e. if you try to install Windows 1.0 with the original floppies the mouse will not work). The patched method uses a driver patch that includes a better display driver, but the installation method is quite different.
Part 2a: Installing Windows the traditional way:
Windows 1x does not support PS/2 mice, which is the type of mouse most VM software, including VirtualBox, typically use. To get around this, you will need to inject the mouse driver from Windows 2x, which does have PS/2 mouse support.
To do this, first open Windows 2x's Disk 1 in a program capable of editing floppy drives and copy MOUSE.DRV to a folder of your choice.
Then open Windows 1x's Disk 1 and replace it's MOUSE.DRV with the one from Windows 2x. Save.
If you're having troubles doing this, you can download the Disk 1 I prepared earlier. It comes with the other installation disks as well, excluding the printer disk.
On your Virtual Machine, mount the first and modified Windows 1x floppy disk and run "setup". Switch to your floppy drive by running "a:" if need be.
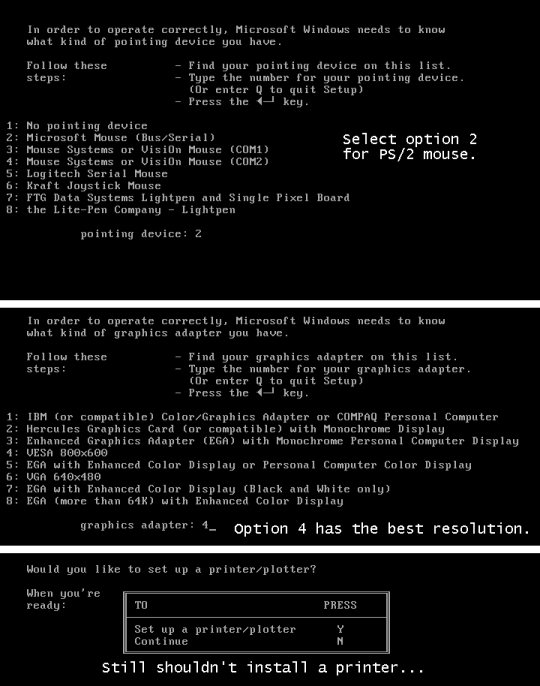
Continue through the setup, then select the following options:
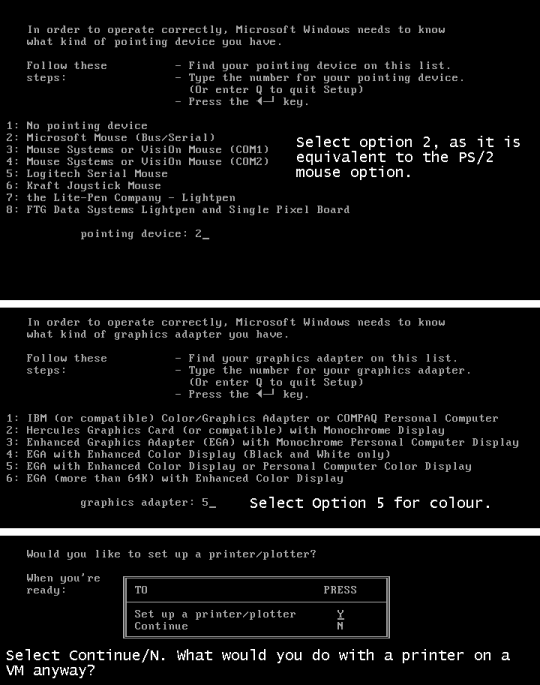
After the setup is complete, you are likely to get an error saying something like "Insert disk with \COMMAND.COM in drive A and strike any key when ready" Remove any floppy drives and restart the VM.
To enter Windows you will need to change the current DOS directory to the Windows directory. To do this, run "cd c:\<windows directory>" or "chdir c:\<windows directory>"
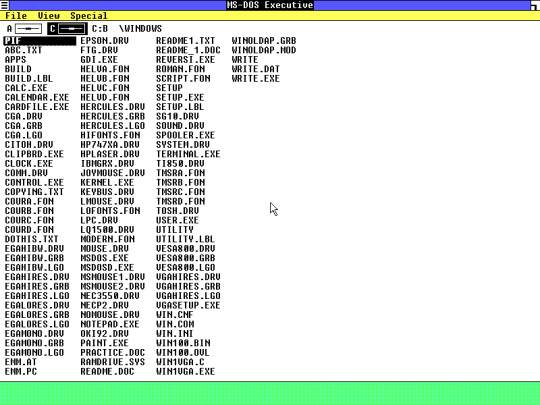
Run "WIN" to start Windows 1.0
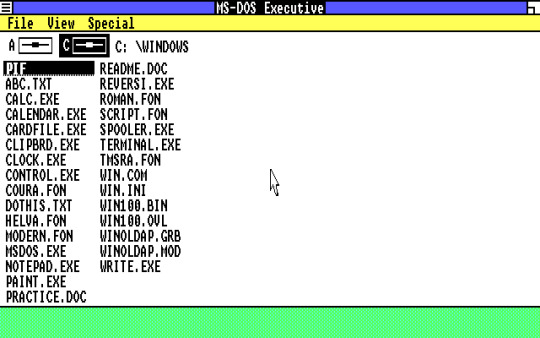
And you're in! You did it! But unfortunately, the screen looks quite squished. Yuck! Which leads to...
Part 2b: Installing Windows using a driver patch:
You will need the driver patch in question in order to be able to use this method. Download it from here.
Extract the VGA utility to a folder of your choice. Then open all Windows 1.0 installation floppies and copy the files over to the same folder.
I have already done this for you. Download it here if you want.
Mount the virtual hard drive for your Windows 1.0 VM (MAKE SURE THE VM IS NOT RUNNING WHEN YOU DO THIS). To make things easier, you can locate your VM's hard drive by copying the file path provided in Settings -> Storage:
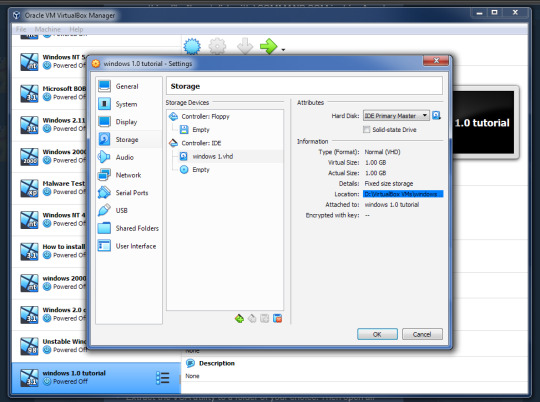
Copy the folder containing the setup files and driver patch to the virtual hard drive. Make sure that its name is eight characters or less, because yes, that was a filename restriction that existed back in those days. MAKE SURE THAT YOU HAVE NO SNAPSHOTS OF THIS VM WHEN YOU DO THIS OR IT WILL NOT WORK.
Eject the virtual drive BEFORE starting up the VM.
In the VM, run "SUBST A: C:\<setup folder>" This tricks the VM into thinking that there is a floppy drive containing all these files. Why? Because Windows 1x does not support setup from the hard drive itself.
Run "a:" to switch to the "floppy drive", then run "win1vga" (without quotes). This will cause the driver patch to install the VGA utility. WARNING: It may not patch the mouse driver, so I recommend using the modified setup disk from Part 2a.
Run "VGASETUP". This is the modified setup that accomodates for the driver patch.
The setup will be slighty different from Part 2a, so select the following options:
This time, you won't have to swap out the floppy disks, because all the files needed are on the same "floppy disk".
After the setup is complete, you can run "WIN" to win!
It looks SO MUCH better now, doesn't it? Though this setup may cause the mouse to get stuck at the edges. Again, you will have to change the directory to the Windows directory the next time you start this VM (explained in Part 2a).
Now you know how to install Windows 1.0. There's not a lot you can do on there. It is an old OS and the first of its kind after all. You can change the colours, run programs like WRITE, PAINT and REVERSI. But fortunately for you, there are actually plenty of apps that you can run on Windows 1.0.
There are two sites that I recommend getting these programs from:
WinWorld: Contains a ton of random programs. Some of these have versions that can run on Windows 1x, such as ZSoft PC Paintbrush (which lets you draw in COLOUR!).
ToastyTech: Has a page dedicated to programs for Windows 1x and 2x. This site also links the driver patch used in Part 2b of this tutorial.
PLEASE NOTE: Some of the progams here are not compatiable with Windows 1x and can only run on Windows 2x. These programs will CRASH Windows and/or even DOS and you may need to reboot the VM in order to use it again. Get a VM with Windows 2.0 or later to run these programs.
#The Nostalgia Zone#old software#old windows#nostalgia#windows#ms-dos#windows 1.0#tutorial#non-video tutorial#written tutorial
2 notes
·
View notes
Text
Leap Office 2000 32 Bit Free Download

Leap Office 2000 32 Bit Free Download Windows 10
Leap Office 2000 32 Bit Free Download Windows
Java 32-bit
The Complete Indian language software
LEAP Office 2000 is a complete Indian language software for office applications. It has been developed in collaboration with Mithi.com Pvt. Ltd (earlier Men at Work) This is the most advanced package in LEAP range of products.
LEAP Office 2000 has a number of features to make the use of Indian languages extremely easy. It provides a number of tools to increase the efficiency of the user. These include multilingual Spellchecker, keyboard shortcuts, search and replace, online keyboard and official language dictionaries.
Leap Office 2000 32 Bit Free Download Windows 10

New technologies like the Internet have been well adopted by LEAP Office 2000. It incorporates the facility to send an Indian language e-mail without going to a separate editor. Creating WebPages using LEAP Office 2000 is as simple as creating any other document.
Language intelligence is inbuilt into LEAP Office 2000 at many fronts such that at any given instance it is possible to know in which language the user is working. The multilingual Spellchecker takes an intelligent decision to check the spellings of the text as per the language. The official language dictionaries come handy for official language terminology.
Leap Office 2000 32 Bit Free Download Windows
Microsoft Corporation (Free) Download Microsoft Office Compatibility Pack is an add-on for Microsoft Office 2000, Office XP and Office 2003 to open, edit and save Microsoft’s newer Word, Excel and Powerpoint formats that were introduced w.

Java 32-bit

Download and install this software to bring back the classic style menus and toolbars to Microsoft Office 2007. You don't need any training or tutorials if you use Office 2003, XP or 2000 before. The software helps you to work with Office 2007 as if it were Office.
Jul 06, 2021 All versions. LEAP Office 3.1.32.199 (latest) LEAP Office 10.0. LEAP Office 3.0. No specific info about version 2.0. Please visit the main page of LEAP Office on Software Informer.
Assamese Leap Office Setup Software Portlock Leap Frog v.5.13.0.2319 Create a bootable Virtual Hard Disk for native Windows deployment Portlock Leap Frog will assist you in creating a bootable Virtual Hard Disk (VHD) for native Windows deployment with your Windows XP, Windows Vista, Windows 7 or Windows Server 2008 machine.
Youtube Subscribe -:https://www.youtube.com/channel/UCf-l7SmOsGry9JMKKAZj0cgTwitter-:https://mobile.twitter.com/SubhrajitsubhaFacebook-:https://m.facebook.co.
Some of the salient features:
Very simple User interface
Online active Keyboard layout for those who do not know how to type
Multilingual Spellchecker
Direct e-mail facility in Indian languages
Facility to make web pages in Indian languages
Synonym dictionary
Official language dictionaries
Bilingual fonts which allows easy toggling between Indian scripts & English in other Windows applications
Seamless exchange of files from LEAP Office 2000 to other Windows based applications
Extensive help at various levels make it easy for a new user to get acquainted very quickly
Choice of Keyboard layouts
For more details, please contact: More information on GIST products E-Mail: info(dot)gist(at)cdac(dot)in Sales related information E-Mail: sales(dot)gist(at)cdac(dot)in Support related information E-Mail: support(dot)gist(at)cdac(dot)in
1 note
·
View note
Text
Poweriso Free

free. software download. 7/10 (165 votes) - Download PowerISO Free. PowerISO is one of the best and most complete programs to work with ISO images from your PC. You can create, mount, edit, and burn ISOs on to discs.
PowerISO Full Crack + Activation Key Free Download (Latest)
PowerISO Crack is a powerful disk image processing tool that allows you to modify image files in several ways: opening, extracting, burning, creating, modifying, compressing, encrypting, sharing and converting image files to the internal virtual drive . All common image files on CD, DVD and Blu-ray are supported. Typically, a “file” is a file that contains the complete image of a hard drive.
These files are commonly used when transferring CD / DVD images over the Internet. Depending on your contact, “ISO file” may refer to all disk image files or only to a certain extent. With , you can access virtual drive images for VMware (VMDK), Virtual PC (VHD) and VirtualBox (VDI) just as easily. Just open it and browse the content, edit individual documents, drag and drop files to or from the image, and treat it like any other player.
PowerISO Full Crack
According to the most restrictive definition, a “PowerISO Serial key file” is created by copying an entire hard drive from sector 0 to the end into a file. Since the image file contains “cooked” sectors with 2048 bytes and nothing else, you can only record one data track this way.
Audio tracks, mixed mode discs, CD + G discs, multisession discs, and other unusual formats cannot be displayed. An .ISO file can be edited in several ways: It can be written to a CD or DVD. Mounted as a virtual drive or viewed.
The file is an exact copy of the CD. It can be used to save a CD or to distribute software on the Internet. can not only create ISO files from CD, but also ISO files from local files and folders. An empty compilation is created automatically. By default, the compilation includes the iso9660 and Joliet file systems.
To create a PowerISO DVD Registry key file, click the New button on the toolbar or choose File> New> Image Data CD / DVD and choose DVD-UDF. You can also change the media type by clicking on the appropriate field in the lower right corner of the window.
so you may also like this DaVinci Resolve Crack
PowerISO Crack Key Features:
PowerISO keygen Create an ISO file:
Create an ISO file or BIN CUE file from files on the hard drive. Create an ISO file or BIN CUE file from a CD / DVD / BD disc.
creates a bootable ISO image file. Automatically detect various CD / DVD / BD image files. Supports ISO9660, Joliet and UDF file systems.
Supports Unicode file name. Optimize file arrangement to save space. Edit the ISO file:
Add files to the ISO file. The ISO file is an exact copy of a CD. can copy the entire contents of the disc to an image file.
Delete the files from the ISO file. If the source disc is a single track data disc, you can save it in ISO, BIN / CUE format. or DAA format.
PowerISO Registration code Rename files to ISO files. However, whether the source disc is a multitrack disc or not, it can only be recorded in BIN / CUE format.
copy sector by sector when copying the disc. All information is copied to the image file. Change the date and time of the file in the ISO file.
Add boot information to the ISO file to create a bootable ISO image file.
PowerISO Key Free Download Extract ISO File:
Support ISO file and other popular disc image file, such as BIN / CUE, DAA, UIF, DMG, MDF / MDS, ASHDISC, BWI / B5I, LCD, IMG, CDI, CIF, P01, PDI, NRG, NCD, PXI, GI, FCD, VCD, C2D, BIF and so on.
Support the multi-session disc image file.
Extract files from ISO file.
View and run files contained in the ISO file.
Poweriso Free Download With Crack
PowerISO Portable v8 Version Burn ISO File:
Moreover, Burn ISO file and another image file to CD-R, CD-RW, DVD-R, DVD-RW, DVD+R, DVD+RW, DVD-RAM, DVD-R DL, DVD+R DL, BD-R, BD-R DL, BD-RE, BD-RE DL.
Burn Apple DMG files directly to CD / DVD / BD discs.
however, Burn files and folders to CD / DVD / BD discs on the fly.
Burn Audio CD from MP3, WMA, APE, FLAC, WAV, or BIN files.
Burn Video image file to CD / DVD disc.
Support two erasing modes for rewritable discs: Full Erasing and Quick Erasing.
PowerISO 7.8 Registration Key:
Mount ISO file and another popular image file as a virtual drive.
Support up to 23 virtual drives.
Make Audio Disc
Create standard Audio CD.
Create a mixed-mode CD.
Support Audio CD-TEXT.
Burn mp3, WMA, Wav, FLAC and ape files to CD.
Burn bin / cue, mp3 / cue, wma / cue, wav / cue, flac / cue and ape / cue audio image files to CD.
Edit existing Audio CD image files.
Support Playing Audio Tracks within the Audio CD image file.
PowerISO Crack Patch Audio CD ripper:
Rip audio CD to mp3, WMA, Wav, FLAC and ape files.
Rip audio CD to bin / cue, mp3 / cue, wma / cue, wav / cue, flac / cue and ape / cue audio image files.
ISO and BIN Converter
Convert ISO to BIN.
serial key Convert BIN to ISO.
Moreover, Convert Apple DMG files to ISO file.
Convert all popular images files to ISO file.
HOwever, Convert all popular images files to BIN file.
Open / Extract /Edit disk image file
Support all popular virtual disc image files, such as VMWare Virtual Disc Images(*.vmdk), VirtualBox Virtual Disc Images(*.vdi), Virtual PC Virtual Disc Images(*.vdi).
Create Bootable USB drive Using PowerISO Fully Licensed:
Poweriso Free Registration Code
Create a bootable USB drive for Windows XP, Windows Vista and Windows 7.
Support USB-FDD, USB-ZIP, and USB-HDD.
Supported CD/DVD disc image types
ISO (Generic CD images)
Support drag and drop.
Moreover, Support clipboard copy and paste.
Support multiple languages.
However, Support operating system: Windows NT 4.0, Windows 2000, Windows XP, Windows 2003, Windows Vista, Windows 2008, Windows 7
Support both 32-bit and 64-bit windows.
System Requirements:
supports the following operating systems:
Windows98 / Windows Me/ Windows NT 4.0 / Windows 2000 / Windows XP / Windows 2003 / Windows Vista / Window 7 / Windows 8 / Windows 10 operating system or above.
Intel Pentium 166MHz or above.
64MB memory.
At least 128MB hard disk space.
What’s New?
Can create a bootable USB FreeDOS and MS-DOS drive.
In addition, Can open 4kn hard disk image files.
Can convert it to iso file.
Supports the ext4 file system.
Improve support for the NTFS file system.
Some bugfixes and minor improvements
How To Install PowerISO Crack:
Start by downloading the installation file via the following link.
Extract the configuration file and run it.
Now press to install.
When the installation is complete.
Open the “Patch” folder.
Double-click Activator.exe.
Made! Enjoy the full version of PowerISO.
1 note
·
View note
Text
Difference Between Microsoft Azure vs Amazon AWS
What is Azure?
• Azure is viewed as both a Platform as a Service (PaaS) and an Infrastructure as a Service (IaaS) offering.
• Azure may be a uniquely powerful offering due to its builder. Few companies have A level of infrastructure support adequate to Microsoft.
Visit Office.com/setup to know more
What is AWS?
• AWS, like Amazon itself, features a vast toolset that's growing at an exponential rate.
• It's been within the cloud computing marketplace for quite 10 years, which suggests that AWS is that the frontrunner and has been for a few times.
• AWS offering services are categorized as Platform as a Service (PaaS), Infrastructure as a Service (IaaS), and Software as a Service (SaaS).
Microsoft Azure vs Amazon AWS Features and Services
Let's start with the basics.
In terms of basic capabilities, AWS and Azure are pretty similar. They share all of the common elements of public cloud services: self-service, security, instant provisioning, auto-scaling, compliance, and identity management. However, between the 2, AWS offers the best depth, with 140 services across computing, database, analytics, storage, mobile, and developer tools. confine mind, however, that they need a start on everyone else since they have been around the longest. That said, Azure is additionally strong on the features and services front and features a parent company that has the resources to carry their own against Amazon.

Storage
Successful cloud deployment relies on sufficient storage to urge the work done. Fortunately, this is often a neighborhood where Azure and AWS are equally strong. AWS's storage relies on machine instances, which are virtual machines hosted on AWS infrastructure. Storage is tied to individual instances--temporary storage is allocated once per instance and destroyed when an instance is terminated. you'll also get block storage attached to an instance, almost like a tough drive. If you would like object storage, you'll catch on through S3, and if you would like data archiving, you'll catch on through Glacier. Azure, on the opposite hand, offers temporary storage through D drive and block storage through Page Blobs for VMs, with Block Blobs and Files doubling as object storage. Like AWS, it supports relational databases, Big Data, and NoSQL through Azure Table and HDInsight. Azure offers two classes of storage: Hot and funky. Cool storage is a smaller amount expensive, but you'll incur additional read and write costs. For AWS, there's S3 Standard and S3 Standard-Infrequent Access. Both have unlimited allowed objects, but AWS has an object size limit of 5 TB, while Azure features a size limit of 4.75 TB.
Computing Power
One front for comparison is computing power, which may be a standard requirement for any IT team. If you are going to take a position in cloud services, you would like cloud services with enough horsepower to stay up together with your office's demands on a day-to-day basis (and during high-traffic periods). The primary issue here is scalability. AWS uses elastic cloud computing (EC2), which is when the available resource footprint can grow or shrink on demand using cloud computing, with an area cluster providing only a part of the resource pool available to all or any jobs. AWS EC2 users can configure their own virtual machines (VMs), choose pre-configured machine images (MIs), or customize as. Users have the liberty to settle on the dimensions, power, memory capacity, and number of VMs they want to use. Azure users, on the opposite hand, chose a virtual hard disc (VHD) to make a VM. this will be pre-configured by Microsoft, the user, or a separate third party. It relies on virtual scale sets for scalability purposes. The key difference is that EC2 is often tailored to a variety of options, while Azure VMs pair with other tools to assist deploy applications on the cloud.
Databases
Regardless of whether you would like an electronic database or a NoSQL offering, both AWS and Azure have robust database offerings.
Amazon's electronic database service (RDS) supports six popular database engines:
1. Amazon Aurora
2. MariaDB
3. Microsoft SQL
4. MySQL
5. Oracle
6. PostgreSQL
Azure's SQL database, on the opposite hand, is predicated solely on Microsoft SQL.
Both systems work perfectly with NoSQL and relational databases. They're highly available, durable, and offer easy, automatic replication.
AWS has more instance types you'll provision, but Azure's interface and tooling are delightfully user-friendly, making it easy to perform various database operations.
This was all about Microsoft Azure vs Amazon AWS. We differentiate these two things to understand you very well. For more help visit Office.com/setup.
1 note
·
View note
Text
Ashampoo ZIP Pro 3.05.08 + Crack [ Latest Version ]
Ashampoo ZIP Pro is a powerful file compression program that allows you to compress, encrypt, exchange, backup, and decompress your important files. The program supports the most popular file formats such as RAR, ZIP, 7z, TAR, CAB, GZ, ARC, VHD, JAR, ACE, MSI, and many more. Ashampoo ZIP offers batch operation that allows you to automatically create, convert, or extract multiple files simultaneously. The program has an intuitive and very easy-to-use interface, it comes with a powerful skinning system, as well as advanced sharing technology and 256-bit encryption.
https://zecrack.org/ashampoo-zip-pro-crack-download/
1 note
·
View note
Link
0 notes