#windows 10 usb tool
Explore tagged Tumblr posts
Visit Tumblr Blog
Explore Tumblr blogs with no restrictions, modern design and the best experience.
Last Seen Tumblr Blogs


Fun Fact
When “GIF” was named word of the year in 2012, Oxford Dictionaries U.S.A. credited Tumblr for pushing the word.
Text
Have YOU got an old Windows PC Microsoft has told you can't run Windows 11? It's time to give it a new life!
How to install Windows 11 on unsupported PC Hardware using Rufus. You can also disable some other Windows 11 bullshit like data harvesting and needing a Microsoft account.
It has been in the news a lot lately that Windows 11 isn't allowed to be installed on PCs without certain requirements, including the TPM 2.0, a chip that was only included in PCs made in 2018 or later. This means that once Windows 10 stops receiving security updates, those PCs will not be able to (officially) run a safe, updated version of Windows anymore. This has led to an estimated 240 million PCs bound for the landfill. Thanks Microsoft! I get you don't want to be seen as the insecure one, but creating this much waste can't be the solution.
(I know nerds, Linux is a thing. I love you but we are not having that conversation. If you want to use Linux on an old PC you are already doing it and you don't need to tell me about it. People need Windows for all sorts of reasons that Linux won't cut.)
So lately I have been helping some under privileged teens get set up with PCs. Their school was giving away their old lab computers, and these kids would usually have no chance to afford even a basic computer. They had their hard drives pulled so I have been setting them up with SSDs, but the question was, what to do about the operating system? So I looked into it and I found out there IS actually a way to bypass Microsoft's system requirement and put Windows 11 on PCs as old as 2010.
You will need: Rufus: An open source ISO burning tool.
A Windows 11 ISO: Available from Microsoft.
A USB Flash Drive, at least 16GB.
A working PC to make the ISO, and a PC from 2018 or older you want to install Windows 11 on.
Here is the guide I used, but I will put it in my own words as well.
Download your Windows 11 ISO, and plug in your USB drive. It will be erased, so don't have anything valuable on it. Run Rufus, select your USB drive in the Device window, and select your Windows 11 ISO with the Select button. (There is supposed to be a feature in Rufus to download your ISO but I couldn't get it to work.?
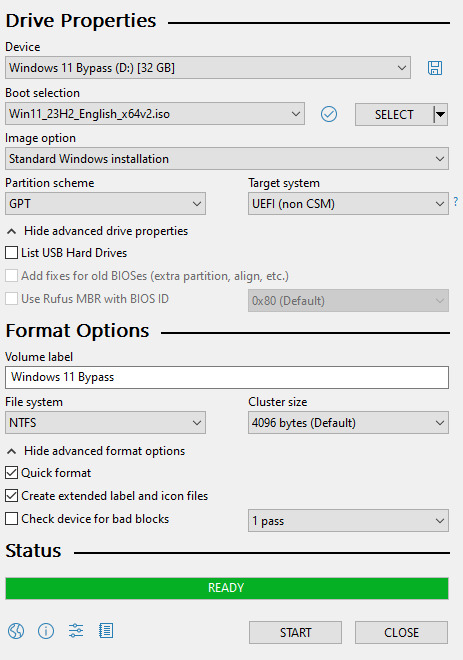
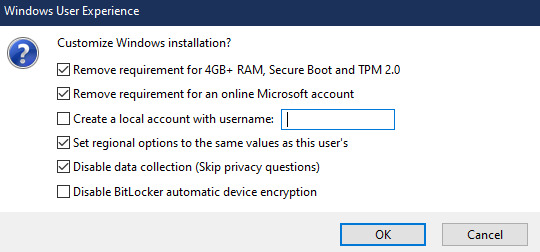
Choose standard windows installation, and follow the screenshot for your settings. Once you are done that, press Start, and then the magic happens. Another window pops up allowing you to remove the system requirements, the need for a microsoft account, and turn off data collecting. Just click the options you want, and press ok to write your iso to a drive.
From there you just need to use the USB drive to install windows. I won't go into details here, but here are some resources if you don't know how to do it.
Boot your PC from a USB Drive
Install Windows 11 from USB Drive
If you had a licensed copy of Windows 10, Windows 11 will already be licensed. If you don't, then perhaps you can use some kind of... Activation Scripts for Microsoft software, that will allow you to activate them. Of course I cannot link such tools here. So there you go, now you can save a PC made from before 2018 from the landfill, and maybe give it to a deserving teen in the process. The more we can extend the lives of technology and keep it out of the trash, the better.
Additional note: This removes the requirement for having 4GB Minimum of RAM, but I think that requirement should honestly be higher. Windows 11 will be unusable slow on any system with below 8GB of RAM. 8GB is the minimum I think you should have before trying this but it still really not enough for modern use outside of light web and office work. I wouldn't recommend trying this on anything with 4GB or less. I am honestly shocked they are still selling brand new Windows 11 PCs with 4GB of ram. If you're not sure how much RAM you have, you can find out in the performance tab of Task Manager in Windows, if you click the More Details icon on the bottom right. If you don't have enough, RAM for old systems is super cheap and widely available so it would definitely be worth upgrading if you have a ram starved machine you'd like to give a new life.

#Windows#Windows 11#tech#tech advice#pc#TPM 2.0#rufus#open source#open source software#technology#tech tips
725 notes
·
View notes
Text
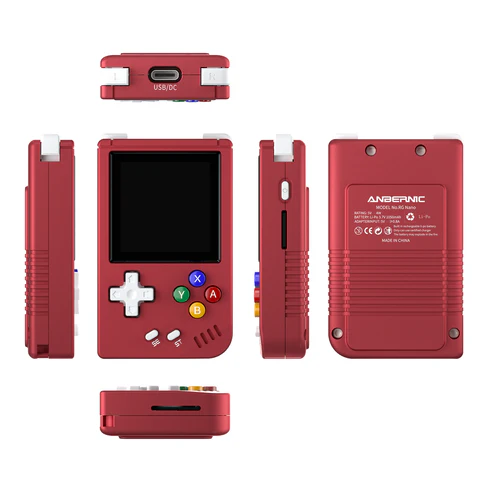
RG Nano Review: The Only Device Worse Than Not Having One
It's been a while since I bought this device and even longer since Anbernic released the RG Nano. It's been about a year and a half since it came out so you can't really accuse me of being an early adopter. But I've been spending a lot of time with this device testing everything that I could and it's not great. I won't pretend there isn't anything good about it but I will tell you now that this device is near 100% novelty with 0% practicality.
The RG Nano for those that don't know if an emulation handheld made to play a myriad of emulators and their game files. In this regard the RG nano is actually very impressive capable of playing everything up to and including the PS1 with minimal to no issues. Which is beyond impressive for a device that is shorter than a cotton swab. But as is standard with Anbernic, and other companies producing these devices, they have long since given up on making the perfect device and have opted for making nearly perfect devices with several drawbacks. After all, if they sold you the perfect device what reason would you have to buy the one they release a month later? In the year since this device was made we've seen over 10 devices made from the same XX family of devices that all have the same internals with the only differences being the shell shape. I'm someone who has been a long time supporter of Anbernic but this past year and this device has made me change my mind. Enough about my growing discontent though, let's actually review it.
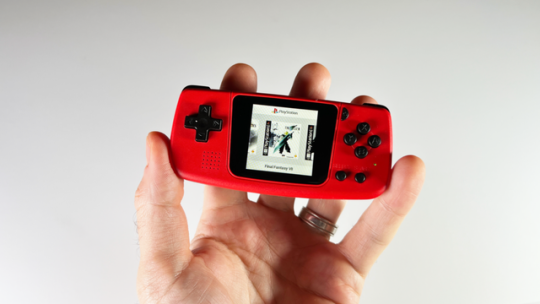
The Shape
There are several important factors that come in when designing a gaming device, especially a handheld. You need to account for screen size, portability, and comfort. The RG Nano is what happens when all of that is thrown out the window. The nano opted for the form factor of the DMG gameboy but with baxy buttons and two bumpers. The shell is metal with grooves for grip. The dpad is a single unit with sharp corners, the baxy buttons are incredibly small and hurt the thumb, the bumpers feel cheap and clicky similar to a 3d printed material, and I have no complaints about Start and Select. The top of the shell is a usb C out for power and data transfer, and it lights up when plugged in, very cool. The power button is small and sits almost flush with system in a receded pit in the device. This also functions as your menu. It's a single boot sd card slot, speaker on the bottom, and fake speaker lines on the bottom right of the device. No headphone jack but it came with a USB to headphone jack dongle.
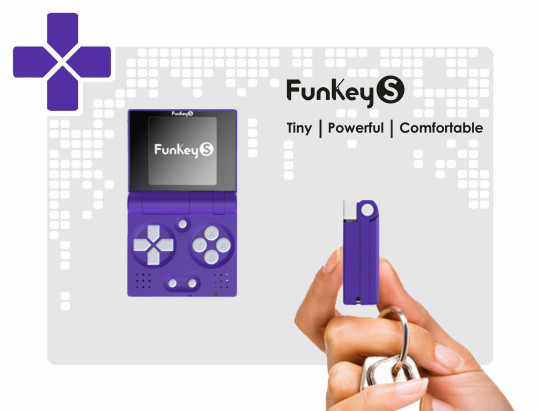
Anbernic created this device during the peak of Mini emulator handhelds. The Funkey S had come out, a small clamshell emulator.
The q36 was a small game gear mini like device. Sega released its game gear minis, and the pocket sprite had released. All of these small devices did similar, they offered a wide suite of emulation tools made in the most portable form factors possible. Each one choosing a different shape. Technically the Funkey S was the smallest, followed by pocketsprite, rg nano, and then q36, and GKD Pixel. The main difference between each was mostly the shape and who was offering them.
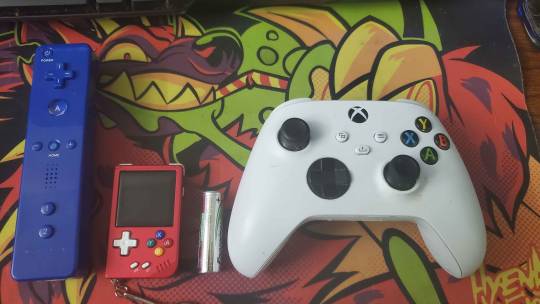
When comparing the RG nano to its peers you can see one thing in common. All of them have better more comfortable shapes and bigger buttons. Playing on the nano is like repeatedly pressing on the end of a push pin. Sessions longer than 30 minutes will result in pain in your thumb and just a minute of play puts a tiny button indent in your thumb. Anbernic was concerned with going as small as possible and congrats, because there is 0 wasted space in its shell. This is the most cramped board I've ever seen and I worked in mobile device repair before becoming a YouTuber.

How this thing doesn't overheat is a mystery to me, I'm guessing the metal shell doubles as a heat sink. Anyway, since they opted for the smallest possible design they went with a square screen, and a vertical form factor. The q36 has the same screen size, but because it went vertical it's overall a much more comfortable shape. The buttons are bigger and every thumb has room to breathe and you have a better grip. Neither handheld is ideal for comfort but q36 is an example of Powkiddy doing the best with the assignment. Anbernic went with sacrificing comfort for novelty. Which is definitely an option. Don't worry though, give them a bit and I'm sure we'll get a nano H for horizontal.

Now about that screen, it's 1:1 square ratio. This square ratio can work great on larger devices like the RG Cube. Having a square screen means every system gets similar accommodations for it's shape. So everyone gets screwed over a little and results in a handheld that is horizontally smaller making it more portable. On smaller devices this means that anything with less than a square aspect ratio is going to be made even smaller. This means only Gameboy, Gameboy Color, NES, and SNES are going to fill out that screen nicely.

Meanwhile everything else is 4:3 or 3:2, leaving massive black bars at the top and bottom with the gameplay being shrunken even further than it's already miniscule monitor. You can choose to stretch the scaling but this will leave many characters look like they went through a taffy puller. 4:3 stretching isn't too bad, but 3:2 like the gameboy advance is horrendous. So despite being made for portability the GBA looks bad or just too small. You can optionally zoom with the shortcut select + right on d pad but this cuts off the edges. Other than that the screen is perfectly legible on emulators for handheld devices. But home systems had smaller sprites intended to be seen on TVs. So it's a big time squint fest. The brightness on the screen is great, maybe too high. The pictures I've shown have all been at 0% brightness but I wish it still went lower. I've been using this as a portable flashlight more than a gaming system because it's brighter than my phone.
The Firmware
Anbernic is as popular as it is because of how easy it is to set up out of the box. Most of the time these devices come loaded with thousands of games with emulators already set up. But these games are usually in Chinese, and they're numbered but not in alphabetical order making it impossible to find games on it. On this device that's pretty bad as in list view you can only see 4 game titles at a time. Have fun. But the firmware for this one is problematic. First issue is Anbernic used Funkey's open source operating system, fun key has said they're fine with that. But Anbernic didn't publicly release their version after which is scummy.

Anbernic has a long history of their OS' being outdone almost immediately after release by the community. This has led to anbernic getting lazy in recent years releasing devices with bad or buggy operating systems. In the Nano's case it boots to a clock first every time before booting into a launcher menu. This launcher menu looks like something you'd see on a nokia flip phone. Thankfully it has an alternate launcher you can get to by pressing power then going to "Set Launcher". Confirm with A then restart the device and you get something that looks more like their usual emulation station style launcher.
Now mine looks a little different, that's because I changed my OS to Funkey OS by Drum76. This is an OS that is much closer to Funkey's and is available for many mini devices. I don't normally switch my OS because before this Anbernic's Stock OS' have been fine. But on the Nano that annoying clock on every launch was annoying, but more annoying was my games wouldn't launch and sometimes my device wouldn't power on without multiple on/offs. I changed my OS to Drum's and everything works now. Sort of, now I get occasional flickering. Well, flickering is a step up from not turning on or launching. But now you can see where my title is starting to make a bit of sense. It gets worse though.
The Sound
Nothing major of note here, I'm not an audiophile but I'm not tone deaf. I prefer my music on vinyl, but at the same time I don't notice audio unless it's really bad. That said the speaker isn't the worst but there may be some latency on the sound. When playing Rhythm Tengoku Silver, a fan translation of the Rhythm Tengoku GBA. I'm pretty good at guitar hero, I can't play on expert but I can beat the majority of songs on hard. But on RTS I noticed my timing was worse than on my preferred device my Retroid Pocket 3+. On RP3 I was finishing Karate Man on first try, but on the nano I had to try multiple times. It wasn't until I plugged in my headphones that I was able to get almost a perfect. This could be blamed on the small buttons, the speaker, emulation, any number of things. Whatever it was, I wasn't playing my best. It was possibly the emulation as there is some pixelation when playing.
The Emulation
At first I thought this handheld was great. I tried the classic Yoshi's Island test and it worked fine despite the CPU being at 83% nearly the whole time. Double of what I was getting on PS1 emulation. But it ran fine, maybe it stutters aren't as noticeable on a small screen? What's the Yoshi's Island Test? This is a test Bob on Wulffden does. Yoshi's Island and some other select SNES games had a built in Super FX chip. This chip let Nintendo squeeze some extra power out of their SNES games. This let them do 3d. Yoshi's Island despite displaying minimal 3d absolutely makes the most of this chip. Maybe because so few games used it or maybe it really is that hard to emulate, either way many emulator handhelds can't run Yoshi's Island well. This is kind of common knowledge because many emulator handhelds that typically come with thousands of games seem to always forget Yoshi's Island. It was even able to run Goodboy Galaxy and that's a very recent GBA game made in 2023.
Anyway, it passed the YIT for me. So I decided to roll the dice and play random games. I got a game gear one, Sonic Chaos and started getting frequent slowdowns despite it being an 8 bit console. But everything runs pretty great or normally. Some ps1 games run at 30 fps but it's a consistent 30 and isn't as noticeable on the Squint Master.
The Game Feel
This is in it's own section because even devices that all run the same hardware and software can still handle games differently than others. The Retroid 2 is comparable to many devices but struggles with Dreamcast when others in it's price range don't for example. Probably because it's an Android device. But a lot of factors go into game feel, the hardware, firmware, the emulators, frame rate, the system size, buttons, individual taste, and yeah the RG nano may nail emulation for the most part but it is genuinely terrible to play on.
The screen is too small the majority of the systems it runs well play bad because of the added shrink from small aspect ratios. GBA suffering the most. Gameboy and GBC are great, perfect fits. But even the NES and SNES with their 10:9 screens are still terrible to play because their sprites are smaller. But they control poorly too as systems like PS1 and SNES have a lot of buttons. Yoshi's island runs but the sprites are so small and the buttons too. So it's hard to see but hard to platform too since the dpad is too small for previse movement. When playing Sonic Chaos I frequently had to try and jump to grab rings. One ring took me 5 jumps because I kept barely moving too much.
The machine is perfect for RPGs because they don't require precise controls and if they have a lot of buttons you at least have plenty of time to press it. Playing PS1 is nearly off limits as the nano lacks analog sticks, and L2 and R2 buttons. You can press Select + R to get R2. But say you're playing Chocobo's Dungeon 2, select is the map. So press R2 means opening your map first and then r2 not doing anything because you're on the map. Ps1 doesn't play too bad with a stretched resolution though.
There is only one use case I can think of that this is a good system. You really like Pokemon. It's turn based, clean text, doesn't require precise inputs, uses few buttons, it's a Pokemon machine. But anything else I played all had drawbacks.
Overall
The RG Nano is a perfect example of "Just because you can do something, doesn't mean you should." Anbernic didn't need to ask "Why don't people make systems this small?" Because the answer is obvious, it's a terrible way to play. Now what I meant by the title. Playing this device made me want to play the other systems I own. Every game I thought "This would be better on the rg28xx" or "I miss my RP3". If I had to play nothing but this, I'd choose to not play anything. I'm not even joking. I'll go outside over playing this.
Get Literally Anything Else
Even if you account for it being the most portable handheld it's still pretty terrible because of its other issues.
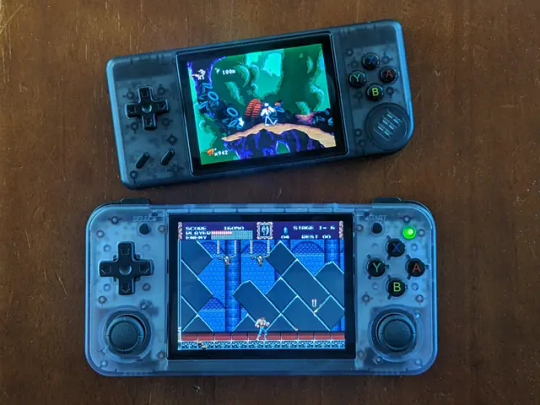
RG28XX above, RG35XX H below
I'd recommend getting an RG28xx it's $30 and goes on sale frequently, the New model has wifi so you can use Retro Achievements. The rg28xx is also only slightly bigger than a micro but still much smaller than a GBA. Better D Pad, bigger buttons, has an r2 and l2, no analog though. The RG35xx H is a better 28xx with analog sticks but and both have hdmi out. Make sure you get the ones that say "New" in their name as they have Wifi.

The Miyoo Mini Plus is recommended by so many people and it's just 50 bucks.
Retroid Pocket 3+, my emu handheld of choice. Android based OS, touchscreen, plays everything from the DS and PSP and earlier. I've even played some Wii and Gamecube on it. But if you want 3ds, Gamecube, Wii U, Wii, and PS2 get RP4 Pro or 5.
If you're willing to go expensive get a Retroid system, they run on Android and it has quickly replaced my phone. When checking social media I don't even reach for my phone anymore. It just needs a camera and a sim slot. If you have literally any other emulation handheld the RG Nano feels like some obscure torture method by comparison. I can confidently say, if the RG Nano is the only emu handheld you can get then maybe it's time for a new hobby. Pick up hiking, rollerblading, skateboarding, boardgames or tabletops.
#gaming#retro#retrocollection#retrocollector#retrogaming#retrocollecting#gamecollecting#gamecollection#emulation#emulator#rg nano#anbernic#miyoo mini#retroid#powkiddy#gba#gbc#gameboy#nes#snes#ps1#playstation#nintendo
18 notes
·
View notes
Text
A few days ago, I re blogged a post describing the intense backlash Adobe is getting for certain policies involving permissions with their cloud services, and posted an article citing these agreements lack of changes until recently - and upon thinking on it for a few days, I AM noticing the apparent lack of transparency, especially since they updated those terms. But the lack of trust for Adobe remains true regardless, and further updates on this matter are far more alarming then the initial read. So, definitely try to find other programs then Adobe's products. I'll likely need to search for something myself. Sadly, I am mostly comfortable with photoshop's features, and clip studio does not work in the way that I like or prefer. I'm a user who likely does not spend as much yearly on a sub, since (and I'm not joking) my uncle does indeed work for Adobe as a programmer, and unfortunately has no clout to stop this higher level lunacy from happening. Though I might pay a smaller price tag, it doesn't change the fact that the price for their programs is astronomical. I'll likely keep using it and other software as I don't have many other options that work the way I'd like them to for my process. However some other options are always nice to look up on. Keep in mind, I am an advanced user, and simple photo manip tools are not going to cut it for painting/drawing/and visual development. I am keeping my eye on a few promising options. Thankfully for Photo manipulation and editing, there is plenty of good and free software to use. Some recs for those who can't just get off the burning Adobe Train - use your firewall to protect you from potential spying from their programs. On Windows, you can change these settings directly within your firewall settings. "No problem.
And for those wondering, on Windows both 10 & 11, go to Control Panel > Windows Defender > Advances Options > Manage Outgoing Connections > Add new rule.
From here you'll enter a wizard menu where you can pick and choose programs to block access to."
(credit to @kevinreijnders.bsky.social for this tip). I also suggest not to use the cloud for your file storage, and I rec getting a different storage device for your art files anyway, as you can take it with you anywhere you go with either an external hard drive, or usb memory stick.
27 notes
·
View notes
Text

Recovery Your PC/Device needs to be repaired The application or operating system couldn't be loaded because a required file is missing or contains errors. Error code: CRITICAL PROCESS DIED You'll need to use recovery tools. If you don't have any installation media (like a disc or USB device), contact your PC administrator or PC/Device manufacturer.
Click Reload This Page to try again Click BSoD to enter Recovery Environment Click Close to shutdown system
A collection of standalone ficlets for @whumptober , featuring alternate scenes and what-if scenarios. Chapter-specific CWs/tags are listed in notes. Individual chapter links listed below.
scan() Miyuki finally comes back online. (Miyuki)
Day 1: race against the clock | search party | panic attack | "If only we could hold on."
firewall() Yuki has learned too much. (Yuki, Aiba)
Day 2: trust issues | "You got away with the crime while the knife's in my back."
memory() Same shit, different lifetimes. (2188!Natsuno, 2188!Yuki, Natsuno, Yuki)
Day 3: set up for failure | "I warned you."
copy() Chihiro isn't alone. (Chihiro x2)
Day 4: hallucinations | sensory deprivation | "You're still alive in my head."
overheat() It was supposed to be a quick research trip. (Tamao, Ei, Iori, Gouto)
Day 5: sun burn | heatstroke | "If my pain will stretch that far."
delimiter() Nenji said he didn't give a shit about his limits. (Tomi, Nenji)
Day 6: not realizing they're injured | unhealthy coping mechanisms | "It's not my blood."
quarantine() The infection reaches the space colony. (2188!Takatoshi, 2188!Izumi, 2188!Ei, 2188!Natsuno)
Day 7: only for emergencies | "It's us or them."
hibernate() The only one way to stop the nightmares. (Shu, Juro, Iori)
Day 8: sleep deprivation | forced to stay awake | "Leave the lights on."
reimage() Ida must bring her back to life. (Ida, Tomi)
Day 9: obsession | broken window | bruises | "Frame me up on the wall, just to keep me out of trouble."
overload() Juro knew the risks when piloting a Sentinel. (Juro)
Day 10: blow to the head | passing out from pain | "I can't think straight."
delete() Ryoko must destroy every trace of him. (Ryoko, Ida, Shu)
Day 11: seeing double | loneliness | "Leave no trace behind, like you don't even exist."
batteryreport() Natsuno can't hold out for much longer. (Natsuno, BJ, Yuki)
Day 12: starvation | "Just a little more."
lock() Everyone was eager to return to the simulation. (Ei)
Day 13: team as a family | familial curse | multiple whumpees | "Death will do us part."
taskkill() He's taking his sweet precious time killing her. (2188!Morimura, 2188!Ei)
Day 14: left for dead | blackmail | "Because I want you to know what it feels like to be haunted."
buffer() Juro is late to dinner. (2188!Megumi, 2188!Juro)
Day 15: childhood trauma | painful hug | moment of clarity | "I did good, right?"
cut() Keitaro pushes himself too far. (Keitaro, Natsuno)
Day 16: necrosis | wound cleaning | "No, I can't feel anything."
missingBIOS() They won the battle, but… (Takatoshi, Tomi, Iori, Gouto)
Day 17: nowhere else to go | shipwrecked | "We had a good run."
chgusr() Megumi will bring back Juro. (Megumi, Juro, Fluffy)
Day 18: revenge | unreliable narrator | loss of identity | "I see what's mine and take it."
reboot() When everything goes dark. (Iori)
Day 19: one way out | "Is there anybody alive out there?"
accept() Miwako can't do this anymore. (Miwako, Iori, Tomi, Gouto)
Day 20: emotional angst | shoulder to cry on | giving permission to die | "It's not your fault."
malware() He refused to go down without a fight. (1la!Takatoshi, Okino)
Day 21: body horror | spirit possession | "Let the bedsheet soak up the tears."
diagnostic() He promised it wouldn't hurt. (Okino, Keitaro)
Day 22: bleeding through bandages | reopening wounds | "Oh that's not good."
shutdown() Everything he did was for her. (Morimura, Izumi)
Day 23: forced choice | public display | broken pedestal | "I'm doing this for you."
recursion() Over 300 loops cause technical difficulties. (Gouto)
Day 24: collapsed building | equipment failure | "I never knew daylight could be so violent."
CAPTCHA() They shouldn't be here. They should be dead. (BJ, 1la!Tamao)
Day 25: surgery | being monitored | "It's for your own good."
cache() She's sick of not knowing, but also of remembering. (Ryoko)
Day 26: nightmares | breakfast table | parting words of regret | "I'm haunted by the lies that I have loved, the actions I have hated."
mute() After a while, Ida just does it for fun. (Izumi, Ida)
Day 27: voiceless | laboratory | "I have no mouth and I must scream."
decrypt() Keitaro discovers Morimura's secret. (Keitaro, Ei - 2188)
Day 28: denial | CCTV | exposure | "They caught me red-handed."
overclock() It's happening again. And again. (Nenji, Tomi, Takatoshi, Okino)
Day 29: fatigue | labyrinth | burnout | "Who said you could rest?"
chkdsk() Natsuno goes missing again. (Natsuno, Keitaro, Yuki)
Day 30: recovery | hospital bed | holding back tears | "What have I done?"
safemode() At least the worst is over. (Tamao)
Day 31: asking for help | making amends | "I'm alive, I'm just not well."
#whumptober2024#completionist#masterpost#13 sentinels: aegis rim#13 sentinels#13 sentinels spoilers#fanfiction#my writing
10 notes
·
View notes
Text
Watch the Birdie Surveillance and Training Options
Prevent your dear little bird from spreading its wings too far with these helpful control tools for the age-regression nursery.
Follow-Me-Birdy Pull Toy. Baby will never guess that this classic toddler plaything hides a GPS tracking device! Cute wooden bluebird on smooth-spinning rubber wheels has a dainty little wrist-loop leash. Snug the strap around slave’s pudgy wrist and snap its buckle closed so little one can’t lose their toy … and it can only be released then with a tiny key that you’ll carry. The rubber leash has hidden braided wires inside, so it will prove surprisingly tough if foolish baby tries to play with scissors! Inner GPS returns location within 10 feet, distance traveled, to a connected smartphone or desktop app.
Watch the Birdie Task Camera. Toy camera with flying bird on top mounts to the wall … and through its lens, a real camera records audio and video at baby’s audio prompt, your silent remote command. Stores videos on a USB drive or streams with a password; records audio on USB or Mini-Record. The birdie bobbles when the camera is recording! Specify blue with orange bird, pink with yellow bird.
Nest Egg Weighing Potty. How adorable would your little one look as a broody birdie perched on the nest? So adorable! Wreath-like faux wicker coil basket encloses the niftiest little glossy-smooth vessel for babyslave’s “bird droppings.” Cute “potty pix” photo op — and there’s a supervision secret underneath. The basket “nest” hides a calibrated scale so you can find out how much weight your “baby chick” is resting on the potty, as well as the mass of what it leaves behind. A companion plastic egg has a window to display the numbers — it just connects to the nest with a little cable. Takes 2 AA batteries. Nest hoses clean; egg wipes clean. Specify egg color white, ivory, blue, brown.
Wet Spot Measure Mat. Obtain objective data on just how soppy your pussy baby gets when he’s watching different sorts of playtime videos … or set up your leaky little lady with a task to produce a certain amount of her “nakey nectar.” You’ll be able to tell by just how far the little puddle spreads on the Wet Spot Measure Mat! Sweet egg-shaped chair mat has suction cups on the bottom, a sleek silicone dildo on top, and printed, labeled circles so you can see the volume of drippy daisy-sprinkles your slave’s vagina produces while impaled there! Special slow-dry fabric feels like cozy baby-friendly flannel; waterproof inner layer prevents soaking through. Flower, kitten, and teddy shapes also available. Machine-wash and dry.
Egg Trampoline. Delightful play and exercise staple has an egg-shaped frame that fully covers its springs, a waist-high grab bar with bondage points for support while jumping — making this little trampoline safe as well as jiggly-fun for ageplayers. Specify a standard bouncy surface or one that gives static shocks if little feet don’t leave the surface again after landing. Specify frame color Translucent Silver Sparkle, Orange Cream, Cherry Blossom, Sky.
Quiet Chirps Luxury Paci Gag. Gorgeous, elegant-feeling adult-baby gag makes sure your baby bird can only tweet very softly indeed! Extra-wide silicone soother fills the mouth – wide, soft wing silhouettes cover the mouth (and wrap the cheeks too). The centerpiece of shatterproof faux china is painted with birds in a blue-willow style, just like a favorite toy tea set, and white patent leather straps buckle at the back to help baby suckle nicely.
Nest Egg Sound Machine. Hanging from the rail of a crib, this egg-shaped speaker soothes and teaches with noise! A caregiver-only back control plate (it’s hidden under an allen-wrench panel) sets the modes: four different audio sets playing indefinitely, starting and stopping when baby taps the speaker front, or cycling one to the next at a tap. And as for those audio sets: it plays white noise, pink noise, or natural wind and birdsong soundscapes ... or sings to baby with birdie-themed nursery favorites: “Rock-a-Bye Baby,” “Birdy Go Fly,” “My Friend Pigeon,” and more! Specify egg color: Translucent Silver Sparkle, Cherry Blossom, gloss French Blue.
#micromanagement#surveillance kink#forceregressed#tpe relationship#humiliation kink#agepl@y#potty training#1cky fiction#bd/sm babygirl#cg/l blog#bd/sm babyboy#cnc agepl@y#cg/l#bd/sm birdie
3 notes
·
View notes
Text
feels like I've been on my feet since monday even though I nap whenever I can. It's just been a lot.
Today I installed windows 10 (use the windows media creation tool to download the iso then use Rufus because the tool will waste your time downloading then not saving that bootable usb) on mum's computer as hers had inexplicably reverted to german and was demanding a password we never set. I really dislike 11 so 10 is much easier for me anyway.
In some (not so) downtime -which ended up being three ten-minute sessions-, I redid a batch of doll earrings and made necklaces for the Rainbow High gals with 70mm eye pins.


and here are my two Zooeys: aliexpress heads on Maleficent playline and Zooey stock. The pale eyeshadow variant never showed up so I gradually acetoned off makeup elements until the character seemed ready. Short Zooey may get green blushed lips, for now i'm really enjoying the serene expression built into the sculpt and the gorgeous mint skin. I'm over the moon with my varied height, varied body, factory/stock heads, swapped eyes crew of Rainbow Highs. 100% worth it.

7 notes
·
View notes
Text
How to mirror iPhone to PC in Windows 11?
Mirroring your iPhone to a Windows 11 PC isn’t as straightforward as mirroring an Android device, but you can do it using third-party apps or workarounds. Here are the best methods:
Method 1: Use AirPlay (If Supported)
Some Windows 11 PCs with AirPlay receiver support (like certain Intel-based systems) can receive iPhone screen mirroring directly:
Ensure your PC and iPhone are on the same Wi-Fi network.、
Ensure your PC and iPhone are on the same Wi-Fi network.
On your iPhone, open Control Center (swipe down from the top-right on newer models).
Tap Screen Mirroring.
If your PC appears in the list, select it.
Enter the AirPlay code if prompted.
Note: Most Windows PCs don’t natively support AirPlay, so this may not work unless you have an AirPlay-compatible app installed.
Method 2: Use a Third-Party App (Recommended)
Since Windows doesn’t natively support iPhone mirroring, you’ll need a third-party tool. Here are the best options:
Option A: LonelyScreen (Paid)
Download & install LonelyScreen on your PC.
Open the app and note the server name (e.g., “LonelyScreen”).
On your iPhone, open Control Center → Screen Mirroring.
Select the LonelyScreen server.
Your iPhone screen should now appear on your PC.
Option B: ApowerMirror (Free & Paid)
Install ApowerMirror on both your PC and iPhone.
Connect both devices to the same Wi-Fi.
On your iPhone, open ApowerMirror and tap “M” (Mirror).
Select your PC from the list.
Your iPhone screen will appear on your PC.
Option C: Reflector 4 (Paid)
Download Reflector 4 on your PC.
Open the app and note the device name.
On your iPhone, go to Control Center → Screen Mirroring.
Select your PC (Reflector) from the list.
The iPhone screen will mirror to your PC.
Method 3: Use a Wired Connection (5KPlayer)
If Wi-Fi mirroring is laggy, try a USB connection with 5KPlayer:
Install 5KPlayer on your PC.
Connect your iPhone via USB and trust the PC.
Open 5KPlayer, go to AirPlay → USB Connection.
On your iPhone, enable Screen Mirroring and select 5KPlayer.
Method 4: Use OBS Studio (Advanced, Requires Mac)
If you have a Mac, you can use OBS Studio with AirPlay and then stream to your PC:
On your Mac, enable AirPlay Receiver in System Settings → Sharing.
Mirror your iPhone to the Mac.
Use OBS Studio to capture the Mac screen.
Stream the OBS output to your Windows PC using NDI Tools or RTMP.
Which Method is Best?
For Wireless Mirroring: Use ApowerMirror or Reflector 4.
For Wired Mirroring: Use 5KPlayer with USB.
If You Have AirPlay Support: Try native Screen Mirroring.
If you still do not have Windows 10/11, You can get it from our store keyingo.com
3 notes
·
View notes
Text
How to Connect Cricut Joy to Computer? (Full Guide)
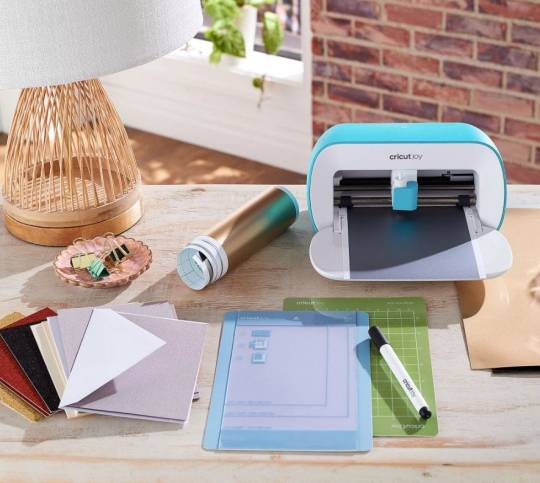
Wants to Learn ‘how to connect Cricut machine and you want to connect it to a computer‘? You can do it effortlessly with the help of this article. This machine is more compact than other Cricut cutting machines. With a sleek appearance and amazing results, Cricut Joy is the choice for many crafters. As a Cricut user and a professional crafter, I’m here to guide you with it. Let’s learn how to connect Cricut Joy to computer.
When it comes to connecting Cricut Joy to a computer, this machine doesn’t support a USB connection. Therefore, you have only one option for connection – Bluetooth. So, I’ll tell you about the Bluetooth connection on your Windows and Mac computers. Let’s get ready with the process.
Minimum System Requirements for Cricut Joy
Before you connect a machine to your computer, check whether your computer and machine are compatible. Why does this matter? You might know that Cricut runs a software called Design Space. This software has some minimum system requirements for a device that is added to it. So, let’s check out those requirements.
For Windows
For a Windows system, Design Space needs Windows 10 or 11 or the latest versions with an AMD processor or an equivalent one. It should also have a minimum of 2GB RAM, good free storage, and compatibility with Firefox, Microsoft Edge, and Google Chrome.
For Mac
For a Mac computer, Cricut Design Space needs a 14.x or newer operating system. Also, an Intel or equivalent processor. It should also have 2GB RAM and 300 MB storage. When you know the most important requirements, let’s dive into the steps involved in connecting your machine to a computer.
How to Connect Cricut Joy to Computer (Windows and Mac)
To connect your machine to your computer, you need to follow the steps given below. Here, you’ll see the steps for Windows and Mac computers.
For Windows
To connect your machine to a Windows computer, check out the given steps. As you already know, Cricut Joy doesn’t support USB, so we’ll stick to the Bluetooth connection.
To start, unpack your machine and collect all the accessories from the machine’s box.
Then, install your machine at least 10-15 feet away from the computer.
Now, connect the machine to a power source and turn it on.
After that, go to the Start menu and hit the Settings option.
Next, you should click on the Devices option.
In the next step, ensure that Bluetooth is ON.
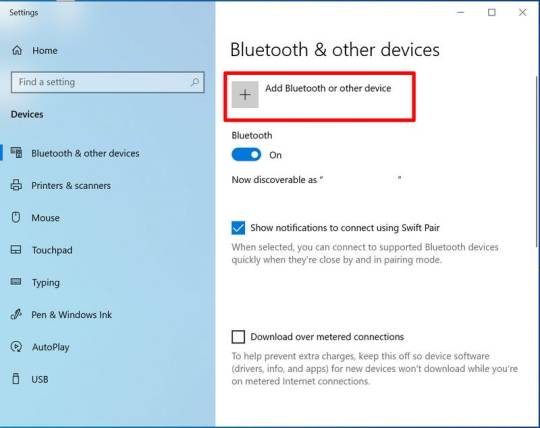
Moving forward, hit the “Add Bluetooth or other device” option.
Also, tap on the Bluetooth and let the computer search for your machine model.
When the machine appears on the screen, select it and let it connect.
Lastly, your devices are paired with Bluetooth connection.
That’s how to connect Cricut Joy to computer. When you know everything, it’s time to try the connection for your devices.
For Mac
If you’re a Mactonish, below are the steps for connecting your crafting machine to your Mac.
To get started, connect your Mac to a power cord.
Then, install your machine on a flat surface and keep it at least 10-15 feet away from your Mac.
Now, go to your Apple menu and select System Preferences.
After that, locate the Bluetooth option on the Mac.
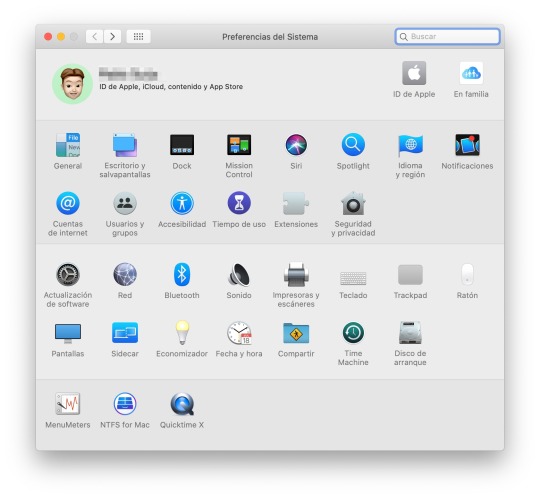
Also, check whether Bluetooth is ON.
In the next step, choose your machine from the list of available devices.
Finally, your machine is paired with your Mac.
That’s how to connect your machine to a Mac computer. Finally, you can start creating projects with your brand-new machine. Now, let’s take a look at the steps for a Mac computer.
Conclusion
Finally, you know how to connect Cricut Joy to computer. Start creating your DIY projects quickly. This machine is excellent for beginners and for DIY pros. The only thing you need to care about is the minimum system requirements for the Design Space software. Besides that, this tiny tool is travel-friendly and works well for you. The crafting machine can become your companion when you need it.
FAQs
How to Download Cricut Design Space on Computer?
To get the Design Space software on a computer, follow these steps:
To start, launch a browser and navigate to https://cricut.com/setup.
Then, accept the Terms of Use and its Privacy Policy.
Now, hit the Download button on the screen.
After that, let the file download under the Downloads folder.
Next, visit the Downloads folder and find the app file.
Double-click on the folder to open it.
In the next step, run the installation and continue with the on-screen directions.
Finally, sign in to your account.
Can I Connect My Cricut Joy to Computer via USB?
No, you can’t use a USB to connect your machine to your computer. It doesn’t support USB. However, you can use a Bluetooth connection to set up a connection between your machine and your computer.
How to Connect Cricut Joy to Windows 11?
You can connect a machine to Windows 11 via a Bluetooth connection. Go to your laptop and search for Bluetooth and other devices. Then, turn on the Bluetooth option. Now, let your laptop locate your machine. Then, choose your machine’s name from the list of devices and let the pairing happen.
Source: How to Connect Cricut Joy to Computer
#how to connect Cricut Joy to computer#cricut design space download#cricut design space app#cricut design space software#cricut joy setup
2 notes
·
View notes
Text
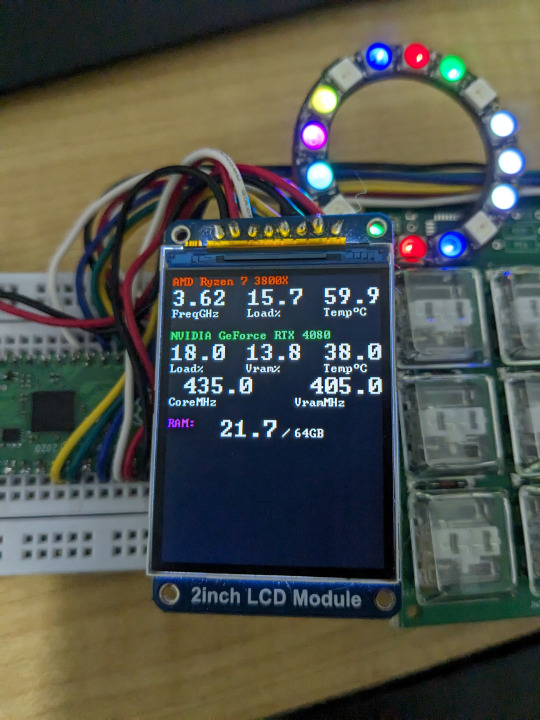
So, how's the JukeBox development coming along? Well, it sure is coming, I promise.

In case you don't know what a JukeBox is, it's a little hotkey device I'm building! I originally made this to assist with my endeavors in streaming, but it turns out having extra keys is very useful for a lot of things! Whether it be hotkeys for quickly running macros via AutoHotKey, managing your Discord audio settings, playing funny sounds with VoiceMod, switching tools in your favorite art program like Paint Tool SAI, or managing OBS like I do. It's a very powerful device, and all it does is act like a keyboard with the F13-F24 keys. I bet you didn't even know there was more than the F1-F12 keys, am I right?
About a year ago, I said I would begin selling these soon. That was a bit of a lie, fortunately I am very good at those. That last bit was also a lie, in case you couldn't tell. I got the opportunity to work on the JukeBox as part of an independent study for college credit, so I took a lot of time to plan and rethink the product. That part wasn't a lie The result is the new V5 board!
Ok so this isn't the actual V5 board yet.
I decided to completely change up what makes up a JukeBox. I decided to use an RP2040 chip, which is used to power a Raspberry Pi Pico. I used a Pico board, along with the old JukeBox V4 boards, an RGB LED ring, and an OLED screen to build my ideal V5 prototype. The result is the same JukeBox known and loved but with some added features, like reactive lighting and a screen to display fun graphics and info!

This is the finalized board, it's design has been shipped off to manufacturing, and will hopefully arrive right at the start of the new year. I'm paying a lot of money for just 10 of these things! I can't wait.
The plan is to sell 3 versions of the board, a basic variant (keyboard only), an RGB variant, and an RGB plus screen variant. Prices are still being determined, but they will be higher than previously anticipated due to rising material costs. The goal is to keep the basic variant at $25 to maintain affordability. You will also be able to choose what kinds of keys you want, be it Cherry MX Blues or Kailh Choc Whites.


I'm working on the final casing. It'll be a 3D printed shell with some nice M2.5 nuts and bolts. It'll also be in a mostly-opaque white so the RGB looks good shining through. The legs are also completely optional, both the case and the legs will have nice rubber feet to keep the board steady. The keycaps will be "relegendable", meaning you'll be able to stick a piece of paper in them with whatever you want on them. You get everything seen here, plus a USB-C cable, and my deepest gratitude. Maybe some day you'll get to have a JukeBox in atomic purple instead of a basic white!
The best part about it all is that you don't need to install any drivers! The keyboard component is always guaranteed to work on any computer that supports USB, and most usually do (hopefully). The screen and RGB won't work without a companion app, sadly, but I'm working hard to make it painless to setup and use, near plug-and-play. I've been writing it in Rust while working on the board, and it will support Windows and Linux without much issue.
Lastly, the entire project is going to be open source! The code will be under an open license, and all the physical parts will be usable under a Creative Commons license (CC BY-NC-SA). I won't allow people to just up and sell the boards without modification, but if someone wants to make and sell their own variant I'd be more than happy to allow it if they ask. Devices like these should be cheap and accessible for everyone.
Hopefully I'll start selling these on my Ko-fi before Q2 of 2024. See you then!
13 notes
·
View notes
Text
How to Free Up Space on Windows 10: A Comprehensive Guide
As your Windows 10 system accumulates more files and applications, it can start to slow down and become less efficient. Freeing up space not only improves your system’s performance but also extends its lifespan. In this guide, we’ll explore various methods to free up space on Windows 10, going beyond the basics to ensure you have a well-optimized system.

Table of Contents
Introduction
Understanding Disk Space Usage
Utilizing Built-in Windows Tools
Disk Cleanup
Storage Sense
Uninstalling Unnecessary Applications
Managing Temporary and Cached Files
Cleaning Up System Files
Windows Update Cleanup
System Restore and Shadow Copies
Using Third-Party Disk Cleaners
Handling Large Files and Folders
Moving Data to External Storage
Using Cloud Storage Solutions
Conclusion
1. Introduction
As modern software and files grow larger, managing disk space effectively becomes crucial. This guide offers practical steps and tips to reclaim disk space on your Windows 10 computer, ensuring it runs smoothly and efficiently.
2. Understanding Disk Space Usage
Before freeing up space, it’s essential to understand how your disk space is being used. Navigate to Settings > System > Storage to view a detailed breakdown. This will help identify which areas need attention.
3. Utilizing Built-in Windows Tools
Disk Cleanup
Windows 10 features a built-in Disk Cleanup tool designed to delete unnecessary files. To access it:
Type “Disk Cleanup” in the search bar and select the app.
Choose the drive you want to clean.
Select the file types to delete (e.g., temporary files, system cache).
Storage Sense
Storage Sense automates disk cleanup. To enable it:
Go to Settings > System > Storage.
Toggle on Storage Sense and configure settings to regularly delete temporary files.
4. Uninstalling Unnecessary Applications
Unused applications take up significant space. To uninstall them:
Go to Settings > Apps > Apps & features.
Review the list and uninstall non-essential programs.
5. Managing Temporary and Cached Files
Temporary files can quickly accumulate and consume disk space. Use Disk Cleanup or third-party tools to regularly clear these files. Browsers also store cached data, which can be cleared from the browser settings.
6. Cleaning Up System Files
Windows Update Cleanup
Old update files can take up substantial space. Disk Cleanup includes an option to remove these:
Open Disk Cleanup and select Clean up system files.
Choose Windows Update Cleanup.
System Restore and Shadow Copies
System Restore points and shadow copies can consume significant disk space. Manage these by:
Typing “System Protection” in the search bar.
Selecting the drive and clicking Configure.
Adjusting the Max Usage slider to limit space usage.
7. Using Third-Party Disk Cleaners
Third-party tools like CCleaner provide more comprehensive cleaning options. They can remove junk files, clean registries, and manage startup programs to free up space.
8. Handling Large Files and Folders
Identifying and managing large files is crucial. Use tools like WinDirStat to find large files and folders. Consider moving non-essential large files to external storage.
9. Moving Data to External Storage
Free up space by moving data such as videos, photos, and documents to external hard drives or USB sticks. Ensure you regularly back up important data to avoid loss.
10. Using Cloud Storage Solutions
Cloud storage services like OneDrive, Google Drive, and Dropbox offer substantial space. Move infrequently accessed files to the cloud to save local disk space.
11. Conclusion
Regular maintenance and mindful storage practices can keep your Windows 10 system running efficiently. Use the tips and tools outlined in this guide to manage and optimize your disk space effectively.
External Authoritative Sources
Microsoft Support: Free up drive space in Windows
CCleaner Official Website
How-To Geek: The Ultimate Guide to Freeing Up Space on Your Windows PC
By following these detailed steps, you can efficiently manage and optimize your disk space on Windows 10, ensuring your system remains fast and reliable.
#Windows 10 Performance#Disk Cleanup#Storage Management#System Optimization#PC Maintenance#Free Up Space#Windows 10 Tips#Specific Techniques:#Disk Cleanup Tool#Storage Sense#Uninstall Programs#Temporary File Management#System File Cleanup#Third-Party Disk Cleaners#Advanced Techniques:#Large File Management#External Storage Solutions#Cloud Storage for Windows#System Restore Management#Windows Update Cleanup#How-To Guide#Windows 10 Efficiency
2 notes
·
View notes
Text
How to Connect Cricut Explore Air 2 (Fast Key)

Are you looking forward to setting up your Cricut Explore Air 2 machine? If so, then first of all, congratulations! You have selected a great machine for your projects. But before you use the machine, you have to be aware that any Cricut machine consists of a few steps that you need to follow. If you are not aware of them, it’s OK. I am going to help you learn how to initiate the setup, how to connect Cricut Explore Air 2 to your device, and how to download the Design Space software.
This Explore Air 2 is a second-generation cutting machine in the Cricut Explore family. It is a mid-range tool available in multiple colors, such as blue, green, purple, and white. The machine cuts more than a hundred various materials, from the lightest, like paper, cards, and foils, to the heaviest, including leather, plastic, and wood.
Step 1: Setting up Your Cricut Cutting Machine
The first step is to set up your machine and then connect it to your operating system. Unboxing the machine from the packaging is the first thing you should do to set it up. It should be followed by removing and checking all the items from the box. When you open the box, the supplies and tools you will get are in the section below:
Cricut machine
Premium fine-point blade
Pen and accessory adapter
Power cord
USB cord
Quick Start Guide
Welcome book
LightGrip mat
Test cut materials
Now that you have checked the items from the box, you should move on to learning the setup process. Here is how to set up your Explore machine quickly and easily
Initially, you should plug your machine into the socket and turn the machine on.
Next, you have to connect your machine to a device using either Bluetooth or USB.
Then, you need to open your internet browser and go to cricut.com/setup.
Now, download the Design Space software on your computer.
When the app is downloaded to the device, you must log in with your email ID. In case you do not have an account, you will have to create one.
Once you follow all the above-written steps, your crafting machine will be ready.
After setting up the Explore machine on your device, it’s time to download and install the Design Space software to create projects and work with it.
Step 2: Download Cricut Design Space on a Device
The second step for learning how to connect Cricut Explore Air 2 is to download the app on your device. You can use any phone or computer that is eligible for the machine. Here, we will see how to download the software on a Windows PC.
First of all, open a browser on the Windows computer and visit design.cricut.com.
Then, you need to download the app from the site. But before downloading the software, you are required to agree to the Terms of Use and Privacy Policy. After that, you have to click on Download.
After downloading the app to your PC, you have to open the file. You will find it in the Downloads folder of your computer.
When you find the file, you have to click on it twice.
After that, select the Yes option from a new window. This means that you can trust the app and the source on your computer.
Now, you will see that the software has started to be installed on your computer.
Log in with your email ID and password, and the app will be ready to use.
Step 3: How to Connect Cricut Explore Air 2 via Bluetooth
After learning the setup process and download Design Space, you will have to connect the machine to your computer. Again, we will see how to connect the Explore machine to an Android phone via Bluetooth. Here is how you can do that:
First, you have to put the machine on a flat surface and keep in mind that it should be near an electric socket. You have to use the power adapter to plug the machine into the socket.
Then, switch on the machine and keep it within 10-15 feet of your computer.
Now, you should click on the Start menu on your computer and visit Settings.
After that, you have to select the Devices option.
You will have to turn the Bluetooth ON and click on Add Bluetooth or other device.
Next, you have to select Bluetooth devices and look for your machine.
Also, click on the machine when you see it.
If the computer asks you for a password, type 0000.
The connection on the machine is established.
Now, your Cricut machine setup is complete. You can proceed to work on your projects.
Conclusion
This blog helped you learn how to connect Cricut Explore Air 2 to your device. Here, you see the whole process of setting up your machine. The setup of any crafting machine includes the unboxing of the machine, downloading the Design Space app, and connecting the machine to your device. You read about all of it in detail, and now you can easily set up your own machine. Once your setup is complete, you can start your cutting and crafting projects.
FAQs
Is Bluetooth Mandatory for All Cricut Machines?
Not really! Most Cricut machines have two options when it comes to connecting the machine to any device: Bluetooth and USB. So, even if your phone or computer does not support a Bluetooth connection, you can add the machine to a device using a USB cable. Also, older Cricut models did not have built-in Bluetooth in them, so you can add them with USB only. To pair them via Bluetooth, you need an external Bluetooth adapter. So, not all Cricut machines need to have a Bluetooth connection.
Does Cricut Explore Air 2 Require an External Bluetooth Adapter?
No, it does not. This machine has an in-built Bluetooth connection, so you don’t need an external Bluetooth adapter for that. An external adapter is needed only for machines that are not enabled with an in-built Bluetooth connection, like some of the older Cricut models. On the other hand, Explore Air 2, like most newer machines, has a built-in Bluetooth connection.
How Can I Reset Cricut Explore Air 2 Connection?
If you have a Bluetooth connection error on your machine and you are unable to fix it, you can simply reset the connection, and the problem will be solved. To reset your Bluetooth connection, you must press the power button on your machine and turn the machine off. After that, plug the machine out from the electric source. Leave the machine like this for a minute or so. Again, plug the machine in and turn it on. Connect the machine and your device again, and the setup will be complete.
Source: How to Connect Cricut Explore Air 2
#how to connect Cricut Explore Air 2#cricut design space download#cricut design space app#install cricut explore air 2#cricut explore air 2 setup#cricut machine setup
1 note
·
View note
Text
How Do I Set Up My Cricut Maker? [Ultimate Guide]
Buying a new Cricut Maker can be overwhelming for all of us. Initially, setup can be daunting, but once you do it, you will love the overall process. However, you can easily set up any Cricut machine without needing much assistance.
The post is all about how do I set up my Cricut Maker. Through this write-up, we will see the items while unboxing the new Cricut Maker. Further, you will explore the Cricut Maker and its types. Afterward, we will explain the complete process of setting up your Cricut Maker machine.
What Do You Get in the Cricut Maker Box?
Unboxing a new product is always an exciting task. While unboxing the Cricut Maker machine, we got several items that we will be discussing here. However, you always have the option to select the bundles when you buy the machine from Cricut's official website.
Following are the items that you get in the box of the new Cricut Maker:
Apart from these, you will get the following:
The best thing is that we get the blades and tools along with the new Cricut machine. These blades allow us to try various products before buying more blades.
How Do I Set Up My Cricut Maker on a Computer?
When we talk about setting up Cricut Maker machine, it means we want to connect it to our devices like computers or mobile phones. However, there are certain ways to connect these machines to our devices. For example, we can connect our Cricut Maker to our computer or phone via Bluetooth or USB cable. So, it is the users’ choice to choose which way is the most suitable for them.
Below, we explain how to set up Cricut Maker. This method is only applicable for Windows or Mac users only:
How Do I Set Up My Cricut Maker on a Mobile?
Here's how to set up your Cricut Maker on Mobile devices with iOS or Android operating systems:
Cricut Maker is the most advanced and versatile in Cricut's lineup. However, the box contains various items that you can use to make several projects uninterruptedly. In this write-up, we explained the Maker and its features in detail. It helps the users to get an overview of machines so that they can use them without any hassle. After exploring the Maker cutting machine, the blog found out how do I set up my Cricut Maker.
FAQs
Question 1: Can I set up the Cricut Maker easily?
Answer: People think the setup is daunting, but this is not the case. Cricut machines are just like printers. The only difference is that Cricut has blades to cut. However, when you go through the notice period, you will find the setup is too easy and complete in less time. While setting up, you will need to download and install the Design Space app. This app will guide you through the further setup process, making it easy for beginners to set up the machine in one go.
Question 2: How do I connect my mobile phone to my Cricut?
Answer: Here, we are going to show you the method to connect your mobile device to the Cricut machine. Here, we are using iPhone or iOS devices. So, ensure you have an iOS device.
Question 3: Can I use the Cricut without its software?
Answer: No, you must use the Cricut Design Space app to send your design to your Cricut device. The machine is the companion for your Cricut cutting machine. Without this machine, you can't cut anything. However, the Design Space is essential for creating intricate designs and then sending them to the machine. Also, the app is the only way to maintain communication between your computer and Cricut.
Visit: cricut.com/setup
cricut.com/setup
Source: https://cricutmakersetup.wordpress.com/2023/10/21/how-do-i-set-up-my-cricut-maker-ultimate-guide/
#cricut explore air 2#design space setup#cricut maker#cricut.com/setup#cricut.com design space#cricut.com/create#cricut.com sign in#design cricut.com download#digital design
2 notes
·
View notes
Note
I am both concerned and worried.
If you have a USB(or any way to just store it for this process, it's easier to do so) and your pc meets the requirements for windows 10 you can download it's installation file from the official Microsoft site. to check for requirements, I suggest looking at your settings as a whole, it's been like........ years since I saw windows 7 settings so I wish you luck bestie if you don't know beforehand
before you install, make sure you have everything you want to keep backed up, justtt in case.
after that's done... just simply run the installer tool, it should simply ask if you want to update your windows if you have windows 7 probably. I really hope it does because I do not know how well or safe it would be to put you in your computer's BIOS.
oh my god what are yuo saying at me
#Scary tech words#i dont know anytning about the world can my pc update if i just think really hard about it#cramswering
2 notes
·
View notes
Text
How to Setup Cricut Machine for Beginners in Easy Steps

Crafting has always been my favorite hobby, so I bought a Cricut machine to create more fascinating projects. As it was delivered to my door, I just got super excited. I unboxed it, pulled out the machine, and placed it on my desk. The box also contained wires, a mat, and a tiny blade.
I was so excited when my new Cricut machine arrived, but my excitement quickly faded when I struggled to set it up. I read the user manual to setup the machine and followed every instruction. But nothing worked even after putting in so much effort, from turning on the machine to connecting cables and downloading Design Space. After some extra effort and thorough research, I successfully set it up. I’ll share with you what worked for me.
If you are a beginner who wants to learn how to setup Cricut machine, follow the steps in this write-up.
Key Considerations Before Setting Up a Cricut Machine
Proper setup is essential to ensure your Cricut machine works efficiently for crafting. But there are certain things you must keep in mind to ensure a smooth process. Let me show you what you need to consider before delving into how to setup a Cricut machine:
Ensure Device Compatibility
You must check that the device you use, whether a computer or smartphone, is compatible with the Design Space software.
Ample Space
It is important to have enough space for the machine to work. Leave space at the front and back of the desk for the mat to move freely during cutting.
Power Requirements
Ensure the power adapter matches the voltage requirements specified for your crafting machine.
Internet Connection
Check your internet connection to see if you are connected properly to a network. You must have a stable internet connection to download and install Design Space.
Materials and Tools
Bring all the essential materials and tools, such as a weeding tool, scraper, mat, and standard scissors. When you have everything, you can enjoy your crafting more.
Setting up a Cricut Machine on MacBook via Bluetooth
The journey from unboxing to your first cut involves a detailed step-by-step setup process. Here is what I’ve learned and have become an expert in “how to setup Cricut machine.”
Step 1: Open a browser on your computer and visit the official Cricut website – design.cricut.com. Step 2: In the search bar, select the model of your machine.
Step 3: Check the box next to “I agree to Cricut Terms of Use & Privacy Policy.”
Step 4: Click Download and then wait for the download process to complete.
Step 5: Open the downloaded file, then drag and drop the Design Space icon into the Applications folder.
Step 6: Double-click on the Design Space file and click Open.
Step 7: In the Design Space screen, click Product Setup and select Smart Cutting Machine.
Step 8: Next, choose your machine model.
Step 9: Now, fill in the information to create a Cricut ID and click Create a Cricut ID.
Step 10: If you already have a Cricut account, click Sign In.
Step 11: Once you’ve created an account or signed in, when you get to the Prepare Workspace screen, follow the instructions and click the next arrow.
Step 12: In the Find an outlet screen, plug the power cable into the machine and the wall outlet.
Step 13: In the Connect to Computer screen, connect the machine to your operating system using a USB cable.
Step 14: Click the drop-down menu and select your machine model, then click Continue.
Step 15: It’ll start loading the updates.
Step 16: Click Update to update your machine to the latest and greatest features, then click Next.
Step 17: When you get the Success screen, click Next.
Step 18: Now, go ahead and perform the test cut following the on-screen instructions.
Setting Up a Cricut Machine on Windows via Bluetooth
You may want to learn the method to connect your machine to your Windows PC via Bluetooth. As a tech expert, I suggest that you follow these steps:
Step 1: Check that your machine is powered on.
Step 2: Click on the Start menu icon and go to Settings.
Step 3: Next, click on Devices and turn on Bluetooth, and you’ll get a list of available devices.
Step 4: If your device does not show up in the list, click on Add Bluetooth or other device.
Step 5: Next, select Bluetooth, and your machine will appear on the list.
Step 6: Click on your device, enter the PIN, and click on Connect.
Step 7: When you get the screen saying Your Device Is Ready To Go! Click Done.
Frequently Asked Questions
Q: Does Cricut Design Space Allow Uploading Custom Images?
Yes, the Cricut Design Space software supports multiple file types, including SVG, JPG, GIF, PNG, DXF, and BMP, which can be used as basic or vector images.
Q: How to Upload an Image in Cricut Design Space?
If you need to upload an image in Design Space, just click the “Upload Images” tab and choose the file you want to upload. Next, click “Open” or drag and drop the file into the Design Space image upload window. You can see your uploaded image on the canvas when you are done.
Q: What Materials Can I Cut With My Cricut Machine?
Whether it is Cricut Maker, Explore, or Joy, you can cut a variety of materials. Some of the most commonly used cut materials are paper, cardstock, vinyl, and iron-on. Faux leather and wood veneer are some specialty materials that a crafting machine can cut, but they are all based on the model type.
Q: What Are Some of the Features of Cricut Design Space?
Once you finish the setup process, you may want to start crafting in Design Space. In Design Space, you can explore a lot of stuff. These include a vast library of various fonts and images, ready-to-make projects, and customization tools. A canvas is the main workspace in which you can create your designs. The Layers panel in Design Space helps customize any image, giving access to features like Weld, Slice, Attach, and Contour.
visit: cricut.com/setup
Source: How to Setup Cricut Machine
#cricut machine setup#how to setup Cricut machine#cricut setup#cricut design space app#cricut design space software#cricut maker setup#cricut explore air 2 setup
0 notes
Text
How to Do Windows 10 License Activation Without a Key
activating Windows 10 can feel like a confusing mess when you don’t have a product key. You sit there staring at that little watermark in the corner of your screen, and you wonder: Do I really need to buy a license just to get rid of this? Or maybe you just reset your PC and suddenly, everything’s asking for activation again.
You’re not alone. It happens to students, new PC builders, even folks upgrading from older versions like Windows 7 or 8. The good news? There are ways to get your Windows 10 up and running without entering a license key right away—and yes, you can still use your computer normally.
In this guide, you'll learn how Windows 10 license activation without a key works, what’s allowed, and what’s just hype. It’s written like you’re talking to a friend who’s been through it—because many people have.
What Is Windows 10 License Activation Without A Key?
Think of it like moving into a rental apartment without signing the lease on day one. You can still walk around, cook dinner, and watch TV—but some things are limited until you sort out the paperwork. That’s how Windows 10 behaves when it’s not activated.
When you install Windows 10 without a key, it’s called a digital license grace period. Microsoft actually lets people run Windows without a product key for a while. You’ll still get updates, you can use most features, and your files and apps will stay safe. The catch? You’ll see a watermark on your screen saying Activate Windows, and you won’t be able to change your wallpaper or personalize your theme.
Now, this isn’t just for testing. Some people use unactivated Windows 10 for weeks or even months. Microsoft doesn’t shut your PC down or block you from browsing the web. It’s more like a soft nudge. They want you to get a valid Windows 10 license eventually, but they don’t make your system unusable in the meantime.
So yes, you can install Windows 10 and skip the license key during setup. Just click “I don’t have a product key” and carry on. It’s a bit like borrowing a library book before getting your membership. Everything’s accessible, just not permanent.
Is It Legal To Use Windows 10 Without Activation?
This is a question that gets thrown around a lot, and for good reason. No one wants to end up on the wrong side of software laws—especially not for something as basic as their computer’s operating system.
Here’s the thing: installing Windows 10 without a key isn’t illegal. Microsoft actually allows it. They call it a “trial” or unlicensed use. According to their own terms, users can install the operating system, skip the product key during setup, and run it in an unactivated state.
It’s kind of like test-driving a car. You’re not breaking any rules by driving it around for a bit. The idea is, eventually, you’ll like the ride enough to buy it.
However, while it’s allowed, it’s still limited. Without activating your Windows 10 license, you won’t be able to personalize your PC—no dark mode, no background pictures, not even a lock screen change. You’ll also get regular reminders to activate.
It’s important to note that if you're using Windows 10 for work, or on a company device, skipping the key might violate your organization’s policies. For home users, especially students or casual users, the activation-free setup is a handy way to get started quickly without stress.
So yes, you can use it legally—but think of it like a temporary setup, not a long-term solution.
How To Install Windows 10 Without A Product Key
Let’s walk through this as if you’re setting up your PC from scratch. Maybe you’re installing it on a new laptop, building your first desktop, or fixing up an older computer. Good news: you don’t need to spend money right away.
First, go to Microsoft’s official website and download the Windows 10 Media Creation Tool. This lets you create a bootable USB or DVD to install the system. Don’t worry, it’s safe and free—straight from the source.
Once you’ve created your install media, plug it in and restart the computer. During the setup, you’ll be asked for a product key. Here's the trick: choose “I don’t have a product key”. That’s it. The setup will continue just fine.
After installation, Windows 10 will run normally in unactivated mode. You’ll notice that watermark in the lower-right corner and lose access to personalization settings. But everything else works—file browsing, app installs, even Microsoft Edge.
People often use this setup when they’re waiting to buy a license or moving over from an old machine. It’s a stress-free way to get your PC running without rushing to buy a key.
Just remember, you’ll still need a proper Windows 10 license if you want to unlock everything later.
Genuine Ways To Get A Windows 10 License Without Paying
Here’s a little secret that folks don’t always talk about: there are legal ways to activate Windows 10 without spending anything. It just takes some patience and timing.
1. Free upgrade from Windows 7 or 8: If you still have an old computer running a genuine copy of Windows 7 or 8, you can install Windows 10 and it will often activate automatically. Microsoft didn’t shout about this after their original upgrade period ended—but many users still report that the old keys work.
2. Windows Insider Program: Tech enthusiasts can join this free program and get access to pre-release builds of Windows 10. It’s aimed at people willing to test new features and give feedback. While it’s not for everyone, the builds come activated—no key required.
3. School or university licenses: Many colleges offer free Windows 10 licenses to students. If you’re enrolled in a program, check your school’s software portal. You might be surprised to find a valid activation key waiting for you.
4. Refurbished PC programs: Some certified refurbishers install Windows 10 with a digital license already activated. If you’ve bought a second-hand machine, check if it has a digital license embedded in the motherboard. It might activate on its own after you connect to the internet.
These methods won’t help everyone, but they’re worth exploring if you’re on a budget or just getting started. Remember, if you’re seeing messages like “Windows is not activated”, that doesn’t mean your computer is broken—it just means it’s waiting for a license.
Why Some Users Stick With Unactivated Windows 10
It might sound odd, but many folks stick with unactivated Windows 10 for months—and they’re totally fine with it. Why? Because the core features still work.
Think about it: most people use their PC for browsing, watching videos, writing documents, or doing schoolwork. None of those need activation. You won’t be blocked from installing apps, using the browser, or connecting to Wi-Fi.
A friend of mine once used unactivated Windows 10 for almost a year while saving up for a new laptop. His system ran smoothly, the only hitch was that watermark at the bottom corner. It became sort of a joke—like a screensaver he couldn’t change. But he never had trouble using the computer.
This approach works best for students, low-income families, or folks fixing older PCs for basic use. It’s not flashy, but it’s real. And for many, it’s more than enough.
Just keep in mind that unactivated Windows won’t give access to personalization, some sync features, or certain updates over time. But for casual use? It gets the job done.
FAQ's
Q1: Can I activate Windows 10 without a key? Yes, you can install and use Windows 10 without entering a key during setup. Just click “I don’t have a product key” and complete the installation. It will run in an unactivated state but remain usable.
Q2: Is using unactivated Windows 10 legal? It’s allowed under Microsoft’s terms. You're permitted to run Windows 10 without activation, although certain features will be restricted. You won’t get full support or personalization.
Q3: Will my files or programs be affected if I don’t activate Windows 10? No, your files and apps work normally. Activation mainly affects cosmetic features and some system settings.
Q4: How long can I use Windows 10 without activating it? There’s no strict time limit. Microsoft doesn’t force shutdowns or lock you out. You’ll get reminders and see a watermark, but your system will continue working.
Q5: Can I remove the watermark without activating? There are third-party methods online, but they may not be safe or legal. The watermark is meant to remind users to activate, and bypassing it might breach Microsoft’s terms.
Windows 10 makes room for everyone, whether you’re running a full setup or just getting started. While getting a proper Windows 10 license brings the full experience, using it without a key is a helpful option for many.
0 notes
Text
Top Tools for Large Scale PC Migration: From USMT to PCmover Enterprise
When organizations plan large-scale PC migrations, choosing the right tools is crucial. Whether you're upgrading to Windows 10 or 11, replacing outdated hardware, or moving to a modern IT environment, the right migration software can save time, reduce risk, and cut costs.
In this blog, we’ll explore popular Windows migration tools—like Microsoft USMT and PCmover Enterprise—and help you decide what’s best for your enterprise.
What Is Microsoft USMT?
Microsoft's User State Migration Tool (USMT) is a command-line utility designed for large-scale Windows deployments. It allows IT pros to transfer user files and settings during automated installations of Windows. While effective, USMT can be complex and requires scripting knowledge, making it less ideal for non-technical teams.
Why Many Enterprises Seek a PCmover Alternative
Though USMT is free and integrates well with other Microsoft tools, it doesn't transfer installed applications—one of the most requested features in modern migrations. That's where PCmover Enterprise comes in as a powerful alternative.
PCmover Enterprise: A Better Way to Migrate PCs
PCmover Enterprise by Laplink is a professional-grade solution for large scale PC migration. Unlike traditional tools, PCmover transfers not only files and settings but also applications. It supports automated deployments, offers centralized management, and drastically reduces manual work for IT teams.
✅ Compatible with Windows 10, Windows 11, and previous versions ✅ Saves hours per PC migration ✅ Secure, fast, and easy to use—even for non-technical staff ✅ Offers a free version (PCmover Express) and a portable option for field use
PCmover Home & Free Versions: Ideal for Individuals
For home users or small teams, PCmover Home or PCmover Free Version offer easy ways to transfer files from one PC to another without needing deep IT knowledge. The portable version allows you to carry the migration software on a USB stick—perfect for quick fixes or remote work setups.
Top Benefits of Using PCmover for Windows Migration
Support for USMT Windows 10 and 11 scenarios
Streamlined migrations with less user downtime
Built-in support for Windows Autopilot and Microsoft Endpoint Manager
Works well with hybrid cloud environments
Conclusion:
Future-Proof Your Migration Strategy
Whether you’re upgrading 10 PCs or 10,000, the right Windows migration tools matter. While Microsoft USMT still has its place, PCmover Enterprise stands out as a modern, user-friendly, and fully automated migration solution.
For enterprises, making the switch to PCmover Enterprise could be the smartest move to handle large scale PC migrations efficiently and securely.
0 notes