Archive of velvetwastaken's bookbinding projects! Plus reblogs of other beautiful bindsMemeber in good standing of the Renegade Bookbinding Guild
Don't wanna be here? Send us removal request.
Statistics
We looked inside some of the posts by bluevelvetbindery and here's what we found interesting.
Average Info
Notes Per Post
206K
Likes Per Post
127K
Reblog Per Post
79K
Reply Per Post
118
Time Between Posts
14 days
Number of Posts By Type
Text
16
Note
1
Last Seen Tumblr Blogs


Fun Fact
In Q3 of 2020, 31% of US users access the Tumblr app daily.
Text
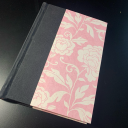
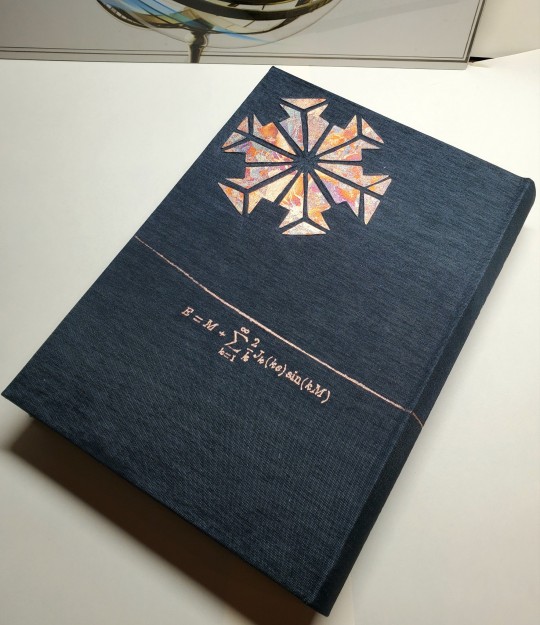
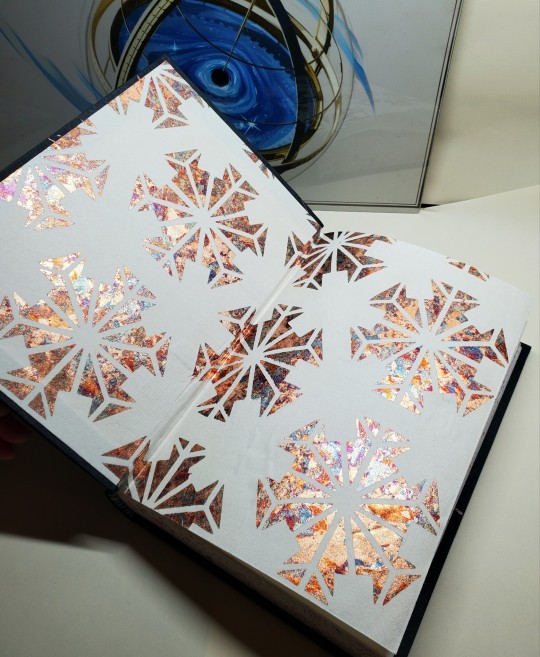
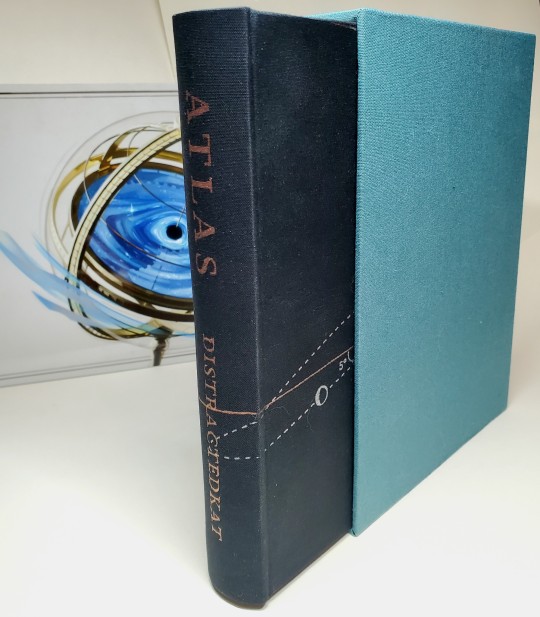
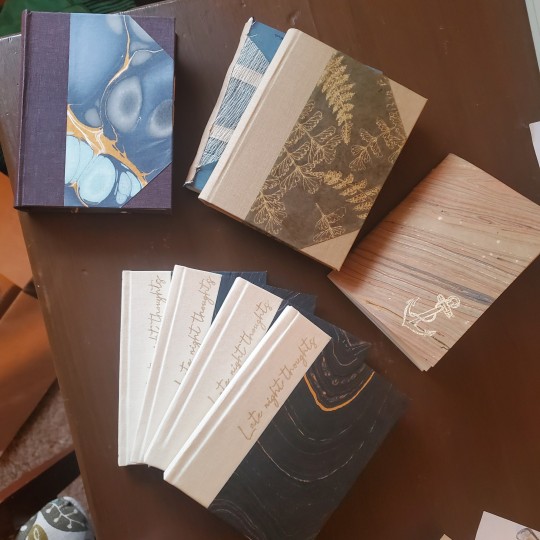
Fanbinding: Atlas, by @distractedkat
(pls click photos for better quality)
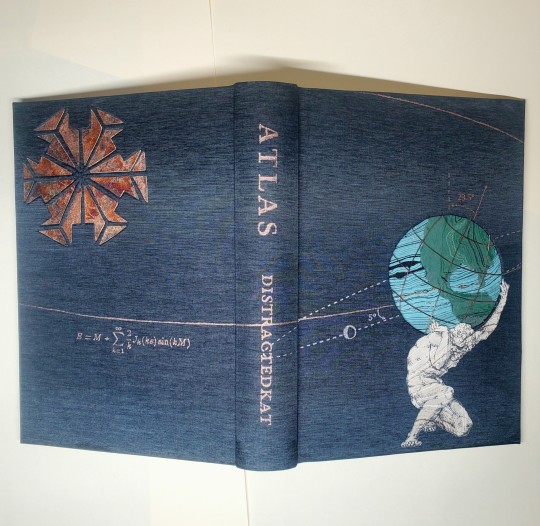
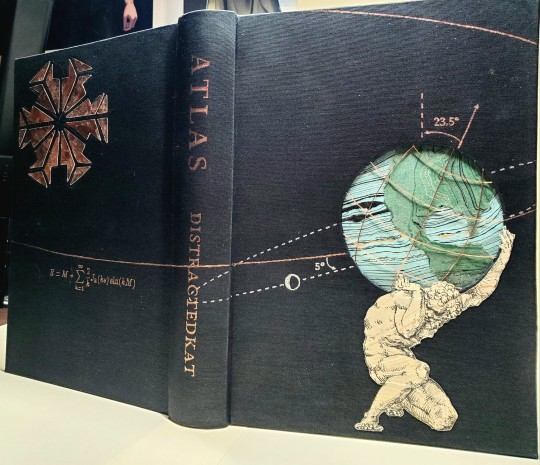
Between what was and what will be stands James Tiberius Kirk, in all his fractured patchwork glory. Because saving the Federation was only the beginning.

This fic has been on my to-do list for a long time, and serendipitously got pushed up for me to do RIGHT NOW because I needed a fic I could use to demonstrate layering boards for cutouts for a class @pleasantboatpress and I taught for Binderary. @finalfrontierpublishing had a great typeset, so I rushed to get the text ready enough for the class demo that I could start the cover... and then things got out of hand. Whoops.
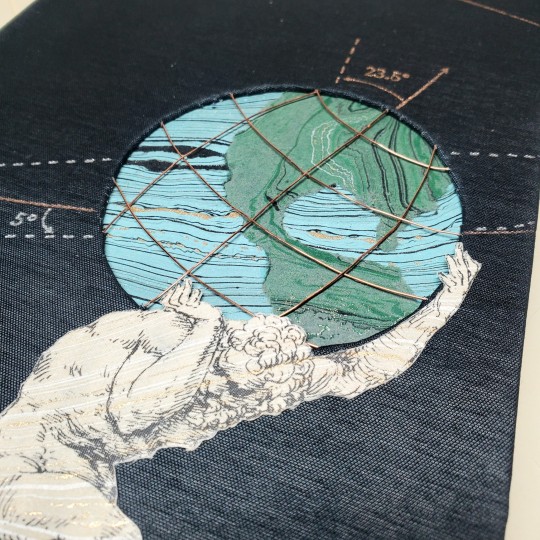
I started with a basic circle cutout for the globe, which then grew a secondary layer for me to sandwich copper wires into. Atlas got printed onto marbled paper and added in on top. Then I developed a plan to have the moon-earth orbits, etc on the cover...
...and I needed a sun & I had this awesome paper I decided to use for endpapers, so we get a stupid complicated paper inset too...

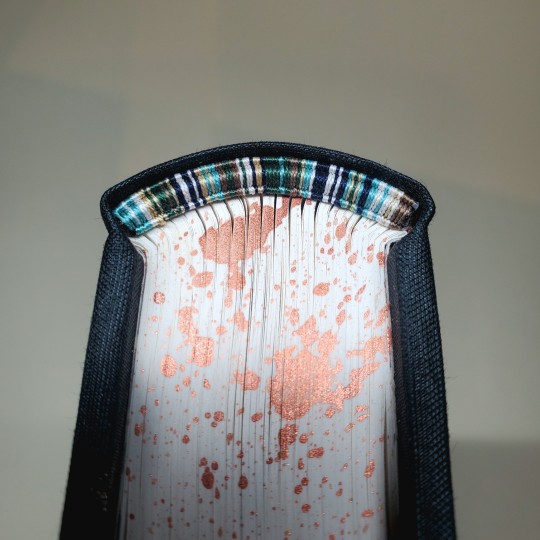
...and I had been meaning to try out French double core endbands so why not do those in the colors of the earth from space...
Annnnnd then I was going to a box-making class & this is the kind of delicate that kinda needs one. so. here we are!
bonus: that art peep in the background is a super awesome metal print by @natureintheory
bonus bonus: cutting out the sun, and the cardstock layer goes under the bookcloth to create the indents that the pieces of the sun fit into like a puzzle
materials notes: colibri uran bookcloth, extremely delicate handmade Japanese paper for endpapers (did an adapted form of made endpapers) that i think? is from Itoya?, marbled jute paper for Atlas + globe, copper wire, copper acrylic ink for the edge, silver + rose gold foil applied with handheld foil quill pen, japanese hand-sewing silk for endbands.
#ansolutely stunning#this is a level of artistry i can never hope to match#but that’s okay because it’s joy enough to see things like this being created by others#fanbinding#bookbinding#celestial sphere press#yall should go follow op. thier work is consistently mindblowing
445 notes
·
View notes
Text
The Fine Art of Book Butchery Deconstruction
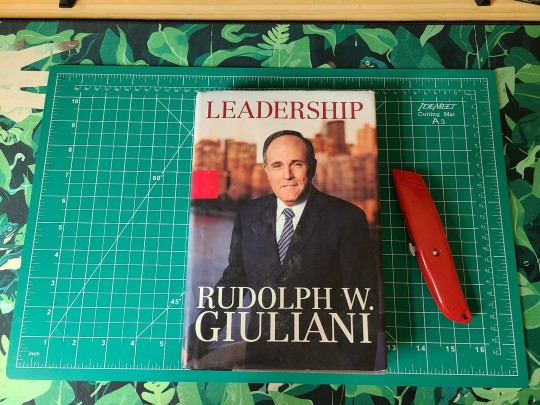
What you need: bad book, a utility knife/box cutter. That's it!
A full guide below!
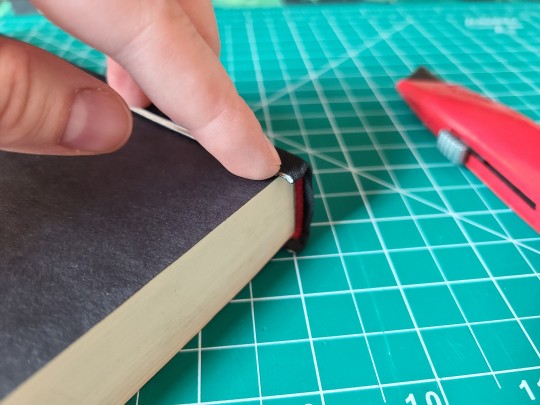
Strip the book!
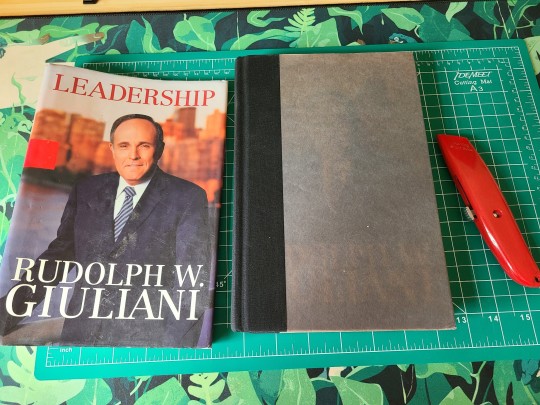
Once it's naked, take a look! I've marked where the bookboard is attached to the spine. This is where you cut!

Do both sides and voila! Boards!

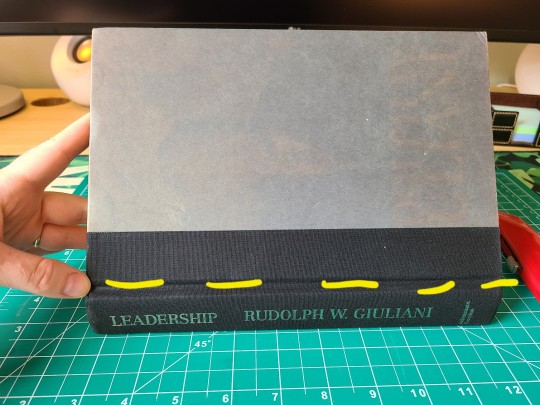
You can trim these to fit whatever size you need later - for now, set them aside! We're gonna get the headbands!
Delectable...hidden...Not for long!

You can very easily peel the spine back as seen here - and then you can peel the headband off.
Sometimes the glue makes it a bit tricky (as seen here) - just use your utiliknife!
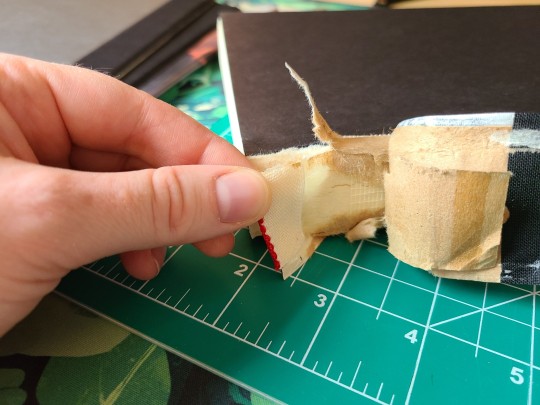

Do both sides... and that's it!

With the remaining text block, it varies on if your city can recycle it. However, it's also good for paper mache! Pulp! Blackout poetry! Discard paper! Compost! Anything you'd like to do - have fun!
1K notes
·
View notes
Text
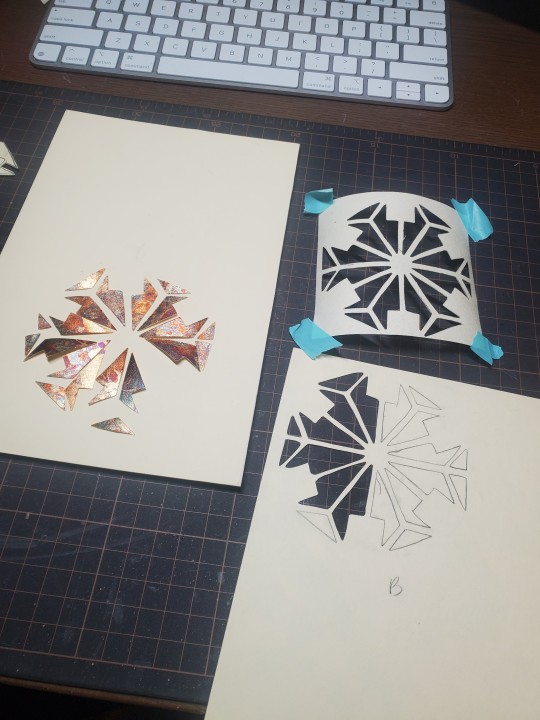
Book Decoration: AKA All The Ways I Don't Use a Cricut
(this post is for people who don't want to buy an expensive cutting tool, or for those that do have an expensive cutting tool that would like to mix things up a little)
1. Print That Shit
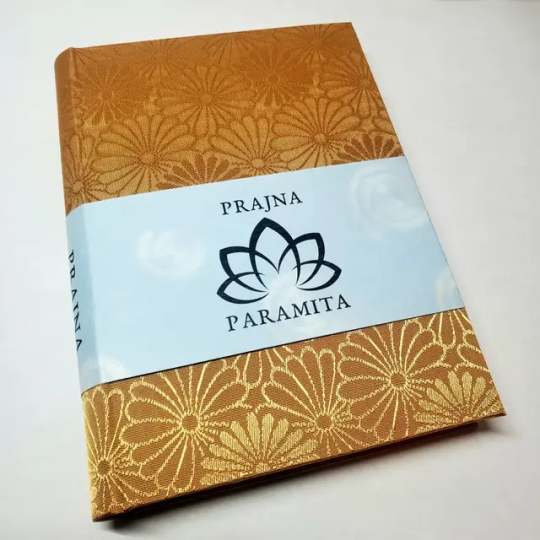
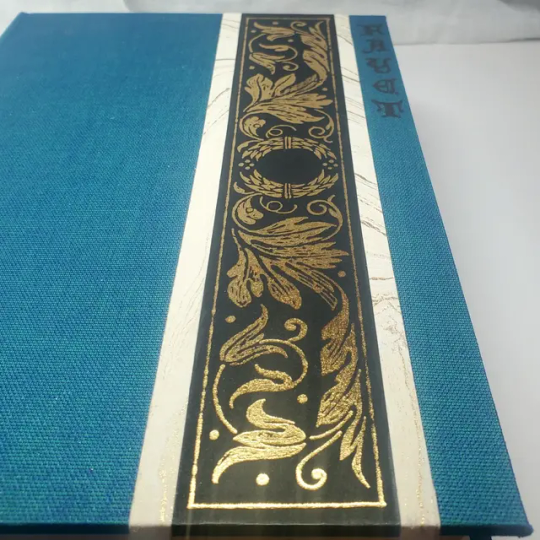
If you're already printing your own textblocks, an easy step for titles is to print them. Above is a title printed onto an "obi" of decorative paper. I measured out where I wanted things on the finished book and laid it out in Affinity, then printed it on a full sheet & trimmed it down to wrap around the book. A more simple method is to print & glue on the label into a slight indent in the cover (to protect it). A third option is to do the spine in bookcloth, while you print on paper for the cover and then glue that paper onto the boards (this usually looks even better when it is a three-piece bradel bind).
2. Foil Quill / Heat Pens
The heat pen is one of my go-to tools, but it can be a bit touchy about materials. The most popular version is the We R Memory Keepers' Foil Quill (which is one of the most ergonomic), but other pens exist that can get you to a higher heat temp, finer lines, or more consistent foil. For example, I have a pen created by a local Japanese bookbinding studio that fares way better on leathers than the WRMK quill & with a finer tip, but it's hell to control. Best results in general are on paper or smooth bookcloth (starched linen, arrestox, colibri - even duo will work but its less solid). The fuzzier a bookcloth is, the less your foil quill wants to deal with it. This means the heat n bond method of making bookcloth does not play nice with a heat pen usually, but there are two solutions: 1) use this tutorial on paste + acrylic medium coated bookcloth instead that will get you a perfect surface for the heat pen, or 2) use the pen on paper & then glue onto the cloth. I did a video tutorial for both foil quill use and this type of homemade bookcloth for @renegadeguild Binderary in 2023.
You get the most consistent results by tracing through a printed template that is taped in place, as I do in the video above.
3. Paint That Shit
Acrylic paints will do you fine! The above is free-handed with a circle template, because I wanted that vibe. If you need straight lines that won't seep, lay them down with tape first & then paint over it first with a clear Acrylic medium, then your color. Same goes for stencils. Two more examples of painted bookcloth:
4. IT'S GOT LAYERS

By using layers of thinner boards, you can create interesting depths & contrasts on your cover. You can also make cutouts that peep through to the decorative paper behind. The most important part to this technique is the order in which each edge is wrapped. To get a good wrapped inside edge, you will split the turn in into tabs to get them to conform to a curve. You can also layer multiple colors of bookcloth without multiple layers of board, as seen below left, so long as you mind your cut edges for fraying.
5. Inlaid... anything
Mirrors! Marbled paper! I saw someone do a pretty metal bookmark once! The key is creating a little home for it to live in, which is pretty similar to the above layering method. On one layer you cut the shape, & glue that layer onto the bottom solid board before covering. You can do the top layer as an entire 1 mm board (like I did for the mirrors) or a sheet of cardstock, like I would use for inlaid paper.
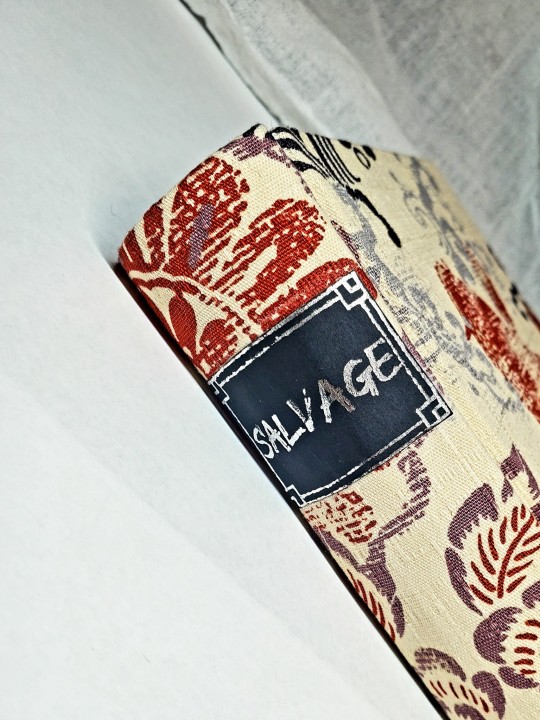
6. Decorative Paper
Decorative paper is always helpful & adds to the paper hoard... & its effects can be layers with other techniques, as below. Marbles, chiyogami, momi, or prints & maps of all kinds can be great additions. Some papers may need a protective coating (such as wax or a sealer).
7. Stamps (with optional linocut)
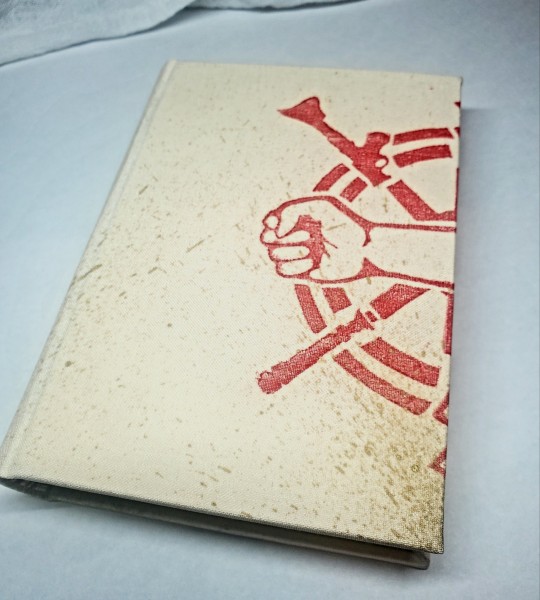
While I've not used many more regular rubber stamps, I do know some who have, successfully! And I've used one once or twice with embossing powder (see photo 3 up, the gold anchor on the little pamphlet bind). What also works is to carve your own linocut or stamp, & then use block printing ink to ink it onto your fabric (as i did above). A bit time intensive, but it was nice how easily reproducible it was, and I liked the effect I got for this particular bind.
These methods are not exhaustive, just ones I've used, and there are of course many others. I haven't gone too into detail on any of these for the sake of length (& post photo limits) but feel free to ask about more specifics. Usually I'm using them in combination with other options.
#i use my library’s cricut to make stencils for painting cover designs#but otherwise i admit to being a cricut htv hater lol#reference#cover design#bookbinding
1K notes
·
View notes
Text
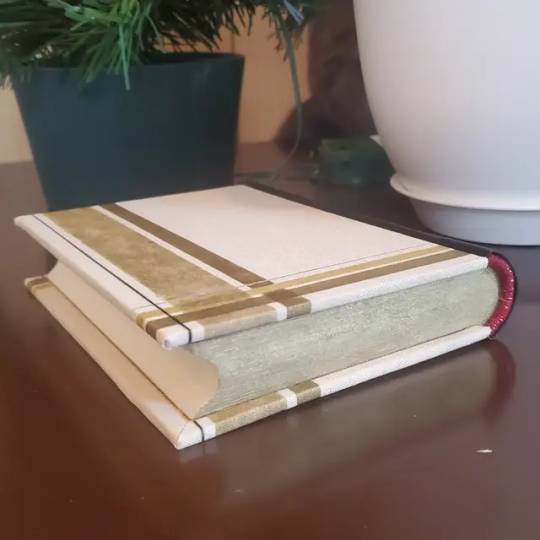
Thought I’d share a few more glamour shots of the mock up.


I’m pretty happy with it. I find it pretty comfortable to hold and read, which a book absolutely should be if possible lol
#reblogging this to my side blog lol#this is the project I alluded to before#I'm making a zine!#bookbinding#fanbinding#stab binding
13 notes
·
View notes
Text


I am neck deep in pre production for a project I’m really really excited about. This is another test notebook for that project. It’s another stab binding, this time using a combination of the traditional noble and hemp-leaf stitching designs. I’m happy with it; I really think I’ll be able to pull this project off 😁
The covers are made from watercolour paper that I marbled myself. I’ll be taking another workshop on that next month, so hopefully my marbling will improve enough I can include it in the upcoming project without dying from embarrassment, haha
8 notes
·
View notes
Note
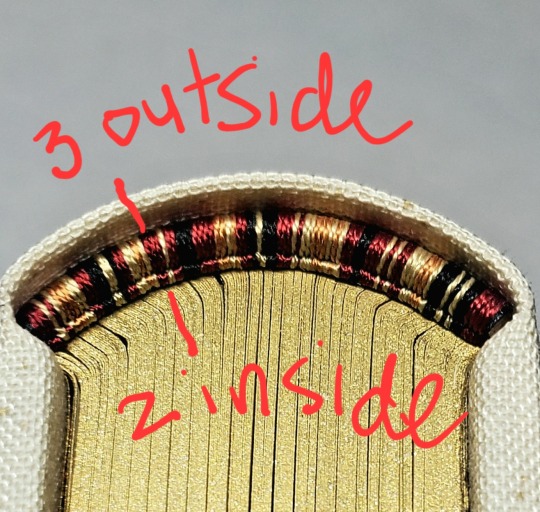
what kind/style of endbands do you usually do? they look so good 👀
hi!! sorry for taking a while to answer, I wanted to make sure I could give you my best answer.
I usually do what's called a "double core" endband. I use double core endbands over the "bead on front" method because bead on front style is not great for uneven distributions of color, irregular patterns, or using more than three colors. Functionally it works by having your extra threads wrapped up inside the thread that is showing, forming the smaller secondary core. Ultimately you are doing figure 8s around the main core & then your secondary core of thread. This keeps things pretty neat & tidy. The tutorial I first used was this one by DAS Bookbinding, though I don't think his endband tutorials are his best ones. Another binder I've spoken with endbands about a lot is maleeka, who recently did an endband tutorial herself.
maybe I should do one... but it takes a lot for me to get enough motivation to make videos. I'll take this opportunity to write up some tips I've shared when people ask instead:
1. Endband core material is the MOST IMPORTANT component. You need a core that is stiff but flexible - it should NOT be floppy because it wiggles everywhere under the tension of the thread, but still needs to flex with the opening & closing of the book. You want something that doesn't compress, to reduce tension shifts in thread creating a lumpy endband. Have a smooth core is less critical but helps to avoid snagging threads & allows you some leeway on sliding threads around for adjustments. My personal choice is smooth leather jewelers cord (link is just an example, I get mine from a local craft store).
2. Thread size. All your threads need to be the same size; it will be visible if you are using two different sizes, and mess with your front core. Additionally, I know lots of people will use larger twists of multiple strands of embroidery thread, which can work, but is more likely to compress & alter its size in unexpected ways. A single strand is preferable. If you want something thicker you can find some thread weights that are heavier twists intended to be used in a single strand, not pulled apart. I prefer smaller sizes because it works better for the gradient designs I like.
3. Silk thread is your friend (if you can spend the money on it). It reduces fuzz (no fuzz like you get with cotton/DMC embroidery thread), it's usually easier to manage, has a more compact twist, and a higher shine. I use Japanese silk hand sewing thread in size #9 (9号). There's multiple brands (Tire, Daruma, KNK/kanagawa, etc). Here's a wholesale listing (minimum 20,000¥ for international). A non-Japanese brand is Guterman silk (German brand). Both the Japanese & German threads come in a heavier weight (Japanese is #16, Guterman is buttonhole).
4. Thread tension is the most important part of the actual technique. You need to ensure the threads currently wrapped in the secondary core keep tension when you are working the thread around them.
5. Working on a curve. This is only really relevant if you're doing an endband on a rounded book, but the circumference of the curve means there's more real estate on the outside vs inside of the curve. Sometimes this can cause bunching on the secondary core. My own solution to this is that sometimes I wrap the primary core but drop a wrap here or there around the secondary core (only between two wraps of the same color I'm dropping). I uh... don't know of anyone currently recommending this besides myself so I can't point to any pro endorsement for this method, it's just what works for me. Forgive my terrible writing:
6. Pattern management. I... don't really plan much how my patterns sit on the spine, which is not very helpful. HOWEVER you can do some pattern management on the fly, if you really want your pattern to end at a certain place. Thread can be packed more or less densely on the core, resulting in some pattern compression; you could also strategically drop wraps in less noticeable locations. An unintended example: I was replicating the pattern on this endband (left) when I realize I wasn't packing the thread as densely as I had the first time around (right), which resulted in the overall pattern taking up more space. You can do this on purpose, if you need to.
this was way more than you asked but it gave me a chance to put all this in one spot. Best of luck in vanquishing the dreaded EndWyrms.
#solid advice from someone who makes some of the prettiest endbands i’ve ever seen#bookbinding#endbands#reference
385 notes
·
View notes
Text
This is the only tiktok you’ll ever need, I’ve made about 13 of these and I’m not stopping anytime soon
#not really bookbinding#but look at these cute bookmarks!!! ahhhh!!!#these would be so cute to make and include with author copies i think 🦋
199K notes
·
View notes
Text
Help, i’ve been completely enraptured by stab binding! Jk. I’m actually really enjoying it


This is a simple notebook made out of plain looseleaf paper. It’s a test/prototype for a project i have cooking for next year sometime, but i really love how it turned out.
The star stitch pattern was created by the brilliant artist and type designer Becca.
12 notes
·
View notes
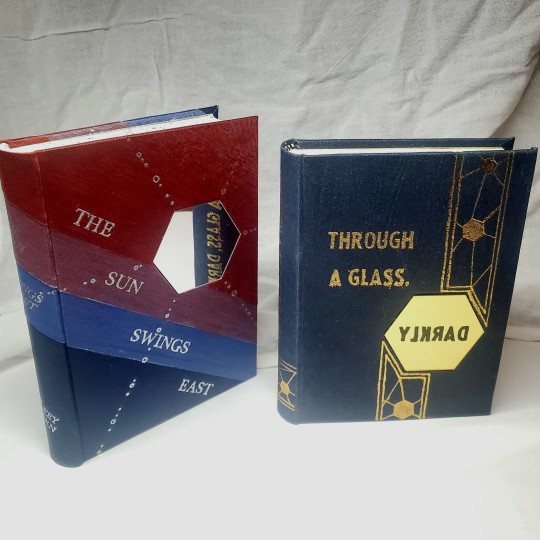
Text


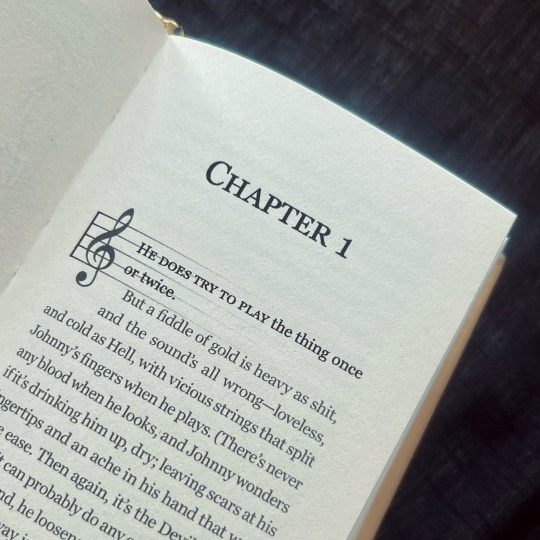
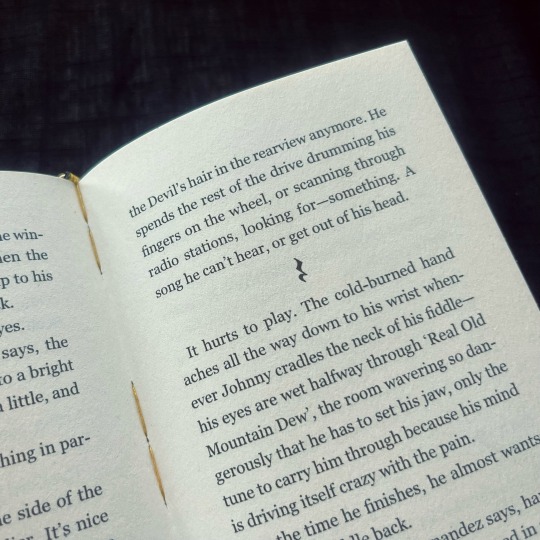
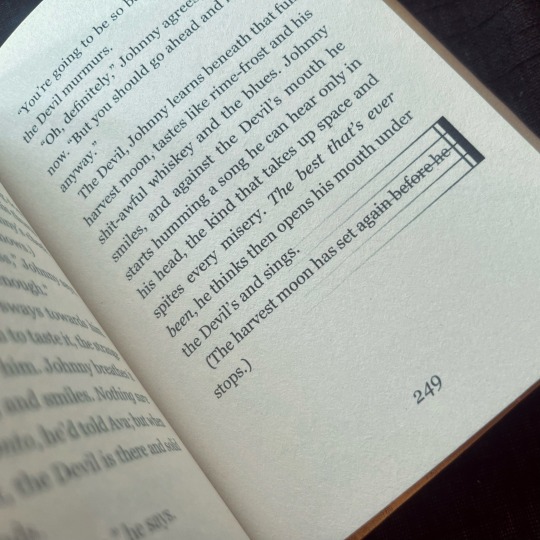
The Devil Went Down to Georgia (And Then Went Down on Johnny) by @notbecauseofvictories
This is one of the stories that I enountered purely due to seeing absolutely outstanding bindings of it, and boy, am I grateful for that, because this one is SO GOOD.
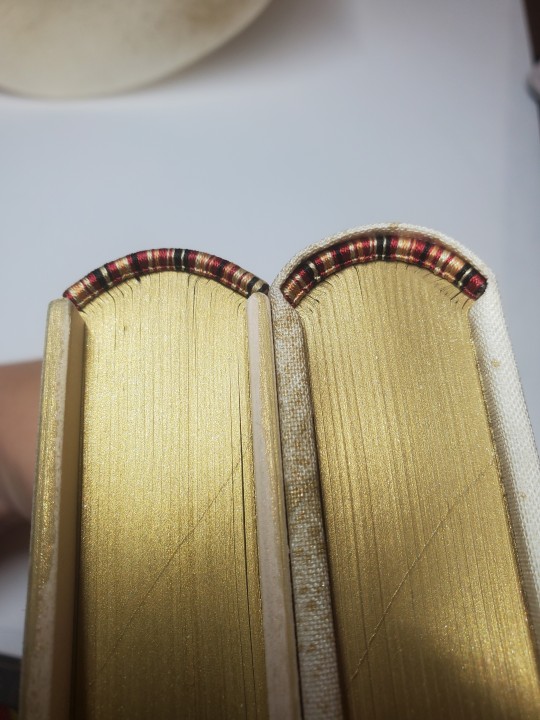
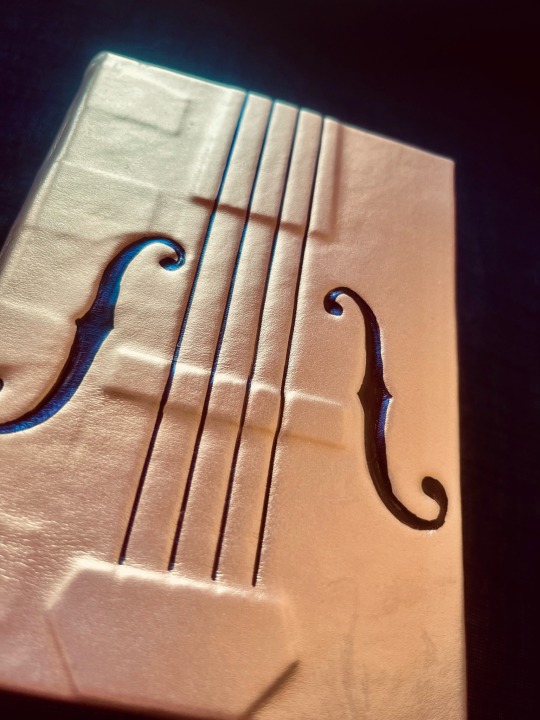
🎻 I knew I wanted to do something that differed from previous takes on the story, so I had a pretty solid design idea, then had a lot of fun typesetting this series using musical notations (many thanks to @lootthecoyote, my resident music expert), sewn the textblock, and THEN had a brilliant idea that, as I'm using leather anyway, why not try a completely new binding type?
🎻 So off came the mule, I hammered my very much swell-less textblock into as much of an arc as I could, and began gleefully constructing the cover with it's many fun cutouts and overlays (that I used to create the violin design under the leather).
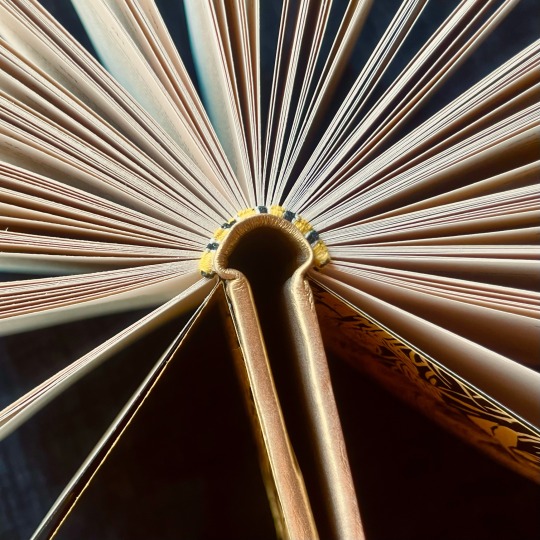
🎻 I then went through hell and back trying to pare leather for the first time (I survived the ordeal, but barely. Me being afraid of sharp knives certainly didn't help!) I did mess up quite a lot of things, but I'm still very happy with the result. The A6 books have too light pages to do the tightback thing and drape really well, but it does the signature K118 party trick of opening ALL THE WAY, as you can see in the last photo.
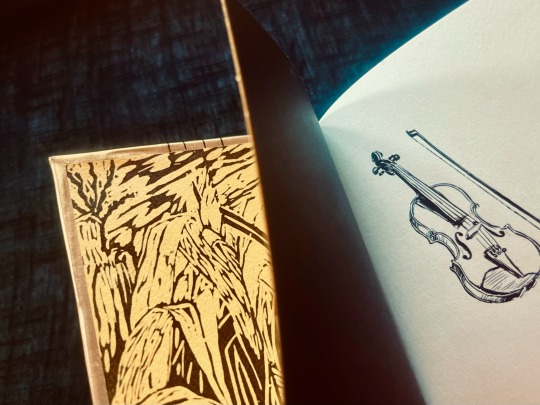
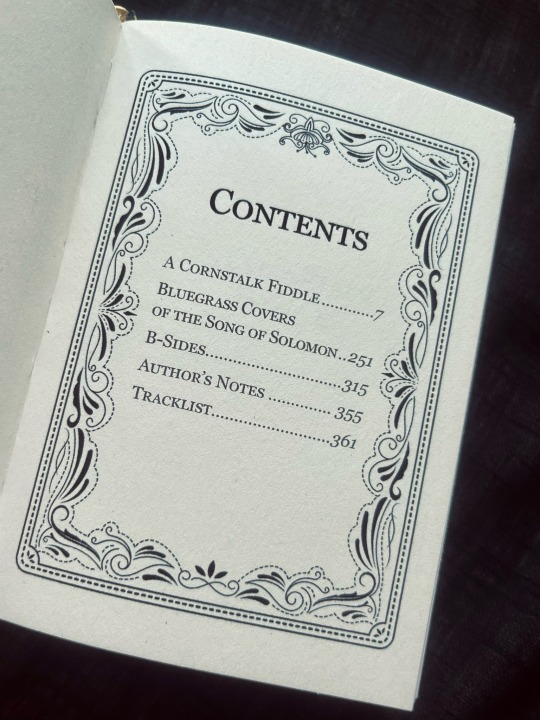
🎻 Additional design notes: the endpapers are yellow paper with a lovely licoprint of a cornfield on it, with additional leaves of black paper, the body (AND the header) font is, of course, my beloved Georgia — not only dear to my heart, but also PLOT RELEVANT, there's a nice engraving of a fiddle on the title and half-title pages, and table of contents and individual story titles feature a frame that gave me ~bluegrassy vibes~.
#ough this is gorgeous#such clever details too like the rest as a page break? genius#bookbinding#fanbinding#not mine
499 notes
·
View notes
Text
Nick & Jess by Ghostcat
At last the time has come for Baby Steps Bindery to make its inaugural post!
It's only been three months or whatever😂
But anyway! Now that the author copy safely arrived, I'd like to finally show off the first fanfiction I've ever bound, which I'm so honoured to be written by my dear friend and insanely talented writer, @ghostcat3000


Design and art by me. To make the dust jacket, I printed it on 200 gsm uncoated A3 paper at OfficeWorks (an Aussie office supplies store), which I then cut to size using a metal ruler, cutting mat, and utility knife.

But what lay beneath the dust jacket?! all of my mistakes WELL HERE IT IS:


So bright, so yellow, so perfectly New Girl! I’m quite happy with how it all turned out. But none of this would’ve been possible were it not for the gentle and patience of my dear friend and master bookbinder, @catja ❤️. Thank you so much for guiding me through, I couldn’t have done it without you🥹🫶💖💖💖
Tagging @renegadeguild! Thank you for all that you do🙏💖
37 notes
·
View notes
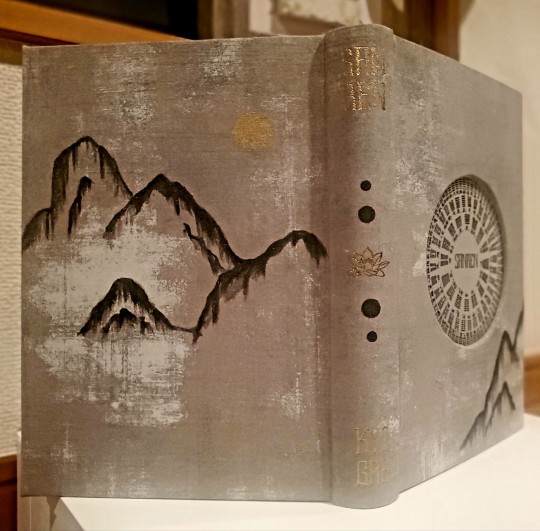
Text
Afterdeath
Read it here!


More pictures of my Afterdeath bind! I really truly am very proud of this one. I think it turned out really well and as the first bind of one of my own fics, I couldn’t be happier.
I actually hadn’t intended to bind this quite so soon, but my local library’s makerspace got some perfect binding machines and I jumped at the chance to try them. So I whipped up a typeset and once that was done, my hands were itching to bind it traditionally as well.
I’m really really happy with both binds of my story. This is easily one of my greatest accomplishments: to have written a novel-length story, and then to have been able to bring it to life as a physical book.

Thank you to everyone who supported the story on ao3 as I was writing, and big thank you to my friends who have been both supportive and encouraging of my efforts on my bookbinding journey.
Here’s to more fics and more binds to be proud of in the future!
#blue velvet bindery#bookbinding#fanbinding#ganqing#genshin impact fanbind#my writing#next on my wish list is a real camera to take pictures with because this phone camera shit ain’t it lmao
69 notes
·
View notes
Text
A sneak peak of my most recent bind. I’ll take some more and hopefully better pictures tomorrow. But to hold this book is a surreal experience because I also wrote this book. I’m so pleased with it!


(Shameless self promotion: you can read the fic here!)
#blue velvet bindery#bookbinding#fanbinding#my writing#i’m so proud of myself#i don’t think i’ve ever been proud of myself before so give me a minute while i adjust to the feeling 😭
20 notes
·
View notes
Text
25 Free Typesets!
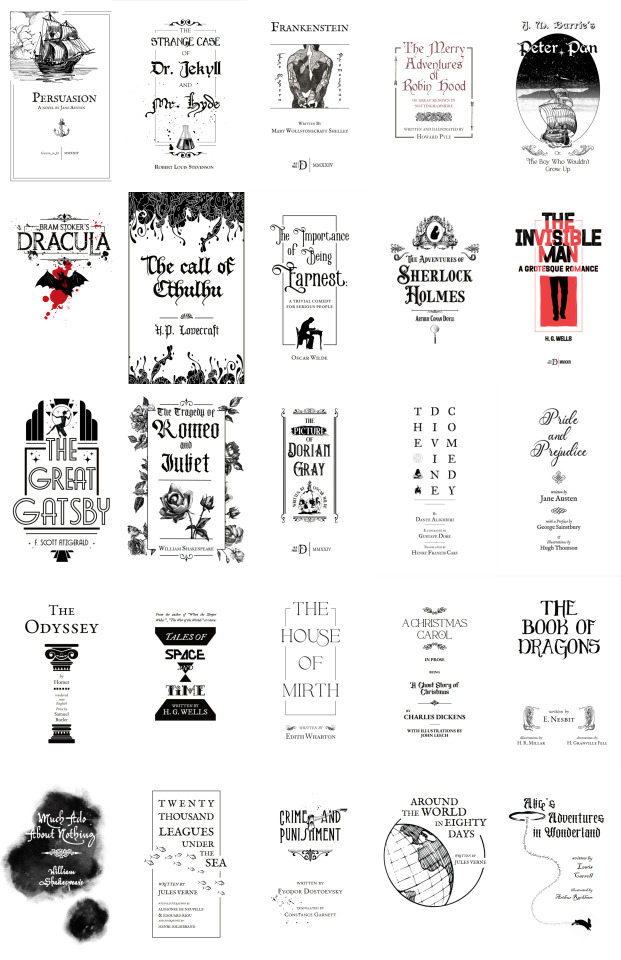
New achievement unlocked! I've finished my 25th public domain typeset, and you can find all 25 unimposed pdfs for FREE here! (Personal use only! Use these to read, bind, burn, or ignore at your pleasure!) I'm so excited to post this collage of all the title pages I've done for pd texts thus far. I started getting into typesetting earlier this year, and that journey started with googling "what is typesetting???" 😅😆. Since then, it's been fun exploring literature and the designs surrounding text. Anyway, thank you to everyone who's stopped by this blog! It's meant a lot to me, whether you liked/reblogged/followed, or just took a look!
2K notes
·
View notes
Text
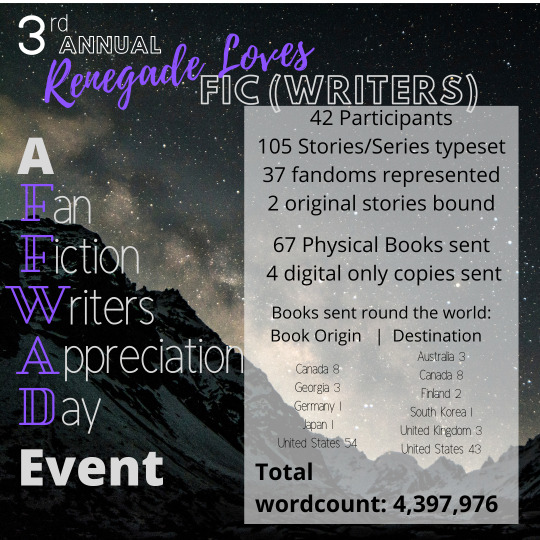
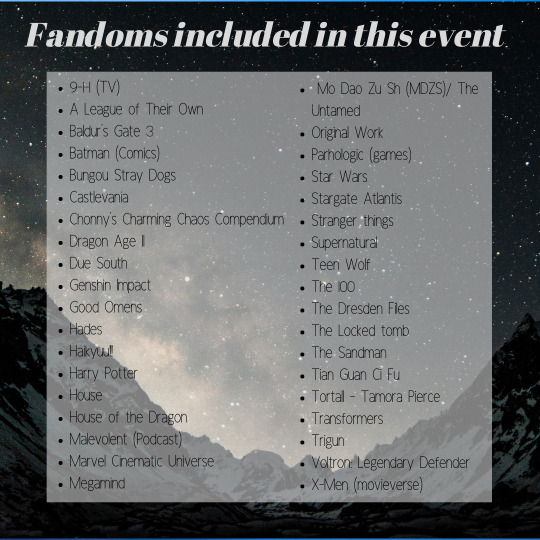
Renegade Loves Fic (Writers) Stats 2024
Fanfiction Writers Appreciation Day or FFWAD (August 21st) is an annual appreciation of fanfiction writers and the gifts that they give to fandom. To show our appreciation, we ran a binding event where binders on our Renegade Discord server chose a fic to make a physical copy of. This was all to say thank you to the author for the work that they put into making it.
Here’s onto the stats for this year’s event!

54 notes
·
View notes
Text
Marbling take two!! It went much better today. Practice really does help you get better at things, who knew? I also experimented with some metallic and pearlescent paints, though you can’t really see them through a photo.

Anyway. I am pleased with these ones, and one day I’ll invest in some higher quality paints as well as a bigger tray and proper combs and then I’ll be unstoppable!
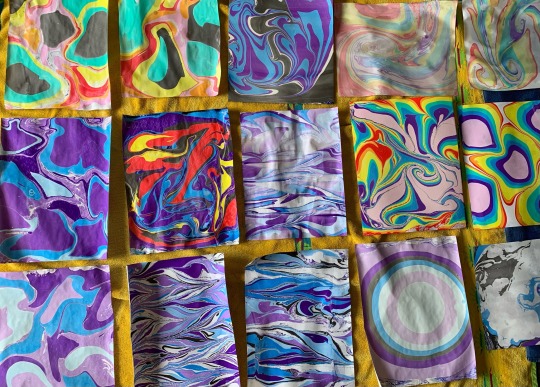
Tried marbling some paper at home today! I am… not very good at this LOL but! In my defence I am not using very high quality materials or tools either.
Regardless, I had fun. And I will reassess my plan to include hand marbled paper in a future bind. I just don’t think my skill in this will do the story justice 😂
10 notes
·
View notes
Text

What is a typeset? Basically, a printable version of a text for bookbinding/reading/whathaveyou. Soooo, currently I have twelve free typesets of public domain works available! 🎊 [Edit: As of 7/10, up to 18!] Twelve was a soft goal for myself (though I have no intention of stopping just yet), and I've had so much fun making these and sharing them all! Here are each of the interior title pages lined up together, from top left to bottom right in order of when I made them. Anyone have a favorite so far? I enjoyed making all of them, though the Jekyll and Hyde one is a particular source of pride. All the files for these books are available in the google drive: drive.google.com/drive/folders/1S2wl_PuxCupofnDpqGuk7VjMHYFMWC6g Everything is sized for letter folio, except for Jekyll and Hyde and The Call of Cthulhu, which are sized for letter quatro. Most of the art/images are from canva or rawpixel. All of these typesets are free for your personal use, but please like/reblog if you can!
And a big thank you to everyone who has stopped by this blog, dropped a like/reblog/ or even a follow. It is greatly appreciated! ❤️ Guys I'm just so happy to have an even dozen in my folder. Twelve is a nice number. (The alternates kind of throw me off though...😆)
#amazing!#typesets can be time consuming to make#this is incredibly generous#bookbinding#references and resources#typesets
761 notes
·
View notes
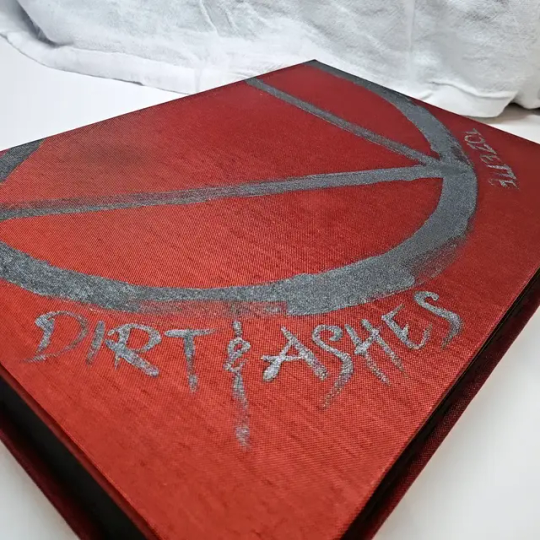
Text
Another book completed! This one also was sitting waiting to be started for quite awhile.


I came across the PDF for this book linked in a tumblr post, and since it had been shared for download by the author himself, I figured it was fair game to bind it. I’m really excited to read it as a bit of research/study for my writing, and my eyes are happy I can read it in book form rather than a PDF on a screen.
I was going for a ‘70s -ish aesthetic, wanting it to look like an old textbook or something, and mostly I think it turned out pretty good!
This is a three piece bradel binding which I love the look of, even if putting it together had me going “I hope this holds together…” lol.
The cover and spine are painted on, and I am still endlessly pleased with how well the paint and the stencils are working.
If I could go back, I would change the endpapers, though. Or at least back them to make them a bit more robust. The thin paper hides nothing 😅
Really happy with this one, mistakes aside. And now I feel practiced up enough to start on a much more important and precious project. Stay tuned!
#I’ll definitely use this binding style again i really love how it looks#bookbinding#blue velvet bindery#the biology of human survival
31 notes
·
View notes