
bobbiamorse
better now.
al, they/them
follows from @alactually
tracking #useral
icon by anissagraces
header by lndsaydenton
10065 posts
Don't wanna be here? Send us removal request.
Last Seen Blogs

princepaddy
my heart is in London

wali-akbar-blog
as-sabirun
archangelmacaron
Archangel Macaron

down-one-juice
Professional Mess
trmsmlk
θ's selection


Text
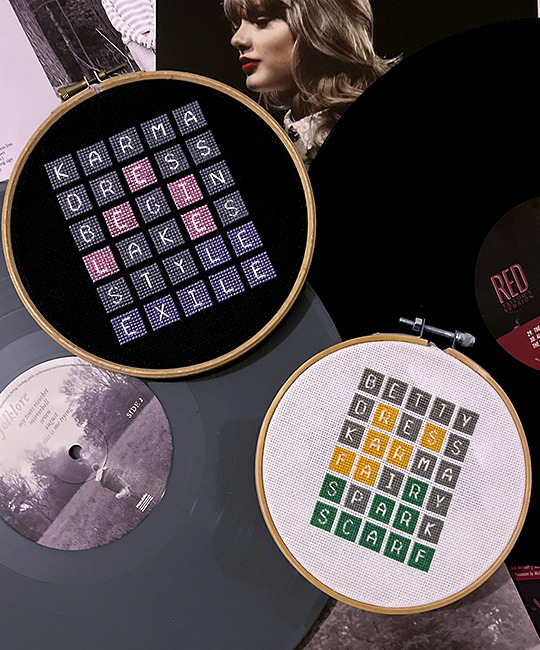
So, I did a little thing and designed some Taylor Swift wordle inspired cross stitch designs - available on my Etsy - I’m not one to normally post about these things but thought I’d put it out there in case anyone was interested or just wanted to share/signal boost.
(Taylor Swift wordle designs, there's 5 options in total (exile/lover/scarf/clean/karma) and a bundle listing of all 5 too includes instant download PDF pages, colours/ colours & symbols)
*just tagging people i know who like taylor, please feel free to ignore this there’s no pressure to reblog as it’s not the usual content i would post but any signal boosting is always appreciated greatly xoxo
#taylor swift#NOT ME RUNNING TO GET MY WALLET#I HAVE BEEN SO EXCITED ABOUT THIS FOR SO LONG#AND NOW IT'S HERE!!!!#EVERYONE GO LOOK
161 notes
·
View notes
Text

HOW TO: Make Animated Neon Text
Hi! No one asked for this tutorial, but this is one of my favorite typography effects as of late — so I thought I'd share how I do it. You can see this effect in the first gif of this *NSYNC Celebrity set and the last gif of this Anthony Bridgerton set. Disclaimer: This tutorial assumes you have a basic understanding of gif-making in Photoshop. It's also exclusively in Timeline and uses keyframes for the fading effect seen on the blue text.

PHASE 1: PREP YOUR BASE GIF
1.1 – Choose a dark scene.
This effect looks best contrasted against a dark background. You can definitely do it with a bright background, but just like a neon sign irl, you only turn it on in the dark/at night — so keep that in mind!
1.2 – Determine the length of your clip.
Depending on how much you want your text to flash or fade in, you'll want to make sure you have a scene long enough to also allow the text not to flash — reducing the strain it takes to actually read the text. For reference, my gif is 48 frames.
1.3 – Crop, color, etc. as you would.
New to gif-making? Check out my basic tutorial here!
PHASE 2: FORMAT YOUR TEXT
Before we animate anything, get your text and any vectors laid out and formatted exactly as you want them!
2.1 – Finding neon sign fonts.
It's easy as going to dafont.com and typing "neon" into the search bar!
2.2 – Fonts I used.
Neon Glow by weknow | Neon by Fenotype | Neon Bines by Eknoji Studio

And to not leave my fellow font hoarders hanging, the font for "tutorial by usergif" is Karla (it's a Google font) 🥰
2.3 – Group your text layers. (Conditional)
If you plan on having multiple text layers like I did and you want them to appear connected (like how the last letters of "NEON" and "sign" intersect with the wand icon), I suggest putting the layers into groups according to color (the shortcut to group layers is Command+G). If you don't group your text and just apply the outer glow settings to each individual layer, you'll end up with something like this:

—where you can see the glow overlap with the line, instead of the smooth connection you see in my final example gif. I'm using 2 colors for my text, so I made a group for red and a group for blue.
2.4 – Apply Outer Glow.
Right-click your text layer (or your group if you have several layers) and select "Blending Options" to open the Layer Style menu. Check "Outer Glow" and feel free to play around with the settings until you like the way your text looks!
Your outer glow color should be darker and more vibrant than the color of the text itself. The text should be within the same color family but much brighter and, sometimes, almost white (see Step 2.2 again for my text colors).
Here are the settings for the Red Glow (the glow color is #FF3966) and Blue Glow (#00F0FF):

These aren't always my exact settings but they're pretty close to my standard. I always set the blend mode to Hard Light and usually have the opacity at 100%.
For every gif I use this effect on, I like to play around with Spread and Size. Spread will make the glow look denser and "expand the boundaries" (source: Adobe) and Size will diffuse the glow and blow it out so it covers a larger area (Adobe says it "Specifies the radius and size of blur").
2.5 – Duplicate your text layer/groups and remove glow.
We're only going to be animating the glow on our text, and since doing this affects its opacity/visibility, we want to preserve the base text by creating a duplicate.
I just hit the Command+J shortcut to duplicate my groups and delete the Outer Glow effects, making sure that the "No Glow" version is above the "Glow" version:

I also put all these groups into one group called "Text" for organization and so I could apply a drop shadow to all the elements for better visibility.
PHASE 3: CREATE THE FLASHING EFFECT
This is for the effect you see on the RED text in my gif!
3.1 – The 0.03-Second Rule
If you've read any of my animation tutorials before, you're probably already familiar with this rule. In my experience (and for reasons I can't explain), Video Timeline pauses every 0.03 seconds (try clicking the forward button a few times, you'll probably find a "duplicate" or paused frame). So, keep all your layers a duration of 0.03-second increments (e.g. 0.06 or 0.09 seconds can also work) and align them on the Timeline at 0.03-second intervals. If you don't follow this rule, you'll get duplicate frames when you export, resulting in a choppy final gif.
3.2 – Trim and arrange your text layers.
Only on the layers/groups WITH the Outer Glow effect, trim them into several segments of varying lengths where the glow will be "on" (visible) and leaving spaces where the glow should be "off."
Typically, I'll have a mixture of 0.06 and 0.03-second text. That's when the glow will be visible. Between each "flash" of visibility, I've got a 0.03-second blank space, baby *pen clicks* and I'll write your name:

The layers shown above are arranged with a few flashes and two long segments of no flashing. This is the order and duration of each segment shown above (purple = visible segments):
0.06 blank, 0.06 visible, 0.03 blank, 0.03 visible, 0.03 blank, 0.03 visible, 0.03 blank, 0.24 visible (the long bit where "FLASHING" doesn't flash at all), 0.03 blank, 0.03 visible, 0.03 blank, 0.12 visible
(I only did this for the text that says "FLASHING" to give it a glitching effect. The other red text keeps the glow visible starting at the first long segment.)
PHASE 4: CREATE THE FADE-IN EFFECT
This is for the effect you see on the BLUE text in my gif!
4.1 – Animate using the Opacity Keyframe.
Again, we're only touching the layers/groups WITH the glow effect. If you only have one layer of text, you'll find the Opacity Keyframe by clicking the film reel icon:

If you're working with groups like me, you'll find it in the Timeline panel under the group when it's expanded:

As you can see, I already added my keyframes (lil diamond babies). And luckily, it's super easy to do!
4.2 – Add the ending Keyframe first.
We're starting at the end because our layers/groups are already at 100% opacity. Drag the playhead (the blue arrow attached to the red vertical line) to a spot where you want the glow to be 100% opaque — this is where the glow will be fully "on" or visible. [Again, follow the 0.03-Second Rule. You will get duplicate frames regardless when using keyframes (this will be explained in the note in Phase 5), but abiding to the rule will mitigate the amount of dupes you get.]
Then, click the clock icon by "Opacity" to place a keyframe:

4.3 – Add the starting Keyframe.
Go backward from the ending Keyframe you just placed (I went back 0.12 seconds — but you can play around with the duration of the fade, just keep it a multiple of 0.03):

And drop another keyframe, this time by clicking the diamond icon by "Opacity":

4.4 – Reduce the opacity on the starting Keyframe.
Keeping that keyframe you just placed selected, go to the layers panel and reduce your layer's/group's opacity to 0%:

Now, this Outer Glow will slowly fade from 0% to 100% opacity.
And just for a visual aid, here's where my fade-in keyframes are in relation to my flashing segments:

To refresh your mind, the 0% Opacity Keyframe starts when "FLASHING" is visible for 0.24 seconds (the first long segment of visibility).
With these keyframes, you'll get a smooth fade-in à la ✨light switch with a dimmer✨
PHASE 5: EXPORT
Yay, we're finished! Convert from Timeline back to Frames and export your gif!
NOTE: If you only did the flashing effect and followed my 0.03-Second Rule, you shouldn't have any duplicate gifs.
BUT if you included the fade-in effect using keyframes, you WILL have duplicate frames. 'Tis the nature of keyframes. 🤷♀️ I had 4 extra frames where the fade-in starts, which I deleted. So, as always, I recommend checking your frames when you convert from Video Timeline back to Frame Animation — and manually delete any duplicate frames.
Sorry this tutorial is so long 🙈 I over-explain so you're not just mechanically copying steps, but understanding the WHY behind each step! Thanks for bearing with me
If you have specific questions about this tutorial, feel free to send a message to usergif and I'll try my best to help! :)
More USERGIF tutorials • More resources by Nik • USERGIF Resource Directory
740 notes
·
View notes
Photo

Some character designs with some…atypical color choices? I guess. I don’t know what’s going on in that area.
This is Nimona and her supervillain friend (He doesn’t have a name yet, I’m working on that). Nimona is his sidekick/squire, they’re like the Batman and Robin of slightly Medieval villains, but she’s actually way more evil than him. He does what he does to make a point, and he doesn’t really want anyone get hurt - Nimona just gets a kick out of destroying stuff.
I’m going to attempt to make a two page comic with them? We’ll see how this goes.
108K notes
·
View notes
Text
— Natasha Romanoff, The Avengers (2012)
226 notes
·
View notes
Text

― Sue Zhao
2K notes
·
View notes
Text
in general i would say that “it’s not fun if they’re totally unrecognisable” is my fandom thesis. like the point of fanfic etc is putting your favourite little guys in situations. where’s the appeal if they’ve been through so many fanon spin cycles that they’re barely even your guys anymore
32K notes
·
View notes
Text


The measure of a person, of a hero, is how well they succeed at being who they are.
@lgbtqcreators creator bingo - color
239 notes
·
View notes
Text
Have a lil animated orville doodle I did in my spare time
70 notes
·
View notes
Photo
@pscentral gift exchange for @kathrynshahn
insp. [x x x]
460 notes
·
View notes
Photo

he is sitting politely
51K notes
·
View notes
Text
one of those time travel AUs where Vader goes back into his body as Anakin before he fell to the dark side and fixes everything. Palpatine is dead, the Jedi are alive, and everyone's happy. He never found out who Luke's twin sister was, but that's fine because this time around he'll get to know both of them from birth. The twins are born and Padmé says she wants to name their daughter Leia! :) And Anakin thinks, Hmm. Looking back I can see that Princess Leia was a good person, and we were only enemies because I went and became a Sith. Okay we can name our daughter Leia :)
Years pass and Leia starts growing older. The Organas adopt a completely different girl. Anakin's looking at his daughter like no, it can't be. No way. Do NOT tell me that Princess Leia was Luke's twin all along, but time keeps passing and it becomes increasingly apparent that this is indeed the case, and now he's having a Crisis
13K notes
·
View notes
Text


Barbie has a great day every day, but Ken only has a great day if Barbie looks at him.
BARBIE
dir. Greta Gerwig | July 21, 2023
#barbie movie#god you deserve an award for how juicy these pinks and blues are#this is the coloring tumblr deserves but doesn't appreciate enough
2K notes
·
View notes
Text

CHELS’ 6K CELEBRATION ∞ AS VOTED BY MY FOLLOWERS:
↳ Favourite MCU Film or Show: Spider-Man: No Way Home (25%)
605 notes
·
View notes
Text


COBIE SMULDERS as MARIA HILL
Secret Invasion S01E01 "Resurrection"
328 notes
·
View notes
Text

It’s a strange feeling. Everywhere I go, I’m the first. Step outside the rover? First guy ever to be there! Climb a hill? First guy to climb that hill! Kick a rock? That rock hadn’t moved in a million years! I’m the first guy to drive long-distance on Mars. The first guy to spend more than thirty-one sols on Mars. The first guy to grow crops on Mars. First, first, first!
The Martian (2015) dir. Ridley Scott
#the martian#i can't remember this movie but what i CAN remember is that i am the color orange's number one fan#and this is such a great shade of orange#that's all
2K notes
·
View notes