
ALICIA-AUDREY. 35. graphics. crackships. psds. ocs. various fandoms. Art by nebulee art.oc masterlist project masterlist
Last active 3 hours ago
Don't wanna be here? Send us removal request.
Statistics
We looked inside some of the posts by crytpidkeeper and here's what we found interesting.
Average Info
Notes Per Post
168K
Likes Per Post
95K
Reblog Per Post
72K
Reply Per Post
114
Time Between Posts
8 days
Number of Posts By Type
Text
15
Photo
2
Last Seen Tumblr Blogs

voir-les-animaux-fantastique
VOir!) Les Animaux fantastiques - Les Secrets de Dumbledore Stre
1 post


Fun Fact
Mobile US users spent an average of 115.8 minutes on Tumblr app monthly.
Text
to those of you who are moving here from tiktok, from someone whos used both tiktok and tumbr for years...
1. DO NOT censor your posts
dont censor sex, abuse, suicide, dont censor it. we dont have censors like tiktok does, you wont be banned for talking about these things and tagging them properly helps people avoid them (also, we dont have shadowbanning here)
2. we dont really have an algorithm
you follow who you follow, and you see posts from who you follow or what you search. the 'for you page' is basically useless here. this also brings me to my next two points
3. dont crosstag
we get it, on tiktok you have to crosstag for reach, but thats not really a thing here. just tag your posts properly (also posters often leave more info about the post in the tags!! and when you reblog stuff you can leave your own notes in the tags, kind of like the old "repost comments" on tiktok)
4. dont expect to go viral/be famous
"viral" isnt really a thing on here (at least not for the average blogger). your posts will probably get 2-10 likes and you wont get nearly as many followers than on tiktok. thats just how tumblr is
5. blocking is your best friend
tiktok is VERY discussion based, and while tumblr is much more discussion based than other social medias, its still not a good place for ragebait/discourse. dont interact, itll make your experience worse in the end, just block and move on
6. you cant go into someone elses house and start rearranging their furniture
this is tumblr, not tiktok. dont diss old tumblr users for how they use the site or try to change them, thats like going into someone elses house and trying to rearrange their furniture. we've been here longer and we're familiar with the site and its culture, either find your niche, adapt, or find a different app
66K notes
·
View notes
Text
My asks are off. I’m not on this app/site enough to deal with the influx of spam I’ve been getting.
0 notes
Text
The fact that Mother Nature gifted me my monthly cycle for my birthday today has got to be some kind of karmic joke.
0 notes
Text


Favourite Patterson Moments from Blindspot Season 4.
(originally posted for the Blindspot 30 Day Appreciation Challenge)
148 notes
·
View notes
Text


"'Abandon all hope, ye who enter here.'" Horror Character Appreciation - Ben Feldman as George in As Above, So Below (2014) dir. John Erick Dowdle
1K notes
·
View notes
Text
Rudy Pankow Gif Pack
[LINK] In this gif packs you will find 485 gifs (275*167) of Rudy Pankow as Erwin Vandeveer in ‘Accidental Texan (2023)’. I made these gifs from scratch, so please don’t claim them as your own and do not repost them in gif hunts (instead link back to this page). You may crop/use them in crackships & stuff, but please don’t forget the credit ! (& since I’m kinda curious, I’d very much like to see :p) Likes and reblogs are appreciated! (Mega link can be found in the master folder) Content warning : flashing lights


151 notes
·
View notes


Text
the lazy coders guide...
okay, so from my various trolls through mammoth google searches to learn bits about coding, i’ve discovered a few wonderful resources out there which actually do some of ( and in some cases, a lot of ) the hard work for you…
these are otherwise known as code generators… here are a few of my faves;;
( NB/ all of the generators are pure CSS - no javascript is needed… )
CSS3 generator - includes generators for; border radius, box shadow, text shadow, rgba, font face, multiple columns, box resize, box sizing, outline, transition, transform, flexbox and gradient
EnjoyCSS - is another multi option generator and will give great live previews with a ton of options - includes; blocks, buttons, text, gradients, backgrounds, shadows, border radius, transition, transformation
CSS3maker - is again, another multi option generator - includes; border radius, gradient, transform, animation, transition, rgba, text shadow, box shadow, text rotation, fontface
Layerstyles - for those of you who use photoshop, this is the editor for you! it will generate CSS code from a PS like editor that should be very familiar - includes; drop shadow, inner shadow, background, border, border radius
Westciv - includes options to generate; gradients, text properties, box properties, transformations
here are some individual generators which give a little more detail and flexibility with the options;
scrollbar generator border radius generator gradient generator gradient generator box shadow button generator button generator menu generator menu generator ( includes bootstrap option ) menu generator tooltip generator tooltip generator ribbon generator table generator table generator typeset generator ease animations full box styling full box styling pattern generator
enjoy :3 love from, octomoosey <3
3K notes
·
View notes
Text


LUKE THOMPSON for Grumpy Magazine
623 notes
·
View notes
Text
Imagine if you had a neighbour who keeps performing songs from Phantom of the Opera in his apartment every night, by himself but accompanied by a parrot, which he has taught to sing Christine's part. Admittedly it's kind of obnoxious but you are far too baffled to even be properly annoyed. And also you don't want to confront someone with that kind of power and determination. So every once in a while you just hear this guy dramatically bellow
"SING FOR ME!"
[ASTONISHINGLY HIGH-PITCHED PARROT SHRIEK]
61K notes
·
View notes
Text
The fact my Pinterest is more active than tumblr for my oc’s kinda saddens me. But I’m more visual than written anyways.
I wish there was like an “Adopt an OC” sort of thing. I give you basics, you create to your hearts content.
Because lord knows I’m not a writing creative, I’m a graphics and Pinterest board collections creative.
0 notes
Text
Writing Tips Master Post
Character writing/development:
Character Arcs
Making Character Profiles
Character Development
Comic Relief Arc
Internal Conflict
Character Voices
Creating Distinct Characters
Suicidal Urges/Martyr Complex
Creating Likeable Characters
Writing Strong Female Characters
Writing POC Characters
Building Tension
Plot devices/development:
Intrigue in Storytelling
Enemies to Lovers
Alternatives to Killing Characters
Worldbuilding
Misdirection
Consider Before Killing Characters
Foreshadowing
Narrative:
Emphasising the Stakes
Avoid Info-Dumping
Writing Without Dialogue
1st vs. 2nd vs. 3rd Perspective
Fight Scenes (+ More)
Transitions
Pacing
Writing Prologues
Dialogue Tips
Writing War
Writing Cheating
Worldbuilding:
Worldbuilding: Questions to Consider
Creating Laws/Rules in Fantasy Worlds
Book writing:
Connected vs. Stand-Alone Series
A & B Stories
Writer resources:
Writing YouTube Channels, Podcasts, & Blogs
Online Writing Resources
Outlining/Writing/Editing Software
Writer help:
Losing Passion/Burnout
Overcoming Writer's Block
Fantasy terms:
How To Name Fantasy Races (Step-by-Step)
Naming Elemental Races
Naming Fire-Related Races
How To Name Fantasy Places
Ask games:
Character Ask Game #1
Character Ask Game #2
Character Ask Game #3
Miscellaneous:
1000 Follower Post
2000 Follower Poll
Writing Fantasy
31K notes
·
View notes

Text
hi everyone! I've gotten several requests to make a tutorial on how to make gifs for someone just starting out and I finally got around to slapping a tutorial together.
This tutorial will cover:
software recommendations
choosing what to gif
creating a gif step by step with probably a lot of unnecessary detail
some tips and tricks:)
(This particular tutorial will not cover how to find tv and movies to download and gif, or any specific instructions on coloring. only the basic gif making process.)
so for the purposes of this tutorial, we will be using Adobe Photoshop, which is the most common program for making gifs, and the one I recommend. the version you have doesn't make a major difference in terms of capabilities but the interface may be slightly different looking if you have an older version or a different type of device. you cannot make or edit gifs in any mobile version of the photoshop application. Optionally, we will also be using Adobe Premiere Rush/Pro or another video editing software of your choice. wherever you are downloading Photoshop, whether from Adobe or a third party, you should easily be able to acquire Premiere as well. I am aiming to be as detailed as possible in this tutorial, so it may sound more time consuming than it really is. once you get the hang of things, it goes fast. the most time consuming part by far is the editing and coloring. in my opinion, one thing that majorly saves time while giffing is knowing your keyboard shortcuts and using your mouse/trackpad as little as possible. I will be going over these in this tutorial as well.
before we begin, some general tips:
gifs of single shots that do not cut between angles or subjects generally will look the best, barring exceptions
for a single gif set, choosing scenes and shots with similar lighting will be easiest to get to look uniform when compiled together, since editing wildly different looking scenes to have similar coloring and lighting is hard and takes some practice!
avoid shots that will require you to majorly crop or zoom to properly frame the subject, as this will greatly diminish quality
speaking of quality, gifs will look best using 1080p video, but you can get away with 720p as well. I would not recommend giffing with anything lower resolution than that
Tumblr's upload capacity for image and gif files is 10mb. be sure when exporting your finished gif that it is under that size. if it is a bit over, you can try trimming a few frames off your gif in the video timeline.
if you get frustrated, don't give up! giffing is hard and complicated especially if you are new to photoshop. I tried to make this tutorial as detailed as possible so it's easy to understand (although im sure I still forgot some stuff)
ok onto the tutorial!!!
STEP ONE: choose what range of frames you want to gif, and how.
once you have decided what you want to gif, there are two main way to convert your episode into a range of frames to make into a gif. the first is by screencapping. this involves downloading a program like mplayer or vlc which can be used to convert video files into "stacks" of screencaps, which can then be separated into whatever range of frames you want and imported into photoshop. this is seemingly by far the most common method I have seen amongst gifmakers*, but personally I don't care for it and I think it's more confusing and time consuming overall, so I will be explaining the second method: importing video frames to layers.
now, normally what this would mean is opening the full episode in photoshop and using the pathetic little playheads on either end of the scrub bar to trim the file into a clip. this is where your video editing software comes into play.
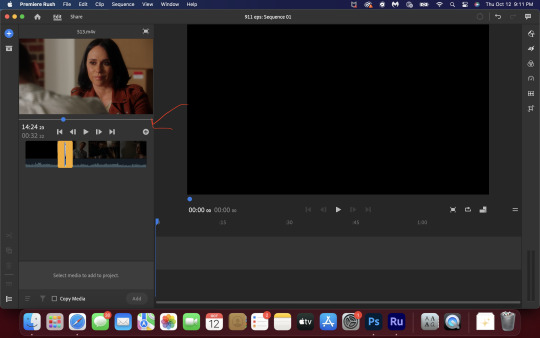
open whatever episode or movie you want to gif in your program. if it is a large file like a long movie in 1080p, this may take a few seconds. like I said, I am using Premiere Rush. I will be using a random episode of 9-1-1 for my example gif.
in your media browser, hover over whichever episode you want (you can also just add the whole episode to your project and scrub through, but that can take longer unless you know what time stamp you're after). click the fullscreen button by the bottom righthand corner.
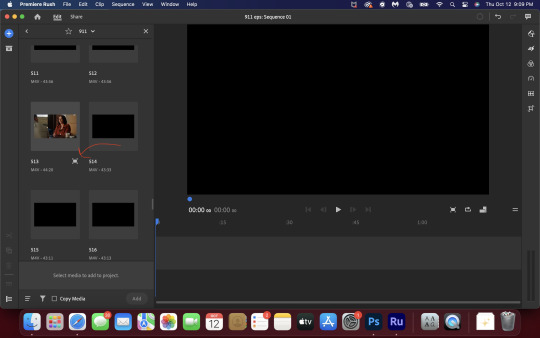
now you can scrub through and trim the episode before you even import it to premiere. this makes trimming your clip even easier.
use the trim bar (yellow outlines) to trim as close as you can around the scene you want to gif.
then click this plus, and then "add" below. this will add the clip to your project.
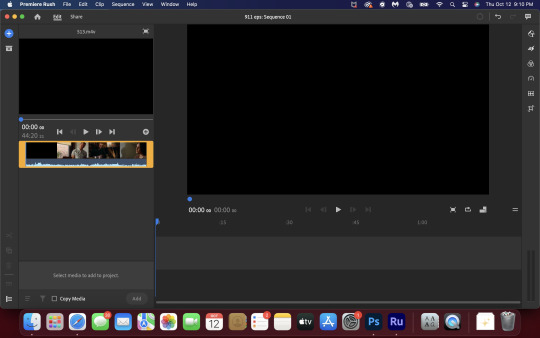
now, move the blue playhead up to the frame you want your gif to start on. then, use the scissors button off to the left to slice the clip. select the portion before the playhead, and delete it.
now move the playhead to where you want the gif to stop. a good length for most gifs is around 1.5-2 seconds in my opinion. some may be shorter depending on how long the shot is, or longer if you plan on making them smaller (remember, the uploading capacity on Tumblr is 10mb per file.) trim again, now delete the portion after the playhead. you can also use the left and right arrows beside the play button to move frame by frame, and you can adjust the side of the horizontal scroll bar below your clip to “zoom” in on it and make scrubbing easier.
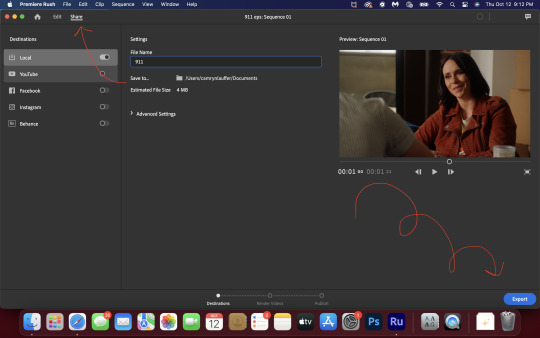
once you have your clip, go up to where it says "share". your clip will be rendered, and then you can click export to save it.
repeat step one as many times as you want for each gif. I know this may sound complicated, but like I said above once you get in the rhythm this step takes only a few seconds.
STEP TWO: create your gif!
close premiere. open photoshop. head to the control bar at the top. select file > import > import video frames to layers.
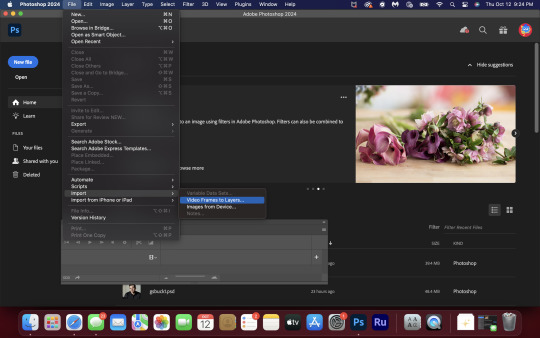
navigate to whatever folder you exported your clip to. select it, and hit enter. a second popup will appear asking you to select your range of frames. since you have already trimmed your clip to your liking, simply hit enter a second time.
now your screen looks like this, and we are going to crop and resize our gif! (troubleshooting: if you do not see the timeline bar at the bottom, select window from the control bar, scroll down, and make sure timeline is selected as part of your workspace. Adjustments and layers should be there automatically but if not add them too).

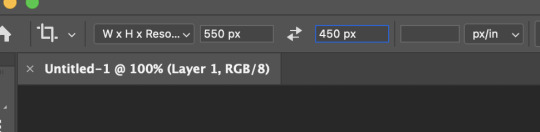
Tumblr posts are 540px wide, so in order to make my gifs as small as possible while maintaining quality, I typically crop my gifs to be around 550-600px wide, with varying heights depending on what shape I want the gif to be. experiment with this a little and decide what works for you. just don't make the width lower than 540px. once you have the portion of the frame you want inside the cropping grid, hit enter again. sometimes you have to hit it twice.
here are the measurements I am using for this gif
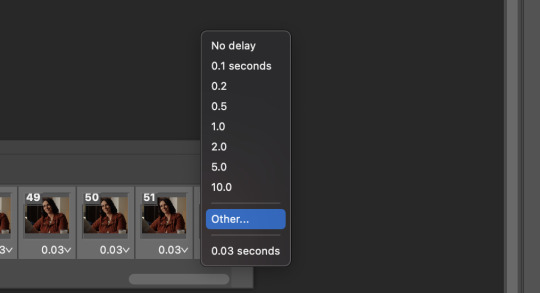
now in your timeline, select frame 1. hold down the shift key and scroll to the end to select the very last frame, thereby highlighting them all. from here we will edit our frame delay rate. photoshop will automatically set it to .03s, which will make your finished gif awkwardly fast. I typically use .05s, or .06s if I want a gif to be subtly slower (this comes in handy if the shot you are trying to gif is very short). anything longer than .06s will look weird though. choose "other" from this menu and type in your delay rate. make sure not to miss the zero after the decimal.
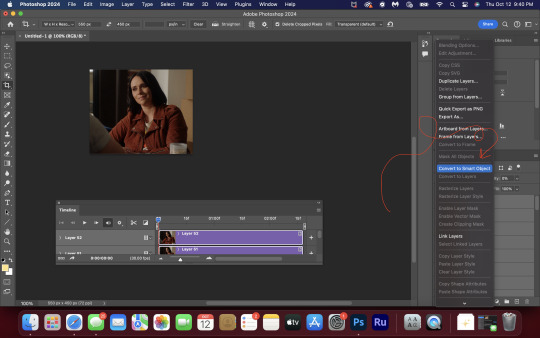
once you've set your frame rate, go to the other end of your timeline and click here to convert your frames into a video timeline.

then press option + command + A (on Mac) or windows + alt + A (on PC) to select all layers. then right click (control + click with a trackpad) on any one of the highlighted layers in your layers tab off to the right. scroll down in the popup menu and select Convert to Smart Object.
THAT'S IT!! CONGRATULATIONS!!!!! WE HAVE GIF!!!
from here comes the fun part!! you will begin adding action filters like sharpening as well as adjustment layers to color and edit your gif. experiment with different adjustments and styles until you find something you like. too many adjustment layers will up the size of the finished gif though, so I tend to keep mine to 3-4 layers max unless its a really hard to color scene. if anyone is interested in a separate coloring tutorial, please let me know!
once you are finished editing your gif, click file > export > save for web (legacy) OR hit shift + option + command + S. play your gif in the export window to make sure it looks okay, and then hit save!
I hope you guys find this helpful and informative! please hit up my in box if you have any questions or if anything doesn't make sense. happy giffing!!!
*one reason people seem to prefer screencapping to this method, is saving all the individual clips as video files does take up a lot of space on your scratch drive, which in turn can cause your computer to work slowly or crash programs. this can be rectified by making sure to delete the clips from your computer once you are done making the gifs. another space hoarder to look out for is the proxy files of your episodes that will be automatically saved to your hard drive whenever you add an episode to your project in Premiere. Periodically, go through your storage and delete all the .proxy video files. this will not delete the original episode files, only the proxy files created by Premiere.
tagging some mutuals to sb hehe: @shitouttabuck @lover-of-mine @honestlydarkprincess @eddiediaaz @compactdiscmp3 @eddiebabygirldiaz @bigfootsmom @callaplums @athenagranted @firemedicdiaz @sibylsleaves @loserdiaz @buck2eddie @diazass @eddiediaztho @giddyupbuck @monsterrae1 @icecreampotluck @sunflowerdiaiz @swiftfootedachilles @singlethread @aziraaphales @911onabc
146 notes
·
View notes
Photo


Scandinavian apartment
THENORDROOM.COM - INSTAGRAM - PINTEREST - FACEBOOK
171 notes
·
View notes
Text


#buck, be smitten
766 notes
·
View notes
Photo


Grey & blue Scandi apartment
THENORDROOM.COM - INSTAGRAM - PINTEREST - FACEBOOK
110 notes
·
View notes