
All about sustainability, meaning practices you can continue indefinitely, creating greater and more numerous benefits in the long term. The focus is not only environmental, social, and economical sustainability, but also nutritional, architectural, educational, as well as any other area of life.
Don't wanna be here? Send us removal request.
Statistics
We looked inside some of the posts by davidstortebeker and here's what we found interesting.
Average Info
Notes Per Post
4K
Likes Per Post
2K
Reblog Per Post
1K
Reply Per Post
8
Time Between Posts
21 days
Number of Posts By Type
Text
16
Note
1
Last Seen Tumblr Blogs


Fun Fact
The most popular pages on Tumblr are about Minecraft, GIFs, and David J. Peterson.
Text
Filling Niches for Greater Abundance
May is certainly my favorite month, I keep realizing around this time, especially having been out of the 4-season temperate climate for more than a decade. After what seemed like an endless back and forth between Winter and Spring, finally the entire landscape has grown into a lush deep green, with plenty of flowers, birds, and bugs, oh my! Even though I am not doing any gardening myself right now, I can't help think about the diversity I keep seeing around me, and even the things I don't see. Which tree is that piece of pollen from that's floating past me int he air? Where did this bumblebee dig its hole? Which bird is going to eat that mosquito that I decided not to kill, just shooed it away from my arm?

What's the Point of Diversity Again?
While Permie minded folks will no doubt understand my excitement about nature's abundance and diversity, outside of this context one may wonder: What's the point of diversity? After all, having a well trimmed lawn in front of our house should be enough to kick the ball around, right? And true enough, if that's all you want to do, you may not even need that much. There are lots of artificial lawn-lookalikes that you won't even have to mow! But when it comes to food production - which I would extend to living with and in nature - a bit of biodiversity goes a long way… and lots of it will offer enormous benefits.

image source
The Food Web: Our Relationship To Each Other
When interacting with nature, one of the most essential things to keep in mind is always: what does one particular species eat, and in turn what likes to it them. With this information we will start seeing each element as an individual who performs a certain function, just by following its most natural inclination (leading to the next important question of how do they go about doing it). It is up to us to utilize their work in certain parts of the ecosystem we live in, and help manage.

image source
Upon closer observation, we will realize that the interaction of species has many levels. Some may not actively eat others, but they will compete against them, even to the point of completely overtaking their space (trees and walls covered in ivy is such a typical case). On the opposite end, others will cooperate, so much so that they may entirely depend on one another (just think of the example of many fruit trees who have evolved with the honey bees as their pollinators). Some species are successful parasites, affecting their victims by taking advantage of their live bodies rather than killing them. Of course, many species are perfectly neutral with each other, though they still affect each other indirectly by other aspects of their lives. No matter what the relationship individually is, the presence of each species will ultimately benefit the entire system.

Resistance to Plagues, Pests, and Famines
Naturally all species try to occupy a niche, the bigger the better. The only thing keeping them from taking up everything that's available is other species, which is quite important: because one species will be vulnerable to being taken out by one simple factor they are not prepared for. So having various other species eating one, while that one is also feeding on a number of species, creates a system that is stable enough to withstand sudden changes in their conditions, whether they are climatic, or have more to do with the composition of their ecosystem. In the end, a stable and dynamic system with a great diversity of life, is also most likely to produce most abundantly. We just need to keep in mind that what we consider "yield" of the garden needs to be just as diverse.

image source
Too much of one thing is rarely a blessing, even if it happens to be our favorite food. Just think of a swarm of grasshoppers eating up every green leaf in sight, or a fungus decimating an orchard. When things have gotten this bad, fighting back by yourself is not only futile, it will most likely be counterproductive, as it takes out merely the weakest elements, giving the survivors a chance to reproduce. What works much better instead, is inviting the natural predators of whatever you have too much of, to help out in controlling them. Not a slug excess but a duck deficiency, as Bill Mollison put it. Fortunately, most species will come voluntarily, without needing to be bought, fed, and actively taken care of… IF they are cordially invited.
It's Not Food, It's Shelter They Need
So how do we tell wild plants, insects, birds, and even mammals to come and take up residence on our land? It may be counterintuitive, but offering them food alone is rarely enough to do the trick. They may partake of it, but if there is no other reason to stay, they will soon move on to greener pastures (provided it's the green pasture they are most happy with). However, if they find that along with the food you also offer them a place to hide, sleep, even have babies they will be more than happy to relocate to your garden permanently. This is why I am always happy to see insect-boxes, usually in community gardens throughout the city.
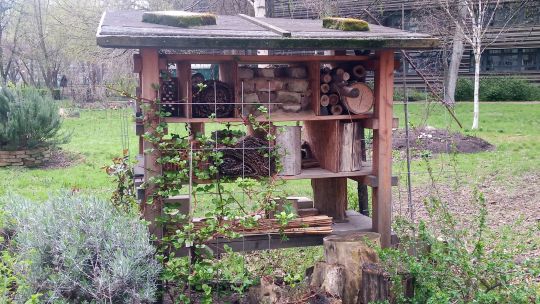
Of course, what works on the small scale can work on the large one. We just need to figure out (by observing) which outside factors they need exactly. Is it an island on a pond to lay their eggs? Is it a pile of rocks in the sun, where they can enjoy the heat of the sun? Is it a hole in the tree or in the ground to make their burrow? Could it be a little nook where they are safe from your cat? Whatever it is, if you build it, they will come. And once they are there, they will do everything in their ability to make your place work in their favor… which in the end is most likely what your place needs.
13 notes
·
View notes
Text
Closing Loops in Soilless Gardening - Hydroponics and Aquaponics
What is the future of food production going to look like? Is the projected 10 billion people in 25 years, out of which two thirds will live in cities, going to require us to convert every square meter of arable land into intensive mono cultural farms? Please don't let that be true! There HAS to be some alternative. Fortunately, there are several. Two of them are different ways of growing plants without soil, a radically new method, which may be most appealing to urban food production.

image source
Hydroponics: Growing Plants in Water
When it comes to growing large amounts of food on a small area efficiently, hydroponic systems are often brought up as a solution. And the reasons sound pretty convincing: An efficient hydroponic farm uses 90% less water, and can yield 3-10 times the amount of produce per area, with 7-14 growth cycles in a year. IMPRESSIVE! But before getting too excited, let's not forget: the devil is in the details! It's worth looking into under exactly what conditions those plants grow, being fed by what light, and most importantly which nutrients, and where they come from.
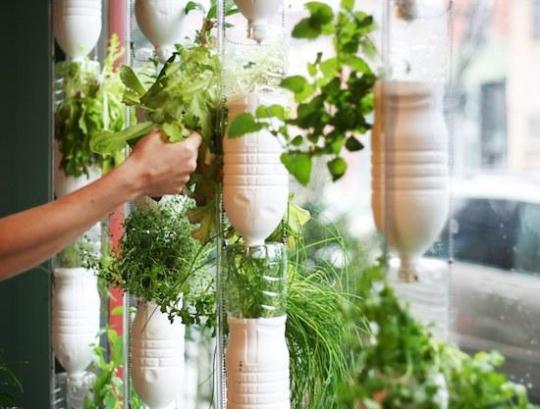
image source
The basic concept, however, of growing plants vertically, in mostly water, with some kind of substrate, such as clay balls or vermiculite, is actually a pretty nifty way to grow food where there are no fields. The most basic form of this may be the Windowfarm technique, which I experimented with myself years ago in my Budapest apartment. Going to Shanghai, the whole idea seems to be taken to a whole new level.
https://static.dezeen.com/uploads/2017/04/sunqiao-urban-agricultural-district-Sasaki-architecture-industrial-china-shanghai_dezeen_hero-b.jpg image source
Is That Really Sustainable? Or Even Healthy?
… not to mention, does hydroponics even fit into Permaculture? Because let's be honest: with a system that needs to be constantly managed and monitored you could not be further from a self-supporting ecosystem. Also, what exactly do those plants get to eat? The typical N-P-K made industrially out of petrochemicals? Most likely. So while it certainly reduces the transport related drawbacks, hydroponics is by no means energy efficient, and the nutritional value won't be any better than your most industrially grown veggies.

image source
How Does Aquaponics Compare?
Okay, so let's bring in the fish! For those not familiar with the difference between the two systems, aquaponics is the combination of hydroponics and aquaculture, which are simply fish farms. Having fish in a tank, they will naturally defecate into the water, requiring it to be changed regularly. Plants, however love to eat those nutrients that the fish excrete. Or to be more exact, they feed on the nutrients that have been converted by bacteria and other microbes. The ammonia will turn in to nitrites, which in turn become nitrates, that is food for the plants.
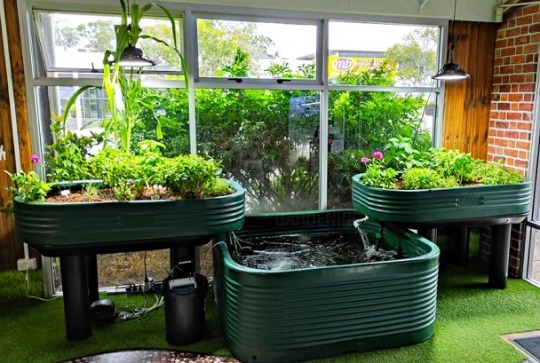
image source
So running the water from the fish through the plants growing substrate will on one hand feed the plants, as well as clean it for the fish to enjoy it again. So the system already closed a few loops there, making it more sustainable than just mere hydroponics. Also, the inclusion of microbes already offers a more diverse environment, bringing the system a bit closer to an ecosystem. But let's not get ahead of ourselves: Aquaponic systems still need close monitoring, as they are still a far cry from a self sustaining ecosystem of let's say a pond. Also, the water circulation / aeration is most likely going to require a pump, and depending on the exact setup of the system, maybe artificial lighting for the plants. All these aspects add to the energy requirement of the aquaponic system.
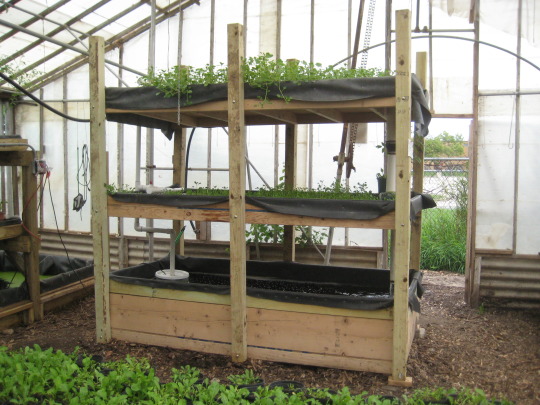
image source
A Truly Closed Loop? Consider the Food of the Fish!
When praising the sustainability of aquaponics, one thing that mustn't be ignored is the source of the fish food. Just like with the hydroponic systems, where the food for the plants or the fertilizer is considered, we can't ignore the feed we give to our fish to eat. If it is the same industrial feed, we may as well have kept to our hydroponics. Not true, since including fish already makes our system more diverse. So instead, let's continue in that same direction. What do fish eat? What is good for them? How can we grow that food ourselves?

image source
Making Your Own Sustainable Fish Food
Here I could probably start a number of individual posts, since talking about fish food is like opening up a can of worms. But fortunately, I already have a number of appropriate things written. Talking about worms, by the way, anyone who has been fishing knows that they are a favored delicacy, and anyone who composts will have no shortage of them. Since worms are mostly vegetarians, and many of us eat meat, it may have been a bit difficult to properly compost greasy, meaty, bony food wastes. That's where black soldier flies come in, whose larvae are also frequently mentioned for fish food. I still need to try growing those guys. As for green plants for the fish, duckweed makes also good fish feed, again something I have no experience with. What I do know, though, is spirulina, which is also super rich in nutrients, and I would be surprised if the fish didn't like it. So I can see throwing some composting worms, black soldier fly larvae, and spirulina into a blender, to make some great nutritious fish food. At the moment this is very theoretical for me, though.

image source
Don't Give Up the Soil Completely
So does this mean we should all focus on setting up our most sustainable fish-plant-compost combo cycles? Hells yeah! But please not at the expense of everything else! Soilless gardening, as exciting and revolutionary as it may sound, is still that: without soil. And let's face it: neither us, nor our beans and tomatoes, have evolved to live entirely without soil. That just seems wrong. Even in a small urban apartment it's worth having a bit of soil on your roof, balcony, or window sill, where you can dig your hands into a world of healthy microbial diversity on occasion. And if you do have the space, by all means, set up a pond, a dam, or another aquatic ecosystem, where fish, and frogs, and dragonflies, and numerous other species can live together without relying on our management. Apart from looking pretty, they will also provide food for us, that is nutritionally superior to anything industrially grown.
Sources: 1, 2, 3, 4, 5, 6, 7, 8
126 notes
·
View notes
Text
Urban Composting using Red Worms
Composting is the Alpha and the Omega of food. Compost replenishes the nutrients lost from the soil during food production, at the same time it deals with the bucketloads of organic kitchen waste that accumulates during food preparation. The compost beautifully connects the garden with the kitchen, and vice versa.
No farm? No garden? No Problem!
What about those of us who don't farm? Those who don't even have small yard? Not that uncommon in cities, even though people still tend to have a kitchen there. For all those who think that this situation makes composting unfeasible, I'd like to share my experience in urban composting using Eisenia foetida, or California Red Worms, first in a Budapest apartment without even a balcony, then on my rooftop in Mexico City.
We are all producers anyway, so let's make the most of it.
Before getting immersed in the details of urban vermiculture, let's stop and think about all the stuff we add to this world on a regular basis: many household garbage bags contain all kinds of lovely-nasty things, from eggshells to tea-bags, from banana peels to coffee grounds, from toenail clippings to that cucumber that grew moldy from being ignored for too long. Not very nice gifts to the world, at least from our perspective. So it's not surprising that they are generally seen as a 'problem'. Also, our trash can would be so much cleaner without all this smelly and gooey organic garbage.
Now let's imagine getting a regular supply of liquid fertilizer (maybe 4 liters / 1 gallon every week), as well as solid humus (around 40 liters / 10 gallons every 6 months). That is a lot, especially for someone who doesn't have a garden! But in their converted forms these former problem items become highly desired goods by those who do, so they can be sold, traded, or gifted. In the end, the little effort put into it pays of quite handsomely.
How does vermicomposting work?
The principle is pretty straight forward: Decomposers, such as fungi, bacteria, and other microorganisms break down our kitchen wastes and make their nutrients available for plants. There are thousands, even millions of these useful little critters, so how can we collect them all to form an ecosystem in our little bin? Fortunately, there is something like a packaged deal:
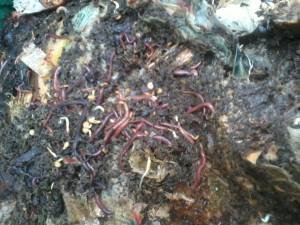
Many microbes that are happy to eat our food scraps live in a close symbiosis with another important decomposer, the composting worm (aka California Red Wiggler or Eisenia foetida) and they can be found in the same dirt the worms live in. Together they can turn our kitchen waste into nutritious humus, given the proper conditions. It’s important to mention, that it’s not the worms who bite into the apple-core, but all the microbes digest it down to a juice they all slurp and exude. Yum! This is also the reason why it’s always best to get the worms with a good amount of soil as inoculant.
Setting up the Wormery
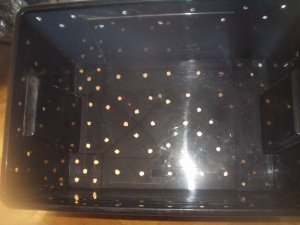
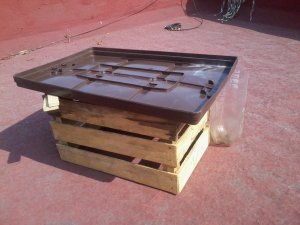
For the bin I usually use a 40 liter / 10 gallon storage box, ideally the stackable kind, which will come in handy once the first bin is full. Drilling lots of small holes on the bottom will make sure that it drains well, and prevent the foul smell that accompanies anaerobic decomposition. The drained liquid, by the way, is the fertilizer mentioned above, sometimes referred to as 'compost juice' or 'worm tea'. I use the lid of the box as a saucer to catch it. From there I let the compost juice drain through a strategically placed hole into a bucket. It’s important to make sure the entire system is sufficiently inclined, so the water can drain in its proper direction.
Making it nice and comfy inside
Once their home is completed it needs to be furnished before our decomposing friends can move in. Fill the bin half way with some organic material, preferably high in carbon, such as dry leaves, straw, hay, woodchips, or if these things are hard to find, ripped-up pieces of cardboard, and paper. Ideally I’d use a good mix of whatever I can find. I usually also include a handful of forest soil, in order to inoculate the system with wild microbes, as well as a good number of thin sticks and twigs, to guarantee aeration when the compost starts to compact. To really make the new tenants happy, it’s also a good idea to prepare some partially composted food, as it is the juice seeping out of the decomposing food the worms live on.

The needs of this community of decomposers, as anyone who has composted before will know, are a good ratio of carbon and nitrogen, good aeration, and sufficient moisture. As for the worms, they are also not too fond of light, so it’s good to keep the inside of the wormery in constant darkness. The bin should be set up in a shady spot, and protected from the rain. Worms need moisture, but they can’t swim! When temperatures approach freezing they will curl up and go dormant, only to become active again in the spring. So don’t assume they froze to death, they’re just sleeping.
Adding the worms
Once the bin is ready the worms can arrive. The old adage ‘the more the merrier’ certainly applies to them, as long as they are of the right kind of worms. Using regular earthworms, or night-crawlers, will most likely kill them, dooming the entire composting system to fail. For my first worm-bin I was given a kilo of red worms by a friend. In my latest one, however, I had to make do with only about 200 individual wigglers, which I bought for an arm and a leg from a stingy worm farmer. They immediately disappeared into the box, making me wonder if they were still alive for the next couple of months. But these Red Wigglers are amazing at multiplying: if they are happy, they can double their population in only 90 days.
The feeding routine
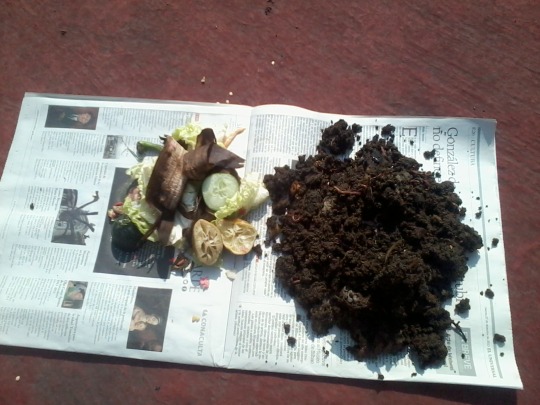
Running the system is super easy, and once the routine has become established, it will almost run itself. Every time I produce organic kitchen waste, I place it into a small (1 liter / quart) bin that I keep next to the kitchen sink. This one I empty every 1-2 days, right into the worm box, on top of everything that’s already in it. Next, I use some carbon-rich material to cover it with. Since most of our food is high in nitrogen, this step is essential. Once again, I could use leaves or straw, but in an urban setting newspaper is a lot easier to come by, or bank statements, or other printed propaganda. It is important to make sure this cover material does not include any harmful substances for our microorganisms, such as lead-based ink or bleached paper. My experience in Hungary and Mexico has taught me that most newspapers can be trusted, even the colorful ones. What I still avoid, though, are glossy prints that are almost certain to include plastic.

Covering the food will not only add the necessary carbon, but will also control the smell and keep invading insects in check. To maximize efficiency I like to rip the newspaper in stripes, and once it has completely covered the little pile of food, I pour some water over it. The water makes the strips stick together, hiding the food underneath, ready to be discovered and colonized from below. Before watering it, I usually empty out the effluent bucket, so it won’t overflow. This worm-tea I collect in a bottle to use to water my plants, in a diluted form. Finally, to protect the worms from the light, and to reduce evaporation, I place a cardboard lid on top of the bin. An old piece of carpet, blanket, sweater, etc. can also do the trick, while keeping moisture from evaporating. Just make sure there are no poisons involved.
What do the worms eat?
As for the dos and don’ts of feeding the worms, the rule of thumb is: they’re not too picky, but are generally vegetarians. Also they are not too fond of oily stuff, and they absolutely hate salt! So I mostly give them fruit and veggie pieces that accumulate while preparing any meal. They don’t object to cooked food per se (cooled down, of course), but since that usually includes oil and salt, it should probably be avoided. Otherwise they get everything from flowers to salad rests, even the dust from the floor. Quite obviously, though it can’t be stressed enough, harmful chemicals should be always avoided!
Even the water I use on the worm bin I set out in the sun for a while to let the chlorine evaporate. Also, the smaller the chunks I give them, the faster the decomposition will go. Putting their daily food into a blender and pouring it on in liquid form would make it even more readily accessible, though I’ve never gone that far in my efforts.
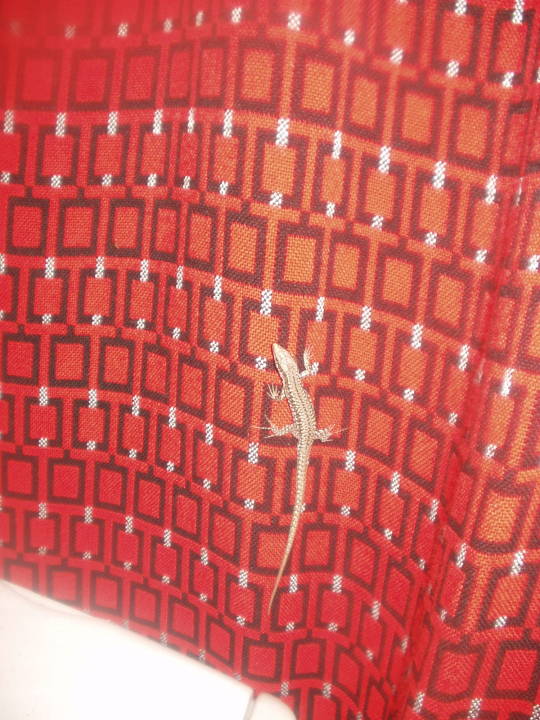
What about the flies?
At this point many users may wonder about possible insects this indoor worm farm could attract. Sure, the better you cover the food, the less insects you have, but in my experience it was hard to avoid a small population of flies. Though they tended to be the tiny fruit flies, and not the pesky houseflies, it can still be annoying to have them around. Fortunately, their population came suddenly under control, just when it seemed like it was getting out of hand…

The solution was a natural predator, who just showed up on its own, in form of a little lizard. I have no idea where it came from, but it quickly made itself home on my kitchen curtain, from where it hunted the flies with agile determination. First I celebrated this incident as a unique marvel of nature, but since then I have seen many lizards hanging around my worm-bin I keep on the roof here in Mexico. They seem to find delicious flies, even though I don’t! Just goes to show how effective they are.
Completing the cycle with a second bin
Once there is no more room in the bin to accommodate more compost it's time for a second bin. After drilling its holes similarly to the first one, I just place it on top of the first one, letting it slide down all the way to the top of the compost. I even push it down a bit, to make sure it is in complete contact, so the worms can crawl through the holes into the second bin. This takes time, of course, but there is no rush.

With a similar substrate, and regularly added fresh food, the worms will want to migrate upwards, especially once they have eaten up everything in the bottom bin. The rest of the compost will be taken care of by other microbes, so by the time the second bin is full too, the first one will be ready to be emptied and placed on top. This whole cycle takes about a year, depending on how much you produce.
And a year later...
Okay, so we’ve kept our kitchen trash food-free for a year, the plants in our home have grown like crazy since we started feeding them with the worm-tea, and our house lizard is getting chubby while keeping the flies to a minimum. So one day we reach the point when the second bin is also almost overflowing with compost. What now?

Instead of getting a third bin (and a step-ladder that would eventually be needed), it’s time to empty the first bin, and set it on the top of the second. This should give the user a sack full of good humus. Now I’ve seen people plant straight into that, and in fact, lots of time you’ll find volunteer plants growing out of it. But this fresh vermi-humus has so much potential that it would be a waste not to dilute it.
The first time I harvested a batch of 50 liters, it ended up revitalizing 500 liters (that’s more than 130 gallons, or about half a ton) of exploited, nutrient-poor soil in a nearby community garden. And yes, there will be some worms left in this humus, which is exactly what we want. After all, the organic decomposition doesn’t stop just because it was taken out of the bin. And why should it? Especially if we mix it with used soil (once again without any chemical poisons), still more organic matter, and start growing plants in it, the continuous cycle of nutrients will go on and on. The most exciting part is starting just now, and to think back that it all came out of our kitchen makes the whole endeavor worth while.
8 notes
·
View notes
Text
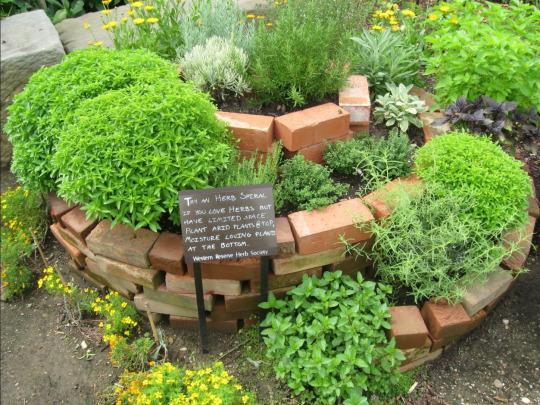
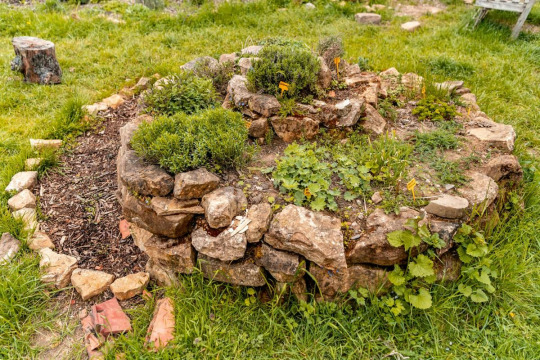
The Permaculture Spiral Garden - A Great Starting Point
There is probably no other structure as popular for illustrating Permaculture in practice as the Herb Spiral. Okay, I guess I could mention the lasagna sheetmulching method or also the cob oven that tends to be the first hands-on project at a typical Permie intro session. But when it comes to showing how landscape design, zones and sectors, stacking functions, and efficient use of space and water come together in one unique structure, the Spiral Garden is unbeatable.
Turning Theory into Practice
In typical Permaculture Designer Certificate courses, but even in brief intro weekends to Permaculture, there tends to be a lot of theoretical discussions. Since the numerous design principles can be applied to any climatic region, from the tropical to the subarctic, and on any scale from the humongous to the tiny, the practical aspects of the ideas can easily get lost. That's where a good hands-on application comes, where the participants get to move around rocks and dirt, while realizing how much it ties in to the concepts they've just discussed. This way the apparent "main purpose" of "building something to grow all your kitchen herbs on", becomes a neat side feature.
Adjust Your Landscape!
The first thing to realize that landscape is welcome to be modified and adjusted to bring out the best in it. Clearly, while it is important to work with what's there already, it doesn't hurt think about mounds and valleys. And before you bring out the excavators for your large-scale farm, it makes sense to start small… say on a circle of 2-5 meters (6-16 feet) diameter. In other words, the Spiral Garden is a hill with a spiral shaped surface, leading down to ground level, or further down into a water hole. It can be made out of rocks, bricks, concrete debris, or anything else you have lying around that can hold your soil.
Design According to Your Scale
Looking around for existing Herb Spirals it's easy to get confused. Some are so big you can actually climb on them (that is, you have to in order to reach what's growing on top). Others are so tiny that you may not even want to step on them. The question is: which size is the right one for you? Since this is something you will have to decide almost daily in Permaculture, it doesn't hurt starting out with this important question.

Organizing Your Spiral Garden
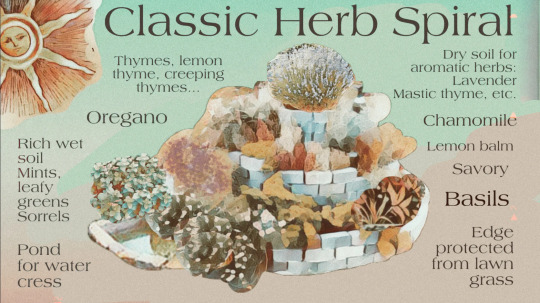
While there are seemingly endless types of Spiral Gardens, there are a few things they all have in common: They all start out with a region on the top, where water is bound to run off right away, leaving the soil relatively dry. This area is also the most exposed to the wind. Keep this in mind when choosing the plants that are going to live here. Ideally, the spiral should start sloping toward the East from here. Delicate plants that benefit greatly from the morning sun will appreciate this region. As the slope continues toward the South and West, it becomes more suitable for sun loving species. Finally, as the spiral reaches the ground level in the shady Northern part, it will be perfect for herbs that prefer less sun, more shade and more water, since the soil tends to be wetter here. (Note: This is for the Northern Hemisphere. In the Southern Hemisphere North and South are reversed.) To make full use of the runoff water, many people add a small pond at the base of the spiral, where additional aquatic plants, such as watercress, can be grown.
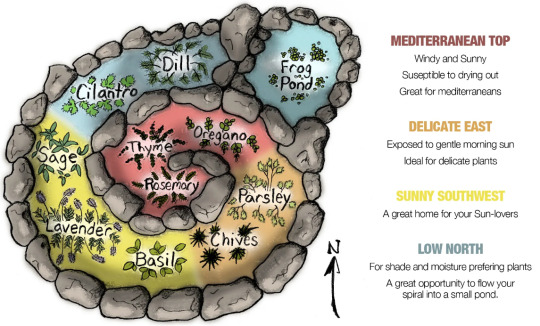
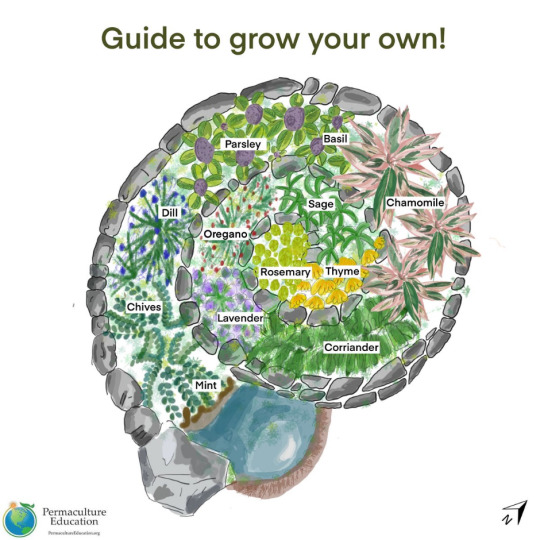
The given illustration offers a good number of herbs for a nicely diverse kitchen. Depending on what else you want in your Herb Spiral, you can add it in the most suitable region. Mint and lemon balm love the cooler, shady part with more water. Lemongrass is great in the sunny area, and tarragon and estragon prefer the dry top of the spiral. Of course, the idea is not limited to kitchen herbs. For maximalists, the same theory can work with a mountain you might want to terraform into a spiral farm. But right now I'd prefer to stay small scale.

Plenty of Benefits (That's Why It's Permaculture)
As explained above, the main purpose of the Spiral Garden is not only to increase your gardening area by making use of the vertical, but also to create diverse climatic conditions, which do make a difference on the smallest scale. But as Permaculture tends to be, there are many other benefits to it. The structure itself offers great habitat for numerous animals, such as frogs, salamanders, lizards, but also pollinating insects, and of course others that may not directly benefit us, but by feeding on others they all add to the stability of our ecosystem. The structure itself will suppress weeds and make use of material that you're not likely to use elsewhere. Finally, depending on the size and location, it will be an ideal place to grow all your kitchen herbs right where you can access them most easily.
Some Things to Keep in Mind
When building the structure, make sure it will contain the soil in a nice trough, slanting slightly inward. That way bits and pieces that fall off will roll towards the center, until contained by the main mound.
Make sure the slope is always nice and gradual, avoiding sudden drops where the water can rush down quickly, eroding the soil.
If you're going to walk on your spiral, include a separate walkway that won't compress good soil. Most importantly, it should be sturdy enough to provide stability and make access safe.
Don't forget that while the structure is important to keep the soil in place, it is the soil that you'll be growing plants in. So it should have a good depth of 20-50 cm (8-20 inches) throughout the entire spiral. This can be the trickiest part!
Apply your own observation to which plants do better in which parts of the spiral. Also, with time you will find many other plants growing in it that you didn't plant. Before removing them, consider how much they actually bother your herbs, and whether their benefits may not outweigh their drawbacks.
Go Out and Build Your Own!
I hope this brief overview got you inspired to go out and try building an Herb Spiral yourself! I would love to hear your experiences with it!
Sources: 1, 2, 3, 4
3K notes
·
View notes
Text
Compost Me When I Go - Natural Ways of Treating Dead Bodies
Recently there seems to be a bit of a discussion regarding natural organic reduction, meaning the composting of human remains, particularly in the US, where this funerary process has been legalized in states such as Colorado and Vermont. So does that mean that this organic breakdown of the body had been previously illegal? Doesn't the traditional casket burial already offer up the body to natural decomposition? Or is there some kind of mummification going on? What options do we really have in dealing with our dead bodies?
Back In The Old Days...
We really don't need to look back too far into the past to see how dead bodies were essentially all composted. In Western tradition up into the 19th century, the most common practice was to place the body in a coffin, and bury it six feet under. No expensive embalming fluids were used (at least for the great majority), only two half-dollar coins "for the ferryman" were placed on the eyes to keep them closed, if the family could afford it. After the funeral, nature took its course in the form of the proverbial worms (more precisely maggots), since the box was not hermetically closed, and offered access to various life forms living on the dead remains.

image source
Also in other cultures, again up into the 19th century, certain practices remained in use which seemed completely different but were based essentially on the same idea: letting your loved ones move on. People would place their bodies high up into trees or on platforms, letting the carrion birds pick them apart and take them to new heights and far away places. I can totally see their point, and while I would be a bit disturbed if a crow dropped a human hand in front of me, the idea of soaring with the birds after my death does seem appealing.

image source
Should They Stay Or Should They Go?
On the other end of the spectrum, various other cultures did not want their loved ones to vanish, even though their bodies had become lifeless. Inca rulers, for example, were left sitting on their throne in a mummified state, so they could continue owning their possession, letting the state apparatus run its course. A neat way to give power to faceless bureaucracy, while the figurehead ruler could not even have an opinion. Ancient Egyptians also mummified not just their pharaohs but everything from dogs to birds. And coming back to the 19th century, a similar trend established itself in Western culture, though at first only among those who could afford it.

image source
Death masks and huge mausoleums had always been common among the elite, but in Victorian society a similar infatuation with keeping some relic of the deceased around became very popular. With the invention of photography, dead bodies were strung up with wires for a last portrait, and families paid huge sums for highly elaborate wakes, where the dead were displayed lavishly to look their best for their last farewell. Granted, by this time it was usually one's offspring who would decide do this, but let's face it: by the time someone has died they are in no position to have a say in things.

image source
Industrialized Funerals for Everyone!
In the 20th century, this latter approach gradually replaced all other funerary practices. It was toned down a lot from Victorian opulence, and on the surface it seemed more similar to the wooden box burial for the poor. The body itself, however, was subjected to an increasingly elaborate embalming process, which would slow down or completely discourage organic decomposition. What would further keep microbes from eating up the human remains, is the fact that over its last living weeks (or years) the body would be flooded with antibiotics and other drugs. In an attempt to appeal for safety standards, and heavily influenced by powerful funerary businesses, state regulation soon established this kind of burial as the only permitted one.

image source
Problems and Alternatives
What worked out great for lining wealthy pockets did not come without its drawbacks. Not everyone could afford a $10,000 plus funeral for their loved ones, and at the same time, cemeteries have a limited capacity. So especially in the second half of the 20th century cremation became widely accepted in the West as a viable and legal alternative. But nowadays, as people are becoming aware of their carbon footprint, both processes are undergoing a deep scrutiny. Cremation releases around 400kg of carbon dioxide per body, plus various toxins from foreign objects, such as tooth-fillings and hip replacements. The embalming fluids from traditional burials on the other hand can poison the soil and leak into the ground water. All this calls for reexamining our funerary rites, and look for alternatives.

image source
Plant A Tree Over My Grave
I used to tell my friends and family to just stick an oak sapling into my belly when I'm dead, so it can feed off of my body, and instead of a gravestone they could visit a living and growing tree. Little did I know that this would have been completely illegal in most (if not all) countries I have lived in. In fact, it would probably remain illegal, even with the ongoing legalization process of human composting. Today in Colorado (and a number of other US states) families can have their loved ones turn into nutritious soil in a controlled, isolated composting chamber, offered by companies specialized on natural organic reduction. At the same time, innovative technologies are being developed to facilitate the human decomposition, making it directly available to trees, such as these tree burial pods, which are still waiting for approval by legislatures.

image source
As it is the case with so many things, it seems like it will take a while, but we're getting there. Does that mean that we are going to be able to stroll through a forest grown from the remains of our great-grandparents? Probably not in our lifetimes. However, if everything goes well, our great-grandchildren might. Anyway, it's good to keep in mind that once we're dead, things are no longer up to us.
1 note
·
View note
Text
After UN Biodiversity Conference: Let's Create Our Own Biodiversity
Last night, at a United Nations summit on biodiversity, called COP15, the majority of the world's nations signed a landmark agreement to protect 30 per cent of the worlds landmass and oceans by 2030. This comes at a time when one million of the roughly eight million known species in the world is threatened by extinction, a rate never seen before in human history. In spite of its sweeping success of reaching an agreement in the first place, there has been considerable criticism whether the goals are realistic to achieve in such a short time frame, or regarding the financial and economic details to implement such a decision.

image source
What Does It All Mean?
Now you may be jumping of joy that world leaders are actually coming together to save us from ecological disaster, or you may be more cynical, pointing at the myriad of previous such agreements, that were signed but later abandoned, modified, or simply turned out to be less effective than intended. If you ask me, all this doesn't matter too much. It's way more important what each of us does, in our own lives, to help biodiversity. The solutions are in fact ridiculously simple, but here I want to list a few of them again, just in case:
Don't Mow, Don't Rake, or if you must, Don't Do It Everywhere!
Okay, this goes for all those who have conventional lawns and park-like empty areas under their trees. Sure, you may enjoy seeing an expanse of short cropped grass, much like a soccer field or golf course, in front of your home. But is it really THAT necessary? Please keep in mind that not only does your lawn have its own maintenance costs, but it is actually more like a desert for any birds, insects, let alone the multitudes of soil dwelling species, who simply can't find a place to live there. The same goes for the Autumn chores of raking up all the leaves to burn them, or bag them up for someone else to do it. Those leaves would have done amazing work for the soil, starting with protecting it from the frost, providing shelter for creatures, all the way up to turning into nutritious topsoil.

image source
I'm not saying you shouldn't have a lawn at all, after all it is nice to have a grassy area to kick the ball around. But leaving a few unmowed islands here and there, even tucked away in corners or behind bushes, will make a huge difference for local species. You will see this right away with the increase of butterflies, just by leaving a bit of space where their favorite plants can grow. As for the leaves, again, it's okay if you want to have some leafless areas. But keeping some areas covered with leaves, especially around trees, is bound to make your place more alive with creatures of various types.
Plant Natives in and Around Your Garden!
There is a good reason why certain species are native to an area: they've evolved together with the place and each other, to maintain ecological balance. Each of them has their own series of contributions, which could fill books on each of them. Of course it is best to become familiar with native species, if we are occupying their space after all, but what's more important is letting them thrive and just do their thing. By doing so you will ultimately invite other native species to live with what they are most familiar with.

image source
This can start as small as a garden bed. Wild flowers and other "weeds" will bring in pollinators that the rest of your garden will also benefit from. These in turn bring in their predators, who will most probably also decimate your "pests" a bit. So everyone will benefit. If you want, you can extend it to bushes or even native tree species. If you go out to your local wilderness, you'll be able to observe these plants in their own habitat, check out who they love to team up with, so you can design your native area accordingly. Or, you could just lean back and let nature take its course. The result should be pretty similar.
Build a Pond!
One of the most certain ways to invite many different creatures to your place is by offering them the one most important thing in life: water! We're all made of water, so this constitutes a need that perhaps surpasses all others. No matter if you're an insect, a bird, a mammal, or a plant, you will need to drink. For this reason, a pond is bound to bring everyone together who gets thirsty, and then some. So building a pond is a great idea. Just make sure to keep some things in mind:

Give good access to all creatures, big and small! Some need a steeper shore, others require a very shallow one. Some prefer to hide between reeds or other plants, others like a sandy beach, still others love to hide between pebbles or sun themselves on larger rocks. Your pond should cater to all!
Make sure the size is right. In the winter you don't want all the water to turn to ice, so having a large volume with a good depth is essential. In the summer evaporation can be an issue, so having a shady part is also pretty important.
Many species will come at free will, but others need to be brought in. There is always a chance that a remote pond in the desert will have fish in it some day... but it's way easier to just introduce them. Make sure they are the right type who will appreciate your pond, and once they've started reproducing, as well as being eaten by others, you can proudly claim you've created fish habitat.
Be Your Own Biodiversity Resolution!
Whether you just leave a small "butterfly patch" in your otherwise close cropped lawn, or if you build a decent pond that migratory birds will start using as a pit-stop, you will have done your part in stepping up to counter our currently ongoing Great Extinction of the Anthropocene. In this case, you can really lean back and celebrate, because no matter what the actual outcome of the COP15 will be, local creatures will have a bit of a sanctuary in your place. And that deserves recognition!
Sources: 1, 2, 3
8 notes
·
View notes
Text
More Power of Convection – A Little Bit of Dreaming
At the beginning there was a water tower...
I'd seen this type of water tower lots of times on various properties, and in different conditions, before one appeared in my dream. I'm talking about the kind of dream you experience while sleeping, but soon it moved into the other type you fantasize about when awake.
In a recent post I showed a couple of examples on how rising heat can be made useful, from rocket stoves to the passive heating / cooling system in Earthships. Today I want to continue spinning this thread and combine it with some ideas that I have had over the years. The result is still in the realm of dreams, though as it usually is with castles of air, all they need is a good foundation to become real. I'm sure I'll get there eventually. For now, let's take a look at its three parts:
Part One: The Water Tower
Now, depending on the local conditions, it may be more efficient to use solar or wind. However, making full use of the water-tower, and my own selfish desire to get high – I mean, enjoying the benefits of a tall place – or rather, the insight that comes in elevated states – I think the water pump, and many other appliances, could be powered only with convection, provided it is combined with the necessary infrastructure.

The technology is very simple: Four pillars support a tank (of around 20 cubic meters or 5000 gallons – my estimation) ten meters (33 feet) above the ground. The benefit is obvious: a decent amount of water positioned high enough will provide good water pressure for gravity feeding the irrigation system on the ground. The one seen in my photo is located in Chapultepec Park, where it was most likely connected to the water and electric grids (before becoming defunct). In rural settings it can be assumed that it is built above a drilled well. Though the electricity to power the pump is very likely still brought in from somewhere far away, it doesn't have be necessarily so.
Part Two: The Earthship Towers
One of the more beautiful experimental structures at the Greater World Community in Taos, NM are the Towers. The idea behind them was to illustrate how Earthships could work in an urban setting, so they designed this two-storey building, complete with a tall greenhouse on the southern side. Although I believe that Earthships would be rather limited in a city (just imagine if they built a taller building across the street from its greenhouse!), one thing is certain: the tall greenhouse certainly does generate a lot of heat.
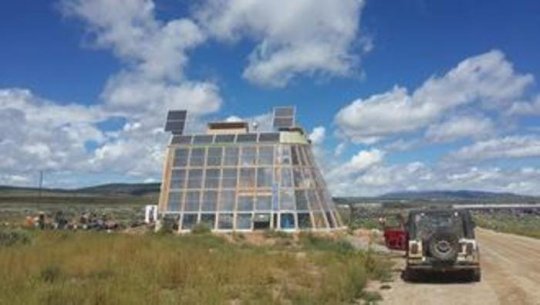
Academy students will probably recall the story of the melted typewriter, the inadvertent result of an earlier prototype of a two-level Earthship. Or consider the heat chimney, a taller section of a roof, made to increase the draw in a building, by directing the heat through a higher portion of the roof. The Towers are exactly like such a heat chimney. And all that hot air escapes through the ceiling vents, where it dissipates into the global atmosphere... Could it possibly be of any additional use before?

Part Three: The Vertical Axis Wind Turbine
Since I've always found it appealing to be sitting on the top of the world, I think it would be the perfect combination to build an Earthship tower right under (and around) a water tower. The idea is to use the constant flow of hot air through the building to power the water-pump. The means to do this would be a vertical axis wind turbine, on top of the water tank. Now this is the part that requires the expert advice of some good engineers, as I haven't seen this exact application in action.
What gave me the inspiration is the Advent Pyramid I could see every Christmas growing up in Germany: The candles around the outer edge provide rising heat to drive the propeller, which in turn makes the figurines of angels, shepherds, three kings, Mary, Joe, and Jesus spin inside the pyramid. Of course the final design would probably resemble more the commercial vertical axis turbines, but the point remains the same: It will turn, no matter which way the wind blows. But even without any wind, the upward draft should drive the wheel and pump water. At this point, generating electricity is only a secondary concern.

image source
The rest is quite straight forward. The wind turbine raises water from the underground well into the tank above the tower. From there, the water is gravity fed down to be used on all levels of the building, as well as outside for irrigation. Most importantly, as the water drops down to ground level, it goes through another turbine, this time with the primary function of generating electricity. It would make a lot of sense to combine the evening watering with the recharging of batteries.

image source
As for the building itself, I would probably prefer to make it a bit more inclined, more conical, to provide a nice large space on the ground level, with a greenhouse, workshop, and lots of space for people. The second level would be a bit more private, but still with sufficient space for a lounge and a dining area for the gathering of closer circles. The top level would consist of a much smaller, more private area, of an extended master bedroom (with washroom, closet, etc.) and of course, a beautiful view onto my domain...
Nice dream, but what about the plan? When can I move into this amazing structure? When am I gonna have my own piece of land? At the moment the plans are non-existent, presently I'm not even sure if it'll happen in the country where I am living now. Gotta see... However, if anyone of you guys likes this design, and would like to implement something like this, I would certainly love to come and see it, or maybe help build it!
8 notes
·
View notes
Text
Hempcrete Finally Aproved by Building Code
More than three decades ago a radically new building material started gaining popularity - in Europe: The benefits of hempcrete (a.k.a. hemplime) include exceptional thermal performance, highly effective transmission of humidity, resistance to mould, and acoustic insulation. It is also fireproof, and sequesters more carbon than its industrial production requires. Given all these incredible benefits, it may sound surprising that until now hempcrete has been not been permitted in US building codes. This had to do with hemp being considered an illegal plant. With the legalization of cannabis for medical and even recreational use in many states, the US is finally ready to include hempcrete as a permitted material in its residential building codes.
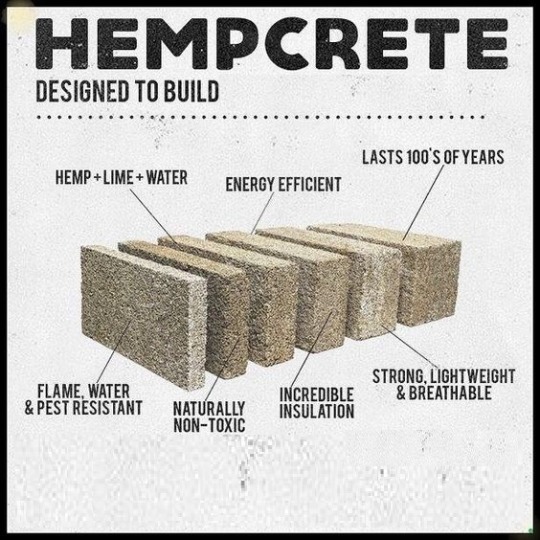
image source
What is Hempcrete?
When separating the woody inner portion of the hemp stalk from the main fiber, we get what's called shives. They are also very fibrous, but unlike the main fiber, which is threaded into rope, shives are coarse, broken pieces. This material is what makes up the bulk of hempcrete. The other part is a limestone binder, using either hydrated or hydraulic lime. This is an industrial product, requiring the calcination of lime at very high temperatures in kilns, similar to the production of cement for concrete.

image source
After the hemp shives are mixed with the lime binder, and combined with the addition of water, the curing process starts. Depending on the type of binder, this could take up to a month. For this reason, the hempcrete is usually molded into blocks, similar to cinder blocks. In comparison, however, hempcrete tends to be lighter, and less brittle than concrete.
An Alternative to Concrete?
Before I continue comparing the characteristics of hempcrete to concrete, I want to get its most important drawback out of the way: Hempcrete has about 5% of the compressive strength of residential grade concrete. This means, it is never meant to be used as a structural material to bear great loads! However, excluding this main disadvantage, hempcrete outperforms concrete in so many other aspects, that it would be a waste dismissing this amazing material for its mere structural weakness.

image source
First of all, hempcrete is not only highly insulative, but it also has a good thermal mass. Normally these would be contradictory properties, since most other materials with plenty of thermal mass tend to be poor insulators, and vice versa. Hempcrete is a great exception to this rule, due to its efficient R value of between 0.67/cm (1.7/in) and 1.2/cm (3.0/in) and a specific heat capacity of between 1000 J/kg K to 1700 J/kg K. At the same time, hempcrete "breathes", meaning it is great at transmitting humidity, keeping the interior air dry, which creates a comfortable warm sensation.
Other beneficial attributes of hempcrete are that it is fireproof, resistant to moulds, and is highly effective at insulating against acoustic disturbances. Its most notable feature, however, has to do carbon sequestration, making it highly interesting for modern applications, as we are facing an overabundance of carbon in our atmosphere.

image source
Carbon-neutral... or Carbon-negative?
Even before it is turned into hempcrete, the hemp plant is already highly effective at taking up carbon from the atmosphere. At 15 tons of CO2 per hectare it does this much faster than any forest or commercial crop, while it is fast growing and doesn't require much care or delicate conditions. So growing hemp is already a great way to combat CO2, but hempcrete takes this carbon sequestration a step further.
In its natural cycle, the hemp plant stops taking up carbon once it dies. Sure, by that time it will likely have reproduced, and its offspring can continue the good work, but in the form of hempcrete even the dead hemp plant can continue this process thanks to the lime binder it is mixed with. Due to the carbonation process, the lime continues absorbing CO2, not only during its curing phase, but throughout its entire existence. The amount of this is estimated around -1.6 to -79 kg CO2e/m2.
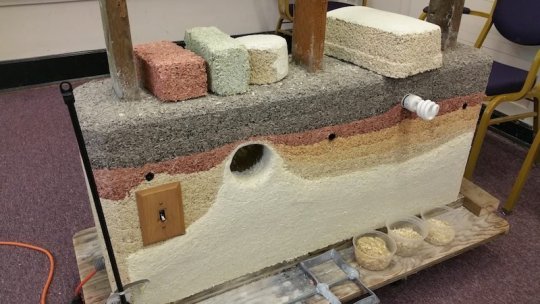
image source
This means that even though the production of the lime binder involves a good amount of carbon emissions, it is all made up by the joint effects of growing hemp and converting it into hempcrete. So you could say that hempcrete is not only a carbon-neutral building material, but it is in fact carbon-negative, removing more carbon from the atmosphere than it has put into it.
Time to Start the Future?
Given its amazing properties, and time tested practicality in Europe, there are many ambitious projects related to hempcrete. One such proposed application are the Urban Sequoias, enormous high-rise buildings that are supposed to sequester 1,000 tons of CO2 per year, about the amount of 48,500 trees. Although no Urban Sequoia has been built so far, the technology is highly promising.

image source
Also, now that the United States has incorporated hempcrete as a permitted material in its 2024 International Residential Code, it can be expected that this it will find further appeal and acceptance among builders, architects, and engineers in far reaching applications.
Sources: 1, 2, 3, 4, 5, 6, 7
10 notes
·
View notes
Text
King Charles III: The Environmentalist Monarch
King Charles III is the longest heir apparent in British history to finally ascend the throne. Charles is certainly the most environmentally conscious monarch in the history of the country, but even in comparison with other contemporary monarchs he stands out for his environmental engagement. Other monarchs with similarly impressive dedication to environmental causes are Prince Albert II of Monaco, Pope Francis, and Emmanuel Macron, whose position of President of France also makes him the co-prince of Andorra.

image source
Half a Century of Environmental Activism
Charles’ passion for the environment goes back to 1970, when the Prince of Wales was still just twenty-one years old. In his first speech on the topic at the Conference on World Pollution in Strasbourg, France he pointed out the dangers of plastic pollution, long before micro-plastics became a mainstream subject. Over the subsequent decades he added to his environmental causes such related issues, as organic farming, appropriate technologies, electric vehicles, solar power, and reducing our carbon footprint. In his speech in 2021 at the 26th UN Climate Change Conference of the Parties (COP26), King Charles urged the world to take on a “warlike footing” to tackle the global challenges of climate change and the loss of biodiversity.
A Number of Environmental Causes
Charles’ environmental engagement has far surpassed merely making speeches, and his many spectacular demonstrations of dedication to the cause, prove that he truly practices what he preaches. In his private estate of Birkhall he installed biomass boilers and a hydroelectric turbine, and he converted his personal car, a 1970 Aston Martin DB6 Volante to run on bio-ethanol. More importantly, Charles used his influence as heir to the throne support progressive climate policy, in cooperation with organizations from the public.
Words Backed up by Actions
In 1990 Charles launched the brand Duchy Originals, selling over 200 different products of his organic farm at Highgrove, generating a good amount of media attention. He established the Prince’s May Day Network in 2007, encouraging private companies to take action on climate change. In 2008 King Charles as Heir Apparent addressed the European Parliament urging the EU to take decisive leadership on the international challenge to abate climate change. In 2010 he launched the International Sustainability Unit for the protection of rain forests and marine ecosystems. In his 2012 address to the International Union for Conservation of Nature, he endorsed the technique known as Holistic Management, developed by Alan Savory, where grazing animals are used to restore soils and grassland. Most recently, Charles launched Terra Carta last year, a new charter that private companies can sign, pledging their support of sustainable actions.
The UK as a Global Climate Leader
With such an impressive track record, it is safe to assume that Charles will continue his environmental efforts in his role as a king. While the British monarch’s direct powers are limited, his position as the head of state of the UK, as well as fourteen commonwealth nations, most certainly has a substantial impact. With such a dedicated king there is hope that we can surmount the greatest challenges of our times.
Sources: 1, 2, 3, 4, 5, 6, 7, 8
5 notes
·
View notes
Text
The Power of Convection
Heat rises, and nature avoids a vacuum. These two simple premises can open up a wide plethora of useful applications, if we know how to use them. In today’s post I’d like illustrate this passive, but highly efficient method, which in my opinion is extremely underutilized, for our otherwise technologically advanced culture. I’m not even sure why that is. It could be that convection is too simple, too passive, making inventors and innovators feel useless. Whatever the case, some people have learned to use convection for their benefits, with some amazing results.
The Kelly Kettle, a Rocket Water Kettle
Probably the simplest way to illustrate convection in practice, is the Kelly Kettle. Invented by ingenious Irish solders in WWI, this rocket water heater consists of a base for lighting a small fire, and a vertical tube placed over it. Around the tube is the container for about one liter of water. Acting as a chimney, the vertical tube maximizes the flow of hot air upwards, while giving a good strong draw to the fire through the hole on the side of the base. As a result the fire burns fast and hot, using up all the fuel very efficiently, so even thin pieces of wood, or even straw, will be sufficient to heat the water inside the kettle. When feeding our caffeine addictions in the morning, we used to heat water in two kettles at the same time: one liter in the Kelly Kettle, and one liter in a conventional stove-top kettle on a gas flame. Though close in time, the Kelly Kettle had the water boiling before the kettle on the gas stove started whistling.

Taking It a Step Further – The Chilean Oven and the Lorena Stove
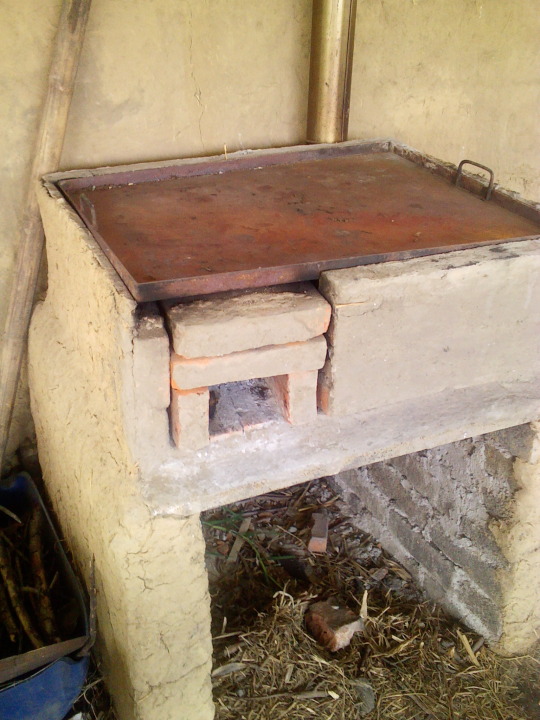
Since convection works so beautifully for a liter of water, why not apply the same principle to stoves and ovens? The kitchen on the Chinampa near where I live uses a rocket stove called the Lorena, and the so called Horno Chileno, or Chilean Oven, based on the same principle of convection. In fact, even the seemingly primitive predecessor of the Lorena was a rocket stove: A shoddy, rusted through metal bucket, filled with “superadobe” (that is dirt and some leftover cement), and some flat pieces of rubble the pot could sit on. Through a strategically placed horizontal opening on the lower side the air could flow upwards and out the big opening on the top. Not necessarily pretty, but it worked like a charm.

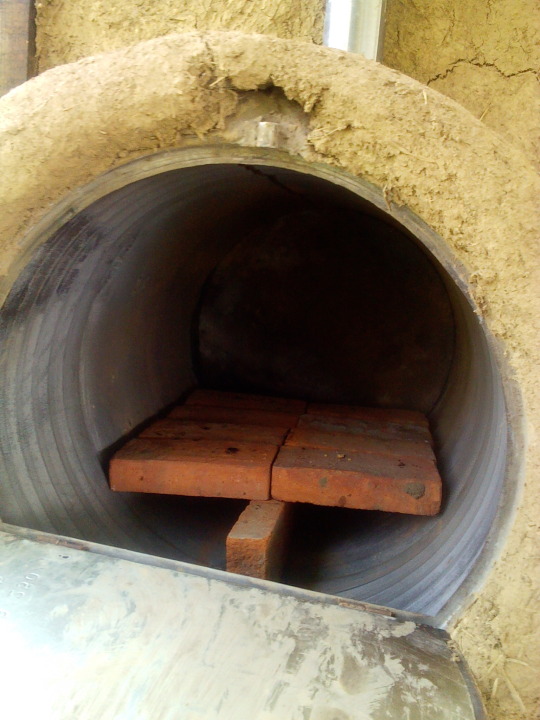
Once the kitchen structure was built, a bigger, nicer, more permanent stove was called for. Enter the Lorena. Under the large square metal tray serving as a stove-top, it is the same convection that makes it work: The air enters through the hole on the left used for feeding the fire. The chimney in the right rear corner draws it along the bricks, providing constant heat. Therefor the left side of the stove has a higher heat, which can burn down quickly, whereas the right side would offer a more constant heat. As for the Horno Chileno, the principle is the same: the air is drawn through the bottom hole, around the drum, and up through the chimney. Inside the bricks offer a flat surface and additional thermal mass for the heat.

Heating the Home Using Convection
Many who are familiar with rocket stoves, would probably continue now with the next logical step: rocket mass heaters. And they are right, when it comes to fuel efficiency and providing a cozy, constant warmth in harsh winter climates, there is hardly anything that could beat a rocket mass heater. In Mexico where I am, however, there really is no need for such contraptions. Instead, the passive solar energy is more than enough, if it is properly used.
The most effective way I have seen passive convection in use, is in Earthships, although the idea itself is ancient, and examples can be seen all throughout North African and Middle Eastern architecture: Cooling tubes / ducts / vents / or simply holes draw cool air from outside, usually from the shady northern side of the building, often leading through thick walls, or in the case of Earthships the berm of dirt piled around the structure. The air inside the building heats up and rises, especially with the aid of the greenhouse on the southern side, and as it escapes through the top vent, it draws more cool air through these tubes behind it. This way, the more heat there is, the more cooling circulation is the result, all completely passively, without any moving parts or energy intake.
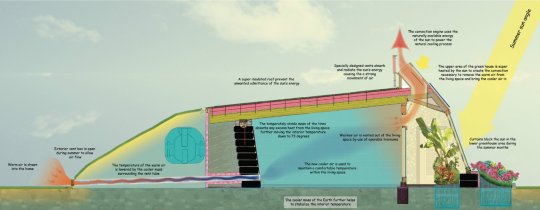
image source
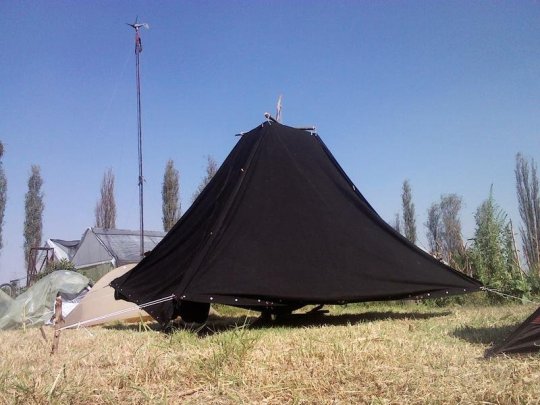
This same law of convection is the reason why my black tent is the coolest place in the daytime heat, if set up properly. The flaps on the side are folded in, making it look like it’s floating in the air. As the black tarp is heated in the sun, the air inside is heated as well, escaping through the hole in the center, and pulling in more air from around the bottom. As a result there is constant air circulation going on inside, which together with the shade offers a comfortably pleasant place to chill.
Preserving Perishables Using a Solar Dehydrator
Another super useful way to use convection is to dehydrate food. As it may be well known, what really helps the decomposition (rot) of food is its water content. Remove the water, and the fungi and bacteria who would otherwise make it go bad rather quickly, will have a much harder time. Unlike with jam or preserve making, there is no additional sugar involved, leaving the fruit as it is (only smaller and shrively, due to the lack of water). So how can we get the water out of it? By exposing it to a constant flow of air, following the same technique.

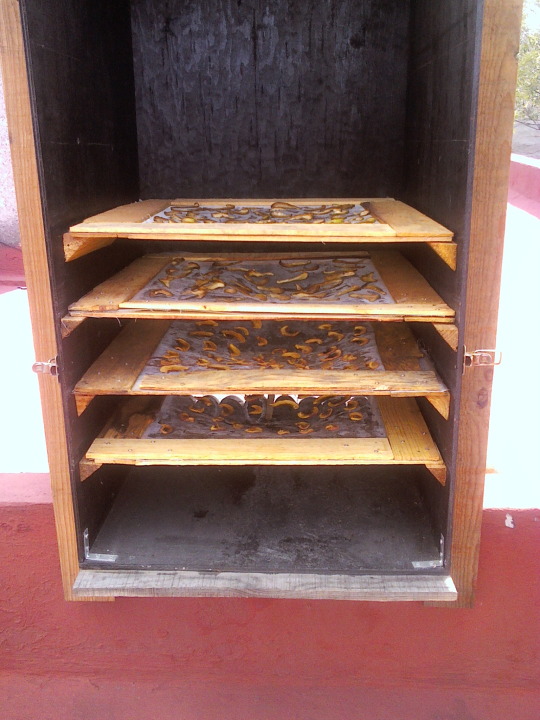
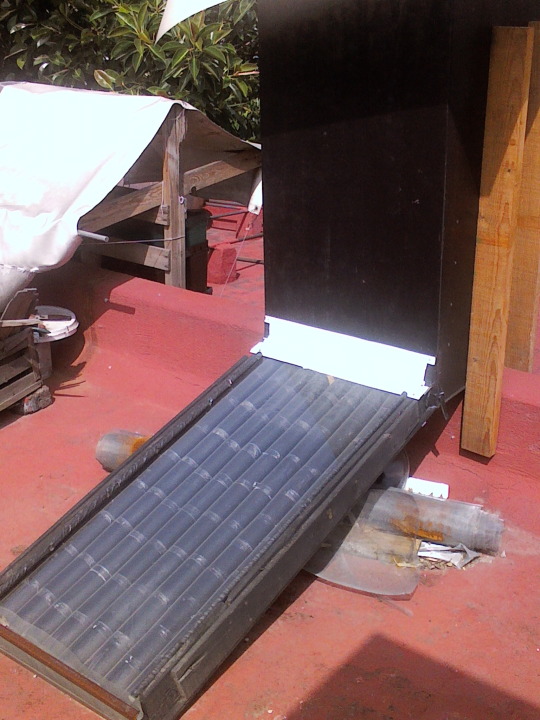
My solar dehydrator consists of a simple plywood box with wire-mesh shelves inside, and a home made solar panel, inclined on its south facing side. The panel is made of recycled beer cans with the tops and bottoms cut off so they can slide into each other, forming a tube of about a meter (yard) long. Ten of these tubes are painted black and placed side by side into an insulated frame, covered by a glass panel. This means, outside temperatures don't need to be really hot for the air to circulate. The direct sunlight is enough to warm up the thin black aluminum tubes under the glass pane, so the air inside them can heat up sufficiently to move upwards through the tubes and into the dehydrator box. There it continues passing through the shelves, taking the moisture from the fruit with it, before leaving through the holes on the top of the northern side, which also functions as door.

This is the first solar dehydrator I have built, but I'm certain it won't be the last. Next time I'll substitute the wire mesh with something that doesn't corrode, and I'll make sure to get a better roof for the whole thing. Other than that, I believe such a dehydrator is an essential infrastructure for any place that produces more food that can be eaten at once, which ideally should be the case for any farm or garden. At the same time, I believe this entire concept of heat convection is not utilized enough, giving us a number of good challenges to work on.
sources: 1, 2, 3, 4, 5, 6
9 notes
·
View notes
Text
Purifying Water – For Ourselves, and Every Other Creature
When it comes to water, most people’s immediate concern is whether it is clean. A valid point for sure. But what do we actually mean by “clean”? Is it safe to drink? Or suitable for washing our bodies, clothes, and dishes? Or do we mean that it’s not contaminated in a way that would kill our plants if we poured it on them? Because there is a world of difference between each of these levels of “clean”.
image source
Discussing Dirty Water to Define Clean Water
To talk about the purity of water, we have to identify the four types of contamination: Firstly, there are solid particles suspended in the water, which could be anything from pieces of rocks to organic matter, and even plastics. The good news here is that once the water evaporates all of these particles stay behind. Also, should they get back into the water, they can be removed easily with a filter.
The next type of pollutant is organic, such as phosphorous or nitrogen. These are the result of biological contamination from urine, manure, or decomposing bodies. While it may be not as simple to get them out as using a filter, these substances are oxidizable, meaning that they can be removed by bacteria, provided there is sufficient oxygen in the water.
A more complicated form of contaminants is microbial pollution, meaning various forms of microbial life living on organic pollution in the water. While many of these microbes are harmless to humans, some of them are pathogenic, and can cause serious or even deadly diseases to our bodies. There are a number of approaches in dealing with these contaminants, which mostly result in either killing them off, or outcompeting them.
Finally, there is the chemical form of water pollution. This involves other harmful substances in our water, such as residues from medicines, pesticides, hydrocarbons, heavy metals, etc. These contaminants are usually the result of human activity, such as industry or intensive agriculture. Because of their toxicity and low biodegradability they pose the greatest challenge to purifying water on any scale.
How Clean Do We Want Our Water To Be?
What a silly question, you might say. Of course we want our water to be 100% clean, all the time! But is that really so? For example, do you really need the water to be potable, only to flush your toilet with it? Or think about a swimming pool: It’s clean enough to swim in, but I’m sure you wouldn’t want to put it into your mouth, let alone swallow it! Also, if you ask your plants, I’m sure they’re quite happy about a bit of nitrogen and phosphorous in their water, which you in turn would not want in your drinking bottle. So I guess it’s safe to say that instead of “pure” or “clean” we should strive for “suitable” instead.

image source
Deadly Sterile, or Living Clean?
Because microbial life is so complex that most of us are not even familiar with the numerous species that are too small anyway to see with the naked eye, we tend to be overwhelmed by the mere question of which ones are good, and which are bad for us. It may therefor be the simplest approach to kill everything, as we do in chlorinating our swimming pools. But is it really the best way of getting the water clean? A bit of chlorine (another chemical poison) will not harm us, but it could be detrimental to a plant to be watered with pool water. Also, just imagine the carnage among our natural skin flora that results from a brief dip in the pool!

image source
On the other hand, imagine taking the same dip in a pristine mountain lake. The water may seem just as “clean and pure”, though it will most likely be teeming with life. Ideally, that kind of water will be good for drinking, swimming, washing, and of course watering your plants with, and may be good for fish and other living organisms to thrive in. Couldn’t we get our water to that kind of purity? Surprisingly, it’s not that difficult.

image source
Using Life to Purify our Water
To separate the solids from our water, all we need to do is imitate a filter, providing sediments of various sizes (rocks, gravel, sand, charcoal) for the water to pass through. In order to neutralize organic contaminants, microbial life is needed, along with the oxygen they rely on. Having a rich diversity of microbes is also essential for outcompeting the harmful ones. But how can we make sure that we do indeed have a vast and vibrant ecosystem on the microbial level, which we can’t even see? We simply need some other creatures that live in symbiosis with these microbes, and are big enough to see. An example are bivalves, such as mussels or oysters.

image source
Not only do these molluscs capture particles suspended in the water, and contribute to the cycling of nutrients, but they are also symbiotic with various types of microbes, just like any other creature, including ourselves. What’s even nicer about them, is that their fragile nature is a great indicator for the water’s purity. In other words, they will be killed by much less contamination than us. This means we can be sure that if the water they live in doesn’t kill them, it will be certainly safe for us too.

image source
Phyto-purification and Natural Swimming Pools
At this point I’d like to bring up some of the many practical applications to the theory of purifying our water. The simplest and most obvious one is a well designed reed-bed behind a house, to filter the household waste water. In a way, this is not much different than the gray-water planters Earthships typically utilize indoors. But can that be brought to a higher level, still? Most certainly so! Imagine various layers of filtering sediments, separate pools for aerobic and anaerobic decomposition, topped up with a mussel farm!

image source
The other popular application which may have popped into your mind are natural swimming pools. These are basins of living water, offering not only a place for humans to swim, but also a habitat for a plethora of aquatic plants and animals. In a way, it’s a simulation of the naturally pristine mountain lake I mentioned before. There are lots of great sources on how to implement one, but they all follow the basic premise of filtering the water, oxygenating it, and maintaining a vibrant ecosystem of plants and animals, to ensure an even greater diversity of microbes. All together they will provide you with water that is good and healthy, not only for you, but for all other forms of life in your ecosystem.
Sources: 1, 2, 3, 4, 5, 6, 7, 8, 9, 10, 11, 12
86 notes
·
View notes
Text
Taking Care of Business 3 – Methane Digesters
In my previous issues of Taking Care of Business I discussed how human feces can be composted aerobically in dry composting toilets, and also how flush-toilets can be made sustainable. Today I want to look at another alternative, the Methane Digester.
Methane? The greenhouse gas exacerbating climate change?
That's right. Letting organic matter decompose without the aid of oxygen produces methane, a flammable gas known for its distinct smell. We don't have to go too far to experience it, as this anaerobic decomposition may happen right in our bodies, where our intestines form an air-tight container to the decomposing organic matter. These farts that occasionally build up and escape in smelly clouds accompanied by the sound of the leather saxophone, are so benign that they're hardly worth the mention... in our species. (If it happens on a regular basis, there may be some digestion-related problem on hand. Otherwise you may laugh it off, or light it on fire for more laughs.)
In case of cattle, however, the emitted methane is more significant, due to their digestive mechanism, as well as larger sizes. Still, all the cows in the world are relatively low methane producers compared to the fossil fuel industry, especially with such innovative methods as fracking. And then there is the methane escaping from thawing permafrost, leaving huge craters behind. Since methane is a greenhouse gas, just like carbon-dioxide, this recently released result of ancient fermentation is both a cause and an effect of climate change.
image source
So How Can You Use This Gas?
By burning it, of course, just like propane, butane, or any other burnable gas. The idea is, if we are going to cook on a gas stove, it may as well be something that doesn't need to be mined from finite resources. Fermenting organic material in an oxygen-free space is not that hard, especially since our bodies already produce sufficient amounts of the needed raw material. It just needs to be fermented a bit further.
The Things I've Seen...
I have come across two impressive cases of methane digesters I'd like to present here. One is noteworthy for its simplicity, the other for its efficiency. Although both rely on animal rather than human excrement, the variability between these two examples suggests a lot of leeway for experimentation. The designer of one of these systems even said he could imagine it feasible to produce cooking gas for a high-rise apartment building, by fermenting the human wastes of its residents. Sounds exciting, though I still need to see such a system in action... But let me start introducing the simple digester:
The Best Thought-out Pig Sty
This setup was designed by a farmer, rancher, gardener, and tinkerer in Costa Rica. Even though he'd never even heard the term Permaculture, his design closes many loops beautifully. It's an ingenious way to combine corn, pigs, methane, and the kitchen stove.
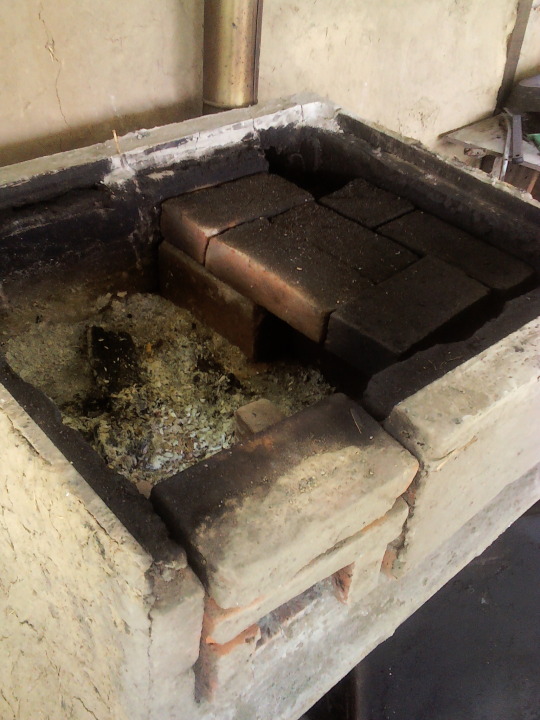
I was quite amazed to see how clean the pig sty was. Of course, the guy pointed out, it gets cleaned three times a day, every time the pigs are fed. I first thought that was ridiculous, but he explained the reasons for this unusual practice. First of all, the pigs appreciate a clean floor (good for them). Also, it only takes about five minutes to hose down the slanted floor, and sweep all excrement with the uneaten corn-meal into the gutter on the lower end of the sty, so work wouldn't accumulate. Most importantly, though, he didn't want the pig excement to start fermenting in the open air.
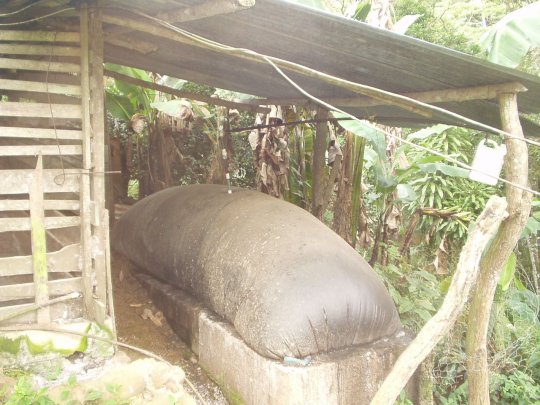
All the slush washed into the gutter passed into a concrete basin, covered airtight by a black tarp. There it would sit, and be slowly decomposed by anaerobic bacteria, who as a byproduct generated methane. This gas stayed trapped under the black tarp, only a safety valve on top allowed excess pressure to escape. From there a pipe ran straight into the kitchen, where it was hooked up to a pair of burners. Using it was as simple as any gas stove.
The water that carried the material from the pigsty flowed through the digester, and came out as a brown colored, nutrient-rich effluent. This was further diluted with water and used to irrigate the corn, which eventually became pig-food. The circle was closed, the corn grew like crazy, the pigs enjoyed a clean sty and literally more food than they could eat, and nobody had to pay for the kitchen gas. Simple, easy, and at perfect scale. The family of six did most of their cooking that way, except for certain delicacies that required wood fire.
Efficiency in a Less Suitable Climate
Costa Rica, where temperatures are fairly stable all year round, even in the mountains, is the perfect place for this sort of setup. The digesting bacteria don't like sudden changes in temperature, which would affect their population, and thus their efficiency at fermenting. The other digester, however, was in the high desert of New Mexico, where outside temperatures would normally fluctuate between freezing at night and sweltering in the daytime. So how did its designer make it work? By thoroughly insulating it at night, and opening up the insulation to absorb the daytime heat. Also, he was living in an earthship-inspired home, which added to the temperature regulation.
The other thing about this amazing setup was that he hardly had any animals to produce fermentable material for him. About 10-15 chickens and a dog was all there was. A daily trip to the chicken coop provided a scooped dust-pan full of chicken manure, with ample feathers, straw, chaffs, and such bedding material. The latter part was important not only for its carbon-rich nature, but for the added surface area, which bacteria would populate. All this was washed down a modified garbage disposer, turning everything into a homogeneous slurry, and added into the digester. Unlike the owner of its Costa Rican counterpart, he didn't want to waste even a bit of excess gas. So with help of a compressor, powered by a wind turbine, the gas was concentrated into a big round container, previously used for storing propane. And of course, the effluent from this digester was also used to fertilize plants. Thus, he covered all the cooking needs of his 1-2 head household. Impressive for his location, and with only a dozen chickens!
sources: 1, 2, 3, 4,
26 notes
·
View notes
Text
Taking Care of Business 2 – Back to Using Water
The undeniable advantages of a flush toilet
In my last post on humanure composting I described how human feces can be composted in a simple, cheap, and efficient way, and why it is less wasteful of water and nutrients than using a conventional flush toilet.
Now, I want to return to the idea of flushing down our human wastes with water. This is not playing devil's advocate, I simply want to look at all possible advantages of that system, to see how they can be utilized in a sustainable way. Also, certain people may have a hard time adjusting to a system they are not familiar with, no matter how efficient it may be. There's nothing to be ashamed of in this. We are toilet trained from an early age, and what we learn during that formative period tends to stay with us all our lives. A flush toilet may in fact constitute a psychological necessity. This need is also important and should not be ignored, especially since there are real, tangible upsides to flush toilets.
The biggest advantage of water is the perfect seal it forms, blocking any smell from whatever has passed the curve in the pipe. This fact alone may be important enough to consider a flush system, preferably the kind that won't waste our resources like our conventional system does.
Can a flush toilet actually be sustainable?
The two most important questions to ask in this regard are: Where does the water for our toilet come from, and where does it go from there? If its origin is a clean water source, such as wells or aquifers, or any elaborate, energy hungry, purifying system, I would deem the use of such system for flushing toilets criminal, to say the least. Using potable water to get rid of excrement while others are dying of thirst used to be punishable by death in many cultures. On the other hand, the flush toilet becomes more acceptable if the water has been used previously, at least a couple of times, as it happens in Earthships. There the water in the toilet has already been used twice: first to wash (hands, dishes, clothes, shower, etc.), then to water plants in the gray-water planter in the greenhouse.
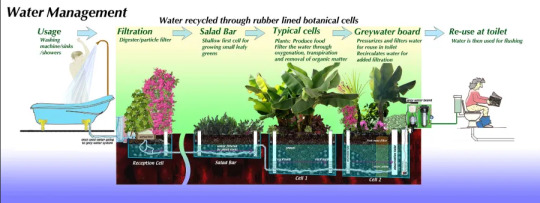
image source
No Earthship? No problem!
Earthships are amazing at catching water, filtering it, using and reusing it, and still re-reusing it further. But what if we don't happen to be living in such a well designed structure? We can still use the water at least once, before flushing it down the toilet. For example, in one of the most common activities linked with the toilet: washing our hands. Japanese toilets have been famous for these kinds of features, but the same idea can be implemented with locally available materials. The picture on the right is my first attempt at this in our Mexican apartment.


The other question regarding the water's final destination is equally important. Since there is no “out” or “away” where you could throw it, another option must be sought. Can humanure in water be composted? It sure can, once it has been removed from the water. Red compost worms (Eisenia fetida) do an amazing job at it. In one place in New Zealand I had the pleasure to help set up such as system. Inside of the house were a seemingly standard bathroom with a flush toilet and a kitchen with a garbage disposer in the sink. Both drained into the same bin behind the house, a concrete basin of 180x60cm, with a depth of 70cm (6 x 2 x 2.3 feet). In the bottom we laid a loop of drainage pipe, leading out through the drainage hole of the basin, and covered it all with gravel. On top of the layer of gravel we suspended a mesh basket. This is where the solids will remain, and where the worms live. The water drains away immediately while the solids remain, feeding the worms. When the basket is full of compost it can be lifted out and emptied, something we estimated to happen every 1-2 years. Meanwhile, the occupant of the house could enjoy full western comfort in kitchen and bathroom, while knowing that their resources won’t be wasted.
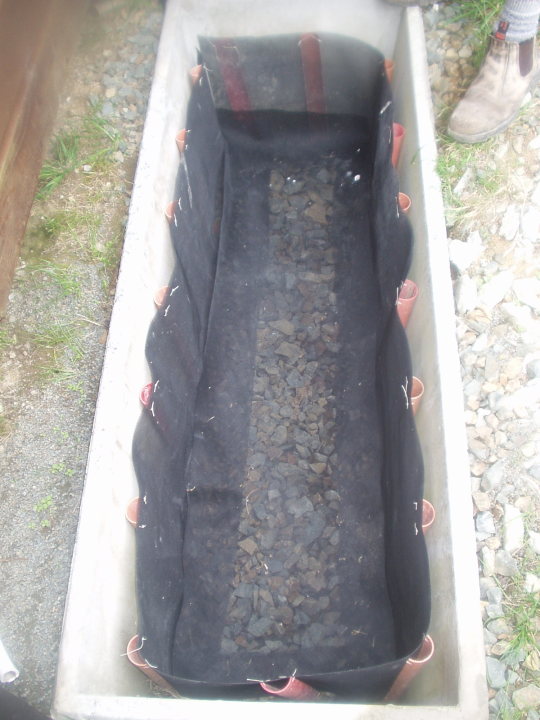

But what happens to the water?
Once it has left the worm-bin, the water flows through a series of basins. The first one is a filtration tank, with layers of bark, scoria, sand, and charcoal. The next step after this tank is the 97 liter (26 gallon) dosing chamber. This feature of the system ensures that when water enters the soakage trench, it spreads out evenly. Without the dosing chamber the water would dribble little by little, every time the facilities are being used, without much pressure, and accumulate in the lowest section of the trench. However, if everything is flushed at once, the entire pipe fills up evenly. This type of dosing chamber works with a pressure siphon. The lack of moving parts guarantees the low maintenance aspect.

Eventually the water drains down the hill into the pipe inside the trench. The trench is 50 meters (164 feet) long, following the contour line of the hill. Around the pipe the trench is filled with more scoria as well as charcoal. This will soak up the water as soon as it comes out of the pipe, and more microorganisms can feed on it. A bit further down the hill a line of citrus trees make use of the water that passes onward through the trench. Still further down the hill, once it has passed through the filter, the trench, and the orchard, the water goes into a pond. A red aquatic weed grows on the surface, which can be skimmed off and used in the garden. It is very rich in nutrients and can be either dried, used as mulch, or mixed into the soil. In any case, it returns the excess nutrients back into the food circle, allowing us to eat our own wastes in form of healthy, tasty, nutritious food.

Other possibilities?
Yet another system I have seen doesn't even need a hill to flush and spread out the water. The concept is quite similar: Nutrient-rich blackwater from the toilet goes into an 'infiltrator', an inverted half-pipe buried underground, with about 60 cm (2 feet) of pumice or scoria under, around, and above it. This buried dome is empty inside, that's where all the water from the house drains into. The water seeps down, into the many tiny pockets in the volcanic rock, where microorganisms get to compost it. Fruit trees are planted all around the infiltrator, and sunflowers on top of it. Their roots reach around and under the half-pipe, taking up the water and the nutrients.
Design for the proper scale
With so many ways to utilize the nutrients from human wastes, whether with or without water, there really should not be an excuse for not composting humanure. No matter which option we go with, it's always important to design the system at the right scale: don't make it too small, which can be quickly overwhelmed by a sudden peak of visitors, but don't make it too large either, which would leave its dependents (worms, trees, etc.) without the water and nutrients they need. Most importantly, make sure all the water you use is taken up, to avoid ground-water contamination, as it is often the case for old-style outhouses.
sources: 1, 2, 3, 4, 5
4 notes
·
View notes
Text
Taking Care of Business 1 – Humanure Composting with a Bucket
What can we do with our human wastes?
Probably one of the most important questions addressed by Permaculture is not the one about where things come from (food from our garden, water from the rain, energy from the sun, etc.) but where they go once we are done with them. Since the mere idea of trash (junk, garbage, rubbish, refuse, waste, but also pests, weeds, and bad people) contradicts everything Permaculture is about, a completely different approach is called for. Referring to the same things as scrap, raw resource, or compost, is a good start. In this way we start seeing the same things as solutions rather than problems.
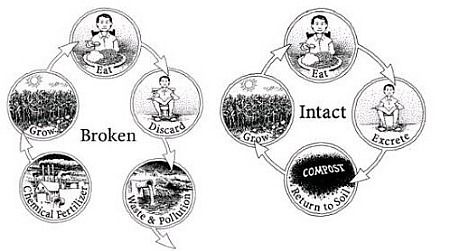
image source
When it comes to human excrement, it doesn’t take more than a bit of an effort to view it as a rich source of nutrients (which almost sounds like food) rather than the pile of crap we’ve learned to treat it as. Clearly, in its original state it is nothing more than a nasty, smelly problem, and a potential source of further problems, such as insects and infections, if not taken care of properly. Unfortunately, some seemingly “proper” treatment methods are responsible for even bigger problems.

image source
The Bucket Chuck-it System
Doing a search on composting toilets will give you a good variety of ways to deal with our feces. The basic idea is always the same: covering our excrement with carbon-rich material will give it the optimal C:N (carbon : nitrogen) ratio for composting, while preventing the exposure to the air, thus keeping the smell and bugs in check. Probably the most common system for this is the two-chamber solution, where a full chamber has time to decompose while the other one is being filled over months. It is a good system, though it requires some construction work to set it up. But where would you go in the meantime? Or suppose you've just arrived on your newly acquired piece of property, without any structures whatsoever, and want to do an observation over the next few weeks. The bucket system is the ideal solution.
Probably the humanure composting system that requires the least infrastructure is the bucket. It’s just as simple as it sounds: a five-gallon bucket with an optional toilet seat on top, and a bag of sawdust on the side. Because of its minimal size, it is inevitable that it must be emptied once a week, at least. Initially, this might seem like a disadvantage. However, taking the bucket to the compost, dumping it out, covering it with some more carbon rich material, then rinsing out the bucket and dumping the water on the pile, can all be done in under ten minutes by one person. And because of the shallow depth of the bucket, it’s fairly easy to ensure that everything is 100% covered, at all times. For this reason I have found this bucket solution to be cleaner, less smelly, and less frequented by insects than the elaborate two-chamber composting toilets. So much so, that it’s even a practically feasible system for indoor use, as it can be seen on this photo of my friend's composting toilet in Hungary. Isn’t it pretty?

And Once the Bucket is Full...
Don't wait till it's full! It's much easier to carry and empty it out if it is only about ¾ full. And yes, it needs to have a composting pile prepared, with more carbon-rich material on the side, such as straw. I’ve once had the pleasure to build a so called “Humanure Hacienda,” straight from Joseph Jenkins’ Humanure Handbook, a highly recommendable source on this subject. There the bucket can be emptied on the pile in the left chamber and covered with straw from the dry section in the middle. When that chamber is full, which should take at least a year, the right one can be used while the left side is left alone to decompose. After the second year, the first chamber is ready to be emptied. This compost is safe to use on plants whose edible parts don’t come in contact with the compost, such as fruit trees, hazelnuts, or even corn.
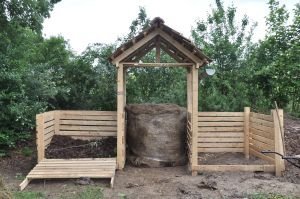
Of course it should be noted, that before the two years are up, the compost should be given its proper respect. Don't mix it with other compost, have a certain sets of tools (shovels pitchforks, etc.) designated for the humanure compost only, and even once it is ready for use, don't fertilize your carrots or cabbages with it.
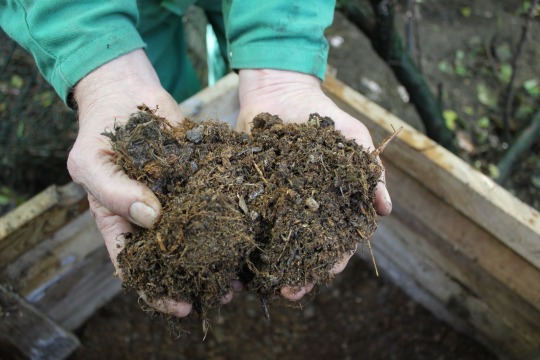
image source
All in all, I consider this the most flexible and most efficient way of dealing with one of our most ubiquitous products. It can be as simple as a bucket and a compost pile, or it can be as fancy and high-end as the structures in the photos. Of course, they are not the only type of sustainable toilets around, so stay tuned for more insights into humanure composting.
sources: 1, 2, 3, 4, 5, 6
4 notes
·
View notes
Text
What Can You Do When There Is No Rain - Dry Farming
The Summer temperatures are higher than ever, and water levels have never been this low. All over Europe emergency measures are implemented, resulting in reduced water available to irrigate small scale farms and gardens. Rains are not to be expected anytime soon, and the already parched garden plants are most probably doomed. What may seem like an exception is supposed to become the norm in the following years. How can a gardener prepare for such a future? Is there anything you can do? Fortunately, this is not the first time humans have faced extreme droughts. Our ancestors have developed fantastic techniques to farm with minimal irrigation. Techniques that want to be rediscovered and utilized.

image source
Dry Farming
The idea behind Dry Farming or Dryland Farming, is to rely exclusively on the natural rainfall during the wet season, to carry the plants successfully through the dry months. In order to do this, a number of techniques must be applied to make the most of the available moisture. Not surprisingly, the cultures that have acquired most of this knowledge happen to be located in arid climates, such as the Middle East, the Mediterranean, and the American Southwest. The techniques used range from the way the soil is treated, to the types and variety of plants used, as well as the question of tilling.
image source
To Till or Not to Till
... that is indeed the question! Depending on your sources, there are good justifications for both tilling the soil lightly, as well as refraining from tilling all together. The rational behind tilling is breaking apart the capillaries, that is the tiny space between grains of soil, where water may evaporate. The old peasant wisdom that tilling the soil is worth watering it, is rooted in this explanation. However, according to scientific studies, the practical effect of this approach is in fact so minimal, that it makes the required effort hardly worthwhile.
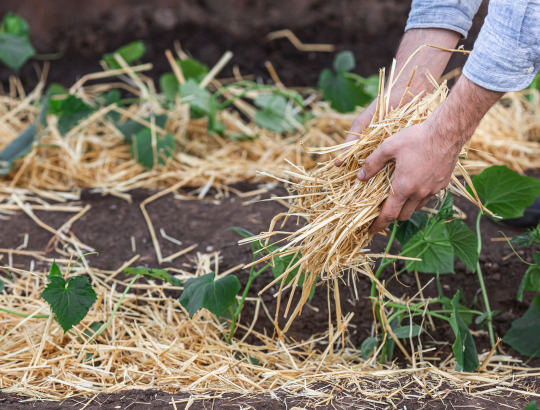
image source
The opposite approach, that is entirely foregoing the tilling of the soil, can have some positive results, provided you combine it with other techniques, such as mulching, sheet mulching, or even Hügelkultur beds, as I described in previous posts. Covering the soil with compostable material, or even non- compostable things, such as rocks, will reduce evaporation. Using ground cover and living mulch is again a contested topic, as "weeds" in general are seen as water parasites, who soak up and evaporate the water from our crops. However, no one may doubt the fact that under a short but thick layer of vegetation the ground is not only slightly more moist, but also cooler than where it is fully exposed to the baking sunlight. To fully appreciate this would be to stop looking at the plants in question as weeds, and start seeing them as a type of crop. After all, not only can we eat most weeds ourselves, but we can use clover for example as a rabbit pasture / cover crop.
The Right Plants in the Right Soil
The soil types with the best water retention are loamy, silty, as well as clay-rich soils. In fact, anything that is not in the sandy category is well suitable for dry farming. However, much more important for conserving moisture as well as nutrients, is the organic content of any soil. A good amount of humus can do wonders even to the worst sand pit. Again, this speaks for mulching and composting, which is useful everywhere, not just in arid climates.

image source
The next question is what to plant in the soil. It’s essential to pick drought resistant varieties that have been selected specifically for their genetic features to withstand longer periods without rain. The species most commonly mentioned are tomatoes, peppers, sunflowers, and of course the famous “three sisters”: corn, beans, and squash. Though there is a huge range of other potential dryland crops, for example melons, and potatoes. It’s a good idea to space the plants out more than you normally would, and case of fast and thick growth, they may be thinned out further. When it comes time to harvest, the chop-and-drop technique is a great way to keep the soil covered with the plants’ remaining organic matter, including the roots in the soil.
Dry Farming Doesn’t Mean Going Without Water
All living things need water, at least on this planet. This means, your garden or farm can’t grow a thing without being watered occasionally. So seasonal irrigation is still vital, especially to get your young plants established. For this reason it is essential to have your timing right, and take as much advantage of the rainy months as possible. Careful observation, and being on top of the changes in weather and climate helps greatly. Of course, nobody can anticipate the rains with complete exactitude, so it is still good to capture as much rainwater as possible, just in case you need to give your plants that little bit of extra watering, so they won’t die, but make it through the dry season bearing a plentiful harvest. All in all, however, if these dryland techniques are applied, the garden should be able to withstand droughts that could otherwise be seen as devastating.
Sources: 1, 2, 3, 4, 5, 6, 7, 8, 9
10 notes
·
View notes
Text
Keeping the Water in the Ground with Swales
It’s scorching hot and the rains just won’t come. You can use water from your well to keep your plants from dying, but under these conditions the water table could just drop, leaving you high and dry. Then, when the long awaited rain comes, half your topsoil could get washed away in the downpour. So horrible, yet so familiar! Fortunately, there is a really neat technique that makes sure your water will stay on – or rather under – your land, instead of ripping through the surface before flowing away never to be seen again.

image source
The Behavior of Water
It’s a good idea to take a close look at what water does during a heavy rainstorm. True, most of us don’t enjoy running around under the open sky when it’s raining cats and dogs. But it can be very educational to observe the natural flow of water. It always takes the quickest way down (never up). And depending on the flow, which in turn depends on the amount of water and the ground’s inclination, it can even tear its own way through the landscape. If the ground is fairly dry and without much vegetation, you will even see how a small stream can create a gully – growing into veritable canyons – by carrying sediment with it.
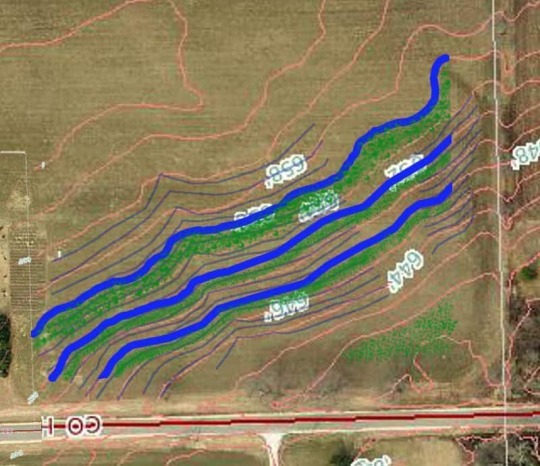
image source
That sediment may be your valuable topsoil! And fairly soon after the rain stops, it will be gone, along with the stream of water. Where did it all go? Just follow the canyon, and you are likely to find it leading away from your land, towards the lower elevations.
But That’s What Water Does. How Can We Counter It?
Admittedly, we will never change the natural behavior of water. What we can do, however, is use it for our purposes. So if it really always goes downhill, let’s give it a place to go: a ditch dug out on the contour line of a hill, which is known as a swale. And that’s all! Since the swale is on contour, meaning that it’s completely horizontal, the water is not going to go anywhere from there until the swale is full (something we must also prepare for). Now that the water lost its momentum, it’s simply going to sit there, and slowly seep downward into the soil. There it won’t have the speed it normally flows with on the surface, so it can’t carry away any soil. Instead it gradually saturates the ground on the hillside below the swale.
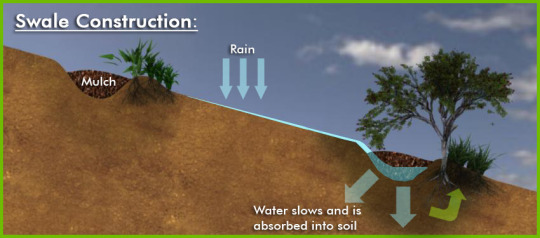
image source
How to Build Swales
It’s really quite simple: First comes the precision work of measuring out the contour line, followed by the grunt work of digging. You may use machines if your topography allows, or do everything by hand, but in either case, exact measurement is the make-or-break aspect of a swale. There are many different methods for this, ranging from the modest (yet effective) A-frame, to the hose level, all the way to the high-tech laser level.

When you are certain that the line is exactly horizontal, you can start digging the trench. Though it can be smaller, I personally like a bigger swale of about 2’ width and depth. That way it can take up more water, and over time it will be gradually filled with soil anyway. What’s most important when digging the swale is to make sure that the bottom remains exactly on contour! The excavated soil we pile up on the side of the ditch that’s sloping downward. This berm is an ideal place to plant trees into to hold the soil together, to help with water saturation and dispersal, as well as to shade the swale to slow down evaporation. In a great design they will also grow something you can eat.
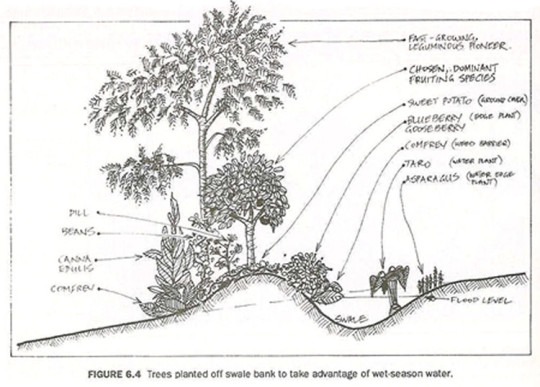
image source
There are a couple of things to look out for: For one thing, the swale should never be placed directly above any buildings (gardens are a much better idea). The best place for them is high up on a hill. Also, make sure the slope doesn’t exceed 15 degrees. Both of these are basic safety measures against slides. It’s also important to make sure the bottom of the swale has a decent water saturation, of at least an inch per hour. Finally, one must prepare for record level rainfall, in other words even the best swale will fill up… and then what? The water needs to go somewhere! So have the overflow channeled into a pond, a dam, or any other feature you have installed for water management.

image source
Okay, so you’ve measured out the contour line, dug a nice big swale, planted trees into the berm, and double-tripple checked that the bottom of your ditch is perfectly level. Great, now you can lean back and wait for the rain! When it comes, get out there again to see how your swale is performing.
Maintenance and Long-Term Effects
After a year or so you can take a look at the swale, preferably when it’s not full of water. You’ll see that it’s not as deep any more as how you dug it. It has filled up with soil: your topsoil! This is your land, that otherwise would have been carried away to your neighbor, or eventually into the ocean, to be lost forever. But here it is, ready to be dug out and used for planting. Of course once again, it’s important to keep the bottom completely leveled.
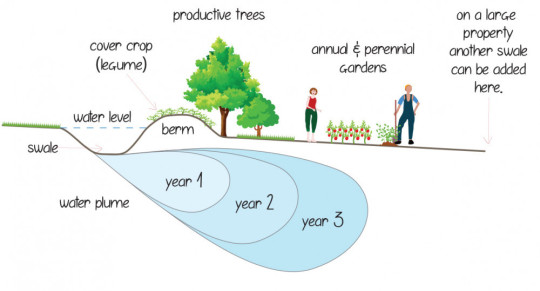
image source
The other effect you are not likely to see immediately, is the water inside, that is under your ground. This is a very gradual process, but the water is going to hang around much longer inside the soil than on the surface. After a while it adds to the water table, and … depending on numerous factors … it will raise it again. There have been many accounts of wells that have been dry for years started having water again, a few years after a swale was built on a nearby hill. But since farming and gardening naturally makes you want to think long-term, this technique will fit right into it.
sources: 1, 2, 3, 4, 5, 6, 7, 8, 9, 10
27 notes
·
View notes