
fr/en depending on how I feel. crafts, thoughts, memes and anxiety.
Don't wanna be here? Send us removal request.
Statistics
We looked inside some of the posts by encephaloscope and here's what we found interesting.
Average Info
Notes Per Post
813
Likes Per Post
565
Reblog Per Post
241
Reply Per Post
7
Time Between Posts
19 days
Number of Posts By Type
Text
11
Last Seen Tumblr Blogs


Fun Fact
28.6 is the average number of monthly visits per US mobile user.
Text
In my 2nd frog era.
As a kid I loved frogs and I stopped being obsessed with them at some point. I don't know why. I had a whole collection of frog-themed items and plushies. I even had a signature frog sketch I was drawing all the time.
Anyway now I'm 30 and I just love the little guys. Bring me all the frog memes. They're just great. Frogs are great.
2 notes
·
View notes
Text
plants and bird and rocks and things
I just published a new pattern on Ravelry!

It's a cute cropped t-shirt with everything I love:
RAGLAN SLEEVES!! of course.
nice, rounded neckline because I don't like my neck to feel stuck
short sleeves b/c I'm always hot
just a little positive ease at the bust
lil' pop of color to make things interesting
cropped because layering is fun
When I was still working on it, the Ravelry project page title was "a crop top with no name" and it kept reminding me of America's A Horse With no Name so I turned to the song lyrics to find a name. I went with "plants and birds and rocks and things" and one thing about me is when I find a name that makes me chuckle a bit, I usually keep it. I loved how long it was so it stuck.
How it's knit: cast-on the neck stitches, knit flat to shape the neck, knit in the round until sleeves/body split, finish the body, finish the neckline, finish the sleeves, surface crochet for the vertical lines. So it's all one piece, top down, no sewing, no colorwork. My patterns always have you finish the body before the sleeves but in reality, after I have split the body and sleeves, I knit the body until I finish my ball of yarn, then I do neckline-sleeves-body. That's because I like to maximize the use of my yarn and I am pickier with sleeve length than body length, so often I will knit the sleeves to fit what I have in mind and then whatever's left goes in the body.

I only need three 100g skeins of fingering weight for a 4XL cropped t-shirt so that's why I love crop tops. I can still use nice hand-dyed yarn but it's less expensive. This design needs 2 to 4 skeins only, and is graded to fit from a XS to a 6XL. I follow the Craft Yarn Council charts for sizing, but I add a little more ease to the sleeves.
I don't write my patterns with beginners in mind specifically, but if you're an adventurous knitter, even if you've never knit a sweater, I think this one should be easy enough and you should be able to find resources easily. Plus, it's a short sleeve crop top, so it doesn't take as long as a full length sweater - it might be more encouraging if you've never undertaken a big project like that.
I really hope someone out there uses all different colors for the vertical lines!
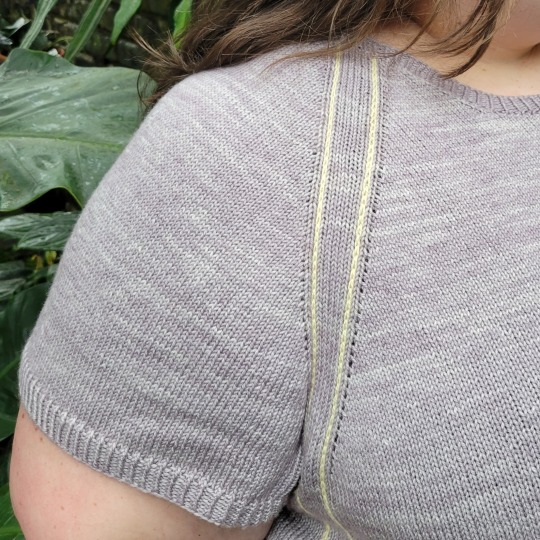
The yarn was generously provided by Julie Asselin, who is a wonderful person and a treasure of the knitting community. I am using her Fino base, which is a lovely mix of merino, cashmere and silk. I love this base for a layering piece, because the cashmere and silk give it delicious drape. The color here is Brume. I absolutely needed a pastel/lavender sweater, and Brume delivered.
My contrasting color is Are U Crazy? from my dear friend Bleu Poussière. Can you believe this pastel neon yellow was obtained with NATURAL DYES? She only uses nature for her colors - flowers, roots, mushrooms. My favorite color of hers is anything dyed with logwood.
150 notes
·
View notes
Text
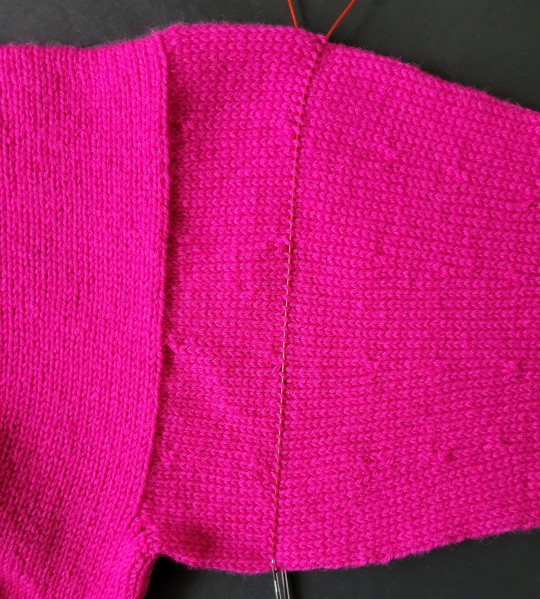
Mabel Sweater/Part 2: Sleeve Surgery
Yesterday I posted Part 1, about the sweater itself.
I mentioned that initially, the sleeves on my sweater were too poufy because I had picked up too many stitches around the armhole. You can see it in the photo below - it is obvious that there is too much fabric at the top of the sleeves. When you knit a drop-shoulder sweater for larger sizes, you have to keep in mind that the junction between the sleeve and the shoulder can be very low on the arm, depending on how much ease you wanted on the body of the sweater. Maybe the poof would have been cute if the sleeve was higher on my bicep. Anyway, it annoyed me, and this project meant too much to me to just accept the sleeves as they were.

Photo is cropped because it was just a WIP pic and those are not my best lol.
Now, I wouldn't consider myself a lazy person but I tend to try to find the most efficient way to get the results I want, so frogging two whole sleeves to re-knit them completely was not the first thing I wanted to try. Keeping in mind that I did decrease rounds every 10 rounds or so, here is how I went about it.
First, I picked up stitches just above my second decrease round.
Then, I CUT in the row below those stitches and unraveled it so I would have a sleeve with live stitches on a needle, and a sweater with a lil' sleeve remnant attached to it.
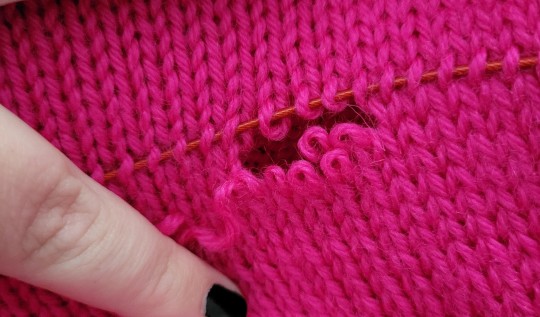

I frogged the lil' remnant, then I picked up stitches from the armhole again. I picked up as many stitches as there were waiting on the other needle with the sleeve, then I knit straight until I reached the length I needed.
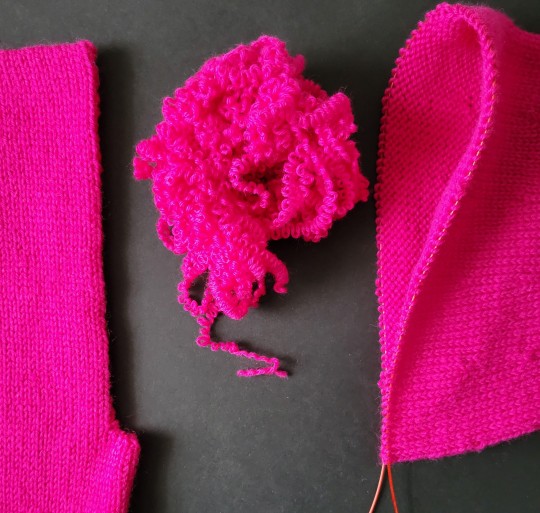
I then grafted the two parts together. I don't mind the hand sewing part of it, and it didn't take that long. The result is great! After blocking, the fit of the sleeve is perfect, much more to my taste, and the grafting is only visible if you know it was done and you are actively looking for it lol. Below is what it looked like before blocking. even then it's not that bad. You also have to keep in my the rest of the sweater and sleeve had already been blocked and this yarn blooms a tiny bit when you wash it.

All in all, I consider this a very successful surgery! I'm very happy I was able to get the sleeves fixed in a week-end rather than over a week.
So just remember - it's all just yarn. It can be reused if you mess up. Don't be afraid to try things if you think they will work. They just might!
12 notes
·
View notes
Text
Mabel Sweater/Part 1: About
oh, how happy I am with this one.

I had this project in mind for a while so bringing it out into the world and having it fit and look exactly how I wanted is amazing. I will write two posts about it, because I want to 1- tell you all about it (yarn, pattern, duplicate stitching) and 2- explain the surgery I did on the sleeves to avoid re-doing them completely.
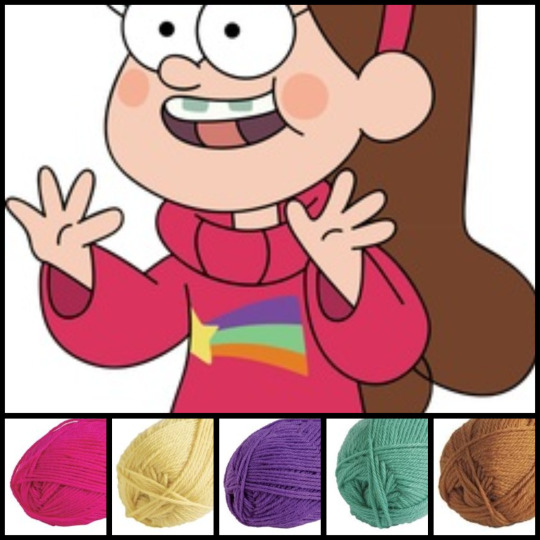
if you don't recognize it, this sweater is inspired by one worn by Mabel in the animated series Gravity Falls (check Disney+, it's so good, so worth it).
the yarn
Wool of the Andes (WotA) is my favorite worsted weight yarn. it's affordable, available in a wide range of colors (many beautiful heathered colorways, too, which I adore), it's non-superwash but not too itchy. it spit splices like a charm and has great warmth. you can knit it at various gauges in the DK-aran range with no problem. not an ad - I just really genuinely love this yarn, lol.
here are the colors I used, from left to right: dragonfruit, creme brulee, poet, tranquil and pumpkin. I think it's a prettttyy good match! I didn't want the orange to be too bright so pumkpin is perfect.
I was very intimidated by the dragonfruit colorway as I don't wear bright colors very often, but it has unlocked a love for pink I didn't know I had! and enough people have told me that it looks good on me that I believe them, now, lol.
the pattern
I wanted a loose-fitting, drop-shoulder, crew neck sweater. I know Mabel's sweaters all have that turtleneck action going on, but I am not comfortable in anything closer than a crew neck. I didn't use a pattern because I can make my own ¯\_(ツ)_/¯ hot take: drop shoulder sweaters are the easiest to grade and any decent designer should be able to have all sizes available. also, as a knitter, you can just knit bigger arm openings if you need bigger sleeves, simple as that.
so, I did some math to figure out how many stitches the body had to be. I divided that in two, for front and back. I decided that there would be one purl stitch on each side for a "faux-seam". I also decided that the neck opening should be a little under a third of the width. so I cast-on for the right shoulder, knit a few rows, put those on hold, did the same for the left shoulder, cast-on my neck stitches in between them, and worked the back until I had reached where the underarm would be. I then put my back stitches on hold and started working on the front. I picked up stitched from the right shoulder and just started to knit, shaping the neckline by trying it on me every few rows until I was satisfied. I put that on hold, mirrored it on the left side, then cast-on stitches in the middle, and knit straight until the front was as long as the back. I then joined everything to work in the round until I was satisfied with the length. so, you know. pretty basic improvised top-down drop-shoulder sleeve construction!
speaking of the sleeves, I picked up stitches with no regard for my row gauge. there were too many, the sleeves were puffy, and I didn't like the look. more on how I fixed them in part 2. aside from that, I opted for decreasing in the round every ten rows or so instead of decreasing under the arm. you can see the decreases on the sleeves a little, but I don't really mind, I like the fit better than if they were triangular.
the shooting star
I made the grid in Stitch Fiddle. I just googled something like "mabel rainbow shooting star sweater" and found an image of the design. I imported it in Stitch Fiddle and ... fiddled ... a bit with it. I figured out how many stitches wide I wanted it to be, and I had to slightly tilt the image so the star wouldn't be too wonky. it would have looked better if I had user a thinner yarn for the sweater, but I think I got a decent result for my gauge.
for the shooting star, I opted for duplicate stitching because I hate intarsia. it took three tries to find the technique that worked best for me and I ended up falling in love with the rhythm of it. for real, I was sad to be done at the end. I worked left-to-right, breaking my yarn for every "line" except the very short ones. here's a pic of the backside, if you're wondering what it looks like.

final thoughts
so yeah, pretty proud of myself on this one. I learned new techniques, I improvised a pattern. it was an exercise in trusting my instincts as I tend to overthink everything I create. it was also a project I knit for fun, for me, without the pressure of writing the pattern or having a deadline. as a bonus, I now have an easy Halloween costume!

#mabel pines#gravity falls#mabel sweater#cosplay knitting#knitters of tumblr#plus size knitter#knitting
387 notes
·
View notes
Text
knitting socks for wide calves
this might be news to some people, but some of us have calves that are too big for most sock knitting patterns. I started modifying the socks I knit for myself from the very first pair and I know many people are not sure how to do it. I believe these mods should be accessible to everyone so I decided to share one of my methods.
for the record, I have three sock patterns for sale on Ravelry, two of them can be very easily adapted for wider calves and include the instructions to do so. the other one is from a period of my life where I was still dealing with a lot of internalized fatphobia and while it would be possible to adapt it, it wouldn't be as easy so I prefer not to recommend it to people who need more width on the calf.
here are the two patterns, and after this little bit of shameless self-promo you'll find the method I use most of the time for my socks.
Jude

Fixing a Hole
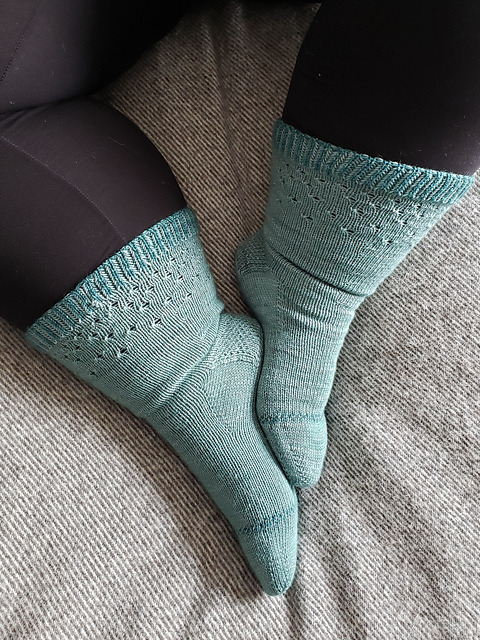
I am using bits from my Fixing a Hole pattern to write this, so you can refer to the photo above to see how it looks (pretty insivible, hehe). This method assumes you are knitting toe-up socks in Magic Loop and the leg of your socks is plain stockinette. Unfortunately, some stitch patterns will need more work to adapt them, but you can use my method as an inspiration. Honestly I didn't invent anything, this is just something I figured out by myself and experimented with over many pairs.
Method
Knit at least one round around after your heel before working the increase rounds.
Increase round: k10, m1l, k to 10 stitches before end of needle, m1l, k to end of needle, repeat on second needle Repeat this round as many times as you need to have enough stitches to fit your legs. I recommend knitting straight for 10 rounds or about an inch between each increase round. I was able to fit three increase rounds in 4 inches on my socks, with 10 rows between each.
You can measure your ankle and calf to figure out the difference and how many stitches that is according to your gauge. For example, if I need to add 2 inches in width and my gauge is 8 sts per inch, then I need to add 16 stitches. That means I would need to work 4 increase rounds. Knowing that, it is easier to plan how to space them apart.
Alternatively, knit one increase round, then plain for one inch, then one increase round, then plain, until you're satisfied with how it looks and fits. Play around and figure out what works for you - I know I say that for everything, but really it's the best way to tailor your knits.
If you're knitting socks with a motif only on the front leg and top of the foot, you can add increases only on the back of the leg, I did that in Jude. You just need to knit your increase rounds closer to one another, and only on half the stitches, so do not "repeat on second needle".
You could also increase only on the sides of the legs, so you would k1 instead of k10. That could work for an all-over motif.
Have fun knitting socks that fit!
12 notes
·
View notes
Text
I wrote this little short story last year to send to a knitting magazine who always calls for articles and other texts at the same time as they call for patterns. they never picked it to be published, so I decided to share it with the world. it's just a lil fiction piece and I had lots of fun working on it (mostly in the parking lot at my workplace when I arrived too early and waited to get inside). hope you like it.
***************
Her Craft Room
I hesitated as my fingers reached for the doorknob. I hadn't been in that room for months.
I took a deep breath and made contact with the cold brass. The door creaked as it opened.
This was my girlfriend's craft room. Everything in here was hers except for the vintage armchair with the velvet fabric. She loved to sit in that chair to knit when she spent the weekend at my place, so when we moved in together three years ago, I suggested we place it in her craft room.
I took a few steps inside. Dust was dancing in the sunlight that the big, south-east facing window was letting in. The natural light was the reason she had claimed this room as hers.
I sat in the velvet chair and took a moment to look around. The desk was messy, filled with craft supplies. On the wall, shelves were heavy with bins of various fabrics, ribbons and scraps of paper. She could never settle on one hobby.
To my right, at the feet of the armchair, was her knitting project basket. She called it Area 51, because it contained all her UFOs - Unfinished Objects. On the top of the pile, I could see my favorite pair of socks, the first one she made for me. She was going to mend them for the third time.
I reached into the basket, under my holey socks, for the project bags. There were two. I opened the smallest one to find a colorwork hat. A piece of paper was also in the bag - the chart she was following.
Judging from the highlighted rows, it looks like she was about halfway done. The yarn was a bit rough for my taste, but I know these more rustic yarns were her favorite. She didn't find them scratchy at all.
The contents of the second bag surprised me. I recognized this project, because I had started it.
Two years into our relationship, we visited Portugal and Spain. She was ecstatic when she found a little yarn shop in one of the cities we explored. I have to admit I was also impressed by the richness of the fibers and the colours they offered. Soft yarns, scratchy yarns, thin ones and big ones, in a multitude of shades. Her happiness, the stars in her eyes as she went from one shelf to the other, carrying multiple balls of fluff in her arms - I still carry this memory with me all these years later. I wanted to pay for her yarn, as a souvenir of our travels and an anniversary gift. She agreed on one condition: that I also chose a few skeins and let her teach me how to knit.
I picked a few balls of medium weight rustic yarn, because I liked the color. She had assured me I would get used to the texture and that once knit and washed, it would feel very soft. Back home, she taught me how to cast on stitches and how to make a knit stitch. With this new knowledge, I set out to knit a garter stitch scarf, a classic beginner project. Unfortunately, I lost interest pretty fast. I couldn't get used to the feeling of the rough yarn on the delicate skin of my hands. She wasn't mad. She said she was happy I tried and spent this time with her sharing one of her favorite pastimes.
This was the project I was looking at. The old garter stitch scarf I had started so long ago. There was a very noticeable difference in the stitches about five inches from the edge, where I had abandoned it and where she had picked up. Her work was even and tight, whereas mine was irregular and loose in some places. She has added ten inches or so.
I took a needle in each hand. Did I remember how to do this? I tried a first stitch. Then another. And soon I found myself completing a row. The yarn felt rough but I was too focused on the movements and the rhythm to bother.
I did not keep up with the craft back then, but I could listen to her talk about it for hours. One of my favorite topics was the vocabulary. She told me about the abbreviations that the knitting community uses, like FO, WIP, and one of my favorites: SABLE, which stands for Stash Acquisition Beyond Life Expectancy. The knitter's version of "biting off more than you can chew".
I looked up from my work in progress, towards the bookshelf. Of course, it did not house books, but instead an impressive number of skeins and balls of yarn, some new, some half used. Her own personal yarn store, carefully curated to fit her palette, with some odd balls in the mix because they were just "too fun to pass on".
How I missed her smile, her touch. The rough yarn I was holding suddenly felt very soft. I knit a few more rows, contemplating how in this very moment I was sitting in her chair, knitting with her needles, feeling so close to her.
I decided I would keep knitting, as I couldn't imagine parting with her precious yarn. Her stash acquisition beyond life expectancy.
48 notes
·
View notes
Text
I need people to understand that if you tell me some place is close to the metro station, I expect to be able to see the metro station from said place. not walk 20 minutes to get to it.
2 notes
·
View notes
Text
can you be nostalgic of a friendship? to look back on the last time you saw this friend, when you didn't know it was the last time, and think, "what happened, why has this person left my life?" they were special and now you realize they were also irreplaceable.
I can't help but worry it's something I did - but maybe it's just what Time does?
#friendship#nostalgia#lost friends#it's not just one I can name like three people#am i a bad friend?
9 notes
·
View notes
Text
on choosing ease for your sweater
most knitting patterns provide full bust measurements and recommended ease for knitters to pick the size they are going to knit.
once in a while someone comes along and suggests that we should use our upper bust measurement to ensure the sweater is not too big.
I don't fully agree with either. I think the key is to know your main body measurements, understand how positive and negative ease work, and what type of fit you prefer. you can then select a size based on your body and preferences.
for example, on crop tops, I prefer no or very little positive ease at full bust, because for my body this translates to my preferred ease at the waist - about 6", which is the different between my full bust and underbust measurement.
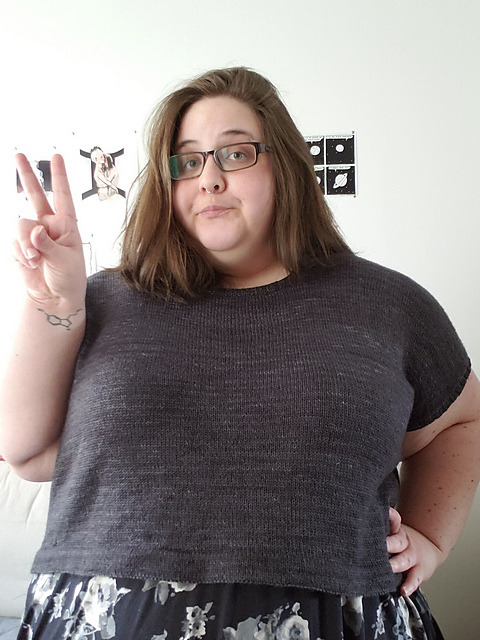
here is an example of a top I frogged because I did not like the fit. it had something like 10" of positive ease at the bust, which resulted in way too much fabric around the waist, it was not the type of fit I like on me. this photo only shows the front, trust me, it was not cute in the back.
on full length sweaters, I prefer 4-6" of positive ease at the bust, as this means it will have zero ease at the hips for me. alternatively, I can knit a size that has zero ease at the bust and increase on each sides for the hips if it works with the pattern.
when I made my Zweig I followed the recommended size for my measurements and ended up increasing after the waist to accomodate my hips. the result is moderate ease throughout the sweater.

so if you don't know what you like yet, how can you figure it out without knitting a ton of different sweaters?
one method that a lot of people suggest, and for good reason, is to measure store bought cloths you already have and love. make notes, compare them, try them on, take photos - understand which parts of the garment are looser or tighter on your body, how the fabric behaves in these parts, what you like and don't like. this method is free, easy and very good for people who need visuals to learn.
another thing you could try, and to be honest I never tried it myself, only needs a t-shirt that is too big for you and a couple binder clips. use the clips to pinch the fabric in different places (sleeves, bust, waist, hips) to change the fit of the t-shirt. try different combos, take away more or less fabric, play around with the clips. and of course, make notes of what you like.
with this knowledge, it is easier to understand how the measurements of a garment would work for your body and you can make a more informed decision when it's time to pick the size you will knit.
167 notes
·
View notes
Text
inner child

Iisten. I simply had to purchase these 1997 McDonalds Hercules plates.
it's not a complete set, either. I'm missing Phil and the Muses. I bought an incomplete and slightly used set on purpose because I knew that if I got a complete and like new set, I would not use them.
I have a very clear memory of the Pegasus plate in my first childhood home. it was so faded from frequent use and wash. I'm pretty sure it was my favorite.
Hercules is one of my top 5 Disney movies. I know the french canadian version by heart and I don't get tired of it. Meg was my first strong independant woman and her solo song in the movie is also one of my favorites.
the joy I get from owning these plates... it's weird to describe. it probably looks stupid or childish from the outside, but I promise my tomato sandwiches are going to taste better in my Pegasus plate. it's just one of those things you do for your inner child. maybe it doesn't make a lot of sense. I just like to think that if something doesn't cost much (relative), doesn't hurt anybody and makes you happy? you should go for it.
what have you done for your inner child lately?

it is worth noting that I have established rules for using them: no dishwasher, no microwave, no knives. and maybe I'll end up buying a full set, you know, for safe keeping.
6 notes
·
View notes
Text
OOTD July 27 + first look at my newest design

quick OOTD photo from last morning. first time wearing this new design. I'm calling it "plants and birds and rocks and things" because for a while it was "a crop top with no name" get it? hint: think song lyrics. it should go into testing soon. I'd like to release the pattern some time this fall.
I only needed three skeins for my 4XL sampler. that's what I love about knitting crop tops. I love wearing them layered over a dress. it's effortless, comfortable and always cute. I can take it off if I get too hot because I am wearing something underneath. the length is perfect; I'm never pulling down on a crop top like I do with "normal" length sweaters or tshirts.
so more about the crop top: the yarn is Julie Asselin Fino, a merino, silk and cashmere blend I love for its drape that makes it perfect for this type of garment. the color is Brume, a lovely grey-lavender that speaks to my current pastel obsession. I used a mini skein of Bleu Poussière's Are You Crazy? colorway which is amazing considering Shani uses natural ingredients to dye with. I've had this mini for a while, it was supposed to go with the Saison I used to make my Linsey crop top in 2020. coincidentally, back then my plan was also to use the mini with a greyish color (Gris de Lin).
I really hope at some point someone will use a different color for each of the contrasting lines. there is a total of 8, 2 for each "raglan line", and they go down the sides of the top. they are made with the surface crochet technique, so don't worry about juggling more than one ball of yarn at a time. if you know me, you know I prefer not to suffer when I knit - lol. but yeah imagine each line or pair in a different color. I think it would be fun. awesome for small leftovers, too. I had a 20g mini and there is plenty left.
this design had been on my mind for about three years. at the beginning I wanted to have a cable or lacy stitch between the two columns but all my swatches were unsuccessful. I just couldn't find a good match, so I decided to go with plain stockinette and what do you know, the simplicity of the end result is just perfect.
also for this photo I tried a new thing I learned on tiktok, which is to actually record a video of you moving and doing things and then take snapshots of the best frames. I discovered my phone actually has this function built in so that was nice. I will definitely use this more in the future. my boyfriend is getting really good at understanding the angles I like/need for my official design photos, but with the video technique I think I would get more interesting angles or poses that I wouldn't think of trying during a photoshoot. plus maybe they would feel more natural. and then my bf can help with the close-ups and more complicated photos. I love working with a "real" photographer but it's an expense I can't always justify. I don't sell thaaat many patterns - I mean I think amongst the Québec designers I'm doing well, but you need to sell a lot of pdfs to cover a photographer's fee. but the photos are worth it. so worth it. so... please buy my patterns so I can have plenty of professional photoshoots? lol.
18 notes
·
View notes