
Don't wanna be here? Send us removal request.
Statistics
We looked inside some of the posts by flavorjunction and here's what we found interesting.
Average Info
Notes Per Post
0
Likes Per Post
0
Reblog Per Post
0
Reply Per Post
0
Time Between Posts
1 day
Number of Posts By Type
Text
17
Last Seen Tumblr Blogs


Fun Fact
Tumblr is available in 18 languages.
Text
"No Immersion Blender? No Problem! Creative Alternatives for Smooth Blending"

The immersion blender, also known as a stick blender, is a versatile kitchen tool that has gained popularity for its convenience in blending soups, sauces, and other recipes. However, what do you do if you don't have an immersion blender in your kitchen arsenal? Don't worry; there are plenty of creative alternatives to achieve smooth blending without one. In this blog post, we'll explore some handy alternatives that will come to your rescue.
1. Traditional Blender:
If you own a traditional countertop blender, this is the most straightforward alternative. Pour your ingredients into the blender, cover it securely, and blend until you achieve the desired consistency. Be sure to allow hot ingredients to cool slightly before blending to prevent splattering or damage to the blender.
2. Food Processor:
A food processor is another excellent option for blending. It works especially well for thick sauces, dips, and purees. Simply transfer your ingredients to the food processor bowl, attach the blade, and process until smooth. Remember to scrape down the sides as needed to ensure even blending.
3. Hand Mixer:
A hand mixer can be surprisingly effective for tasks like blending soft fruits for smoothies, mashing potatoes, or creating creamy whipped desserts. Use the lowest speed setting and be cautious of splatters, especially when dealing with liquids.
4. Potato Masher or Fork:
For softer ingredients like cooked potatoes or steamed vegetables, a simple potato masher or a fork can work wonders. Mash and stir vigorously until you achieve the desired texture. While this method won't provide ultra-smooth results, it's perfectly suitable for rustic recipes.
5. Whisk or Wooden Spoon:
When dealing with thinner soups or sauces, a whisk or wooden spoon can help you achieve a smoother texture through thorough stirring. Be patient and consistent in your efforts to break down any lumps or chunks.
6. Sieve or Strainer:
For recipes like tomato sauce or fruit purees, you can use a fine-mesh sieve or strainer to separate the liquid from any solids. This method is effective at removing seeds, skins, and unwanted textures.
7. Mortar and Pestle:
If you're working with small quantities of ingredients like herbs, garlic, or spices, a mortar and pestle can help you create a smooth paste or blend them effectively.
8. Hand Blender:
While not exactly an immersion blender, a hand-cranked hand blender can be a viable alternative. It doesn't require electricity and can be quite effective for small blending tasks.
Conclusion:
Not having an immersion blender shouldn't deter you from exploring a wide range of recipes that require smooth blending. With the creative alternatives mentioned above, you can still achieve fantastic results in the kitchen. Remember to adapt your method to the specific recipe and ingredients you're working with, and you'll be blending like a pro in no time. Happy cooking
0 notes
Text
Unleash Your Culinary Creativity with the Hamilton Beach Power Elite Wave Action Blender

In the world of kitchen appliances, a reliable blender is an essential tool for culinary enthusiasts and home cooks alike. When it comes to dependable blending performance and versatility, the Hamilton Beach Power Elite Wave Action Blender is a standout choice. In this blog post, we'll take a closer look at this powerful kitchen companion, exploring its features, benefits, and how it can elevate your cooking game.
The Power Elite Wave Action Blender: A Quick Overview
The Hamilton Beach Power Elite Wave Action Blender is a versatile and robust appliance designed to meet a variety of blending needs. Here's a brief overview of what makes it a kitchen favorite:
Powerful Performance: With a 700-watt peak power motor, this blender can effortlessly handle a wide range of ingredients, from ice and frozen fruits to tough vegetables and nuts.
Wave Action System: The unique Wave Action blending system pulls ingredients down into the blades for consistently smooth results, ensuring that no chunks or unblended pockets are left behind.
Multiple Speeds and Functions: The blender offers a range of speeds and functions, allowing you to tailor your blending experience to the specific task at hand. Whether you're making smoothies, sauces, or soups, you'll find the perfect setting.
Durable Design: The Power Elite Blender is built to last, featuring stainless steel blades and a robust construction that can withstand heavy use.
Benefits of the Hamilton Beach Power Elite Blender
Let's dive deeper into the advantages of adding this blender to your kitchen arsenal:
Versatility: From morning smoothies and protein shakes to evening cocktails and homemade sauces, the Power Elite Blender can handle it all. Its versatility means you can experiment with a wide range of recipes.
Ease of Use: The intuitive controls and user-friendly design make this blender suitable for both beginners and experienced cooks. You'll have no trouble mastering its operation.
Wave Action Technology: The unique blending system ensures that your ingredients are thoroughly mixed, resulting in consistently smooth and creamy textures, whether you're making a tropical fruit smoothie or a velvety tomato soup.
Easy Cleanup: The removable blades and jar are dishwasher safe, making cleanup a breeze. Say goodbye to the hassle of scrubbing hard-to-reach places.
Affordability: The Hamilton Beach Power Elite Blender offers high-quality blending performance at an affordable price point, making it accessible to a wide range of consumers.
Creative Culinary Possibilities
With the Hamilton Beach Power Elite Wave Action Blender at your disposal, the culinary world is your oyster. Here are some creative ways to harness its blending power:
Smooth and Creamy Smoothies: Whip up nutrient-packed smoothies with your favorite fruits, vegetables, and yogurt.
Silky Soups and Sauces: Create restaurant-quality soups and sauces by blending ingredients to perfection.
Frozen Treats: Make your ice creams, sorbets, and frozen desserts with ease.
Salsa and Dips: Craft homemade salsas, dips, and dressings for your snacks and appetizers.
Cocktails and Mocktails: Blend up delicious cocktails and non-alcoholic mocktails for your next gathering.
Conclusion
The Hamilton Beach Power Elite Wave Action Blender is more than just a kitchen appliance; it's a culinary companion that empowers you to explore your creativity and elevate your cooking endeavors. With its powerful performance, innovative technology, and user-friendly design, it's no wonder that this blender has earned a place in countless kitchens around the world.
If you're looking to enhance your culinary skills and experiment with new recipes, the Hamilton Beach Power Elite Wave Action Blender is a must-have addition to your kitchen. It's time to unleash your culinary creativity and blend your way to delicious, satisfying meals and beverages.
0 notes
Text
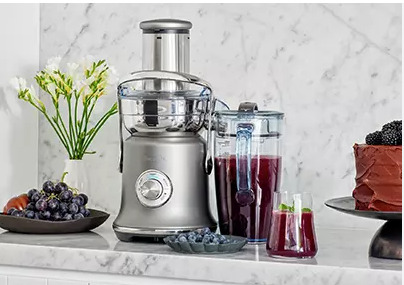
The Difference Between a Blender and a Juicer: Which One Is Right for You?

In the world of kitchen appliances, blenders and juicers are often used interchangeably, but they serve distinct purposes and offer unique benefits. Whether you're a health-conscious individual looking to boost your daily intake of fruits and vegetables or a culinary enthusiast experimenting with new recipes, understanding the differences between a blender and a juicer is crucial. In this blog post, we'll break down the key distinctions between these two appliances to help you make an informed choice.
1. Functionality:
Blender: Blenders are versatile kitchen workhorses that are designed to blend, puree, and emulsify a wide range of ingredients. They excel at creating smoothies, soups, sauces, and even desserts. Blenders retain all the fiber from fruits and vegetables, making them an excellent choice for those seeking to increase their dietary fiber intake.
Juicer: Juicers, on the other hand, are specialized machines that extract the liquid (juice) from fruits and vegetables while separating the pulp and fiber. This process results in a concentrated juice that's devoid of solid matter. Juicers are ideal for individuals who want a pure and clear juice, often for specific health or dietary reasons.
2. Texture and Consistency:
Blender: Blenders are known for their ability to produce thick and creamy textures. When you use a blender, you retain the entirety of the fruit or vegetable, creating a beverage or mixture with a smooth consistency. This makes them perfect for smoothies, shakes, and recipes where you want to keep the fiber intact.
Juicer: Juicers produce a thinner, liquid product that lacks the fiber and pulp. The resulting juice is typically smooth and free of any solid particles. This can be ideal for those with digestive sensitivities or for recipes that call for clear juices.
3. Nutrient Retention:
Blender: Blenders retain most of the nutrients from the fruits and vegetables since they keep the fiber intact. This means you'll get a beverage with the full spectrum of vitamins, minerals, and antioxidants. However, the fiber can slow down the absorption of these nutrients.
Juicer: Juicers extract the liquid portion of fruits and vegetables, concentrating the vitamins and minerals. While the juice is nutrient-dense, it lacks the fiber that slows nutrient absorption. This can be advantageous for those who want a quick nutrient boost.
4. Cleanup:
Blender: Cleaning a blender is relatively straightforward, as you usually only need to wash the blender jar and blades. Many blender components are dishwasher-safe, making cleanup even more convenient.
Juicer: Juicers can be a bit more challenging to clean, as they have more parts, including a juice container, pulp container, and various filters or strainers. Disassembling, cleaning, and reassembling a juicer can be more time-consuming.
Conclusion
In summary, blenders and juicers each have their own unique strengths and purposes in the kitchen. Blenders are fantastic for retaining fiber, creating creamy textures, and offering versatility in recipes. Juicers, on the other hand, excel at producing clear, nutrient-dense juices. The choice between a blender and a juicer ultimately depends on your specific needs, dietary preferences, and the types of recipes you plan to prepare. Consider your priorities and use cases carefully to determine which appliance is the right fit for your kitchen.
0 notes
Text
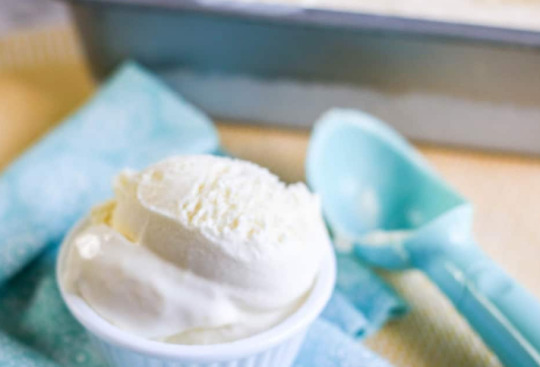
"Scoop It Up: How to Make Ice Cream at Home"
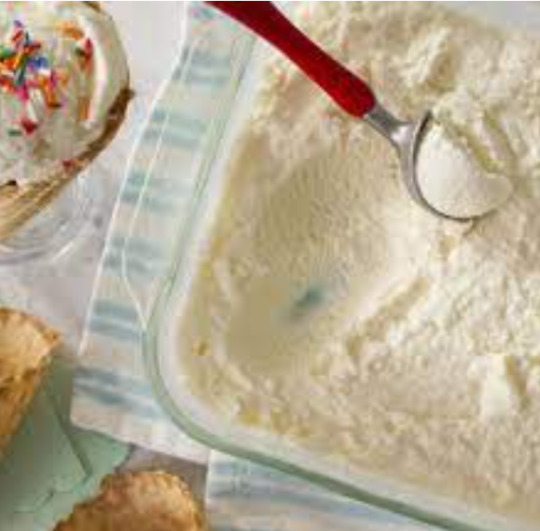
Ice cream, with its creamy texture and endless flavor possibilities, is a beloved treat that can be enjoyed year-round. While store-bought options are readily available, there's something incredibly satisfying about making your own ice cream at home. In this blog post, we'll take you on a delicious journey, exploring the art of making ice cream from scratch, with or without an ice cream maker.
The Magic of Homemade Ice Cream
Before we dive into the process, let's take a moment to appreciate the many advantages of making ice cream at home:
Customization: When you make ice cream at home, you have complete control over the flavors and mix-ins. You can let your creativity run wild, experimenting with unique combinations that you won't find in stores.
Quality Ingredients: You choose the ingredients, ensuring that your ice cream is made with high-quality, fresh ingredients without artificial additives or preservatives.
Freshness: Homemade ice cream is as fresh as it gets. You can enjoy it straight from the churner, savoring the rich, creamy goodness.
Family Fun: Making ice cream at home is a fun activity for the whole family. It's a chance to bond over a shared love for sweet treats and get creative in the kitchen.
Now, let's explore the steps to make ice cream at home.
Ingredients You'll Need:
2 cups heavy cream
1 cup whole milk
3/4 cup granulated sugar
1 tablespoon pure vanilla extract (or your flavor of choice)
A pinch of salt
Optional Mix-Ins:
Chocolate chips, crushed cookies, fruit puree, nuts, or any other favorite additions.
Equipment You'll Need:
An ice cream maker (or alternative methods described below)
Mixing bowls
Whisk
Airtight container for storage
Step-by-Step Instructions:
Prepare the Base: In a mixing bowl, whisk together the heavy cream, whole milk, sugar, vanilla extract, and a pinch of salt until the sugar has completely dissolved. This forms the base of your ice cream.
Chill the Base: Cover the bowl and refrigerate the mixture for at least 2-4 hours or overnight. Chilling the base helps develop the flavors and ensures a creamier texture.
Churn the Ice Cream:a. Using an Ice Cream Maker:
Follow the manufacturer's instructions for your ice cream maker.
Pour the chilled base into the ice cream maker and churn according to the machine's guidelines.
Add any mix-ins during the last few minutes of churning.
b. Without an Ice Cream Maker (No-Churn Method):
Pour the chilled base into a freezer-safe container.
Place the container in the freezer.
After 1-2 hours, remove the container and vigorously stir the mixture with a fork or whisk to break up any ice crystals.
Repeat this process every 1-2 hours for about 4-6 hours or until the ice cream reaches your desired consistency.
Add mix-ins during one of the stirring sessions.
Serve and Store: Once your ice cream reaches the desired consistency, scoop it into bowls or cones, and enjoy immediately. If you have leftovers, store them in an airtight container in the freezer.
Conclusion
Making ice cream at home is a delightful and rewarding experience. With a few simple ingredients and the right equipment, you can create a wide range of flavors and indulge in the creamy goodness of homemade ice cream. Whether you're making classic vanilla, experimenting with exotic flavors, or inventing your own signature creations, the joy of homemade ice cream is a treat that's hard to beat. So grab your favorite ingredients, get churning, and savor the sweet satisfaction of your very own homemade ice cream masterpiece.
0 notes
Text
"The Art of Keeping Your Blender Bottle Pristine: How to Clean It Right"

Blender bottles are versatile and indispensable tools for whipping up your favorite shakes, smoothies, and supplements. However, to ensure these trusty companions remain at their best, regular cleaning is essential. In this blog post, we'll share tips and tricks on how to clean your blender bottle effectively, keeping it fresh, odor-free, and ready for your next culinary adventure.
The Importance of Cleaning Your Blender Bottle
Before delving into the cleaning process, let's understand why it's crucial to keep your blender bottle in tip-top shape:
Hygiene: Blender bottles come into contact with food, liquids, and supplements. Without proper cleaning, they can become breeding grounds for bacteria, leading to potential health risks.
Odor Control: Lingering odors from previous blends can negatively affect the taste and smell of your next creation. Regular cleaning helps prevent these unwelcome surprises.
Longevity: A well-maintained blender bottle will last longer, saving you money in the long run.
Now, let's explore the steps to clean your blender bottle effectively.
Step 1: Disassemble the Blender Bottle
Lid and Spout: Begin by unscrewing the lid and removing the spout or drinking straw, if applicable. Some blender bottles have additional components like rubber gaskets or seals; be sure to take these apart as well.
Mixing Ball: If your blender bottle includes a mixing ball or wire whisk, remove it.
Step 2: Rinse Thoroughly
Hot Water Rinse: Start by rinsing the blender bottle, lid, and all disassembled parts with hot water. This helps remove loose residue and prepares the surfaces for cleaning.
Step 3: Cleaning Solutions
Dish Soap and Warm Water: Fill the blender bottle with warm water and add a few drops of mild dish soap. Secure the lid and shake vigorously for a minute or two. Pay special attention to the interior surfaces.
Bottle Brush: For thorough cleaning, use a bottle brush with soft bristles to scrub hard-to-reach spots, such as the bottom and sides of the blender bottle.
Lid and Components: Scrub the lid, spout, and any other components separately with the bottle brush or a dishcloth.
Step 4: Rinse Again
Thorough Rinse: Rinse all parts under running hot water to remove soap residue. Ensure no soap or debris remains.
Step 5: Odor Control
Odor Elimination: If your blender bottle has developed a persistent odor, fill it with a mixture of equal parts water and white vinegar. Let it sit for an hour before thoroughly rinsing with hot water. This should help neutralize any lingering smells.
Step 6: Air Dry
Air Dry: Leave all components, including the blender bottle, lid, spout, and mixing ball, to air dry completely before reassembling. Store the blender bottle with the lid off to prevent trapped moisture and potential mold growth.
Step 7: Regular Maintenance
Frequency: Make it a habit to clean your blender bottle immediately after each use. This minimizes the effort needed and keeps it in pristine condition.
Conclusion
A clean blender bottle is not only essential for your health and hygiene but also for maintaining the quality and taste of your beverages. By following these steps for effective cleaning and making it a regular part of your routine, you'll ensure that your blender bottle remains a reliable companion for all your culinary adventures. Keep it clean, keep it fresh, and keep enjoying your favorite shakes and smoothies hassle-free.
0 notes
Text
"Shred Cabbage: A Versatile Ingredient for Healthy Eating"
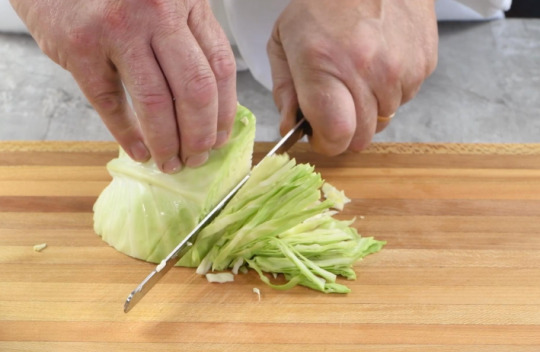
Cabbage, a cruciferous vegetable known for its robust flavor and impressive health benefits, often finds its way into our meals in various forms. One of the most popular ways to prepare cabbage is by shredding it. Whether you're making coleslaw, stir-fry, or even sauerkraut, shredded cabbage is a versatile ingredient that adds both nutrition and texture to your dishes. In this blog post, we'll explore the many reasons why you should incorporate shredded cabbage into your culinary repertoire.
The Nutritional Powerhouse
Cabbage, in any form, is a nutritional powerhouse. When you shred cabbage, you're preserving its nutrient content while making it easier to incorporate into your meals. Here are some of the key nutrients you can benefit from when you add shredded cabbage to your diet:
Vitamins: Cabbage is an excellent source of vitamins like vitamin C, which boosts your immune system, and vitamin K, crucial for bone health. Shredded cabbage retains these vitamins in their entirety.
Fiber: Shredded cabbage is rich in dietary fiber, which aids digestion, promotes a feeling of fullness, and supports a healthy gut.
Antioxidants: This vegetable contains a variety of antioxidants, including flavonoids and polyphenols, which help combat oxidative stress and inflammation in the body.
Minerals: Cabbage provides essential minerals such as potassium and manganese, contributing to overall health and well-being.
Versatility in the Kitchen
Shredded cabbage's versatility in the kitchen is truly remarkable. Here are some delightful ways to incorporate it into your meals:
Coleslaw: Perhaps the most well-known use of shredded cabbage, coleslaw is a classic side dish. Mix shredded cabbage with a creamy dressing for a refreshing and crunchy addition to your meals.
Stir-Fries: Add shredded cabbage to your stir-fries for a satisfying crunch and a boost of nutrients. It pairs exceptionally well with a wide range of proteins and sauces.
Sauerkraut: Fermenting shredded cabbage with salt and spices creates sauerkraut, a probiotic-rich condiment that's not only delicious but also great for gut health.
Salads: Toss shredded cabbage into your salads for extra texture and a mild peppery flavor. It pairs wonderfully with a variety of dressings and toppings.
Wraps and Tacos: Use large cabbage leaves as a low-carb alternative to tortillas or wraps. Shredded cabbage makes a great base for all kinds of fillings.
Soups: Add shredded cabbage to your soups and stews for a hearty and nutritious addition. It softens as it cooks, adding body and flavor to the dish.
Conclusion
Shredded cabbage is an underrated gem in the world of culinary delights. With its impressive nutritional profile and culinary versatility, it deserves a place in your kitchen. Whether you're aiming to boost your vegetable intake, add crunch to your dishes, or explore new recipes, shredded cabbage is your go-to ingredient. So, the next time you're at the grocery store, be sure to grab a head of cabbage and shred away for a healthier, more exciting culinary experience. Your taste buds and your body will thank you!
0 notes
Text
Deconstructing the Food Processor: A Comprehensive Parts List

Food processors have become indispensable kitchen appliances, revolutionizing the way we prepare meals. These versatile gadgets are equipped with various components that work together to simplify chopping, blending, and mixing tasks. In this blog post, we'll provide a detailed breakdown of the essential food processor parts, helping you better understand the inner workings of this culinary workhorse.
Base Unit:
Motor: The heart of the food processor, responsible for powering all the other components.
Control Panel: Houses the control buttons or switches for adjusting speed settings.
Work Bowl:
Bowl: The main container where ingredients are placed for processing.
Lid: Fits snugly onto the work bowl and usually has a feed tube for adding ingredients during operation.
Pusher: Used to safely guide ingredients through the feed tube.
Blade Assembly:
S-Shaped Blade: Often referred to as the "S-blade," it's used for chopping, pureeing, and mixing a variety of ingredients.
Dough Blade: Designed specifically for kneading dough, it has a unique shape that helps with dough consistency.
Disc Attachments:
Slicing Disc: Used to achieve even and uniform slices of fruits and vegetables.
Shredding Disc: Ideal for shredding cheese, vegetables, and more.
Julienne Disc: Creates thin, matchstick-like strips for various recipes.
Whisk Attachment:
Whisk Blade: Used for whipping, aerating, and mixing ingredients such as eggs, cream, and meringues.
Dough Hook:
Designed for kneading bread and pizza dough, making it an essential part for bakers.
Spindle Adapter:
Connects the motor to various attachments, allowing the food processor to perform different tasks.
Food Pusher:
Used to safely push ingredients down into the work bowl while the processor is running.
Additional Attachments (Optional):
Citrus Juicer: Attaches to the food processor for juicing citrus fruits.
French Fry Cutter: Creates uniform French fries with ease.
Nut Butter Blade: Specifically designed for making nut butter.
Understanding the functions and capabilities of each food processor part is crucial for maximizing your appliance's potential. Whether you're chopping vegetables, kneading dough, or shredding cheese, knowing which attachment to use and how to assemble them correctly will save you time and ensure consistent results.
Conclusion
The food processor is a versatile kitchen tool that simplifies food preparation by utilizing various components to handle a wide range of tasks. From chopping and slicing to mixing and kneading, each part serves a specific purpose, making it a must-have for any cooking enthusiast. With this comprehensive parts list, you'll be better equipped to unlock the full potential of your food processor and explore the endless culinary possibilities it offers.
0 notes
Text
Blender Safety: Essential Tips for a Risk-Free Kitchen Experience
Blenders are indispensable kitchen appliances that can help you create a wide range of culinary delights, from smoothies and soups to sauces and shakes. However, like any kitchen tool, blenders must be used with caution to ensure safety in your culinary adventures. In this blog post, we'll explore essential blender safety tips to help you minimize the risks and enjoy a risk-free cooking experience.
1. Read the User Manual
Before you start using your blender, take the time to read the user manual thoroughly. It contains valuable information about your specific blender model, including safety guidelines, maintenance instructions, and recommended usage. Familiarizing yourself with this information is the first step to safe blender use.
2. Check for Damage
Before each use, inspect your blender for any visible damage, such as cracks in the pitcher, frayed power cords, or loose parts. Using a damaged blender can be dangerous, so address any issues promptly. If you discover any problems, discontinue use until the blender is repaired or replaced.
3. Properly Place the Blender
Ensure that your blender is placed on a stable and level surface. Unstable placement can lead to accidents, such as the blender falling or tipping over during operation. Make sure it's secure and won't move while in use.
4. Secure the Lid
Always ensure that the blender lid is securely in place before starting the appliance. Most blenders are designed with safety interlock systems that prevent operation unless the lid is properly locked. This feature prevents potential splatters and accidents.
5. Start at a Low Speed
When you start blending, begin at a low speed setting. Starting at high speed immediately can cause ingredients to splatter or shoot up, creating a mess and posing a safety risk. Gradually increase the speed as needed.
6. Use the Pulse Function
The pulse function is your friend when it comes to achieving the right texture and preventing over-blending. Instead of running the blender continuously, use short bursts of power by pulsing the blender. This allows you to maintain better control over the blending process.
7. Monitor the Blender
While the blender is in operation, don't walk away. Stay nearby to monitor the blending process and make adjustments as needed. This helps you catch any issues early and ensures safe operation.
8. Be Cautious with Hot Liquids
Blending hot liquids requires extra care. Always allow hot liquids to cool slightly before blending, and use a kitchen towel or paper towel to cover the blender's lid partially. This allows steam to escape while preventing splatters. Blend at a lower speed when working with hot liquids.
9. Clean Safely
Unplug the blender before cleaning it to prevent accidental starts. Most blender parts are dishwasher safe, but be cautious when handling sharp blades. Always handle and store blender parts carefully to avoid injury.
10. Keep Out of Reach of Children
Blenders can be fascinating to children, but they are not toys. Store your blender in a secure location out of reach of curious little hands. Additionally, educate your children about the potential dangers of blenders and the importance of staying away from them when in use.
Conclusion
Blender safety is paramount in the kitchen to prevent accidents and ensure a smooth cooking experience. By following these essential safety tips and using your blender mindfully, you can enjoy the convenience and versatility of this kitchen appliance without compromising your well-being or the safety of those around you. Stay vigilant, practice caution, and let your blender continue to be your trusty kitchen companion.
0 notes
Text
Mastering the Art of Blending Hot Liquids: Tips and Tricks

Blending hot liquids can be a bit tricky, but with the right techniques and precautions, you can achieve perfectly smooth and delicious results. Whether you're making creamy soups, frothy lattes, or hot sauces, learning how to blend hot liquids safely and effectively is an essential skill for any home cook or aspiring chef. In this blog post, we'll explore some valuable tips and tricks to help you master the art of blending hot liquids.
Use the Right Blender
Choosing the right blender is the first step to success when it comes to blending hot liquids. Opt for a high-quality blender with a sturdy construction, a heat-resistant pitcher, and a strong motor. Many blenders are specifically designed for hot liquids, so be sure to check for this feature when making your selection.
Allow Hot Liquids to Cool Slightly
Before blending, it's crucial to let your hot liquids cool for a few minutes. Blending extremely hot liquids can create pressure inside the blender, potentially leading to splatters or even explosions. Allowing the liquid to cool slightly reduces the risk and ensures a safer blending process.
Ventilation is Key
When blending hot liquids, it's essential to provide an escape route for the steam that builds up during blending. To do this, remove the small cap from the blender lid and cover the opening with a clean kitchen towel or a paper towel. This allows steam to vent while preventing any splatters.
Blend in Batches
If you're working with a large volume of hot liquid, it's often best to blend in smaller batches. Overfilling the blender can lead to spills and uneven blending. Blend in manageable portions and combine them in a heat-resistant container afterward.
Start at a Low Speed
Begin blending at the lowest speed setting. Gradually increasing the speed helps prevent splatters and ensures a smoother blend. Once the blender is running smoothly, you can increase the speed to achieve your desired consistency.
Use a Towel for Extra Safety
For added safety, wrap a clean kitchen towel around the base of the blender. This acts as an additional barrier to catch any potential leaks or spills. Always keep a firm grip on the blender to maintain control during blending.
Blend with Caution
While blending, be cautious not to overfill the blender or overblend the mixture. Hot liquids can expand during blending, so leave some extra room in the pitcher to accommodate this expansion. Also, avoid blending for extended periods; shorter bursts are usually sufficient.
Lid Securely in Place
Ensure that the blender lid is securely in place before starting the blending process. A loose lid can result in hot liquid splattering all over your kitchen. Double-check the lid's seal to prevent accidents.
Conclusion
Blending hot liquids can open up a world of culinary possibilities, from velvety soups to flavorful sauces. By following these tips and tricks, you can blend hot liquids safely and efficiently, achieving the perfect texture and taste in your hot creations. Remember that patience and proper precautions are key to mastering this culinary skill. So, go ahead and experiment with hot blends, and watch your cooking repertoire expand to exciting new heights.
0 notes
Text
"Brief Overview of the Oster Blender Pro 1200 With Glass Jar"
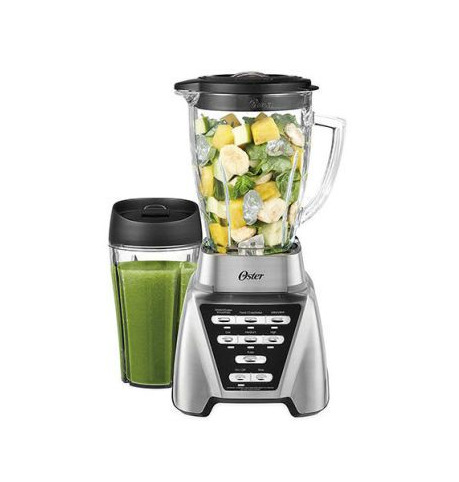
Are you on the hunt for a versatile blender that can handle a variety of blending tasks with ease? Look no further than the Oster Blender Pro 1200 with a glass jar. In this brief overview, we'll take a closer look at this powerful kitchen appliance and explore the features that make it a popular choice among home chefs and smoothie enthusiasts.
The Powerhouse Motor
At the heart of the Oster Blender Pro 1200 is its robust motor, packing a punch with 1200 watts of power. Whether you're blending frozen fruits for a refreshing smoothie or pulverizing ice for your favorite cocktails, this blender can handle it all. Its powerful motor ensures consistent performance, allowing you to achieve smooth and creamy results every time.
Versatile Blending Options
One of the standout features of this blender is its versatility. It comes with both a 6-cup Boroclass glass jar and a 24-ounce smoothie cup with a to-go lid. This means you can easily prepare large batches of soups, sauces, or smoothies, or whip up a quick single-serving drink to take on the go. The glass jar is not only durable but also resistant to odors, stains, and scratches, ensuring that it remains in top-notch condition for years to come.
Smart Settings for Precision
The Oster Blender Pro 1200 boasts three pre-programmed settings – Green/Frozen Smoothies, Food Chop/Salsa, and Milkshake – along with seven speeds, including a pulse option. These settings take the guesswork out of blending, making it easy to achieve the perfect texture for your recipes. Whether you're looking for a chunky salsa or a silky smooth puree, the blender's smart settings have you covered.
Dual-Direction Blade Technology
To further enhance blending performance, this blender features Dual-Direction Blade Technology. The 3.5-inch stainless steel blades reverse direction automatically during blending, ensuring that ingredients are consistently pulled down into the blending vortex. This results in smoother, more thorough blending and reduces the need for manual stirring.
Easy to Clean
Cleaning up after blending is a breeze with the Oster Blender Pro 1200. The glass jar, smoothie cup, and blade assembly are all dishwasher-safe, saving you precious time and effort in the kitchen. The base can be easily wiped clean with a damp cloth, and the blender's sleek design ensures it will look great on your countertop.
Final Thoughts
In conclusion, the Oster Blender Pro 1200 with Glass Jar is a versatile and powerful kitchen appliance that can handle a wide range of blending tasks. Its durable glass jar, powerful motor, smart settings, and Dual-Direction Blade Technology make it a top choice for those looking to elevate their culinary creations. Whether you're a seasoned chef or a smoothie enthusiast, this blender is sure to become an essential tool in your kitchen arsenal. So, why wait? Experience the blending power of the Oster Blender Pro 1200 for yourself and take your culinary adventures to the next level.
0 notes
Text
"What's the Common Ground Between a Blender and a Juicer? Discover Their Shared Features"
Blenders and juicers are two kitchen appliances that often find themselves side by side on the countertop, each serving a unique purpose in the world of food and beverage preparation. While their primary functions are distinct, these appliances do share some common ground in terms of features and capabilities. In this blog post, we'll explore the shared features between blenders and juicers, helping you understand how they can both contribute to your culinary endeavors.
1. Versatility in Ingredient Processing:
One of the most significant shared features between blenders and juicers is their ability to process a wide variety of ingredients. Both appliances are versatile in their own right:
Blenders are known for their ability to blend and mix ingredients into smooth and consistent textures. They can handle fruits, vegetables, ice, yogurt, and more, making them ideal for creating smoothies, soups, sauces, and even nut butters.
Juicers, on the other hand, are specialized in extracting the liquid content from fruits and vegetables, leaving behind the pulp. However, many modern juicers come with additional features that allow them to process soft ingredients, such as making frozen fruit sorbets or nut milk.
2. Nutrient Retention:
Both blenders and juicers have the potential to help you retain the nutrients present in your ingredients, albeit in different ways:
Blenders retain the entire fruit or vegetable, including the pulp and fiber. This means that you'll consume all the nutrients present in your ingredients, promoting a high-fiber, whole-food approach to nutrition.
Juicers excel in extracting concentrated juice from produce, which can be easier to digest and absorb quickly. While some fiber is lost in the juicing process, the resulting juice is rich in vitamins, minerals, and antioxidants.
3. Creativity in the Kitchen:
Blenders and juicers both encourage culinary experimentation and creativity:
Blenders allow you to blend various ingredients together, giving you the flexibility to create a wide range of recipes, from creamy soups to fruity smoothie bowls.
Juicers provide the opportunity to craft unique juice blends by combining different fruits and vegetables. You can create custom juice recipes tailored to your taste preferences and nutritional needs.
4. Easy Cleanup:
Both blenders and juicers have become more user-friendly in terms of cleanup:
Blenders usually have removable parts that are easy to wash, and many are dishwasher-safe. Cleaning a blender typically involves rinsing the jar and disassembling the blade for thorough cleaning.
Juicers often have removable components that can be quickly cleaned under running water. Some models even come with cleaning brushes to assist in removing pulp residue.
5. Health and Wellness:
Both appliances contribute to a healthy lifestyle:
Blenders enable you to incorporate more fruits and vegetables into your diet, promoting overall health and well-being. The fiber content in blended beverages supports digestive health.
Juicers offer a convenient way to consume a concentrated dose of vitamins and minerals from fresh produce. Freshly juiced fruits and vegetables can boost your energy and support your immune system.
In conclusion, while blenders and juicers have distinct purposes, they share common features that make them valuable additions to any kitchen. Whether you're blending up a nutrient-packed smoothie or juicing for a quick energy boost, both appliances have their place in helping you achieve your culinary and wellness goals. Understanding their shared features empowers you to make the most of these versatile kitchen tools.
0 notes
Text
Crafting Creamy Delights: How to Make Ice Cream at Home
There's something incredibly satisfying about indulging in a scoop of rich, creamy ice cream, especially when it's homemade. While you might think that making ice cream at home requires fancy equipment or advanced culinary skills, the truth is that it can be a delightful and straightforward process. In this guide, we'll take you through the steps to create your own mouthwatering ice cream right in your kitchen.
Ingredients You'll Need
For the Base:
2 cups heavy cream
1 cup whole milk
3/4 cup granulated sugar
1 tablespoon pure vanilla extract
For Flavor Variations:
Chocolate chips, fruit puree, crushed cookies, or any other mix-ins you desire.
Equipment You'll Need
A mixing bowl
Whisk
Ice cream maker (optional, but recommended)
Freezer-safe container with a lid
Plastic wrap
Step 1: Prepare the Base
In a mixing bowl, whisk together the heavy cream and whole milk until well combined.
Gradually add the granulated sugar while continuing to whisk until the mixture is smooth and the sugar is fully dissolved.
Stir in the pure vanilla extract to add a delightful, aromatic flavor to your ice cream base.
Step 2: Customize Your Flavor
This is where you can get creative with your ice cream. Decide on your favorite flavors and mix-ins. Here are some ideas:
For classic vanilla ice cream, you're all set with the vanilla extract.
Add chocolate chips or chunks for a decadent chocolate chip ice cream.
Swirl in fruit puree for a refreshing fruit-flavored ice cream.
Crushed cookies, candies, or nuts make for fantastic mix-ins.
Fold your chosen flavorings into the ice cream base until they're evenly distributed.
Step 3: Chill the Mixture
Cover the bowl with plastic wrap, ensuring it touches the surface of the ice cream mixture to prevent ice crystals from forming. Refrigerate the mixture for at least 2 hours, or overnight if possible. This chilling period allows the flavors to meld and ensures a smoother, creamier texture.
Step 4: Churn Your Ice Cream
If you have an ice cream maker:
Set up your ice cream maker according to the manufacturer's instructions.
Pour the chilled mixture into the machine and churn for about 20-25 minutes, or until it reaches a soft-serve consistency.
If you don't have an ice cream maker:
Pour the chilled mixture into a freezer-safe container.
Place the container in the freezer and let it sit for about 45 minutes.
Remove the container from the freezer and vigorously stir the mixture with a fork or whisk to break up any ice crystals.
Return the container to the freezer and repeat the stirring process every 30 minutes for 2-3 hours, or until the ice cream reaches the desired consistency.
Step 5: Freeze and Serve
Once your ice cream has reached the perfect texture, transfer it to a lidded, freezer-safe container. Seal it tightly and freeze for a few more hours or overnight to firm up.
Now, you're ready to scoop and serve your homemade ice cream in your favorite bowls or cones. Top it with additional mix-ins, a drizzle of sauce, or fresh fruit for an extra special treat.
Enjoy the satisfaction of creating your very own creamy ice cream flavors, customized to your taste preferences, right from your own kitchen. Whether you savor it on its own, sandwiched between cookies, or served alongside your favorite desserts, your homemade ice cream is sure to delight your taste buds and impress your family and friends. So, get ready to scoop up happiness, one delicious spoonful at a time!
0 notes
Text
Bulletproof Coffee: What Is It and Why Is It Trending?

If you're a coffee enthusiast or health-conscious individual, you may have heard of the buzz surrounding Bulletproof Coffee. This unique coffee concoction has gained popularity in recent years, with claims of increased energy, improved mental clarity, and even weight loss benefits. But what exactly is Bulletproof Coffee, and why has it become such a trend? In this blog post, we'll dive into the world of Bulletproof Coffee, exploring its origins, ingredients, and the science behind its potential benefits.
The Origins of Bulletproof Coffee
Bulletproof Coffee was first popularized by Dave Asprey, an entrepreneur and biohacker, who discovered this energizing beverage while traveling in Tibet. Inspired by the Yak butter tea consumed by the locals, he decided to create his own version using coffee, butter, and coconut oil. Asprey claimed that this unique blend of ingredients provided sustained energy, mental clarity, and a feeling of fullness throughout the day.
What Is Bulletproof Coffee?
Bulletproof Coffee is a concoction made from high-quality coffee, grass-fed unsalted butter, and medium-chain triglyceride (MCT) oil or coconut oil. Here's a breakdown of its key components:
Coffee: High-quality, freshly brewed coffee is essential as the base for Bulletproof Coffee. The choice of coffee beans can significantly impact the flavor and quality of the final product.
Grass-Fed Butter: Unsalted, grass-fed butter is a primary ingredient that provides healthy fats and a creamy texture. Grass-fed butter is preferred because it contains higher levels of beneficial nutrients like omega-3 fatty acids and vitamins.
MCT Oil or Coconut Oil: Medium-chain triglycerides (MCTs) are a type of saturated fat that is easily absorbed and metabolized by the body. MCT oil or coconut oil adds a boost of energy and may aid in mental clarity.
The Science Behind Bulletproof Coffee Benefits
The purported benefits of Bulletproof Coffee are primarily attributed to its unique combination of fats and caffeine:
Sustained Energy: The healthy fats in the butter and MCT oil provide a slow-release source of energy, helping to avoid the energy crashes associated with some other morning beverages.
Mental Clarity: Some users report improved focus and mental clarity after consuming Bulletproof Coffee. This is believed to be due to the combination of caffeine and MCTs, which can enhance cognitive function.
Appetite Control: The fats in Bulletproof Coffee may help you feel full and satisfied, potentially reducing cravings and calorie intake.
Weight Management: Some proponents claim that Bulletproof Coffee can aid in weight loss by increasing the body's ability to burn fat for energy. However, more research is needed in this area.
How to Make Bulletproof Coffee
Making Bulletproof Coffee is relatively simple:
Brew a cup of high-quality coffee.
Add 1-2 tablespoons of grass-fed, unsalted butter.
Add 1-2 tablespoons of MCT oil or coconut oil.
Blend everything together until it becomes frothy and well-mixed.
Conclusion
Bulletproof Coffee has made a significant impact on the world of coffee and wellness, with many people incorporating it into their daily routines. While its potential benefits are intriguing, it's essential to remember that individual experiences may vary. If you're curious about Bulletproof Coffee, it's worth trying it for yourself to see if it enhances your energy, mental clarity, and overall well-being. As with any dietary change, consult with a healthcare professional if you have any concerns or underlying health conditions.
0 notes
Text
"Cuisinart Food Processor Always On – Why & What to Do?"

Cuisinart food processors are renowned for their reliability and efficiency in the kitchen, making meal preparation a breeze. However, what do you do when you encounter an issue where your Cuisinart food processor seems to be stuck in the "on" position? Don't worry; we've got you covered. In this article, we'll explore the possible reasons behind your Cuisinart food processor staying on and provide you with practical solutions to address this issue.
Common Reasons Your Cuisinart Food Processor Stays On
Before we dive into troubleshooting, let's understand some of the most common reasons why your Cuisinart food processor might appear to be stuck in the "on" mode:
Faulty Switch: One of the most straightforward explanations could be a malfunctioning power switch. Over time, switches can wear out or become loose, causing the processor to stay on.
Interlocked Parts: Many Cuisinart food processors come with safety features that prevent them from operating if certain parts are not correctly locked into place. If any of these parts are not properly engaged, it can cause the processor to remain on as a safety measure.
Lid and Bowl Issues: The processor's lid and bowl must be securely locked for it to operate. If there is an issue with the lid or bowl, the processor may not recognize that it is safe to turn off.
Motor Issues: In some cases, motor problems or electrical issues within the processor can cause it to stay on.
What to Do When Your Cuisinart Food Processor Stays On
Now that we've identified potential reasons, let's explore the steps to troubleshoot and resolve the issue:
Safety First: If your food processor is stuck in the "on" position, the first step is to unplug it from the power source to prevent any accidents.
Check the Switch: Examine the power switch for any damage, loose connections, or debris that might be causing it to stay on. If you find any issues, consider replacing the switch or consulting a professional.
Inspect Interlocked Parts: Ensure that all components, including the work bowl, lid, and pusher, are correctly locked into place. If any of these components are not secured, the processor may not turn off.
Reset the Processor: Some Cuisinart food processors have a reset button. Press this button to see if it resolves the issue. Refer to your user manual for the exact location of the reset button on your model.
Professional Assistance: If none of the above steps resolve the problem, it's advisable to contact Cuisinart customer support or a qualified technician for a thorough inspection and potential repair.
Preventing Future Issues
To prevent your Cuisinart food processor from getting stuck in the "on" position in the future, consider the following tips:
Regularly clean and maintain your food processor to ensure all parts are in good working condition.
Handle the components with care, as rough handling can lead to damage.
Follow the manufacturer's instructions for assembly and operation closely.
In conclusion, a Cuisinart food processor that remains on can be a frustrating issue, but with the right troubleshooting steps and a little patience, you can often identify and resolve the problem. Always prioritize safety and, if needed, seek professional assistance to ensure your food processor operates smoothly for many delicious meals to come.
0 notes
Text
"Debunking the Myth: The Truth About Blending Protein Powder"

Protein powder has become a staple in the diets of many fitness enthusiasts and health-conscious individuals. It's a convenient way to boost your protein intake, support muscle recovery, and meet your nutritional goals. However, there's a common misconception that protein powder must always be blended to be effective. In this article, we'll debunk this myth and explore the truth about blending protein powder.
The Purpose of Blending Protein Powder
Blending protein powder is a matter of personal preference and convenience, rather than an absolute necessity. Here are some reasons why people choose to blend their protein shakes:
Texture: Blending can create a smoother and creamier texture, which some individuals find more enjoyable.
Mixing Ingredients: Blending is convenient for mixing other ingredients with your protein powder, such as fruits, vegetables, yogurt, or milk, to create a well-balanced and flavorful shake.
Enhanced Dissolution: Blending can help the protein powder dissolve more completely, reducing the risk of clumps or a gritty texture.
Temperature Control: Blending with ice can make your shake colder and more refreshing.
While blending can offer these benefits, it's essential to understand that they are primarily related to taste and texture rather than the effectiveness of the protein itself.
Protein Powder Without Blending: Is it Effective?
The truth is that you can absolutely consume protein powder without blending it and still enjoy its benefits. Here's why:
Rapid Digestion: Most protein powders are designed to be easily digestible, meaning they dissolve well in liquid and are absorbed by your body quickly.
Shaker Bottles: Using a shaker bottle with a mixing ball or mesh screen can effectively mix your protein powder with water or milk. Simply add the liquid, protein powder, and shake vigorously.
Stirring: In a pinch, you can mix protein powder with a spoon or fork in a glass of liquid. It may take a bit more effort to dissolve completely, but it's entirely doable.
Ready-to-Drink Options: Many pre-packaged protein drinks are available and require no blending or mixing at all.
Tips for Enjoying Protein Powder without Blending
If you prefer not to blend your protein powder, consider these tips to enhance your experience:
Use a shaker bottle with a mixing ball or mesh screen for better mixing.
Add protein powder to your liquid gradually while stirring to prevent clumps.
Choose flavored protein powders to make your shake tastier without additional ingredients.
Opt for protein powders with fine textures for easier mixing.
Conclusion
Blending protein powder can certainly improve the taste and texture of your shakes, but it's not a requirement for enjoying the benefits of protein supplementation. Whether you choose to blend, shake, or stir your protein powder, what truly matters is getting the protein your body needs to support your fitness goals and overall health. So, feel free to debunk the myth that protein powder must always be blended and choose the preparation method that suits your lifestyle and taste preferences best.
0 notes
Text
"Mastering Your Culinary Creations: A Guide to the Cuisinart Smart Stick Variable Speed Hand Blender"

In the ever-evolving landscape of kitchen appliances, the Cuisinart Smart Stick Variable Speed Hand Blender stands as a versatile and indispensable tool for both professional chefs and home cooks alike. This sleek and powerful hand blender has earned its place in countless kitchens, thanks to its ability to simplify a wide range of culinary tasks. In this comprehensive guide, we'll delve into the world of the Cuisinart Smart Stick Variable Speed Hand Blender, exploring its features, practical uses, and how it can elevate your culinary creations to a new level of excellence.
The Art of Versatility: Features that Matter
The Cuisinart Smart Stick's design is a marriage of form and function. Its ergonomic grip handle ensures comfortable use even during extended blending sessions. The stainless steel blending shaft not only guarantees durability but also ensures easy cleanup, a crucial factor in busy kitchens. Here are some key features that make this hand blender a kitchen favorite:
1. Variable Speed Control
At the heart of the Cuisinart Smart Stick is its variable speed control. With a simple twist of the knob, you have precise control over the blending speed. Whether you're aiming for a gentle stir or high-speed blending, this feature allows you to adapt to the specific requirements of your recipe.
2. Versatile Attachments
One of the hand blender's strengths is its versatility, thanks to the array of attachments it comes with:
Blending Wand: The workhorse of the hand blender, ideal for creating silky-smooth soups, sauces, and beverages.
Whisk Attachment: Perfect for whipping cream, beating eggs, and achieving fluffy batters for pancakes and more.
Chopper Attachment: A handy tool for chopping herbs, nuts, vegetables, and even small amounts of meat with precision.
3. Effortless Cleanup
The Cuisinart Smart Stick is designed with convenience in mind. Most of its attachments are dishwasher safe, and the stainless steel blending shaft can be swiftly cleaned with a rinse or wipe. Its detachable design ensures thorough cleaning without the fuss.
The Culinary Possibilities: Practical Uses in Your Kitchen
Now that we've explored its features, let's uncover the practical uses of the Cuisinart Smart Stick Variable Speed Hand Blender:
1. Soups and Sauces
Creating velvety soups and sauces has never been easier. With the hand blender's precise control and blending wand, you can achieve the perfect consistency for your dishes effortlessly.
2. Smoothies and Beverages
Whip up nutritious and delicious smoothies in seconds. The variable speed control allows you to blend to your desired texture, making it an excellent choice for health-conscious individuals.
3. Batters and Whipped Cream
Achieve bakery-quality results with the whisk attachment. From pancake batter to homemade whipped cream, this attachment ensures flawless, consistent results every time.
4. Chopping and Food Prep
The chopper attachment is a time-saving tool for chopping herbs, vegetables, nuts, and small quantities of meat with precision, reducing the need for manual chopping.
Conclusion: Elevate Your Culinary Creations
The Cuisinart Smart Stick Variable Speed Hand Blender has rightfully earned its place in modern kitchens. Its blend of ergonomic design, variable speed control, and versatile attachments simplifies your cooking process and empowers you to explore a wide range of culinary creations.
So, whether you're a seasoned chef or a passionate home cook looking to take your culinary adventures to new heights, consider the Cuisinart Smart Stick Variable Speed Hand Blender as your trusted kitchen companion. Master your culinary creations with this invaluable tool and discover the joy of effortless blending, whipping, and chopping in your own kitchen.
0 notes
Text
"Ninja NJ601AMZ Professional Blender: Unveiling Its Capabilities"

In the realm of kitchen appliances, blenders play a crucial role in simplifying various culinary tasks. When it comes to blending power and versatility, the Ninja NJ601AMZ Professional Blender often stands out as a formidable contender. If you're on the hunt for a blender that can handle everything from smoothies to sauces with ease, this review will unveil the capabilities of the Ninja NJ601AMZ and help you determine if it's worthy of a spot in your kitchen.
Key Features:
1000-Watt Motor: The Ninja NJ601AMZ is equipped with a robust 1000-watt motor, providing ample power to tackle a wide range of blending tasks.
Total Crushing Blades: Ninja's Total Crushing Blades are designed to crush ice, pulverize frozen fruits, and blend ingredients to a smooth consistency, ensuring consistent results.
72-Ounce Pitcher: The blender comes with a generous 72-ounce pitcher, making it suitable for blending large batches of drinks or soups for the whole family.
Variable Speed Control: With multiple speed settings, you have precise control over the blending process, allowing you to achieve the desired texture for your recipes.
Pulse Function: The pulse function provides short bursts of power for tasks like chopping, blending, or creating chunky textures.
Performance:
The Ninja NJ601AMZ Professional Blender lives up to its name with impressive performance. The 1000-watt motor is a workhorse, effortlessly handling everything from crushing ice for refreshing drinks to blending silky-smooth soups and sauces.
One of the standout features of this blender is its Total Crushing Blades. These blades are designed to pulverize ice and frozen ingredients, making it an ideal choice for creating creamy smoothies and frozen treats. You can also count on them to effortlessly break down fibrous fruits and vegetables for nutrient-packed beverages.
The variable speed control is a valuable tool for achieving the perfect texture for your recipes. Whether you're aiming for a velvety soup or a chunky salsa, you can fine-tune the speed to suit your needs.
The pulse function is another asset, especially for tasks that require short bursts of blending. It's handy when you want to incorporate ingredients evenly or when you're creating a textured sauce or dip.
Versatility:
The Ninja NJ601AMZ is not limited to just smoothies and frozen drinks. Its versatility extends to:
Hot Soups: The blender's powerful motor can handle hot ingredients, allowing you to blend and heat soups right in the pitcher.
Dips and Sauces: Whether you're making a creamy dip for a party or a flavorful sauce for pasta, this blender can handle it all.
Frozen Desserts: Create homemade ice cream or sorbet by blending frozen fruits and other ingredients.
Value:
Considering its performance, versatility, and the fact that it can replace multiple kitchen appliances, the Ninja NJ601AMZ Professional Blender offers great value for your investment. Its durability and reliability ensure that it will serve you well for years to come.
In conclusion, the Ninja NJ601AMZ Professional Blender is a powerhouse in the world of blenders. Its powerful motor, Total Crushing Blades, and variable speed control make it a versatile and reliable kitchen companion. Whether you're a smoothie enthusiast, a home cook, or someone who enjoys experimenting with culinary creations, this blender is more than worthy of a place in your kitchen. It's a worthy investment that can elevate your culinary adventures to new heights.
0 notes