
Last Seen Blogs

aloysius9822
Justin Aloysius

myamazingkosmos
Everyday art and beauty

alexraito-blog
ALEX RAITO

stormingrose
†††††††††††

uncutrequired
Uncut Cocks RULE!
Text
Καφές Κέτο με Σταγόνες Στέβιας SweetLeaf: Η Απόλυτη Υγιεινή Απόλαυση

Η κετογονική διατροφή κερδίζει συνεχώς έδαφος ως μια από τις πιο αποτελεσματικές μεθόδους για απώλεια βάρους και βελτίωση της υγείας. Αν αναζητάτε έναν τρόπο να απολαμβάνετε τον καφέ σας χωρίς ενοχές, ο Καφές Κέτο με Σταγόνες Στέβιας SweetLeaf είναι η ιδανική λύση. Ας ανακαλύψουμε μαζί τα οφέλη και τη διαδικασία παρασκευής αυτού του μοναδικού ροφήματος.
Τι είναι ο Καφές Κέτο;
Ο καφές κέτο είναι ένας καφές φτιαγμένος ειδικά για όσους ακολουθούν την κετογονική δίαιτα. Περιέχει υψηλά λιπαρά, χαμηλούς υδατάνθρακες και μπορεί να περιλαμβάνει συστατικά όπως βούτυρο, λάδι καρύδας ή MCT oil. Αυτός ο συνδυασμός βοηθά στην αύξηση της ενέργειας και στην προώθηση της καύσης λίπους.
Γιατί να επιλέξετε Σταγόνες Στέβιας SweetLeaf;
Οι σταγόνες στέβιας SweetLeaf είναι μια φυσική γλυκαντική ουσία που δεν περιέχει θερμίδες και δεν επηρεάζει τα επίπεδα σακχάρου στο αίμα. Αυτό τις καθιστά ιδανικές για την κετογονική δίαιτα, καθώς μπορείτε να απολαμβάνετε τη γλυκύτητα χωρίς τους επιπλέον υδατάνθρακες. Επιπλέον, οι σταγόνες SweetLeaf έχουν εξαιρετική γεύση χωρίς την πικρή επίγευση που πολλές φορές συνοδεύει άλλα γλυκαντικά.
Πώς να Φτιάξετε τον Ιδανικό Καφέ Κέτο με Σταγόνες Στέβιας SweetLeaf
Ακολουθεί μια απλή και γρήγορη συνταγή για να φτιάξετε τον καφέ σας:
Υλικά:
• 1 φλιτζάνι φρεσκοψημένο καφέ
• 1-2 κουταλιές της σούπας βούτυρο ή λάδι καρύδας
• 1 κουταλιά της σούπας MCT oil (προαιρετικά)
• Μερικές σταγόνες στέβιας SweetLeaf (κατά προτίμηση)
Εκτέλεση:
1. Φτιάξτε τον καφέ σας όπως συνήθως.
2. Προσθέστε το βούτυρο ή το λάδι καρύδας και το MCT oil στον καφέ.
3. Προσθέστε τις σταγόνες στέβιας SweetLeaf.
4. Ανακατέψτε καλά με ένα μίξερ χειρός ή ένα blender μέχρι να γίνει ομοιογενές το μείγμα και να αποκτήσει μια κρεμώδη υφή.
Οφέλη του Καφέ Κέτο με Σταγόνες Στέβιας SweetLeaf
• Αύξηση Ενέργειας: Τα υγιεινά λιπαρά προσφέρουν σταθερή και μακροχρόνια ενέργεια.
• Βοήθεια στην Απώλεια Βάρους: Ο καφές αυτός μπορεί να σας βοηθήσει να παραμείνετε σε κατάσταση κέτωσης, προωθώντας την καύση λίπους.
• Βελτίωση της Συγκέντρωσης: Η συνδυαστική δράση καφεΐνης και MCT oil μπορεί να βελτιώσει τη νοητική σας διαύγεια.
• Χαμηλή Περιεκτικότητα σε Υδατάνθρακες: Με τις σταγόνες στέβιας SweetLeaf, απολαμβάνετε τη γλυκύτητα χωρίς τους υδατάνθρακες.
Ο Καφές Κέτο με Σταγόνες Στέβιας SweetLeaf είναι η απόλυτη υγιεινή απόλαυση για κάθε στιγμή της ημέρας. Δοκιμάστε τον σήμερα και νιώστε τη διαφορά στην ενέργειά σας και στη γενικότερη υγεία σας. Συνδυάστε τον με την αγαπημένη σας πρωινή ρουτίνα ή απολαύστε τον ως ένα απόγευματινό ρόφημα για να παραμείνετε γεμάτοι ενέργεια και υγεία όλη μέρα.
#Keto#Coffee#SweetLeaf#Stevia#Drops#Low#Carb#Diet#Healthy#Sugar-Free#Ketogenic#Recipes#Friendly#Lifestyle#Weight#Loss
0 notes
Text
Кето кафе - какво е това?

Кето кафето, известно още като bulletproof кафе, е нещо повече от обикновена чаша кафе. Това е напитка, която съчетава висококачествени мазнини и кафе, за да предостави енергия и умствена яснота през целия ден. В тази статия ще разгледаме какво представлява кето кафето, какви са неговите ползи и как да го приготвите у дома.
Какво е кето кафе?
Кето кафето се състои от прясно сварено кафе, несолено масло или гхи, и MCT масло или кокосово масло. Тази уникална комбинация е специално създадена за хора, следващи кето диетата, която е нисковъглехидратна и високомазнинна диета. Основната идея е да се доставят на организма мазнини, които да бъдат използвани като основен източник на енергия, вместо въглехидрати.
Ползи от кето кафето
Продължителна енергия без сривове: Кето кафето осигурява стабилна енергия през целия ден, без обичайните сривове, които се наблюдават при консумацията на захари и въглехидрати.
Подобрява умствената яснота и концентрация: Съставките в кето кафето подпомагат мозъчната функция и подобряват концентрацията и яснотата на мисълта.
Потиска апетита и намалява похапването: Високото съдържание на мазнини в кето кафето помага за потискане на апетита и намаляване на желанието за похапване между храненията.
Подпомага и поддържа кетозата: Кето кафето е идеален начин да поддържате кетозата – състоянието, при което организмът изгаря мазнини вместо въглехидрати за енергия.
Насърчава изгарянето на мазнини: Кето кафето спомага за изгарянето на мазнини като основен източник на енергия, което е основен принцип на кето диетата.
Как да приготвите кето кафе у дома
Приготвянето на кето кафе е изключително лесно и бързо. Ето как:
Необходими съставки:
1 чаша прясно сварено кафе
1-2 супени лъжици несолено масло или гхи
1-2 супени лъжици MCT масло или кокосово масло
Инструкции:
Започнете с прясно сварено кафе.
Добавете маслото и MCT маслото към горещото кафе.
Смесете всички съставки в блендер за около 20-30 секунди, докато се получи кремообразна и пяна текстура.
Вашето кето кафе е готово за консумация! Насладете се на тази вкусна и енергизираща напитка, която ще ви помогне да постигнете целите си в кето диетата.
Заключение
Кето кафето е перфектното решение за тези, които търсят начин да увеличат енергията си и да подобрят концентрацията си, докато следват кето диетата. Със своите множество ползи и лесно приготвяне, кето кафето бързо става любимо на много хора по света.
Не забравяйте да посетите нашия блог за още полезна информация и рецепти за кето диетата. Открийте перфектното решение за вашето здравословно хранене и начин на живот.
#КетоКафе #ЗдравословенЖивот #КетоДиета #Енергия #Кетоза #Здраве #НисковъглехидратнаДиета #BulletproofCoffee #ПолзиОтКето #КетоРецепти
#Keto#Coffee#Benefits#Bulletproof#High-Fat#Low-Carb#Ketogenic#Diet#Energy#Boosting#Mental#Clarity#Appetite#Suppressing#Ketosis#Support#Fat#Burning
0 notes
Text
How To Easily Cut A Watermelon

How to Easily Cut a Watermelon: A Step-by-Step Guide
Cutting a watermelon can often seem like a daunting task. With its large size and thick rind, it can be messy and cumbersome. However, with the right technique, you can cut a watermelon easily and efficiently, leaving you with perfect slices or cubes for your summer snacks. Here’s a step-by-step guide on how to cut a watermelon effortlessly.
Step 1: Gather Your Tools
Before you start, make sure you have the following tools:
A sharp chef’s knife
A large cutting board
A watermelon (obviously!)
A large bowl for the watermelon pieces
Step 2: Wash the Watermelon
It’s important to wash the outside of your watermelon thoroughly. This removes any dirt and bacteria that might be on the rind, preventing it from transferring to the flesh when you cut it.
Step 3: Cut Off Both Ends
Place the watermelon on your cutting board. Using your sharp chef’s knife, cut off both ends of the watermelon. This will create flat surfaces on each side, making it easier to handle and more stable when you’re cutting it.
Step 4: Slice the Watermelon in Half
Stand the watermelon upright on one of the flat ends. Carefully cut the watermelon in half lengthwise. You’ll now have two halves that are easier to manage.
Step 5: Cut Each Half into Quarters
Place each half of the watermelon flat side down on the cutting board. Cut each half in half again, so you have four quarters.
Step 6: Slice the Quarters into Eighths (Optional)
If you prefer smaller, more manageable pieces, you can cut each quarter in half again to create eighths. This is particularly useful if you’re serving a crowd or want smaller slices.
Step 7: Remove the Rind
Take one of the quarters (or eighths) and make a lengthwise cut between the rind and the flesh. Follow the curve of the watermelon to separate the rind from the flesh. Repeat this step for each piece.
Step 8: Cut into Slices or Cubes
Now that you have the rind removed, you can cut the watermelon flesh into your desired shape. For slices, simply cut the quarters or eighths crosswise. For cubes, cut the watermelon flesh into strips and then cut those strips crosswise into cubes.
Step 9: Store or Serve
Place your watermelon slices or cubes into a large bowl. If you’re not serving the watermelon immediately, cover the bowl with plastic wrap or a lid and store it in the refrigerator. Freshly cut watermelon is best enjoyed within a few days.
Tips for Cutting Watermelon Easily
Use a sharp knife: A sharp knife will make the cutting process smoother and safer.
Keep the watermelon cold: A cold watermelon is easier to cut and less likely to become mushy.
Cut on a stable surface: Ensure your cutting board is stable to prevent any accidents.
Conclusion
Cutting a watermelon doesn’t have to be a messy or difficult task. By following these simple steps, you can easily and efficiently cut a watermelon into perfect slices or cubes. Whether you’re preparing for a summer picnic, a refreshing snack, or a healthy dessert, knowing how to cut a watermelon properly will make your life much easier. Enjoy your perfectly cut watermelon!
youtube
#How#to#Cut#a#Watermelon#with#Slicer#cutting#water#melon#tip#life#hack#quick#demonstration#test#Knife#salad#chunk#chef#Archers#new#rival#the#real#fruit#ninja#challenge#21#seconds
0 notes
Text
Chicken Panje Pota

In this tasty video, we will direct you through the succulent procedure of creating a delicious Chicken Pota Recipe. If you are a fan of spicy and fragrant meals, then this Fry Chicken Pota Masala makes sure to turn into one of your favorites.
Our professional chef will reveal you step by step how to prepare this authentic Fry Pota Masala, which is loaded with rich tastes and textures. Beginning with tender chicken and hearty potatoes, this recipe combines the perfect mix of spices to develop a really rewarding meal.
From marinading the chicken to frying the potatoes to perfection, you will discover all the tricks of the trade to attain the ideal balance of flavors in this Fry Chicken Pota Recipe. The combination of succulent chicken and completely cooked potatoes, covered with an alluring blend of spices, will have your palate dancing with delight.
Whether you're hosting a dinner party or simply craving a hearty meal, this Chicken Pota Recipe is a fantastic option. The aromatic spices and fragrant herbs utilized in this recipe will fill your kitchen area with an irresistible aroma that will have everybody eagerly waiting on the meal to be served.
So, if you're ready to start a culinary adventure and impress your family and friends with a delightful Chicken Pota Recipe, then join us in this video tutorial. With our step-by-step instructions and useful suggestions, you'll be able to recreate this restaurant-style meal in the convenience of your own kitchen area.
Do not lose out on the opportunity to indulge in the flavors of this Fry Chicken Pota MAsala. Enjoy the video now and discover the secrets to creating this mouthwatering dish that will leave you craving for more.
Components:
-500 grams chicken pota (chicken gizzards).
-2 medium-sized onions, carefully sliced.
-2 tomatoes, pureed.
-2 green chilies, slit.
-1 tablespoon ginger-garlic paste.
-1 teaspoon turmeric powder.
-1 teaspoon red chili powder.
-1 teaspoon coriander powder.
-1/ 2 teaspoon garam masala powder.
- Salt to taste.
- Cooking oil.
Directions:.
1. Wash the chicken pota completely and drain pipes the excess water.
2. Heat oil in a pan or kadai over medium heat.
3. Add the chopped onions and sauté until golden brown.
4. Add the ginger-garlic paste and green chilies. Sauté for a minute till the raw odor vanishes.
5. Include the pureed tomatoes and cook till the oil separates from the masala.
6. Now, include the turmeric powder, red chili powder, coriander powder, and salt. Mix well and cook for another 2-3 minutes.
7. Add the cleaned up chicken pota to the masala mix and mix till the pota is well covered with the masala.
8. Decrease the heat to low, cover the pan, and let it prepare for about 15-20 minutes or till the chicken pota hurts, stirring sometimes.
9. As soon as the pota is cooked, spray garam masala powder and mix well.
10. Prepare for an extra 2-3 minutes to let the flavors mix together. Change the flavoring if required.
11. Get rid of from heat and serve hot with rice or roti.
Enjoy your delicious fry chicken pota masala!
youtube
0 notes
Text
Malwani Prawns Pulao Recipe

Introducing our mouthwatering recipe for Malwani Prawns Pulao - a delectable dish that will transport your taste buds straight to the coastal regions of Malwani! Made with love and packed full of flavors, this homemade dish is bound to leave you craving for more.
Our Malwani Prawns Pulao recipe showcases the traditional flavors and spices of the Malwan region, known for its rich seafood cuisine. This recipe combines succulent prawns with fragrant basmati rice, aromatic spices, and a blend of fresh herbs to create a truly irresistible dish.
To begin, we start by marinating the prawns in a flavorful mix of Malwani masala, turmeric, and lemon juice. This step ensures that the prawns are infused with the robust flavors of the spices, resulting in a truly delicious outcome.
Next, we prepare a fragrant base by sautéing onions, garlic, and ginger until golden and aromatic. We then add in the marinated prawns and cook them until they turn pink and tender. This step allows the prawns to absorb the flavors of the spices and develop a delightful taste.
Once the prawns are cooked to perfection, we add in the soaked basmati rice, along with a generous helping of coconut milk and water. The combination of coconut milk and spices creates a luscious and creamy texture, enhancing the overall taste of the pulao.
To elevate the flavors even further, we sprinkle in some freshly chopped coriander leaves and mint leaves. These herbs add a refreshing and vibrant touch to the dish, elevating it to a whole new level.
Finally, we allow the pulao to cook on low heat, allowing the rice to absorb all the flavors and become perfectly fluffy and aromatic. The end result is a tantalizing Malwani Prawns Pulao that is bursting with flavors and guaranteed to impress your family and friends.
Whether you're hosting a dinner party or simply looking to indulge in a flavorful seafood dish, our Malwani Prawns Pulao recipe is a must-try! With its authentic Malwani flavors and the perfect balance of spices, this dish is sure to become a family favorite.
So, what are you waiting for? Grab your apron and head to the kitchen to recreate this delightful Malwani Prawns Pulao recipe. Trust us, your taste buds will thank you!
Ingredients:
- 2 cups Basmati rice
- 300 grams prawns, cleaned and deveined
- 1 onion, finely chopped
- 2 tomatoes, finely chopped
- 2 green chilies, slit
- 1 tablespoon ginger-garlic paste
- 1 teaspoon turmeric powder
- 1 teaspoon red chili powder
- 1 teaspoon garam masala
- 1 teaspoon coriander powder
- 1/2 teaspoon cumin powder
- 1/4 cup coconut milk
- 2 tablespoons oil
- Salt to taste
- Fresh coriander leaves, for garnish
Instructions:
1. Rinse the basmati rice under cold water until the water runs clear. Soak the rice in water for 30 minutes, then drain and set aside.
2. Heat oil in a large pan or pot over medium heat. Add the chopped onions and sauté until golden brown.
3. Add the ginger-garlic paste and cook for a minute until the raw smell disappears.
4. Add the chopped tomatoes and green chilies. Cook until the tomatoes turn soft and mushy.
5. Add the turmeric powder, red chili powder, garam masala, coriander powder, cumin powder, and salt. Mix well and cook for a couple of minutes.
6. Add the cleaned prawns to the pan and cook for about 3-4 minutes until they turn pink and are cooked through.
7. Add the soaked and drained rice to the pan. Mix gently to coat the rice with the masala.
8. Pour in the coconut milk and 3 cups of water. Stir gently and bring the mixture to a boil.
9. Reduce the heat to low, cover the pan with a tight-fitting lid, and simmer for about 15-20 minutes until the rice is cooked and the liquid is absorbed.
10. Once the pulao is cooked, remove from heat and let it rest for 5 minutes. Fluff the rice gently with a fork.
11. Garnish with fresh coriander leaves and serve hot.
Enjoy your homemade Malwani Prawns Pulao!
youtube
0 notes
Text
Poosanikai Or White Pumpkin Halva
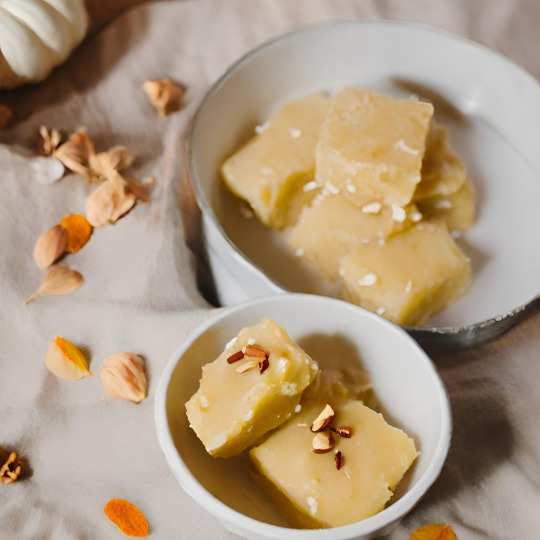
In this delightful blog, we bring you a step-by-step guide to making the traditional Indian dessert, Poosanikai Halva, also known as White Pumpkin Halva or Ash Gourd Halva. Made with the finest ingredients and bursting with flavors, this sweet treat is a must-try for all dessert lovers.
The Poosanikai Halva recipe showcases the unique taste of ash gourd, a versatile vegetable known for its high water content and subtle sweetness. We carefully peel and grate the ash gourd, extracting its essence to enhance the flavor profile of the halva.
Watch closely as we combine the grated ash gourd with a perfect blend of ghee, sugar, and cardamom powder, infusing the dish with aromatic notes and a rich, creamy texture. The heavenly aroma that fills the kitchen while cooking this halva is simply irresistible.
The blog demonstrates the simple cooking process, allowing you to follow along effortlessly. Our expert chef shares valuable tips and tricks to ensure your Poosanikai Halva turns out perfect every time. From achieving the right consistency to getting the balance of flavors just right, you'll learn all the secrets to create a memorable dessert experience.
Whether you're a seasoned chef or a beginner in the kitchen, this blog is your ultimate guide to mastering the art of Poosanikai Halva. Impress your family and friends with this delectable Indian sweet, perfect for festivals, special occasions, or simply as a delightful treat.
So, if you're craving a unique and flavorful dessert that will tantalize your taste buds, look no further than this Poosanikai Halva recipe. Indulge in the creamy goodness of ash gourd, and experience the joy of creating a traditional Indian sweet that will leave you wanting more.
Don't miss out on this incredible culinary adventure. Refer to this blog and Watch the video now to discover the secrets of making the mouthwatering Poosanikai Halva, also known as White Pumpkin Halva or Ash Gourd Halva.
Ingredients:
- 2 cups grated ash gourd (poosanikai or white pumpkin)
- 1 cup sugar
- 1/2 cup ghee (clarified butter)
- 1/2 cup milk
- 1/4 teaspoon cardamom powder
- 2 tablespoons chopped nuts (cashews, almonds, pistachios)
Instructions:
1. Start by grating the ash gourd (poosanikai or white pumpkin) using a grater. Remove any excess water from the grated ash gourd by squeezing it gently.
2. In a heavy-bottomed pan, heat the ghee over medium heat. Once the ghee melts, add the grated ash gourd and sauté for a few minutes until it turns translucent.
3. Add the milk to the pan and cook the mixture on low heat, stirring occasionally. This will help the ash gourd cook and soften further.
4. Once the ash gourd has cooked and the milk has evaporated, add sugar to the pan. Stir well to combine all the ingredients.
5. Continue cooking the mixture on low heat, stirring frequently to prevent it from sticking to the bottom of the pan. The sugar will melt and release water, creating a slightly liquid consistency.
6. Cook the mixture until the water evaporates and the halva starts to come together. It should become thick and glossy.
7. Add cardamom powder to the halva and mix well. This will enhance the flavor and aroma of the dish.
8. In a separate small pan, heat a tablespoon of ghee and roast the chopped nuts until they turn golden brown. This will add a crunchy texture and nutty flavor to the halva.
9. Add the roasted nuts to the halva and give it a final stir.
10. Remove the halva from heat and transfer it to a serving dish. Allow it to cool slightly before serving.
11. Serve the poosanikai or white pumpkin halva warm or at room temperature as a delicious dessert or sweet treat.
Enjoy your homemade Poosanikai or White Pumpkin Halva!
youtube
0 notes
Text
Bengali Small Fish Curry Recipe
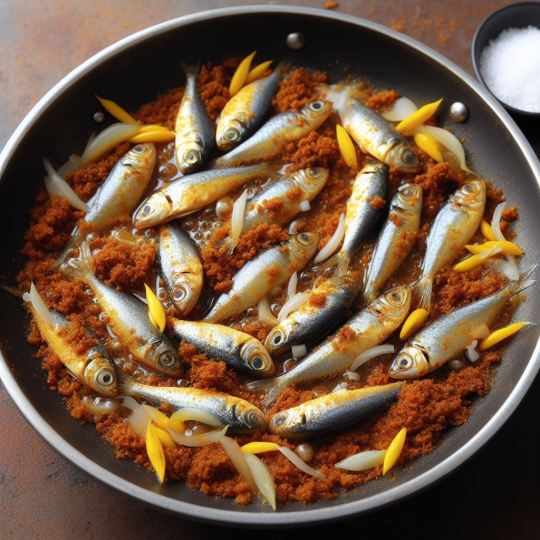
In this blog, we are going to take you on a culinary journey to the heart of Bengal, where we will be sharing a traditional Bengali Small Fish Curry Recipe prepared in a village-style kitchen. If you are a seafood lover or simply want to explore new flavors, this recipe is a must-try! Bengali cuisine is known for its rich and aromatic dishes, and this Small Fish Curry is no exception.
To start off, we will be using fresh small fish, which is a staple in Bengali households. The fish will be marinated with a blend of spices, including turmeric, cumin, coriander, and garam masala, which will infuse a burst of flavors into each bite.
Next, we will sauté onions and garlic to create a fragrant base for our curry. The addition of tomatoes and green chilies will add a tangy and spicy kick to the dish, balancing out the flavors.
Once the curry is simmering, we will carefully add the marinated fish, allowing it to cook gently in the flavorful sauce. The fish will absorb the spices, becoming tender and melt-in-your-mouth delicious.
To achieve an authentic village-style taste, we will be cooking our Bengali Small Fish Curry over an open flame, allowing the flavors to intensify and develop a smoky aroma.
This recipe is not only packed with flavor but also offers various health benefits. Small fish are a great source of Omega-3 fatty acids, protein, and essential nutrients, making this dish a nutritious addition to your mealtime.
Whether you are a Bengali food enthusiast or simply looking to expand your culinary horizons, this Bengali Small Fish Curry Recipe will transport you to the vibrant and flavorful world of Bengali cuisine.
So, join us on this gastronomic adventure and learn how to create this mouthwatering dish that will surely impress your family and friends. Don't forget to like, share, and subscribe to our channel for more authentic recipes like this one. Enjoy!
Ingredients:
- 500 grams small fish (such as hilsa, rohu, or catfish)
- 2 onions, finely chopped
- 4 garlic cloves, minced
- 1-inch piece of ginger, grated
- 2 green chilies, slit lengthwise
- 2 tomatoes, chopped
- 1 teaspoon turmeric powder
- 1 teaspoon red chili powder
- 1 teaspoon cumin powder
- 1 teaspoon coriander powder
- 1 teaspoon garam masala powder
- Salt to taste
- Fresh coriander leaves, chopped (for garnish)
- Mustard oil for cooking
Instructions:
1. Clean and wash the small fish thoroughly. Pat them dry with a kitchen towel and set aside.
2. Heat mustard oil in a pan or kadai over medium heat. Once hot, add the chopped onions and sauté until golden brown.
3. Add minced garlic, grated ginger, and slit green chilies to the pan. Sauté for a minute until the raw smell disappears.
4. Add the chopped tomatoes to the pan and cook until they turn mushy and soft.
5. Reduce the heat to low and add turmeric powder, red chili powder, cumin powder, coriander powder, and salt. Mix well and cook for a minute.
6. Add the small fish to the pan and gently coat them with the masala mixture. Be careful not to break the fish.
7. Cover the pan and cook for about 10-12 minutes, or until the fish is cooked through and tender. Keep stirring occasionally to prevent sticking.
8. Sprinkle garam masala powder over the curry and mix gently. Cook for another 2 minutes to allow the flavors to meld together.
9. Remove from heat and garnish with freshly chopped coriander leaves.
10. Serve the Bengali small fish curry hot with steamed rice or roti. Enjoy the village-style flavors!
Note: Adjust the spice levels according to your taste preferences. You can also add a squeeze of lemon juice for a tangy twist.
youtube
0 notes
Text
Chicken Keto Casserole

This mouthwatering Chicken Keto Casserole recipe is perfect for various occasions. Whether you're looking for a delicious weeknight dinner, a crowd-pleasing potluck dish, or a flavorful option for your next family gathering, this homemade Chicken Keto Casserole has got you covered.
Packed with tender chicken, savory spices, and a creamy, cheesy sauce, this casserole is not only incredibly satisfying but also fits perfectly into a keto diet. It's low in carbs and high in healthy fats, making it a great option for those following a ketogenic lifestyle.
To prepare this Chicken Keto Casserole, you'll start by browning the chicken in a skillet until it's cooked through and golden brown. While the chicken is cooking, you can prepare the creamy sauce by combining keto-friendly ingredients like heavy cream, cream cheese, and grated cheddar cheese. This sauce adds a rich and indulgent flavor to the casserole.
Once the chicken is cooked, simply layer it in a baking dish with your choice of low-carb vegetables, such as broccoli or cauliflower. Pour the creamy sauce over the chicken and vegetables, making sure everything is evenly coated. Top it off with some additional grated cheese for an extra cheesy finish.
Bake the casserole in the oven until it's bubbly and the cheese is melted and golden. The result is a comforting and flavorful dish that will satisfy your cravings while keeping you on track with your keto goals.
This Chicken Keto Casserole is not only delicious, but it's also versatile. You can customize it by adding your favorite keto-friendly ingredients like bacon, mushrooms, or spinach. It's a great way to use up any leftovers or incorporate different flavors into your meal.
So, whether you're hosting a dinner party, attending a potluck, or simply looking for a comforting meal, this Chicken Keto Casserole is a must-try. Its flavorful combination of tender chicken, creamy sauce, and low-carb vegetables will leave you wanting more. Give it a try today and enjoy a delicious keto-friendly dish that everyone will love.
Ingredients:
- 2 pounds chicken breasts, cooked and shredded
- 1 cup broccoli florets
- 1 cup cauliflower florets
- 1/2 cup diced bell peppers
- 1/2 cup diced onions
- 2 cloves garlic, minced
- 1 cup grated cheddar cheese
- 1/2 cup grated Parmesan cheese
- 1/2 cup heavy cream
- 1/4 cup mayonnaise
- 2 tablespoons olive oil
- 1 teaspoon dried thyme
- 1 teaspoon dried oregano
- Salt and pepper to taste
Instructions:
1. Preheat your oven to 375°F (190°C).
2. In a large skillet, heat the olive oil over medium heat. Add the diced onions and bell peppers, and sauté until they become soft and translucent.
3. Add the minced garlic and cook for an additional minute.
4. Add the broccoli and cauliflower florets to the skillet, and cook until slightly tender.
5. In a separate bowl, mix together the heavy cream, mayonnaise, dried thyme, dried oregano, salt, and pepper.
6. In a greased casserole dish, layer half of the cooked chicken, followed by half of the vegetable mixture.
7. Pour half of the cream mixture over the chicken and vegetables, and sprinkle half of the cheddar and Parmesan cheese on top.
8. Repeat the layers with the remaining chicken, vegetables, cream mixture, and cheeses.
9. Cover the casserole dish with aluminum foil and bake for 20 minutes.
10. Remove the foil and continue baking for an additional 15-20 minutes, or until the cheese is melted and golden brown.
11. Let the casserole cool for a few minutes before serving.
Enjoy your delicious Chicken Keto Casserole, perfect for any occasion!
youtube
0 notes
Text
Restaurant Style Paneer Bhuna Masala
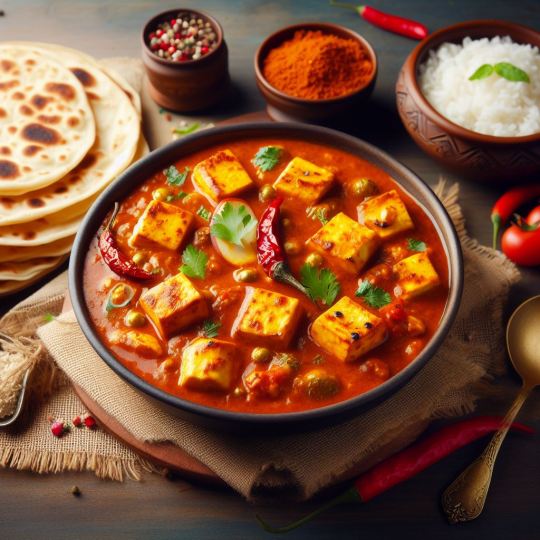
In this exciting blog, we bring you the authentic and tantalizing recipe of Restaurant Style Paneer Bhuna Masala. Get ready to indulge in the rich flavors of this classic dish that will transport you straight to the bustling streets of India.
Our skilled chef takes you through the step-by-step process of creating this delectable vegetarian dish. Using the finest ingredients and traditional spices, we ensure that every bite bursts with a perfect balance of flavors.
The star of this recipe is the paneer, a soft and creamy Indian cheese that absorbs the aromatic spices beautifully. We show you how to prepare the paneer in the restaurant style, where it is first marinated and then pan-fried to perfection, resulting in a delightful texture and taste.
The Bhuna Masala, a fragrant and spicy tomato-based curry, is the perfect companion for the paneer. We reveal the secret behind achieving that authentic Dhabha taste, with the right combination of spices and slow cooking techniques.
As you read through this blog and the video that follows, you will be mesmerized by the sizzling sounds, vibrant colors, and enticing aromas that fill your screen. Our detailed instructions and useful tips will help you recreate this iconic Dhabha Style Paneer Bhuna Masala in your own kitchen, impressing your family and friends with your culinary skills.
So, if you're craving a wholesome and flavorsome Indian dish that will transport you to the streetside Dhabhas, look no further. Sit back, relax, and join us on this flavorful journey as we present to you the ultimate Restaurabt Style Paneer Bhuna Masala recipe. Get ready to savor every bite and experience the true essence of Indian cuisine.
Ingredients:
- 250 grams paneer (cottage cheese), cut into cubes
- 2 onions, finely chopped
- 2 tomatoes, pureed
- 2 green chilies, slit lengthwise
- 1 tablespoon ginger-garlic paste
- 1 teaspoon cumin seeds
- 1 teaspoon coriander powder
- 1/2 teaspoon turmeric powder
- 1/2 teaspoon red chili powder
- 1/2 teaspoon garam masala
- 1/4 cup fresh cilantro leaves, chopped
- 2 tablespoons oil
- Salt to taste
Instructions:
1. Heat oil in a pan over medium heat. Add cumin seeds and let them splutter.
2. Add chopped onions and sauté until they turn golden brown.
3. Add ginger-garlic paste and green chilies. Sauté for a minute until the raw smell disappears.
4. Add the tomato puree and cook until the oil separates from the masala. This should take about 5-7 minutes.
5. Add coriander powder, turmeric powder, red chili powder, and salt. Mix well and cook for another minute.
6. Add the paneer cubes to the masala and gently mix to coat them with the spices. Be careful not to break the paneer cubes.
7. Cover the pan and let it cook for 5 minutes on low heat, allowing the flavors to blend together.
8. Sprinkle garam masala and chopped cilantro leaves on top. Mix well and cook for another minute.
9. Remove from heat and serve hot with roti, naan, or rice.
Enjoy your Restaurant Style Paneer Bhuna Masala!
youtube
0 notes
Text
Fry Chicken Pota Masala

In this delicious and flavorful video, we bring you an amazing Chicken Pota Recipe that will surely impress your taste buds. If you're a fan of fried chicken and love the rich flavors of masala, then this recipe is a must-try!Our Fry Chicken Pota Masala recipe is a tantalizing blend of succulent chicken and perfectly cooked potatoes, all coated in a delectable masala spice mix. This combination creates a mouthwatering dish that is sure to be a hit at any gathering or family meal.
To begin, we start by marinating the chicken pieces with a blend of aromatic spices and herbs. This step ensures that the chicken is infused with the flavors, resulting in a tender and juicy bite. We then fry the chicken until it turns golden brown and crispy, adding an irresistible texture to the dish.
Next, we move on to the star of the recipe - the potatoes. We cut them into bite-sized pieces and fry them to perfection. The potatoes soak up the flavors from the masala, making them incredibly flavorful and satisfying.
Once the chicken and potatoes are cooked, we combine them in a pan and add a generous amount of our homemade masala spice mix. This blend of spices, including cumin, coriander, turmeric, and paprika, adds a burst of flavor to the dish and takes it to a whole new level.
As the masala simmers with the chicken and potatoes, the flavors meld together, creating a heavenly aroma that will make your kitchen smell absolutely divine. The result is a Chicken Pota Masala that is bursting with flavor and guaranteed to satisfy even the most discerning palates.
Whether you're craving a hearty meal for lunch or want to impress your guests with a delicious dinner, our Fry Chicken Pota Masala recipe is the perfect choice. It's easy to make, requires simple ingredients that are readily available, and is guaranteed to be a crowd-pleaser.
So why wait? Treat yourself and your loved ones to this mouthwatering Chicken Pota Recipe today. Watch the video and follow along as we guide you step by step to create a dish that will leave everyone wanting more. Don't forget to subscribe to our channel for more delectable recipes like this one. Enjoy!
Ingredients:
- 500 grams chicken pota (gizzards)
- 2 tablespoons oil
- 1 onion, finely chopped
- 2 tomatoes, pureed
- 2 teaspoons ginger-garlic paste
- 1 teaspoon turmeric powder
- 1 teaspoon red chili powder
- 1 teaspoon coriander powder
- 1/2 teaspoon garam masala
- Salt to taste
- Fresh coriander leaves for garnish
Instructions:
1. Clean the chicken pota thoroughly and cut them into bite-sized pieces.
2. Heat oil in a pan and add the chopped onion. Saute until the onion turns golden brown.
3. Add the ginger-garlic paste and cook for a minute until the raw smell disappears.
4. Add the tomato puree and cook until the oil separates from the masala.
5. Now, add the turmeric powder, red chili powder, coriander powder, garam masala, and salt. Mix well.
6. Add the chicken pota pieces to the masala and coat them evenly.
7. Cover the pan and let the chicken pota cook on medium heat for about 15-20 minutes, stirring occasionally.
8. Once the chicken pota is cooked and tender, remove the lid and cook on high heat for a few minutes to dry up any excess moisture.
9. Garnish with fresh coriander leaves and serve hot with rice or roti.
Enjoy your delicious Fry Chicken Pota Masala!
youtube
0 notes
Text
How To Make Sugar Free Honey Candy

In this mouthwatering video, we're bringing you a delicious and guilt-free treat: Honey Candy Recipe No Sugar! If you're wondering how to make sugar-free hard candy without using sugar, then you're in for a sweet surprise.We all love indulging in candy, but sometimes the excessive sugar content can make us hesitant. But worry no more! This recipe breaks the traditional mold by replacing refined sugar with natural and wholesome honey, making it a perfect alternative for those looking to cut down on their sugar intake.
Join us as we take you through the step-by-step process of creating these delightful honey candies. We'll guide you from start to finish, ensuring that you have all the knowledge and skills to recreate this delectable treat in your own kitchen.
First, we'll explore the ingredients needed for this sugar-free delight. We'll discuss the different types of honey that work best for this recipe, ensuring that you choose the perfect one for your taste buds. We'll also touch upon other essential ingredients that will enhance the flavor and texture of our honey candies.
Once we have our ingredients sorted, we'll dive into the cooking process. We'll show you the exact measurements and techniques required to achieve that satisfyingly crunchy texture of hard candy. From heating the honey to the precise moment it reaches the desired consistency, we'll make sure you're equipped with all the tips and tricks to master this recipe.
Throughout the video, we'll provide helpful tips and alternatives for those with specific dietary preferences or restrictions. Whether you're following a low-sugar diet, have dietary restrictions, or simply want to explore new flavors, this honey candy recipe is a versatile and inclusive option for everyone.
But the fun doesn't end there! We'll also explore various ways to customize your honey candies. From adding natural flavors like citrus zest or extracts to incorporating colorful and edible decorations, we'll inspire you to get creative and make these candies uniquely yours.
So, if you're ready to embark on a sugar-free candy-making adventure, join us in this captivating video. With our comprehensive instructions, helpful tips, and the irresistible allure of honey, you'll soon be enjoying your very own batch of delectable Honey Candy Recipe No Sugar. Get ready to satisfy your sweet tooth guilt-free!
Ingredients:
- 1 cup honey
- 1 tablespoon lemon juice
- 1 teaspoon vanilla extract
- 1/2 teaspoon salt
- 1/2 teaspoon cream of tartar
- 1/2 teaspoon flavored extract (optional)
- Food coloring (optional)
Instructions:
1. Prepare a baking sheet by lining it with parchment paper or greasing it lightly with cooking spray.
2. In a medium-sized saucepan, combine the honey, lemon juice, vanilla extract, salt, and cream of tartar. Place the saucepan over medium heat.
3. Stir the mixture constantly until it reaches a temperature of 300°F (150°C) on a candy thermometer. This process may take around 10-15 minutes.
4. Once the mixture reaches the desired temperature, remove it from the heat and let it cool for a minute or two.
5. If you desire a specific flavor, add the flavored extract of your choice to the mixture and stir well. You can also add food coloring at this stage if desired.
6. Pour the mixture onto the prepared baking sheet, spreading it out evenly. Be careful as the mixture will be extremely hot.
7. Let the mixture cool completely at room temperature until it hardens. This may take approximately 1-2 hours.
8. Once the candy has hardened, you can break it into small pieces or use cookie cutters to create desired shapes.
9. Store the honey candy in an airtight container to maintain its freshness.
Note: Honey candy made without sugar may have a slightly different texture compared to traditional hard candy recipes. Adjustments to cooking time and temperature may be necessary based on your stove or desired candy consistency.
youtube
0 notes
Text
Lunch Box Paneer Bhurji Recipe
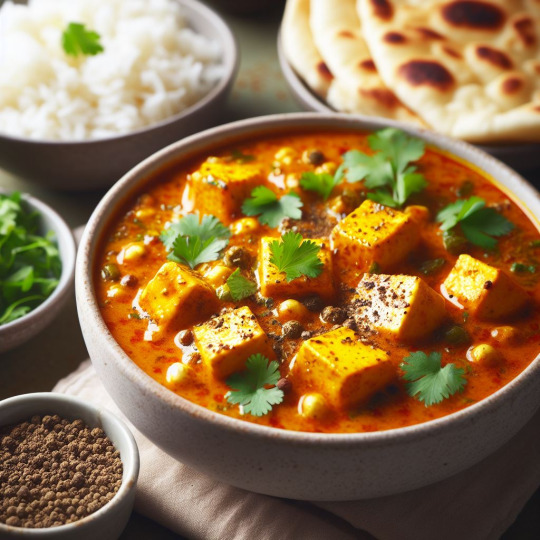
In this mouthwatering video, we bring you a delicious and authentic recipe for Paneer Bhurji Gravy, prepared in the popular Dhaba style. If you're a fan of paneer and crave a hearty and flavorful dish, then this Paneer Bhurji Gravy recipe is a must-try!
Paneer Bhurji Gravy is a popular Indian dish that combines crumbled paneer with a rich and aromatic gravy. This recipe is a perfect balance of spices, textures, and flavors, creating a delectable dish that will leave you wanting more. Whether you're a vegetarian or simply looking for a meat-free alternative, this Paneer Bhurji Gravy recipe is sure to impress.
To make this authentic Dhaba style Paneer Bhurji Gravy, we start by sautéing onions and tomatoes until they are soft and fragrant. Then we add a blend of spices like cumin, turmeric, coriander, and garam masala, which adds depth and complexity to the gravy. Next, we crumble the paneer and mix it in with the flavorful gravy, allowing it to absorb all the delicious flavors.
The result is a creamy and luscious Paneer Bhurji Gravy that pairs perfectly with hot rotis, naans, or rice. Each bite is a burst of flavors, with the paneer melting in your mouth and the gravy coating your palate with its tantalizing taste. This recipe is versatile and can be customized to suit your spice preferences, making it a favorite among both spice lovers and milder palates.
Whether you're cooking for a family dinner, a special occasion, or simply want to indulge in a comforting meal, this Paneer Bhurji Gravy recipe is the ultimate choice. With its authentic Dhaba style preparation and irresistible taste, it is sure to become a staple in your kitchen.
So why wait? Grab your apron and get ready to recreate this flavorful Paneer Bhurji Gravy recipe. With its combination of aromatic spices, creamy paneer, and a rich gravy, it's an absolute delight for your taste buds. Don't miss out on this mouthwatering dish - watch the video now and try it for yourself!
Ingredients:
- 200 grams paneer (cottage cheese), crumbled
- 1 large onion, finely chopped
- 2 medium tomatoes, finely chopped
- 2 green chilies, finely chopped
- 1 tablespoon ginger-garlic paste
- 1 teaspoon cumin seeds
- 1 teaspoon turmeric powder
- 1 teaspoon red chili powder
- 1 teaspoon garam masala
- 1 teaspoon coriander powder
- 1/2 teaspoon kasuri methi (dried fenugreek leaves)
- 2 tablespoons oil
- Salt to taste
- Fresh coriander leaves, chopped for garnish
Instructions:
1. Heat oil in a pan over medium heat. Add cumin seeds and let them splutter.
2. Add chopped onions and sauté until they turn golden brown.
3. Add ginger-garlic paste and green chilies. Cook for a minute until the raw smell disappears.
4. Add chopped tomatoes and cook until they become soft and mushy.
5. Add turmeric powder, red chili powder, coriander powder, and salt. Mix well.
6. Cook the masala for a few minutes until the oil starts to separate from the sides.
7. Add crumbled paneer to the pan. Mix well with the masala.
8. Crush the kasuri methi between your palms and sprinkle it over the paneer bhurji.
9. Cook for another 3-4 minutes, stirring occasionally, until the paneer absorbs the flavors of the masala.
10. Add garam masala and mix well. Cook for a minute.
11. Finally, garnish with fresh coriander leaves.
12. Serve hot with roti, paratha, or rice.
Enjoy your delicious Paneer Bhurji Gravy, prepared in the Dhaba style!
youtube
0 notes
Text
How To Make Ragda Pattice Recipe
Introducing our delicious and mouth-watering Ragda Pattice Recipe! If you're a fan of Indian street food or looking to try something new, then this recipe is a must-try.
Our step-by-step tutorial will guide you through the process of making authentic and flavorful Ragda Pattice right in the comfort of your own kitchen.
Ragda Pattice is a popular street food dish from Maharashtra, India. It consists of two main components - Ragda, a spicy curry made with white peas, and Pattice, which are crispy potato patties. The combination of these two elements creates an explosion of flavors and textures that will leave you craving for more.
In this video, we will show you how to make Ragda Pattice from scratch. We will start by preparing the Ragda, where we will cook the white peas with a blend of aromatic spices and herbs. The result is a thick and flavorful curry that will serve as the perfect base for our dish.
Next, we will move on to the Pattice. We will teach you the secret to making perfectly crispy and golden-brown potato patties. Our recipe includes a mix of mashed potatoes, bread crumbs, and spices, which are then shaped into patties and shallow-fried until they are beautifully crisp on the outside.
Once both the Ragda and Pattice are ready, we will show you how to assemble this delightful dish. We will plate the hot and crispy Pattice and generously pour the Ragda over them. To enhance the taste, we will top it off with an assortment of chutneys, finely chopped onions, and fresh coriander leaves.
Our Ragda Pattice Recipe is not only flavorful but also versatile. You can customize it to your liking by adding additional toppings such as grated cheese, sev (crunchy chickpea flour noodles), or even yogurt. The possibilities are endless!
So, whether you're hosting a gathering, looking for a delicious snack, or simply wanting to explore the world of Indian cuisine, our Ragda Pattice Recipe is the perfect choice. Follow along with our easy-to-follow instructions and discover the joy of preparing this authentic street food delicacy in the comfort of your own home.
Don't miss out on this amazing culinary experience! Watch our Ragda Pattice Recipe video now and get ready to indulge in a burst of flavors that will transport you straight to the streets of India.
Ingredients:
- 1 cup dried white peas
- 2 medium-sized potatoes, boiled and mashed
- 1 onion, finely chopped
- 1 tomato, finely chopped
- 2 green chilies, finely chopped
- 1 teaspoon ginger-garlic paste
- 1 teaspoon red chili powder
- 1 teaspoon cumin powder
- 1 teaspoon coriander powder
- 1/2 teaspoon turmeric powder
- Salt to taste
- Oil for frying
- Fresh coriander leaves, chopped for garnish
- Tamarind chutney and mint chutney for serving
For Patties:
- 2 medium-sized potatoes, boiled and mashed
- 1/2 teaspoon red chili powder
- 1/2 teaspoon cumin powder
- Salt to taste
- Bread crumbs for coating
Instructions:
1. Rinse the dried white peas and soak them overnight in water. Drain the water the next day.
2. In a pressure cooker, add the soaked peas along with enough water to cover them. Pressure cook for about 4-5 whistles or until the peas are soft and mushy.
3. Heat oil in a pan and add chopped onions. Sauté until they turn translucent.
4. Add ginger-garlic paste and sauté for a minute or until the raw smell disappears.
5. Add chopped tomatoes and cook until they become soft and mushy.
6. Add red chili powder, cumin powder, coriander powder, turmeric powder, and salt. Mix well.
7. Add the cooked peas to the pan and mix everything together. Mash the peas slightly while mixing.
8. Cook for a few minutes until the flavors blend well. If the mixture is too thick, add some water to adjust the consistency. Keep it aside.
9. In a separate bowl, combine the mashed potatoes, red chili powder, cumin powder, and salt. Mix well.
10. Divide the potato mixture into equal portions and shape them into flat round patties.
11. Coat each patty with bread crumbs and shallow fry them in a pan until golden brown on both sides.
12. Once the patties are ready, place them on a serving plate.
13. Pour the prepared ragda over the patties.
14. Garnish with chopped onions, green chilies, and fresh coriander leaves.
15. Serve hot with tamarind chutney and mint chutney.
Enjoy your homemade Ragda Pattice!
youtube
0 notes
Text
Easy Stuffed Cabbage Rolls Recipe

In this video, I will be sharing with you my easy and delicious Stuffed Cabbage Rolls recipe. If you love cabbage rolls, then you'll definitely want to try out this recipe!Cabbage rolls are a classic comfort food that is loved by many. They are made by rolling a flavorful meat and rice filling in cabbage leaves, and then simmering them in a rich tomato sauce. The result is a hearty and satisfying dish that is perfect for any occasion.
To make these Stuffed Cabbage Rolls, you will need a few simple ingredients. Ground beef (or any ground meat of your choice), cooked rice, onion, garlic, and a blend of spices are combined to create a delicious filling. The cabbage leaves are then blanched to make them pliable and easy to roll.
Once you have your filling ready and your cabbage leaves prepared, it's time to roll! Simply place a spoonful of the filling onto a cabbage leaf, fold in the sides, and roll it up tightly. Repeat this process with the remaining cabbage leaves and filling.
Next, the cabbage rolls are placed in a baking dish and covered with a flavorful tomato sauce. The sauce is made with tomatoes, onions, garlic, and a combination of herbs and spices. It's simmered until thick and then poured over the cabbage rolls.
Finally, the dish is baked in the oven until the cabbage rolls are cooked through and the flavors have melded together. The result is a mouthwatering dish that is sure to impress!
Whether you're looking for a comforting meal to enjoy on a cozy night in or you want to impress your friends and family with a delicious dinner, these Stuffed Cabbage Rolls are the perfect choice. They are easy to make, packed with flavor, and guaranteed to satisfy even the pickiest eaters.
So, if you're ready to try out a new recipe and indulge in a comforting and delicious meal, be sure to watch this video and learn how to make these amazing Stuffed Cabbage Rolls. You won't be disappointed!
Ingredients:
- 1 large head of cabbage
- 1 pound ground beef
- 1/2 cup cooked rice
- 1 small onion, finely chopped
- 2 cloves garlic, minced
- 1 egg
- 1 cup tomato sauce
- 1/4 cup brown sugar
- 1 tablespoon Worcestershire sauce
- Salt and pepper to taste
Instructions:
1. Fill a large pot with water and bring it to a boil. Carefully place the whole head of cabbage in the boiling water and cook for about 5-7 minutes, or until the outer leaves become soft and pliable. Remove the cabbage from the pot and let it cool.
2. In a mixing bowl, combine the ground beef, cooked rice, chopped onion, minced garlic, egg, salt, and pepper. Mix everything together until well combined.
3. Gently remove the softened cabbage leaves and carefully trim the thick center vein from each leaf.
4. Take a cabbage leaf and place a scoop of the ground beef mixture onto the center of the leaf. Roll the leaf tightly, tucking in the sides as you go. Repeat this process with the remaining cabbage leaves and filling.
5. In a large skillet, mix together the tomato sauce, brown sugar, and Worcestershire sauce. Place the cabbage rolls in the skillet, seam side down. Pour the remaining tomato sauce mixture over the cabbage rolls.
6. Cover the skillet and cook on low heat for about 1 hour, or until the cabbage rolls are tender and the flavors have melded together.
7. Serve the stuffed cabbage rolls hot, garnished with some additional tomato sauce if desired. Enjoy!
That's it! You now have a delicious recipe for stuffed cabbage rolls.
youtube
0 notes
Text
Easy Vegan Oreo Cheesecake To Make At Home

Check out this delicious Oreo Recipe Vegan! In this video, we will show you how to make an Easy Vegan Oreo Cheesecake using a homemade Oreo recipe. If you're a fan of Oreos and looking for a vegan-friendly dessert, then this recipe is perfect for you. Our homemade Oreo recipe ensures that you have a vegan alternative to the classic Oreo cookies, so you can enjoy this delectable cheesecake guilt-free. With simple ingredients and easy-to-follow steps, you'll be able to whip up this mouthwatering dessert in no time.
To start off, we'll guide you through the process of making the vegan Oreo cookies from scratch. You'll be surprised at how simple it is to recreate that iconic, chocolatey flavor without any animal products. Once the cookies are ready, we'll move on to making the creamy cheesecake filling, which is made with vegan cream cheese, coconut cream, and a touch of vanilla extract.
Our Oreo Recipe Vegan Cheesecake is not only delicious but also visually appealing. We'll show you how to layer the Oreo crust, creamy filling, and crushed Oreo cookies on top for an irresistible dessert that will impress your friends and family.
Whether you're a seasoned vegan or simply looking to try something new, this Oreo Recipe Vegan Cheesecake is a must-try. It's the perfect dessert for parties, gatherings, or simply as a treat to satisfy your sweet tooth.
So, what are you waiting for? Grab your ingredients, follow along with the video, and indulge in this heavenly Oreo Recipe Vegan Cheesecake. Don't forget to share this recipe with your fellow vegans and dessert enthusiasts. Happy baking!
Ingredients:
- For the Homemade Oreos:
- 1 cup all-purpose flour
- 1/2 cup unsweetened cocoa powder
- 1/2 teaspoon baking soda
- 1/4 teaspoon salt
- 1/2 cup vegan butter, softened
- 3/4 cup granulated sugar
- 1 teaspoon vanilla extract
- 1/4 cup non-dairy milk
- For the Cheesecake Filling:
- 2 cups raw cashews, soaked overnight and drained
- 1/2 cup coconut cream
- 1/4 cup maple syrup
- 1/4 cup melted coconut oil
- 2 teaspoons vanilla extract
- 1/2 cup crushed homemade Oreos
Instructions:
1. Preheat your oven to 350°F (175°C).
2. In a bowl, whisk together the flour, cocoa powder, baking soda, and salt for the homemade Oreos.
3. In a separate large bowl, cream together the vegan butter and sugar until light and fluffy. Add the vanilla extract and non-dairy milk, and mix well.
4. Gradually add the dry ingredients to the wet ingredients, mixing until a dough forms.
5. Roll out the dough between two sheets of parchment paper to about 1/4 inch thickness. Use a round cookie cutter to cut out the Oreo shapes. Place them on a baking sheet lined with parchment paper.
6. Bake the Oreos for 10-12 minutes, then transfer them to a wire rack to cool completely.
7. In a high-speed blender or food processor, combine the soaked cashews, coconut cream, maple syrup, melted coconut oil, and vanilla extract for the cheesecake filling. Blend until smooth and creamy.
8. Add the crushed homemade Oreos to the blender and pulse a few times to incorporate them into the cheesecake filling.
9. Pour the cheesecake filling into a prepared crust of your choice or directly into a lined springform pan.
10. Smooth the top with a spatula and tap the pan gently on the counter to remove any air bubbles.
11. Place the cheesecake in the refrigerator and let it set for at least 4-6 hours, or overnight.
12. Once set, remove the cheesecake from the pan and decorate the top with additional crushed homemade Oreos, if desired.
13. Slice, serve, and enjoy your delicious vegan Oreo cheesecake!
Note: The homemade Oreos can be enjoyed on their own or used in other recipes as well.
youtube
0 notes
Text
Pumpkin Cake Roll - Dutch Apron Bakery Style

Welcome to our channel, where today we have an exciting bakery review for you! In this video, we will be trying out the delectable Pumpkin & Red Velvet Cake Roll from Dutch Apron Bakery. Prepare to indulge in the perfect combination of autumn flavors and heavenly sweetness.The Dutch Apron Bakery Cake Roll is a true delight for the taste buds. Made with the finest ingredients, this cake roll is a testament to the bakery's commitment to quality. Each bite is a symphony of rich flavors and moist textures that will leave you craving for more.
The star of this review is the Pumpkin & Red Velvet Cake Roll. The pumpkin brings a warm and comforting essence, while the red velvet adds a touch of indulgence. Together, they create a match made in dessert heaven. Whether you are a fan of pumpkin or red velvet, this cake roll is sure to satisfy your sweet tooth.
The Dutch Apron Bakery Cake Roll is not only delicious but also visually stunning. With its vibrant colors and intricate design, it is a treat for both the eyes and the taste buds. It's the perfect centerpiece for any special occasion or a delightful treat to enjoy on a cozy evening.
Join us as we dive into this scrumptious creation and share our thoughts on the flavor, texture, and overall experience of the Dutch Apron Bakery Cake Roll - Pumpkin & Red Velvet. We'll explore every aspect of this cake roll, from its aroma to its presentation, and provide an honest review that will help you decide if it's the right dessert for you.
So, if you're a fan of Dutch Apron Bakery or simply love cake rolls, this is a video you don't want to miss. Sit back, relax, and join us on this mouthwatering journey. Get ready to savor the flavors of the season with the Dutch Apron Bakery Cake Roll - Pumpkin & Red Velvet. Don't forget to hit the like button and subscribe to our channel for more delicious reviews like this one.
Keywords: Dutch Apron Bakery Cake Roll, pumpkin & red velvet, bakery review, autumn flavors, indulgence, quality ingredients, moist textures, sweet tooth, visually stunning, special occasion, cozy evening, scrumptious creation, honest review, mouthwatering journey, flavors of the season.
Ingredients:
- 1 ½ cups all-purpose flour
- 1 teaspoon baking powder
- ½ teaspoon baking soda
- ½ teaspoon salt
- 1 teaspoon ground cinnamon
- ½ teaspoon ground nutmeg
- ½ teaspoon ground ginger
- ¼ teaspoon ground cloves
- 1 cup pumpkin puree
- 3 large eggs
- 1 cup granulated sugar
- ½ cup vegetable oil
- 1 teaspoon vanilla extract
- Powdered sugar, for dusting
For the Red Velvet Filling:
- 8 ounces cream cheese, softened
- ½ cup unsalted butter, softened
- 3 cups powdered sugar
- 1 teaspoon vanilla extract
- Red food coloring (optional)
Instructions:
1. Preheat your oven to 350°F (175°C). Grease and line a 10x15-inch jelly roll pan with parchment paper.
2. In a medium bowl, whisk together the flour, baking powder, baking soda, salt, cinnamon, nutmeg, ginger, and cloves. Set aside.
3. In a large mixing bowl, beat the eggs and granulated sugar until light and fluffy. Add the pumpkin puree, vegetable oil, and vanilla extract. Mix until well combined.
4. Gradually add the dry ingredients to the wet ingredients, mixing until just combined. Be careful not to overmix.
5. Pour the batter into the prepared jelly roll pan, spreading it evenly with a spatula. Bake in the preheated oven for 12-15 minutes, or until a toothpick inserted into the center comes out clean.
6. While the cake is baking, prepare the red velvet filling. In a mixing bowl, beat the cream cheese and butter until smooth and creamy. Gradually add the powdered sugar and vanilla extract, mixing until well combined. If desired, add a few drops of red food coloring to achieve a vibrant red color.
7. Once the cake is baked, remove it from the oven and let it cool in the pan for a few minutes. Then, carefully transfer it onto a clean kitchen towel or parchment paper.
8. Starting from one of the shorter sides, gently roll the cake and towel/parchment paper together into a log. Let it cool completely on a wire rack.
9. Once the cake has cooled, carefully unroll it. Spread the red velvet filling evenly onto the cake, leaving a small border around the edges.
10. Carefully roll the cake back up, removing the towel/parchment paper as you go. Place the cake roll on a serving platter, seam side down.
11. Dust the cake roll with powdered sugar for a finishing touch. Slice and serve!
Enjoy your delicious Dutch Apron Bakery Pumpkin & Red Velvet Cake Roll!
youtube
0 notes
Text
Pork Curry Made Indian Style

In this mouthwatering video, we bring you an authentic and easy-to-follow recipe for Pork Curry Indian Style. If you are a fan of bold and flavorful Indian cuisine, then this Tasty Pork Curry Recipe is a must-try!Our expert chef takes you on a culinary journey as he shares his secret tips and techniques for creating the most delicious East Indian Pork Curry. With the perfect balance of spices and a touch of Indian magic, this dish will surely tantalize your taste buds.
This Pork Curry Indian Style is a wonderful blend of tender pork pieces cooked in a rich and aromatic curry sauce. The combination of exotic spices such as turmeric, cumin, coriander, and garam masala, along with the sweetness of onions and tomatoes, creates a symphony of flavors that will leave you craving for more.
Whether you are a meat lover or simply looking to explore new flavors, this video will guide you through every step of the cooking process. From marinating the pork to sautéing the spices and simmering the curry, our chef's instructions are clear and easy to follow, making this recipe accessible for both beginners and experienced cooks.
With its vibrant colors, fragrant aromas, and irresistible taste, this Pork Curry Indian Style is perfect for any occasion. Whether you are planning a family dinner, hosting a party, or simply treating yourself to a delicious homemade meal, this dish will surely impress your guests and satisfy your cravings.
So, why wait? Grab your apron, gather your ingredients, and get ready to embark on a culinary adventure with this Easy East Indian Pork Curry recipe. Be prepared to indulge in a burst of flavors that will transport you straight to the heart of India.
Don't miss out on the opportunity to experience the true essence of Indian cuisine. Watch this video now and learn how to make this delectable Pork Curry Indian Style that will surely become a favorite in your household.
Ingredients:
- 500 grams of pork, cubed
- 2 onions, finely chopped
- 2 tomatoes, pureed
- 4 cloves of garlic, minced
- 1-inch piece of ginger, grated
- 2 green chilies, slit
- 1 teaspoon cumin seeds
- 1 teaspoon mustard seeds
- 1 teaspoon turmeric powder
- 2 teaspoons red chili powder
- 1 teaspoon coriander powder
- 1/2 teaspoon garam masala powder
- Salt to taste
- Fresh coriander leaves, chopped (for garnish)
- 2 tablespoons oil
Instructions:
1. Heat oil in a pan over medium heat. Add cumin seeds and mustard seeds. Let them splutter.
2. Add chopped onions and sauté until they turn golden brown.
3. Add minced garlic, grated ginger, and green chilies. Sauté for a minute until fragrant.
4. Add pork cubes to the pan and cook until they are browned on all sides.
5. Add turmeric powder, red chili powder, coriander powder, and salt. Mix well to coat the pork with the spices.
6. Pour in the tomato puree and stir to combine. Cook for a few minutes until the tomatoes are cooked and the mixture thickens.
7. Add enough water to cover the pork and bring it to a boil. Reduce the heat, cover the pan, and simmer for about 45 minutes to 1 hour until the pork is tender and cooked through.
8. Sprinkle garam masala powder over the curry and mix well.
9. Cook for an additional 5 minutes to allow the flavors to meld together.
10. Garnish with freshly chopped coriander leaves.
11. Serve the Pork Curry Indian Style hot with steamed rice or roti.
Enjoy your delicious Pork Curry!
0 notes