
documenting building my (@theenderwalker) technoblade cosplay for my BFA thesis exhibition!
Don't wanna be here? Send us removal request.
Statistics
We looked inside some of the posts by forgingtheblade and here's what we found interesting.
Average Info
Notes Per Post
63K
Likes Per Post
39K
Reblog Per Post
24K
Reply Per Post
130
Time Between Posts
6 days
Number of Posts By Type
Text
14
Note
2
Photo
1
Last Seen Tumblr Blogs


Fun Fact
Tumblr was attacked by a cross-site scripting worm deployed by the Internet troll group GNAA on Dec 3, 2012.
Text
7 notes
·
View notes
Note
love ur work btw, can i suggest something relating to technoblade's great potato war with im_a_squid_kid? because its the first thing that interested me as technoblade, if you don't mind...
I do actually have an idea for this! It was something I wanted to include but ran out of time, but I may still add it later down the line. I’m gonna do a plaque on the inside of the crown that’s the inscription of the Sun Tzu quote on the Potato Crown item from the end of the series!

I was considering having one of my friends do calligraphy of it in mandarin and then etching it in foam, and I just ran out of the time to actually make it. But it is in the plans!
30 notes
·
View notes
Note
Hey, idk if this is weird or overstepping or anything, but if you don't mind saying, where is the gallery that your Technoblade cosplay is at? I'm only asking because Katsucon is pretty close to me and so I figure I might actually be able to go see your Technoblade in person, and I'd really love to do that.
I’m unfortunately not local to the Katsu area :( Apologies!
14 notes
·
View notes
Text
tag list: taglist
@too-much-alphabet-soup , @embers-archive, @nothing-to-see-around-here , @pluralphilza , @aleeaviancrowalt , @islib , @ruffboijuliaburnsides , @delphionix , @fern1e


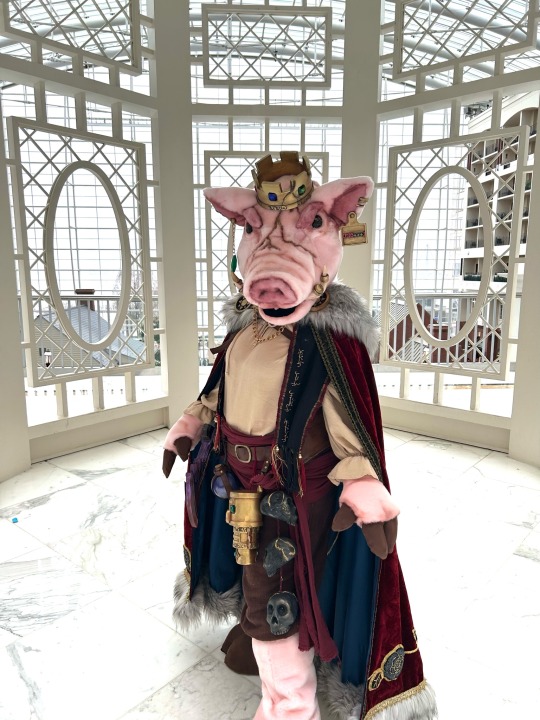
TECHNOBLADE IN THE GALLERY!!
The reception for my BFA thesis is TONIGHT! I’ve definitely fallen off of posting regularly here, but I will share process updates as soon as I have some more free time.
but HE’S FINALLY DONE!!!
10K notes
·
View notes
Text
TECHNOBLADE IN THE GALLERY!!
The reception for my BFA thesis is TONIGHT! I’ve definitely fallen off of posting regularly here, but I will share process updates as soon as I have some more free time.
but HE’S FINALLY DONE!!!
10K notes
·
View notes
Text
i forgor 💀
14 notes
·
View notes
Text
boar of strenght and boar of power
heavy training every hour
huge and fat my awesome pig
i make it large i make it big
40K notes
·
View notes
Text


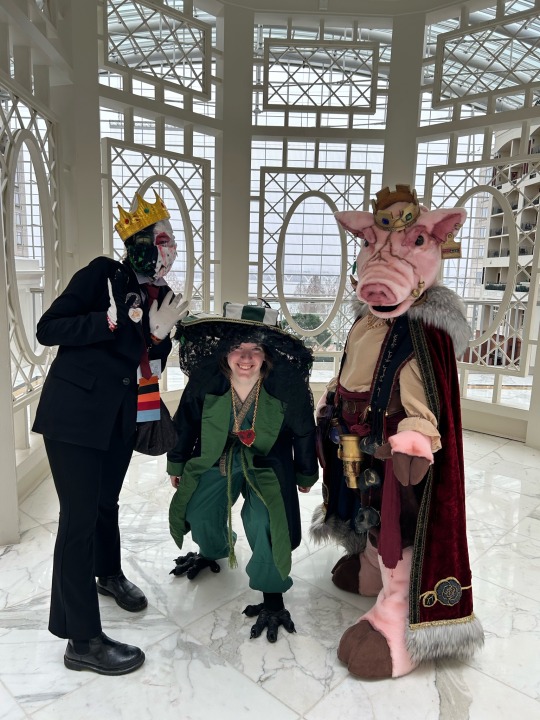
PIGGY! IN THE KATSUCON GAZEBO
today i got to wear techno out for the first real time, together with my lovely lovely friends @fitmc as phil and @ranboo5 as ranboo (as well as @atticustimestwo @mackdizzy and @the-ark-awaits as fundy, quackity, and tubbo for a butcher army shoot!! which i will have images from later!)
i also competed in the hall cosplay contest & walked in the fashion show (which is effectively the exhibition category in their masquerade), and i ended up winning best in masters!!! i am so so eternally grateful to mack for convincing me to compete and then SIGNING ME UP FOR MASTERS when i wasn’t looking /hj. i am so so proud of everything i have done so far for this costume, and i’m elated by the response other people have had to it as well :’)
my award winning hog katsu gazebo :D

#technoblade#cosplay#dsmp#ctechno#ctechnoblade#dsmp technoblade#cranboo#cphilza#katsucon#katsucon 2025
561 notes
·
View notes


Text


the build as of january 2025! would you believe it if i told you i’m still nowhere near done? we’ve still got at *least* 3 more weapons and a suit of armor to go!
taglist under the cut, reply or send an ask to be added!
@too-much-alphabet-soup , @embers-archive , @nothing-to-see-around-here, @pluralphilza, @aleeaviancrowalt, @islib
1K notes
·
View notes
Text
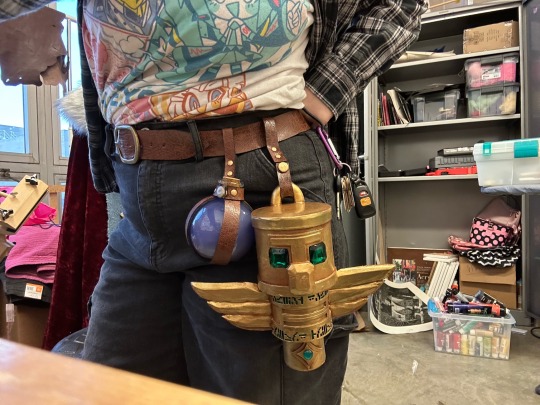
how do you keep your pants up when you’re performing? it’s incredible!
belt.

i started this with a sheet of upholstery vinyl that i laminated together front and back using heat-n-bond. i then cut out each of the pieces i needed and painted the edges with a black satin paint to create the illusion of burnished leather! i used riveting tools to cut out all of the holes on the belt, and of course, to install the rivets that hold the buckle in place.
the first belt accessory is the potion! i’ve had this bottle sitting around for like three and a half years now, empty, from the target dollar spot around halloween. it was finally time to put it to good use! the solution is water, acrylic inks for color, and gold and silver mics powder for the shimmer when agitated! i was trying to capture the nuances between the greyish color of the turtle master potion in recent updates, and the bluish purple of the enchantment glints prior. after mixing it up, i simply sealed it with some silicone. all of these materials were just things i had sitting around my studio already, which is awesome.


i cut and painted more strips, and modeled a potion holder after ones i’ve seen at every renfaire and convention vendor hall since i can remember. no use changing up a formula that works! i did end up adding a decorative cover to the snap here, and painting the rivets to match the belt’s hardware.

using the same processes, i made a loop to feed through the loop on the totem!


again modeled vaguely after another design for a sword frog i liked online, i sketched up a pattern for a weapon frog! i wanted it to be somewhat versatile since i’ll have more than one weapon i’ll want to put in it, so i opted for three snap straps to hold whatever weapon it is in place. again, i covered the snaps with decorative ones and painted all the rivets gold.

it fits toothpick with just a little give, so it can fit a weapon up to just a little bit bigger around than toothpick’s upper handle!

originally that was everything i had planned for the belt, faux leather wise, but I realized there was no way in hell i was carrying a bag with this cosplay, so I wanted a pouch for my phone. I made a couple mistakes while working on this. most notably, I chose a metallic cord for the thread. why did i do this. it took probably twice as long as it would have had i just used embroidery floss because of the nightmare challenges metallic threads pose.


I do think it ultimately turned out nice, though!
The only pictures I have with all of the finished pieces on the belt at once are on the next full costume sneak peek, so you’ll have to wait either for those to be ready or for me to finish the wither skull props, whichever comes first ;)
taglist under the cut, reply or send an ask to be added!
@too-much-alphabet-soup, @embers-archive , @nothing-to-see-around-here, @pluralphilza, @aleeaviancrowalt, @islib
102 notes
·
View notes
Text
TECHNOBLADE NEVER DIES
or, the totem!!
the first place i’m wearing this cosplay out to is with a full butcher army group. hence, the props i started with were toothpick, and a totem of undying!

i again, just like toothpick, sketched in CSP and blueprinted in illustrator, cutting all of my fine details out on the laser engraver.
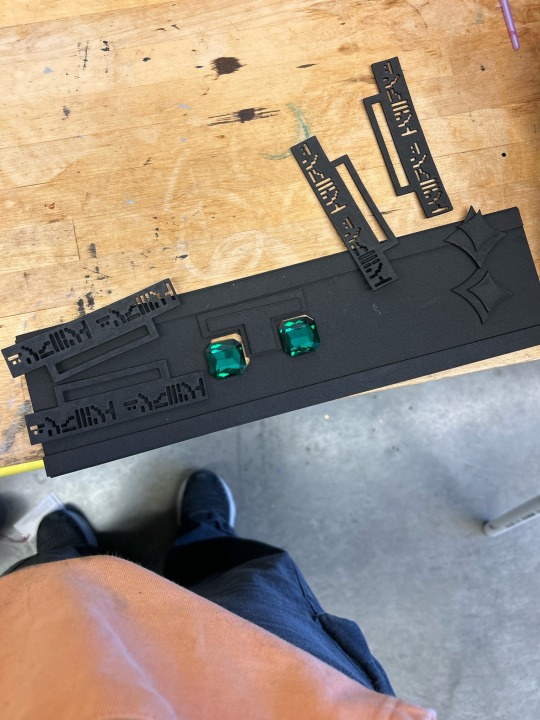
i’m so grateful i have access to the laser right now, it allows me to add so much cool detail at levels of precision previously unimaginable. wherever i end up after college, i need to find a way to keep access to a laser like this. also, when i ordered the gems for the crown (months ago at this point) i wasnt sure which green i wanted for the crown. i had extra space in the order, so i ordered two of each of the greens i had picked out and decided whichever ended up not being the crown would be the eyes for the totem!
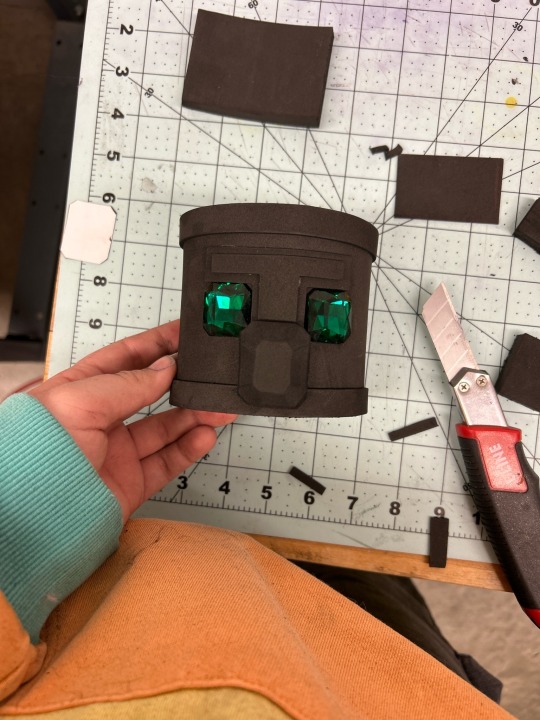
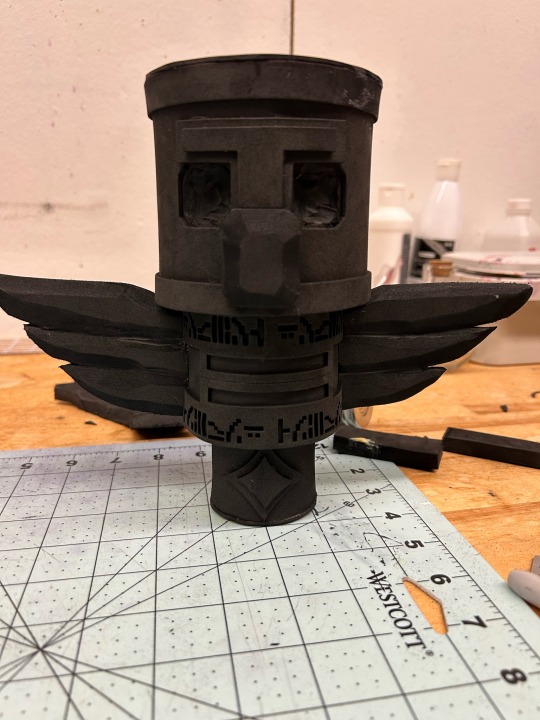
i made each of the layers with 10mm eva foam, and added the detail work in 2mm. the nose and wings were sculpted with my dremel tool. i sealed off the top and bottom with a simple 2mm circle and alternated between filler and dremeling to smooth any gaps in the seams.
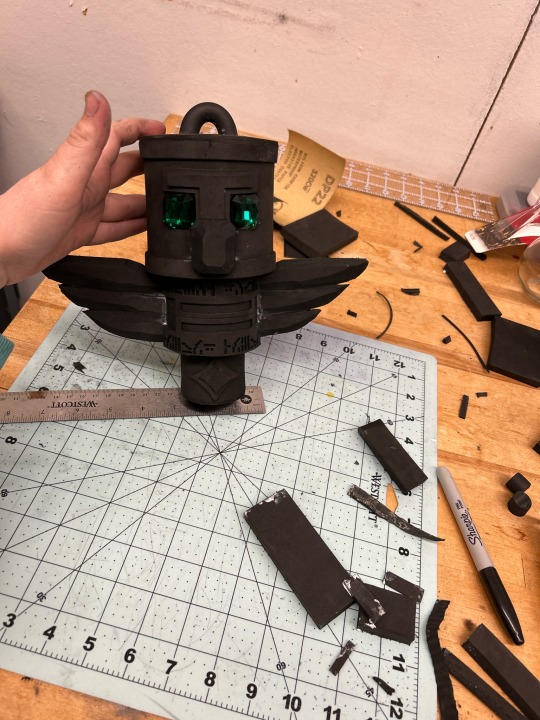
using an eva foam dowel, i added a loop for it to hang from.
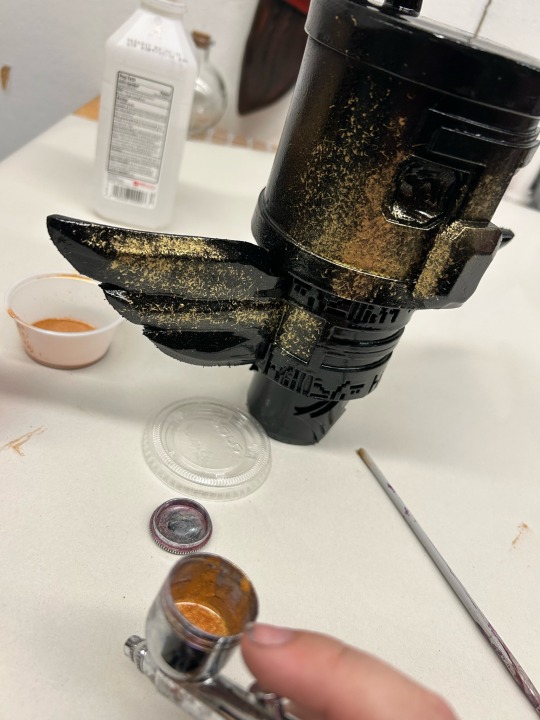
this guy also got a plastidip and black gloss coat before i went in with the airbrush. it took me a minute to figure out the gold paint in the airbrush again, leading to some weirdly cool sputtering effects.
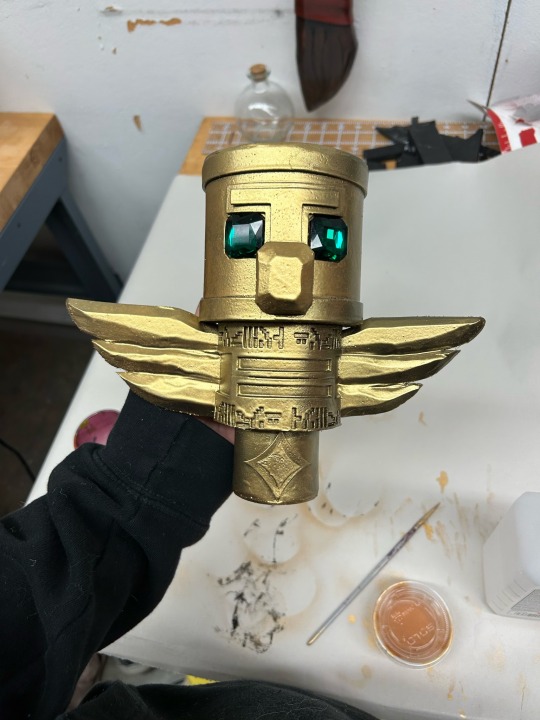
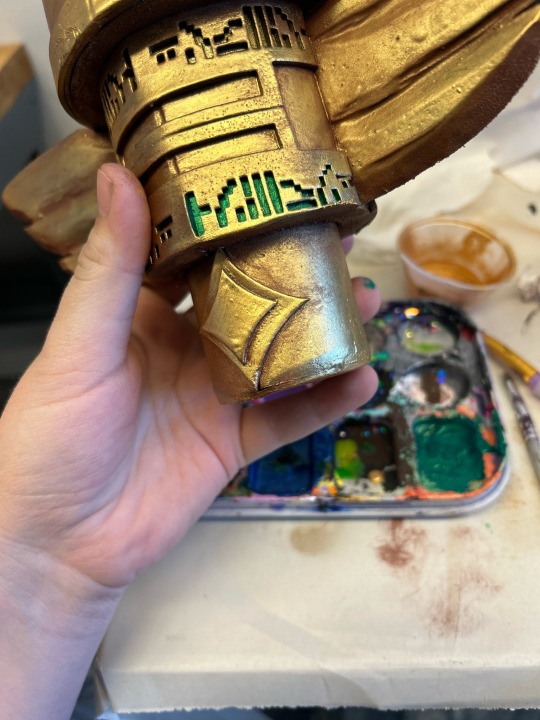
after finally getting a smooth solid gold finish, i started filling in the enchantment script (which in this case just reads “undying” repeatedly) with a green paint mixed with mica to make it metallic.
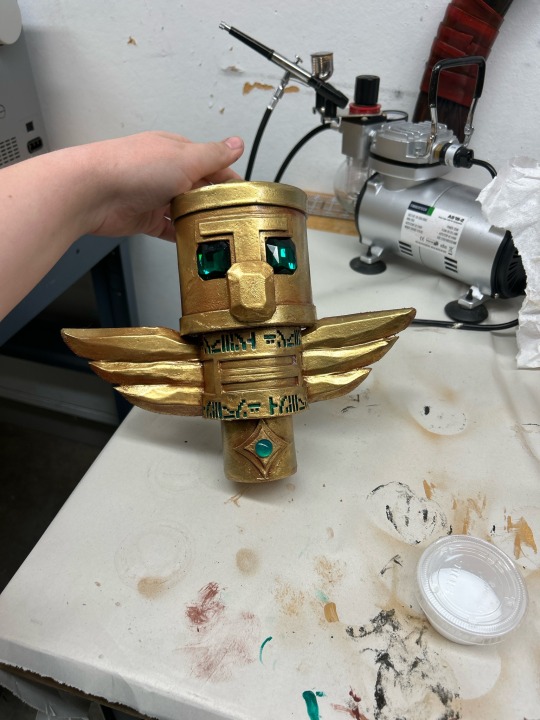
i then weathered with a warm brown to give it some more dimension and depth, and added a little gem on the star motif to finish it off! i’ll talk more about the hanging rig and belt in another post ;)
taglist under the cut! reply or send an ask to be added :3
@too-much-alphabet-soup , @embers-archive , @nothing-to-see-around-here, @pluralphilza, @aleeaviancrowalt
220 notes
·
View notes
Text
I’VE GOT A PICKAXE, QUACKITY, AND I’LL PUT IT THROUGH YOUR TEETH
or: On Toothpick

i started with my concept sketch and made a clean blueprint based on it in illustrator! this allows me to print it out to test scale and use a laser engraver to achieve those finer details like the enchantment script along the blade.


my original blueprint was WAAAAY too big. i genuinely could not tell you what the thought process was there. i scaled it down by a third and ended up with a much more reasonable scale for a pickaxe to be.

i traced and cut all of those pieces out of foam, three times. in the handle, the middle layer had the center cut out for a pvc pipe to be installed to make it more sturdy.

after gluing the layers together with contact cement, i used a dremel tool to sand the shape down into something rounder, more handle like. this step created a LOT of foam dust, and i’d like to clarify that any time i was using the dremel, contact cement, spray paint, or heating foam i was wearing a respirator! i also have n95 dust masks available for any visitors to my studio on days where i’m doing this sort of work :)


i glued the head together, laser cut the detail work, and dremeled in a bevel along the head of the pickaxe. i also added a googly eye as a rivet on the part where the head and handle meet.

after 3 coats of plastidip and 2 coats of glossy spray, the head of the axe got a pass with black rub-n-buff, airbrushed with purple interference paint, and then back in with the rub-n-buff for weathering.

i then painted the same gold paint i’ve been using for the crown and other accessories onto the detail work and into the engravings. this process made me decide that on any future designs the enchantment text will not be any smaller than 1/2 an inch, and if i can manage it it will be bigger than that still. painting this was a messy nightmare.

the handle and wraps and blood splatter are all just various treatments of acrylic paint! i took a pass over the whole thing with a satin varnish (that ended up being a little glossier than i’d hoped, but it’s ok), and then a gloss varnish over the blood specifically to try and give a wet illusion.
i am genuinely obsessed with this thing! i can’t wait to put it though quackity’s teeth!
taglist under the cut! reply or send an ask to be added!
@too-much-alphabet-soup , @embers-archive , @nothing-to-see-around-here, @pluralphilza, @aleeaviancrowalt
235 notes
·
View notes
Text
I’VE GOT A PICKAXE, QUACKITY, AND I’LL PUT IT THROUGH YOUR TEETH
or: On Toothpick
i started with my concept sketch and made a clean blueprint based on it in illustrator! this allows me to print it out to test scale and use a laser engraver to achieve those finer details like the enchantment script along the blade.
my original blueprint was WAAAAY too big. i genuinely could not tell you what the thought process was there. i scaled it down by a third and ended up with a much more reasonable scale for a pickaxe to be.
i traced and cut all of those pieces out of foam, three times. in the handle, the middle layer had the center cut out for a pvc pipe to be installed to make it more sturdy.
after gluing the layers together with contact cement, i used a dremel tool to sand the shape down into something rounder, more handle like. this step created a LOT of foam dust, and i’d like to clarify that any time i was using the dremel, contact cement, spray paint, or heating foam i was wearing a respirator! i also have n95 dust masks available for any visitors to my studio on days where i’m doing this sort of work :)
i glued the head together, laser cut the detail work, and dremeled in a bevel along the head of the pickaxe. i also added a googly eye as a rivet on the part where the head and handle meet.
after 3 coats of plastidip and 2 coats of glossy spray, the head of the axe got a pass with black rub-n-buff, airbrushed with purple interference paint, and then back in with the rub-n-buff for weathering.
i then painted the same gold paint i’ve been using for the crown and other accessories onto the detail work and into the engravings. this process made me decide that on any future designs the enchantment text will not be any smaller than 1/2 an inch, and if i can manage it it will be bigger than that still. painting this was a messy nightmare.
the handle and wraps and blood splatter are all just various treatments of acrylic paint! i took a pass over the whole thing with a satin varnish (that ended up being a little glossier than i’d hoped, but it’s ok), and then a gloss varnish over the blood specifically to try and give a wet illusion.
i am genuinely obsessed with this thing! i can’t wait to put it though quackity’s teeth!
taglist under the cut! reply or send an ask to be added!
@too-much-alphabet-soup , @embers-archive , @nothing-to-see-around-here, @pluralphilza, @aleeaviancrowalt
235 notes
·
View notes
Text
I am in fact setting up a taglist, reply to be added!
10 notes
·
View notes
Text
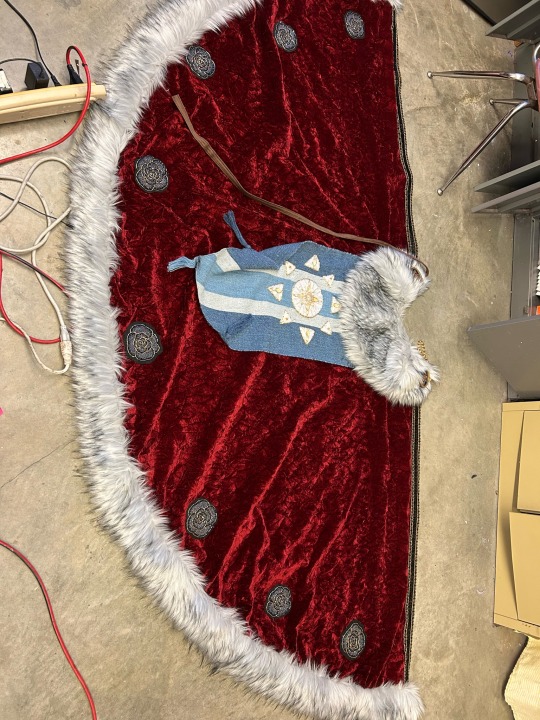
CLOAK PART TWO: BET YOU DIDNT EXPECT THERE TO BE MORE TO IT
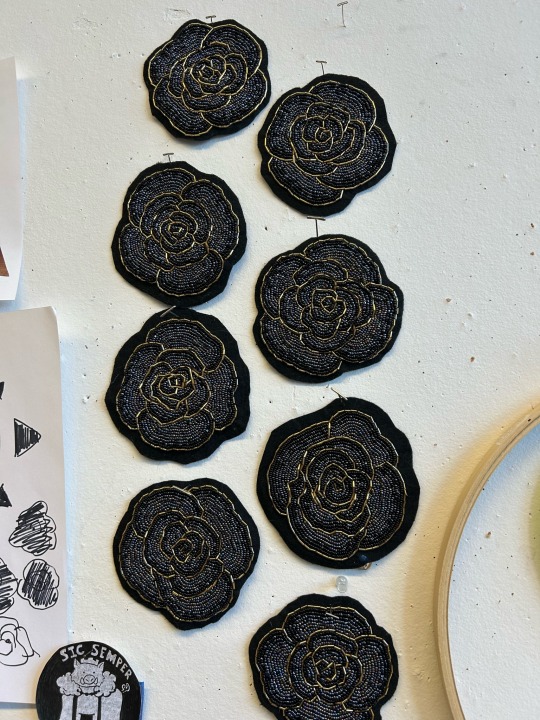
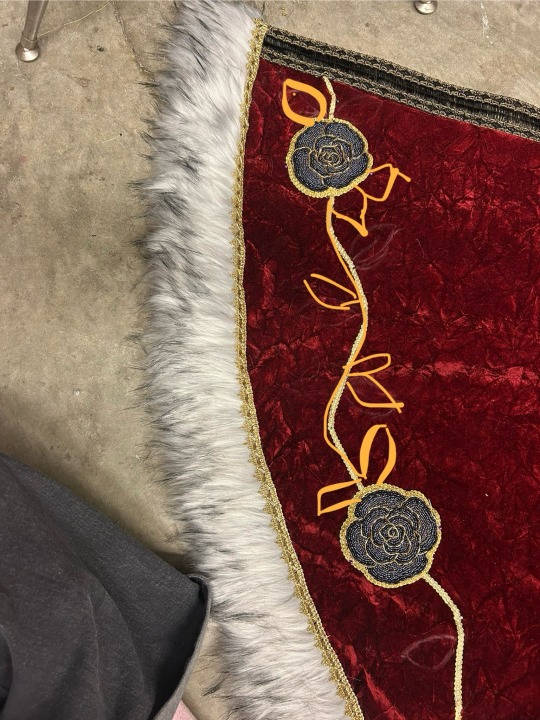
this! is what the roses i’ve been working on since june were for. and i finally finished it last week. while i was originally planning for 12 roses, when i finished the 8th rose in the interest of not making things harder than they needed to be, i laid everything out to check the spacing, and realized that anything more than 8 would be overkill. from then on, it was a matter of figuring out how exactly i wanted them to go on.
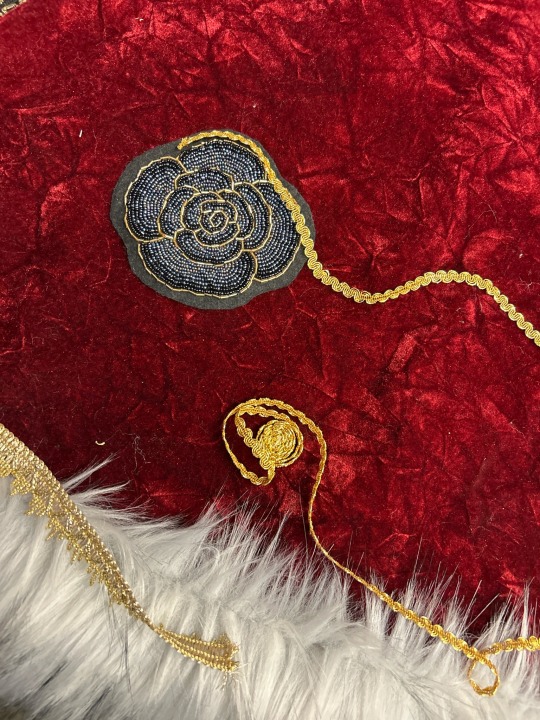
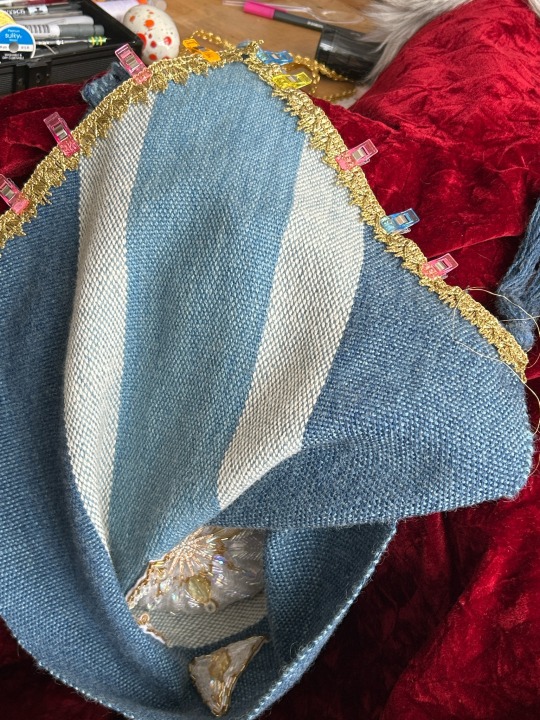
in general, i knew i wanted more gold in the cloak. i added trim to the bottom of the banner, the top of the fur at the hem, and around the roses & as their stems.
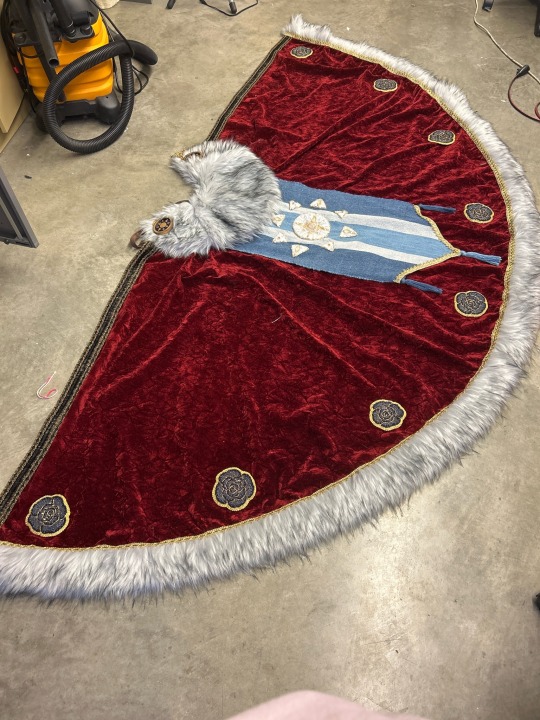
i was pretty nervous at this point, everything still felt so disjointed and laying out the stem without anything between the roses was so awkward. i was kind of terrified at this point that all of the over a hundred hours i’d invested in the roses was for naught. but sketching in how i wanted the leaves to fill out the space relieved a lot of that anxiety.
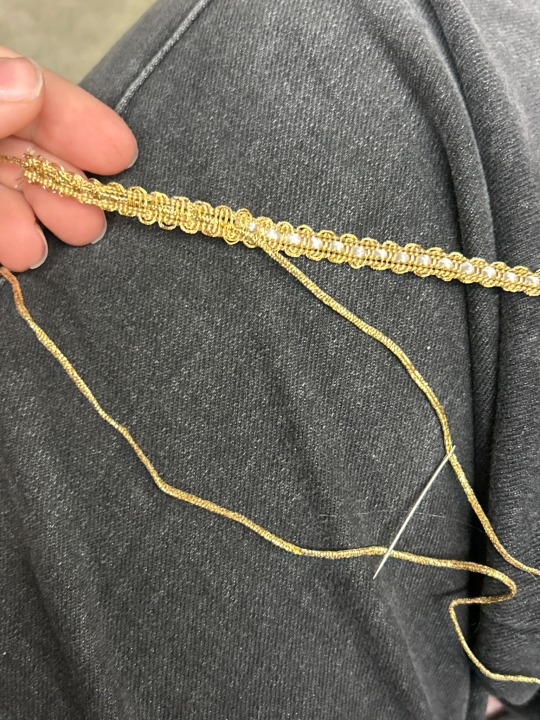
this thin braided trim i used for the roses and stems and leaves was in weirdly short supply, and i ended up needing somewhere in the realm of 5 or 6 spools of it. the store had 3 in stock at a time. they did also have a variation with a white middle instead of gold, and I thought it would be close enough. but the difference was still super apparent from a distance, so i pulled out the center of it and threaded a gold cord onto a needle and wove it into place instead. it was labor intensive, but SO worth it to me.
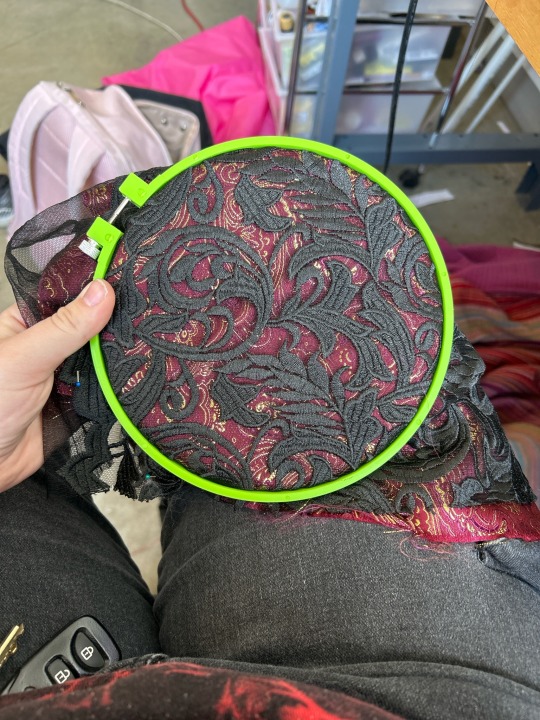
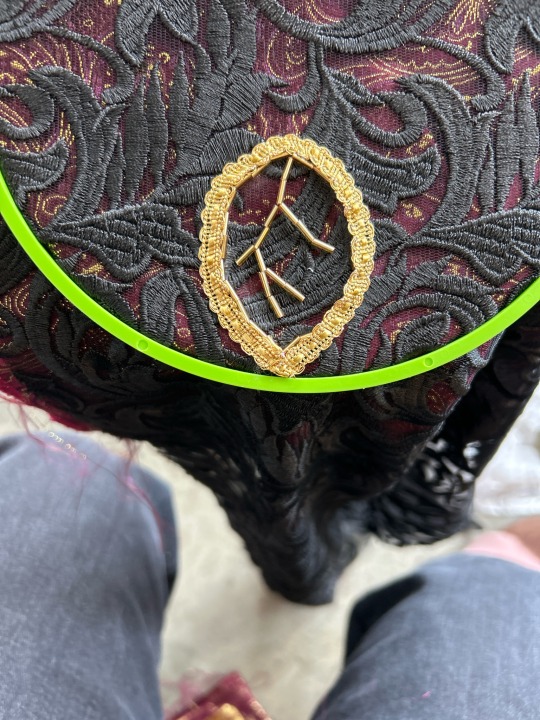
for the leaves, i originally wanted them to be fully beaded. after some experimentation i decided otherwise, and settled on this layered effect using some black lace and a brocade i had on hand, leftover from the last time i built a technoblade cosplay. i trimmed them with that same gold ribbon and added beads for veins, and they did exactly what I wanted them to do with color and space on the cloak. i made 26 leaves to go along with my 8 roses, spaced along the stem on the hem of the cloak.
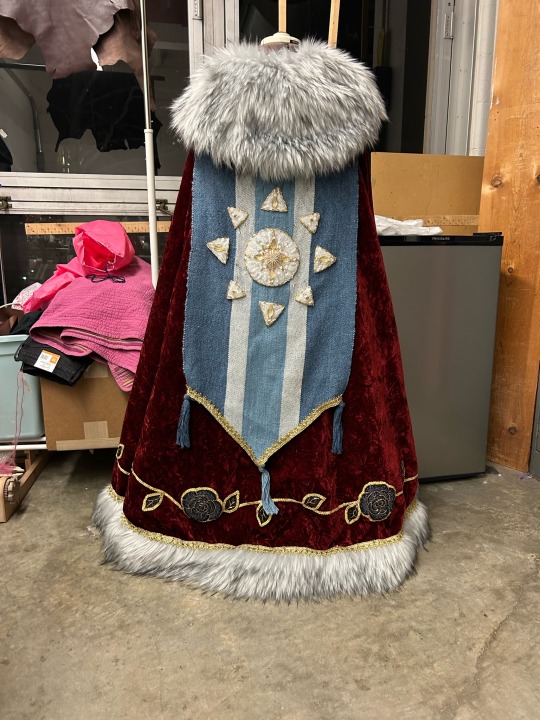
ultimately, i put probably in the realm of 200-250 hours into the cloak alone, and i am so proud of every detail as it’s fallen into place. i feel like ive made a cloak truly worthy of technoblade and his legacy.
400 notes
·
View notes