
Carbon sequestration as a means of increasing plant yields, suppressing weed growth and increasing plant vigor. I am also breeding plants and trees for drought and disease resistance.
Don't wanna be here? Send us removal request.
Statistics
We looked inside some of the posts by gemwel and here's what we found interesting.
Average Info
Notes Per Post
936
Likes Per Post
595
Reblog Per Post
333
Reply Per Post
8
Time Between Posts
2 months
Number of Posts By Type
Text
16
Link
1
Last Seen Tumblr Blogs


Fun Fact
Tumblr has a low social media market share in South America.
Text
Now pet cats are getting bird flu from cows and not wild birds. This is becoming a strange transmission chain. Who knows if it becomes a pandemic, but at least we still have a functioning public health system to find these weird transmissions.
http://publichealth.lacounty.gov/phcommon/public/media/mediapubhpdetail.cfm?prid=4908
4 notes
·
View notes
Text

This is a three year old sorghum plant. It grew from a seed off another plant that has been growing for about five years. My PhD advisor would be so mad at me for getting this to work, as he told me my question was dumb. But he never answered it. So I did experiments and found that it isn't dumb, but rather a way to induce plants into continuous growth. Hopefully it will be published in the next year with seed in limited release soon.
0 notes
Text
Solar water heaters are incredibly efficient, can be built on the cheap (hello black box filled with black painted pipes with a clear glass cover), and work even in cold climates (although we had to drain the water from ours in Wisconsin every winter, it was still working 50+ years after it was installed).
Excerpt from this New York Times story:
The Biden administration on Tuesday adopted stricter energy-efficiency standards for residential water heaters, the most consequential move in a flurry of changes designed to reduce the energy used by many common appliances including stoves, dishwashers and lightbulbs.
The Department of Energy said the new standards, taken together, will save American households and businesses nearly $1 trillion over 30 years, and save the average family $100 a year or more through lower utility bills. The changes will also cut greenhouse gas emissions, the agency said, by an amount equivalent to taking 18 million gas-burning cars off the road over that time.
However, the changes have come under withering attack by Republican lawmakers who claim the new rules will make appliances costlier in the short term. Late last year several representatives introduced legislation with names including the “Hands Off Our Home Appliances Act,” the “Liberty in Laundry Act” and the “Stop Unaffordable Dishwasher Standards Act.”
The proposed legislation was just the latest salvo in a long running fight waged by conservative groups and politicians who claim the standards limit consumer choice. Republican politicians and their allies have accused the administration of planning to ban gas stoves, for example, and conservative groups have blamed environmental rules for what it claimed was the decline of the American dishwasher.
Household appliances are a big deal for energy use and for climate change. Homes and commercial buildings consume 40 percent of the energy used in the United States, and most of that energy is used by appliances and equipment like water heaters. Generating that electricity produces a lot of greenhouse gas emissions, which are causing the world to warm dangerously.
As one of the largest users of energy in American homes, more efficient residential water heaters are expected to bring the largest savings ever from a single D.O.E. rule standard. The new rules would shift most new electric water heaters to heat-pump technology, which typically uses less than half the amount of electricity that many older models use. The new rules also require gas-burning water heaters to meet more stringent standards.
Over 30 years of shipments, the new standards are expected to save Americans $124 billion on energy bills, and reduce as much planet-warming carbon dioxide emissions as 43 million homes would generate in a year. Replacing traditional water heaters with electric heat-pump water heaters would save households approximately $1,800 on their utility bills, on average, over the life of the appliance, the D.O.E. said.
10 notes
·
View notes
Text
Have you ever looked at roses and wondered if they were tasty? (Or maybe you went to a restaurant with something like rose milk tea with rose jelly that you got & liked).
Well, here is a guide to eating roses.
(Please note that people tend to put all kinds of nasty chemicals on roses sold both commercially & that you find growing at a neighbor's house, so please make sure they are unsprayed/untreated/organic before consuming them and always ask permission if they are growing on someone else's land).
First, go early in the morning (as that lovely rose scent will disappear as the day heats up) & pick some just opening flowers. Then wash them to remove dirt and bugs.
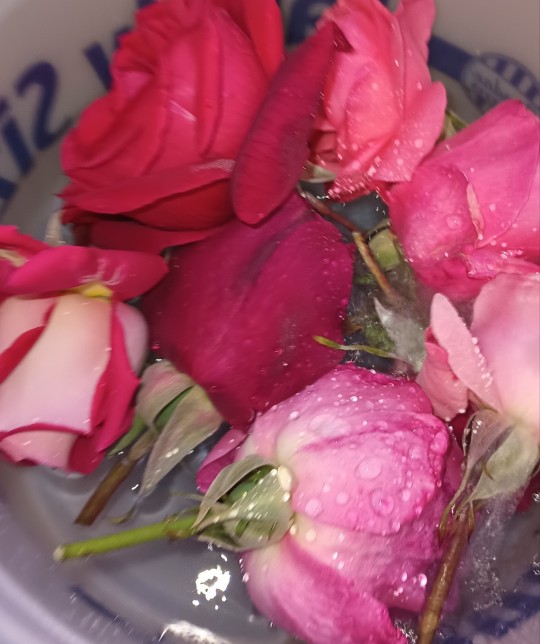
These are some common domestic roses (Mr. Lincoln, Queen Elizabeth, etc), but if you are buying roses to eat, supposedly Damascus roses are the best. Next, you will gently remove the petals from the stem (a slight twist & pull is usually sufficient). Now you have to choose preparing fresh (rose jam, rose jelly, rose syrup, rose oil, rose water, etc) or drying them for later.
In this case, I dried them.

As you can see, once I had just over 2 quarts/2 liters, I proceeded to the next step. Grinding them to a fine powder in the blender.
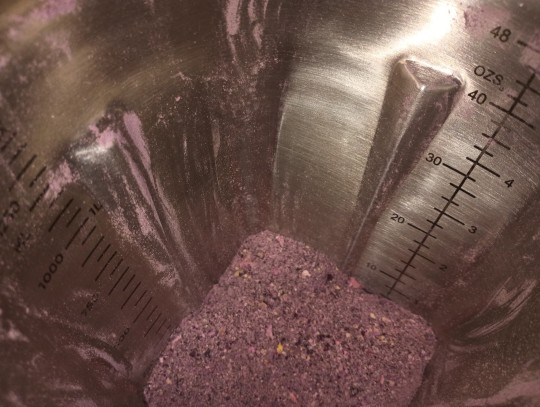
As you can see, grinding the petals dramatically reduces the overall volume. For long term storage of the powder, I sift it (through a sieve) and dry again before storing it in glass jars.
This powder is really nice to have on hand. One spoonful into a cup of hot water or coffee makes a nice drink. Or you can add it to baked goods for rose flavor & color.
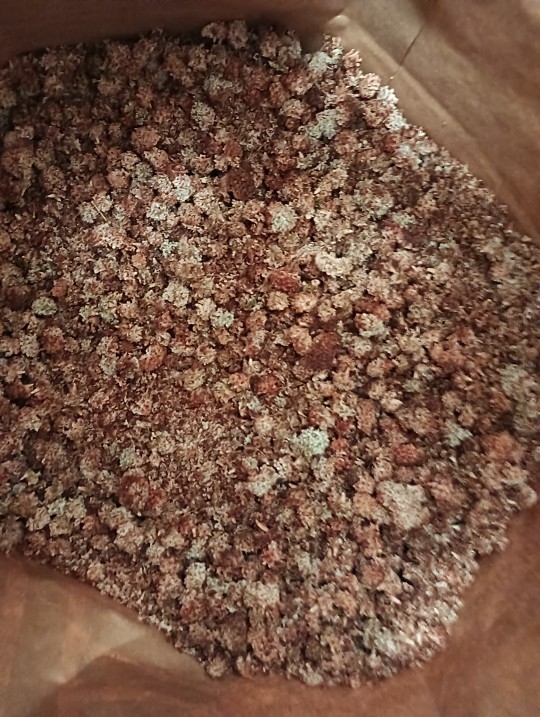
In this case, I am going to make waffles. I started with a commercial pancake mix, added ingredients suggested on the box and a good amount (no more than 1/10 the volume of mix/flour) of rose powder. After making the waffles, they looked like this:

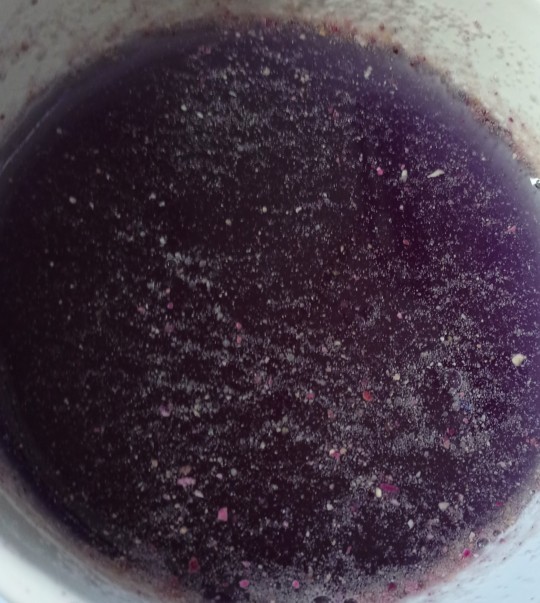
I also had some rose syrup using a recipe from a really interesting cookbook about Lebanese pantry staples (which can be made from things that grow well in Mediterranean climates like roses).

The rose syrup was interesting to make as the pigments in the rose petals leach into boiling water, leaving clear, transparent, and slightly chewy petals behind. The book has lots of recipes for fresh rose petals. I water bath canned them for 15 minutes so I can store it long term. It was a two day process to make.
Then I combined the rose waffles with rose syrup to moisten them.

Finally, I used hot water to clean the blender & make my first batch of rose tea. I think the purple color is from my Mr. Lincoln rose.
So there is an entire meal from roses. (If you want a clear tea, use dried whole rose petals & strain them out before drinking).
#rose#homegrown#homemade#waffles#herbal tea#unique flavors#edible rose#rose syrup#urban farming#urban garden los angeles#plantblr
15 notes
·
View notes
Text
Avocados grow fine in parts of the US (Florida & California), but Mexican avocados depress US avocado prices, making it uneconomical to grow them in the US. In the 1930s, avocados were $1 each & US grown (before inflation). I have seen these Mexican avocados 5/$1. They are much smaller & less tasty than US grown avocados. Many US producers are switching to producing avocados to fill gaps in Mexican avocado production instead of supplying the entire US market like they used to. (Avocados don't ripen until picked and most trees have a 3-12 month window in which the fruit can be picked).
So we are allowing Mexico to absorb all these negative externalities just so US consumers can enjoy ever declining avocado prices. If we stop destroying Mexican forests, there will still be plenty of avocados as there are huge amounts in the US that no longer go to market (most buyers want at least a semi trailer worth these days, you can no longer sell off a few hundred extra pounds from a small grove).
This is a microcosm of how we got to where we currently are: we destroy ecosystems to produce lower quality goods that undercut the production of the more sustainable version, driving it out of the marketplace. Then, by having huge monocultures, that production becomes vulnerable to numerous new issues. Meanwhile, sustainable production is no longer financially viable & goes away, so politicians can wring their hands & bemoan the lack of alternatives to the destructive system.

Excerpt from this article from the Center for Biological Diversity:
Avocados have exploded in popularity across the United States. And every year Super Bowl Sunday is the biggest day for avocado consumption nationwide, as millions of football fans gobble delicious guacamole during the game.
But to produce all that guac, the avocado industry is gobbling, too — scarfing up vast swaths of Mexican forest, where millions of monarch butterflies migrate to spend the winter and other imperiled wildlife struggle to survive.
Most avocados sold in the United States come from a single region in Mexico, where the industry burns forests and uses an enormous amount of water — 18.5 gallons to produce one avocado — in a region already suffering from extreme drought. Avocado production also brings land grabs, pollution, and violence to Indigenous and other local communities. Research from Climate Rights International has linked this devastation to importers that supply major U.S. grocery stores with avocados.
While some grocery companies have anti-deforestation policies for palm oil and beef, few — if any — have them for avocados. And most corporate policies to protect human rights don't address violence to Indigenous and other local communities in their supply chains.
Every day more than 10 football fields' worth of Mexican forest are cleared for avocado production. If the United States keeps consuming avocados at this rate, by 2050 the land destroyed to grow them will have increased by more than 70% — at the expense of even more forests, including those of the world-famous Monarch Butterfly Biosphere Reserve. Imperiled monarchs are plunging toward extinction already. Losing their winter home in Mexico could be the final blow.
11 notes
·
View notes
Text
It is something that should be easy to propagate. Historically, "special" plants like that don't make much revenue as person A buys one, takes cuttings & gives away to everyone they know (or sells under the table on the cheap). I see it as potentially another "Hass" avocado situation, where everyone has them but very few pay properly for them, especially at that price point. I don't see any good way for them to prevent unlicensed propagation. Sadly, I don't think they will make very much from this plant, even if everyone gets one, which will further discourage investment in plant genetics.
"A company in France has developed genetically-enhanced houseplants that remove 30 times more indoor air pollutants than your normal ficus.
Paint, treated wood, household cleaners, insulation, unseen mold—there is a shopping list of things that can fill the air you breathe in your home with VOCs or volatile organic compounds. These include formaldehyde and other airborne substances that can cause inflammation and irritation in the body.
The best way to tackle this little-discussed private health problem is by keeping good outdoor airflow into your living spaces, but in the dog days of summer or the depths of a Maine winter, that might not be possible.
Houseplants can remove these pollutants from the air, and so the company Neoplants decided to make simple alterations to these species’ genetic makeup to supercharge this cleaning ability.
In particular, houseplants’ natural ability to absorb pollutants like formaldehyde relies on them storing them as toxins to be excreted later.
French scientists and Neoplants’ co-founders Lionel Mora and Patrick Torbey engineered a houseplant to convert them instead to plant matter. They also took aim at the natural microbiome of houseplants to enhance their ability to absorb and process VOCs as well.
The company’s first offering—the Neo P1—is a Devil’s ivy plant that sits on a custom-designed tall stand that both maximizes its air-cleaning properties and allows it to be watered far less often.
Initial testing, conducted by the Ecole Mines-Telecom of Lille University, shows that if you do choose to shell out the $179 for the Neo P1, it’s as if you were buying 30 houseplants. Of course, if you went for the budget route of 30 houseplants, you’d have to water them all.
The founders pointed out in an interview done with Forbes last year that once they settled on the species and fixed the winning genetic phenotype, the next part of the process was just raising plants, the same activity done in every nursery and florist in every town in Europe."
Deliveries for the P1 are estimated for August 2024.
-via Good News Network, November 6, 2023
--
Note: I'm not a plant biologist, but if this works the way the company's white paper says it does, holy genetic engineering, Batman.
(Would love to hear thoughts from anyone who is a plant biologist or other relevant field!)
579 notes
·
View notes
Text
How to make acorn flour (because there are tons of free acorns everywhere this time of year):

The first step is to find some acorns. These are black oak acorns. I usually gather in a grocery bag. If you find a good tree, you will get over 100 lbs (300kg) of acorns. Average to poor trees give around 20-40 lbs (60-120kg). Once you get them home, wash them in a bucket of water & discard any floaters. Then let the acorns dry for a few days to weeks until you have time for the next step. Do not store in the shell long term if possible.

The next step is to remove the kernel from the shell. I give them a whack on a palm tree stump covered with a towel (to stop them from rolling) with the flat side of a hammer. Any hard surface will work. If you find white grubs (acorn grubs), they are edible. Usually I give them to my pet chickens along with any "bad" acorn kernels.

Shown above are the kernels. They don't have to be pretty because we will grind them up later. These kernels are white with a brown skin, but different varieties will be different colors.

Once you finish shelling your acorns, grind them in a blender in enough water to cover. For these black oak acorns, it looks like a creamy, milky liquid. Make sure you have a container that can hold four or more times as much water as acorns for this step. I am using commercial plastic storage that holds one gallon.

Leave the container in the refrigerator overnight or at least several hours and the acorn flour settles to the bottom. Pour off the liquid on the top, being careful not to dump the bottom two layers. It is ok if you can't remove all of the top layer. Add more water & stir to mix. Then repeat the process as long as needed to remove all bitter flavor from the acorns. Depending on what kind of acorns you start with, this could be 1-12 changes of water. The black oak acorns took about 8 to be leached. All acorns should be leached at least once, even if they taste sweet. If there is a layer on the top of the first leaching' clear layer, this is the skins & should be discarded with the clear layer.

The final step is to dry your acorn flour. Small amounts can be dried in shallow bowls/plates covered with a towel. Larger amounts are dried in bowls in a dehydrator on low. Once it is dry, I run it through a strainer to remove any chunks. Once dry, you can use as a gluten-free, starchy flour. Please note that because we didn't cook it during the leaching process, the starch will set when cooked (like cornstarch). These black oak acorns changed color to a dark brown when dried
193 notes
·
View notes
Text
If you are in Southern California, there is native buckwheat growing wild everywhere. See photo below. They make attractive informal hedges and grow nicely between roses. You can also purchase plants for your yard at any local native plant sale.

Now (fall/winter) is the time to harvest the seed heads to make a gluten free flour substitute. (You can also eat the young shots in spring, which have a lemony flavor). One plant can easily yield one or more paper grocery bags of seed heads. See photo below. (They are a little underripe, the dark brown ones are fully ripe and ok to collect as well. White seed heads are too immature).
Once you have acquired your seed heads (we grow several plants), it is time to get them ready to eat. They need to be soaked overnight to get rid of the bitter compounds. Put them in twice as much volume of water as you have seed heads and soak overnight (8-12 hours).

Once they are done soaking, scoop them out into a fine strainer and rinse until the water runs clear. Be careful with soaking water as it may stain surfaces (or experiment with using it as a dye). Once you are done rinsing, it will look like below.
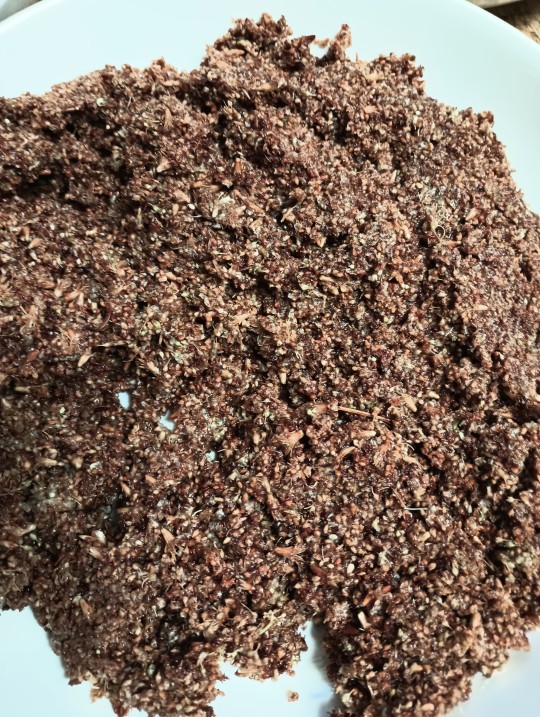
At this point, you can cook everything up wet like a porridge. If you want to keep it longer, you will need to dry it. You can spread in thin layers to air dry or put it in a dehydrator on low (which is what I do). Once it is dry, you can store it in glass jars to use as a gluten free flour substitute. It has a distinct flavor, so have fun experimenting. It makes delicious pancakes, especially when mixed with an equal part of acorn flour (see previous post). Photo below shows after dehydration.

You can grind the flour in a blender to make a finer texture, or toast it before use to alter the final flavor.
17 notes
·
View notes
Text
Ok, here are some instructions on how to can loquats, which are very delicious canned (my kids prefer canned to fresh). They are often overlooked, but are in season right now. Please ask before taking from any tree that isn't yours. See below for photo of ripe loquats from my tree.

For the most economical storage, use narrow mouth quart jars. I usually use 4 oz narrow mouth jars for single serving fruit cups (great for school lunches back when kids were going to school). Narrow mouth pint jars are also good if you can't finish a quart jars before it spoils (they will keep about a week in refrigerator once opened).
After harvesting loquats (afternoon/early evening is best), you should rinse them. They can then be stored overnight in refrigerator or keep going.
The next step is to de-stem them, cut them in half, and remove seeds, blossom end, and peel. Once you have extracted the flesh, immediately immerse it in water to which you have added Vitamin C powder (the best choice, about 1 tablespoon per 6 quarts/liters of water). If you don't have Vitamin C, you can also use lemon or lime juice, or even vinegar, but they won't keep as long in refrigerator. You can refrigerate them in this acidulated water for several days. They will turn brown quickly if you skip this step. See below for what they should now look like.

Now it is time to can them in boiling water. Make sure to use Mason jars with brand new lids or similar jars designed for canning (don't reuse grocery store jars). The first step is making the canning syrup (which helps preserve them). For best flavor, use light syrup (1 cup sugar plus two cups water, boiled to combine). It is ok to use natural or turbino sugar, but it may be a bit darker than white sugar. If you are going to keep them for more than a year, use medium syrup (3 cups sugar, 4 cups water). See recipe below.

Once you bring the syrup to a boil, drain loquats from acidulated water and add to syrup, cooking for 2-4 minutes. Then use ladle and canning funnel to transfer to pre-sterilized jars. (Sterilize jars by boiling in plain water, with a splash of vinegar added if you have hard water). Wipe the rims, place sterilized lids & bands on, tighten and return to boiling water bath (any pot deep enough to cover top of jar). Boil for 15 minutes for pint or smaller jars, 20 minutes for quart jars. This step is very important as it kills the spoilage organisms in your fruit, so use a timer for precision. Once processed for necessary time, remove from the boiling water and cool for 24 hours. After at least 24 hours, remove bands (cleaning and saving for later). Then wash jars well to remove any residue from exterior. Label lid with date & contents so you know what it is. Store jars in cool, dark place (like a basement) until ready to use. Refrigerate after opening (if you have leftovers). See below for final product (canned with raw sugar powder).

This recipe was adapted from the Farm Journal canning book recipe. Enjoy!
41 notes
·
View notes
Text
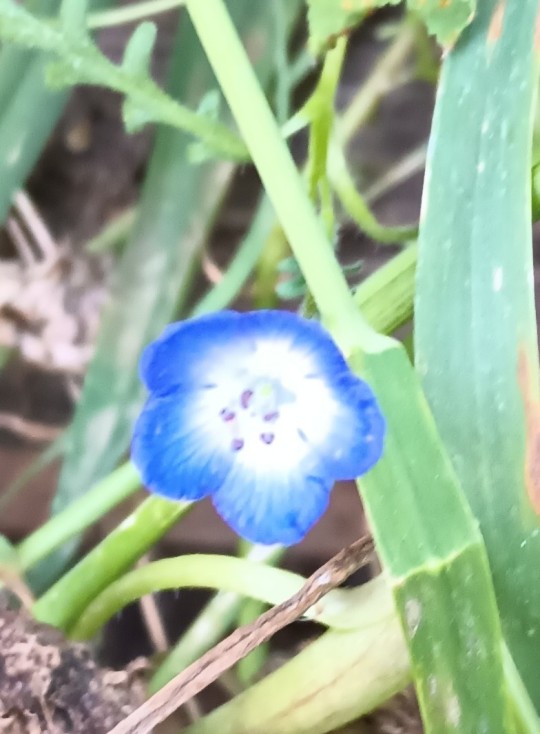
Our wildflower mix is starting to bloom, with these beautiful tiny Baby Blue Eyes flowers.
1 note
·
View note
Text

Sometimes your chickens give you something weird, like this shell-less egg. The hen that laid it usually has green-shelled eggs.
1 note
·
View note
Link
Also important (and less expensive in the long run), plant native food sources for your local birds. A variety of berries & seeds will ensure a steady stream of feathered visitors. Plus many of these plants also support hummingbirds & other pollinators such as native bees when in bloom.
We can start by doing what our family is doing, here at our house and at our daughter’s house. In our yard, we have four medium to large sized feeders into which we pour pounds of bird stuff, three thistle feeders and three suet feeders. In the summer, we add hummingbird feeders and specialty feeders designed to attract and feed birds like orioles. We also have five bird “shelters” where we know babies are born and raised, mostly wrens. I know what we do can be considered insane, and requires a lot of time, patience and money, but we have noticed a dramatic increase in the bird population in our yard and in our neighbor’s yard (they are as crazy as we are), as well as a dramatic increase in the number of species we see. The payback: we know we’re contributing to helping birds survive the extinction crisis, but the personal payback of sitting in the yard and watching the daily bird soap operas is just as fulfilling. Plus the squirrels and bunnies are happy.
Excerpt from this story from The Revelator:
In 2019 a staggering study revealed North America had lost nearly 3 billion birds since 1970 — almost 30% of the total population, with declines in both common and rare species. Grassland birds were down more than 50% and shorebirds by around one-third.
The figures floored even the researchers.
It also provided a jolt to avid birders and retired journalists Anders and Beverly Gyllenhaal. They wanted to know what had happened — and what could be done.
To find out the couple took off on a cross-country trip, meeting with 300 experts and other people working to recover birds. They have now chronicled their journey in their new book, A Wing and a Prayer: The Race to Save Our Vanishing Birds.
The Revelator spoke with the Gyllenhaals about who’s saving birds, how technology helps, and what more we need to do.
30 notes
·
View notes
Text
Chickens in the sand bath, having some socialization time. All the black hens are daughters of the black & white hen. The white hen is unrelated. The trees surrounding this area are starting to grow and shade the area nicely (sugar bush and mulberry, both are drought tolerant trees that produce edible berries enjoyed by chickens).

#pet chickens#urban farming#urban garden los angeles#california native plants#chicken foraging#sandbath#mulberry#sugar bush
1 note
·
View note
Text
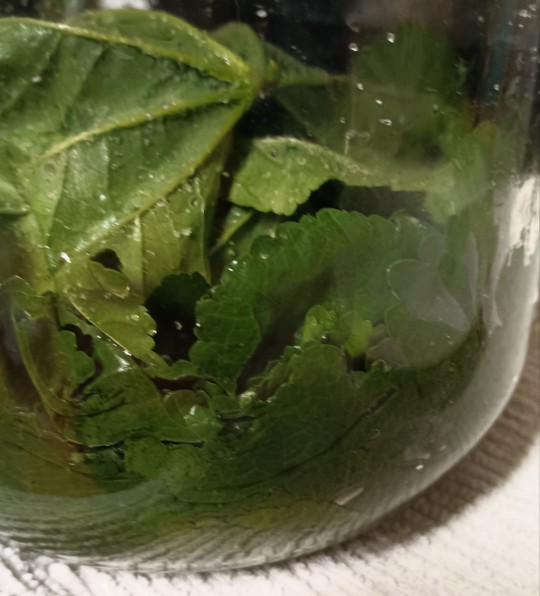
How to Make Fermented Mallow Leaves
So there are mallow plants growing all over Southern California right now, maybe even as weeds in your yard. But you can preserve them now to enjoy later after they are gone.
First, find some mallow plants with big leaves. With all the rain this year, they can get huge. Make sure they don't have orange rust spots on them and are blemish free (we will remove insects in a subsequent step).
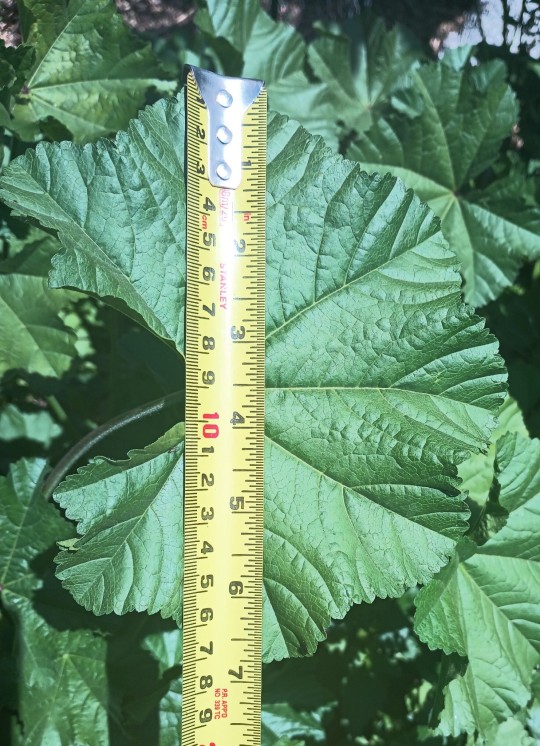
You will need a large amount of leaves as they will compact down a lot in subsequent steps. But you can keep adding more each day until your container is full. You can use scissors or clippers to cut the leaves off the stem, as shown below. You want as little stem as possible as it interferes with layering.
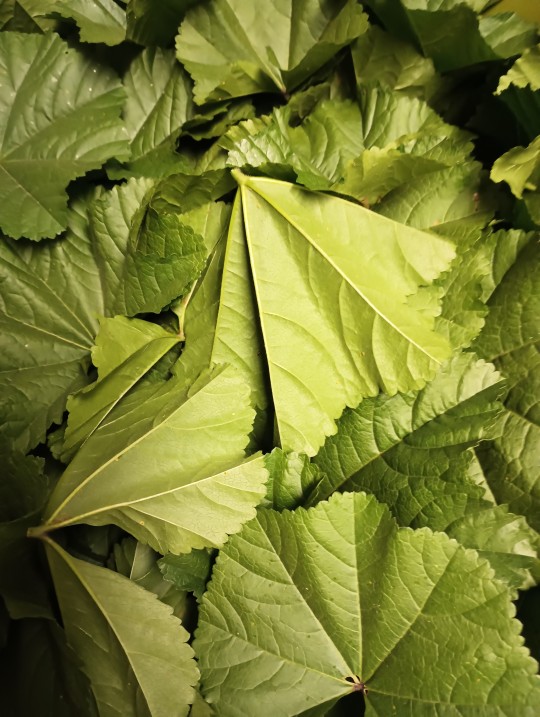
The first thing we need to do is thoroughly wash both sides in running water to remove insects, dirt, etc. Discard any leaves with orange rust spots or serious insect damage. After washing, spin dry in a salad spinner. They don't have to be completely dry, just not super wet.

Now that our mallow leaves are clean and excess water removed, we are going to do the really hard part of this recipe. Grab a small plate and put some granular sea salt on it. (I used Kirkland Signature sea salt, but any brand of sea salt is fine. Do not use iodized salt or chemical salt/NaCl.)

Grab a leaf, then touch the salt (you should pick up a small amount on your damp fingers), then rub onto both sides of the leaf. It should feel like rubbing it with sand. You only need a small, evenly distributed amount on both sides to draw out the moisture. Once the leaves are rubbed in salt, start stacking them in a clean glass container (I used a half gallon kimchi jar, but a glass bowl will also work).
Stack them in layers, altering position on the leaves to keep everything as flat as possible. Try not to tear or otherwise damage the leaves. Once you have added your leaves, add a bit of liquid culture from live, active kimchi or sauerkraut.

This is extra liquid from a previous batch. That will also work. Let everything sit for at least a week to ferment, pressing down daily into the liquid. Then put it in the fridge until you need them. If you want to use them right away, soak in plain water to desalt (optional). You can also use them as a substitute for fresh seaweed.
To store them long term, the next step is to dehydrate them. This will make them crispy like chips and they can be eaten whole & dried (you can also coat them with a thin coat of oil prior to drying if they will be eaten right away, but don't do this if they will be stored more than a week).

The batch shown above had some kimchi brine added, which gives it a reddish color. I dried them on parchment paper to make it easier to get them off the dehydrator tray. If you have some that break, put them aside to be ground up into a salt substitute, as shown below.
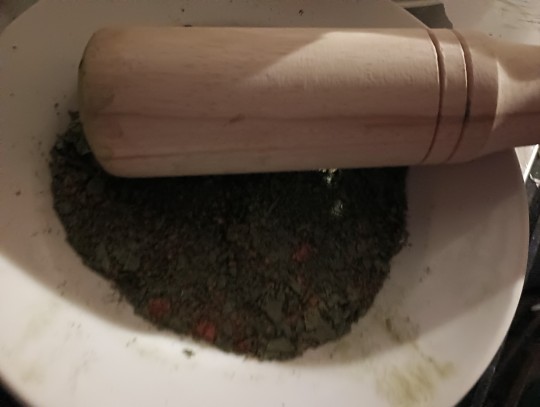
You can grind the dry leaves quite easily, I used a wooden pestle (or even a small glass/metal container with a flat bottom) in a salad bowl. Pass them through a sieve if you want them to be a uniform size (keep grinding the bigger pieces until they pass through.)
The powder has a nice flavor (a bit seaweed like) and can be used to add salt & flavor to dishes and baked goods.
#california native plants#urban foraging#free food#california mallow#wild food#wild edibles#fermentation#fermented foods#fermented leaves#seaweed substitute#sustainability#losangeles#leaf wrap
7 notes
·
View notes
Text
If you are in Southern California, there is native buckwheat growing wild everywhere. See photo below. They make attractive informal hedges and grow nicely between roses. You can also purchase plants for your yard at any local native plant sale.
Now (fall/winter) is the time to harvest the seed heads to make a gluten free flour substitute. (You can also eat the young shots in spring, which have a lemony flavor). One plant can easily yield one or more paper grocery bags of seed heads. See photo below. (They are a little underripe, the dark brown ones are fully ripe and ok to collect as well. White seed heads are too immature).
Once you have acquired your seed heads (we grow several plants), it is time to get them ready to eat. They need to be soaked overnight to get rid of the bitter compounds. Put them in twice as much volume of water as you have seed heads and soak overnight (8-12 hours).
Once they are done soaking, scoop them out into a fine strainer and rinse until the water runs clear. Be careful with soaking water as it may stain surfaces (or experiment with using it as a dye). Once you are done rinsing, it will look like below.
At this point, you can cook everything up wet like a porridge. If you want to keep it longer, you will need to dry it. You can spread in thin layers to air dry or put it in a dehydrator on low (which is what I do). Once it is dry, you can store it in glass jars to use as a gluten free flour substitute. It has a distinct flavor, so have fun experimenting. It makes delicious pancakes, especially when mixed with an equal part of acorn flour (see previous post). Photo below shows after dehydration.
You can grind the flour in a blender to make a finer texture, or toast it before use to alter the final flavor.
#California buckwheat#urban garden los angeles#urban foraging#free food#california native plants#gluten free#flour substitute#wild grain
17 notes
·
View notes
Text
Chickens snacking on California buckwheat and Toyon berries. (Please note Toyon is legally protected in CA and cannot be foraged from the wild. We have our own plants to harvest from).
Both plants are drought tolerant and native to Southern California. The Toyon berries are a bit too fibrous for my taste (eating them is like trying to eat cherry flavored chewing gum), but the buckwheat produces an acceptable flour substitute (from gorgeous seed heads not pictured). I'm pruning back the buckwheat to shape it up for next year, so chickens get the prunings. The young shots of the buckwheat are extremely tasty, especially when added to salad (they have a sour lemon taste like sorrel).

#pet rooster#pet chickens#urban garden los angeles#california native plants#toyon#California buckwheat#chicken foraging#urban chickens#urban farming
8 notes
·
View notes
Text
How to make cedar flavored sugar:
If you have access to incense cedar saplings, this is a great way to extract their unique flavor (like a minty vanilla). It will also work with other edible trees (be sure to do a small batch first to check flavor).
Step 1: Add a layer of sugar to the bottom of your container (this is a commercial 20L storage container).

Step 2: Press small pieces of the saplings (which you washed & dried) into the sugar. Try to do this as soon after cutting the saplings as possible so they don't dry out. Ideally they should be a little sticky. Fall is the best time of year as the trees should be at the peak of dryness and flavor.

Continue adding pieces of the tree, cut so they lay flat, until you have a shallow layer. Don't go too thick as you want to maximize contact between the trees and the sugar.

This is about as thick as you want to make the layers. You should still be able to see some of the sugar underneath. Now add more sugar to cover as shown below.

Keep layering branches and sugar until you have filled the container. Add a bit more sugar to the top & poke down any stray bits of branch into the sugar with a clean spoon. Then let it sit for several months to a year to infuse (a year is good because then you can reuse the container for the next batch). If you have a basement/cool spot, that would be a good place to store this while infusing. When it attains a nice flavor, remove the branches (they can now be composted) and store the sugar dry until needed. This is lovely to sprinkle on baked goods or make holiday sugar cookies.
1 note
·
View note