after years of saying I'm gonna do it, I'm actually working on trying to learn how to draw and here I share my painful journey
Don't wanna be here? Send us removal request.
Statistics
We looked inside some of the posts by ladylitart and here's what we found interesting.
Average Info
Notes Per Post
1M
Likes Per Post
643K
Reblog Per Post
478K
Reply Per Post
677
Time Between Posts
2 months
Number of Posts By Type
Text
12
Photo
4
Note
1
Last Seen Tumblr Blogs


Fun Fact
The total number of visits Tumblr.com received during January 2021 is 327 million.
Text

Anya made her debut at AX a few weeks ago and was a big hit!
7 notes
·
View notes
Text


these prints and more are available now in my shop update!
5 notes
·
View notes
Text

the first love of my life
30 notes
·
View notes
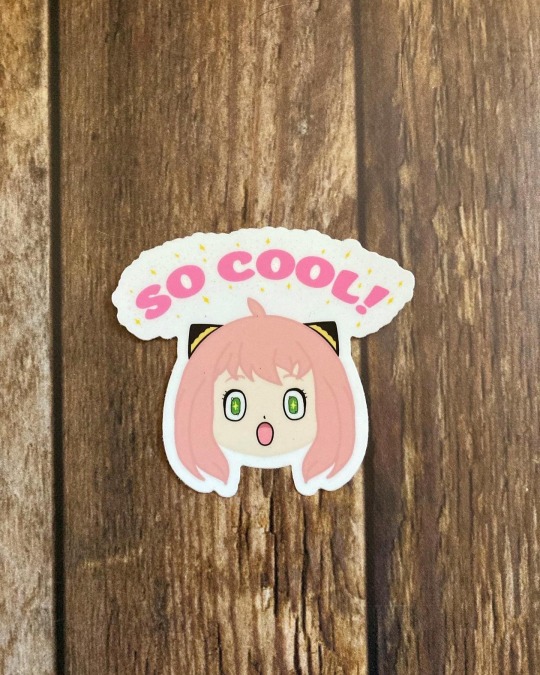
Text
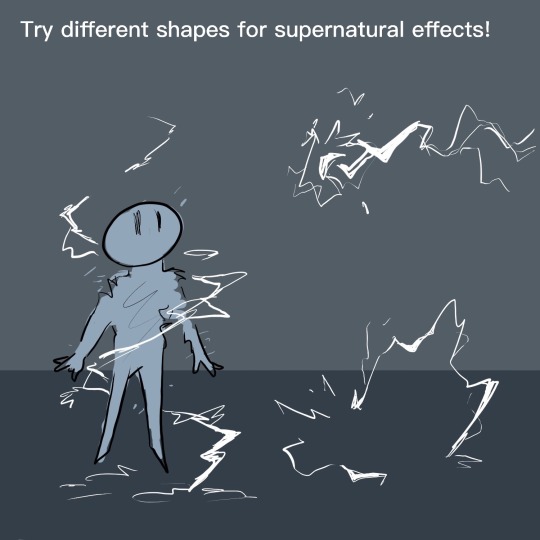
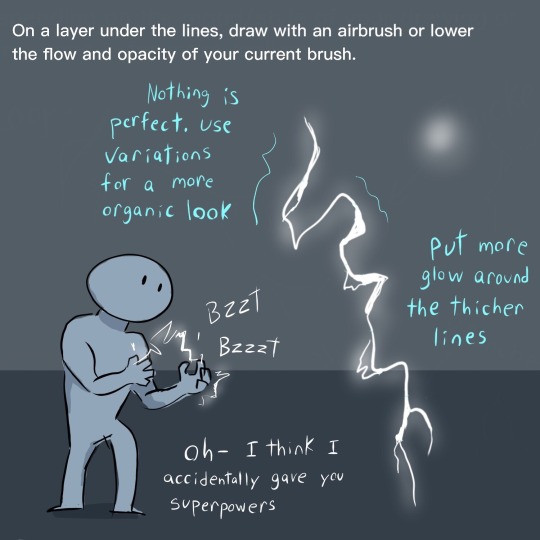
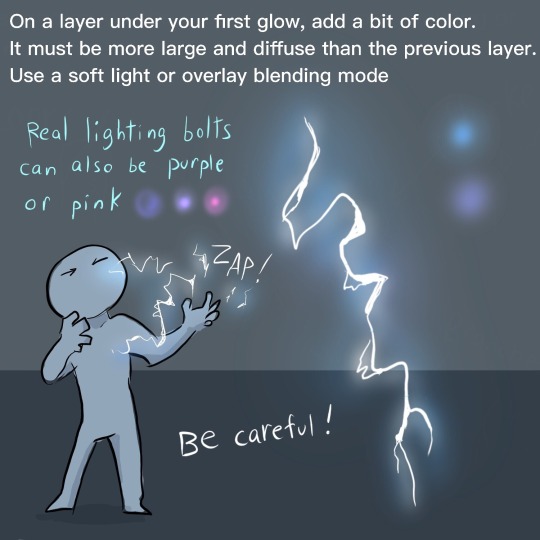
Electricity tutorial
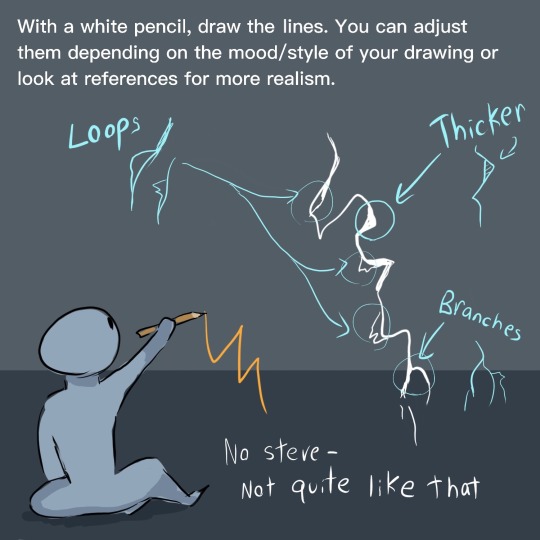
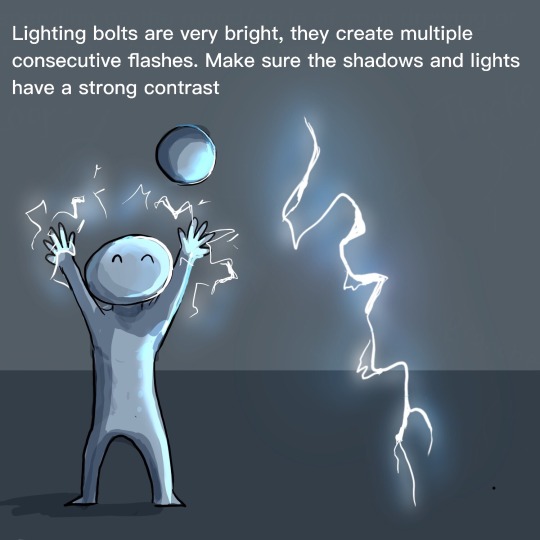
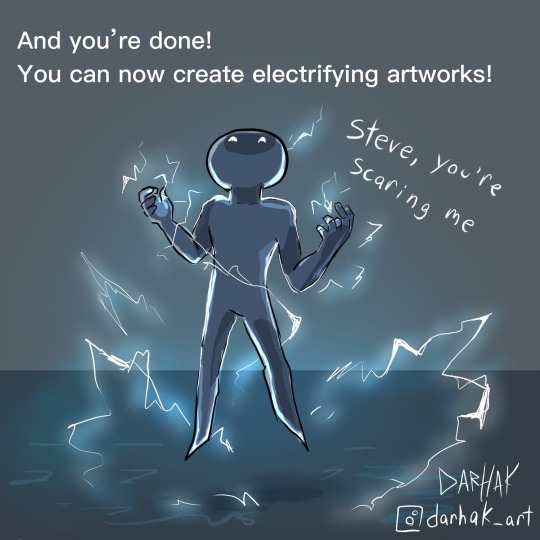
I don’t know how to deal with Steve honestly. Things are getting out of control at every tutorial… It’s been almost a year this tutorial is on Patreon and I don’t have a lot of new things to post, so enjoy!
You may ask yourself why don’t I post often… Well! I got a job in a 2D animation studio (Loomi animation) as a background artist! The team is awesome and I love the projects. I basically draw all day, so I draw less as a hobby but still. (I might post some 3D animation too in the next months, we’ll see). Anyway prepare yourself because I feel like my artskills are improving a lot since I started at the studio ahah!
Metal tutorial
Fire tutorial
Underwater tutorial
12K notes
·
View notes
Text
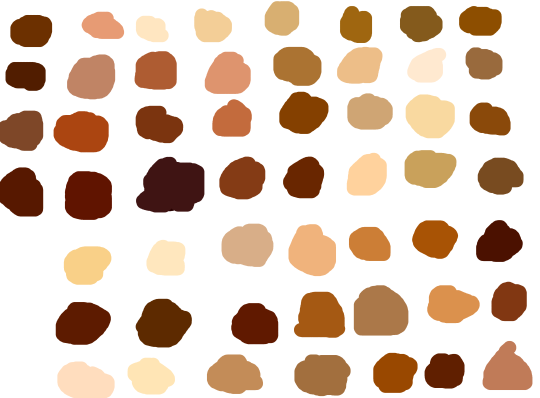
skin color ref because some of yall non-black poc and whites keep fucking up as if yall don’t know there’s other shades of brown when u racebend for woke points or something
(non-black artists please reblog)
184K notes
·
View notes
Text

Appa deserves all the love and protection
4 notes
·
View notes
Text

finished up a Blue Spirit sticker design today 💃🏽
6 notes
·
View notes
Text


LOOK AT THIS IMPROVEMENT
3 notes
·
View notes
Text

I’m finally using quarantine time to art
#weapons#dnd#dungeons and dragons#daggers#knives#not really knives but you know#digital art#yajaira arts
3 notes
·
View notes

Text
Some advice for if you’re having trouble drawing hands proportionally, for basic pictures–
Put your own hand on your face, with the heel of your palm on your chin. Pay attention to the overall width, and where your fingertips and knuckles are. Then draw a rough outline of the hand over the face you’re drawing, and match the proportions to yours. You can adjust up or down a bit from there if you feel the need, but that should be a good base visual.
6K notes
·
View notes
Text
being a self-taught artist with no formal training is having done art seriously since you were a young teenager and only finding out that you’re supposed to do warm up sketches every time you’re about to work on serious art when you’re fuckin twenty-five
395K notes
·
View notes
Text
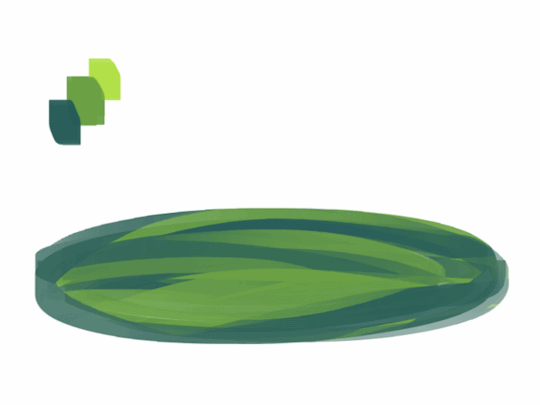
a quick grass tutorial
I’ve never really wrote a tutorial before so apologies if this is bad
1. okay first thing I do is pick three colors, a mid, dark, and light. I like to check the colors in greyscale to make sure there’s enough contrast between each one.
I then plop down a blob of whatever my middle tone color is.
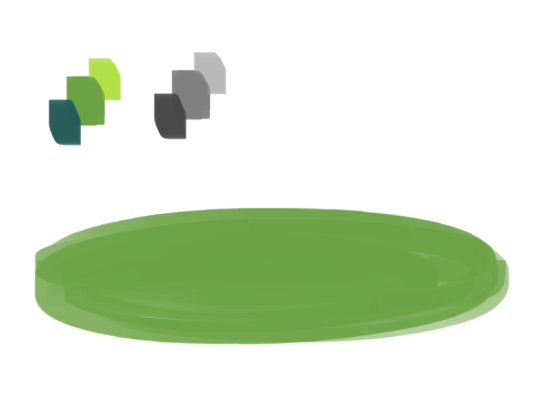
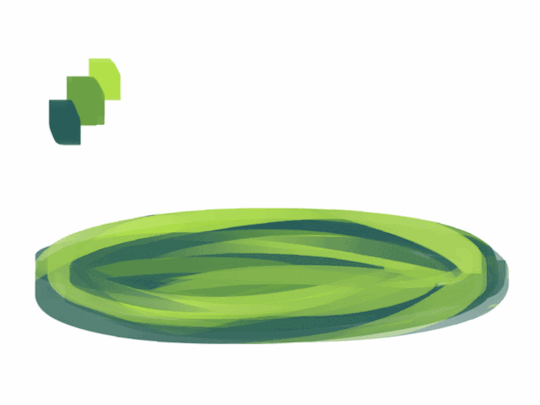
2. next, I take my dark color and just sort of randomly place it around. I try to make sure there’s a good amount of both the mid and dark tones spread throughout. I personally like to keep it kinda messy. I also have pen pressure on for both brush size and opacity, so I can have some blending action going on.
3. for the next step I do the exact same thing as before, except with the light color.
4. aight this is where we start adding details. see how you just have a bunch of colors and edges where two colors meet? use the eyedropper and go to an area where two colors meet, eyedrop a color, and then use that color to draw in your grass blades. I do this at every point where colors meet. should note I personally like to use a square brush, but you can really just use anything.
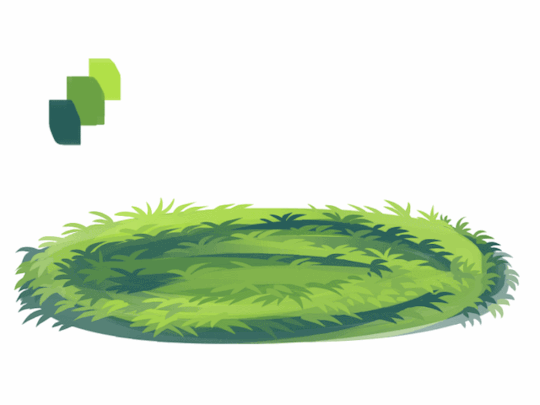
5. you can technically stop at the last step if you’re going for a more simple look, but to add more details I go to the “empty” areas of solid color and just draw in random strokes using a color nearby. it’s just a way to fill up the empty space.

6. basically more of the same idea of eyedropping and drawing. for more variety so things look interesting, I like to add random plant shapes.

7. and so the grass doesn’t look too plain, I add random dots of color and pretend it’s flowers and stuff.
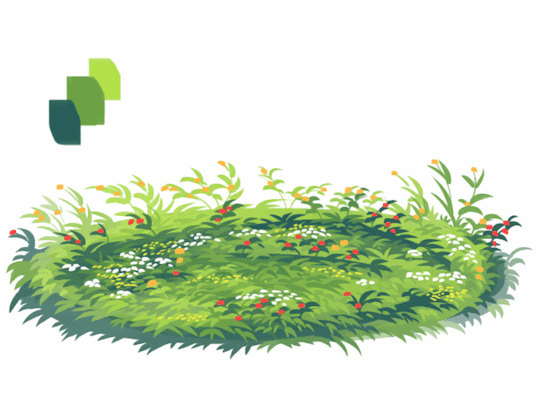
and there you have it, this is how I approach drawing grass.
122K notes
·
View notes
Photo
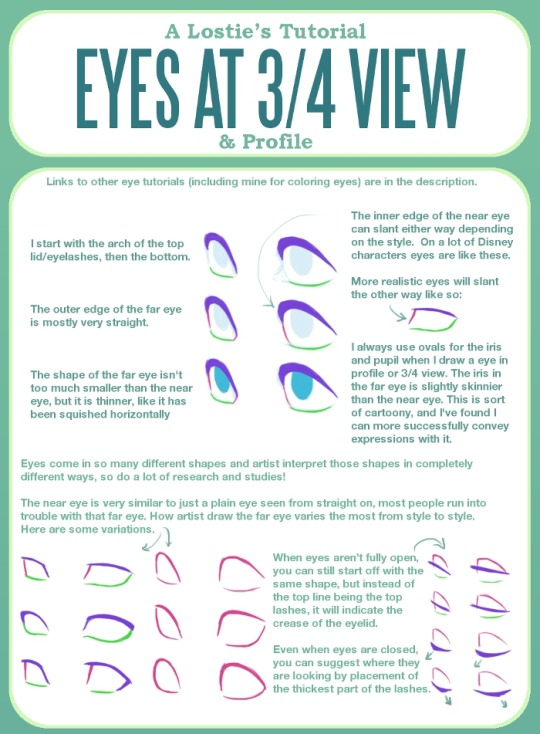

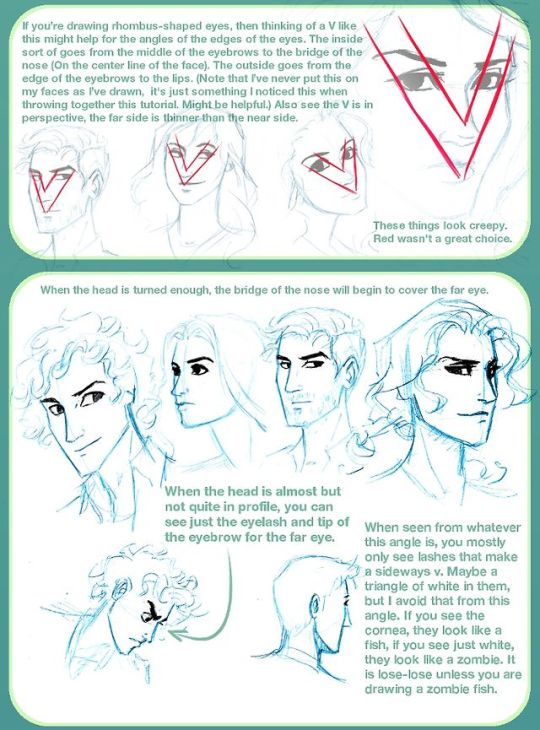
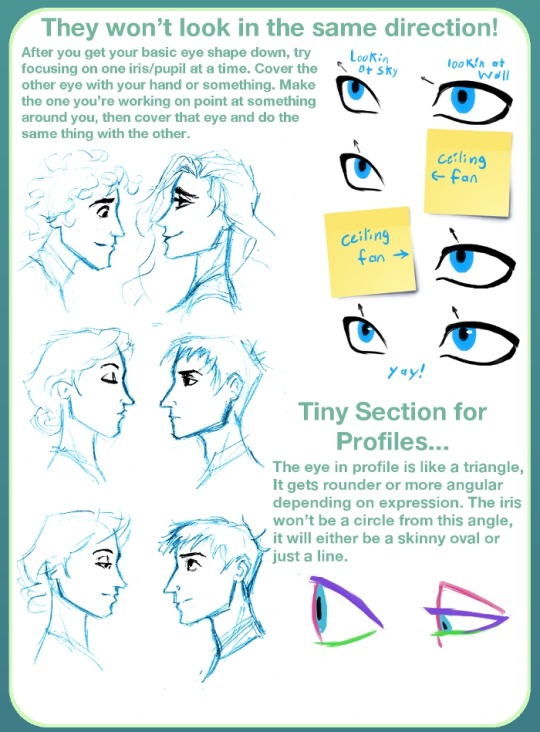
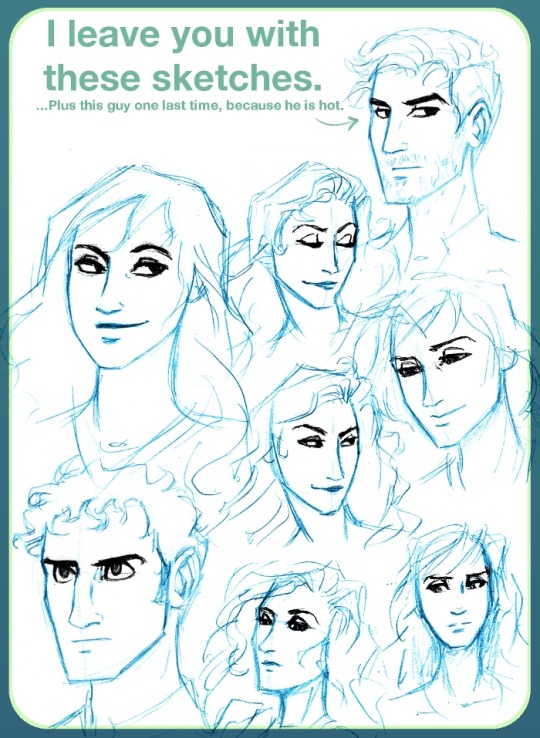
If you would like to request a tutorial, you can do so on this post over here! Eye Coloring Tutorial by me | Other Eye Tutorials: 1 2 3 | My Resource list for Faces and Heads
95K notes
·
View notes
Photo


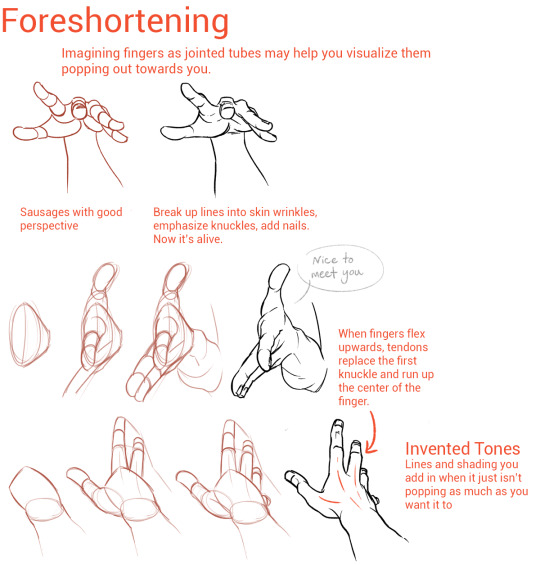
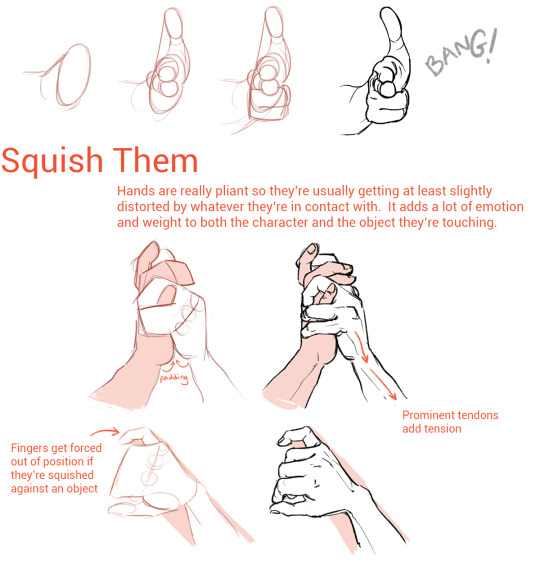
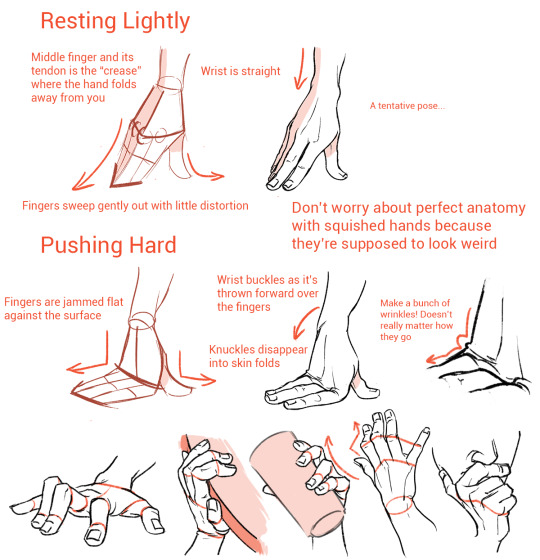
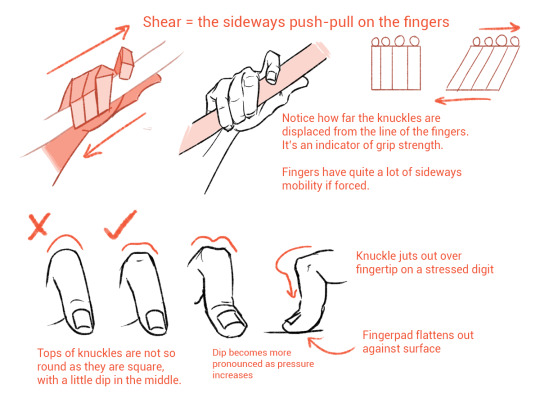
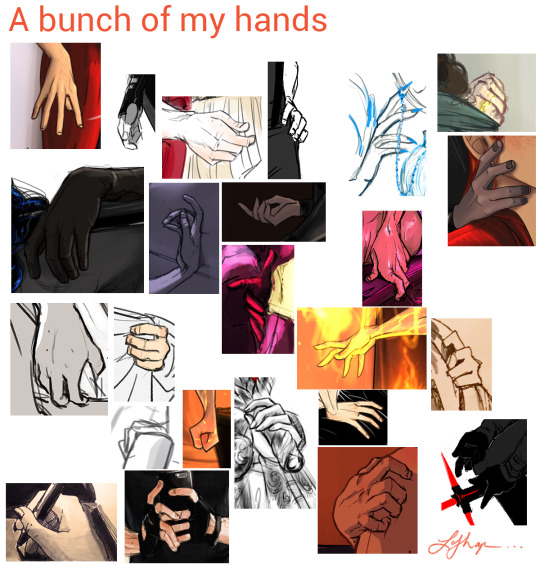
I’m not an expert but I like hands a lot so hopefully some of this was helpful!
224K notes
·
View notes
Photo


Notes on what goes into how I do expressions/faces.
I felt bad I pretty much did a “draw a circle NOW DRAW THE REST OF THE OWL” for this question so I thought to expand a bit.
55K notes
·
View notes
Note
I have two questions! First: have you ever thought of doing a tarot card suit for your characters? I think it'd work really well for them! And two: help me how do I draw legs
@gravitality
Hi!! I’ve absolutely been thinking about that, yeah, in fact I recently talked about that to my boyfriend just recently. It’ll likely happen after october! And to answer your second question! I made a thing on legs that i hope you’ll find useful!!
So. I’ve already explained basics on legs here, but I don’t think it hurts to go through some extra details to help you understand legs some more.
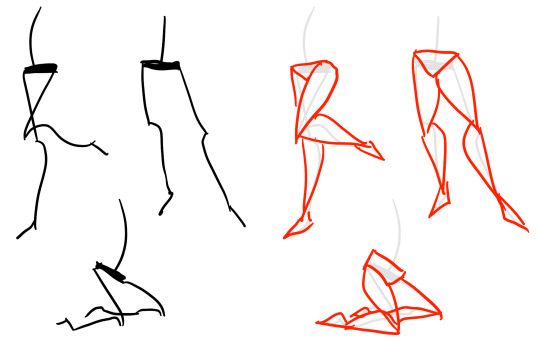
The very basic thing is to imagine legs as teardrops. Again, this has already been covered in said tutorial above, but I figured it’s still good to mention even the most basic thing that I know of. I still highly recommend you check it out to get in more detail and to see some other examples and practices that you do. But basically, think of legs in the shapes of teardrops, when it comes to shape. If you need a simple stick-figure to connect the legs in the first place, make sure that they bend at the knees a bit so that the legs don’t come off as stiff and unnatural.
As you can see, this method works perfectly for realistic legs as it does for stylistic ones. Remember to use these as a guideline, never to be the exact base of the legs you will be drawing. If you draw traditionally, remember not to draw these guides too hard, or they will be hard to erase/do freestyle!
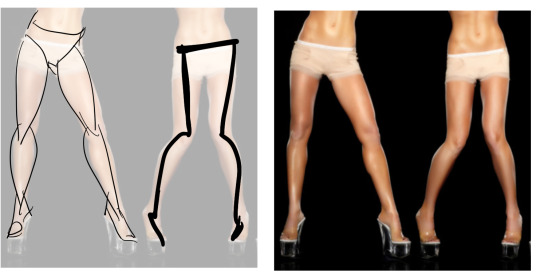
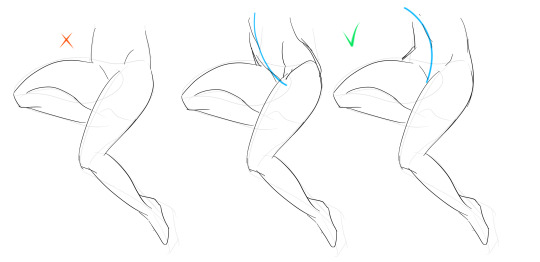
But how do you actually draw out the legs without drawing them perfectly straight, as shown to the left? The trick is to add volume to them, and how you do that can be winged to your own liking. The idea is to think in curves. As no leg is perfectly straight. You may make these curves minimal if you don’t want them to be curvy, but keep in mind, still, that not even your own bones are perfectly straight, so it is highly recommended that you make them bend, at least a little.
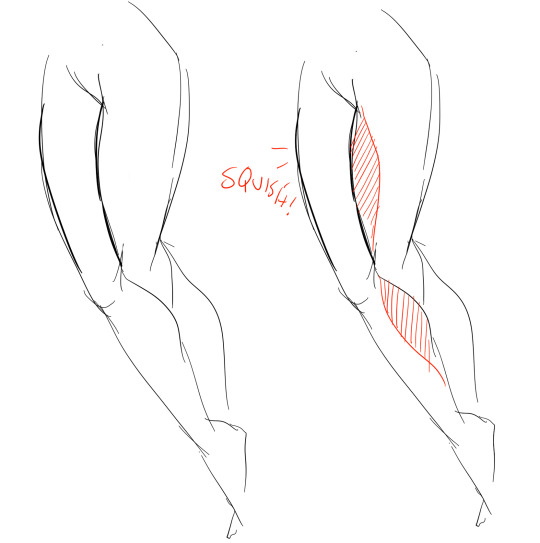
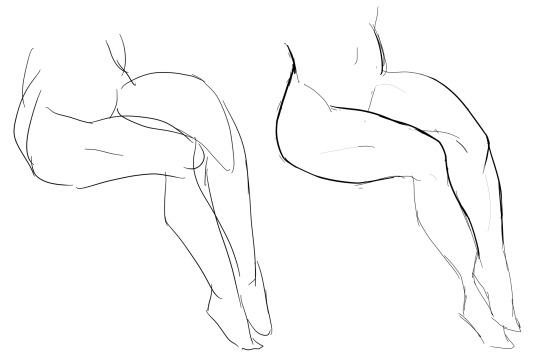
It all depends on how you draw them as well. Say you put your legs together, as shown in this picture, what happens to the fat and muscle? Naturally, they press together, much like how thighs squish on the surface when you sit down (I’m sure most people know what I’m talking about). Make sure this shows in your art! This is very important to keep in mind, because it makes it all look more natural and believable. Try to cross your legs or stand up and sit down again for real-life examples!
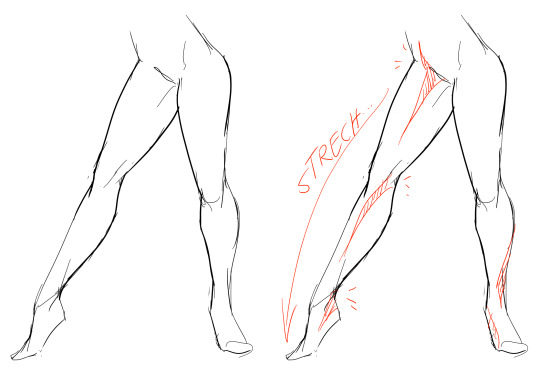
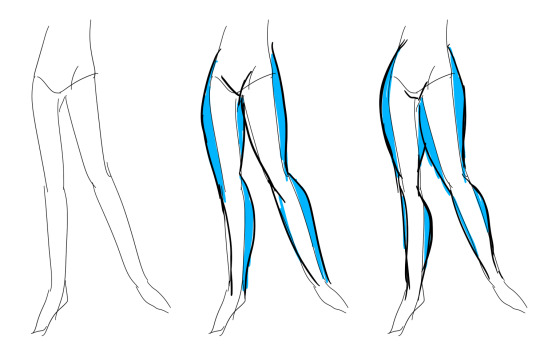
The same applies for stretching your legs, more or less, except they appear to become more ‘hollow’ and slimmer. They become less soft to the touch, too, and might show. Try stretching your legs and feel where the muscles tense and where it feels ‘hollow’. This is very helpful with your art.
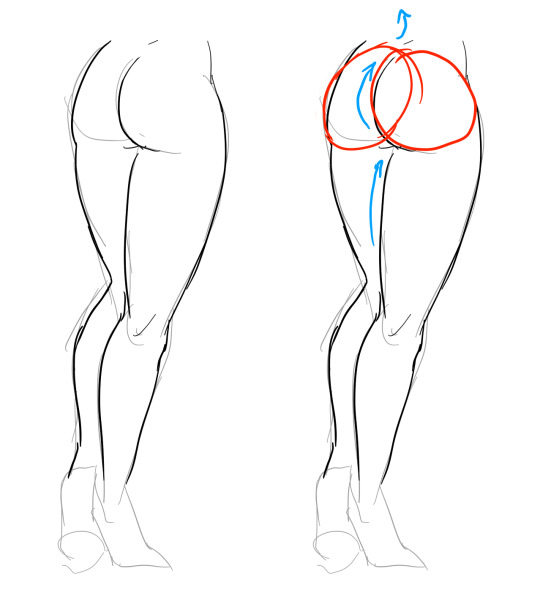
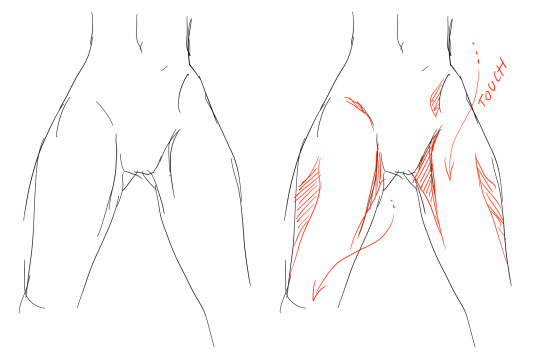
Many leg tutorials talk about legs without mentioning the behind. It requires a tutorial on it’s own, in all honesty, but this is the most simplest way to draw it connecting to the legs. Remember that it comes in many different shapes, and this is just a super basic guide! Two circles overlapping, while following the line and flow of the legs. Remember the muscle/fat as mentioned above!
Okay, so we got the basics of leg shapes figured out? What if you want o draw them in a certain pose, or with a certain silhouette, but perhaps do not have the reference for it? Or you want to blend your style into it? The key is to not shy away from doodling the form. Make mess, draw lightly and don’t care about the anatomy. That way you’ll get everything down without it appearing stiff. You can clean up the sketch later, always, and if you can, use a reference after you have drawn your pose, to correct your drawing.
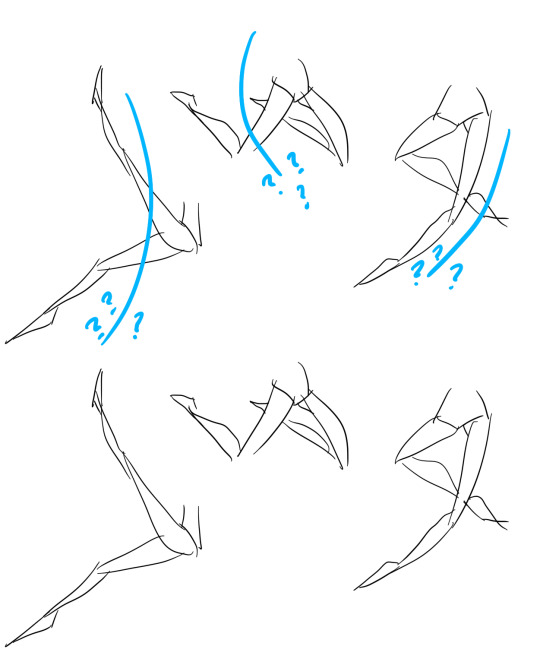
Remember that the hips do a lot to the pose of the legs! Make sure they are in flow with your legs, so that it can look more natural. Remembers that hips ‘rotate’ with the spine.
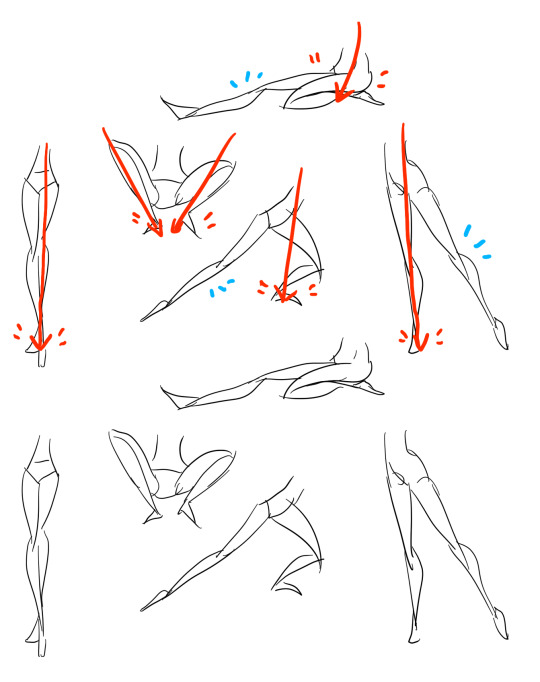
I’ve talked about this method before when it comes to posing, and the same applies for the legs. One way to make legs appear ‘steady’ is to picture them standing in a line, and one of those legs need not to stray from the lines too much, making it steady. If you want a dynamic pose despite the steady pose, you can always have the other leg stray from the line, since it only matters that one leg is steady. This method can create good, casual poses without making them appear boring. (also notice how the teardrop shapes are used here, despite the highly stylized legs)
Do you want a highly dynamic pose, or them to appear unsteady, then skip the line entirely and make both legs aim away from it completely. As you can see, the legs appear more moving, in action, as if they’re fighting, falling, or dancing. As you can imagine, this is not a pose that one could stay steady on, suggesting that it’s taken mid-movement. More about posing and this ‘line’ method is talked about in this tutorial.
Hope this helped you, if you have any questions let me know, and if you’d like to check out all my tutorials they can be found here!
28K notes
·
View notes