
Costume and prop making for cosplay Progress on FB and IG @dashycrafts 🔨🎨
Don't wanna be here? Send us removal request.
Statistics
We looked inside some of the posts by lisadashy and here's what we found interesting.
Average Info
Notes Per Post
74K
Likes Per Post
43K
Reblog Per Post
31K
Reply Per Post
3
Time Between Posts
3 months
Number of Posts By Type
Photo
14
Note
2
Text
1
Last Seen Tumblr Blogs


Fun Fact
69% of Tumblr users are millennials.
Photo


youtube
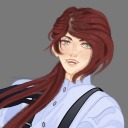
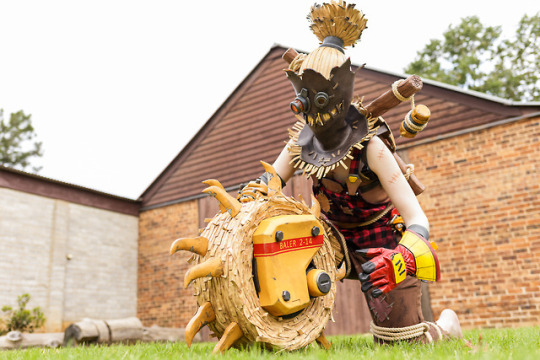
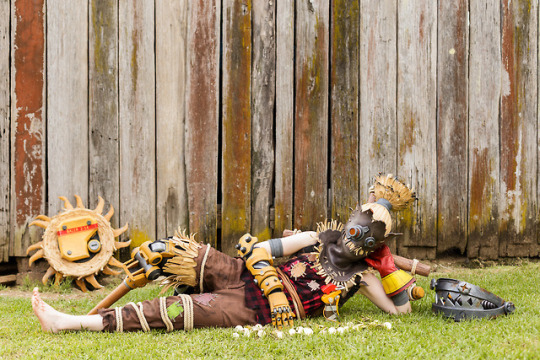
🔥 Hayseed Junkrat cosplay [ Overwatch ] 🔥
Love this skin design! ❤️🧡💛 I’ve been upgrading this project over 2 years. 📷 tags: (1) E.Hua Photography (3) Snap Happy Ian (4) Magic Missile Studios (The rest are from my solo shoot) ⚙️ Detonator 3D printed kit: birchprops
Some progress shots can be found on my Instagram: dashycrafts
Construction notes below in ‘read more’ link:
💥 Mask:
Mostly eva foam; heat formed around a cast of my head
Foam sealed with Flexbond, painted with Angelus acrylics and finished with a satin acrylic clear coat
Hair dome is detachable from the mask (3 velcro+elastic attachments)
Pony tail section is detachable from the dome via velcro inside the grey band on one half of the circle; an LED battery pack for the two pony tail lights is stored inside that band in the other half of the space
Flickering LEDs are from those LED candles; I've removed the LEDs and re-wired them to some compact, thin button cell battery holders
Orange plastic sheet (document folder) for the lenses - sprayed with “CLEAR DE-FOG”
Vision is fairly limited, especially in low light with the LEDs on
RE: Breathing: There are gaps in the mouth hay and between the hay dome and mask at the top
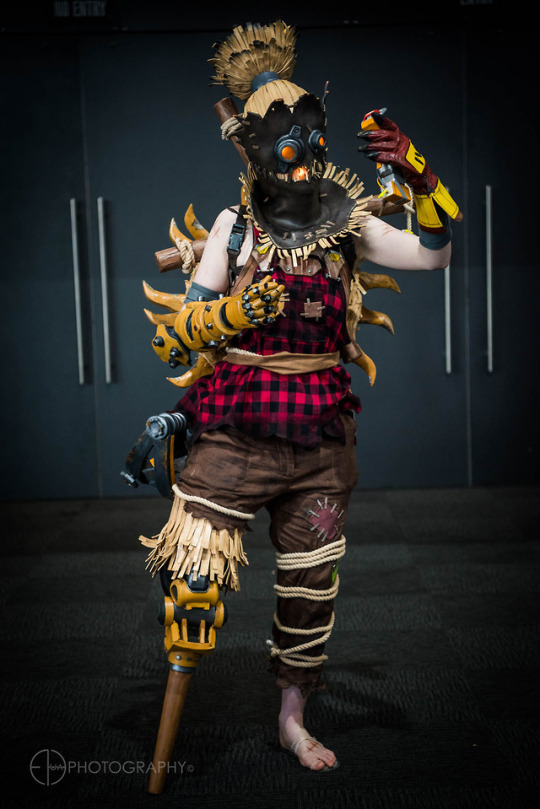
💥 Tyre, back mount and logs:
Hay is individual strips of eva foam glued on covering a foam base
Back panel removable, small items can be stored inside
Spikes are eva foam and worbla, attached with bolts and wing nuts (ended up being a hassle to screw them on/off, I should have tried something else)
Tyre attaches with a wooden peg that fits into a slot on the back mount - Apoxie Sculpt molded around the peg inside a PVC end cap which is bolted to the mount
Back mount is worbla heat-shaped over a bowl and eva foam
Logs rest on a metal bracket bolted inside the back mount, there is also webbing bolted on which wraps around the logs to secure them
Logs are eva foam cylinders with scored and heated detailing
Logs can be dissembled for travel with a threaded plastic rod inside
Rope has been tinted with some acrylic paint
💥 Singlet and waist wrap:
Cotton flannel 'buffalo check plaid' found on Etsy
Started the pattern by cutting up a cheap plain singlet, transferred that basic shape to paper then drafted the rest
Shoulder straps have strips of eva foam inside to make them sturdier, these are embedded inside the clips
Clips and patches are eva foam
I ironed on fusable interfacing to the patches and clips to try sewing them on but had some issues with the edges not sitting flat so finished them off with some glue
Darkened areas of the flannel with some watered down fabric paint, sponged on
Bottom raw edges were coated with 'Fray Stoppa'
Rivets are googly eyes
Waist wrap fabric is from the right pant leg cut off! The original colour of the pants is close enough and has a nice linen texture; dug out some fabric from my stash for the backing to make it sturdier; features sewn-in snaps
Attached a clip and keyring combo to the rope with electrical tape
💥 Arm armour and hand:
Eva foam and worbla for fingers
Hand patterned by drawing onto a disposable rubber glove (should have allowed for wider gaps for better flexibility, also probably should have used eva foam instead)
Hand pieces completely separate from black under glove, joined together by elastic (this ended up being annoying to put on/take off, next time I make gloves I’ll try attaching the pieces directly to a glove)
💥 Pants:
Started off as 2nd hand linen pants found on Ebay; dyed darker brown
Rope and patches hot glued on
Weathered with some fabric paint
Hay thigh held in place with elastic that loops around a belt
💥 Peg leg:
Pine furniture leg
Upper section is eva foam construction, front and sides only
When posing my knee rests on a support inside - dowel screwed into the leg, part of a knee pad screwed into dowel (ended up trimming most of it off as it was too bulky), added some worbla to make a curve then some foam on top for padding
Elastic straps attached to secure it around my leg, also one longer strip goes up to my belt and loops around tightly
💥 Red glove:
Started as a yellow leather glove bought on Ebay
Patterned a gauntlet cuff, made with eva foam; other details also foam
Painted with Angelus acrylics
💥 Trap:
More eva foam construction!
PVC pipe base
Jaws swivel open and closed
💥 ‘Bare’ foot shoe:
Traced around my foot to make a pattern, added a bit extra all the way around to ensure my foot doesn’t touch the ground
Clear PETG base cut with small holes drilled in for the straps (two overlapping like a cross at the middle, another over my big toe)
Eva foam added for padding/comfort, cut slightly smaller than foot, matching holes, taped on
Mesh fabric straps threaded through the holes, ends taped down (holes kept the fabric tight)
💥 Detonator - 3D printed kit by @birchprops
Glued parts together
Hours of sanding the raw PLA
Sprayed layers of filler primer
Hours of wet sanding primer
Masked and sprayed the colours on then more sanding
Completely reconstructed the printed bracket from thermoplastic as I accidentally broke the section where it bends; fragile part that ideally should be actual metal. I think it has a bit more flex than the PLA now; screwed into the body
Drilled a hole into the bracket so the antenna could be attached with a screw
Drilled out a large cavity in the top of the main body underneath the button plate to make space for an LED and button cell battery holder
Drilled out holes for magnets to hold the plate on
Glued magnets onto the plate
Filled in the magnet holes with Apoxie Sculpt and squished in the magnets to help with making the holes the right depth and alignment
Made a new translucent button that can be illuminated to replace the original opaque one. Cut and sanded acrylic rod. Dyed red.
Drilled hole for button to fit into
Wired a red LED to a button cell (2) battery holder
Glued magnets into the 'metal' ring at the top so it can swivel separately to the red cap
Cut, sanded and painted the orange and grey wiring
Drilled holes for the wiring to slot into
Made a thermoplastic cover piece for the grey wiring
Wrapped 2 different kinds of tape around; bottom layer is silver cloth tape, top is Scotch transparent tough tape for more noticable texture
Applied Rub n Buff to 'metal' parts
Painted weathering details
Sprayed clear coat
#junkrat#overwatch#junkratcosplay#overwatchcosplay#blizzard#hayseed#junkertown#evafoam#foamsmith#cosplay
420 notes
·
View notes
Note
Do you ever make these to sell?
Not making these to sell as the shape is difficult to re-create exactly and I imagine it would be tricky for me to get the fit right for other people’s hands.
2 notes
·
View notes
Photo


Completed Arya Stark S4 outfit + Needle.
A huge amount of time went into this project: many hours of research, sourcing materials, patterning, trial and error, developing new skills and re-making parts to improve; really proud of this cosplay! :D PHOTOGRAPHY: • Byte Size Photography • Rivencraft Photography • Horse photos courtesy of my friend, Fyr
The locations featured in the shoot with Byte Size Photography were in Lithgow and Wentworth Falls (Australia). The other shoot was done solo: DSLR mounted on a tripod, remotely controlled via a phone app. The last two photos with the horse were during The Kingdom of Ironfest. Appreciative of the effort involved by the lady in bringing her beautiful horse to the event (she was cosplaying a Nazgûl / Ringwraith). :) Album featuring close up photos of each part of the costume: https://www.flickr.com/photos/92263865@N03/albums/72157650861833670 NEEDLE DETAILS: • HILT: Narrow PVC pipe with wider pipe on the ends + shaped dowel inside + leather wrap w/ Angelus leather paint shading • CROSS-GUARD + POMMEL: Sculpted with worbla; pommel has a pine base which connects/slots with the hilt dowel; worbla primed with wood glue • BLADE: Resin cast into foamed PVC sheet (aka sintra) mold (sealed with J-Wax); fibreglass fishing rod embedded for the core; grooves sanded in; METAL FINISH: Rub n Buff applied over a Krylon Fusion Satin Black base (wet sanded to 2000 grit) Video of the blade finish reflectiveness: https://www.youtube.com/watch?v=h9lNcEQHRYU JERKIN DETAILS: • Created the pattern in Adobe Illustrator • Strip material is jute webbing, original width 50mm, edges machine sewn, airbrushed with a custom mix of Createx paint • 2mm and 3.5mm leather cord • Edging is pleather that has been painted with Angelus leather paints (sponged on and rubbed with paper towel) • Distressing done with sandpaper • Hand-sewn eyelets • Mud detailing is acrylic paint sponged on BLOUSE DETAILS: • Altered vintage pattern Butterick 5285 • Fabric type is unknown (no label), possibly some kind of wool blend • Lower drawstring casing for the gathered neck is a french seam that joins the neckline to that separate piece/strip, the upper casing is just hemmed • Distressing done with sandpaper • Airbrushed the dirty areas with a custom mix of Createx paint • Separate brown neck band fabric is cotton gauze PANTS DETAILS: • Altered pattern Butterick 5614 • Fabric: linen; fabric weight: approx. 290g/sqm / 10.2 oz) • Distressing done with sandpaper • Airbrushed the dirty areas with a custom mix of Createx paint BOOTS DETAILS: • Altered (cut) shoe base • Cardboard patterning • Eva foam, heat formed around toe area • Covered with textured pleather • Painted / weathered with Angelus leather paints • 1mm waxed thread detailing • Eyelets • Leather lace BELT DETAILS: Steps involved: • Bought brown belt length blank • Cut to what I think is the right length (bit longer than V1) • Tapered one end to a point • Holes punched in • Buckle slot cut • End buckle area skived/shaved down to fit 9mm rivets • Belt keeper/loop scored and stapled • Edges bevelled, dyed, burnished and sealed • Sponged on Angelus leather paint for weathered look • Distressed it (bending, folding, etc)
9 notes
·
View notes
Text
RE: Magic power prop ideas for cosplay!
Hello everyone, I’ve recently added some new versions to the post - I thought it would be better to update that post to keep them all together. :)
http://lisadashy.tumblr.com/post/110086260174/magic-power-prop-ideas-for-cosplay-updated-with
5 notes
·
View notes
Photo
Signal boosting for a lovely friend who creates beautiful hand-made geeky jewellery / accessories. ^__^
I'm particularly fond of the Legend of Zelda: Ocarina of Time-inspired stacked song rings made with sterling silver and the glow in the dark Fallout-inspired charms of Nuka-Cola and Quantum.
Have a browse and keep in mind there could be possible gift ideas or items that would interest a friend.


Just a few geeky/fantasy pieces I’ve been working on lately, all available in my Etsy store!
www.geekoutlet.co
·Winged crystal quartz sword pendants ·Deathly Hallows pendant ·Slytherin ring with Labradorite ·Legend of Zelda song rings ·Lapis Lazuli’s mirror ·Mermaid tail pendant, fin moves!
56 notes
·
View notes
Photo


If you haven't seen any of the show iZombie yet I highly recommend it - fantastic writing and cast!
Love the variety of options in outfits, accessories, props and characteristics for cosplaying Liv!
Bought the blouse from Myer, love the design!
Wig (re-styled) from Wig is Fashion
White foundation - Manic Panic Dreamtone
For these shots I set up my camera on a tripod and controlled it with Canon's remote phone app.
Wig and make up took longer than expected so I didn't have much daylight left by the time I was ready but happy with these!
5 notes
·
View notes
Photo

Clever crossover concept by Magic Missile Studios at Sydney Oz Comic-Con. xD
Arya: Dashy Ryuk: Nerdalina Ballerina
4 notes
·
View notes
Photo


Made some major improvements to my Legion cosplay recently:
New smaller head has really improved proportions. The face mask is 2 layers of anti-slip mat/mesh, these are attached together by elastic which slots through some cut slits and is glued into a loop; I then attached velcro to the elastic; the eva foam plates were glued to elastic loops as well. Painted on the black lines.
Replaced the iphone eye with a static eva foam version because the screen/effect was lost in day light.
New feet have wedge heel boots as a base for a height boost.
Overhauled the back armour, which included: trimming it to make it narrower, separating the 'butt' plate/section (which has elastic connecting from back to front under my crotch to make the plate sit snug, repositioning and shortening the harness straps and tubes to fit more closely to my body, heat-bending the 'spine' tubing into more of a curve (added eva foam pieces beneath to push out sections) and adding PVC pipe to push out that outer section (where the shorter larger tubing mounts).
Chest-side tubing is now connected with metal key-ring clips, same as the elbow tubing.
Secured the chest armour closer to my chest.
A major mistake I made earlier was gluing parts to the body suit. All of the tubing can actually be strategically secured by straps and connected to separate armour. For example the tubing which runs up from the back of my thigh along the side of my hip is now only partially glued on at the bottom, the other half is now secured by running through an elastic loop which is around the butt plate strap - I picked up this approach from another amazing Legion cosplayer, Dillon in N7 Elite.
Doubled the calves padding.
Re-painted the boots and gloves.
Some material notes:
Chest armour = cast latex reinforced with Chux wipes and eva foam
Rest of the armour = eva foam (templates created in Illustrator, on paper and with paper mock ups)
Body suit = airbrushed Zentai suit with Createx paint
Smaller tubing = gap filler/backer rod
Larger tubing = poly drain pipe
Feet = wedge heel boot base, shaped with upholstery foam then covered with spandex
Recorded a brief video as well (very similar to the first set of photos): https://www.youtube.com/watch?v=gyTyrGhrwt8
Tali cosplayer: Milly & Chloe's Cosplay Closet
Photography: 1: Myself (set up camera) + assistance from my dad. 2: Industry 383 3: Myself (set up camera) + assistance from my dad. 4: Lark Visuals 5: What A Big Camera 6: SoulBound 7: Myself (with Canon's EOS Remote app) 8: Trung Do Photography 9: Steamkittens
I've changed so much since the first time wearing this costume at PAX Aus in 2013. All that trial and error has been a great learning experience. :) It is still far from what I consider finished (still so much I can improve on) but I want/need to move on to new projects.
2K notes
·
View notes
Photo

Arya Stark boots complete!
Altered (cut) shoe base
Cardboard patterning for eva foam pieces
Eva foam heat formed around toe area
Pleather stretched over and glued with contact adhesive
1mm waxed thread detailing (threaded twice for double thickness)
Eyelets
Leather lacing
Angelus leather paint weathering
I originally scored in texture into the foam but wasn’t happy with it so covered it with the textured pleather. Ended up being too difficult to properly re-lace the toe area at this stage due to it being assembled/enclosed (I originally laced it prior to gluing on the eva foam covers), so I took a different approach: cut tiny pieces of thread, hot glued them on, then tried to taper the ends and push them in a bit to create the illusion of them being threaded through. Might need to work on that a bit more.
7 notes
·
View notes
Photo


Arya make up, hair and contact lenses test!
• Lenses = FreshLook ColorBlends Sterling Grey (included a photo showing me wearing just one for comparison to my natural eye colour). Very happy with how they look. :D Today I managed to insert both contacts in less than 20 minutes, that is much faster than previous times. >_<
• Hair = Styled with wax.
• Make up = foundation, eye brow pencil and eye shadow for below my eyes and dirt.
*Edit* I’ve received some great advice on how I can improve the make up for next time. :)
4 notes
·
View notes
Photo

Re-made Arya's belt with leather from Birdsall Leather. This is my first leather working project. I think I hammered the rivets in too much but at least they're secure. 2 of them will be hidden when the belt is worn anyway.
Steps involved: - Bought brown belt length blank - Cut to what I think is the right length (bit longer than V1) - Tapered one end to a point - Holes punched in - Buckle slot cut - End buckle area skived/shaved down to fit 9mm rivets - Belt keeper/loop scored and stapled - Edges bevelled, dyed, burnished and sealed - Sponged on Angelus leather paint for weathered look - Distressed it (bending, folding, etc); might do some more later
3 notes
·
View notes
Photo


Quick rush build of Arya’s Needle before Iron Fest that was last weekend (in Lithgow, Australia).
Main section of the hilt is PVC pipe with dowel inside, ends tapered by a dremel. Pommel started off as a pine base, drilled a hole into it that corresponded with the tapered dowel end. Sculpted the detailing with Worbla, same with the cross-guard. The blade started off as 3 tapered pieces of Worbla which were then merged together to form that triangular, scooped shape. Filled in some of the scoops with Apoxie Sculpt.
The metallic paint I used was Dupli-Color Auto Spray - "Chardonnay" (gold) for pommel and cross-guard and "Iron Grey" for the blade. On top of that I sponged on an acrylic dark brown as a wash so it could sink into the recessed areas then be wiped off the raised areas.
Worbla was a poor blade material choice. Broke at the event so I repaired it with tape then painted over that with some emergency touch-up paint, outside the tent I slept in. Reminiscent of Ron Weasley's wand. xD I will be re-making the blade with a stronger, more rigid material in future that goes through the entire length of the hilt and includes a core - needs to be con-safe though, will also refine the overall finish so it is smoother. Also contemplating 3D modelling + 3D printing parts to create more intricate detail - so keen to start developing skill in that area, I foresee a steep learning curve.
The grip is a section of a 2nd hand purse that has been painted.
I think the overall scale worked out well in proportion with my height, hand size, etc. Based these measurements on Needle's size in relation to Maisie. I’m still not sure if it’s exact but I think it’s close.
349 notes
·
View notes
Photo


Arya jerkin complete! :D (For now lol, might alter the weathering a bit later)
Hair is a work in progress, growing it out because I don't think I can make the wig I bought before look as legit as my actual hair. Haven't styled it for these photos, I'll be posting a hair styling + make up + contact lenses test later.
6 notes
·
View notes
Photo


Forgot to upload this earlier, this is one of my older cosplays from 2011!
Ravenclaw quidditch player - PS/COS film style. 1st photo credit: Isaac (exposures.smugmug.com)
Parts made: - Robe - Arm, leg and knee guards - Broomstick Parts bought: - Sweater - Corduroy pants - Patch - Socks - My old leather converse shoes (not entirely screen accurate but I like the look of them) Parts modded: - Paintball gloves (painted them to match the guards) - Snitch (added some gold paint to it) Fabrics used for the robe: - Chino drill (colour: royal) - I liked the texture and shade of blue - Cotton voile (colour: metal) - this fabric is very light, feels so nice and the colour is perfect. It is translucent by itself but since I used it as lining it wasn't an issue at all.
10 notes
·
View notes
Photo


Started this project [Arya Stark] mid last year, currently re-making it to improve on proportions, fabrics, detail - everything. :P
Created the jerkin pattern in Adobe Illustrator. That roll sitting on top is jute webbing. 3rd photo shows a mock up for ref; strips cut, edges sewn then laced together with leather cord. I have airbrushed the final strips brown (with Createx) prior to the lacing stage.
I've almost finished the jerkin, next update will show it completed. :D
3 notes
·
View notes
Note
Hi there! I hope you don't mind me asking how you made Legion's data pad. I think it would be a great prop and I'd love toget some tips/a tutorial! Thanks so much
Hello! That was a very last-minute prop before a con. I bought a clipboard for the data pad screen and snapped parts off (after scoring, I don't recommend this technique though because it can easily go wrong), can’t remember exactly what type of plastic it is, possibly acrylic, fluorescent edge-glow type. Etched the text and shapes in with files, tracing a printed version (paper) underneath. If I had more time I would have sent a more detailed design to a laser cut & etch service company.
Frame is 12mm eva foam, detailing done with utility knife and heat gun (heat expands the lines). Painted (sponge brushed) with 4 layers of Angelus leather paint, wet sanded lightly with 800 grit after each layer. One coat of Krylon Crystal clear on top. You could also use spray paints on foam, just make sure the can mentions being suitable for plastic. I dremeled channels into the foam to embed the LEDs. The battery holder was embedded too but protruding out of the frame a bit, should be completely concealed. If I was going to make another I would use a more rigid material for the frame, possibly sintra.
0 notes
Photo


Magic power prop ideas for cosplay!
*UPDATED WITH NEW VERSIONS!*
Set #1: Most recent version (V4). Shortly after posting V3 (set #2) I realised the spiral section around the pendant needed to look more warped. Managed to make 1mm PETG work for the entire piece this time, looks consistent now. Merged the previous pattern pieces into one for a cleaner design. Video of it on youtube: https://youtu.be/nCKk30X4bM0
Sets #1-4: PETG thermoplastic and LEDs (’Berry lights’ and ‘Pet collar pendant light’ - from ebay). More info/tutorial in this thread: http://www.therpf.com/f9/magic-power-prop-tutorial-233092/
Set #5: Heat-shaped PETG strips to form a half-sphere structure to support organza, all attached together by tape. The most vivid sheen swirls in the bottom left photo were created by a torch (I was just holding the torch separately in my other hand to test light reflection, the light isn’t built into the prop) Set #6: I later found another organza (it was labelled 'dance organza' - bought it at Spotlight) with a more vivid sheen than the type featured in the 4th set of photos. Video showing the organza fabric in motion: http://youtu.be/RkYFXwSOWTE
72K notes
·
View notes