#prop tutorial
Explore tagged Tumblr posts
Visit Tumblr Blog
Explore Tumblr blogs with no restrictions, modern design and the best experience.
Last Seen Tumblr Blogs


Fun Fact
Tumblr.com rank in the US is 25.
Text
Tutorial: William T Spears' Death Scythe (moving version)

Heyo! I recently wrote this tutorial for the Cosplay Tutorial Challenge, and since part of the spirit of the challenge is actually posting and distributing the tutorial, I figured I'd link to it here in case anyone wants to cosplay Will in the future :)
Here is the link to my tutorial
Feel free to hit me up if you have any questions! Some of the parts are a little fiddly and hard to explain, so I'd be happy to walk anyone through any confusing parts
Additional rambling:
You'll notice I don't provide any close-ups of my own Death Scythe or provide any video examples. That's because, embarrassingly enough, my Death Scythe doesn't work.
Due to multiple constraints, I wasn't able to coat the EVA foam in Worbla, and thus the handles aren't durable enough to put any force on the dowel 💀 The grippers move if I wiggle the dowel a little, but alas, it doesn't work the way it's supposed to.
However! I am 100% sure my mechanical reasoning is sound. Not only do my individual parts move the way they're supposed to, I've made several working models out of paper, cardboard, and push pins. At least one video is floating around on this blog somewhere, believe it or not.
Anyway, figured I'd explain myself somewhere. Let me tell you, the Worbla coating is NOT optional. My poor Death Scythe is falling apart, and I'll need to remake it sooner rather than later
That's all! Enjoy the tutorial :)
#black butler#kuroshitsuji#cosplay tutorial#william t spears#death scythe#cosplay prop#tutorial#prop tutorial#grimpost
24 notes
·
View notes
Text

frieren staff speed build!! made in about 2 weeks. it’s not perfect and i’ll definitely be updating it in the future, but i’m satisfied for now. just glad i finished it in time to have a semi decent prop to carry this weekend!


i cut the base shape out of 5mm foam and then built up the shape with foam clay. molded the central ring around the red sphere in the middle (which is just a painted diy ornament) and attached it with wooden dowels. the fabric strip is cut from some cheap red fabric i had left over, with a foam bead i molded and painted gold at the end. the gemstone at the end is an extra crystal i had left after making the earrings!
so excited to finally wear the full costume this weekend at metro! i’ll be sure to share lots of photos here after the con but you can also find more on my instagram!
#cosplay#cosplayer#metrocon#cosplay wip#cosplayers of tumblr#frieren#frieren anime#frieren cosplay#frieren: beyond journey's end#sousou no frieren#cosplay props#prop making#cosplay process#wip#cosplay making#cosplay tutorial#prop tutorial
10 notes
·
View notes
Text
youtube
I'm excited (And slightly terrified) to post the project that's been occupying most of my spare time for the last few months, filming a very in-depth tutorial on how to make one of my Firey Plush toys for Youtube! I have been wanting to make this video a reality for a few years now, so it's sorta surreal to finally see it finally complete. I'd be lying if I said I wasn't a little nervous about the quality of this video, I'm very much an amateur at sewing after all. But if an amateur like me can make this cool plush, then surely the majority of folks out there can make it too!
Hopefully this'll be the first of a good few prop replica tutorials I film for Youtube, but I'm gonna reward myself with a bit of a break before I even think about recording something again.
#labyrinth#jim henson#labyrinth 1986#sarah williams#jareth#Firey#Chilly Down#Tutorial#prop replica#prop making#Youtube
184 notes
·
View notes
Text
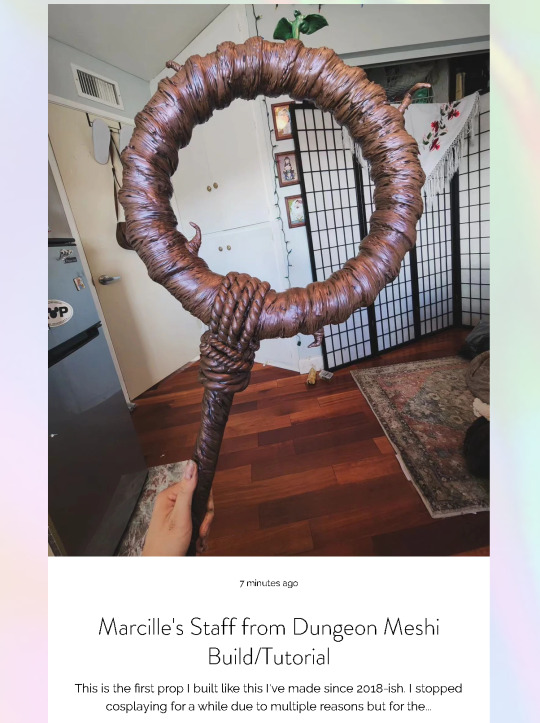
I made a tutorial/build log for how I made Marcille's staff from Dungeon Meshi!
#cosplay#personal#props#propmaking#dungeon meshi#delicious in dungeon#marcille donato#marcille dunmeshi#dunmeshi#dungeon meshi cosplay#cosplay props#tutorial#cosplay tutorial#cosplay wip#my cosplay#prop build#cosplay prop#delicious in dungeon marcille#marcille dungeon meshi
172 notes
·
View notes
Text
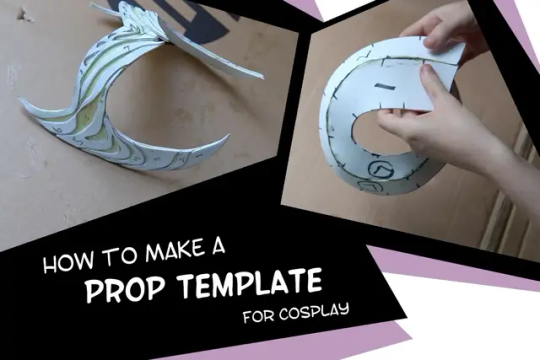
Written by Emily Joice of Cosplay Advice, this tutorial teaches you several methods to create templates for cosplay props. You can check it out here!
The CovidSafeCosplay blog and its admin are unaffiliated with the tutorial author or Cosplay Advice, and are simply sharing the resource. Blog admin has not personally tested each method. Please thoroughly read the tutorial for full instructions.
Do you have a favorite free crafting resource? Share in the comments or via a reblog! Bonus points for those that are free, include image descriptions, or contain detailed tutorials for newbies to follow.
#cosplay#cosplay tutorial#cosplay props#cosplay prop#cosplay tip#cosplay 101#crafting tips#crafting tutorials
51 notes
·
View notes
Text
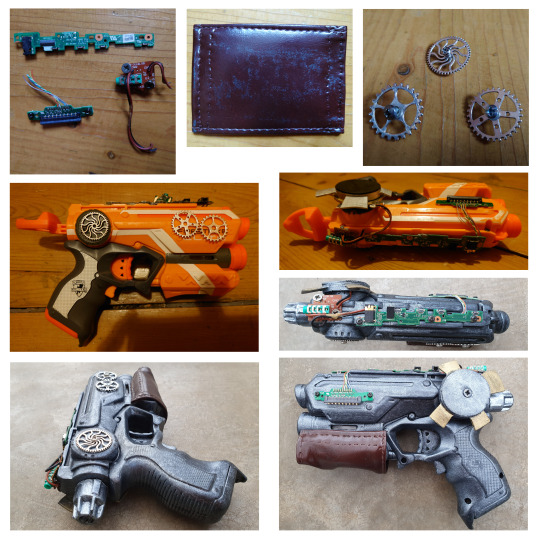
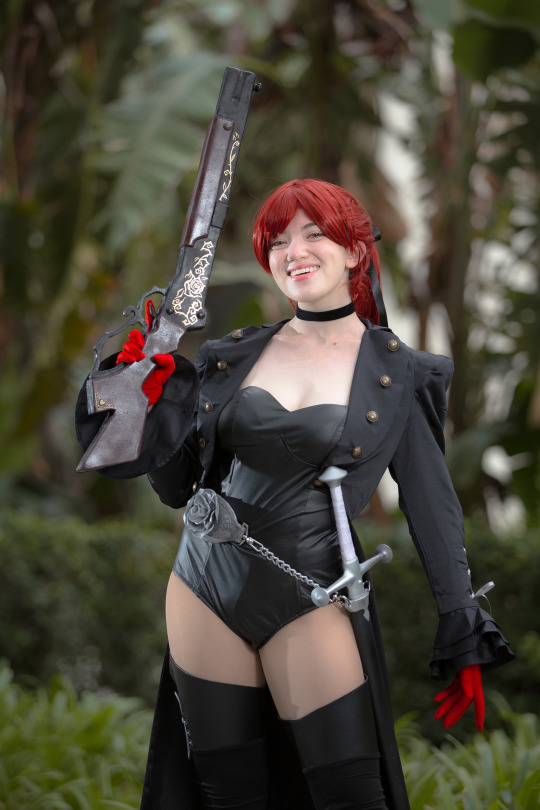
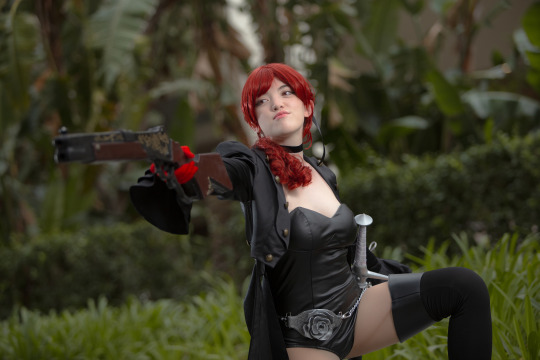
I was going to post a cosplay photo today, but decided to do another of my tutorial type things instead👩🏫. This time it’s for the steampunk handgun I used in my recent Typhoid Mary shoot and also seen in a few of my earlier pics. I’ve found it super useful to have, as it suits a bunch of different characters. If you want to rustle one up yourself, you’ll need these ingredients…
1 x Nerf gun or similar – Choose your gun carefully, as it will dictate what your finished weapon looks like. I went for something small, but chunky, which I picked up cheap in a thrift store (💜 my bargains).
Sandpaper for prepping the gun.
1 x can of black spray paint (or possibly more depending on the size of your gun – tbh I regularly misjudge how much paint I’ll need for stuff and end up having to make extra trips to the craft store to stock up 🚶♀️😩
Silver acrylic paint and 🖌️🖌️ to give the gun a metallic look (or gold if you want to bling out).
Assorted fixtures for decorations – I used some gears left over from another project, a bit of an old speaker and some circuitry from a broken tablet, but loads of other stuff will work. Btw, if you haven’t tried it, it’s super therapeutic pulling bits out of an old tablet, especially if it’s one that used to crash on you a lot like mine😈😈😈
Plastic knob – Replacement for the cocking thingy at the back of the Nerf gun, as this totally gave away that it was a toy. My piece was stripped off a toy gun I used in another project, but you can use whatever’s available.
A piece of leather – Trim for the barrel to add to the steampunk vibe and (hopefully) make the gun look a bit more realistic.
Needle and thread 🪡 – Most of my projects involve sewing in some way, as it’s something I like doing. Here it was used for finishing the edges of the piece of leather.
Fixative spray – Used to try and ensure I don’t accidentally scratch off any paint when I’m using the gun in a typical display of klutziness 🥴
Normally when I do these tutorials, I start rambling on at this point about whatever bits of the project pop into my head, but this time, I’m totally going to be structured about it, so here’s a step-by-step guide…
Sand off any logos and stuff on your gun, as these always make them look toy like. If the gun you’ve chosen has any smooth surfaces, you might want to sand these as well, as the paint will go on better that way. Top tip here is not to use really rough sandpiper or you’ll end up with nasty scratches.
Strip off any fittings on the gun which don’t look realistic and replace if necessary. In my case, this included replacing the thing for getting the gun ready to fire (I’m sure there’s a technical term for this, but it beats me what it is). I screwed the new bit into the end of the mechanism, so it still works, which is pretty cool.
⛫💨 Spray the gun matt black to prime it, plus any of your fittings which need to match. Usually this has to be done in a couple of stages, as if you’re working on a table or something you won’t be able to turn anything over until it’s dry. Also, no matter how good a surface looks at the time, you often come back to find the paint hasn’t covered something properly 😠😠. Here’s another tip… go off and do something else between coats rather than waiting around for however many hours it takes the paint to dry 💡
🎨 Add the metallic distressed look with the arcylic paint. For this to work, you need to dust the paint on super lightly. I usually wipe my brush on a bit of paper each time I dip it in the paint to get rid of the excess.
Once the paint is dry, attach your fittings. The trick here is to try to make them look like they have some kind of purpose and aren’t just window-dressing. Glue is the easiest way to stick things on, but I use bolts and screws when possible 🪛🔧, as these are more secure and allow gears and stuff to spin around if you want them to. If you’re using leather like me (or any other material), you’ll probably want to sew in a folded overedge before attaching it to stop it fraying 🪡.
Touch up any damage you did to your paintwork when working on step 5. Maybe you’ll be luckier than me, but no matter how careful I am, there always seems to be some.
⛫💨 Spray on your fixative for protection. This should be done in steady lines with the can about 30 cms away from the gun. It’s best to do a few coats, sometimes working from side to side and sometimes from top to bottom, so you get good coverage. My tip for this stage is to shake the can well before use and do a quick test spray first to make sure the fixative is coming out evenly.
Pick up the finished gun and start rocking it /̵͇̿̿/’̿’̿ ̿ ̿̿ ̿̿ ̿̿💥
So there you have it. Hopefully if you’re new to projects like this, it will give you a good starting point. I think you get good results for some pretty easy steps. Let me know if you found it useful or if you have any questions 💬, and stay tuned for more cosplay stuff.
Luv your friendly neighborhood cosplayer, Christabel ❤️🧡💛💚💙💜
ko-fi.com/christabelq instagram.com/christabel.simpson/ deviantart.com/christabelq
#steampunk gun tutorial#cosplay tutorial#steampunk gun#costume design#prop design#cosplay gun#hand guns#steampunk#cosplaygirl#cosplayers#ukcosplayer#cosplaygirls#follow for follow#follow back#followback#followforfollow#like for like#likeforlike#typhoid mary cosplay#typhoid mary
50 notes
·
View notes
Text
gender envy is so funny because when I was an egg I thought it would be like "oh I want to be Big and Tough and Manly like that Masculine Man who fits the Societal Standard of Masculinity" and don't get me wrong, it do be like that sometimes, but 95% of the time it's just "hnngkf why is this guy so pretty"
(this post has been brought to you by Ashur Gharavi growing out his hair)
#OH ALSO#dannyphantom.exe#love that guy#rambling of a bean#gender envy#genderfluid#transmasc#ashur gharavi#massive props to him for posting makeup tutorials btw. my cosplaying-in-the-bathroom-at-3am ass is eternally grateful.
13 notes
·
View notes
Text
The Making of Strange Flower

Somehow I never showed my process of strange flower's creation. Below are the materials and steps.
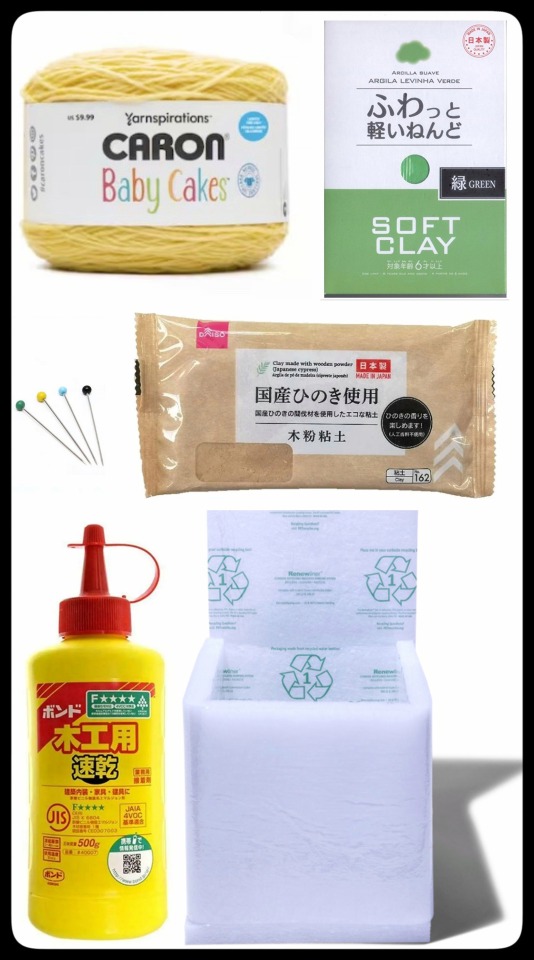
Materials I used:
Yellow wool (mine was yellow yarn that I carded myself with a carding brush / pet brush)
Cheaper white core wool (mine was recycled fluffs from poly batting of my pandemic-era grocery delivery packing liners)
Glass pins for eyes
Air dry clay (mine was green paper clay and wood pulp clay but you can color air dry clay with some acrylic paint)
Wood glue (for water resistance), or PVA glue (if you don’t care for water resistence)
A good stick. I got mine from an old messed up artificial flower.
Felting needles
Felting base foam (I used recycled polyurethane packing foam blocks from my online orders)

To make a strange flower:
Start by felting the base of your flower’s face. You can speed up this process by wet-felting with soapy water mid way. It should end up looking like a concave cookie.
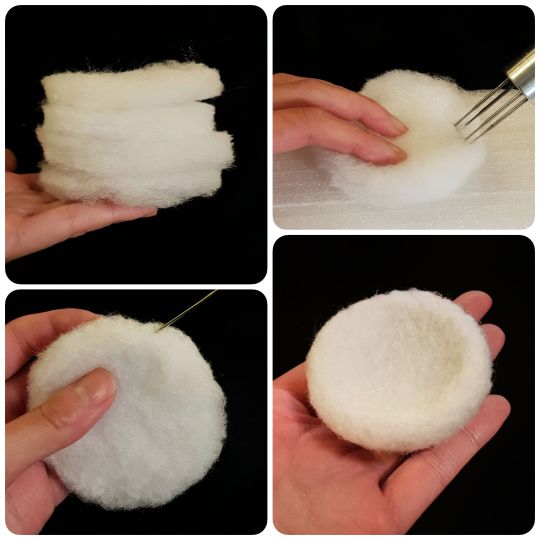
Then start to layer some yellow wool on top of your core wool cookie. Cover all the whites.

Then start to add details like cheeks, chin, and lips. You can test-place your flower’s eyes to better figure out the placement of your flower’s cheeks.
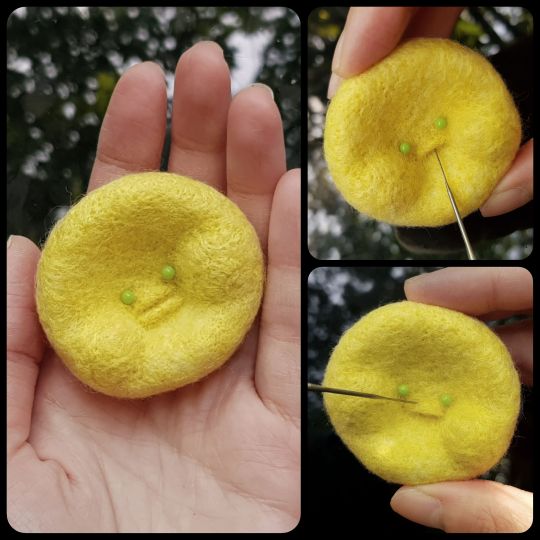
Then cut your glass pins short, bend the pin slightly downward (so it’s long enough to hold its position but won’t stick out the back of your flower’s head), and insert the beady eyes.

Start molding the desired flower petal shapes of your choice. I wanted mine to be plump. So I made it plump. Let it dry a bit. Then I added a water-down layer of wood glue and smooth out my clay petal. Poke a hole at the center of the petal about the size of the artificial stem.
Tip: If you’re also using an artificial flower stem, try to mold the base of your flower petal to fit into the stem head’s shape. Mine was a bit flat and ended up having a big gap and I had to use more glue to fill the void and it took ages to dry. Save any artificial petals you can salvage. Incorporate the ones that work with your strange flower. The rest can be materials for another project someday.
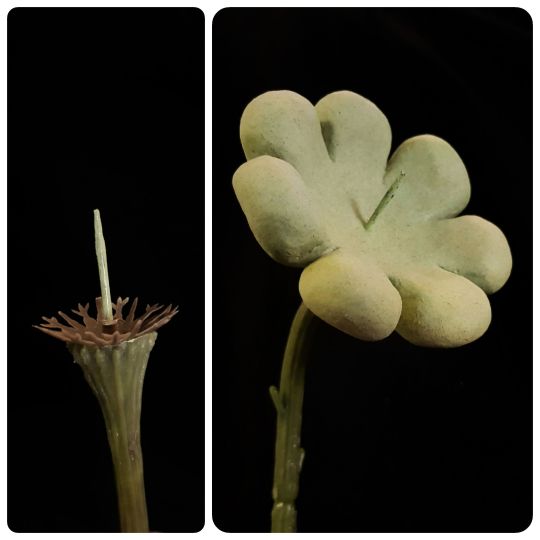
Once completely dry, pin your petals onto your artificial flower stem with some wood glue or PVA glue at its base.
Once the clay petal is dried and secured on the artificial flower stem, carefully poke your flower head on top.

And a strange flower is born! 🌷
#crafts#crafting#cute art#art#arts and crafts#upcycle#fiber art#springtime#flowers#flower#flowercore#bloomcore#tutorial#diy#weird friends#weirdcore#dreamcore#oddities#curio#creechur#fiber crafts#mixed media#sculpture#weird art#kidcore#prop design#puppetry#naturecore#nature art#botanical art
36 notes
·
View notes
Text
MASTER SHAKE'S STRAW FOR COSPLAY
EVA foam (I used 6mm thickness) first time using Eva foam? https://youtu.be/dN3NHy7Asqc?si=xw5WCLOEKci1tYAp
youtube
youtube
Contact cement (for EVA foam)
Respirator and/or a well-ventilated area like outside
Heating gun or an iron
Exacto knife/Hobby knife
Kwik seal
Clear Plasti dip
Acrylic Paints
—————————————
Pink structured baseball cap (Velcro backing works best imo)
Lipton ice tea bottle
Needle and thread
Scissors
—————————————-
If you have prior experience with using Eva foam this is relatively a light project. Eva is great for armor and prop cosplay, it’s light and durable. If this is your first time using Eva foam I highly recommend watching KamuiCosplay on YouTube she goes over the basics and what you need to know about Eva foam, heat sealing it and priming it.
This is my first time making a step-by-step thing, i don't have every photo for each step due to being in a time crunch.
EDIT: for cosplay something called like the 5 foot rule (someone please correct me if I’m wrong) where it’s you make something big enough to be noticeable from a couple of feet or more because thats how far away people are going to see you at a con.
____________________
Inside of hat
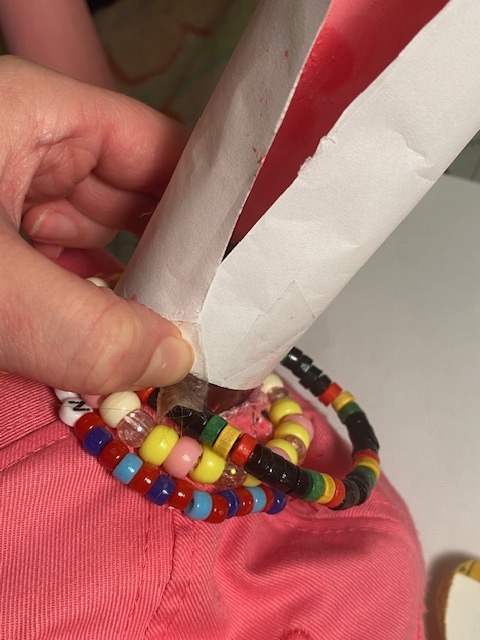
1 Empty Lipton iced tea bottle (using the neck up from the bottle)
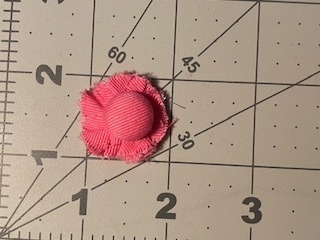
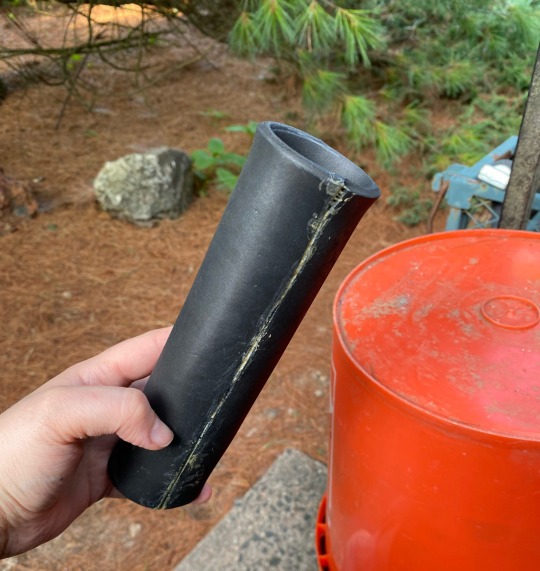
Extremely important to not lost the cap and to keep the rest of the lid and twist part intact along with the long neck of the bottle (cut the neck just above the body of the bottle) The circumference of the cap will be used to measure the circumference of entirety of the straw. I am not good with math so what i did was tape the edge of a piece of paper and gently rolled it until it met with the paper again
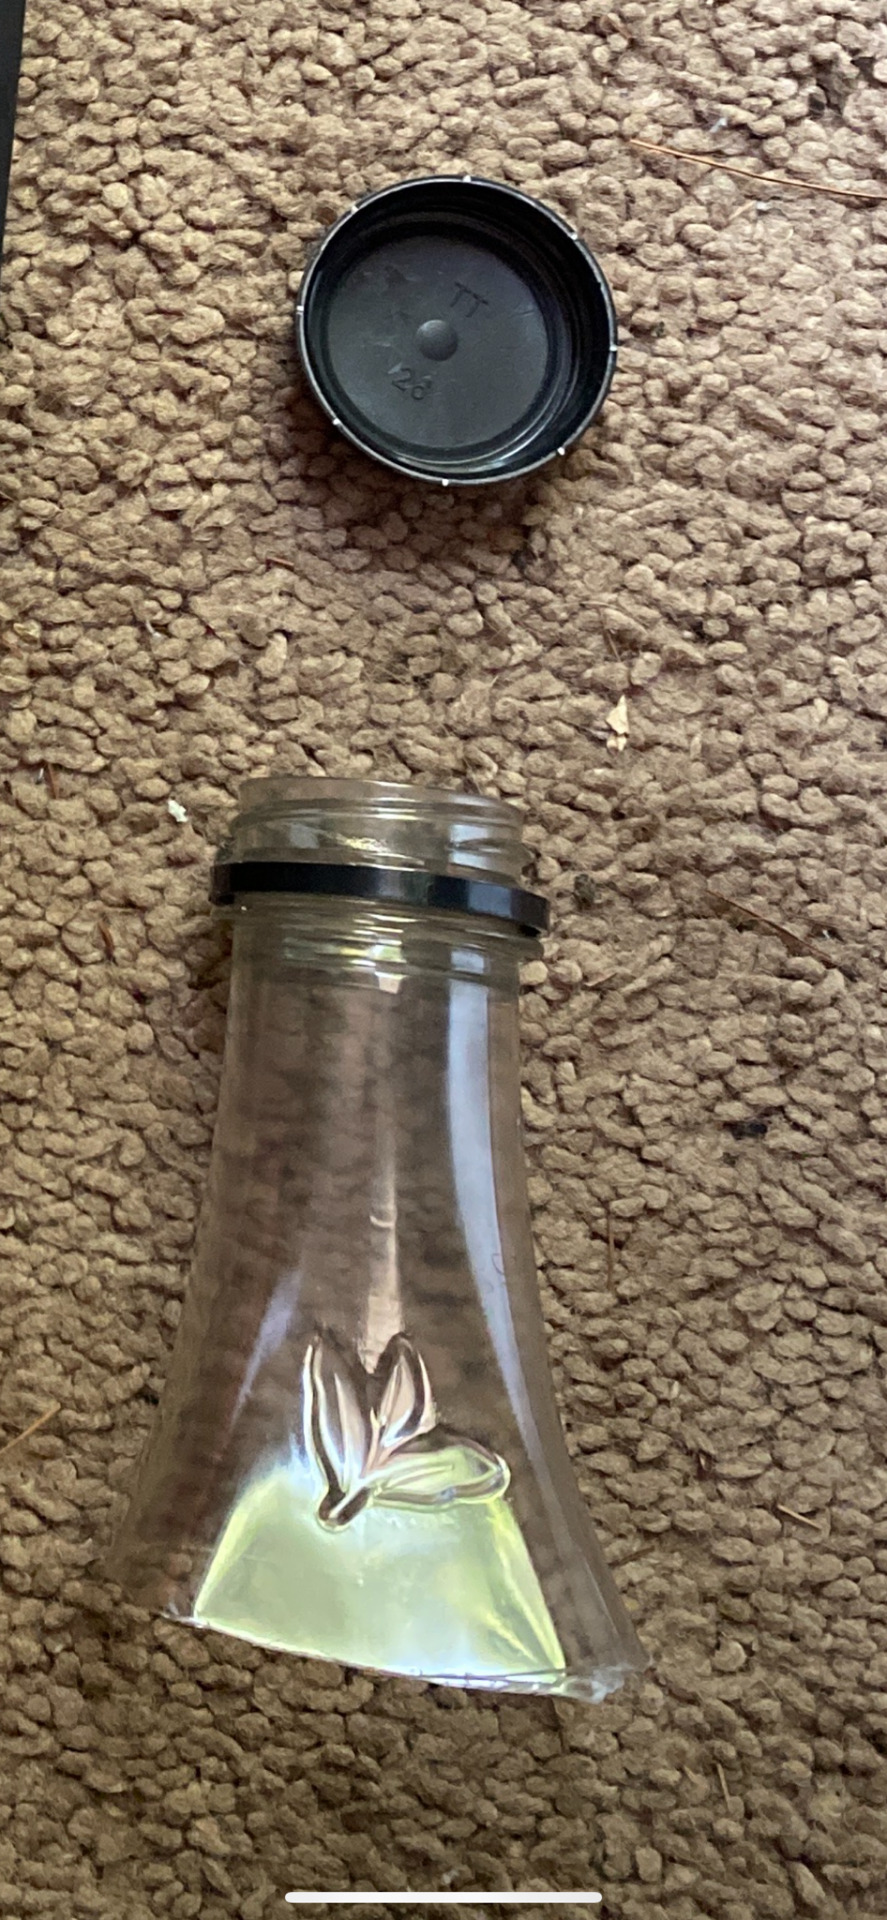
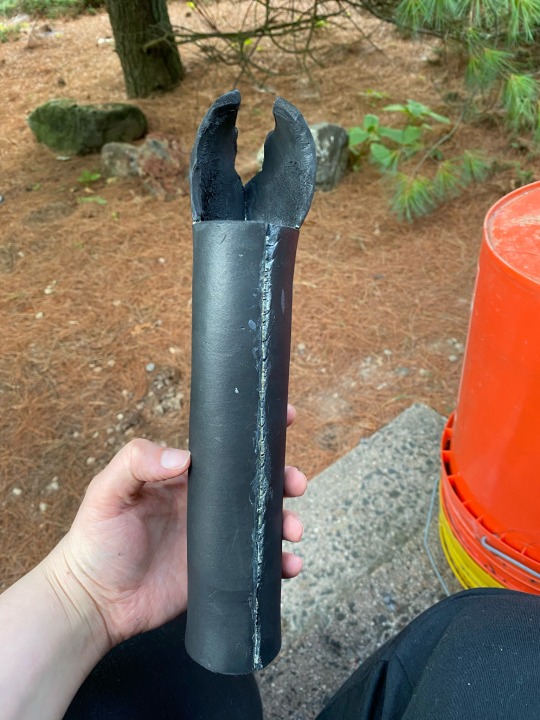
The neck of the bottle will be cut into 4 sections length wise; these flat sections will lie inside of the hat and on top of your head. This is where to use a heating gun or an iron. In my case I only had an iron available to me. So, I took parchment paper between the iron and the plastic and heated it and bending them back one by one. Be sure to either sand or heat the cut corners so they don’t cut into you or the hat. I was under a time crunch so most of this prop was half assed
The flat parts will be used for support and keeping the straw upright
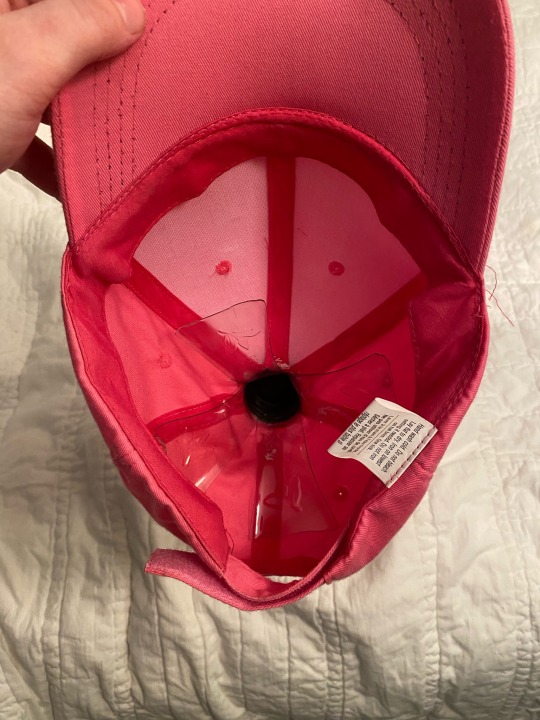
The twist and cap part of bottle will be used as a base to hold the straw in a “up” position
Very important to have a structured hat, it will help give support.
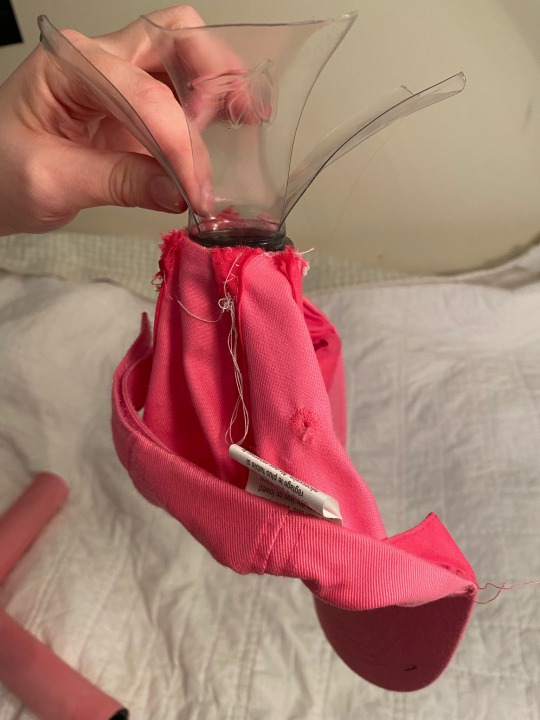
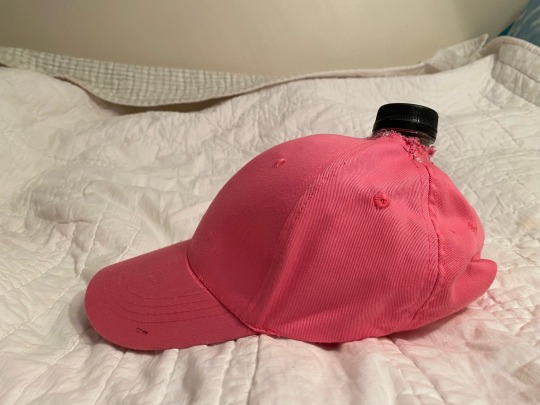
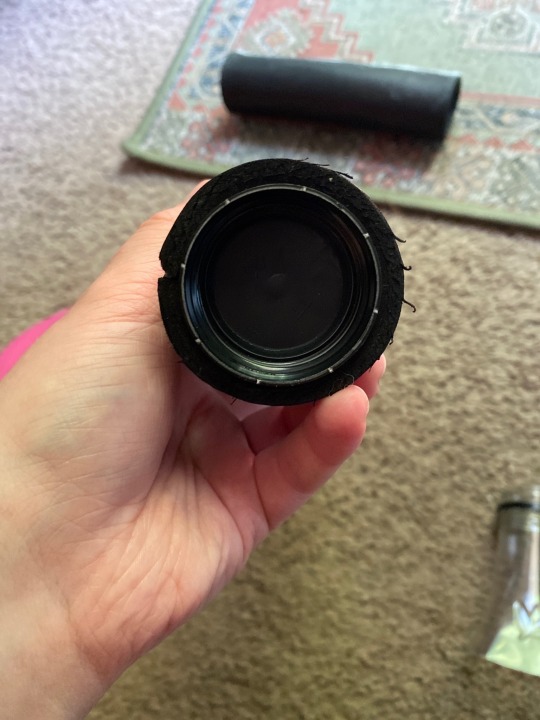
The button on the hat will be cut out, It seems small BUT this is where the bottle will be pushed through the hole in the hat.
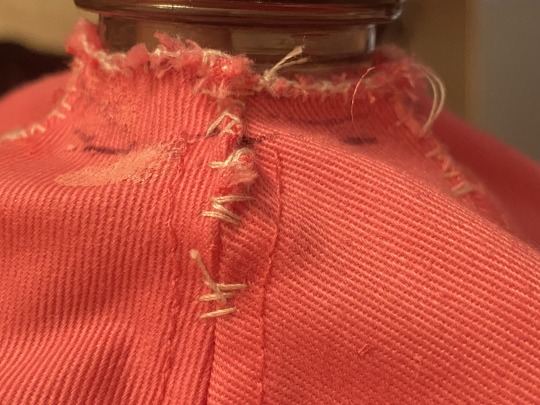
After a hole is cut, much smaller hole than the circumference of the cap. This will be so the hat will be fitted around the neck of the bottle. Push the top of the bottle through so it’s just the twist part showing. KEEP THIS IN WHILE SEWING. Start to stitch below the cut to keep the seams of the hat secure and together.
heres how to start a knot: Basic Hand Sewing - Tying a Starting Knot (youtube.com)
heres how to finish off with a knot: Basic Hand Sewing - Tying a Finishing Knot (youtube.com)
i did the blanket stitch so the hat was fitted around the neck of the bottle. like the picture above the plastic support is now fitted onto the hat. So, if the hat gets knocked off of you or anything the prop will still be in one piece!
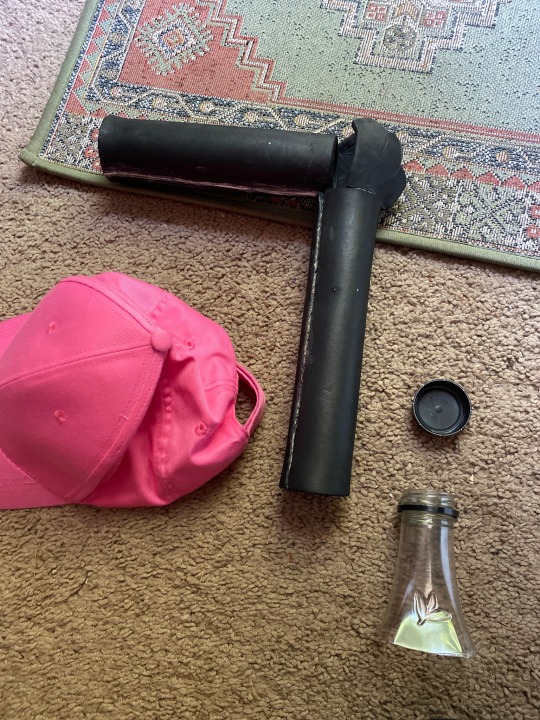
Building the straw
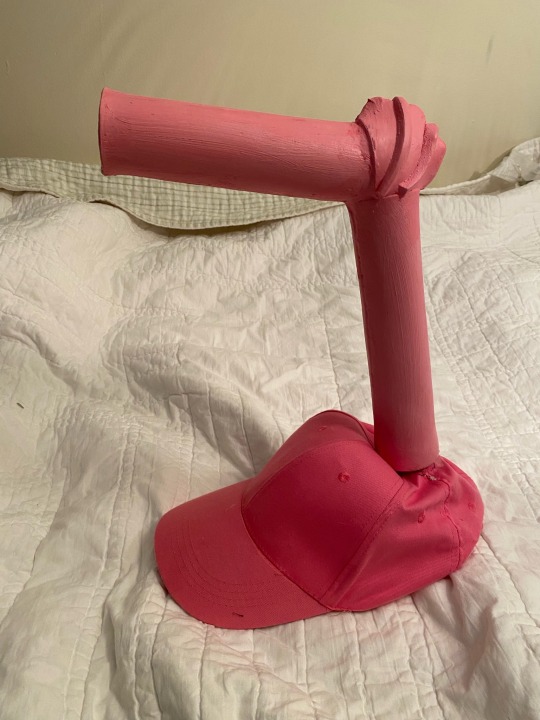
The foam will shrink a bit due from the heat making make a snug fit on the cap. When this happens, after the contact cement has been applied and the foam has been shaped to your desirer Kwik seal is good for filling those cracks in. when the whole thing is glued together there will be some spaces where the bendy part meets the top straw, i honestly filled it with a bunch of Kwik seal and painted it over. Once it's all glued this is where Plasti Dip comes in, it help seals in the foam from the acrylic paints. it takes a few layers of Plasti Dip i think i used 2-3 layers with 30 mins in between dry time. I also diy some metallic paint with eyeshadow to make it glisten in the sun.
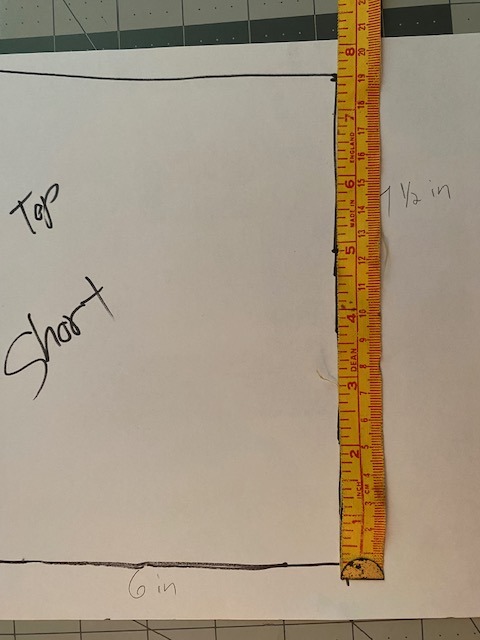
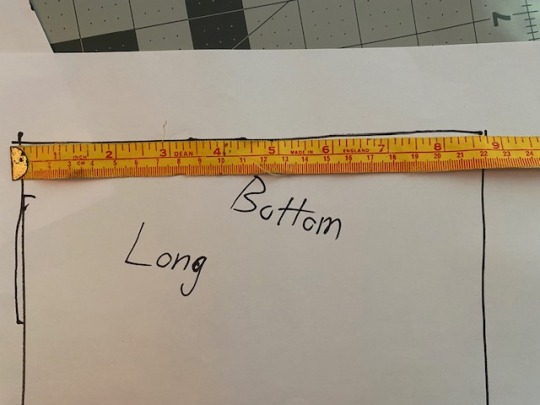
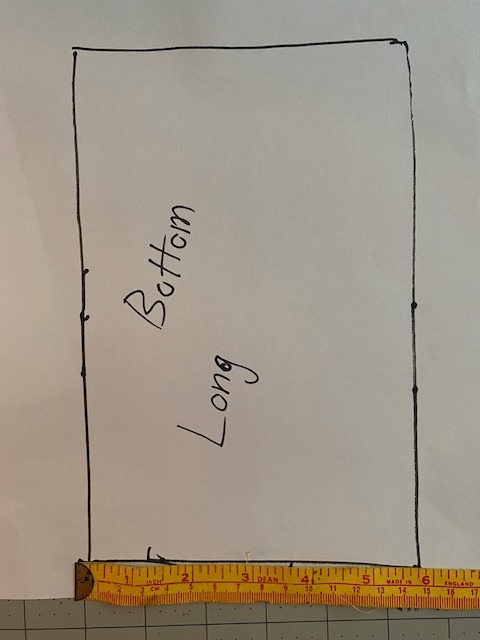
Below are the mesuments of how long the bottom and top straw should be. (8 inches and 3/4ths) 9 inches basically VVVVV
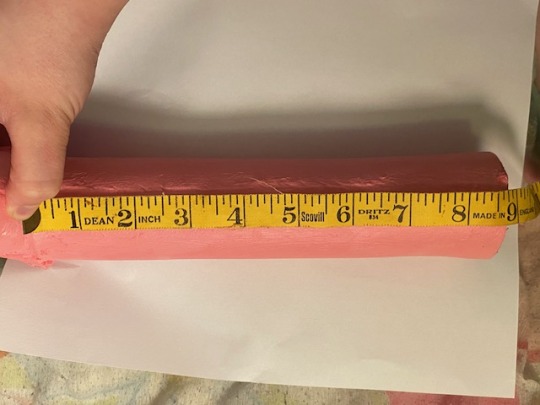
this is the bottom half of the straw (7 1/2 inches to make it easier)VVVVVV and the bend of the straw, it will be 2 pieces. I really struggled with the bendy part. if anyone else finds a better way to make it please tag me ill add it onto this
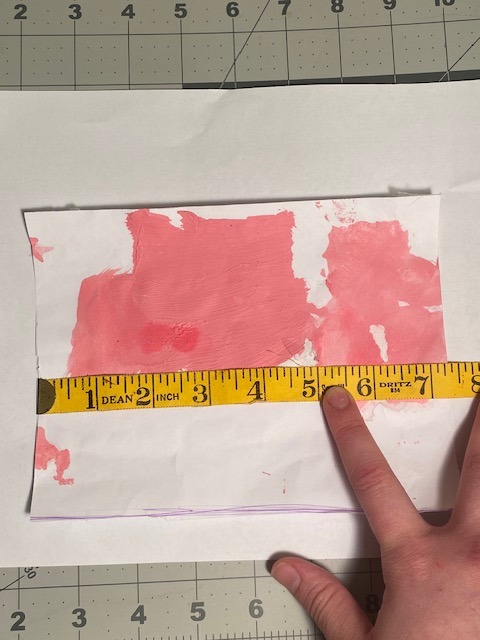
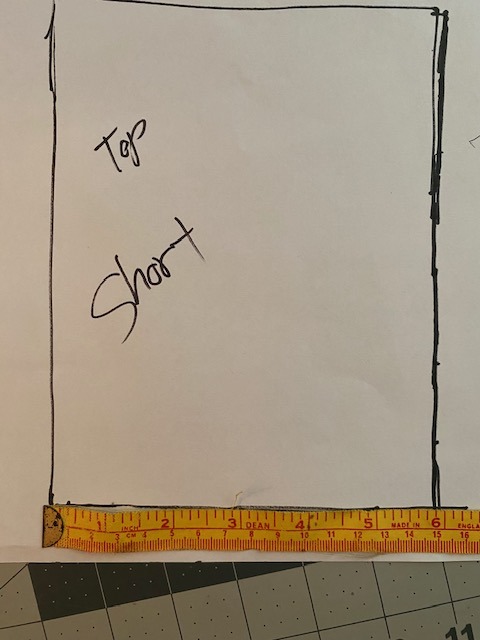
the top half of the straw is short so when the straw is glued inside the "bendy" part of the straw so it may seem shorter when all put together. I don't remember much of putting the straw together to due outside stressors and con crunching
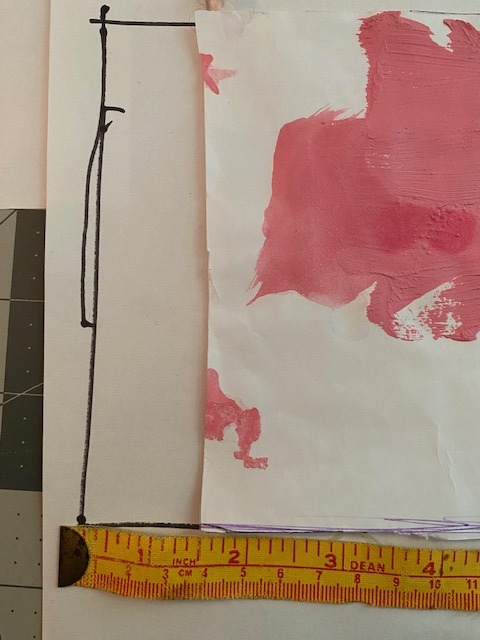
After the foam has been cut heat it up, you should see it seal itself. when its hot get it into a round tubelike shape, it make take a few times depending on what tool you're using (heating gun or iron) MAKE SURE YOU DO NOT MELT THE CAP!! while its still warm fit the cap in one end of the straw so it keeps that shape. i did not glue the straw to the cap. the foam will be tight enough for it NOT to need glue and now if needed it can be broken down for easier storage.
but it was basically heat shaping the bend of the straw, it was 2 sperate pieces that were beveled inward, heated and shaped and then glued. after that the upper straw piece was inside and when it was ready, it was heated and then glued finally. I glue some scrap pieces of foam on the bend to give it more wrinkles,,,i honestly don't know why i did that i was already mentally checked out
Sooo i think thats it for the tutorial. Hopefully i covered everything best I can. Feel free if you guys have found better ways to build this prop, all i ask is that DONT put it behind a paywall and please tag me/credit me when sharing and reposting.
It’s not required but is appreciated if you leave a kofi for me https://ko-fi.com/zimvatt
#Youtube#eva foam#cosplay#cosplay props#master shake#aqua teen hunger force#athf#cosplay tutorial#athf master shake#demonpikmin#kofi#buy me a kofi#props#cosplaying#convention#aqua teen forever#art#artists on tumblr
15 notes
·
View notes
Text


Hello guys, i need some advice about how to style a new wig for my first cosplay as chili pepper cookie.
But I don't know how to style this wig to make it have those shapes on the sides and front of her hair. So, if you have any tips for this cosplay, it would be very helpful. 🥳🌶
(Even tips for making props)
#beginner cosplayer#cosplay wigs#red hair#wig styling#cookie run kingdom#chili pepper cookie#cosplay#costume#prop making#crk#beginner artwork#tutorial
3 notes
·
View notes
Text


Photos by Belka
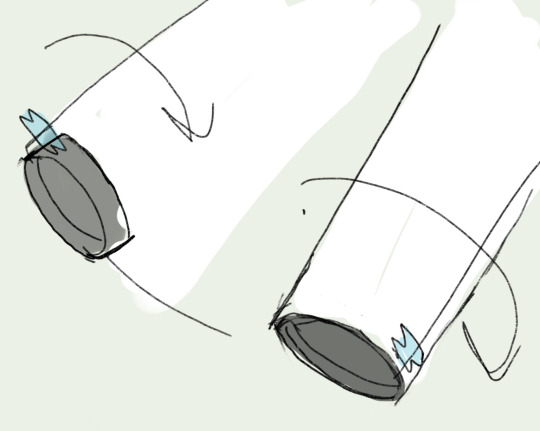
As promised, I'll start uploading tutorials for my Shadowheart cosplay. I'll start small: a few words on the tadpoles. What you need (no link since you'll probably have different brands available) :
a 3d printed tadpole; I printed it myself, took Dark Nyarl's model, but there will probably be other models soon if there aren't already;
everything you need to paint a 3d miniature (primer, purple and gray paints; optionally, some vanish);
a round glass jar with a cork stopper. Those key words gave me nothing in my region, but it got easier once I figured out that the required volume is around 120 ml;
2 component resin. Important: it needs to allow for thick layers; measure the height of your jar - the resin should be poured in in one layer;
greenish resin color pigment. Important: it needs to say that the pigment is translucent. Semi-translucent will not do.
Here are some details:

I modified the 3d model's size. The tadpole on the left was 5 cm high and turned out to be too small, so I printed several more 6 cm big. If you can print something at home, I don't need to explain to you how to print and paint it, but if you're asking someone else to print one for you, remember that a miniature needs to be primed before you paint it (there are liquid primers you brush on, and there are spray cans). Here are the colors I used:

You don't NEED varnish after, but the paint will crumple somewhat in the resin later on. It's not really noticeable with a naked eye, but keep that in mind anyway.
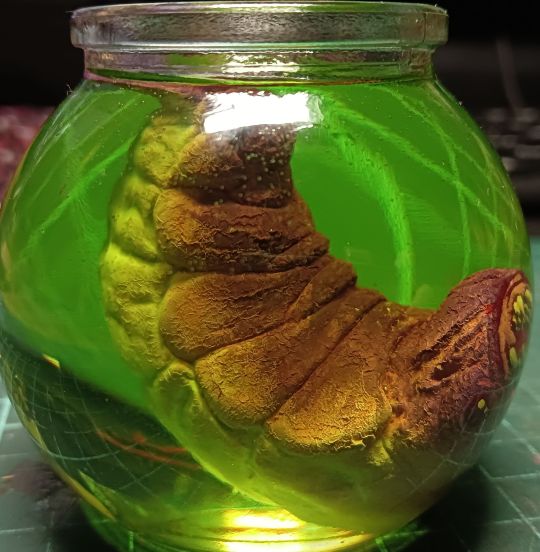
Glue your tadpole to the jar from the inside if you want it to stay in a specific position. Be warned that it'll look very chonky once there's resin around it. Follow the instructions for the resin: mix the components as suggested (use a kitchen scale if you have one), add your color pigment and mix it in. It took me 10 drops to get the color you see above.

I tried pouring in several 2cm layers of the most standard reson, and it didn't work out for me, I could see the layers. A pro might know how to avoid it, but a newbie should try to find the kind of resin that can be poured in a 5cm layer of thicker. Here's the old version:

If you want to avoid having bubbles in your resin, research bubble-removing methods in advance if there are no tips in the instruction that comes with the reson you found. Let the resin solidify as per the instruction!
#bg3#shadowheart#cosplay#tutorial#props#tadpole#baldur's gate 3#is there a 'read more' version for everyone?#if not#how do I add it?
34 notes
·
View notes
Text
youtube
I've finally finished my next Youtube tutorial, this time making a prop version of the poisoned peach that sends Sarah to Jareth's ball. While I can't guarantee following this tutorial will get you a dance with the Goblin King himself, at least you'll feel like you're in the running. Please check out the video to see me turn a generic Styrofoam peach into something that looks like you just plucked it out of the junkyard of a magical man who stole your baby brother.
#labyrinth#jim henson#labyrinth 1986#sarah williams#jareth the goblin king#jareth#prop replica#prop making#youtube tutorial#Youtube
35 notes
·
View notes
Text
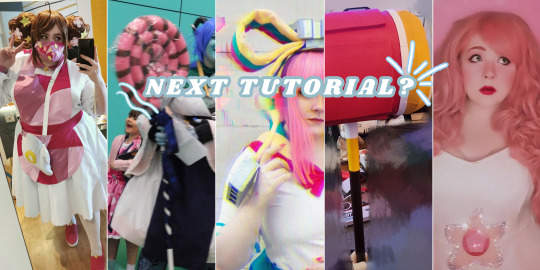
Hey! Do you want to learn how to make Giffany's Bow? Or Rose's shield? or maybe Jester's Lollipop?
Well I'm trying to work out what tutorial to work on next, head over to my Ko.fi to vote! Click Here or on the picture above!
#Cosplayer#cosplay#cosplay tutorial#tutorial#kofi#cosmaker#wig styler#wig styling#sewing#crafting#prop building#jester#critical role#lavorre#bee#and#puppycat#wig#robot#cyborg#donut ep#cartoon#giffany#yandere#disney#costume#makeup#robotics#foamsmith#foamwork
5 notes
·
View notes
Note
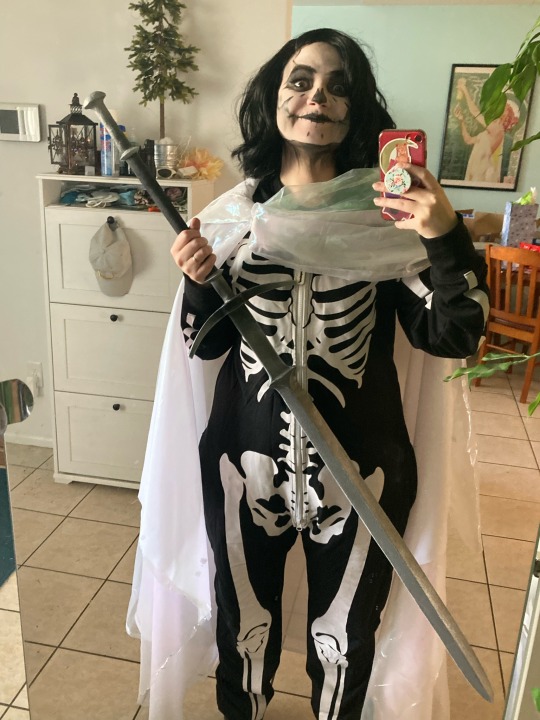
Hi!! your Alecto cosplay is so cool and your sword looks FANTASTIC, did you make it? do you have any other pics with it?
thank you so much! that sword is my husband’s handiwork, originally made to go with my gremlin harrow look last holmat, but the process was pretty straightforward.
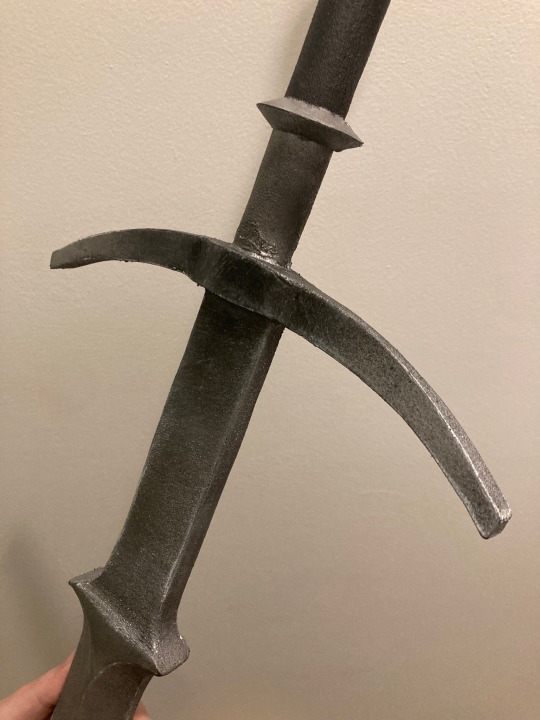
figure out the scale in comparison to me (who is very short) so that it’s long enough to look BIG but not so long it’ll drag on the floor if i put it on my back.
cut blade out of foam in two pieces (one for each side), carving a channel down the middle.
glue dowel rod down the length of the blade.
carve the blade down with a dremmel on the sides, but it doesn’t need to be terribly flat or sharp to read as a sword.
cover remaining dowel handle in foam for pommel and cross guard.
give it a couple layers of spray on plasti dip and then paint once dry. i think he did silver and then went back in with black for shading.
add painted highlights along edges for fake sharpness.
the whole sword is SUPER light and very con safe! he didn’t actually give it as heavy a coat of plastidip as i’d recommend just due to time, so it’s definitely gotten kind of beat up, esp at the tip. but like, it still looks cool even with it’s non-sharp tip lol.
here’s me right after getting into gremlin harrow for holiday matsuri brandishing my new sword:
and here’s some closeups of its current state:


and i’ll have more photos of it later once we get to editing my alecto shoot from metrocon!
oh and follow my husband @shmaba if you like neat weapon designs. this sword is basic, but he did a whole bunch of cool ones for last swordtember!
27 notes
·
View notes
Text
Making Kasumi's Rifle from Persona 5 Royal
Here's a process log of making Violet's gun from Persona 5 Royal for my cosplay!


To start with, I looked up a bunch of pictures and combed through gameplay footage to try to find good reference pictures of her gun. The best reference turned out to be pictures of Amakuni's scale figure that included her gun since the photos had clear shots of the gun from the side.

2. Then I made a pattern in Photoshop by tracing a picture of the gun from the figure and printed it out at the scale that I wanted it to be. To size it accurately to my proportions, I used nifegun.com.
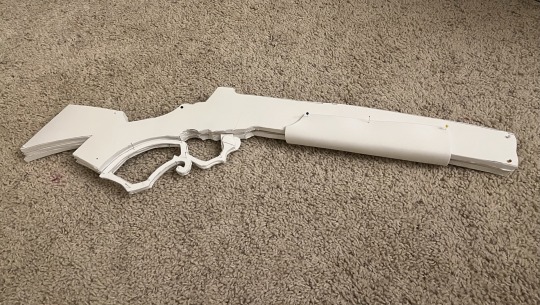
3. After that, I cut out 3 layers of 5mm foam for the main part of the gun and 3 layers of 3mm foam for the lever/trigger section. Here I had them pinned together so I could double check the thickness/scale before gluing it all together. (I didn't take a picture of this part, but I also carved out space inside the gun to fit two small PVC pipes taped on top of each other to make the barrel on the inside and to give the floppy EVA foam a stable core.)
4. I glued it all together with contact cement. Here I also used a dremel to carve an indent into the side of the barrel at the front end. I also tested the primer I was planning to use (black Plastidip) on the lever/trigger part at the bottom.


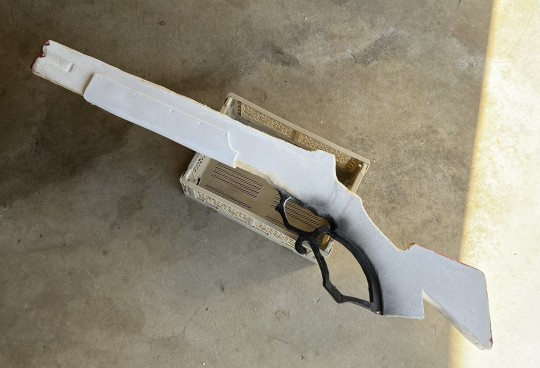
5. Ignore how crusty everything looks here LOL but this is the part where I experimented a lot on how to smooth out the seams on the top, front, and bottom of the gun. I'm not 100% happy with the level of smoothness I ended up with, but this was a last minute 1-week build before a con so I settled with a couple layers.
First I tried foam clay but had a lot of trouble sanding it because the brand I bought was super cheap/sticky and would not dry. Then I moved on to wood filler, which was slightly better and actually sandable but I still wasn't really liking the gritty texture. So as a last resort I ended up using Bondo glazing putty (which is super toxic and not fun to be around--wear a respirator!) since it's my go-to when I'm working with 3D printed props. Bondo ended up working the best, but I still want to keep experimenting with other less-toxic methods for future foam props...
I also added some more panels here on top and on the sides to add some dimension.

6. I spray painted the gun black and brown and added googly eyes for rivet-like details.

7. Finished the gun by adding all the rest of the details! Glued a black plastic gem onto the front of the barrel with hot glue for the front sight, bought some brass embellishments like the little framing piece on the stock and the metal rivet on the forestock, and hand-painted the filigree on the side of the gun with a gold paint pen.
(Photos by @wickedapricot on Instagram)
Overall, I'm pretty happy with how it came out considering it was a one-week build and my first ever gun prop! This is also the second foam prop I've made, and I feel like I learned a lot from the process.
If I ever remake it, I'd really like to add a hinge to the lever to make it functional like it is in the game like in her introduction where she spins it by pulling the lever down. I'd also probably give myself like a month or more to work on it instead of a single week LOL I got so many mosquito bites from working on this in my hot garage at night in the summer 〒▽〒
If any other cosplayers are making her gun and want to use my pattern or have any questions about the materials/process, feel free to shoot me a message :^) I haven't seen any other cosplayers make her gun but it's such a cool design!
#persona 5#cosplay#kasumi yoshizawa#violet#violet persona 5#persona#persona cosplay#cosplay prop#cosplay tutorial
11 notes
·
View notes
Text
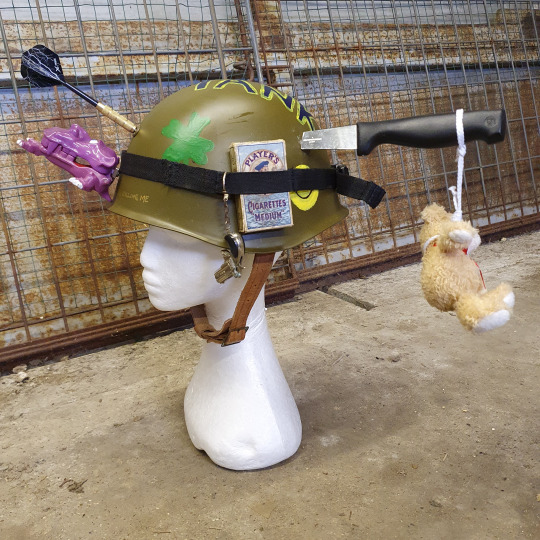
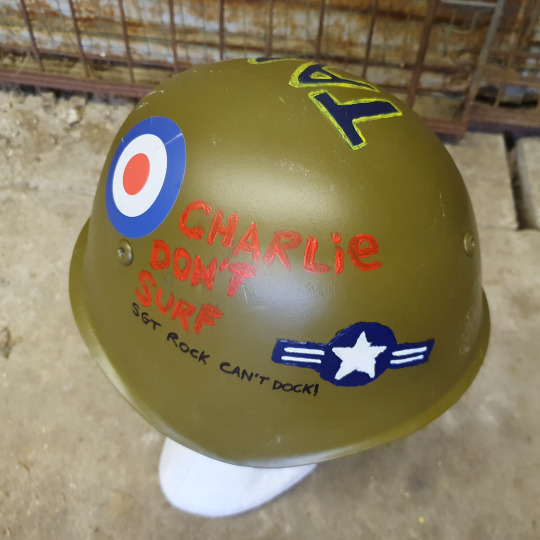
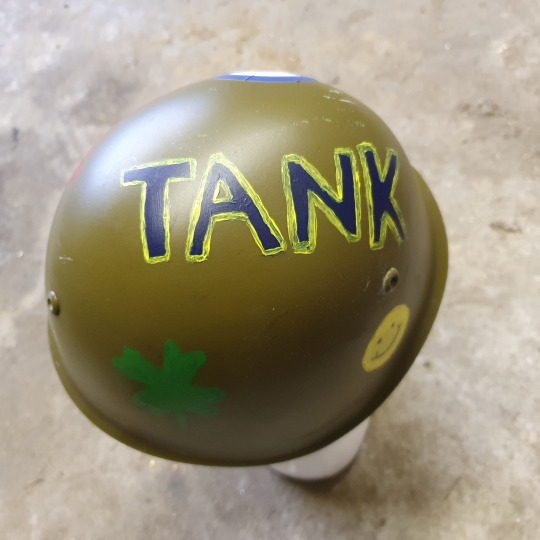
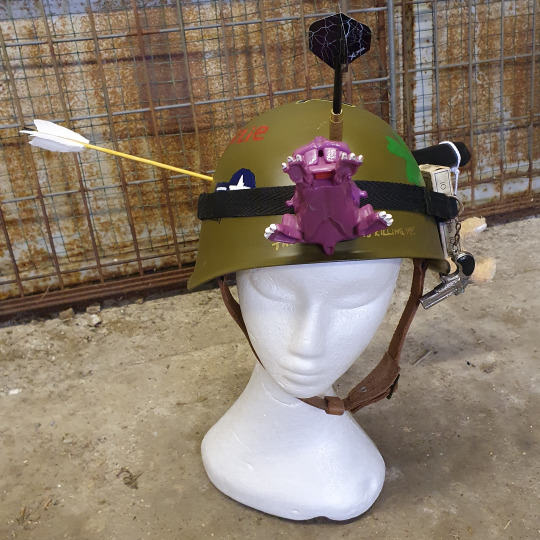

As any Tank Girl fans out there will know, our gal can often be seen wearing customised army helmets. They’re a super fun accessory, so I decided a few months back to have a go at making one. I started off by picking out a couple of ones I liked in the comics (see above for an example) and worked out a design. There were a lot of sticky out bits, so I had a feeling putting it together was going to be easier said than done, but I’ve never let that stop me before and didn’t this time. I could have taken the easy route and bought a plastic helmet, which would have been soooo simple to attach things to, but me being me, I decided to go with something authentic, namely (and I quote) a ‘genuine vintage Bulgarian army M72 steel combat helmet’ which was going cheap on good ol’ ebay 👍👍. I was totally expecting to have to drill holes in this for some of the attachments, but as luck would have it, there were some readymade ones 😊. These are the other bits I used…
1 x plastic creature head – I was looking for something which resembled the head on the attached reference picture and stumbled on something perfect while rummaging through a box of random toys in a thrift store.
1 x neodymium magnet – Used to fix the creature head onto the front of the helmet.
1 x dart – To stick in one of the holes. My only complaint here was I had to buy a pack of 3 and don’t know what to do with the other 2. Maybe I can use them in some future cosplay project.
1 x wooden rod + craft feathers + 1 x plastic wall plug – Used to make an arrow to poke in another of the holes. I had to make my own arrow, as none of the ones I saw for sale would have fit.
1 x kitchen fork – Another thrift store find which looked like it would be a good stand-in for the knife in the picture if I chopped the top off.
Some straps and buckles from an old bag – Stitched together to make a carrying strap for the helmet (which I needed to hang things off).
3 x old bullets for decoration
Some bits of leather to make a bandolier type thing to hold the bullets.
1 x old cigarette box for decoration.
1 x gun keyring – This was an impulse thrift store buy, which wasn’t in the original design, but I thought would be another good decoration (there were actually so many impulse buys like this I couldn’t use them all and ended up making a Tank Girl baseball cap for the overflow – more about that another time).
One of my old teddy bears (Flapjack) to hang from the knife (really a kitchen fork) handle.
1 x old white shoelace to make a hangman’s noose for my teddy (poor Flapjack 🎻).
Acrylic paint and brushes - I’m sure y’all can guess what these were for.
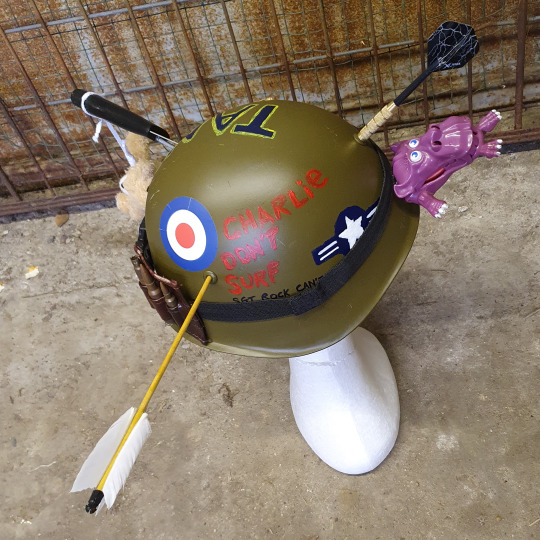
1x target sticker – I bought this in a craft store, because it looked just like the target on the helmet in the picture and I wanted to save myself a tricky painting job.
It took me a while to get all of that together (as you can imagine), but eventually I was ready to go. I eased myself in gently by sticking on the target sticker. Then I did the painting bits. I seem to be getting better at this, as I managed to get through it with no major screw-ups😊. I left the paint to dry for a day and sprayed on some fixative to protect it. It seems to be doing the job, though I have no clue how long it will last.
I made my arrow from the bits mentioned above and sawed off the top of the kitchen fork to make my stand-in knife. Then I worked out how I was going to attach everything. As I said, I used a magnet for the creature head. I stuck the arrow into one of the holes and the dart into another with a plastic bung on the other side to hold it in place. For the knife, I pushed a long screw through the last hole and screwed it into the top of the handle. You can see the screw from some angles, but it was the best I could come up with and it does the job.
I hung Flapjack from the knife handle, clipped on the carry strap with its various decorations and that’s pretty much it. It’s not a bad take on the Tank Girl originals if I do say so myself, though it takes some getting used to. I can’t tell you how many times I’ve bashed one of the sticky out bits on something when I’ve been walking around. Also it’s heavier at the back, so it has a tendency to slip off. As always, this isn’t a proper tutorial, but maybe it will be helpful if anyone out there is thinking of making their own Tank Girl helmet. Have fun if you do. I’m on Ko-fi if anyone is feeling generous and wants to support me in my cosplay adventures… ༻ko-fi.com/christabelq༺ It’s always super-appreciated. Bye for now. ❤️🧡💛💚💙💜
#tankgirl#tank girl#tankgirlcomic#cosplaygirl#cosplayers#ukcosplayer#cosplaygirls#comicbooks#follow for follow#follow back#followback#followforfollow#like for like#likeforlike#costume design#prop design#cosplay tutorial#rocket launcher#alan martin#jamie hewlett#helmet
80 notes
·
View notes