
Statistics
We looked inside some of the posts by lmh-tech-tutorials-blog and here's what we found interesting.
Average Info
Notes Per Post
1
Likes Per Post
1
Reblog Per Post
0
Reply Per Post
0
Time Between Posts
5 months
Number of Posts By Type
Text
4
Last Seen Tumblr Blogs


Fun Fact
US Tumblr user growth rate is estimated to slow down to 4.1%.
Text
YouTube API Changes and GET User Information with v3 IDs
Anyone who has worked with any Google API knows how easy most things are for most purposes, but how difficult they can be to be worked-in to a different platform. I’m using this opportunity to take a look at YouTube’s v3 API which has had some recent changes, but requires a rewrite to most applications that use it, since it has made a lot of small lines of code require a complete rewrite, and some some schema, a few extra long functions.
Intro and "The Thing"
The recent change added a new way to access and recieve channel information. Before this change you just need the channel username, but after this change you can use the channel username or the channel ID. The main reason for adding this isn't quite clear to be, because both the username and ID are both unique to a channel, but an ID is infinitely harder to remember, because it is a 24 character randomized string with capital and lower-case lettering, plus integers.
The Issue
The first thing I did to try and wrap my head around this change is to try both the ID and username on https://youtube-collections.com/ and I wasn't surprised when it did not work. The main reason for this is because the GET request features 3 parts: "part", used for requesting a specific part of the result to be sent back to the user, "id", to specify username or (now) ID, and "apikey", for the API key.
The Punchline
This issue renders my website completely useless because it requires user information, completely provided by the user. The information is of unknown origin, and it was easy to guess that the user would input a username because the introduction of the ID, because it was the only thing to provide, just whether it was in URL form (just splitting the URL and finding the appropriate array part) or just a username.
The Inevitable Workaround
Now I have incorporated (hopefully) a standardized fix, which implements before any other in-line functions. What this function, we'll call it Butterfly(), does, is finds if the user's input was a username or ID. To do this it first requests the information like it usually does, using a snippet, an ID and the key, then it asks itself "Is the information I just recieved a whole set of arrays and objects, or was it nothing?". This works because YouTube's API doesn't return data if the input isn't accepted. So then the code assumes the requested information was in the form of an ID instead of a username, and requests the same information, but instead uses the request "part:'id', forusername:id, key:apikey". This should recieve a lot more information, and the information that we want to get, which is the actual username.
Conclusion
It doesn't really matter which order you put these in, but the main difference is that the snippet GET will request far less information, so do this one first to make less of an impact on the user's internet and your overall API token requests. To be clear this will only really work if you are parsing this username down a chain of functions. \For me it was easy to rewrite all the function because it is all very simple GETs, adding to arrays and localstorage.
This post was very longwinded and I rewrote it a few times, but I think is worth it to save some headache.
0 notes
Text
How to create Ringtones in iTunes for iPhone/iOS Products
In this short tutorial you will understand and learn how to create a ringtone for use with iOS products, including iPhones, iPads and iPods.
You will be able to accomplish this by:
Creating a copy of the song or media, with timing added if desired,
Converting the audio to a suitable format required for playback on an iOS device,
Copying the file to the iOS device, and lastly
Setting the ringtone in the iOS menu.
Couldn’t be simpler! Before we start you may want to open up you iTunes application and ensuring you have your iOS device attached and synced to your computer. Done? Let’s begin.
1. Creating a Copy of your Ringtone Audio
Firstly, you need to make a copy of the audio. This ensures that you have the right timings necessary for the iOS platform, which you can read more about Here.
Firstly, we need to trim the audio down a bit. Don’t worry, this will not affect the original song in any way. This is one of the reasons that we are making a copy. The copy of the song will be the trimmed down version, so a 4 Minute song can become a 20 Second ringtone. To trim the audio we need to find the song in iTunes, right-click-click it and click on “Get Info”

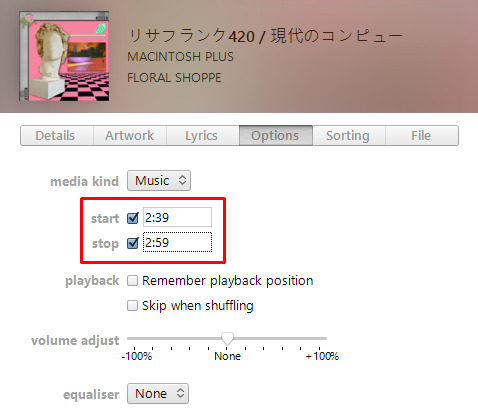
Now a box should appear. Go to the “Options” tab.

Now you can change the Start and Stop times, for example if you want to start the song at a specific time. For the Stop time you need to make sure that it is 20 Seconds after the start time, as an iPhone’s ringtone can only be 20 seconds long. It should now look something like this:
Now click “Ok”. We are now ready to create our copy. To Copy the file, Right-Click, and click on “Create AAC Version”.

Now another Song with the same name will be present in iTunes, but it should only have a length of only 20 Seconds. (If it’s length is more or less than 20 seconds then you calculated the times wrong in the last step. Just right click and delete this file and redo the last step)

Now you need to Right-Click on the Long version of the song and click on “Get Info”, Go to Options and Uncheck the Start and Stop Times.

Now click “Ok”. Now you have 2 versions of the same song. One of them is the original length, and the other is max 40 seconds long.
2. Converting the Audio to Ringtone Format
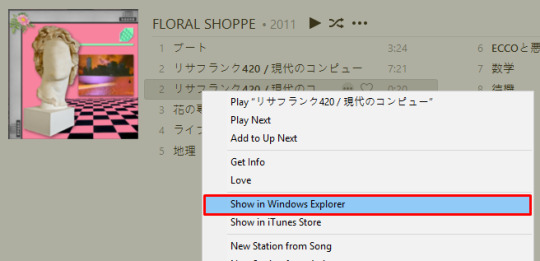
To convert the file to “ringtone format” we first need to locate it. Right-Click the ~40 second song and click “Show in Windows Explorer”
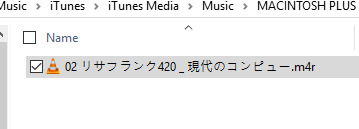
A window similar to this should pop up:

Now you need to rename the last part of the filename (after the dot) from “.m4a” to “.m4r”

NOTE: If you cannot see the extension “.m4a”, you need to click on “View” then make sure “File Name Extension” is checked and retry.

Once you change this, make sure you keep this window open.
The last step for part 2 is to delete this song from iTunes, because you’ve changed the filename it will not be able to find it unless you specify, and still, you won’t want to listen to a 40 second snippet of a song you already have.
Right-Click the ~40 second file and click delete, then click “Delete song”

3. Copying the ringtone to the iOS device
To transfer the file to you iPhone you must make sure that your ringtone is in your “Tones” folder in iTunes. To check, go to the “Tones” folder.

If it is not located in this list, simply open the window that we left open before, then click and drag the ringtone into the “tones” folder.
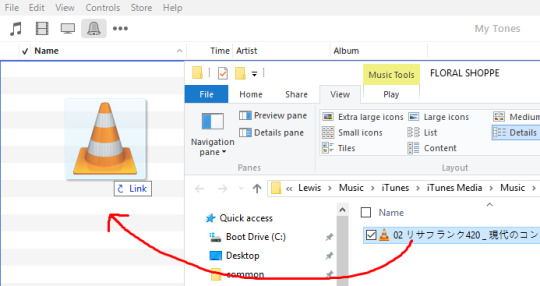
Now it should appear in your tunes folder.
To copy to your iOS device Follow these 4 steps:

1. Select your iOS device,
Go to the “Tunes” Folder,
Make sure “Sync Tunes” is ticked
Select “Selected tones” and check the tones you want to copy,
Click “Apply” in the bottom-right hand corner.
4. Setting the Ringtone
To set the ringtone you first have to go into your iOS device’s settings menu.
Find the “Settings” App on your home screen and tap on it.

Now scroll Down and tap on the “Sounds” sub-menu,
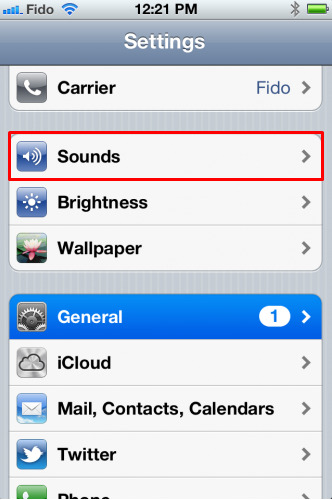
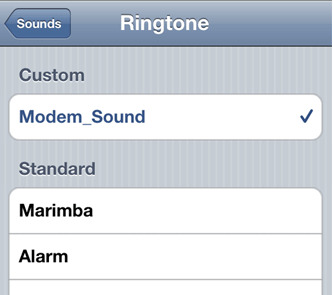
and now tap on either “Ringtone” or “text tone”, whichever one you would like to set the ringtone you just created as,

Lastly, tap on the ringtone you just created from the List.
1 note
·
View note
Text
Install and use Dxtory with the Lagarith Lossless video codec
Things you will need to install:
Dxtory 2.0.x (full version)
Lagarith Lossless Codec
1. Download and install “DxtorySetup2.0.127.exe” (in the Dxtory zip file)
2. Double click the “DxtoryLicenceFile.dxtorylic” file and click “Register”

3. Run Dxtory once from the start menu or desktop and then close it.
4. Download and install the Lagarith lossless codec setup
5. Once installed, run Dxtory again and continue setting it up with the following setting. Any settings not defined in this tutorial can be set by the user (you).
6. First, set a folder for the recordings and screen-shots.

7. Set the HotKeys for things like recording, screen-shotting, etc.

8. Setting up lagarith: First we need to set the codec to “Lagarith Lossless Codec”.

9. Then press the config button (next to the codec you just selected) and make sure you have the following settings:
(These settings are optimal for faster performance/better video quality)

10. Change the rest of the settings on the Movie settings page to whatever you want (this is self explanatory). Just make sure under “Output”, you have “File Output selected”, and “DirectShow Output” isn’t selected. You can then either choose AVI or RawCap (I recommend AVI).

11. Audio sources using the “+” Button, and select the device, and audio codec. You can use MPEG Layer-3 Codec (MP3), PCM (.WAV) or IEEE Float (Not recommended) based on what you need.
I recommend PCM, but MPEG Layer-3 Codec works fine too.

12. Change you screenshot settings (if necessary)
13. Change Advanced settings: Uncheck everything on this page for better overall performance, and I’d recommend checking “Force CPU Processing” if you have a lower-end GPU. Also, make sure your “Processing Threads” is set to the number of cores your CPU has.

14. Now open a game and do some test recordings and screen-shots see if everything is fine, and troubleshoot errors if necessary.
Notes:
If you experience lag decrease your game video settings,
if you get choppy FPS or Screen Tearing during capture, use “Limit Video FPS” to the refresh rate of your monitor (in the advanced settings tab). If monitor = 60Hz, Limit video to 60FPS, if monitor = 144Hz, Limit video to 144Hz.
If you experience lots of game lag with a high-end computer set-up, turn off “Use Multithreading” in the lagarith lossless codec settings and uncheck “Force CPU processing” in the advanced settings.
0 notes
Text
Mute background microphone noise [Tutorial]
Things you will need to install:
Virtual Audio Cable (Run “setup.exe” then copy all the files from the “x86″ to “C:\Program Files (x86)\Virtual Audio Cable”.
Reaper (60-day free trial)
Once you download and install these applications, you are good to go.
1. Setup 1 (or more) virtual audio cable(s) in VAC’s Control Panel and click “set”.

You can now close the VAC control panel.
2. Open Reaper, and go to Options > Preferences > Audio > Devices (On first launch it should do this automatically) and make sure the input device is your microphone, and the output device is “Line 1″

3. Open Reaper and Right-click on the gray space to the left of the time-line (or press CTRL+T)

4. Now you need to arm your Reaper output for live use by pressing the small circular button on your Mic track (the one that looks like a “Record” icon).

5. Next, make your audio output through “Line 1″ by pressing the record monitoring button.

6. Next, enable a filter that gets rid of background noise. Click on the “FX” icon on your microphone track.

7. Next we need to search and apply a VST filter called “ReaFir”. When you find it, double-click it and it will add the filter to your mic output.

8. Now a complicated looking box should pop up. Don’t worry, we only need to do 2 things here. First, change the mode to “Subtract”

9. Then, press the “Automatically build noise profile” button, and then press it again after 10-15 seconds. Make sure you stay very quiet, as it's processing the background noises of you room.

You can now close the filter window.
10. Now you will notice that your master output scope is silent when you aren't talking. This is because the filter is actively muting specific sounds from your microphone that we recorded with the ReaFir filter.

Notes:
Make sure you do not shut down Reaper, because it is running the active filter
You may receive various delay intervals of around 150-500ms between your microphone and Line 1 output. Play with the sample-rate and buffers within Reaper’s audio preferences to shorten this interval, but keep in mind it can only process what your computer is capable of.
0 notes