
I make low-tech costume tutorials on youtube, I make my own music and sound effects, I obsess over details, I think you'll be content with my content
Don't wanna be here? Send us removal request.
Statistics
We looked inside some of the posts by makerholic and here's what we found interesting.
Average Info
Notes Per Post
542
Likes Per Post
438
Reblog Per Post
100
Reply Per Post
4
Time Between Posts
4 days
Number of Posts By Type
Text
16
Note
1
Last Seen Tumblr Blogs


Fun Fact
Tumblr is used by 21% of adults online aged 18-29 years.
Text
I made a cardboard armored glove tutorial, check out Makerholic on youtube to soothe your soul with low-tech DIY sights and acoustic guitar sounds


youtube
The goal of my channel is low-tech tutorials for quality products. Ideally, anyone with hot glue, cardboard, and passion can make what I make. Join the community, I intend to make it a rewarding experience.
Like my work? Follow me on your favorite social media:
Instagram:
https://www.instagram.com/makerholic_/
Facebook: https://www.facebook.com/groups/888144868611587
Twitter: https://twitter.com/makerholic
DeviantArt: https://www.deviantart.com/makerholic
Reddit: https://www.reddit.com/user/Makerholic
Pintrest: https://www.pinterest.com/Makerholic_/_created/
50 notes
·
View notes
Text
I made a cardboard armored glove tutorial, check out Makerholic on youtube to soothe your soul with low-tech DIY sights and acoustic guitar sounds
youtube
The goal of my channel is low-tech tutorials for quality products. Ideally, anyone with hot glue, cardboard, and passion can make what I make. Join the community, I intend to make it a rewarding experience.
Like my work? Follow me on your favorite social media:
Instagram:
https://www.instagram.com/makerholic_/
Facebook: https://www.facebook.com/groups/888144868611587
Twitter: https://twitter.com/makerholic
DeviantArt: https://www.deviantart.com/makerholic
Reddit: https://www.reddit.com/user/Makerholic
Pintrest: https://www.pinterest.com/Makerholic_/_created/
50 notes
·
View notes
Text
Hello all, I'm back with something new! The first episode of my podcast: the Cosmaker Propcast. Originally this was a segment of my DIY video, but I'm posting it as a standalone as the main video is delayed.
Meet Gaby, she was a joy to interview. She's new to the scene and actively uploading quality content, and at a stunning rate! You like consistent, skilled cosmakers? Check out Gaby's social media (links below)
youtube
The goal is to spotlight small-time cosplayers and propmakers like myself, focusing on showing off their work. I'm stoked to start helping my people take off!
Follow her on Instagram to see her awesome props, costumes, and makeup.
https://www.instagram.com/cosplaywithgaby/?hl=en
Wanna do makeup like Gaby? Check out her YouTube channel!
Like my work? Wanna see more? Check out Makerholic on my other social media:
https://www.instagram.com/makerholic_/
#Youtube#podcast#interview#cosplaying#cosplayer#best videos#propmaker#makerholic#CosplayWithGaby#podcaster#cosplayer interview#cosplay#costumer#entertaining#funny#funny videos#funny podcast#cosplay podcast#nerds#nerd podcast#comicon#youtuber
4 notes
·
View notes
Text
The EPIC CARDBOARD PROPS guy reviewed my sword/kite shield prop build!
I'm quite stoked, this prop-master is at the top of the hill I'm climbing. Getting his advice on a build is an honor, and getting permission to use the clips in my tutorial video is a privilege I appreciate very much.

I added a link to his video for anyone interested in his new prop reviewing series. I'm looking forward to the opportunities and clout this could bring, stay tuned y'all
Here's his video link:
https://youtu.be/5I-I-N6WrOU
youtube
Here's my channel link
40 notes
·
View notes
Text


From my upcoming video, the pommel for my broadsword with an extending handle.
In the video I show how to make a hexagon, then remove 2 sections and fold it together into a perfect square based pyramid.
Then you simply fold a strip of cardboard into the square piece, then spear them on a bamboo skewer with square cardboard washers between and hot glue or wood glue it together.
You can follow my tutorial to make the sword grip this piece fits into, or use it on your own design. Consider subbing so you don't miss the upload :D
Here's a link to my channel for when it drops:
27 notes
·
View notes
Text


From my upcoming video. I show you how to use the power of geometry to cut a single piece of cardboard into a fantasy broadsword hilt design.
That being said, with slight altering you can make it into a variety of hilt styles. It's on my list for future videos, a hilt guard super video covering historical and fantasy guards.
In the meantime, this is a foolproof design for a lit broadsword. Consider subbing so you don't miss it
45 notes
·
View notes
Text


From my upcoming video. I figured out how to precisely bend cardboard into a hexagon, then slide bamboo skewers through it to make an extremely -stronk- exterior handle.
The interior handle its similarly bent cardboard wrapped around 3 skewers (I call it the tri-skewer), hot glue or wood glue them together.
I added a string to keep the handle from going too far, I also added customization tips for handle extension modifications.
With my designs and tutorial, anyone can add an extending handle to their prop sword. Consider subbing so you don't miss it :D
5 notes
·
View notes
Text


From my upcoming video. I show you how to precisely cut and fold the blade pieces, using geometric folding to make the tips angle inwards.
A long 1" strip of cardboard runs the length as the spine, reinforced with bamboo skewers glued into the long sides. Bamboo skewers are also glued to the bases of the spine, as well as where the grip rests in the base of the blade.
I show you how to cut the edges of the blades at an angle so there flush with each other, then cut angled strips of cardboard at a similar angle and glue them alongside the edges to extend the surface available to glue the blades together.
While this is a broadsword blade tutorial, it's so detailed (42 minutes) that the skills I display will help you make -any- prop blade.
My goal is to leave no questions. Sub so you don't miss this masterpiece :D
6 notes
·
View notes
Text
Couters complete, another tutorial for my cardboard suit of armor series. Any suggestions on what I should make next?


youtube
Also, upon seeing my viewers are 3% Canadian, I committed to adding metric units of measurement to this and future tutorials. O Canada, eh?
Like my work? Follow me on your favorite social media:
Instagram:
https://www.instagram.com/makerholic_/
Facebook: https://www.facebook.com/groups/888144868611587
Twitter:
https://twitter.com/makerholic
DeviantArt: https://www.deviantart.com/makerholic
Reddit: https://www.reddit.com/user/Makerholic
Pintrest: https://www.pinterest.com/Makerholic_/_created/
32 notes
·
View notes
Text
Wanna make an INFINITY GAUNTLET? Knight or IRON MAN armor?
Get started with my hand-armor tutorial! My DIY style is CHEAP and EASY
I show/explain every step thoroughly, including video diagrams and all build footage
I linked the videos script in the video description to help builders
I make unique background music/sound effects and have a goofy can-do attitude!
All you need is time to watch my YouTube tutorial!
Tools:
Hot glue
Exacto blade/Scissors
Measuring tools
Straight edge
Marker/pencil
Materials:
Cardboard
Rubber bands
Plastic water bottle
youtube
Like my work? Follow me on Instagram for more:D
https://www.instagram.com/makerholic_/
Wanna be in my next upload? I'm gonna start dropping dozens of follower usernames in the credits and in the build footage
How to get in my videos:
Follow me on any of my social media
Like my posts
Comment on my posts
Share/reblog my posts
One lucky cosplayer or propmaker will be interviewed on my new podcast, The Cosmaker Propcast!
The winner will also get their content spotlighted IN my next upload! I add it to the end where I plug the podcast
Thats all for now, GOOD LUCK:D
https://www.reddit.com/user/Makerholic
The goal of my channel is low-tech tutorials for quality products. Ideally, anyone with hot glue, cardboard, and passion can make what I make. Join the community, I intend to make it a rewarding experience.
50 notes
·
View notes
Text
The Fancy Witcher! Original and Unisex DIY Tutorial (see the videos on my Youtube channel)
Wanna cosplay as geralt? My original Fancy-Witcher tutorial videos are a great way to start!
Not into my fancy design? I demonstrate how to measure your body and precisely draw/cut your uniquely shaped armor pieces, its your choice how to decorate them!
Absorb my knowledge, I linked my youtube channel at the end if you wanna watch how I made it and follow my instructions! :D

I got the idea while thrift shopping for materials to make a normal Geralt costume. My boi Colby, who doesn't do cosplay, was helping my hunt and he pointed out the suit jackets. At first I was like "nah man, lol", then I saw this in my head. Months later, here I am! And here it is!
1. The Vest

I cut the sleeves off a thrift shop jacket, then trimmed the edges with strips of scrap leather. I also covered the pocket flaps with leather. I added bigger buttons and painted them gold. To make it fit my sides, I moved the button locations inward on the jacket. This drew the sides of the vest in nicely, like a corset. I'll prolly do that with my real jackets now xD
2. The Spaulders

The spaulders are the easiest armor piece. After we cut the shape, use the sleeve fabric from the jacket to wrap the outside (same with all of the armor pieces, the inside is hidden), then trim the armor with scrap leather from the leather coat (used for leggings as well). Glue it to the shoulders of the vest and your good to go!
3. The Gauntlets

The gauntlets are easy, I show you how to draw the design on cardboard and shape it to your arms, then wrap them with suit jacket sleeve material and trim with scrap leather. My favorite detail is the cuff buttons! Drill holes and lace them with leather string.
4. The Rerebracers

Like the other armor, I wrapped rerebracers with the suit jacket sleeve material then trimmed them with leather. As before, I glued the belts on and drilled holes over them, then laced them with leather string to hold them down.
5. The Scabbard/Shield

I modeled this off the shield/scabbard Geralt uses in his fight with the striga, episode 3. You see it when he meets the king on the bridge and when he's in the bedroom. I made a cardboard frame and wrapped it in dress shirt-style cloth from a fabric store, I trimmed it with scrap leather then drilled holes and laced them with leather string.
6. Leather leggings

I made the leather boot leggings from a thrift shop leather coat. I cut the sleeves off, then cut them down the middle so they'd wrap around my leg. I made belts from the scrap leather and buckles from coat hanger wire (see my tutorial on youtube to learn how). I oriented the cuff end of the sleeve to be at the knee, so there's a cool half-cuff at the top the leggings. The bottom covers the top of my shoes, making it look like I'm wearing knee high boots. I came up with this idea in 2014 for my steampunk costume, in fact I used those leggings for this photo.
The goal of my channel is low-tech tutorials for quality products. Ideally, anyone with hot glue, cardboard, and passion can make what I make. I've moved into cardboard armor lately.
I've also started spotlighting my follows, especially from my INSTAGRAM. Follow Makerholic_ for great content and a chance at free clout!
https://www.instagram.com/makerholic_/
Consider joining the community on Youtube, I intend to make it a rewarding experience!
youtube
Like my work? Follow me on your favorite social media:
Instagram:
https://www.instagram.com/makerholic_/
Facebook: https://www.facebook.com/groups/888144868611587
Twitter: https://twitter.com/makerholic
DeviantArt: https://www.deviantart.com/makerholic
Reddit: https://www.reddit.com/user/Makerholic
Pintrest: https://www.pinterest.com/Makerholic_/_created/
95 notes
·
View notes
Text
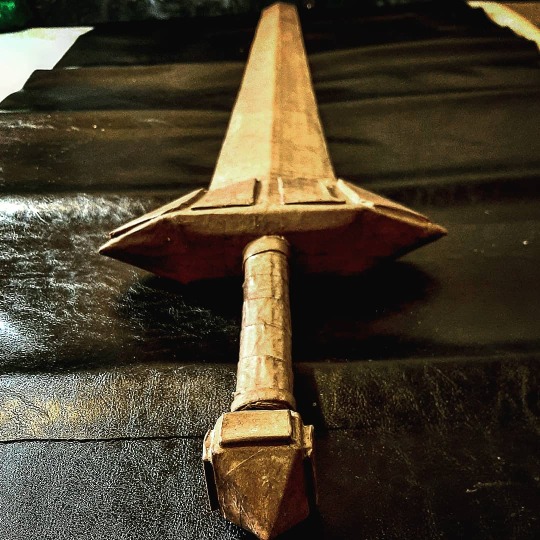
Wrapping cardboard sword w/PAPER and glue water
I copied the epic cardboard props guys style (Raphael) to decorate my broadsword hilt.
(My old style on left, new style on right)
The little rectangles go on the pommel
The triangles go on the wings of the guard
The rectangles with the point go on the center of the guard

Wood glued them on, its surprising how fast glue dries on cardboard. It absorbs the moisture I'd guess. Its original decoration, I eye-balled what fit my hilt guard best. I wish I'd cut out the center of the pieces with a design, now I guess I can add details on top but it'll be super bulky. It is a paladin sword tho, so thats good?
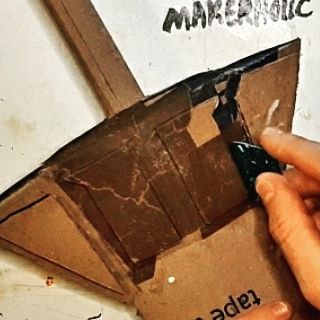
I used a broken piece of a plastic ruler to define the edges, also a bamboo skewer. You really have to rub the paper in to make a flush, strong bond without bubbles, then work the details with your tools for a while. Its a pain, but super worth

I folded a large, long rectangle of paper over many times to make a belt. Then I folded one side over slightly (you can see what I mean in pic) to make a raised edge when I wrapped it around the hilt. I should have made it thicker, but it did the job.

I folded a rectangle of paper into a narrow but thick belt, then wrapped it around this end of the hilt. I did the same at the other end, with a bigger belt. I also wish these were thicker, but I can go back and wrap more later

This part was the most time consuming and frustrating. The details are so cramped and there are so many edges, I'll avoid this in the future lol. I still need to finish it, there are a few gaps you can can see in my photos

I'm glad I used shipping paper, I was able to cut a piece the full length of the blade. Using multiple pieces makes awkward seams which look okay but not great. You can rub where the paper edges meet to kinda remove the seam, but it's better to plan paper shapes beforehand
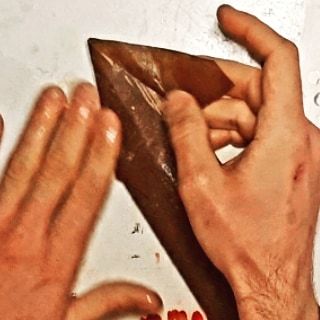
I cut the paper shape to account for the tip, cutting down on seams. Its tricky getting the paper at the right moisture, too much and it soaks your cardboard and drips forever. Too little and it won't bond to the cardboard. It just takes practice, but it's totally worth. Try it too!
Like my content? Follow me on Instagram for more, and check out the tutorial for this sword when it drops on youtube (soon, hopefully)
https://www.instagram.com/makerholic_/
#youtube#cosplay#diy project#diy#diy tutorial#crafts#tutorial#cosplaydiy#handcrafted#costumedesign#sword design#sword#cosplay props#propmaker#props cosplay#cosplaying#costume design#cosplay project#cosplay progress#diy halloween#diy cosplay#cardboard#how to#prop making#broadsword#decoration#paper craft#cardboard crafts#craftersofinstagram#swords
113 notes
·
View notes
Text
Halloween 2014, the great Jacob P and I did a prop-building overnighter to make my Braum shield (League of Legends).


I got styrofoam insulation boards from home depot

then sketched out the base shape of the shield. Then I sketched the surface details on the base until they looked right (always a pain), and transferred the shapes onto the remaining styrofoamboards.

Hot gluing the Styrofoam directly melted it, we found a couple solutions.
I cut squares of paper, took one and hot glued a side well, then I waited until it had partially cooled. Once cooler, you can glue the paper to the Styrofoam without melting. I put many of these on the surface to be glued down, then hot glue all of them at once, waited for the glue to cool a bit, then pressed it into place.

I wanted the horns to be shear-resistant, so we stabbed popsicle sticks through the center of the layers, then removed them and hot glued the stick and stuck it back in. It did the trick, the shield took a hard hit later and the popsicle sticks kept the horns from breaking off.


I also built Braums armor on my own, I'll post the building pics next Thursday!

And finally, Braums blue tattoos. We straight up duct taped the designs on me and spray painted them on. I wouldn't reccomend that, but we were short on time xD

This is my past work, check my instagram or youtube channel to see what I'm up to these years!
https://www.instagram.com/makerholic_/
#Braum #makerholic #LeagueofLegends #LoL #shield #cosplayprop #cosplayprops #cosplaypropmaking #cosplaypropsmaker #diycosplay #lolcosplay #diyprop #diyprops #cosplay #cosplay #propdesign #prop #props #cosplayprop #cosplaytutorial #leagueoflegendscosplay #braumshield #cosplaying #cosplaydesign #cosplayer #propmaker #propmaking #propsmaker #diyprop #cosplaydiy #cosmaker
10 notes
·
View notes
Note
Are cardboard weapons allowed at cons?
I'm sure, they can't do damage right?
Edit: I looked it up, most places want foam/cardboard weapons only
5 notes
·
View notes
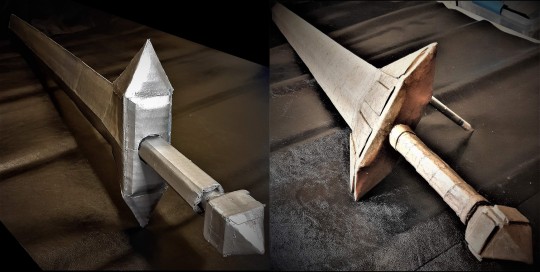
Text
CARDBOARD broadsword with extending handle
I'm most proud of how I did the handle. I folded cardboard paper over into a thick strip, then soaked it in glue water and wrapped around the hilt. Similarly, I wrapped more strips around both ends of the outer hilt handle.

It looks/feels great, I took the idea for the grip from the Mjolnir build by the Epic Cardboard Props guy. Furthermore, it made my build noticeably stronger.
Can't reccomended this style enough! Can't wait to upload my baby, I added a link to my channel for anyone interested in my work.
#youtube#cosplay#diy#crafts#diy project#diy tutorial#tutorial#cosplaydiy#handcrafted#costumedesign#cosmaker#propmaker#props cosplay#cosplay props#cosplayprop#cardboard#sword design#sword#costume design#design#broadsword#cosplaying#diy cosplay#diy halloween#diy costume#steampunk diy#diyinspiration#diyideas#halloween costume#costumes
6 notes
·
View notes
Text
I'm most proud of how I did the handle. I folded cardboard paper over into a thick strip, then soaked it in glue water and wrapped around the hilt. Similarly, I wrapped more strips around both ends of the outer hilt handle.

It looks/feels great, I took the idea for the grip from the Mjolnir build by the Epic Cardboard Props guy. Furthermore, it made my build noticeably stronger.
Can't reccomended this style enough! Can't wait to upload my baby, I added a link to my channel for anyone interested in my work.
#youtube#cosplay#diy#crafts#diy project#diy tutorial#tutorial#cosplaydiy#handcrafted#costumedesign#cosmaker#cosplaying#diy cosplay#diy halloween#diy costume#armor diy#diyideas#diyinspiration#sword design#costume design#design#halloween costume#costume#sword shield#sword#cardboard#broadsword#propmaker#props cosplay#cosplayprop
2 notes
·
View notes
Text
The key to a cardboard build is wrapping it in paper.

I started by copying the Epic Cardboard Props guys style from his videos, I can't reccomend it enough. I'd do this for any homemade prop.
It cleans it up nicely, makes it stronger, and allows decoration options like nothing else. I'm a convert lol, can't wait to put a glossy finish on this bad boi. I already painted it with wood glue, so it's water-proof.
Next up, the matching kite shield! Can't wait to upload my baby, I added a link to my channel for anyone interested in my work.
#youtube#cosplay#diy#crafts#diy project#diy tutorial#tutorial#cosplaydiy#handcrafted#costumedesign#cosplaying#diy cosplay#costume design#halloween costume#costume#diy costume#diy halloween#diyideas#diyinspiration#sword shield#sword design#sword#broadsword#cardboard#cosmaker#propmaker#props cosplay#cosplayprop#cosplay project#cosplayprogress
2 notes
·
View notes